Phone Book
 Level | 1 |
|---|---|
| Core? | Core |
 Duration | 10 minutes |
| Duration (minutes) | 10 |
 Learn | Adding DataCustom FunctionField PropertiesFiltersValidation Automation |
 Prerequisite | Designer ToolFieldsTables |
Intro
Having trouble keeping track of your contacts? Look no further! This simple phone book database solution is here to help you store and manage your contact information. You will learn how to create a table, add fields to it, add a custom error message if something is filled out incorrectly, and use the “Length” function to count the number of characters in a field. So start organizing your contacts today with this easy to use phone book database solution!
What you will learn
- HOW to create a table and add fields to it
- WHAT tables and fields are
- HOW to add a custom error message if something is filled out incorrectly
- WHAT a custom function is + other ways to use custom functions
- HOW to count the amount of characters (letters, numbers, etc) in a field using the “Length” function
FAQs
- How do I create a table and add fields to it?
- To create a table in Digital-Clay, you will need to click on the “Designer” tool and select the “New Table” button. This will open a window labeled “Custom Tables” where you can fill out the information and select an icon for the table. Once the table is created, you can click on the “Custom Fields” shortcut to add fields.
- How do I make sure that the phone number field is filled out correctly?
- To make sure that the phone number field is filled out correctly (ie there should be 10 digits in the phone number field and if not then an error should pop up), you can use the “Validation Automation” feature. This will allow you to display a custom error message if a specific filter that you set does not match the value in a specific field.
- What is the “Length” function?
- The “Length” function is a custom function that allows you to count the amount of characters (letters, numbers, etc) in a field. This can be used to ensure that the field is filled out correctly.
- What is the “Browser” view of a table?
- The “Browser” view of a table allows you to view, edit, and create items in your table. An “item” of this table would be an individual “phone number” of a contact. The “Browser Tool” also provides a variety of options that you can use to manage your table.
Instructions
- To create a phone book in Digital-Clay you will need to create a table to hold the phone number information. The phone book we will create will hold the “Phone Number” and the “Contact Name”. We also want to make sure that the phone number field is filled out correctly (ie there should be 10 digits in the phone number field and if not then an error should pop up)
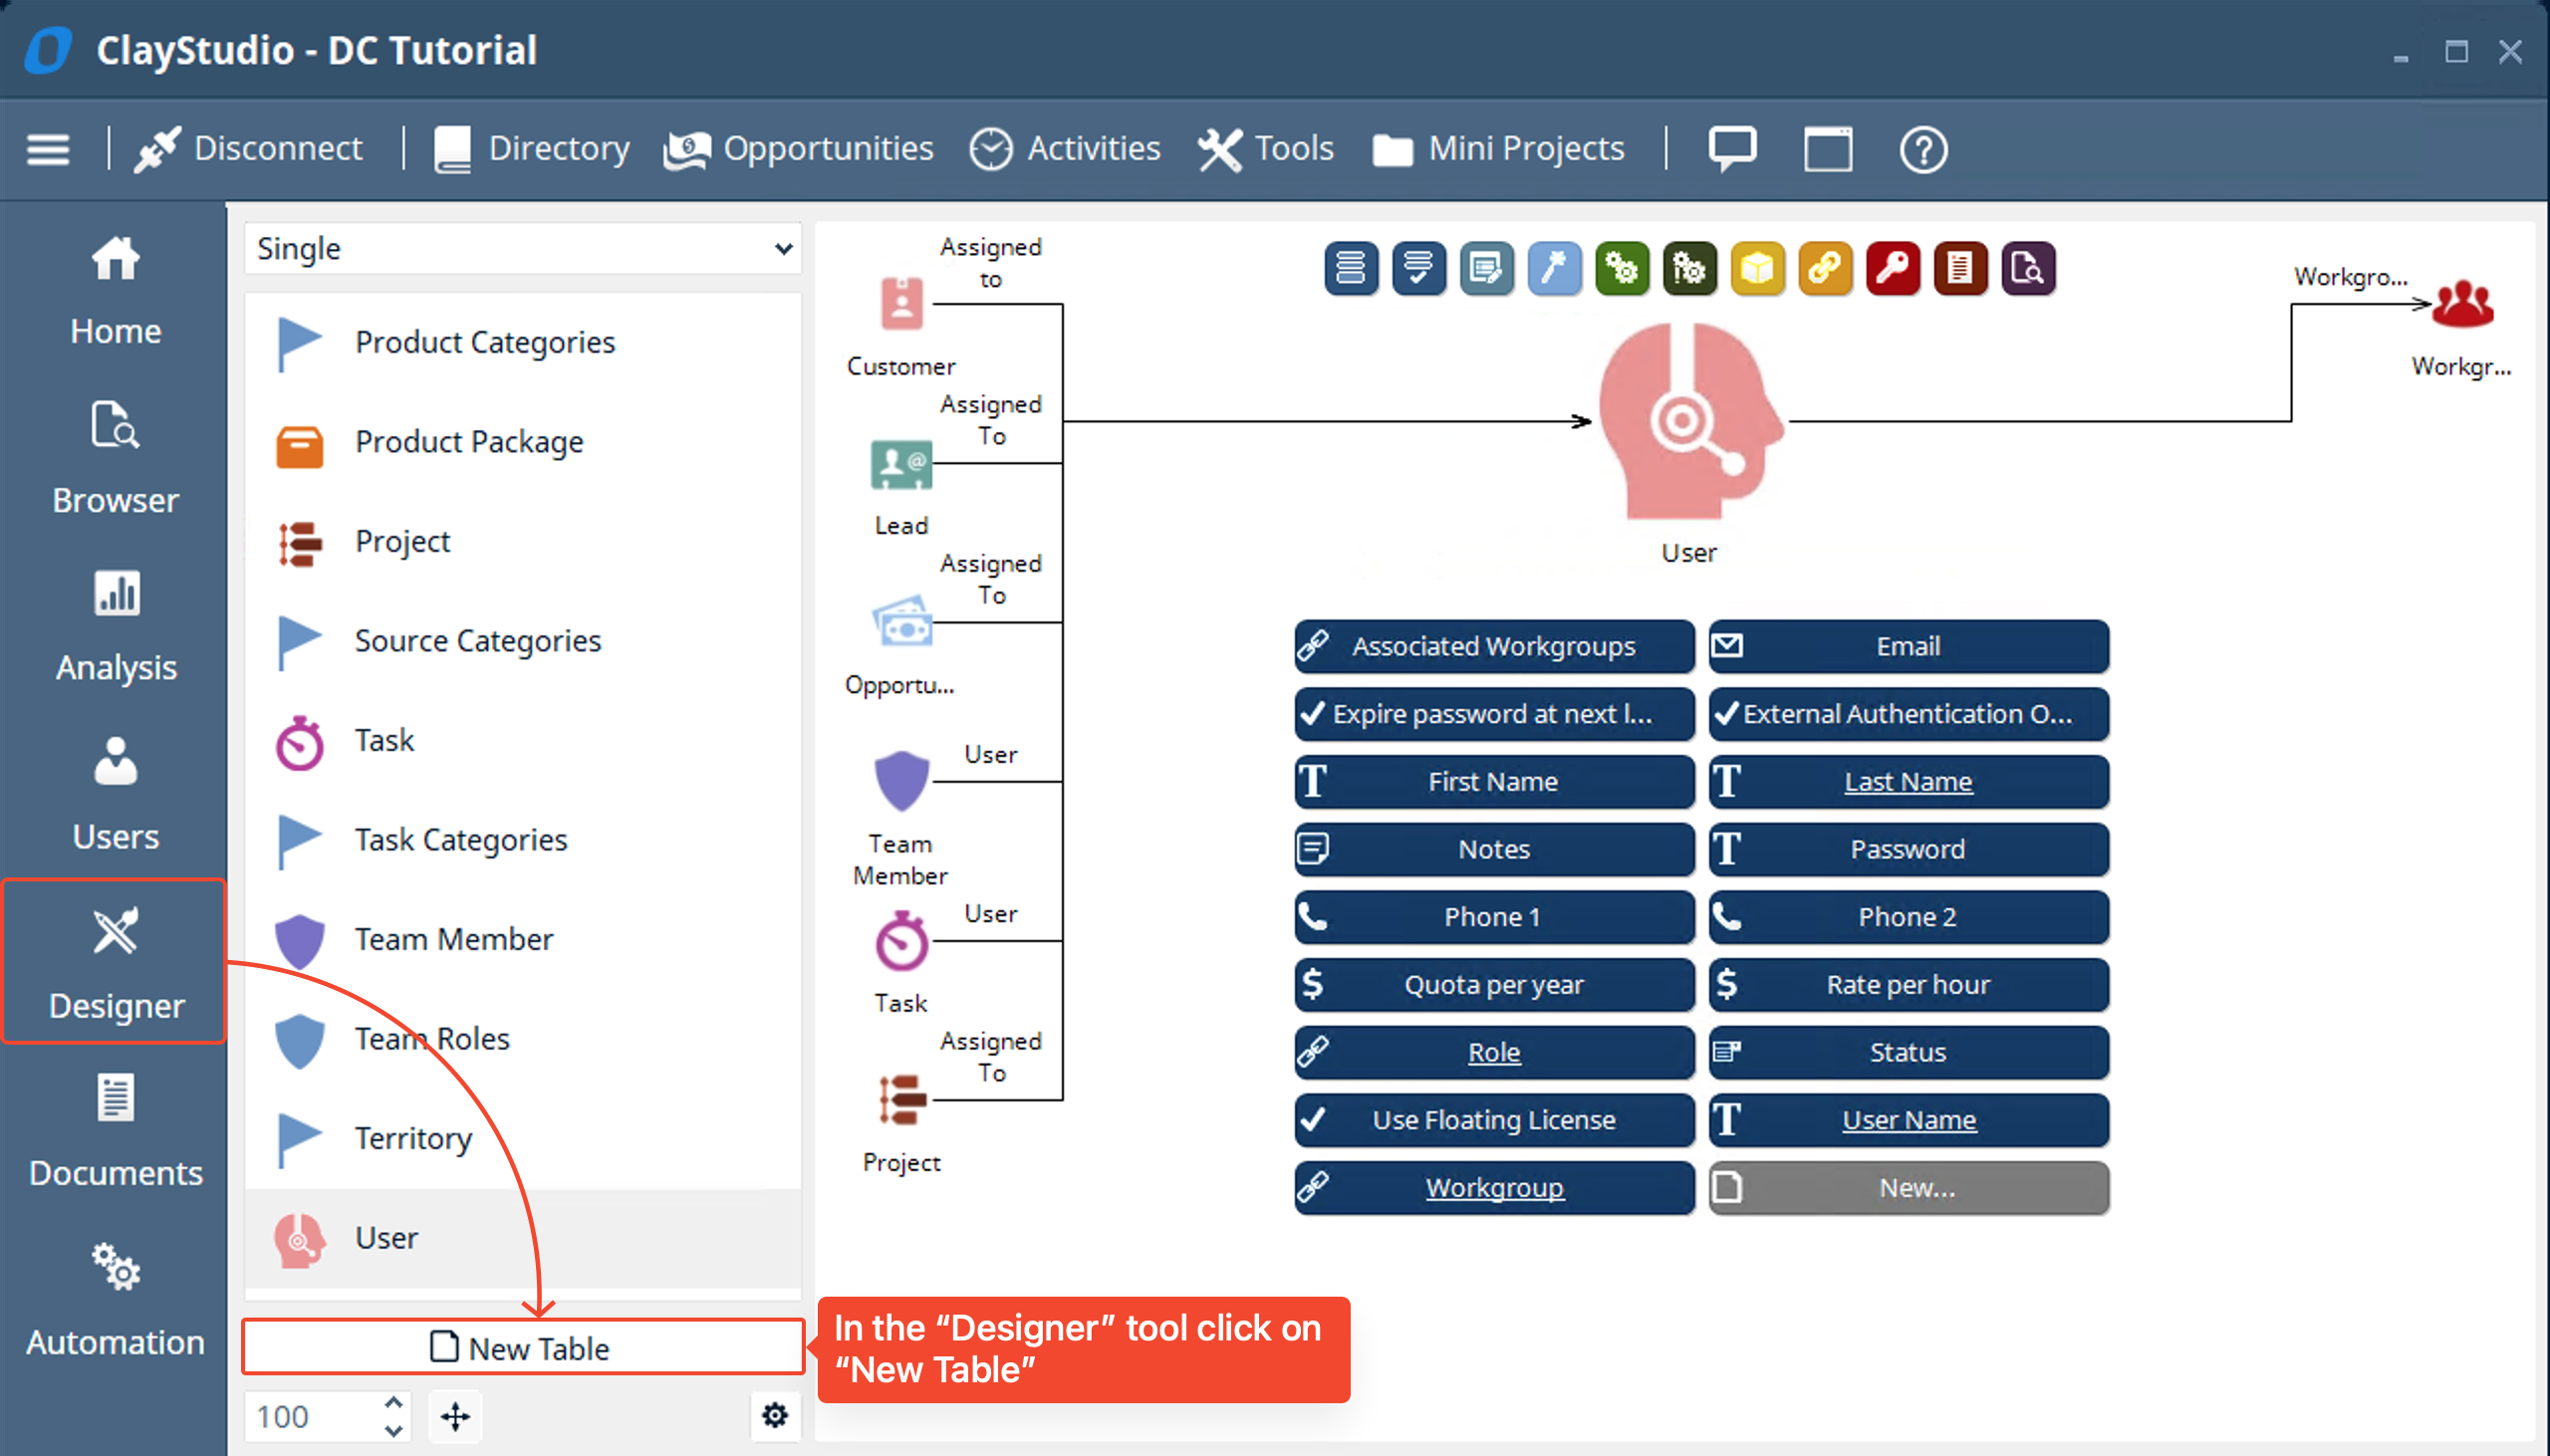
- Let’s start by logging into “Clay Studio” → Click on the “Designer” tool → click on the “New Table” Button
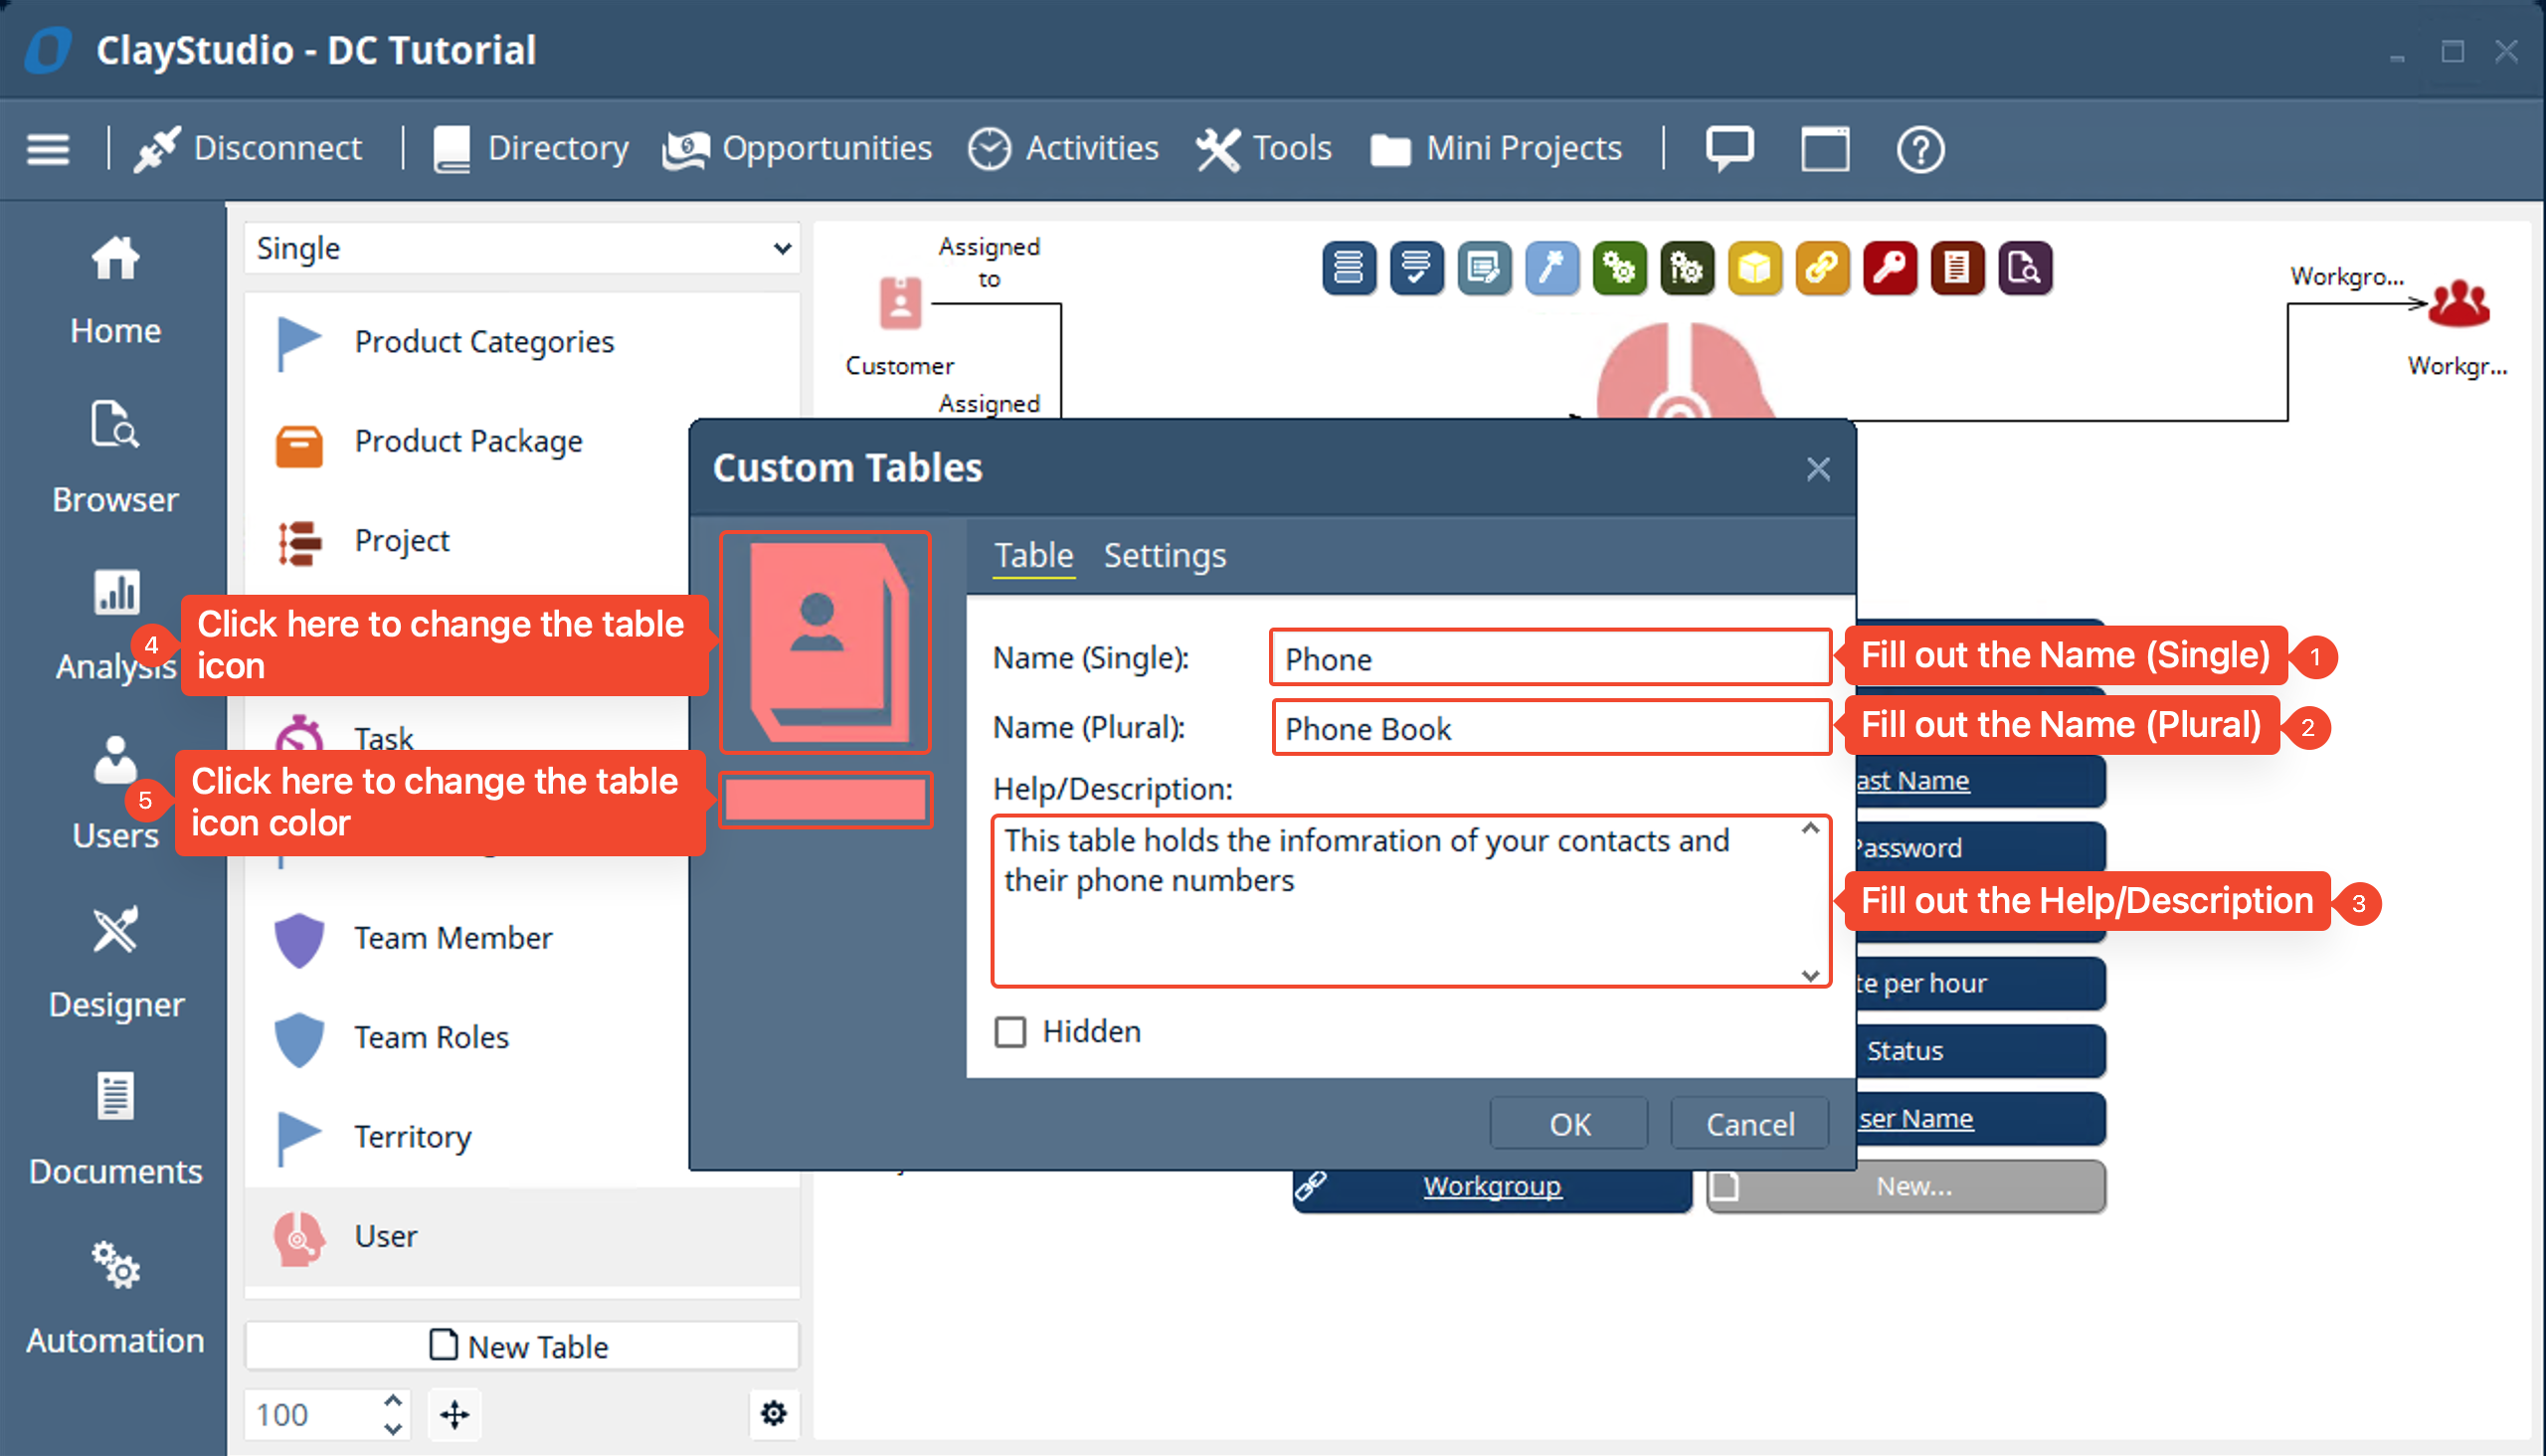
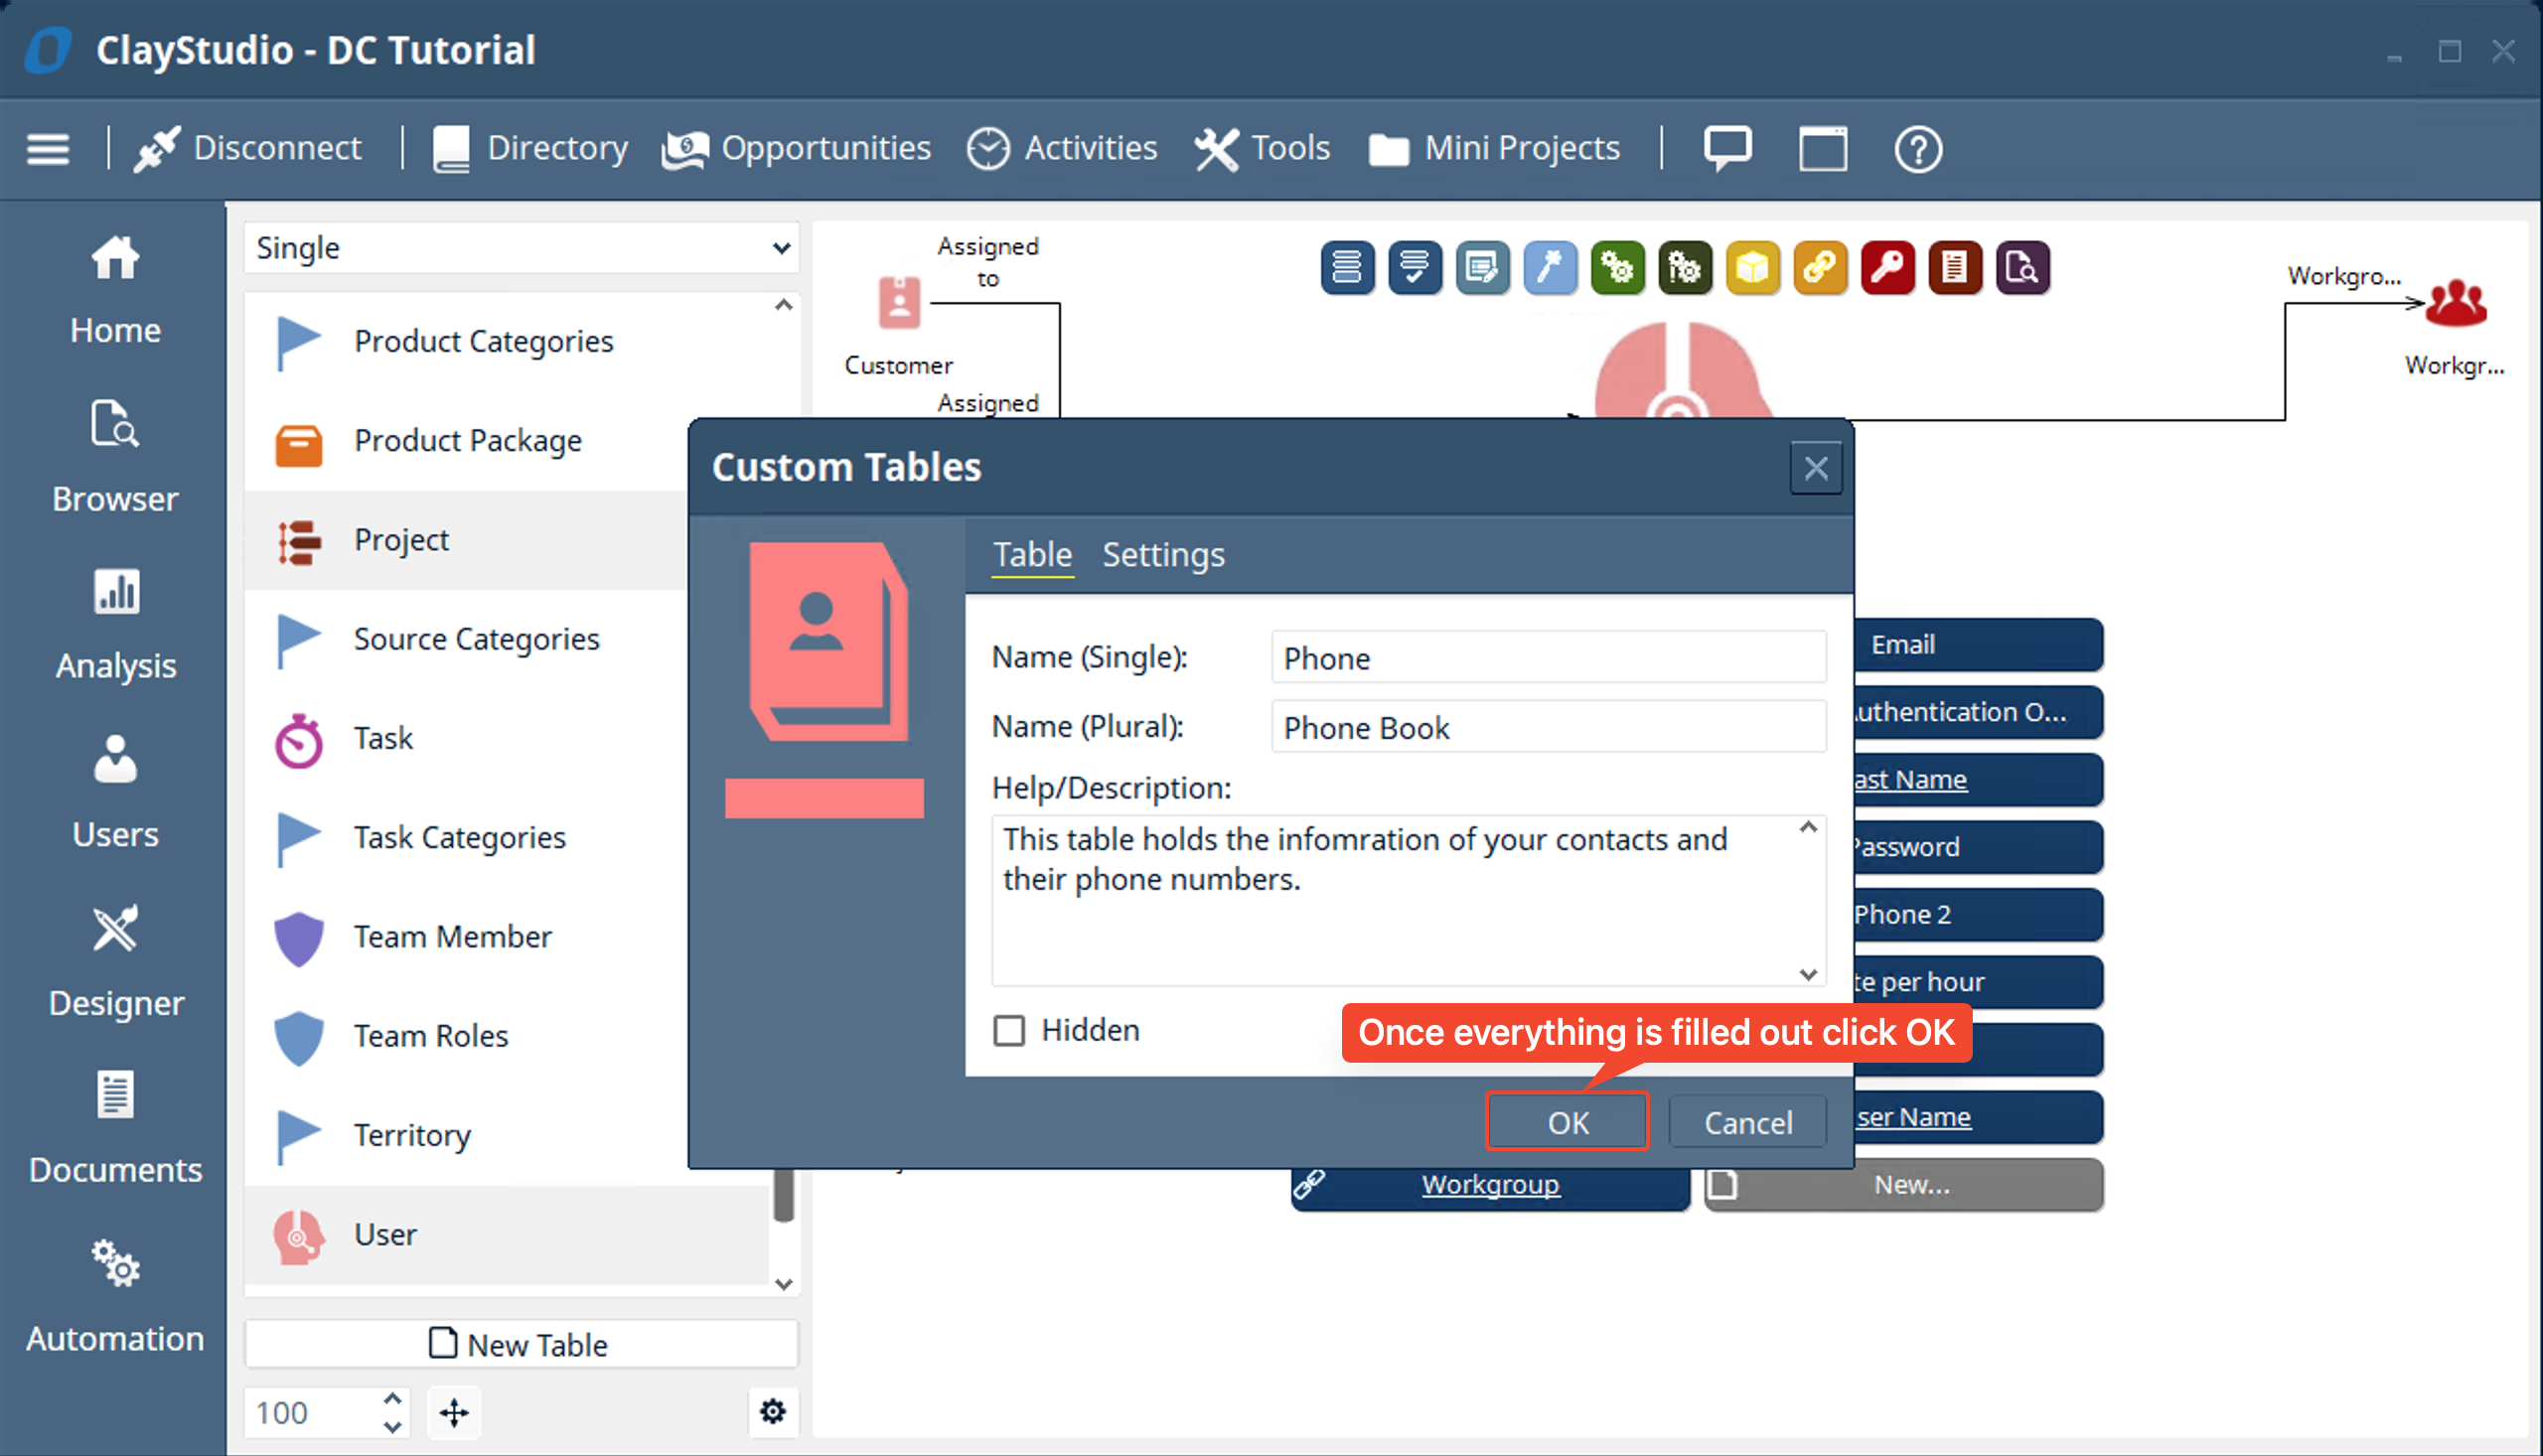
- You will see a window labeled “Custom Tables” → proceed to fill out the information as shown below in the screenshot.
- The “Name (Single)” is the the singular version of the data you are trying to store. In the same manner “Name (Plural)” is a plural version of the data you are trying to store. In the example below I have single phones and i’m denoting multiple phones to be considered a phone book
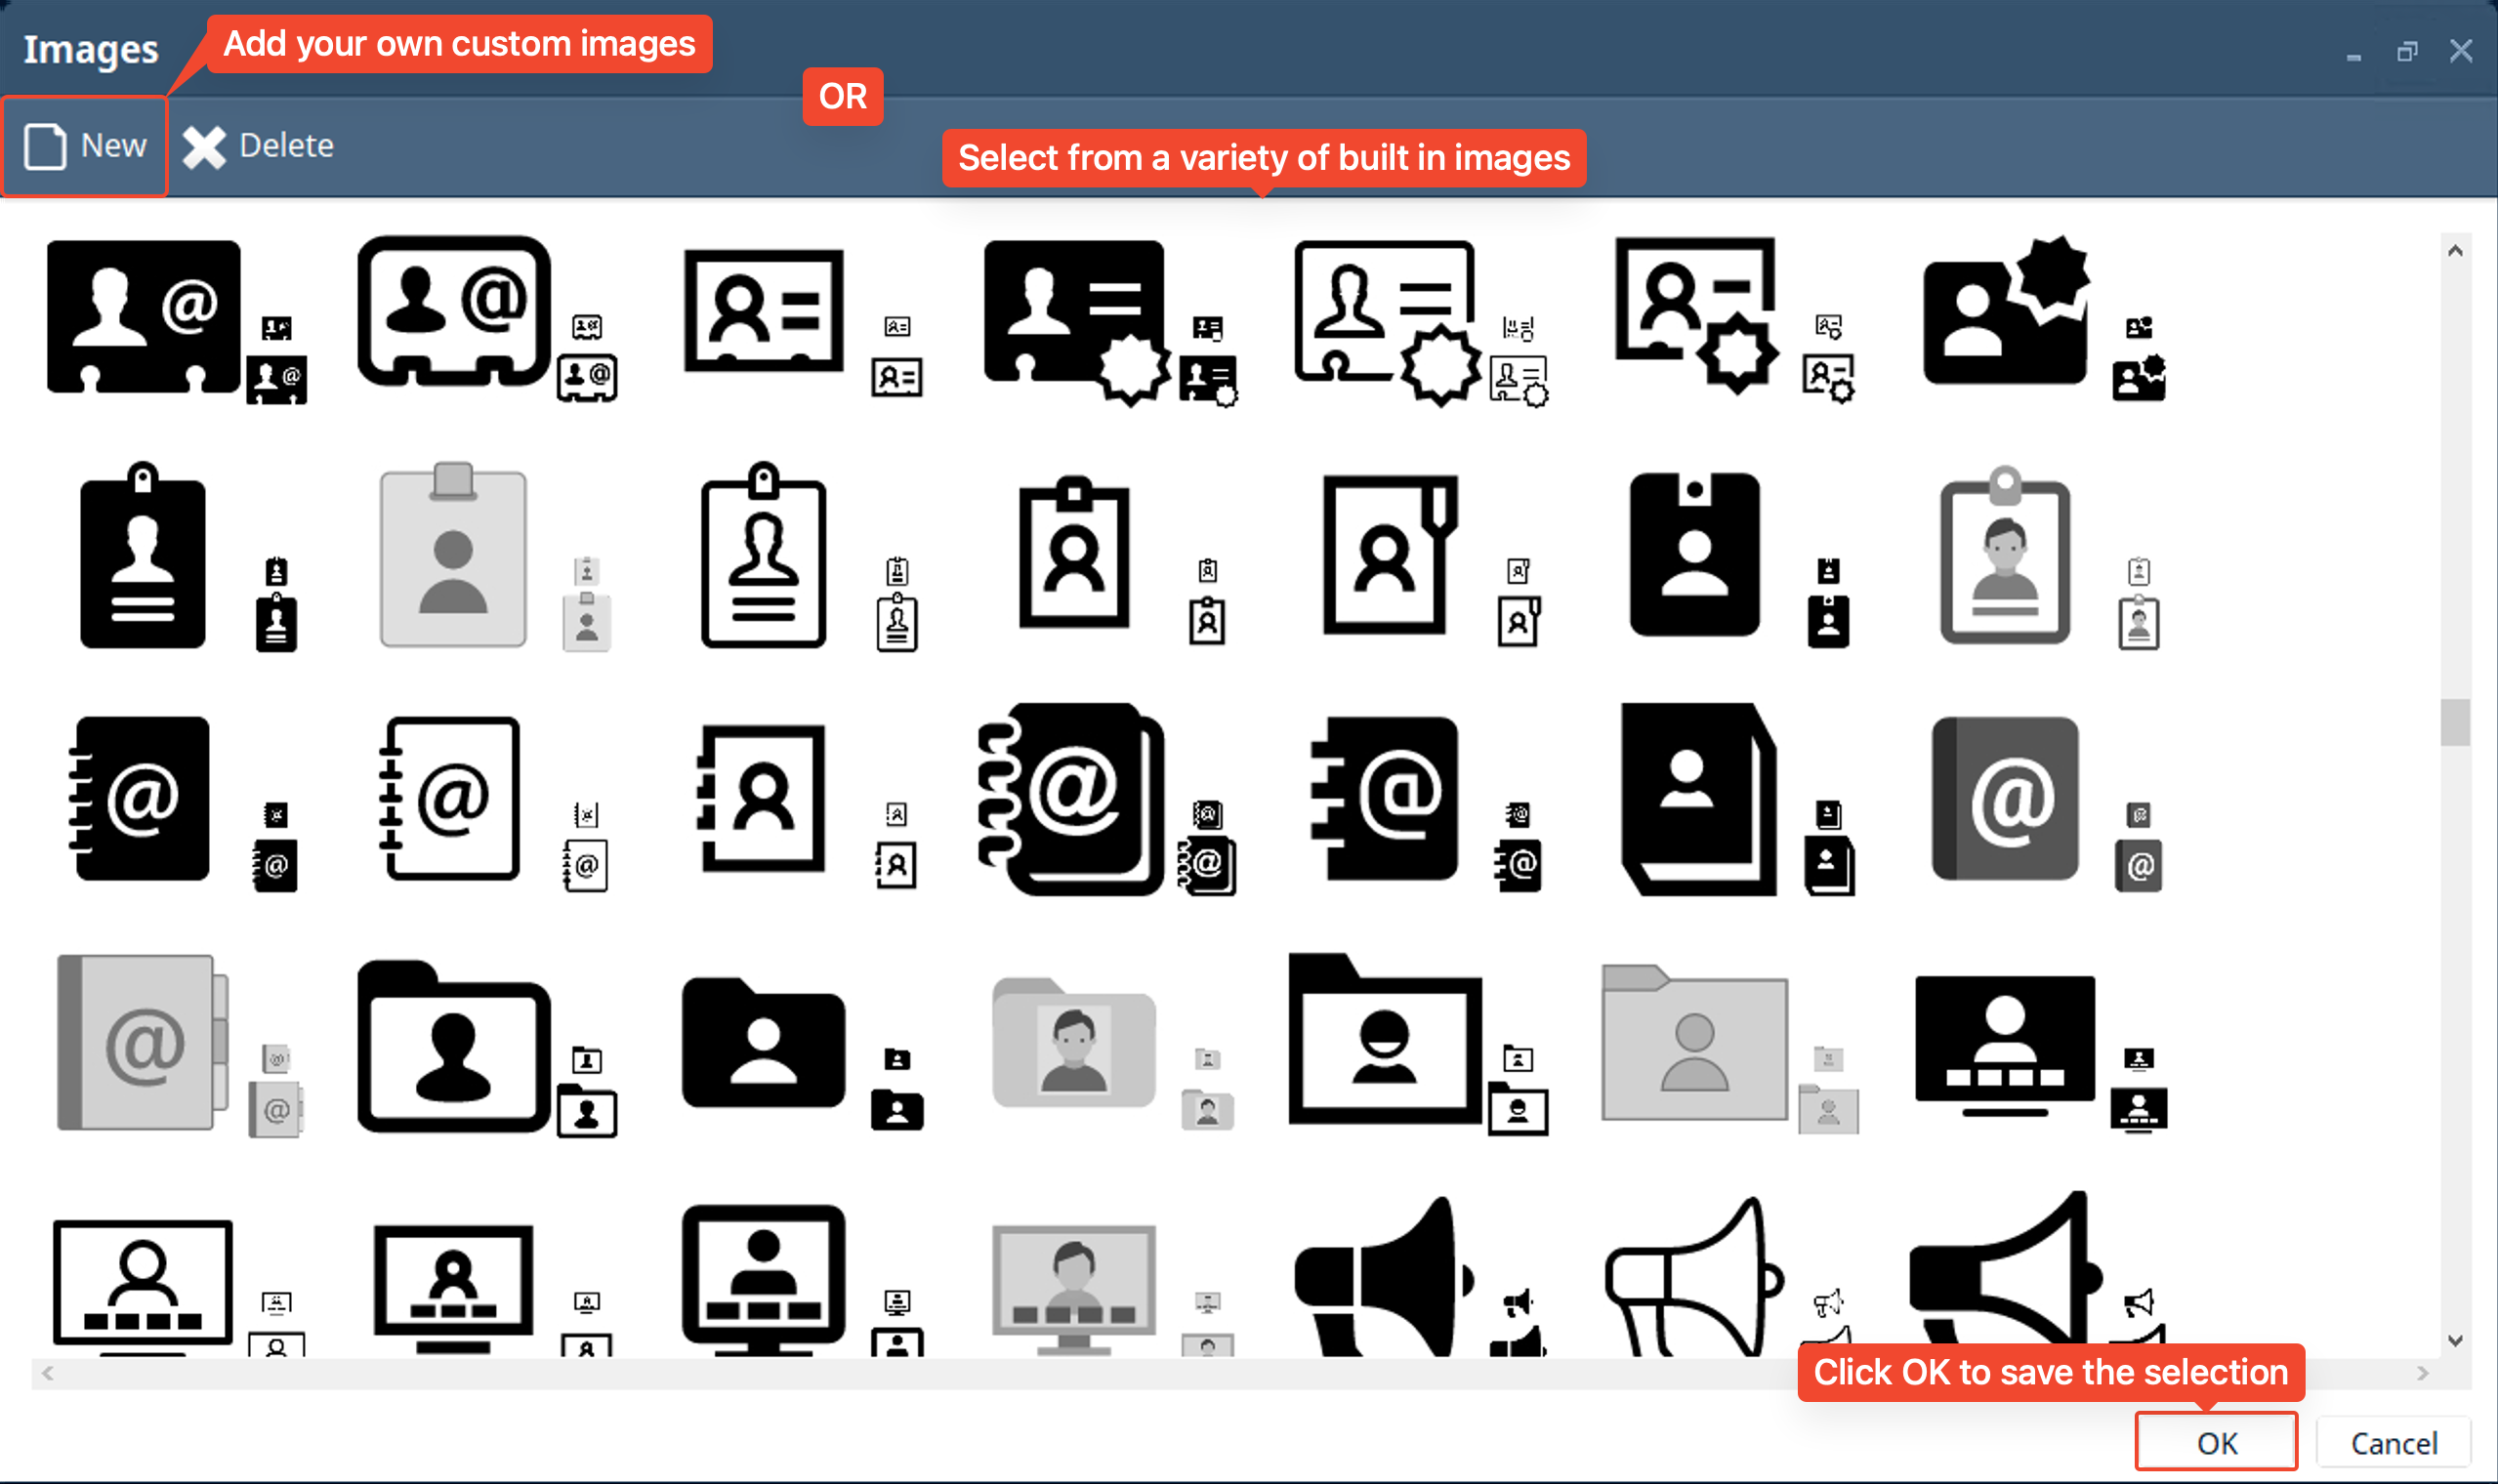
- When selecting an icon for your table you can easily select from a wide variety of built in images or add your own custom images from your computer by using the “New” button as shown in the screenshot below.
- I used a built in image for the table icon
- Once you filled out everything and selected your table icon click OK.
- Note: You can change all of the custom table information and settings at any time
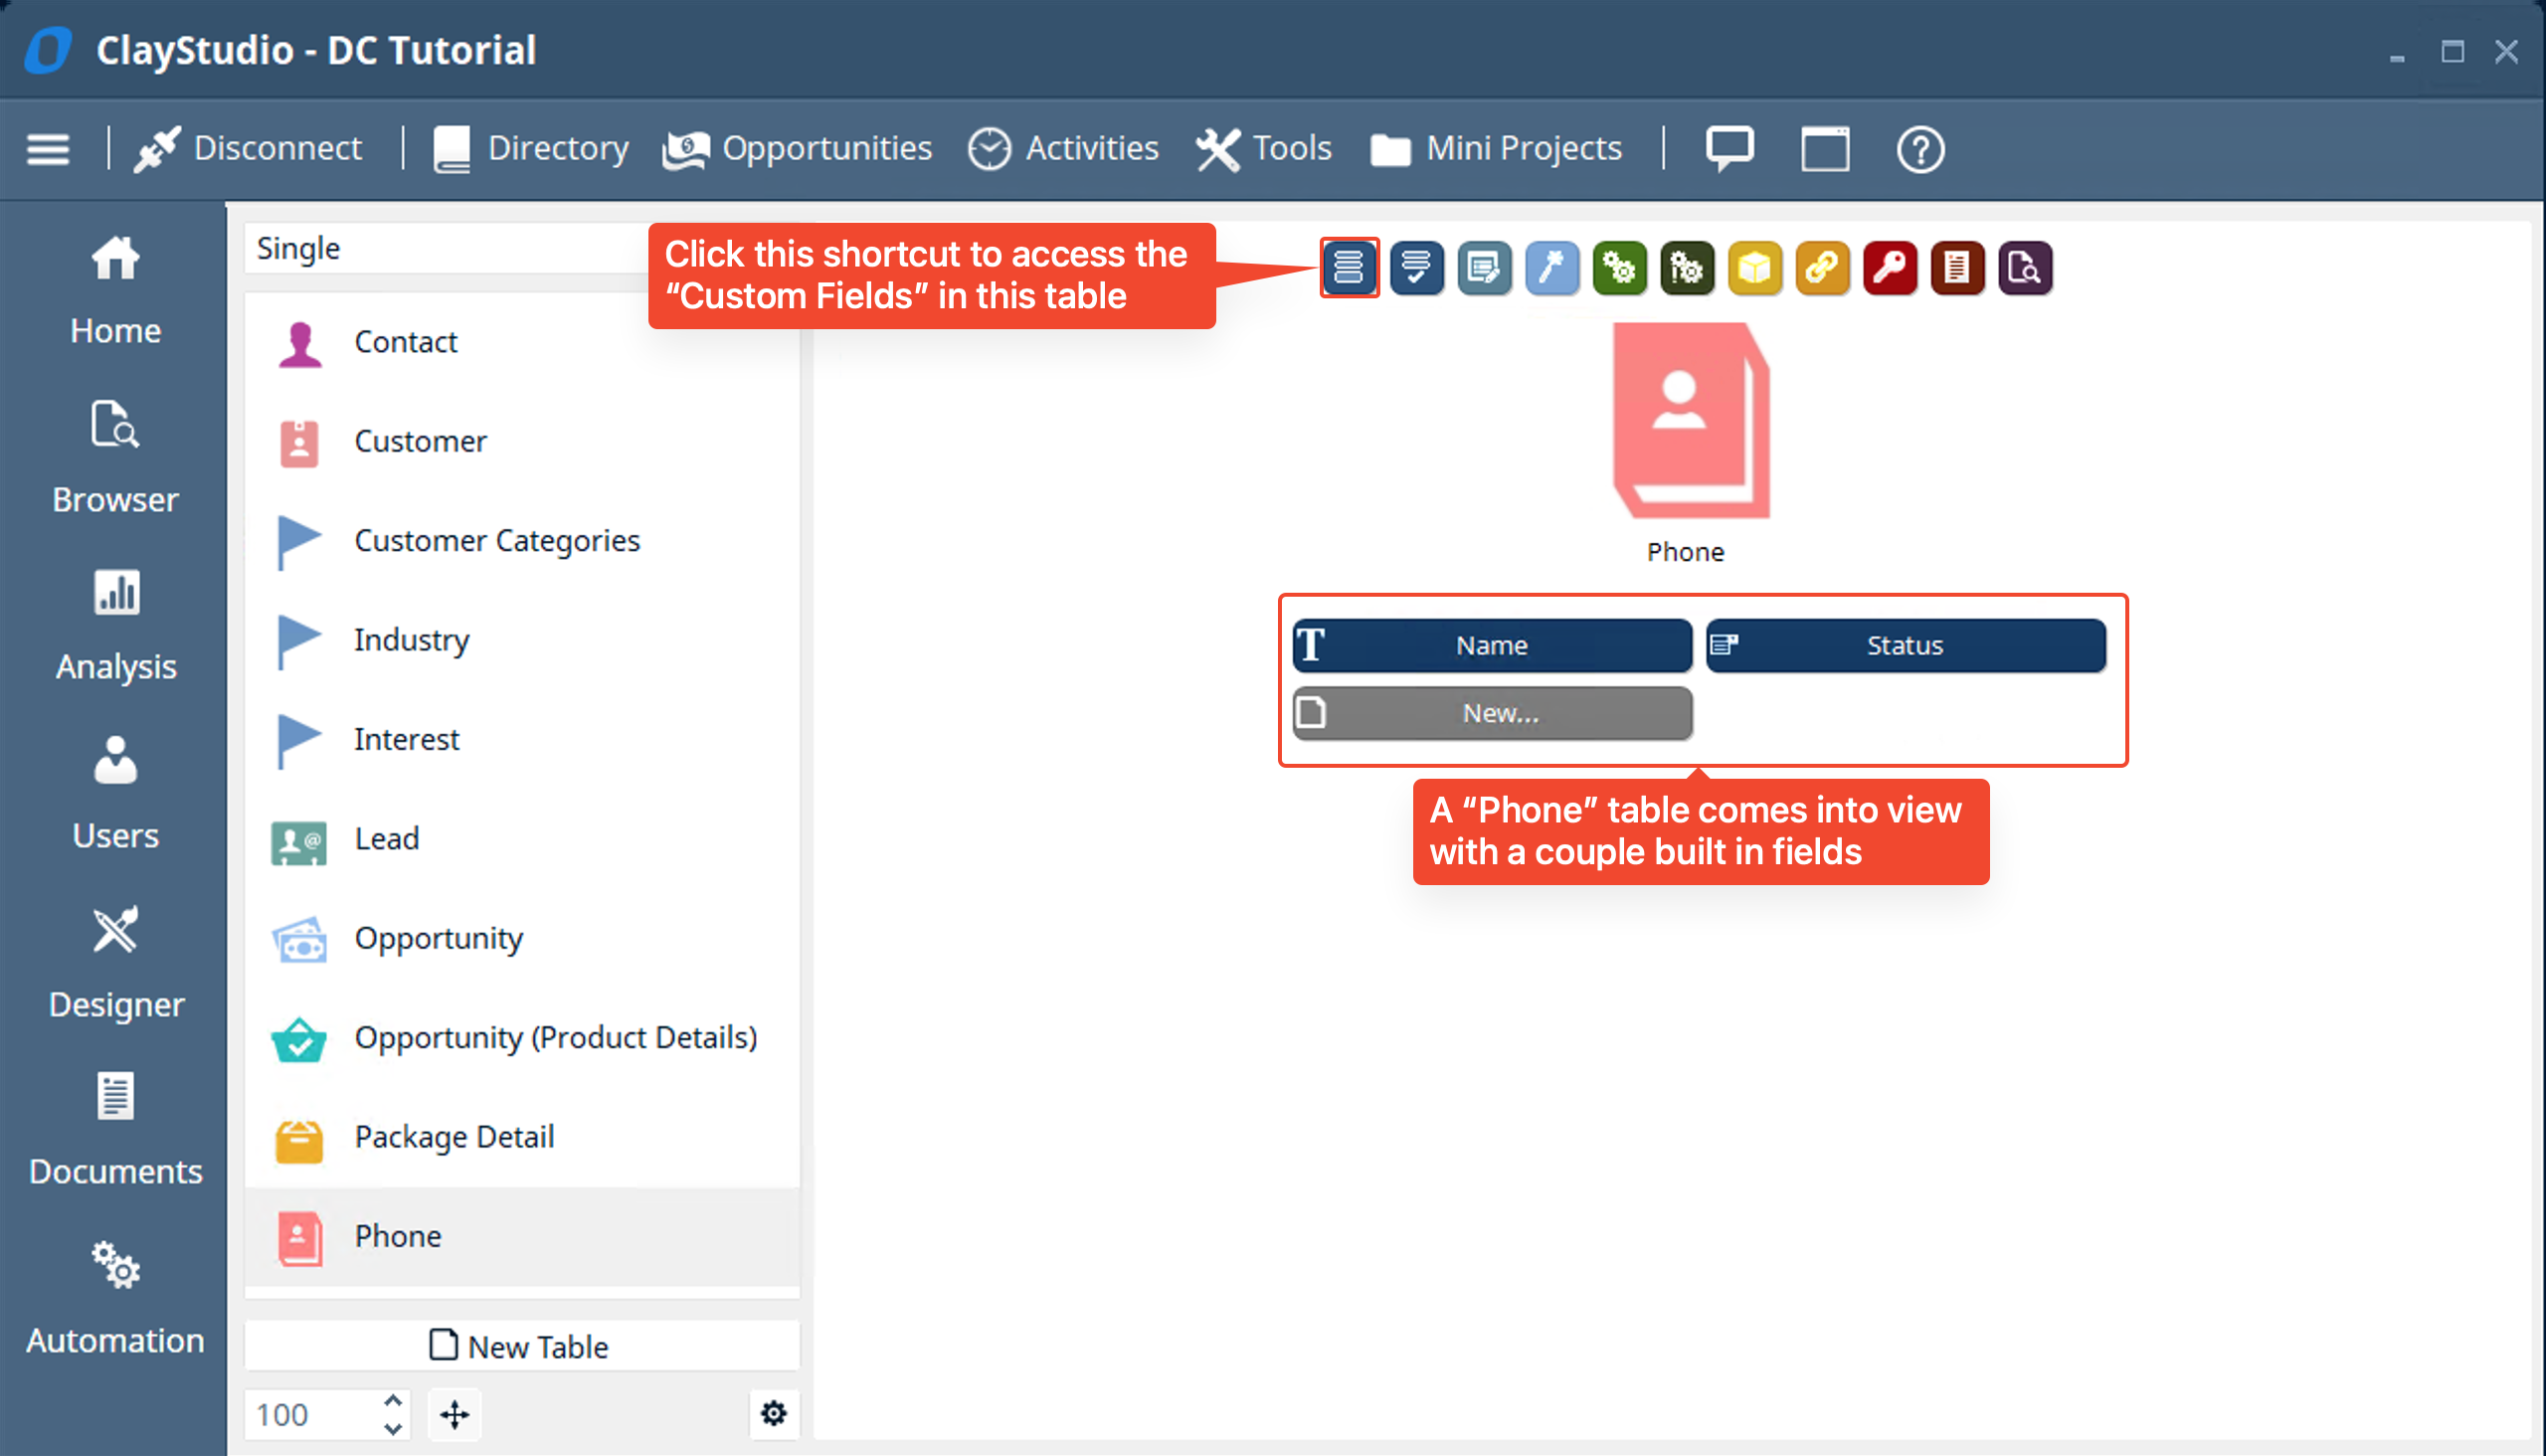
- Once the table is created you will see it come into view. Clicking on the “Custom Fields” shortcut you will see a couple built in fields: Name and Status. These fields can be used for whatever purpose you choose, but they can cannot be deleted.
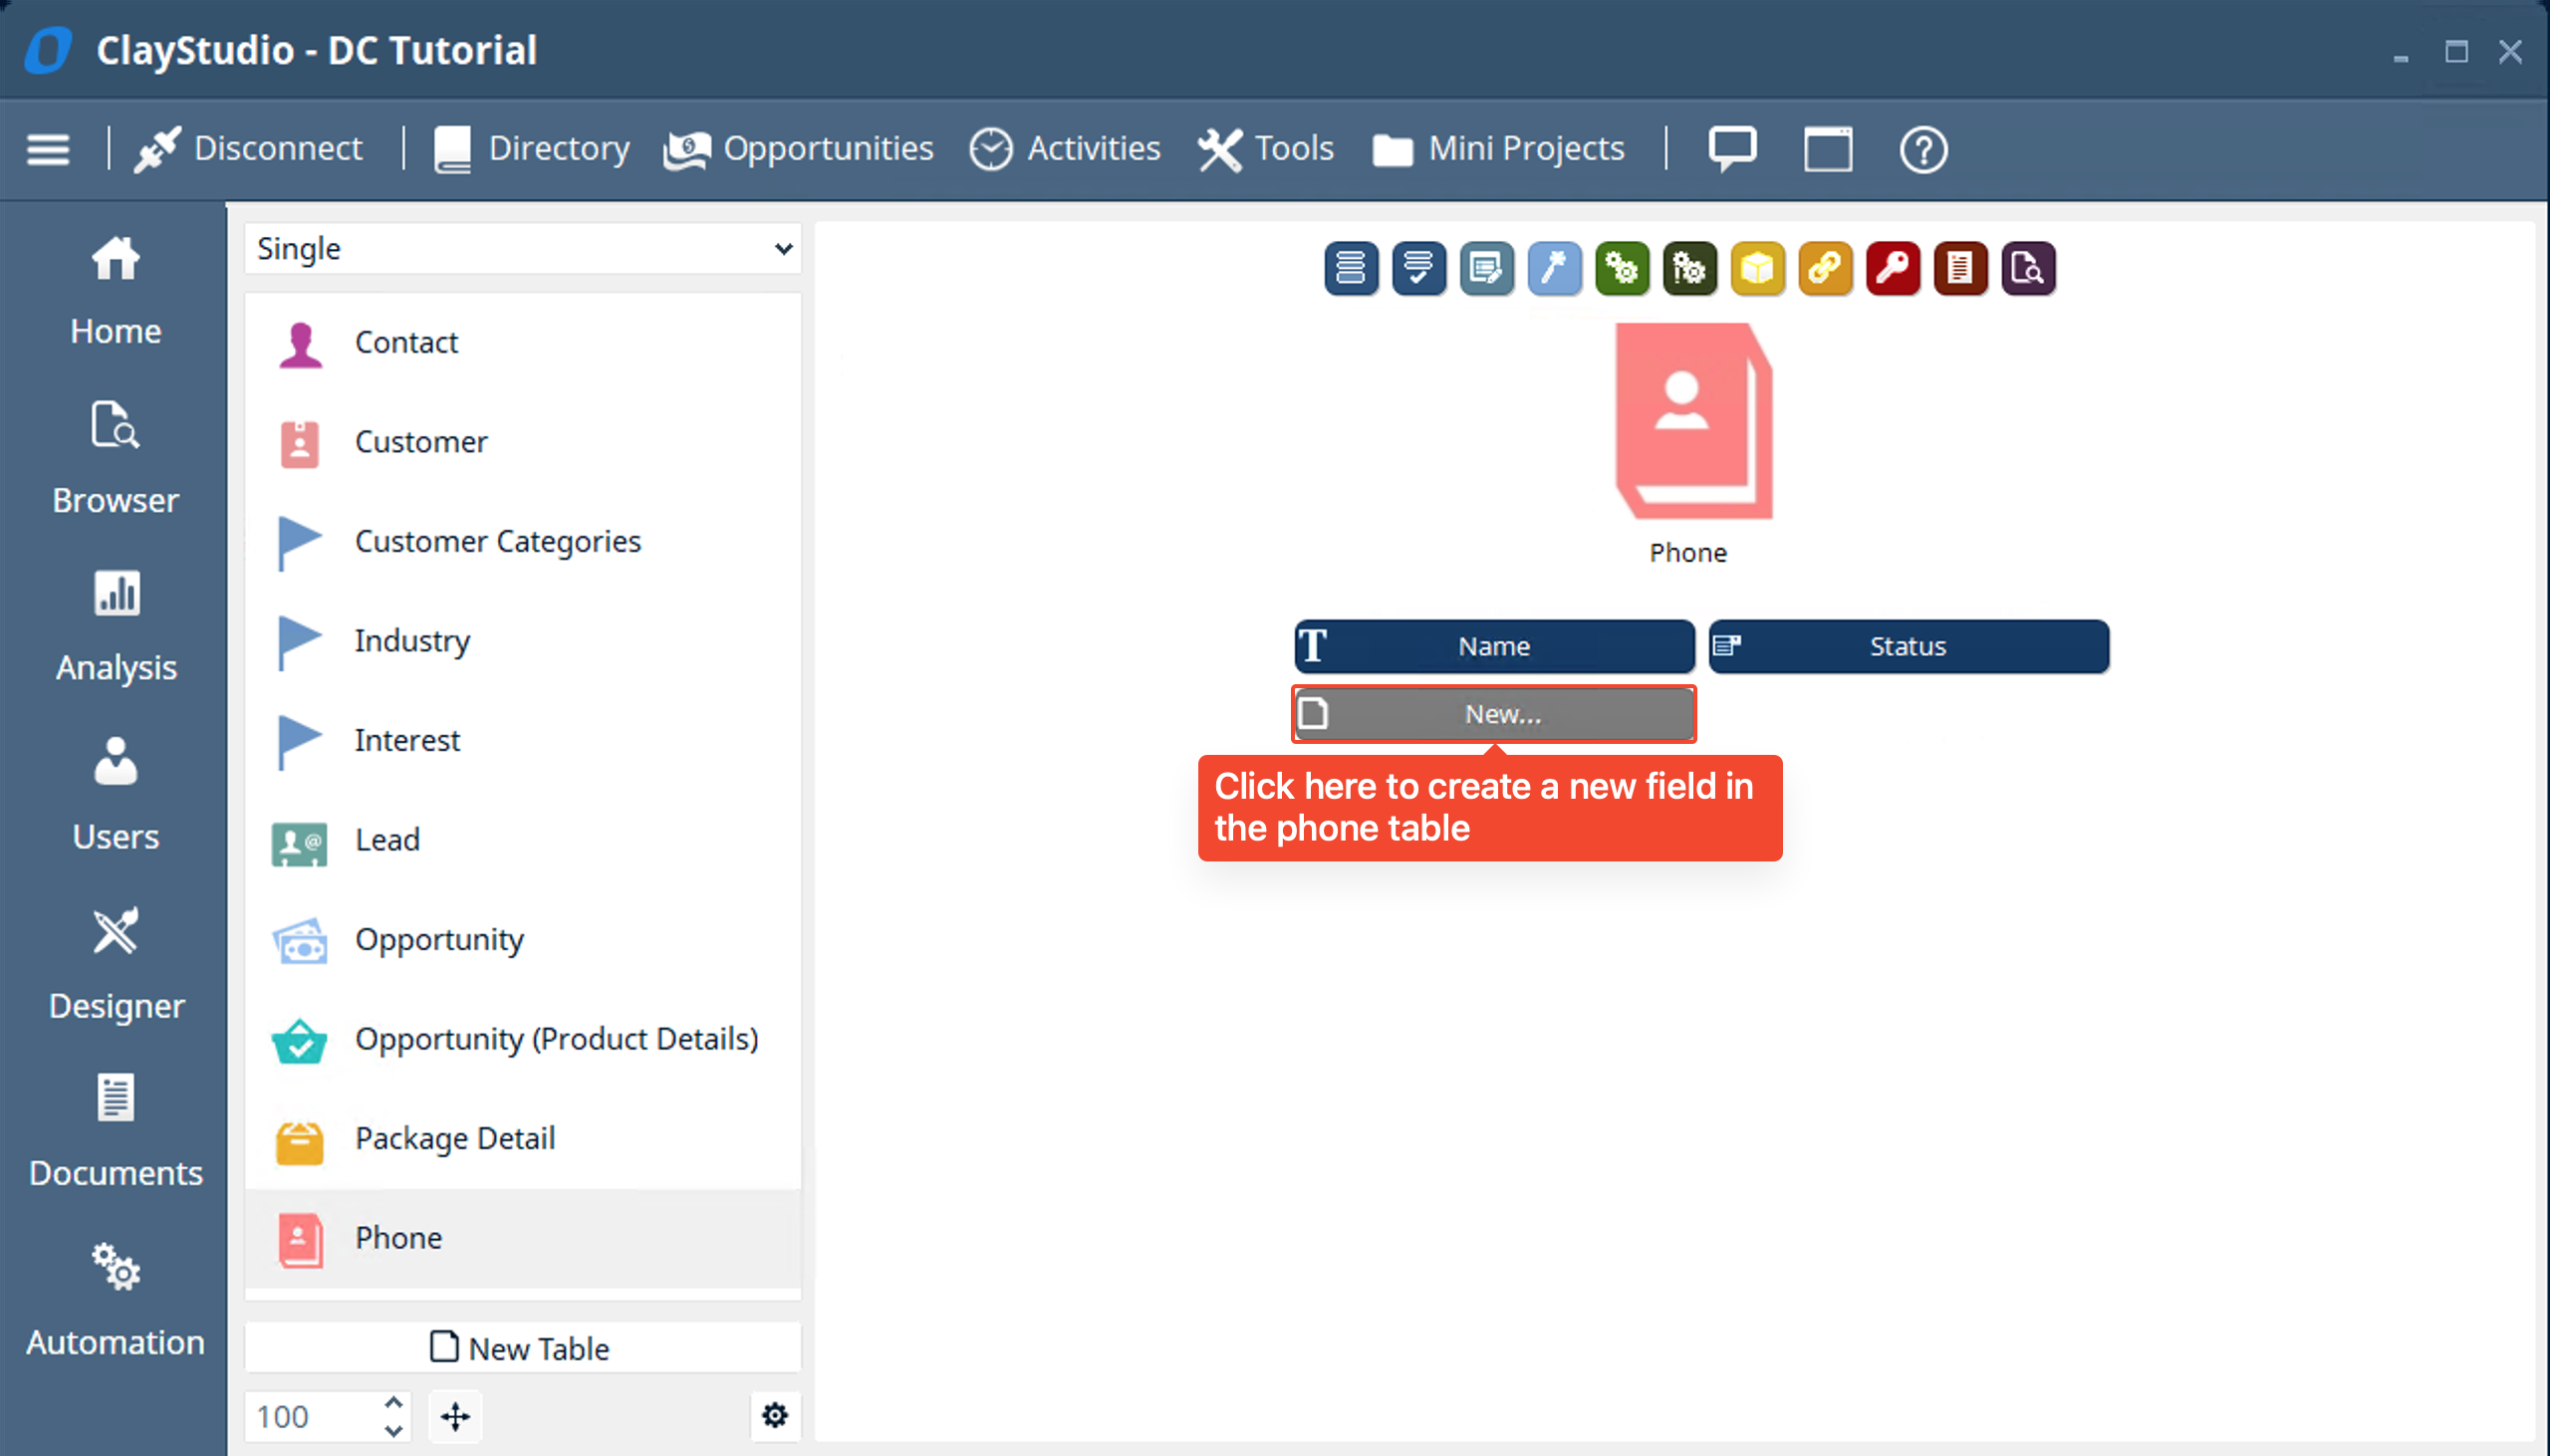
- We will use the built in “Name” field to hold the name of the contact. This means we only need to create a field to hold the Phone Number of the contact. To do this we will click on the “New” button in the “Custom Fields” view
- A field window pops up allowing you to name the field and select the field type. You can also specify the maximum length (characters/digits) allowed to be entered in the field you are creating. We will create a “Phone Number” field → of data type “Text” → of sub data type “Phone” → with a maximum length of “10”. Then we will click on “Add another”
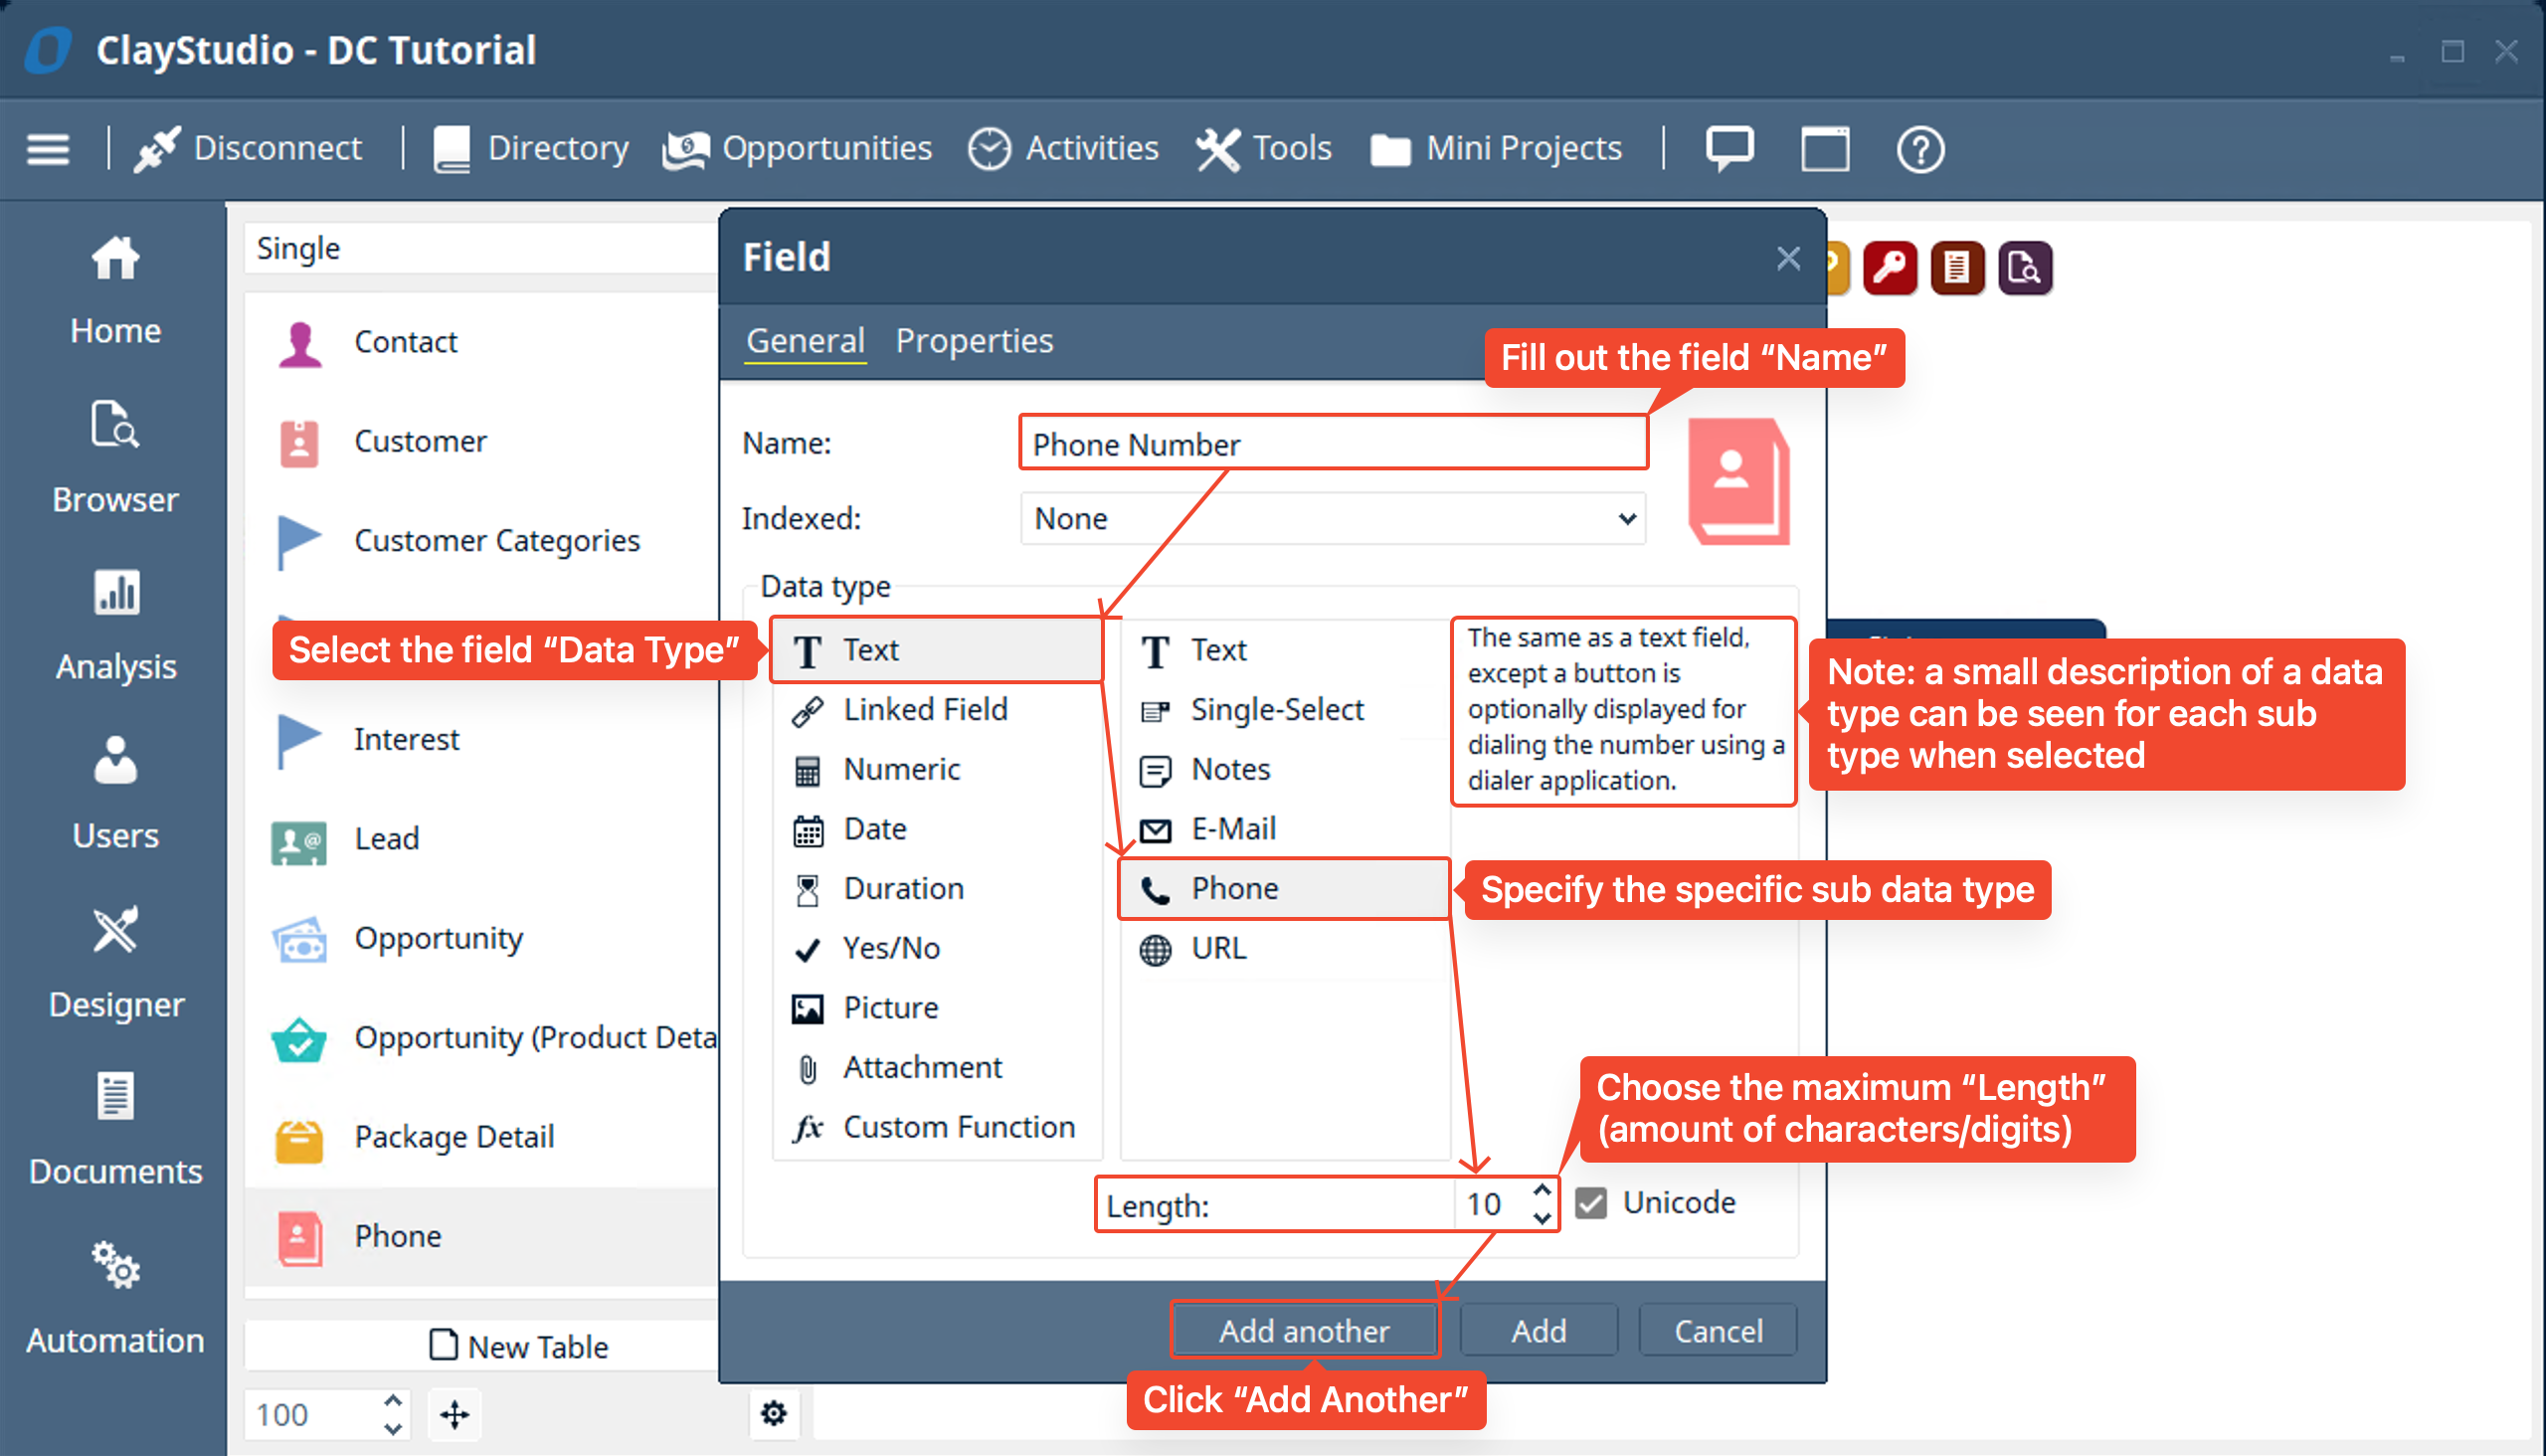
- For the next field we will create a “Country Code” field that will be a regular “Text” data type field and then click “Add”
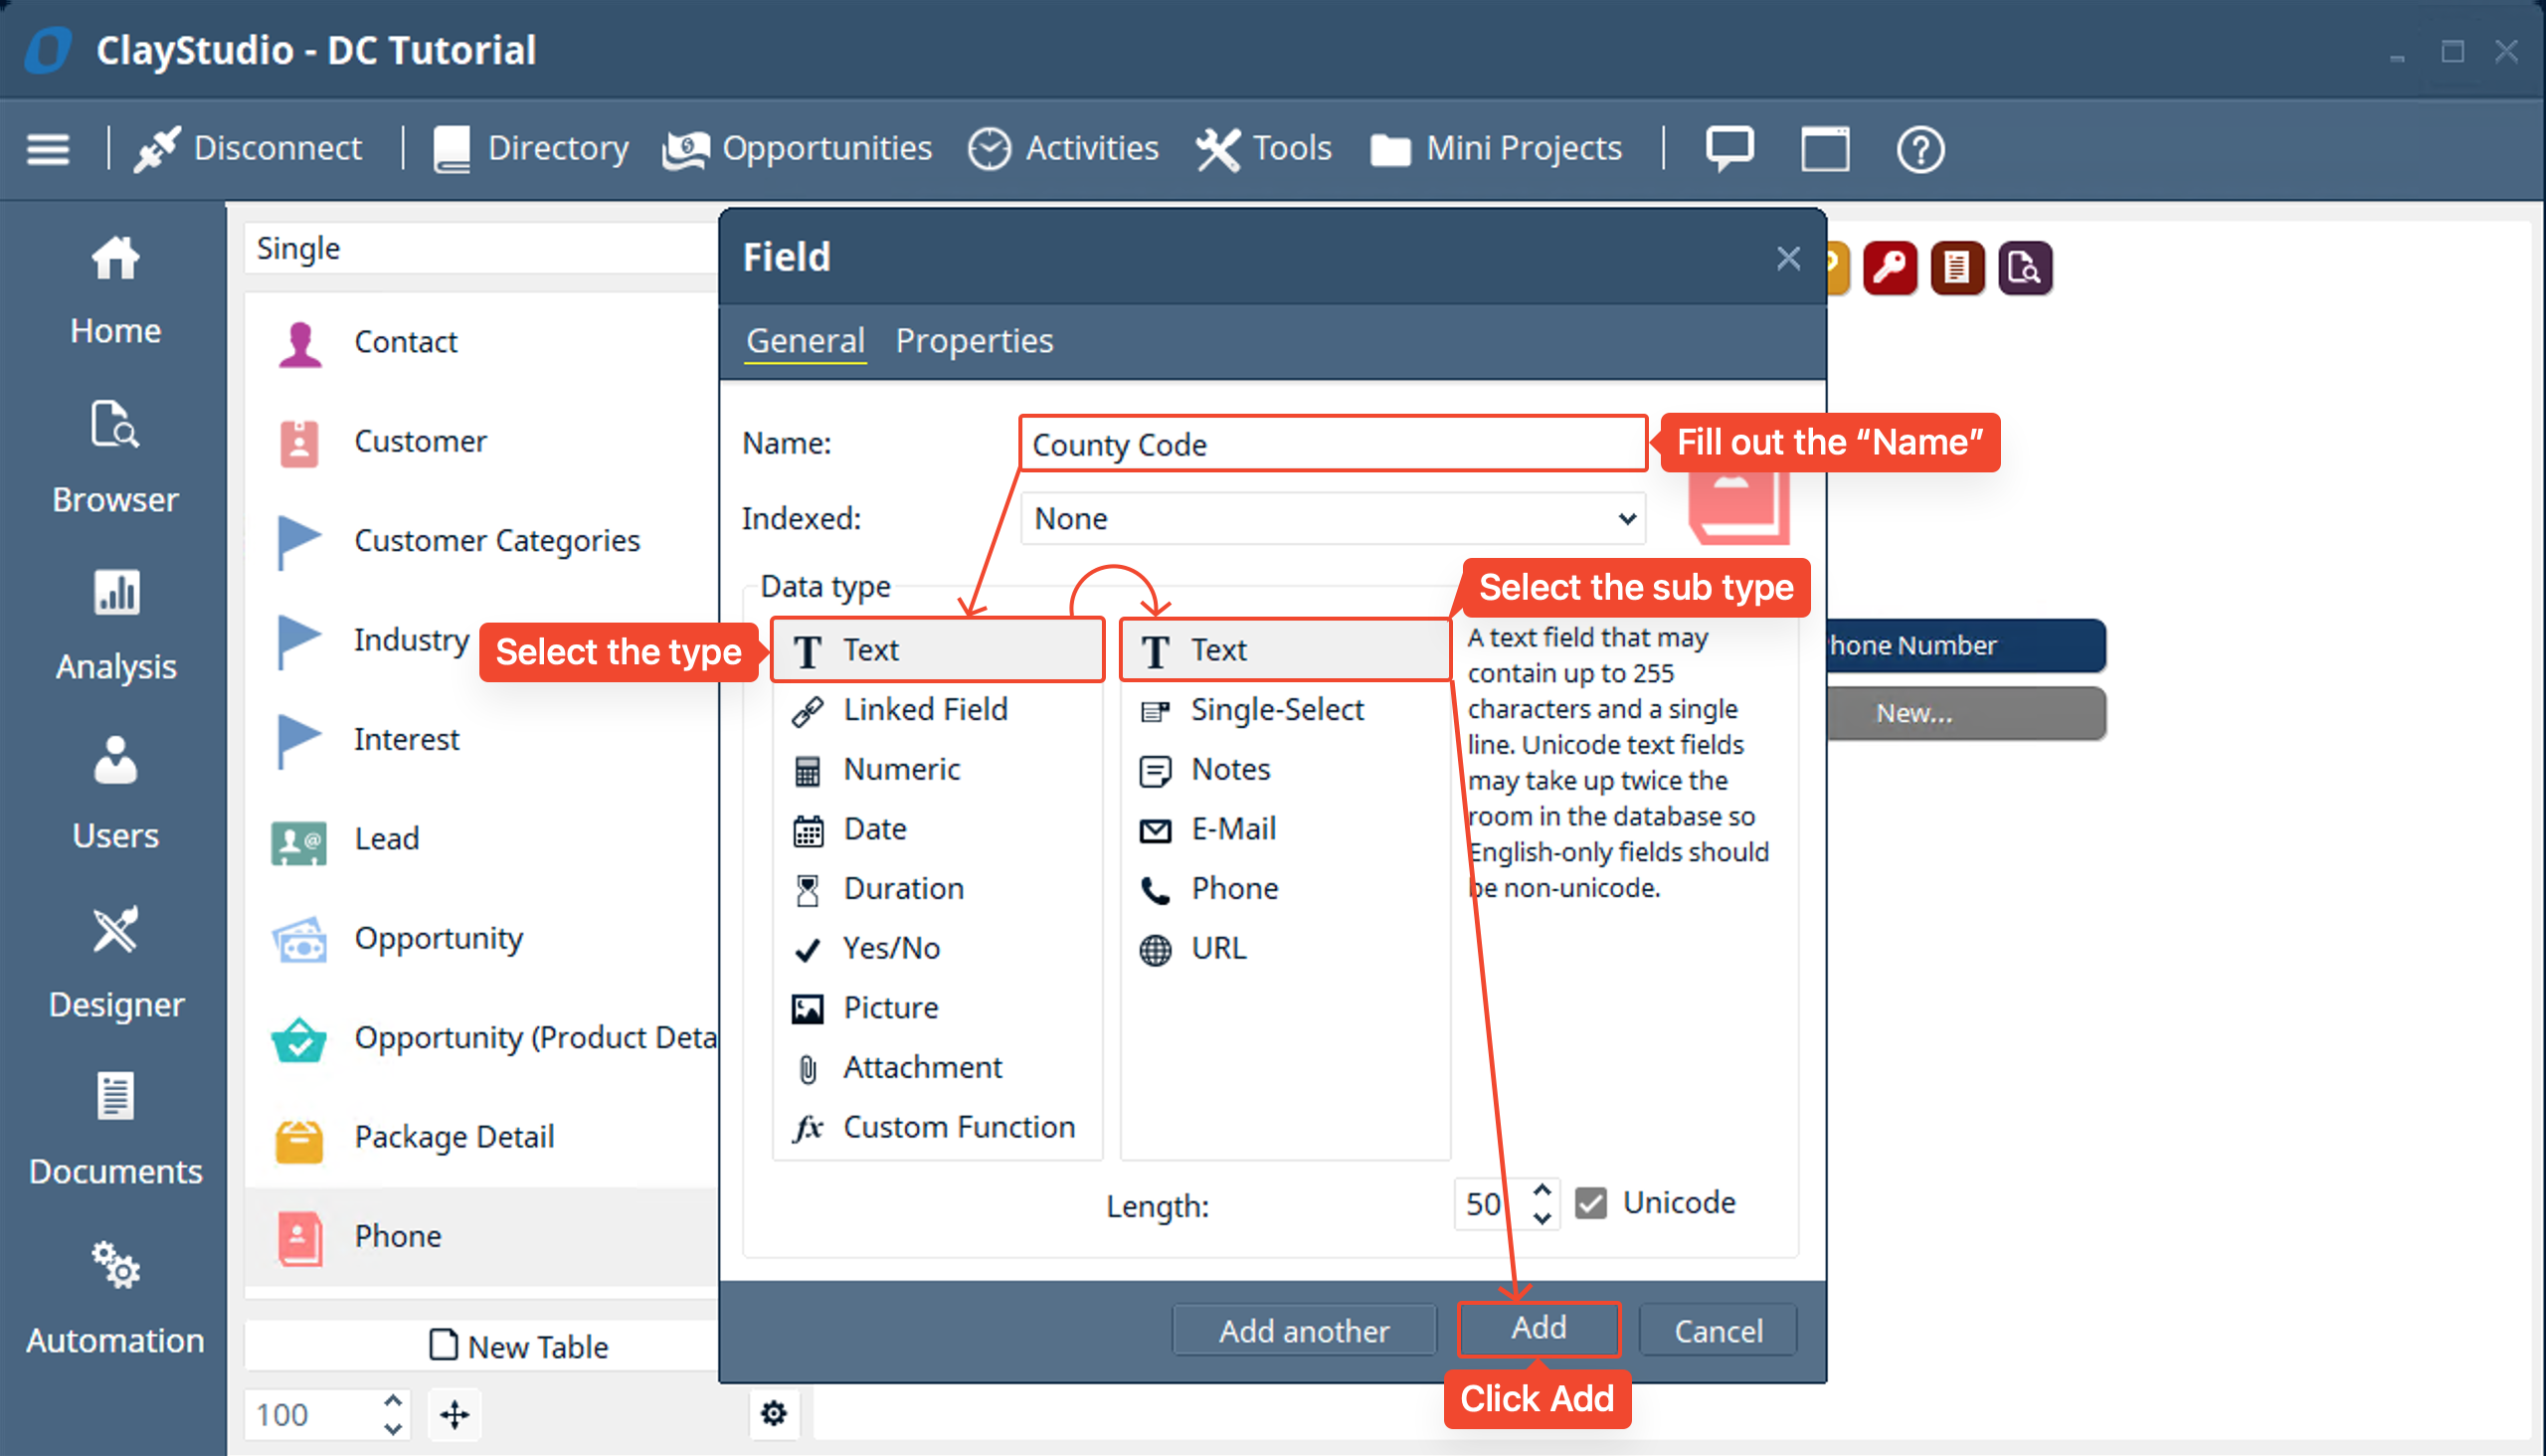
- The fields you added are displayed in the “Custom Fields” view of the table
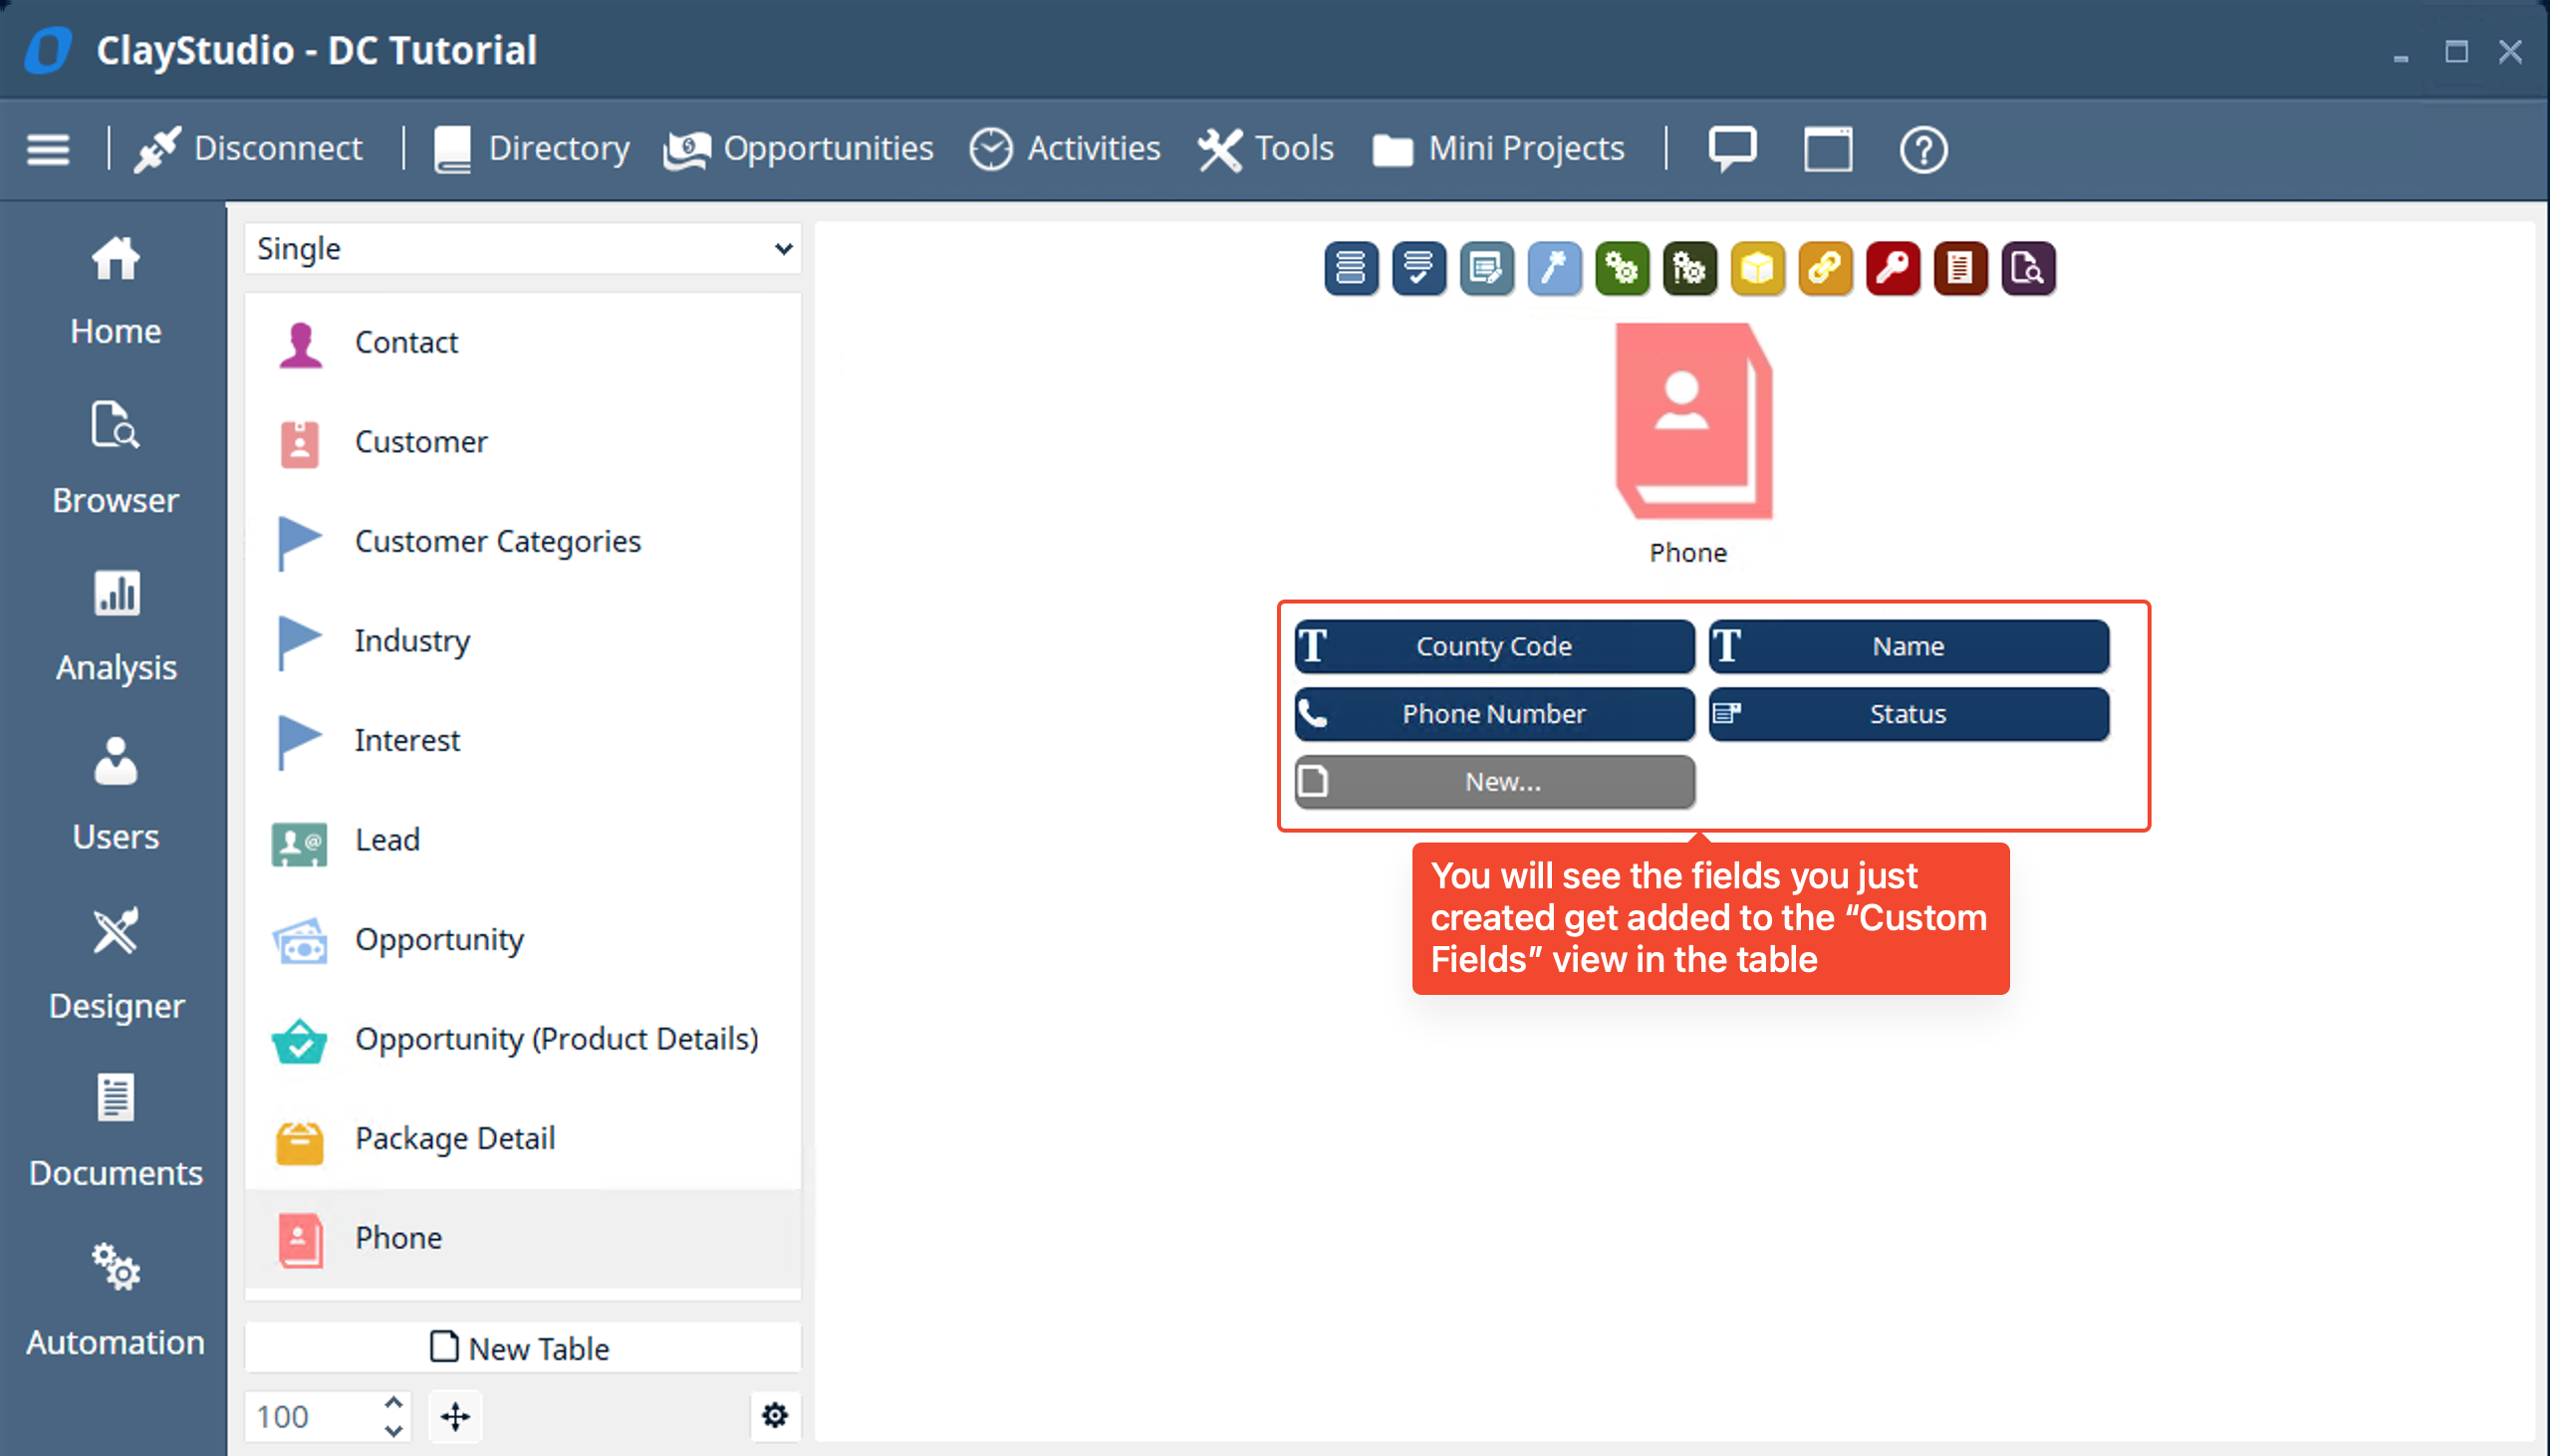
- Let’s click on the “Browser” view of a table. This will allow us to browse the items in this table as well as create new items for this table. In this case an “item” of this table would be a an individual “phone number” of a contact
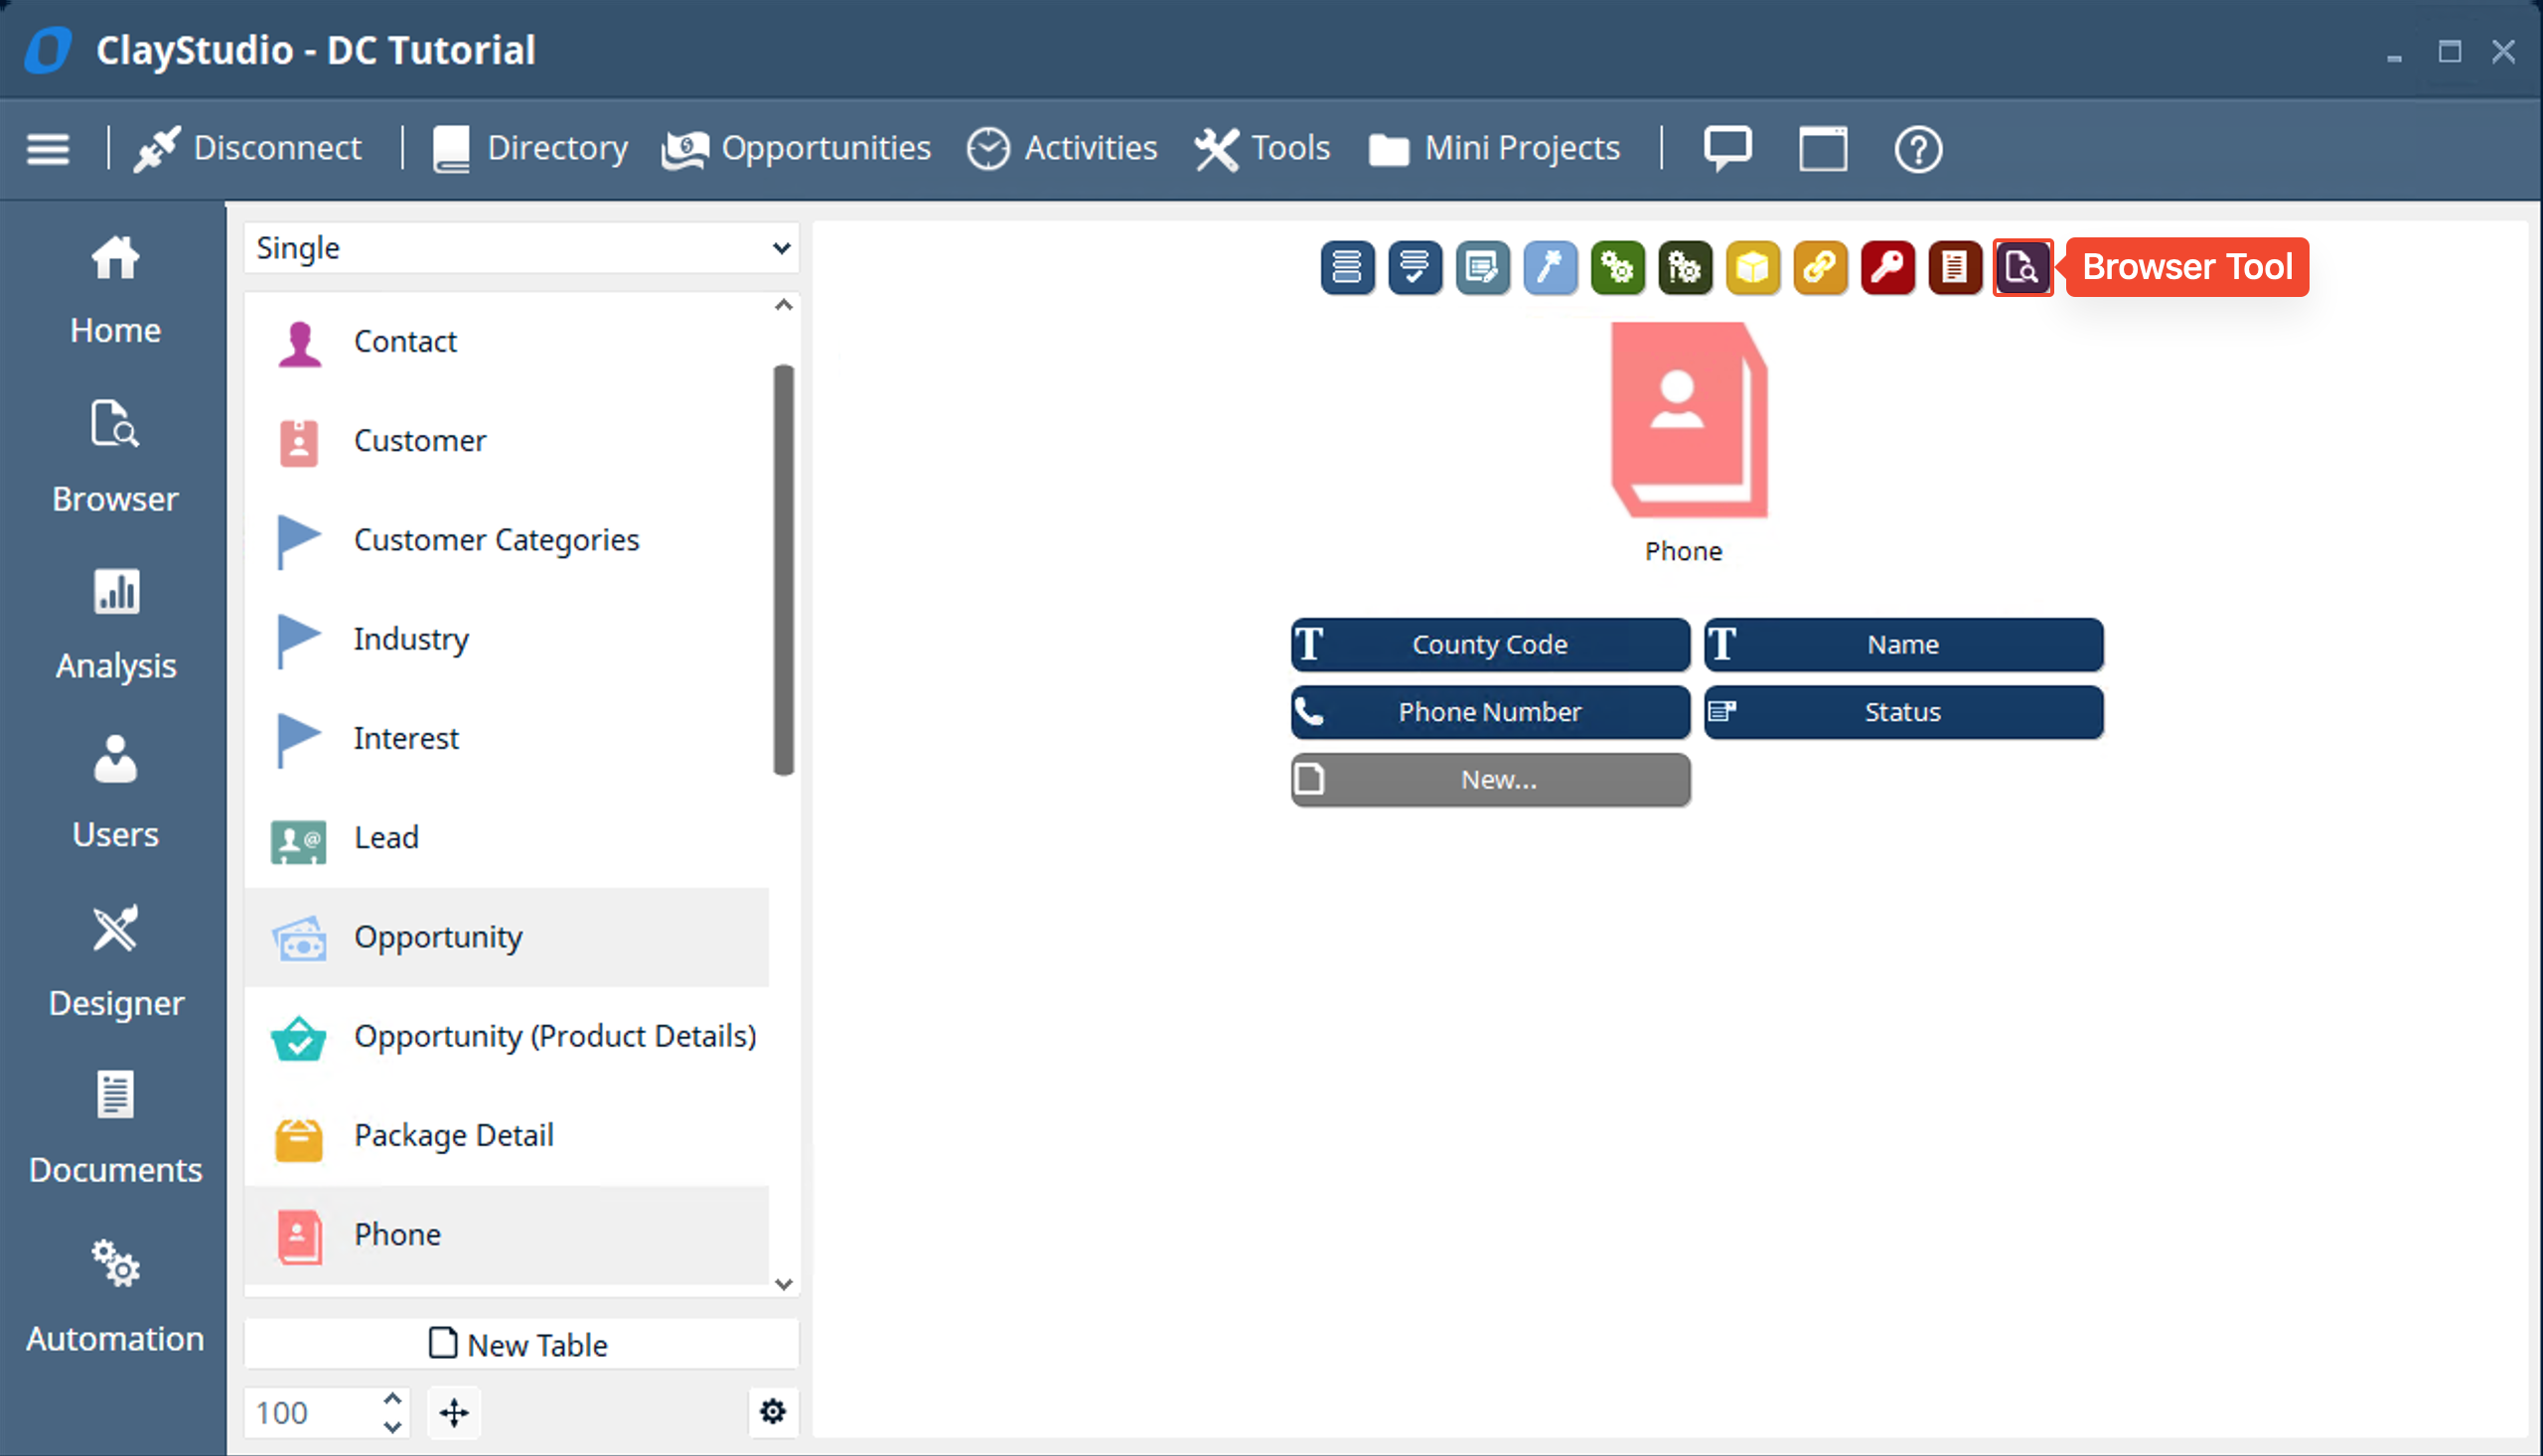
- The Browser tool is n incredibly powerful tool that allows you to view, edit, and create items in your table. The screenshot below labels all the options you can see in the “Browser Tool”.
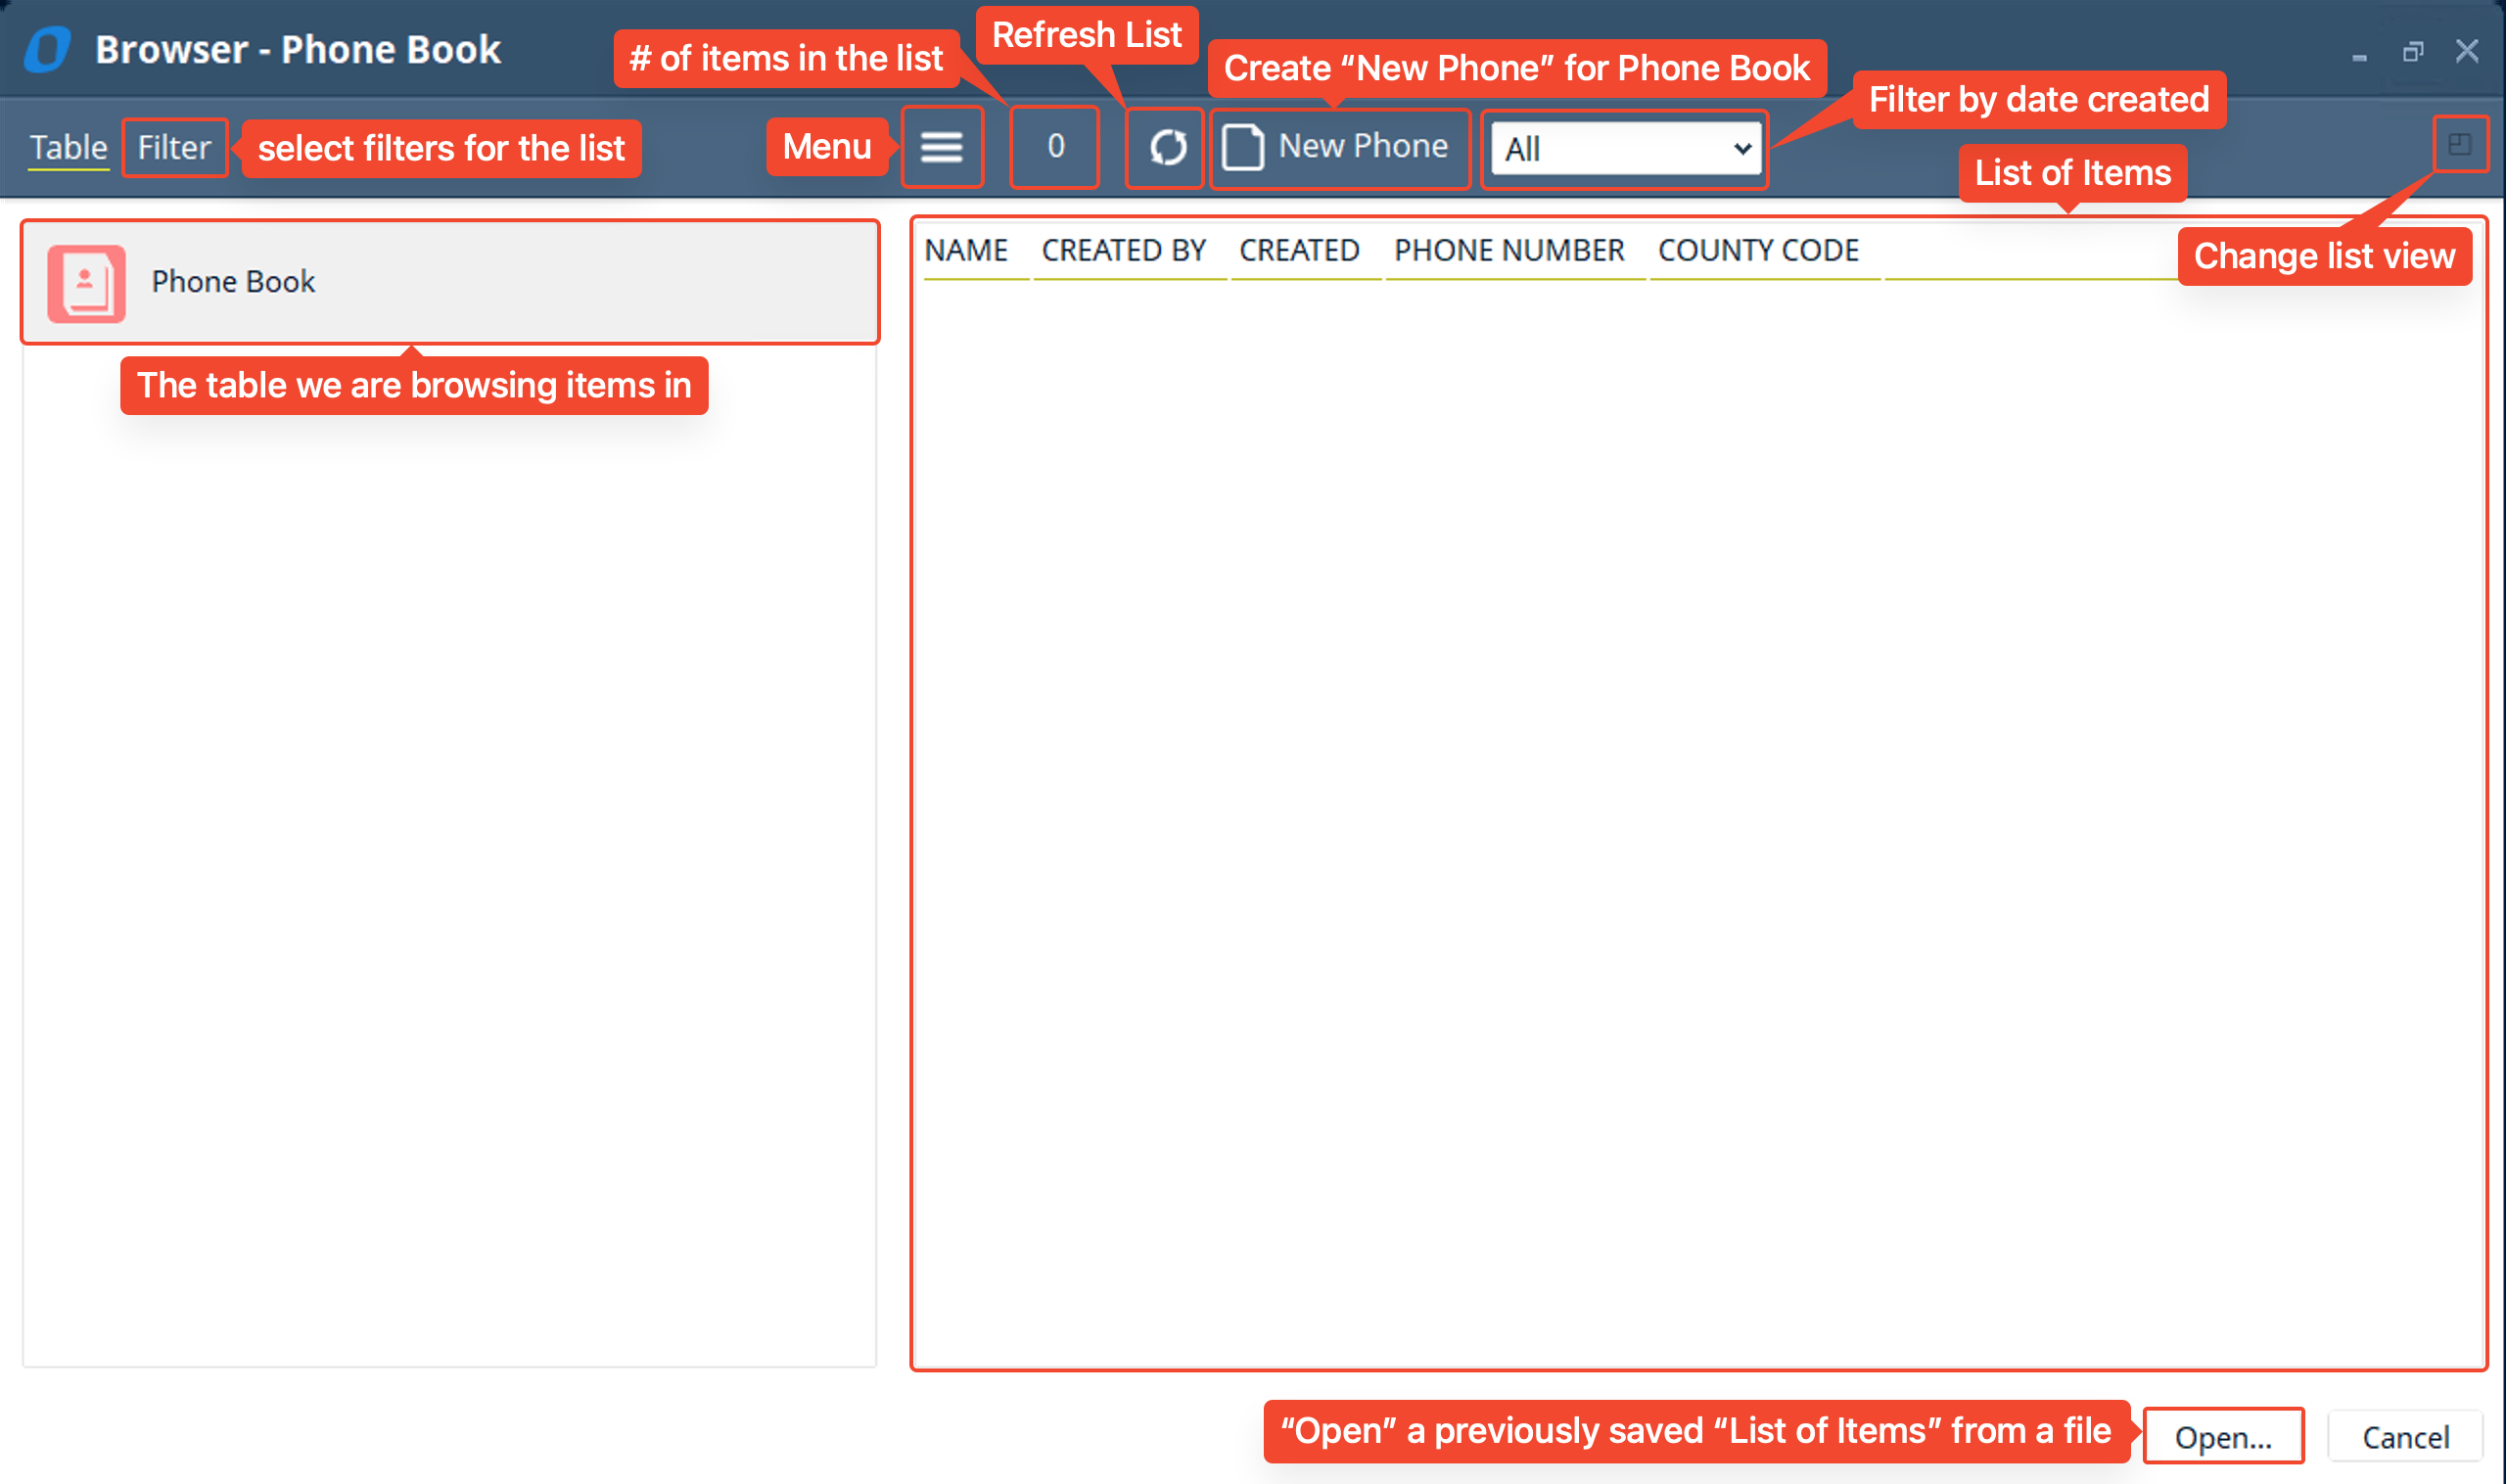
- Let’s add a “New Phone” to our Phone Book
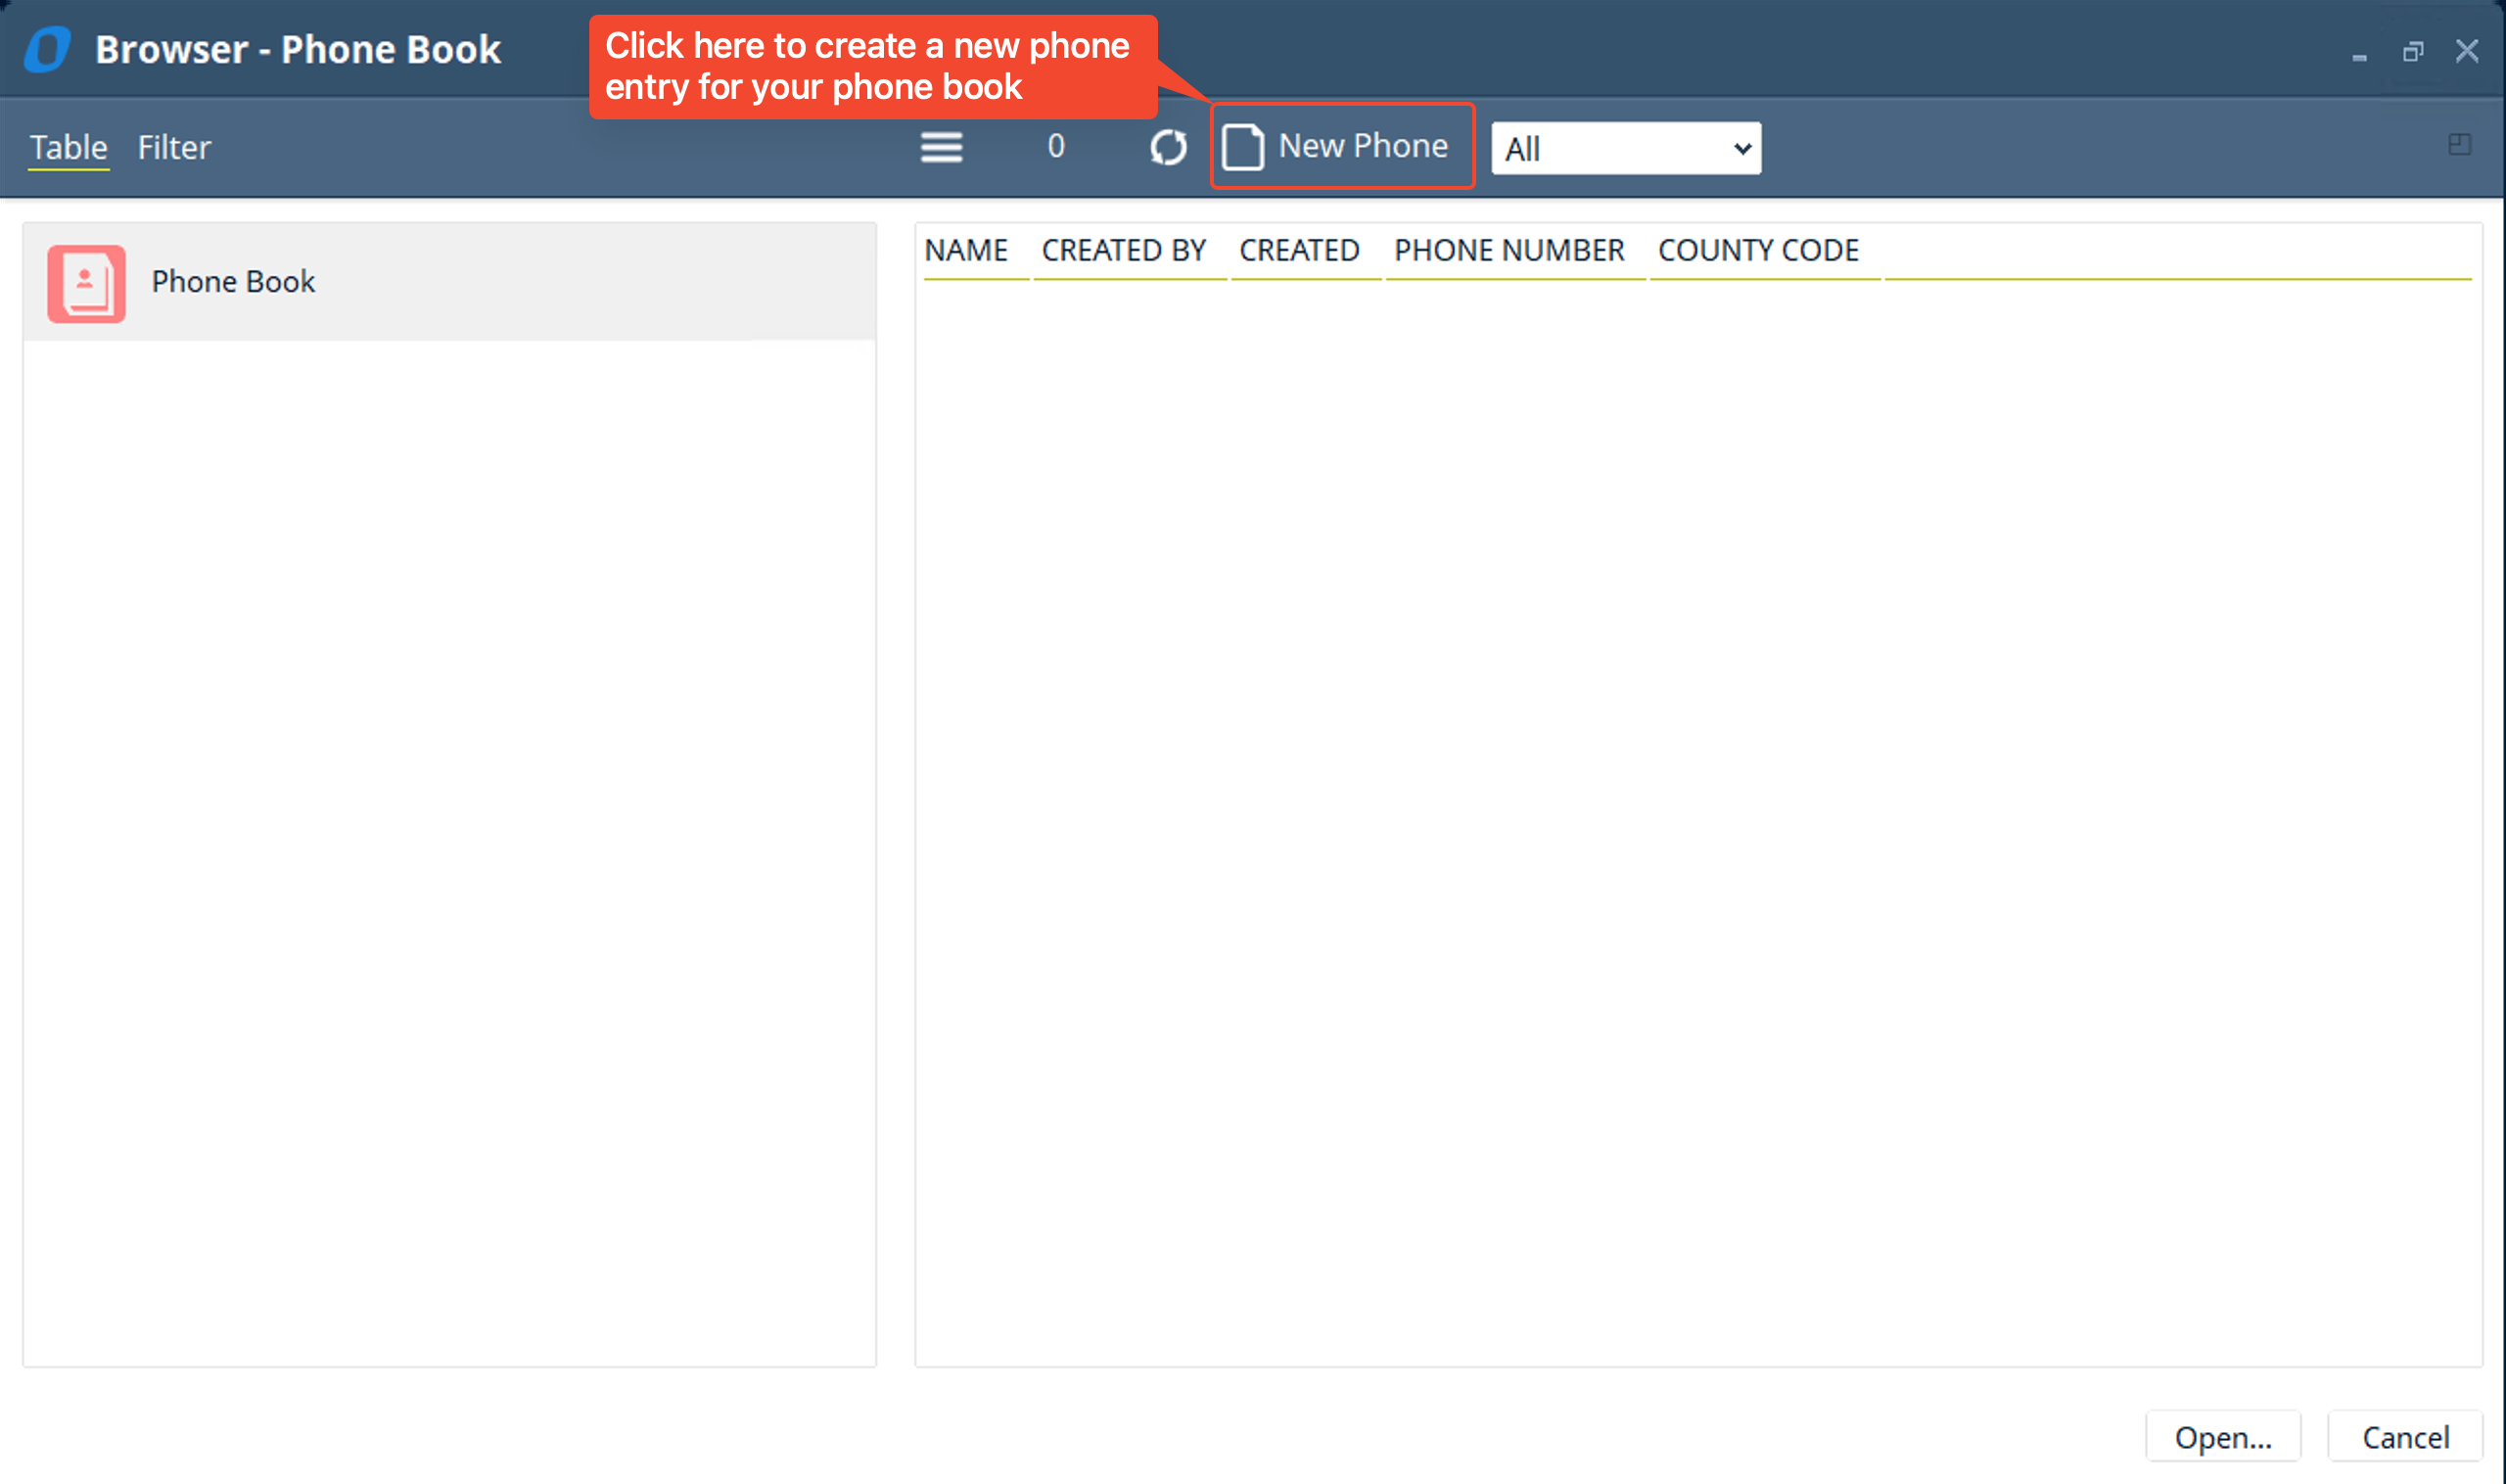
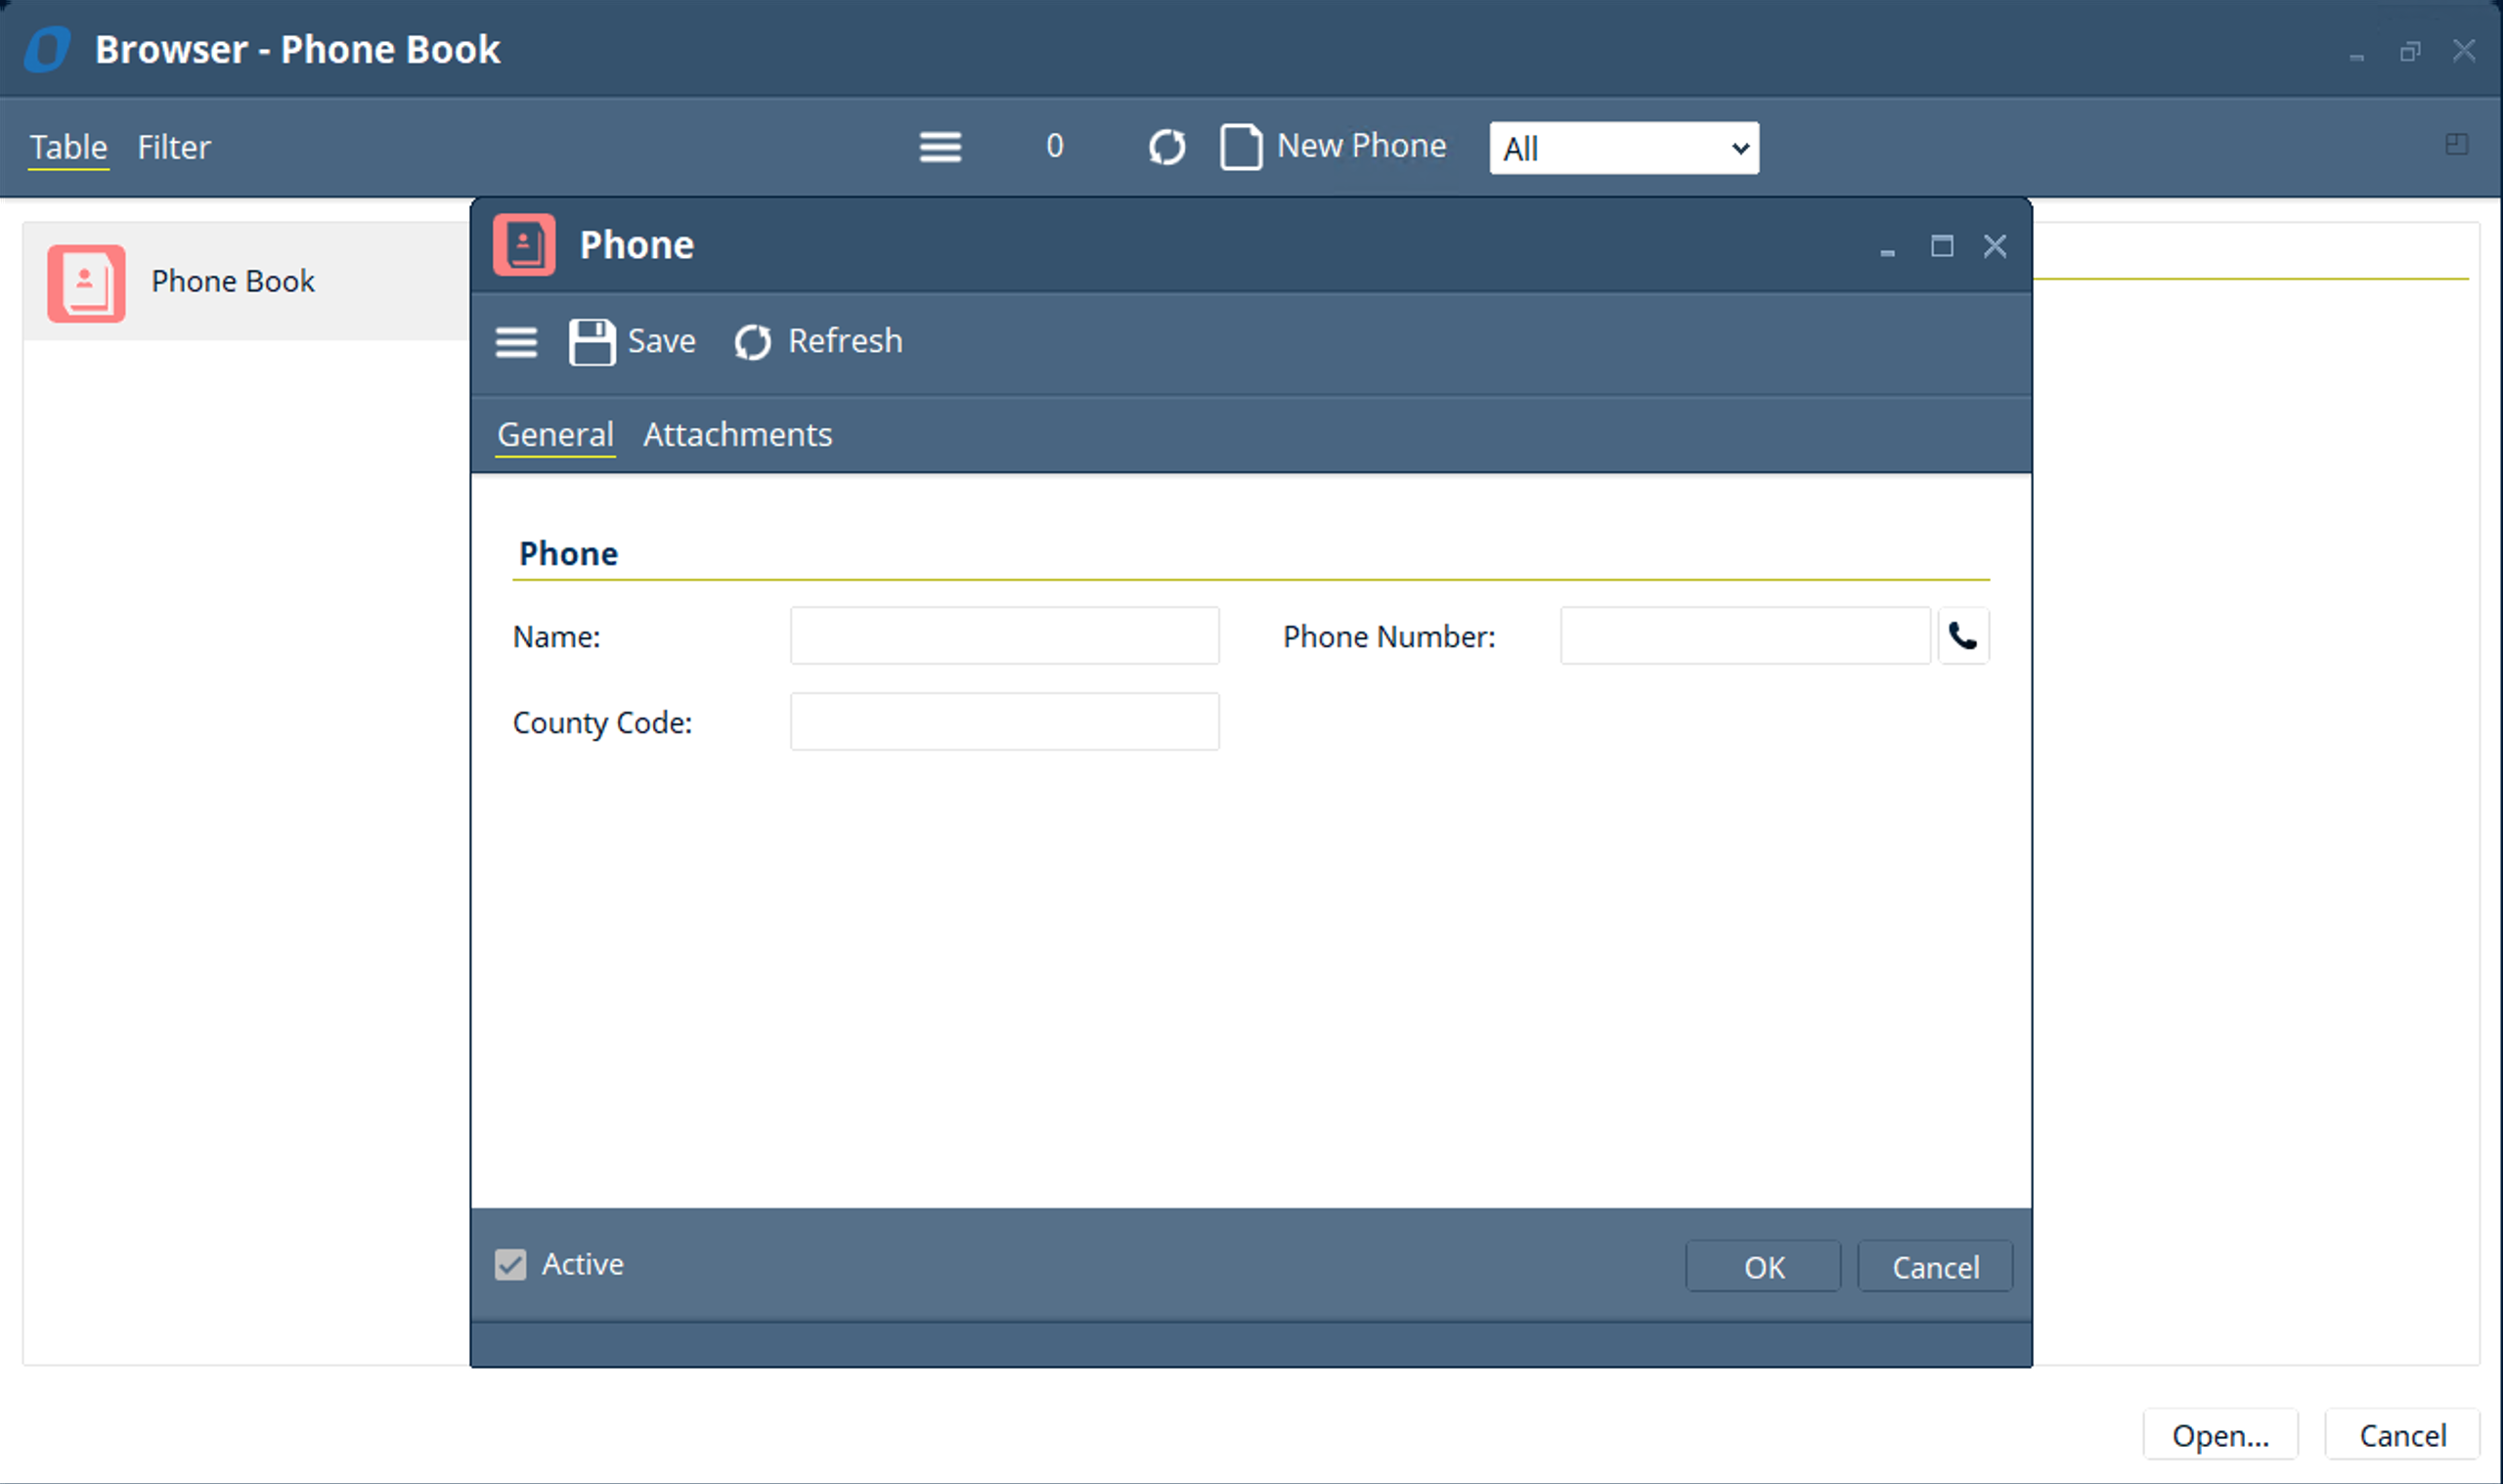
- A “Phone” window pops up with the “Name”, “Phone Number”, and “Country Code” fields
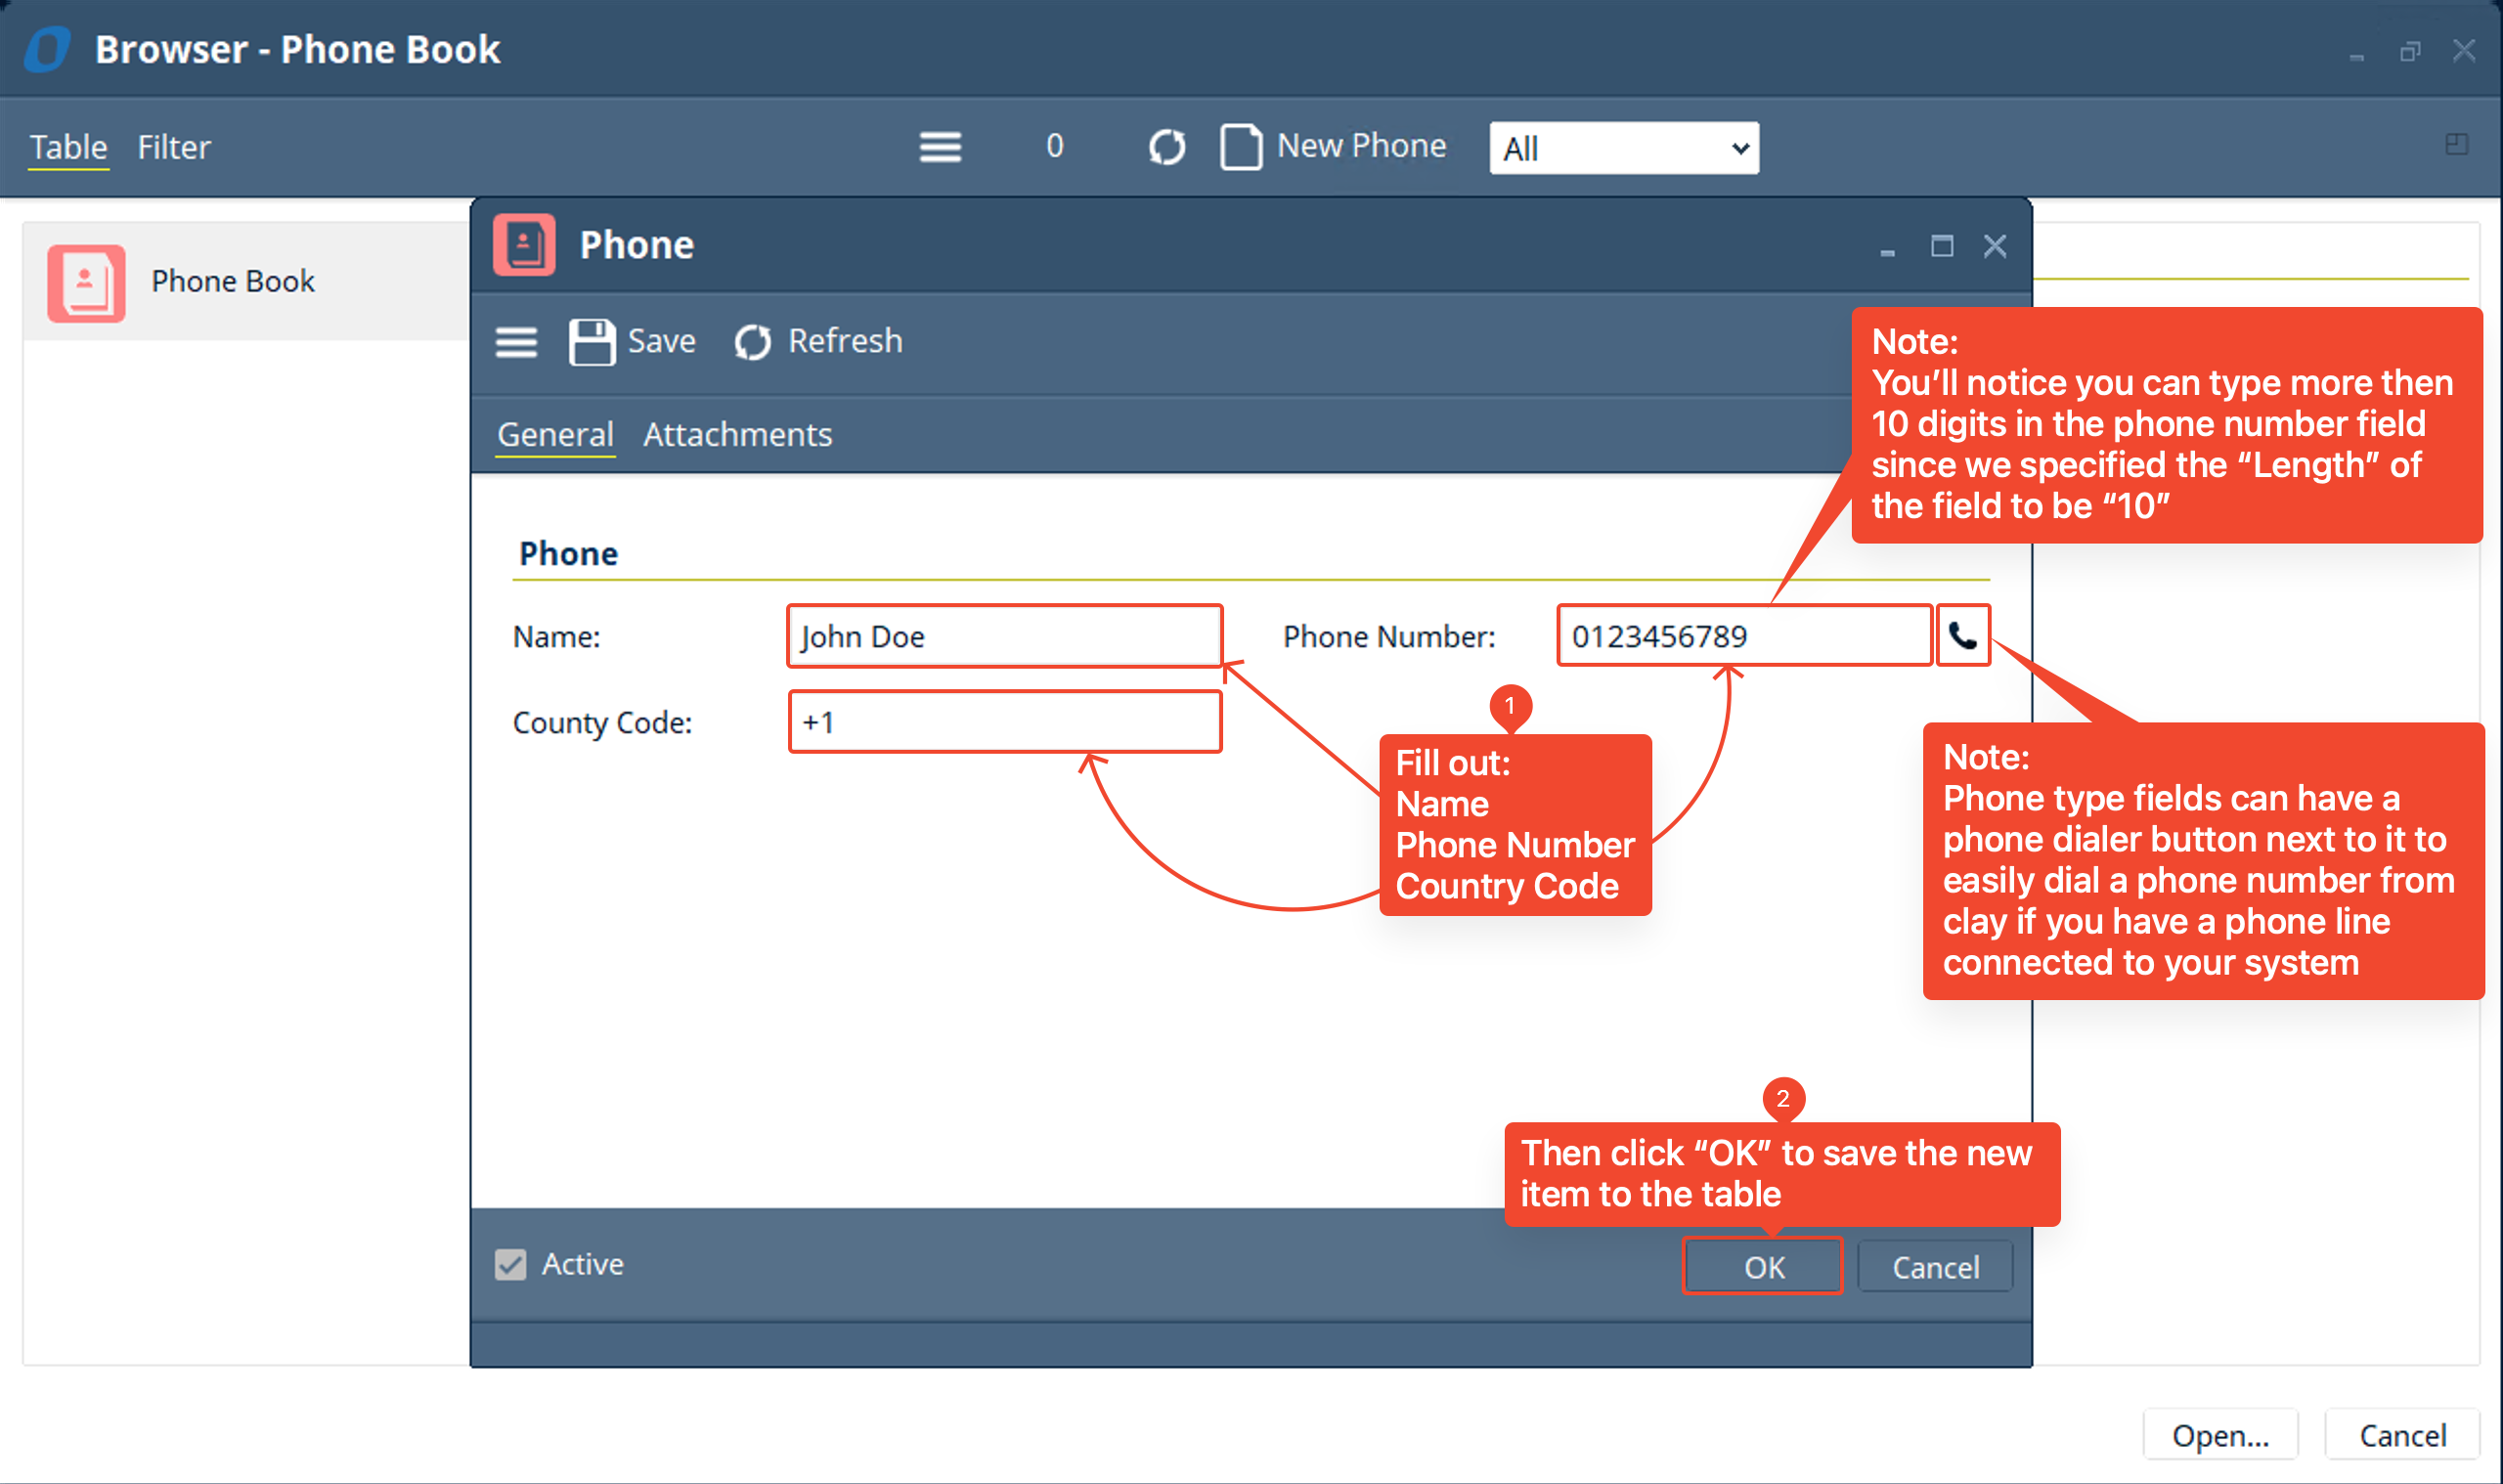
- Fill out the the fields in the item and click OK
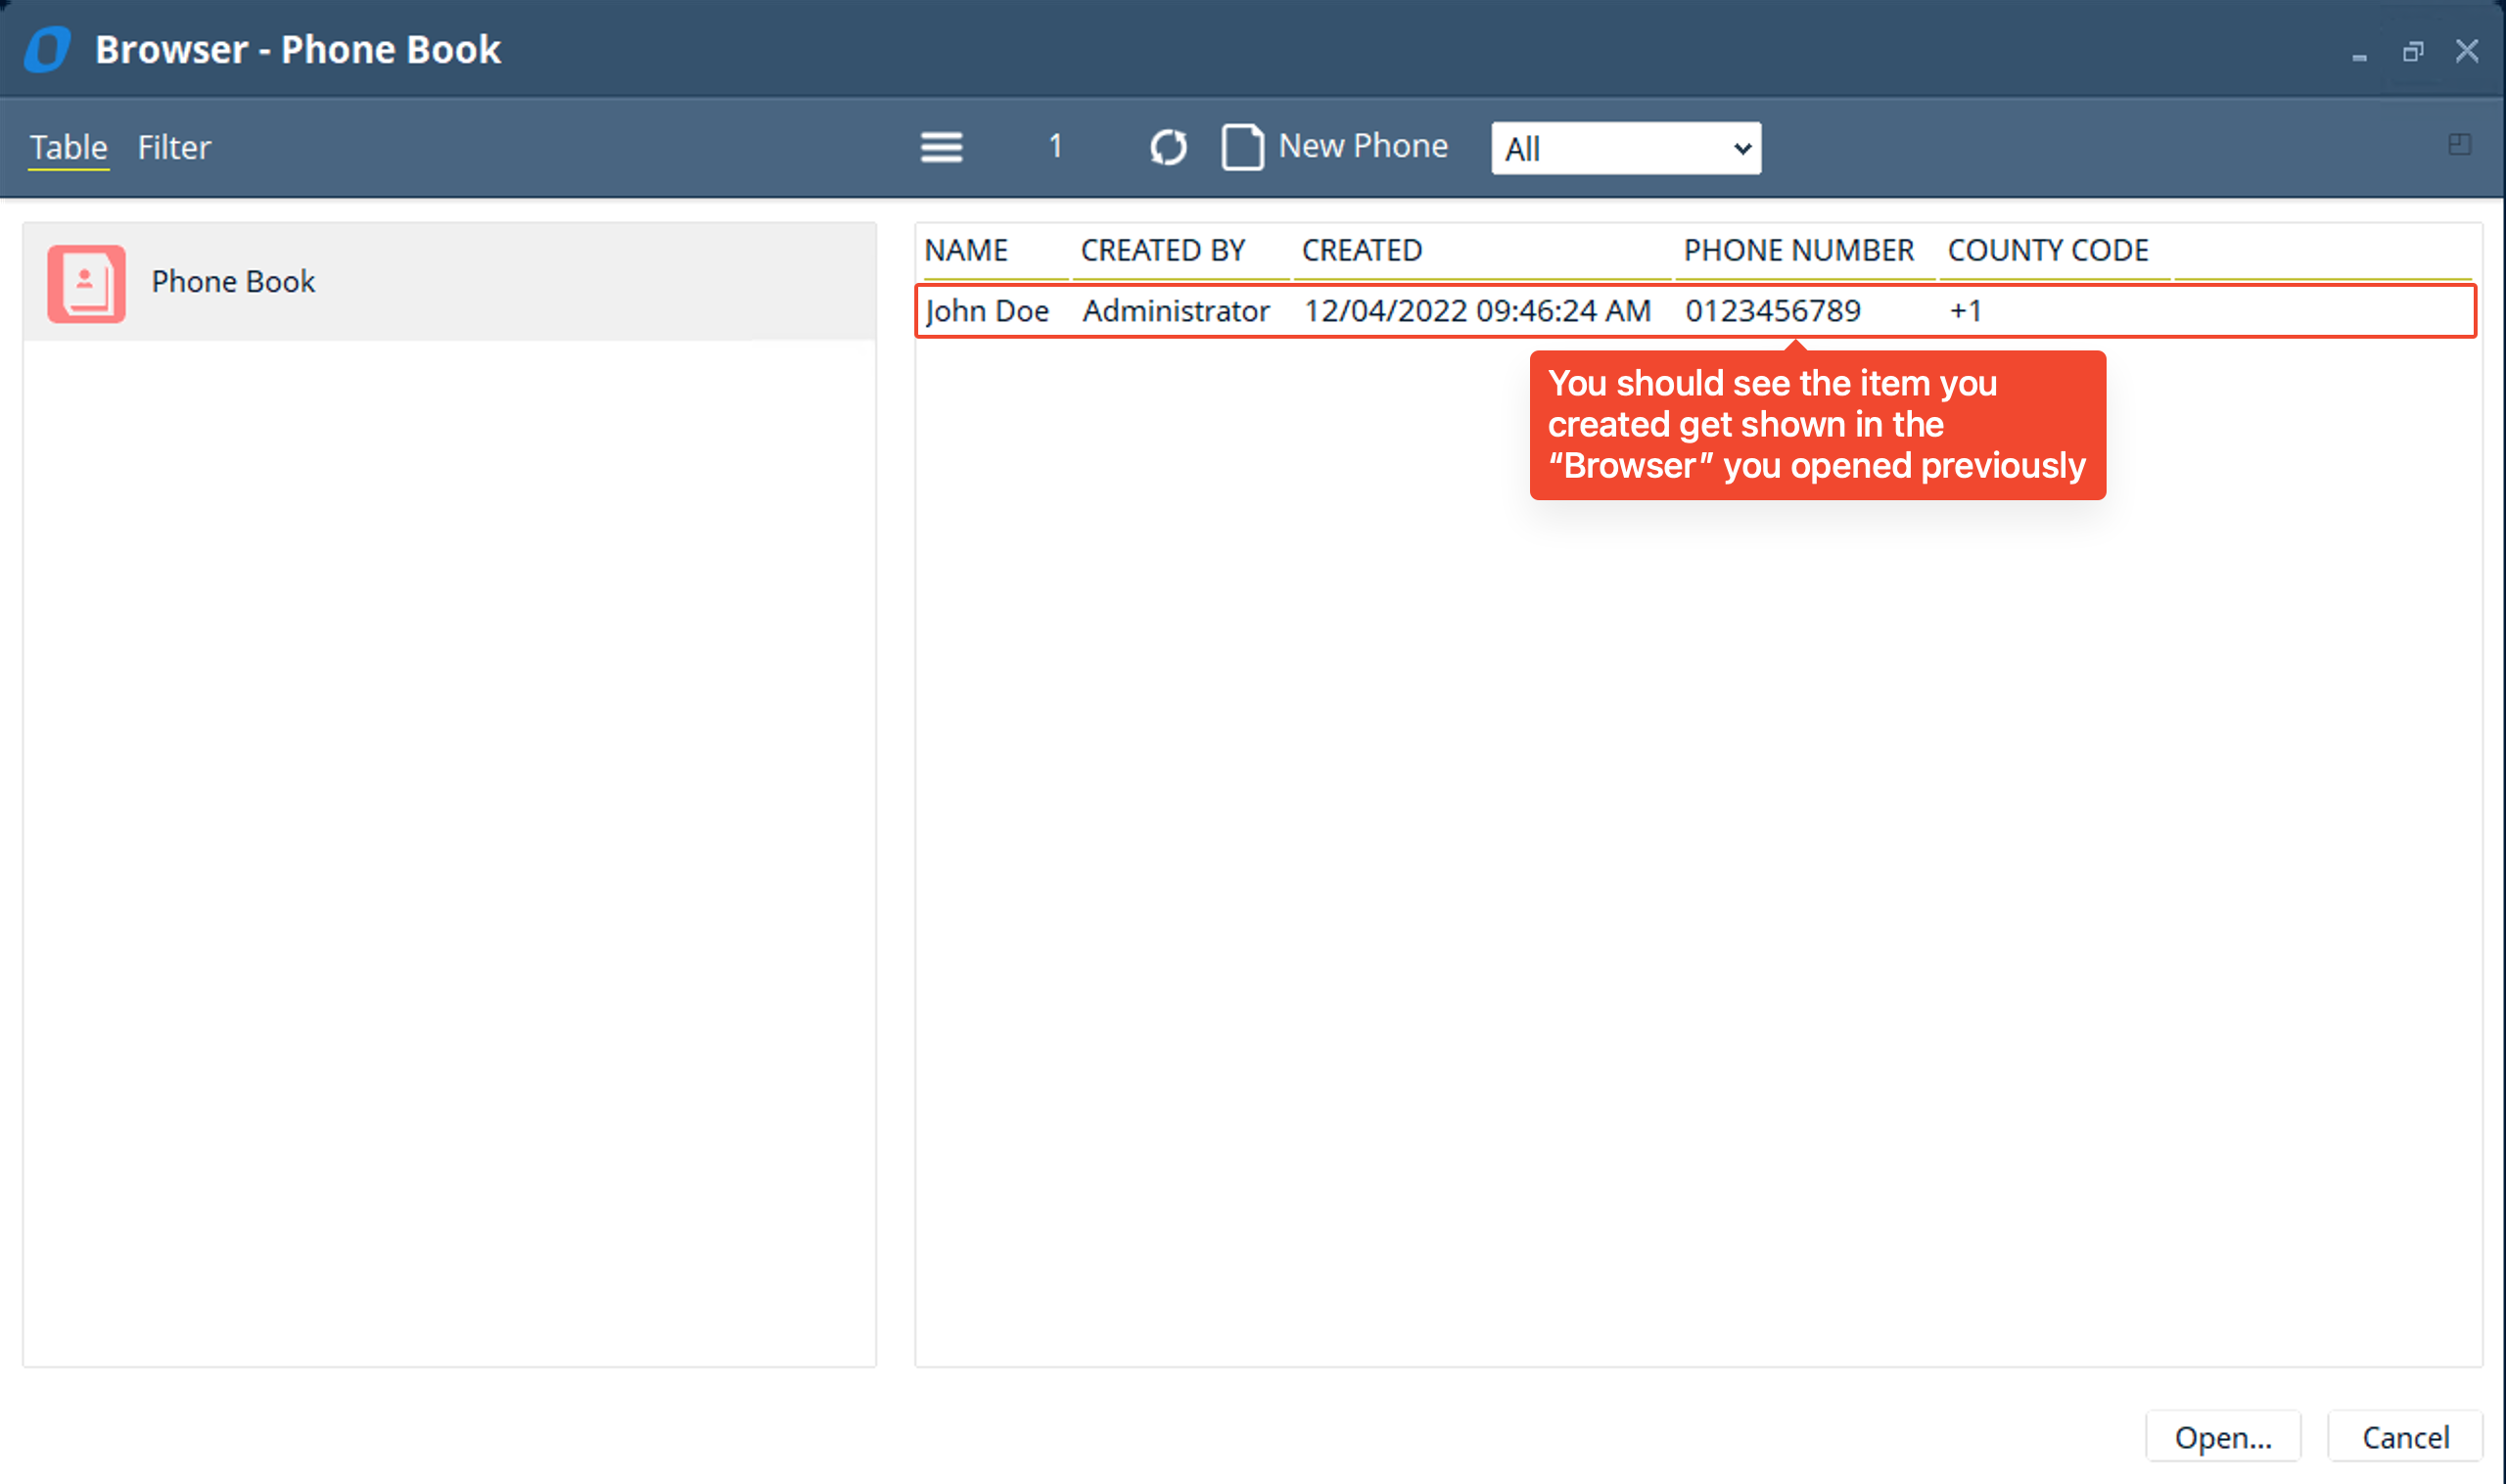
- You have successfully added a phone number to your phone book. Now close the “Browser” window
ADVANCED
- Now, we want to make sure that all “phone numbers” are 10 digits long (not longer and not shorter). To do this we can set up a simple automation that will check the amount of digits in the “Phone Number” field and if there is not exactly 10 digits in the phone field an error should be displayed saying “10 digits are required in the phone field”
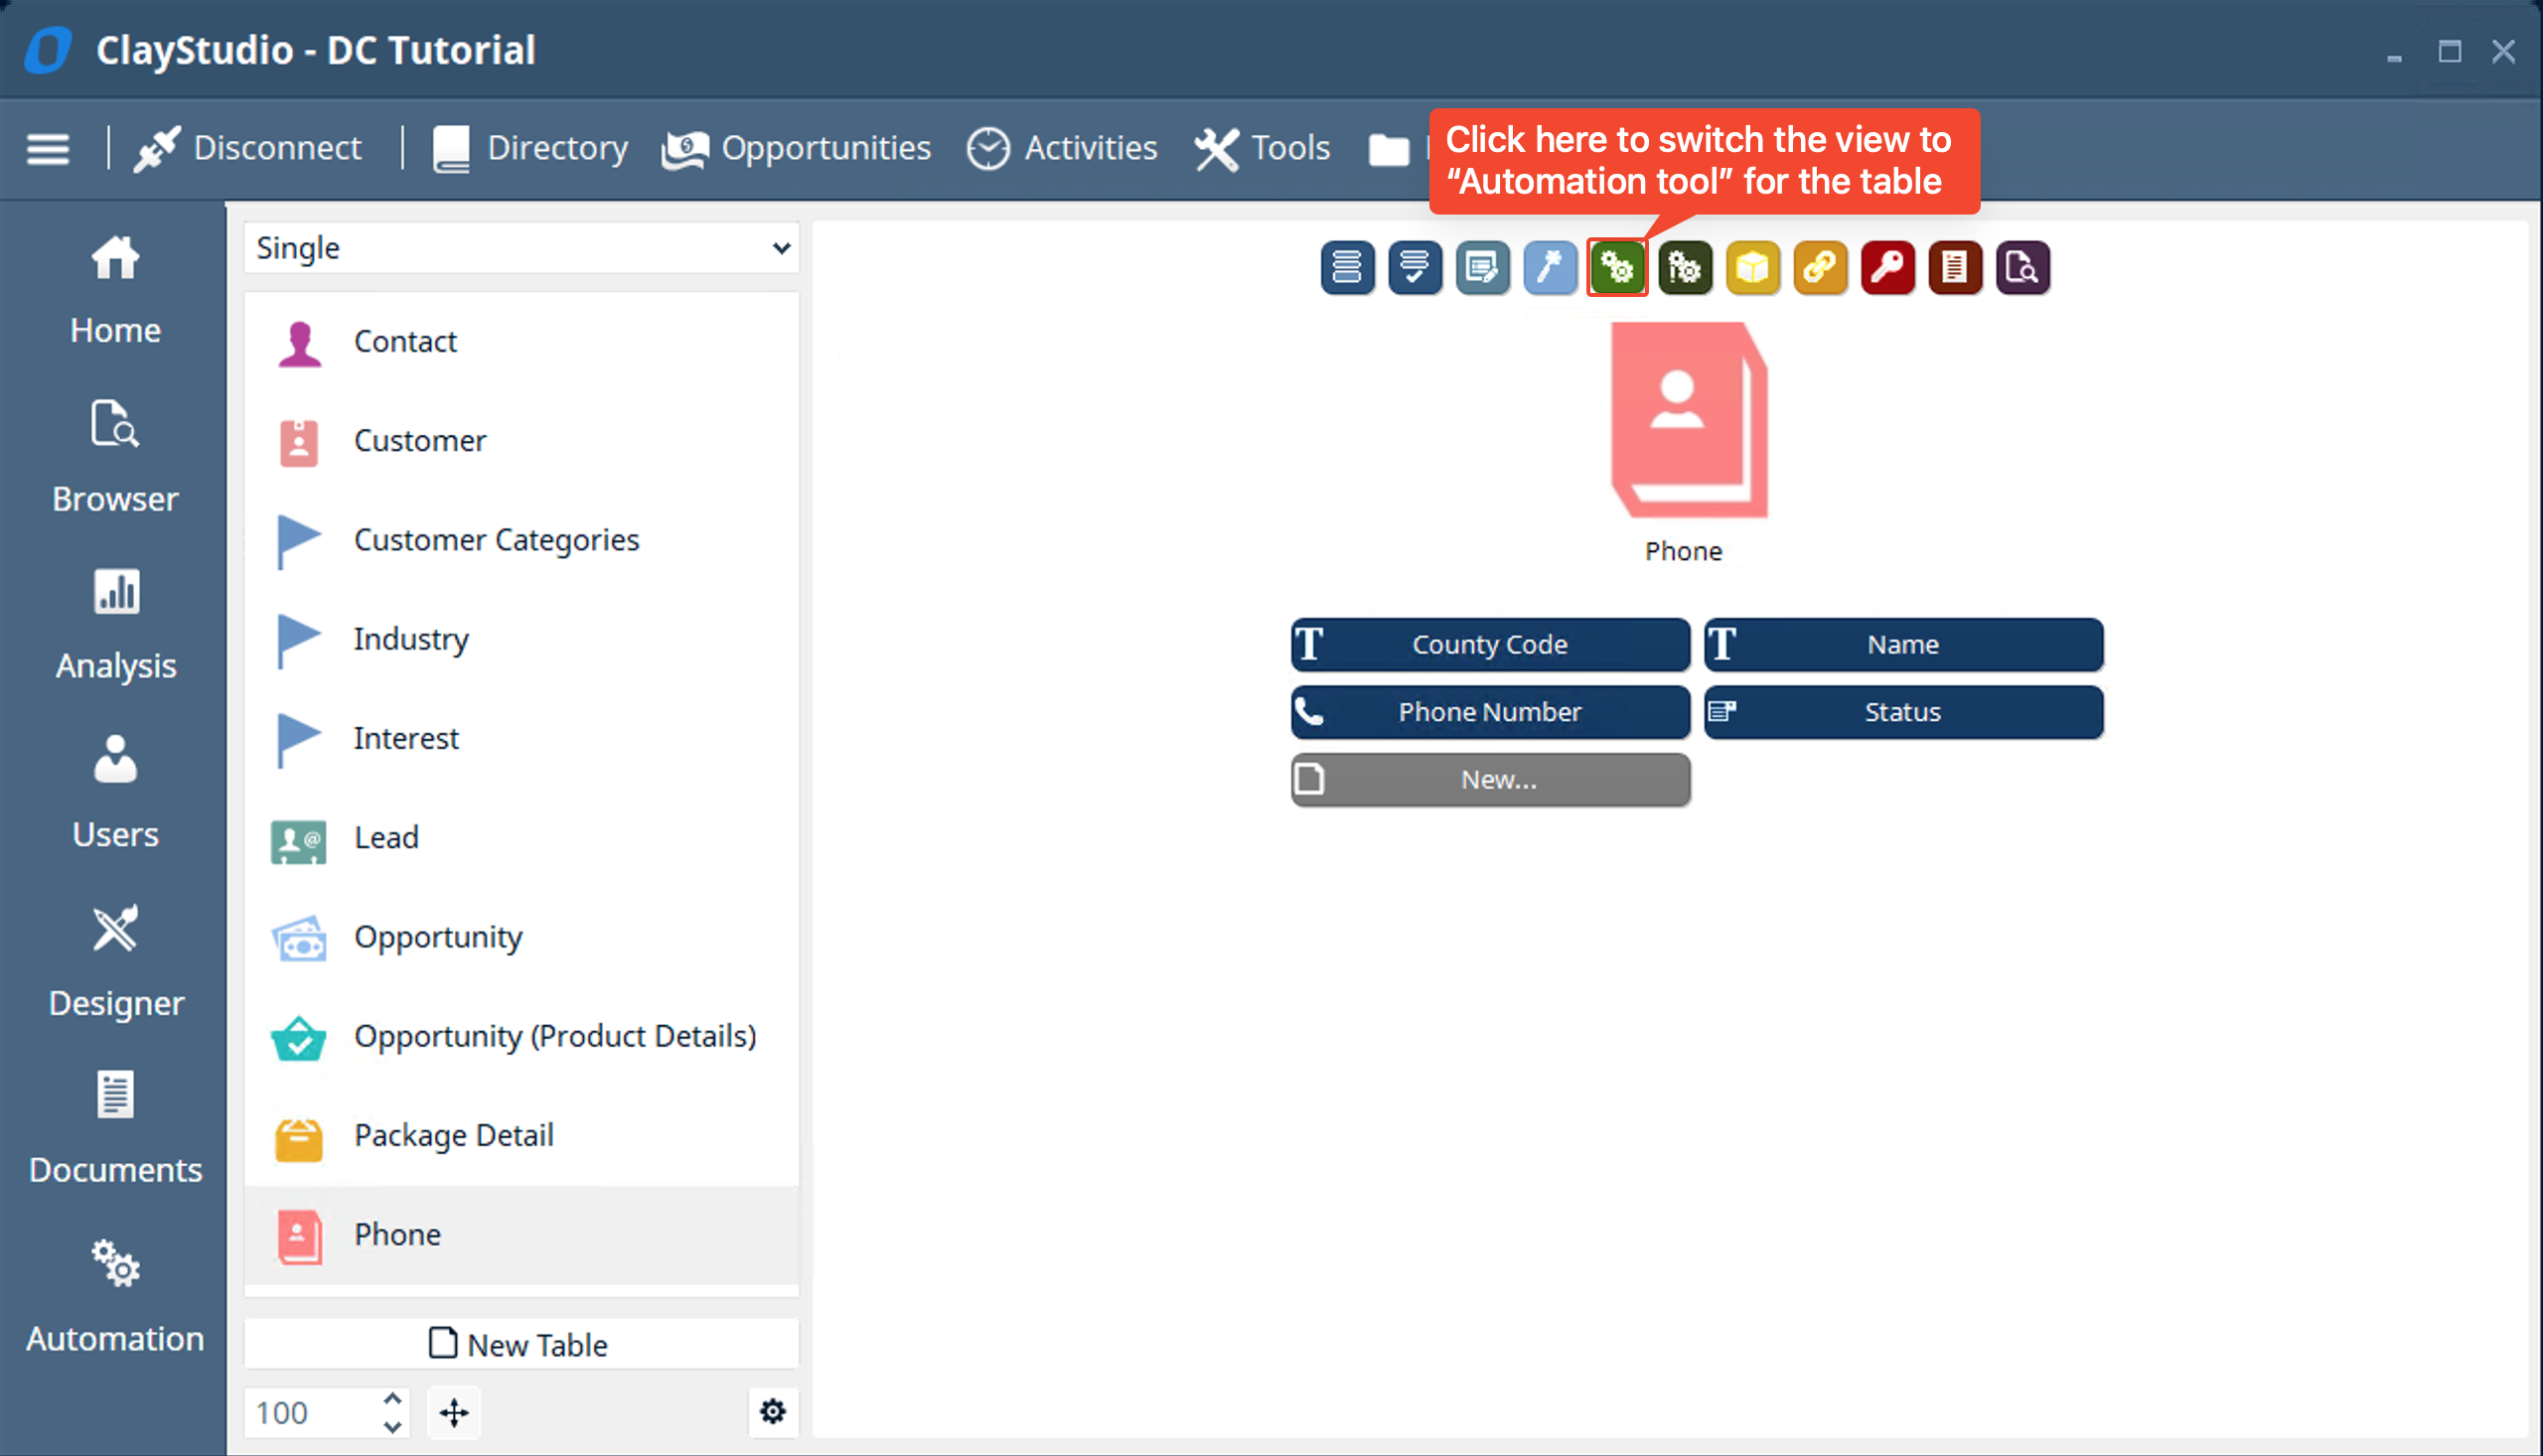
- To do this, in the Designer view of the phone table, click on the “Automation tool” button in the phone table as shown in the screenshot below.
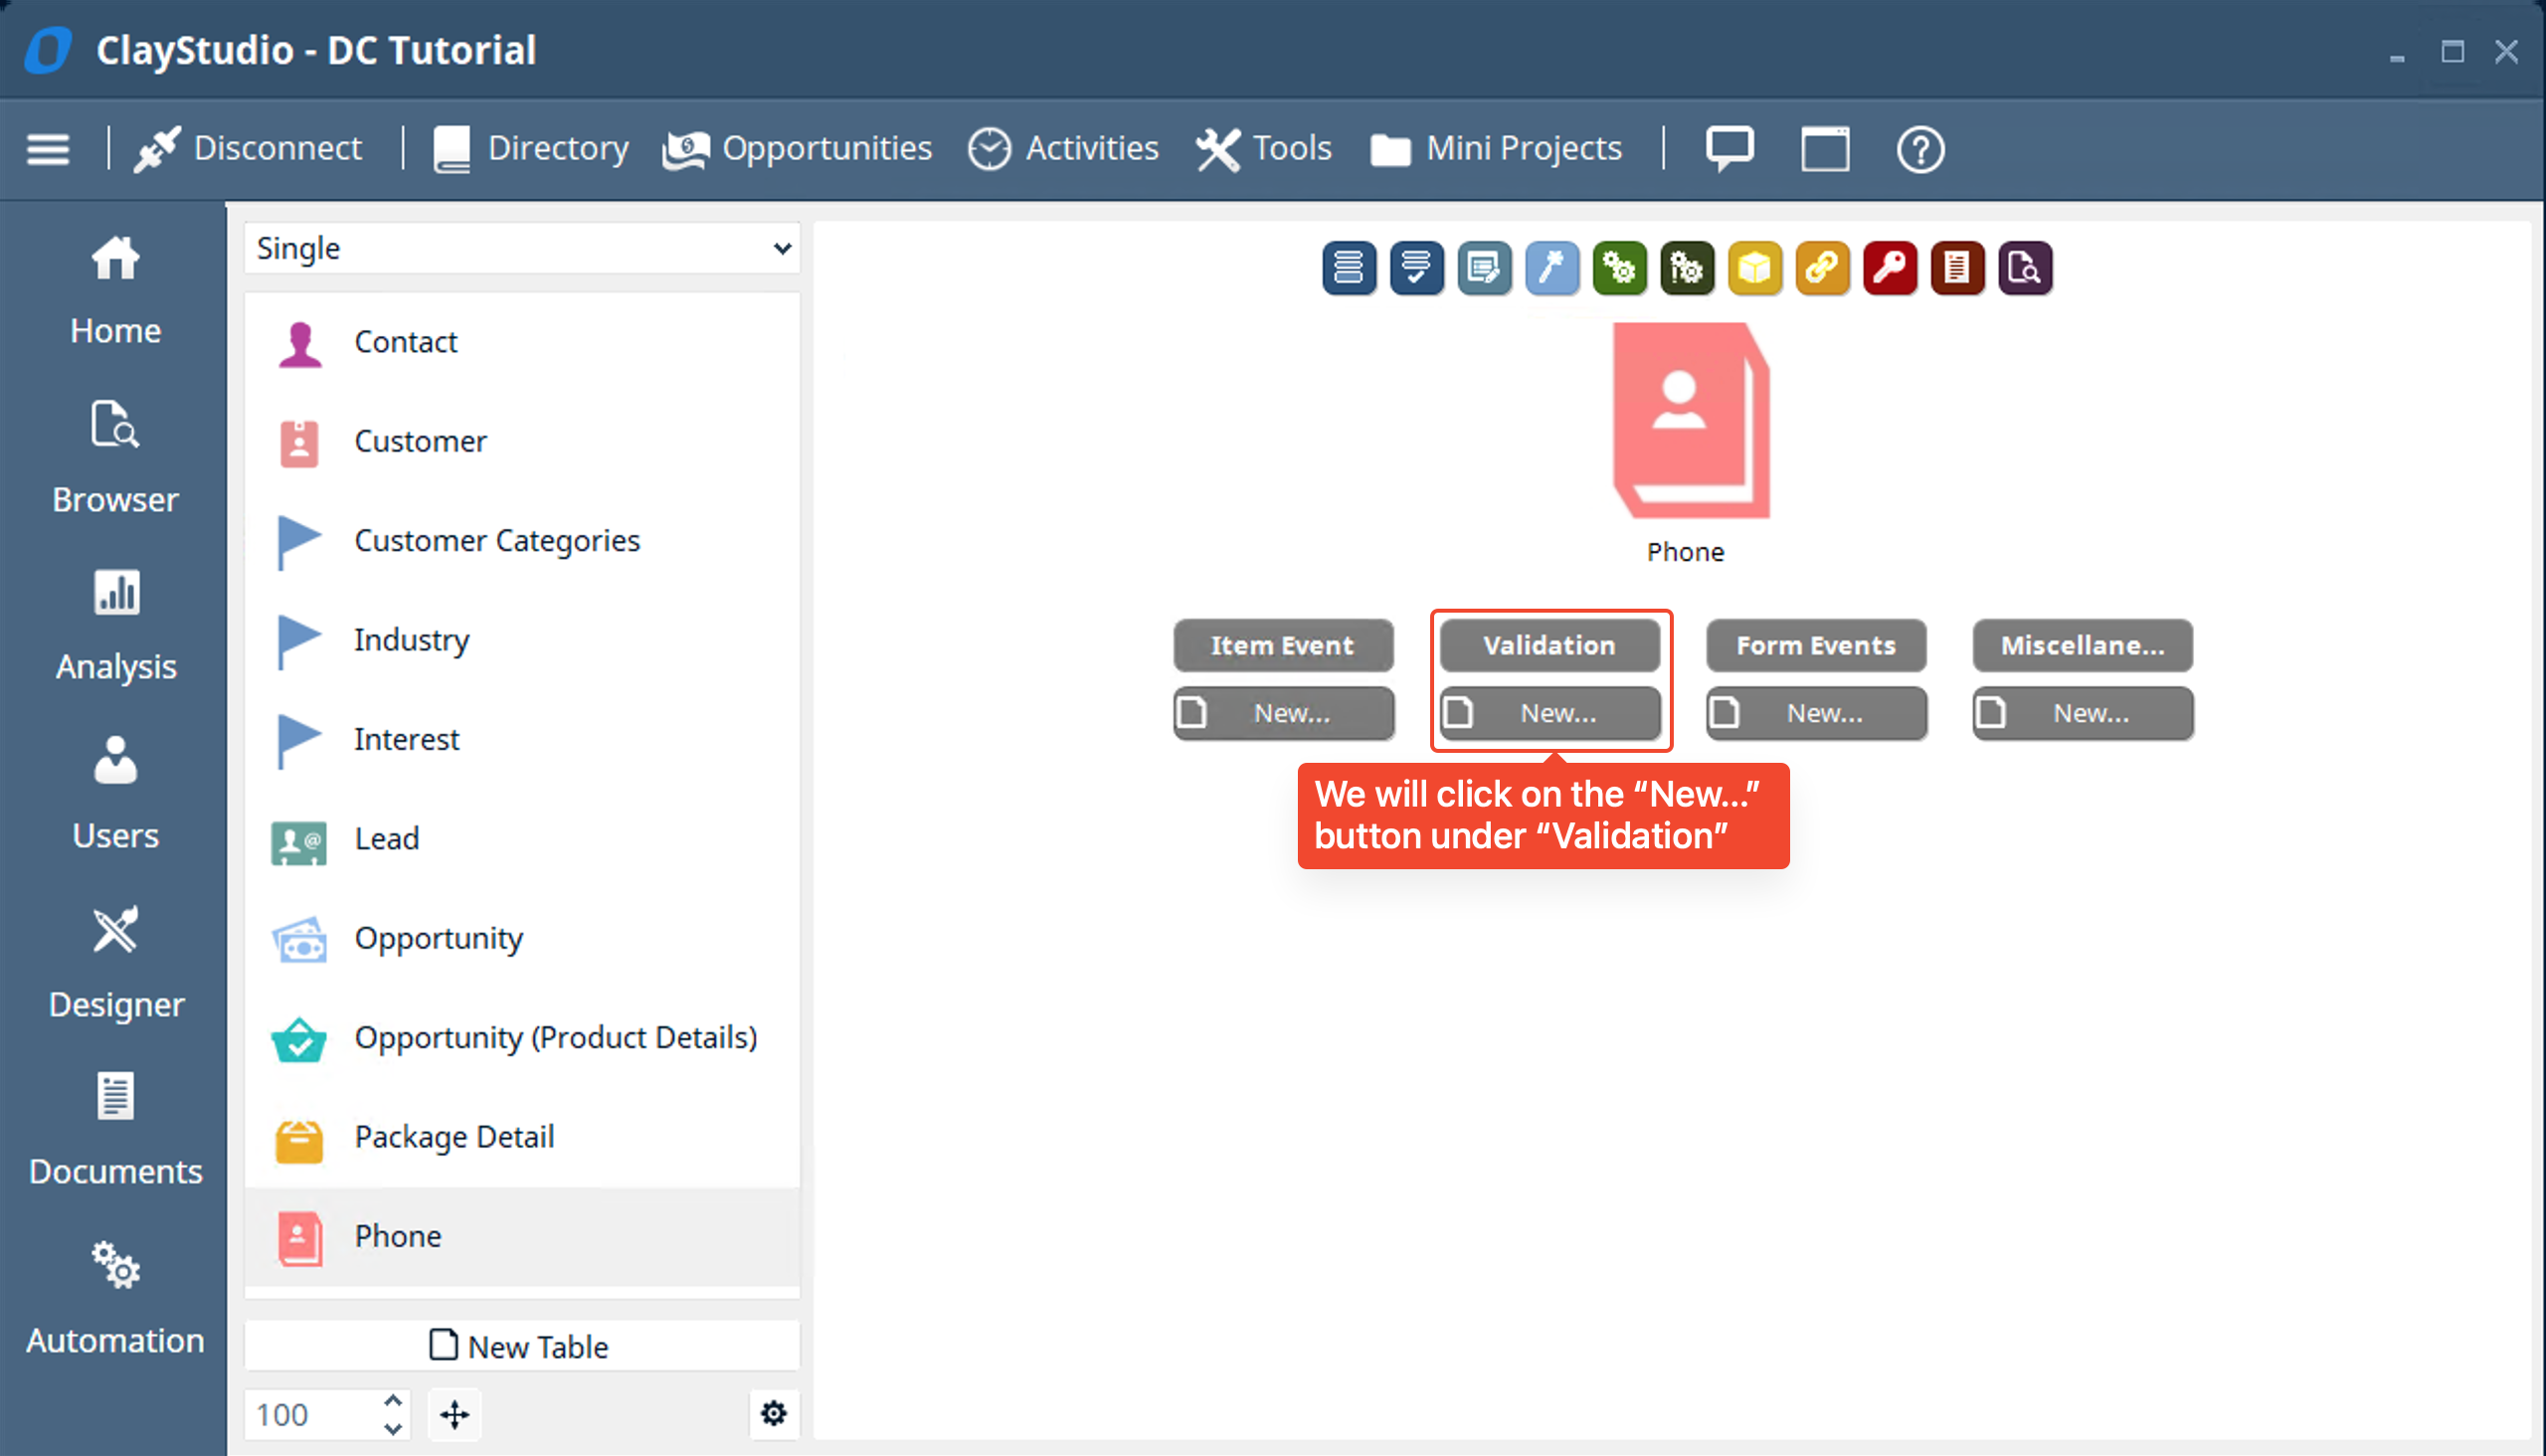
- If we want to automatically display a custom error message when adding/changing an item we will want to use a “Validation Automation”. This automation type allows you to display a custom error message if a specific filter that you set does not match the value in a specific field. So let’s click on “New…” to create our first “Validation” automation in clay
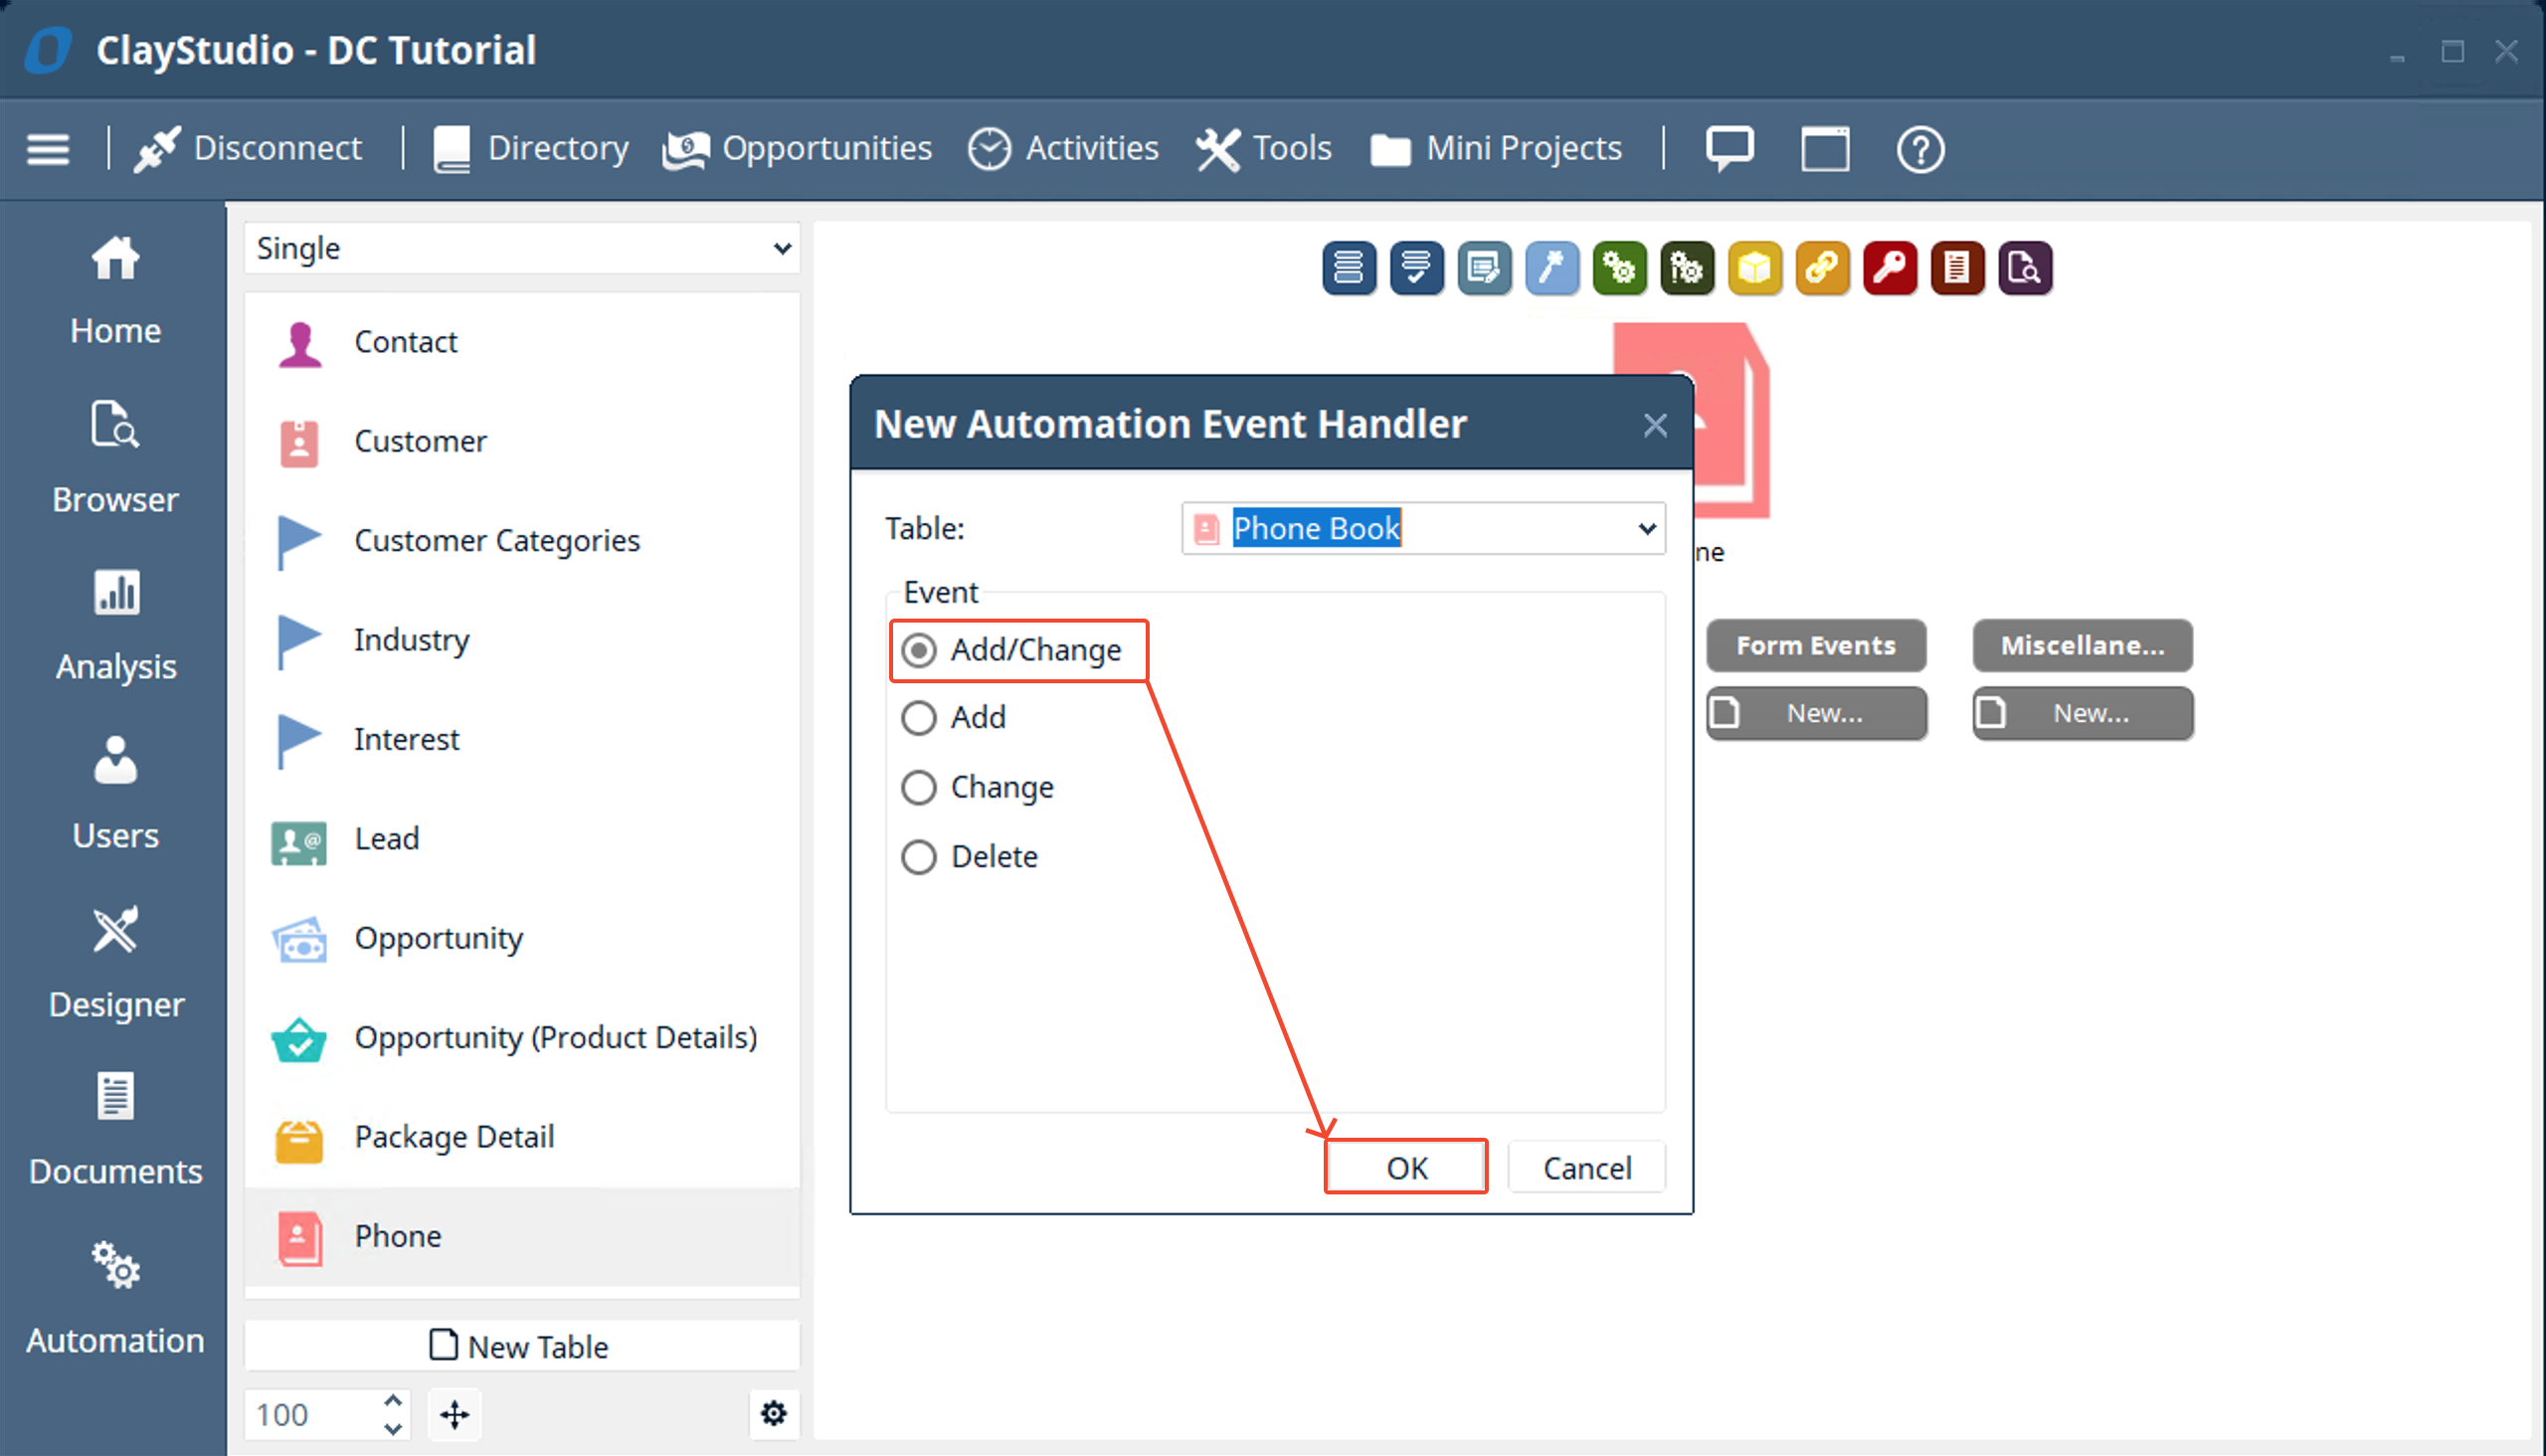
- A small window shows up asking to choose the “Event Type” that should cause the automation to run. Since we want this automation to run when a phone item is added or changed we will select “Add/Change”
- Automations will be covered in more depth in future mini projects with a higher level complexity as automations is an incredibly powerful and feature packed tool that can do any automation you can think of
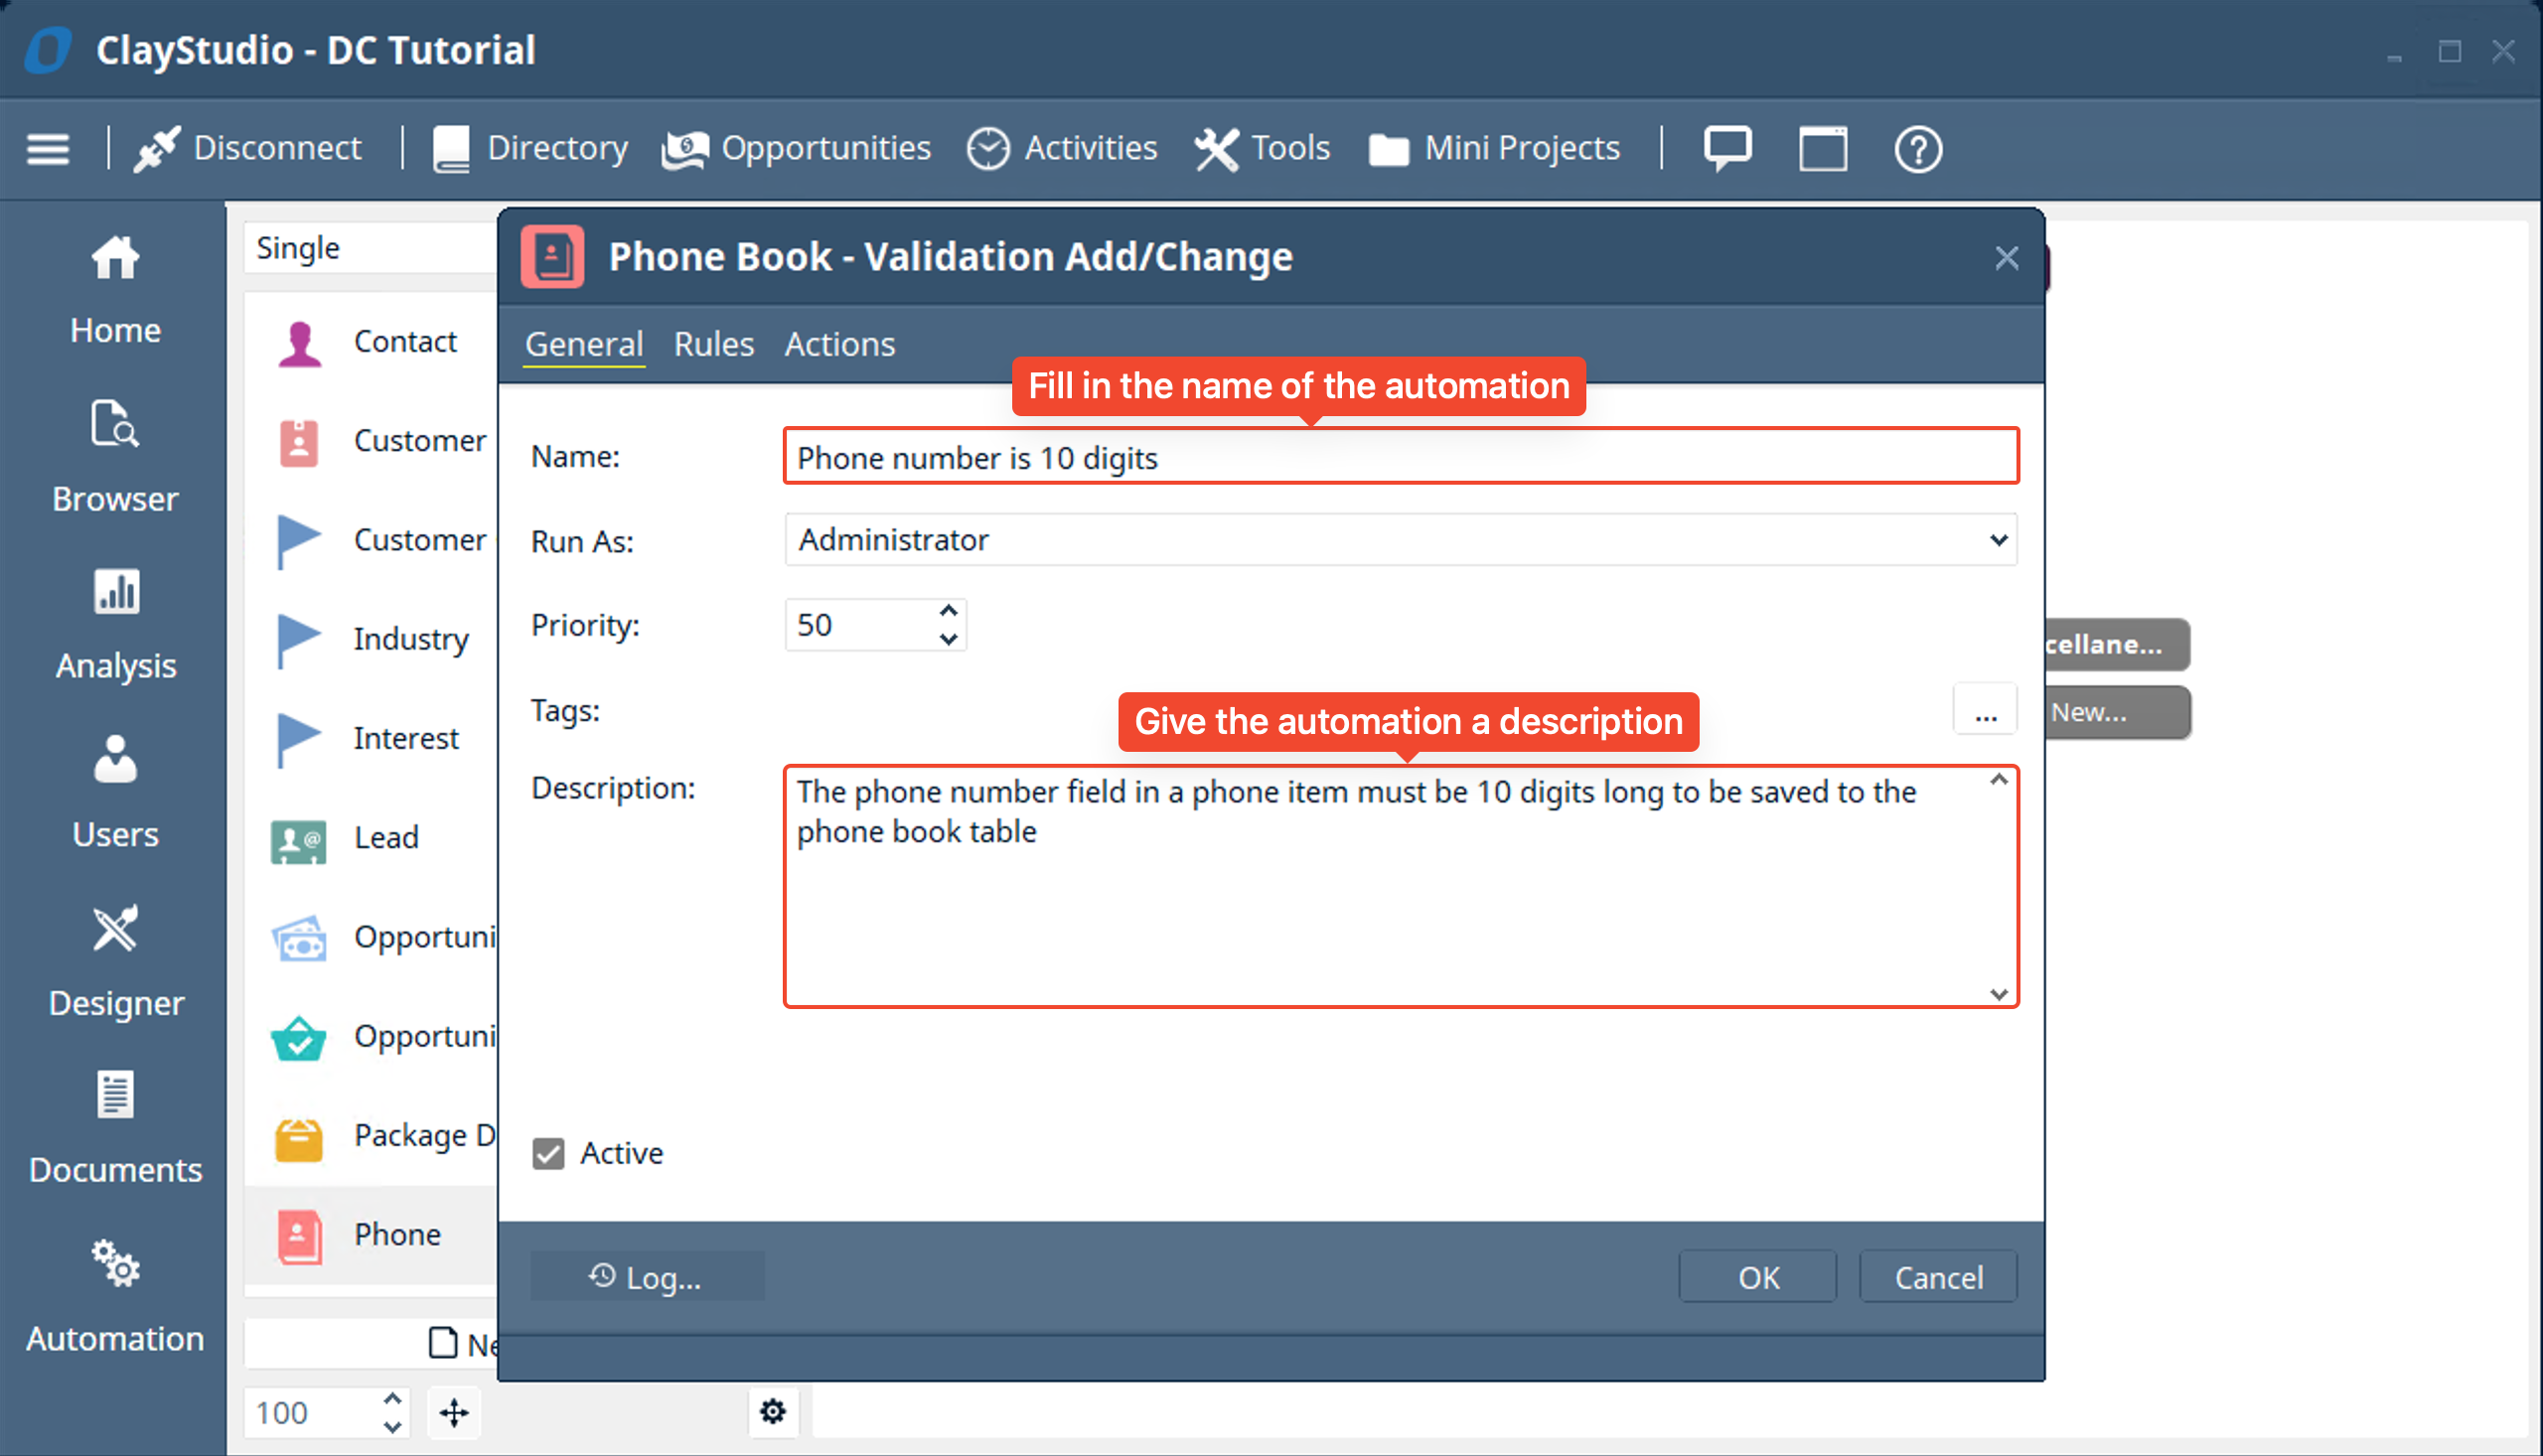
- There are a few options to fill out here. For now to keep the complexity low just fill out the “Name” of the automation as well as the “Description” of what the automation will do
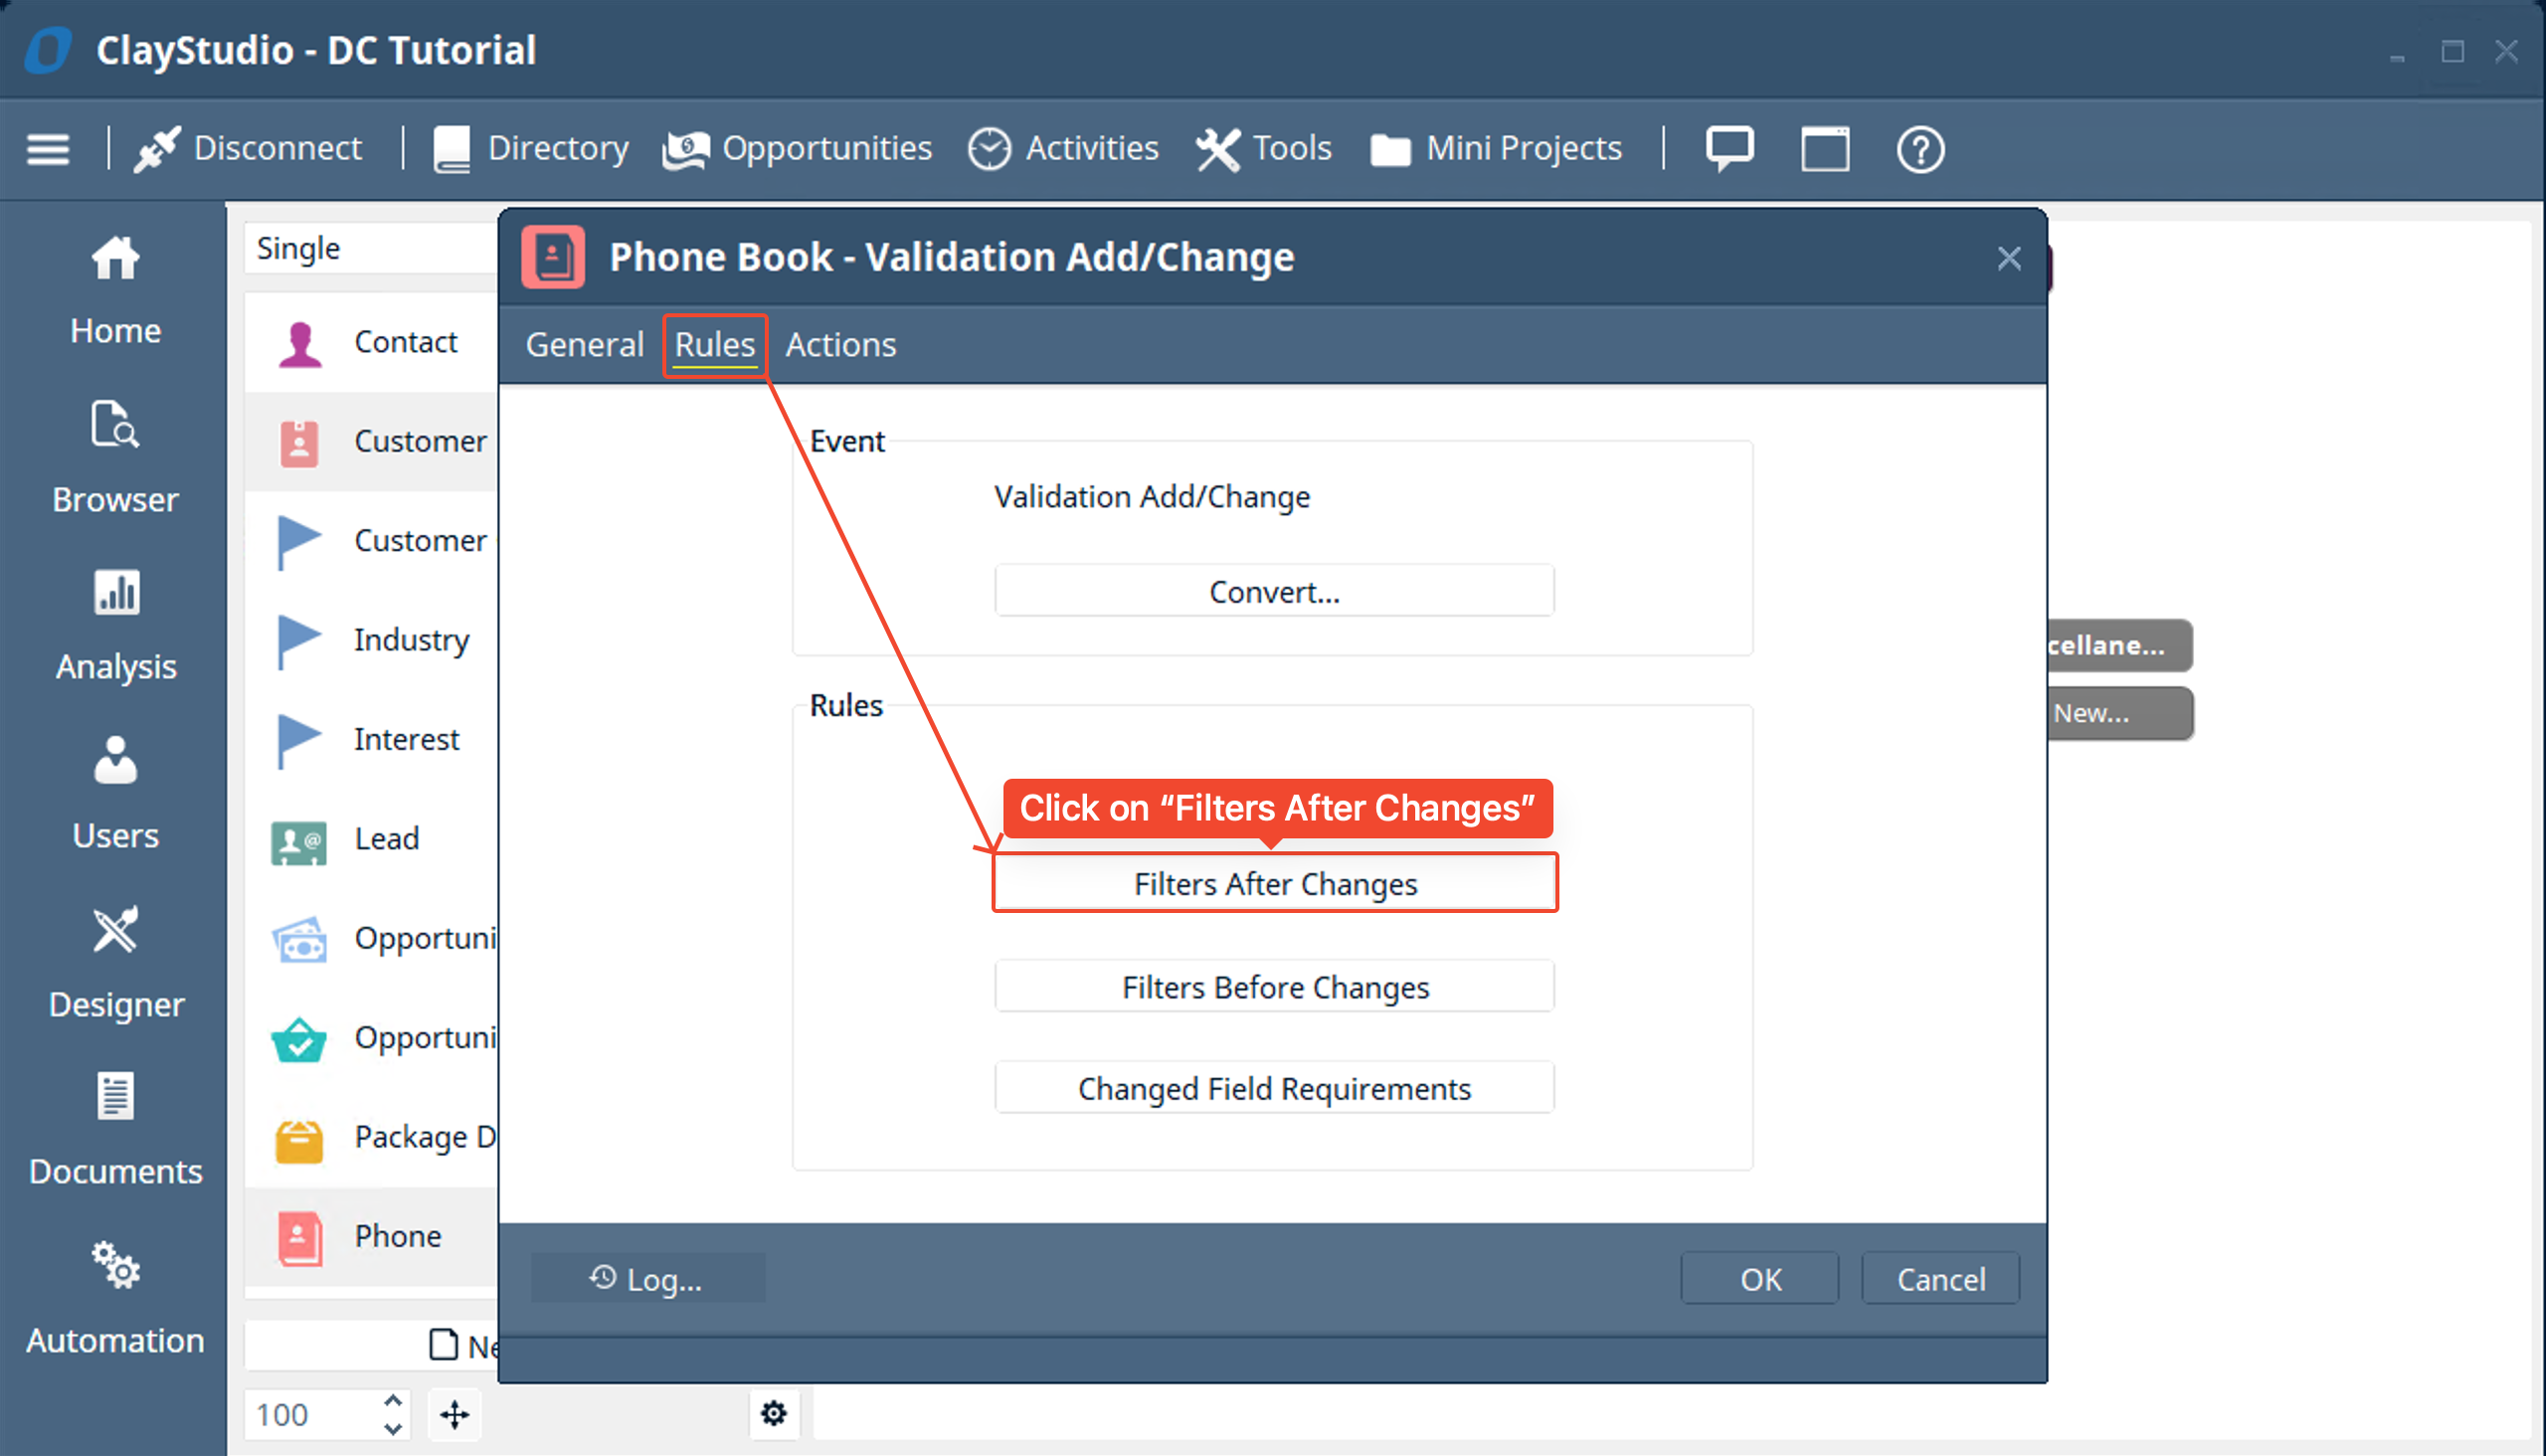
- Next we will click on the “Rules” tab. This tab allows us to choose a filter rules that will determine if an error message pops up or not when adding or changing an item to the phone book table. Click on “Filters After Changes” so that you can specify the filter rules for when the error message will show up
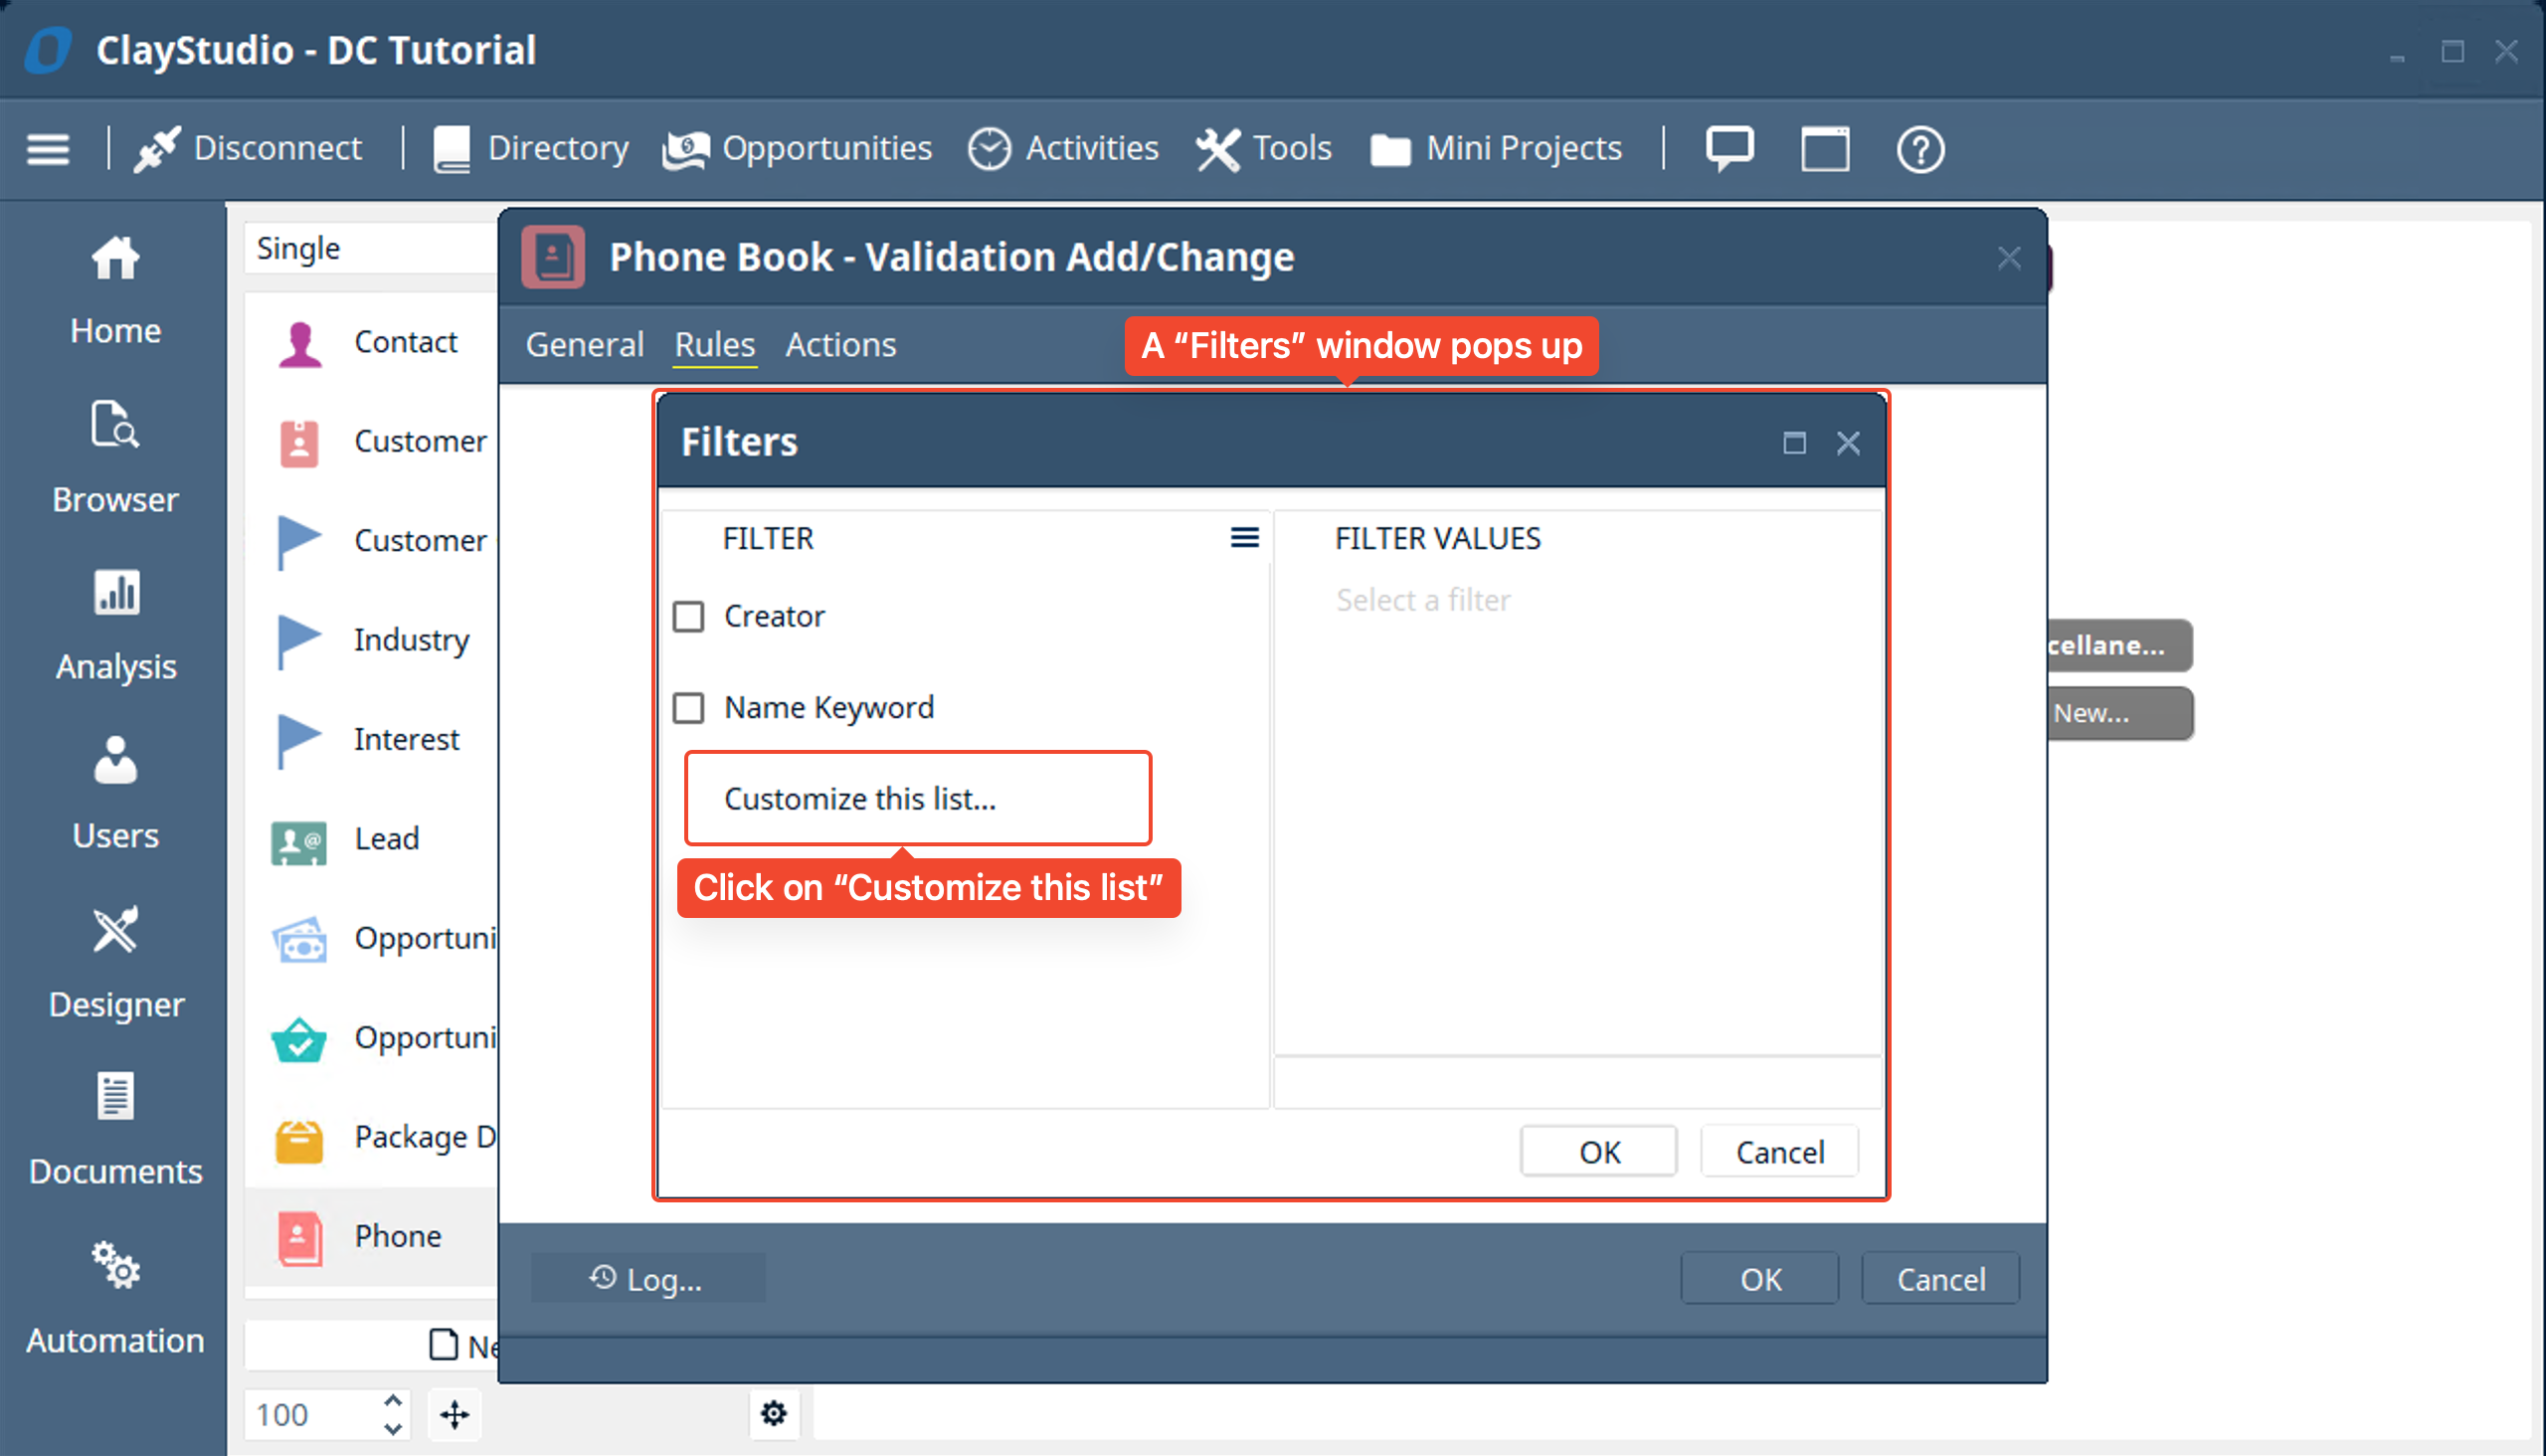
- A filters window will pop up with a list of a couple fields to filter by… Click on customize this list to add a custom filter.
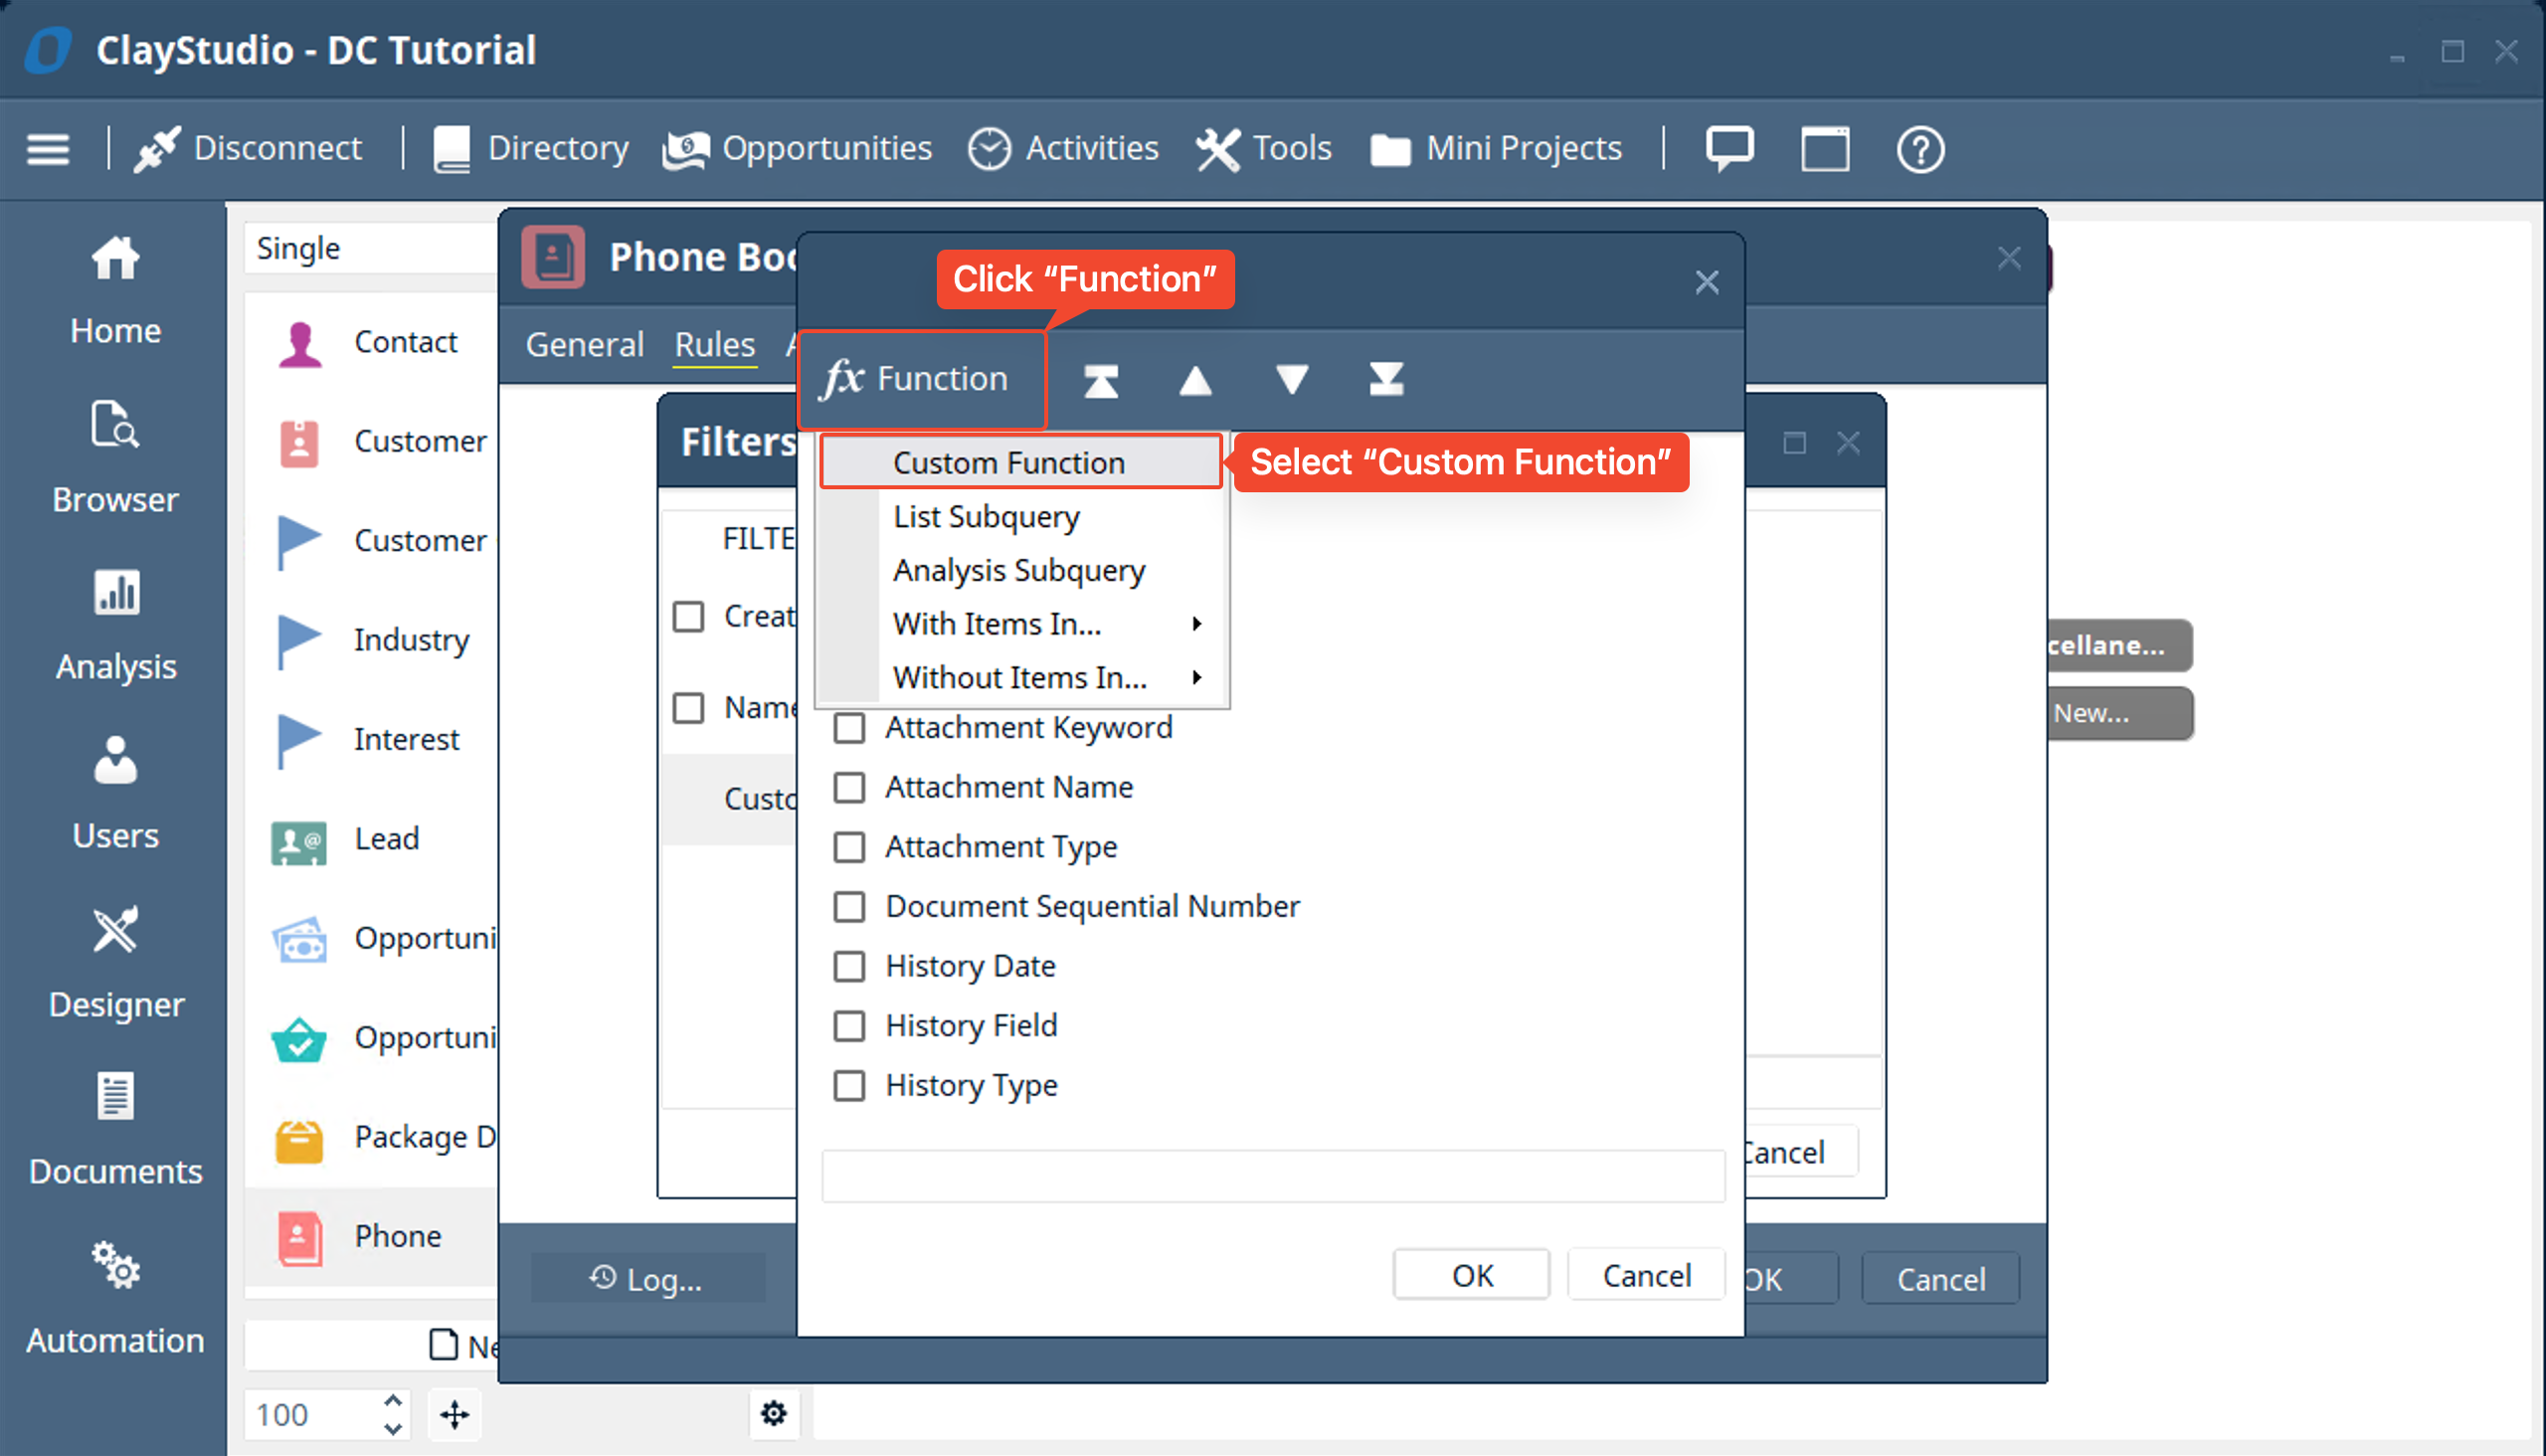
- Since we want to check if the “Phone Number” field has 10 digits in it we will need to have a “custom function filter”. The custom function will count the length of how many digits are in the “Phone Number” field. So Click on “Function” and select “Custom Function” from the dropdown.
- Note: the reason we don’t just choose to filter by the “Phone Number” field itself is because we will only be able to filter by the values of the specific field and not the length of the value
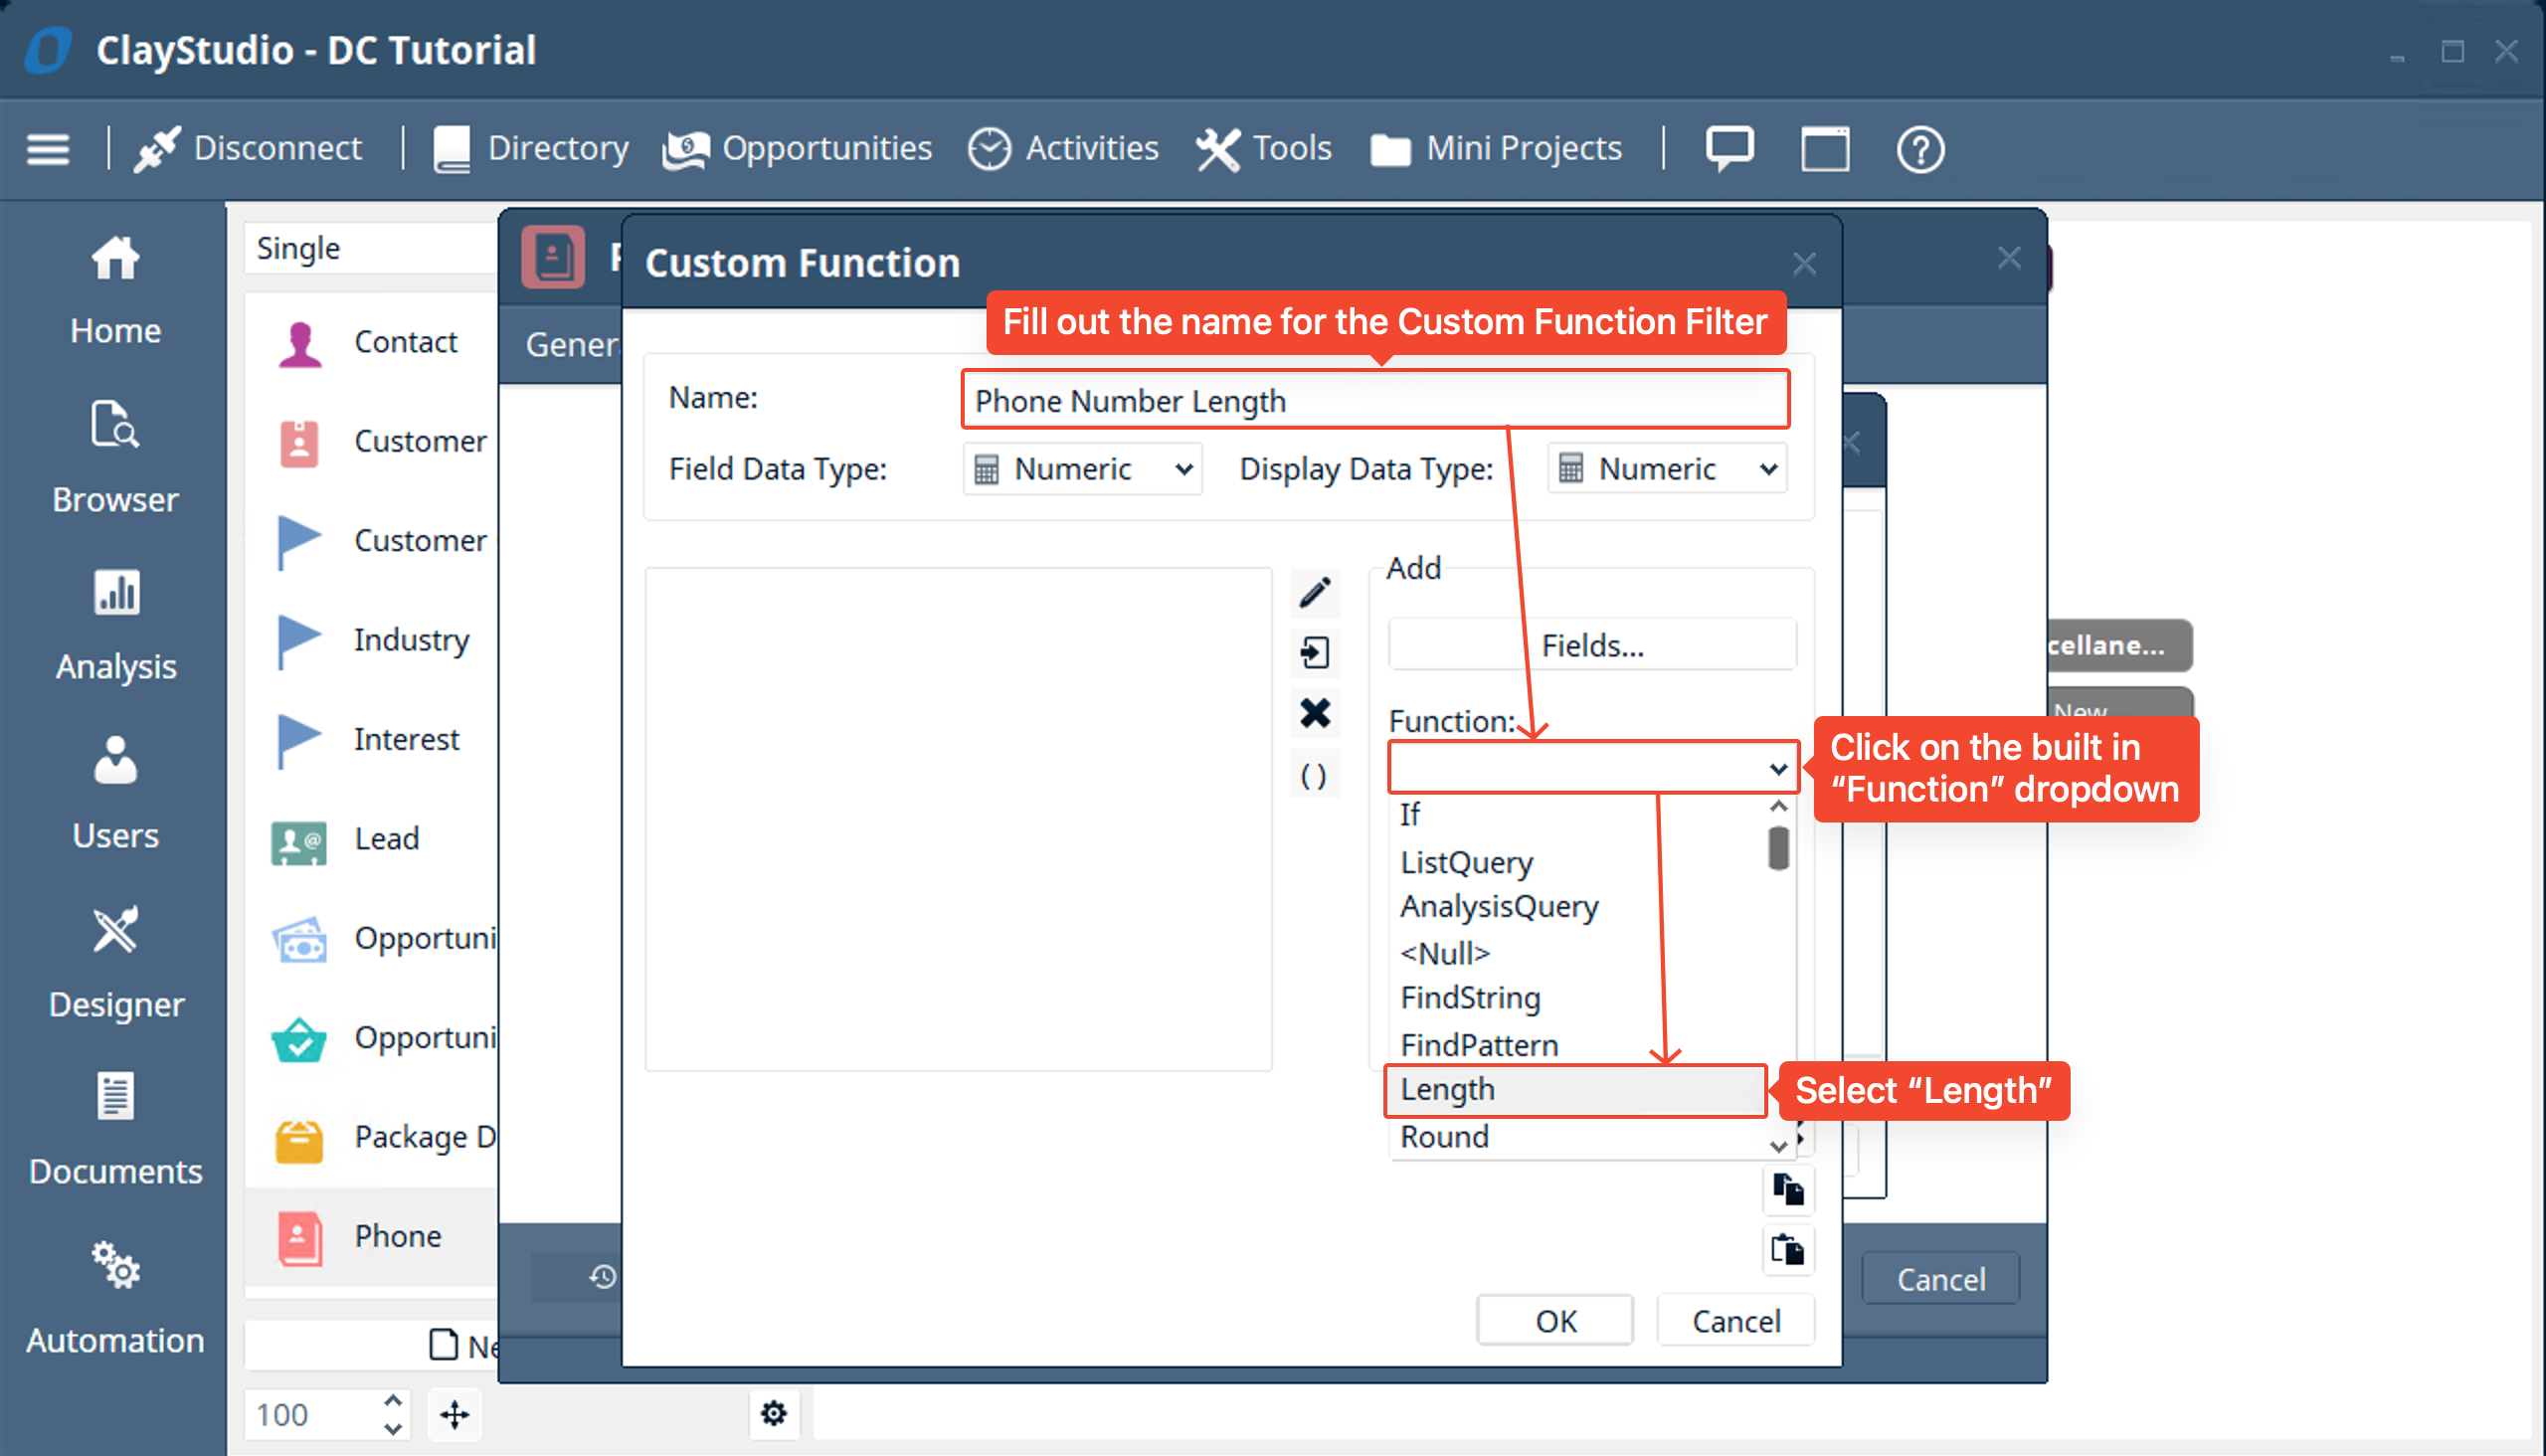
- In the custom function window fill out the Name → select the “Function” dropdown → and choose “Length”. The “Length” function is a built in function in Digital-Clay that counts the characters/digits in a text field and returns the number value of the length.
- For Example: If I have a text field filled out with “Hello World 123” then the length of this field would be 15 (this includes spaces)
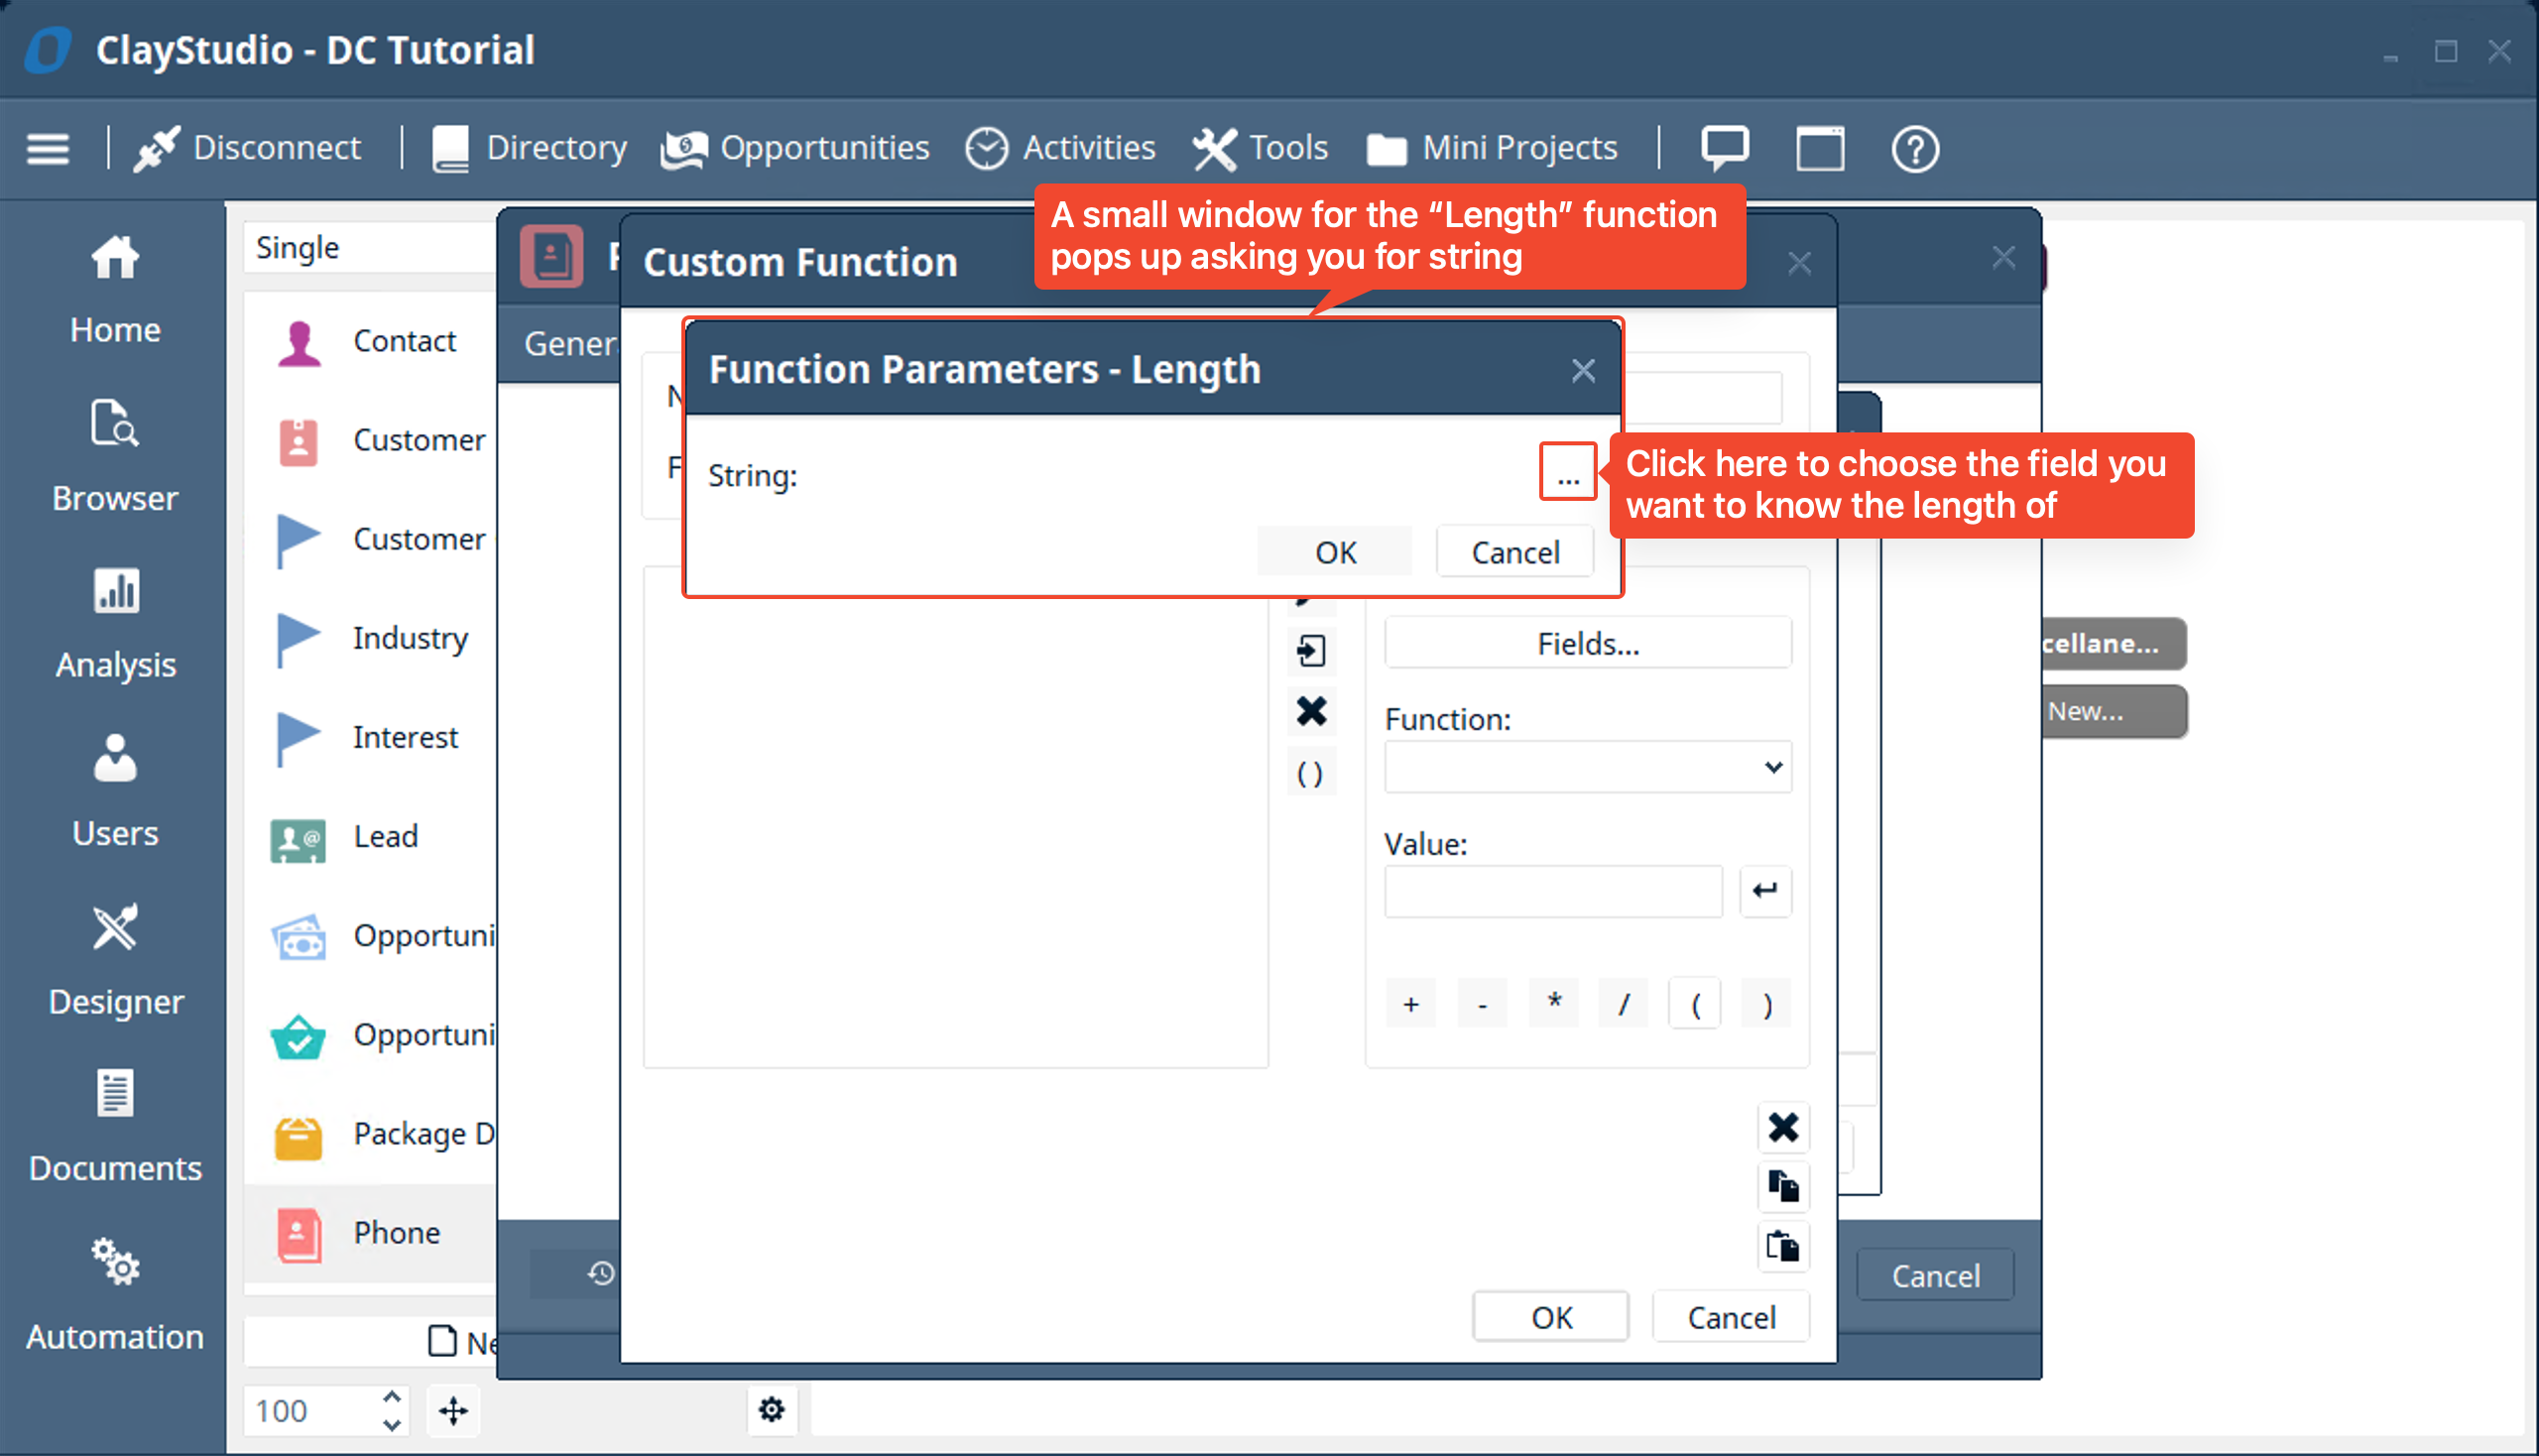
- A small window labeled “Function Parameters - Length” pops up which allows you to choose a string to calculate the length of (a string is a field of the “Text” data type). Click on the “…” to choose the field you want to calculate the length of.
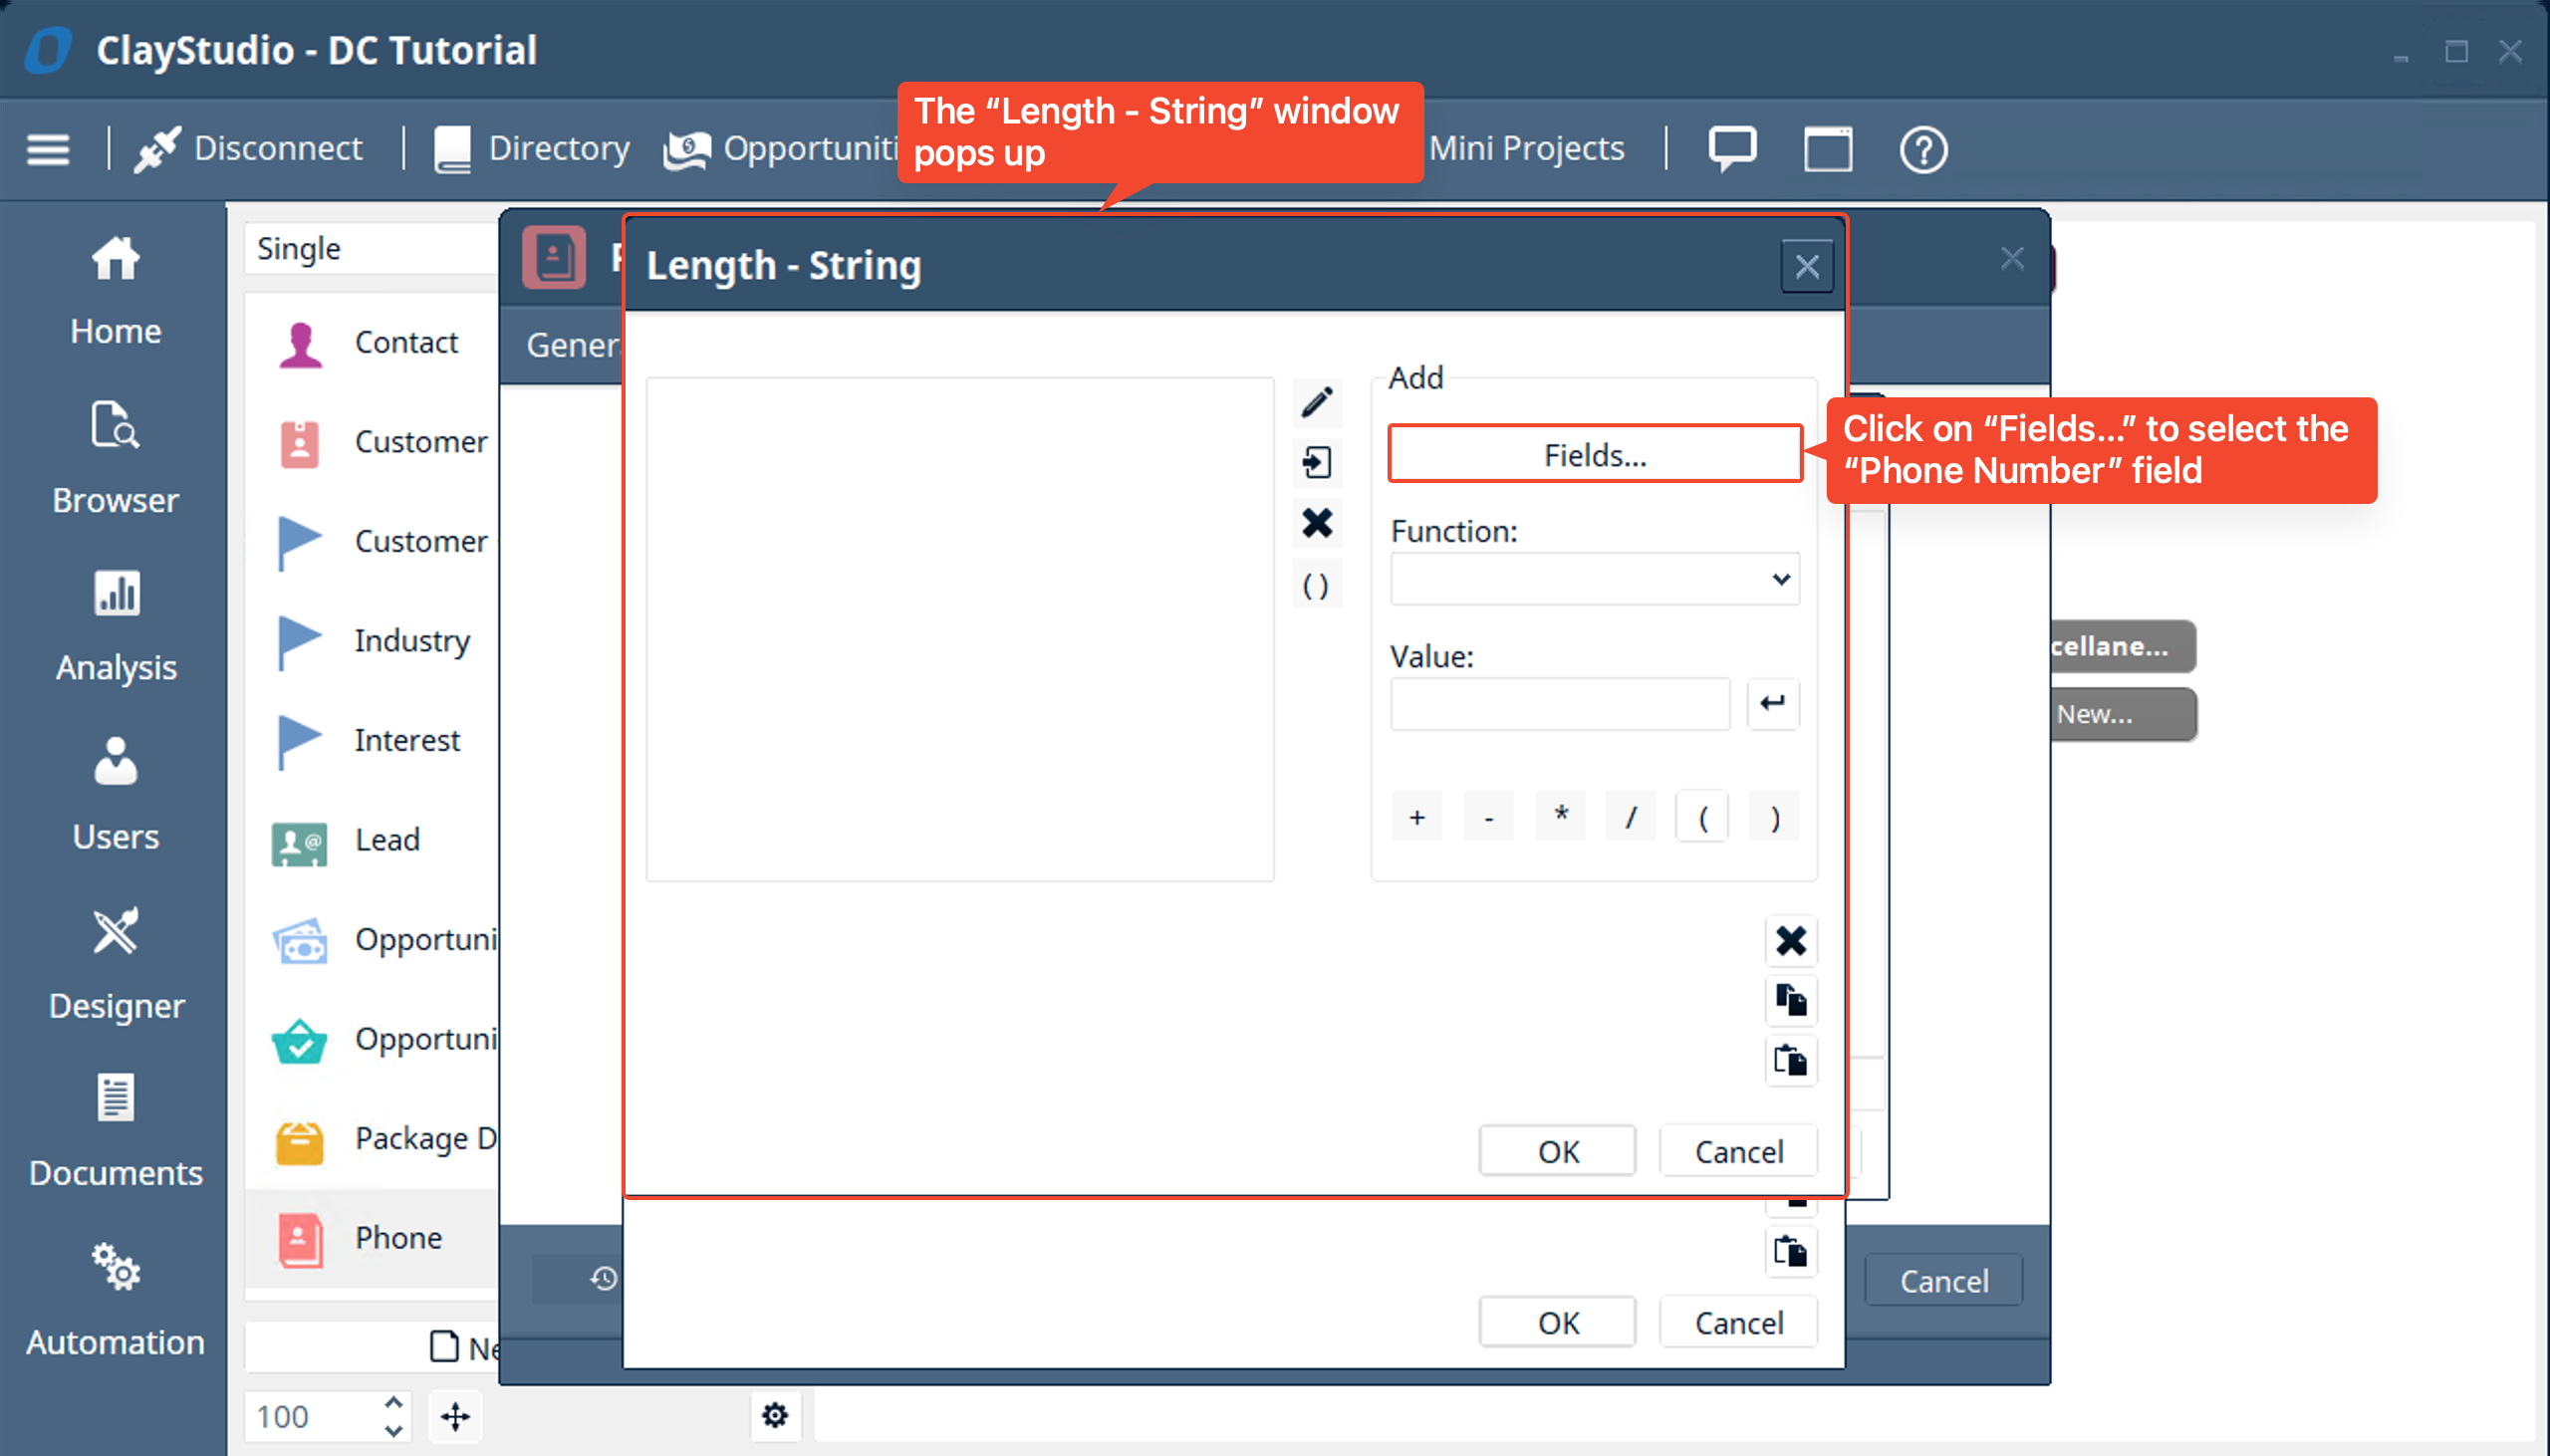
- The “Length - String” window pops up. The window is another custom function window but this one is specifically for the “Length” built in function. Here you have all the same options as a custom function except for selecting the data type (since here you are required to select a field of the “Text” data type). Click on “Fields…” to select the “Phone Number” field you want to know the length of.
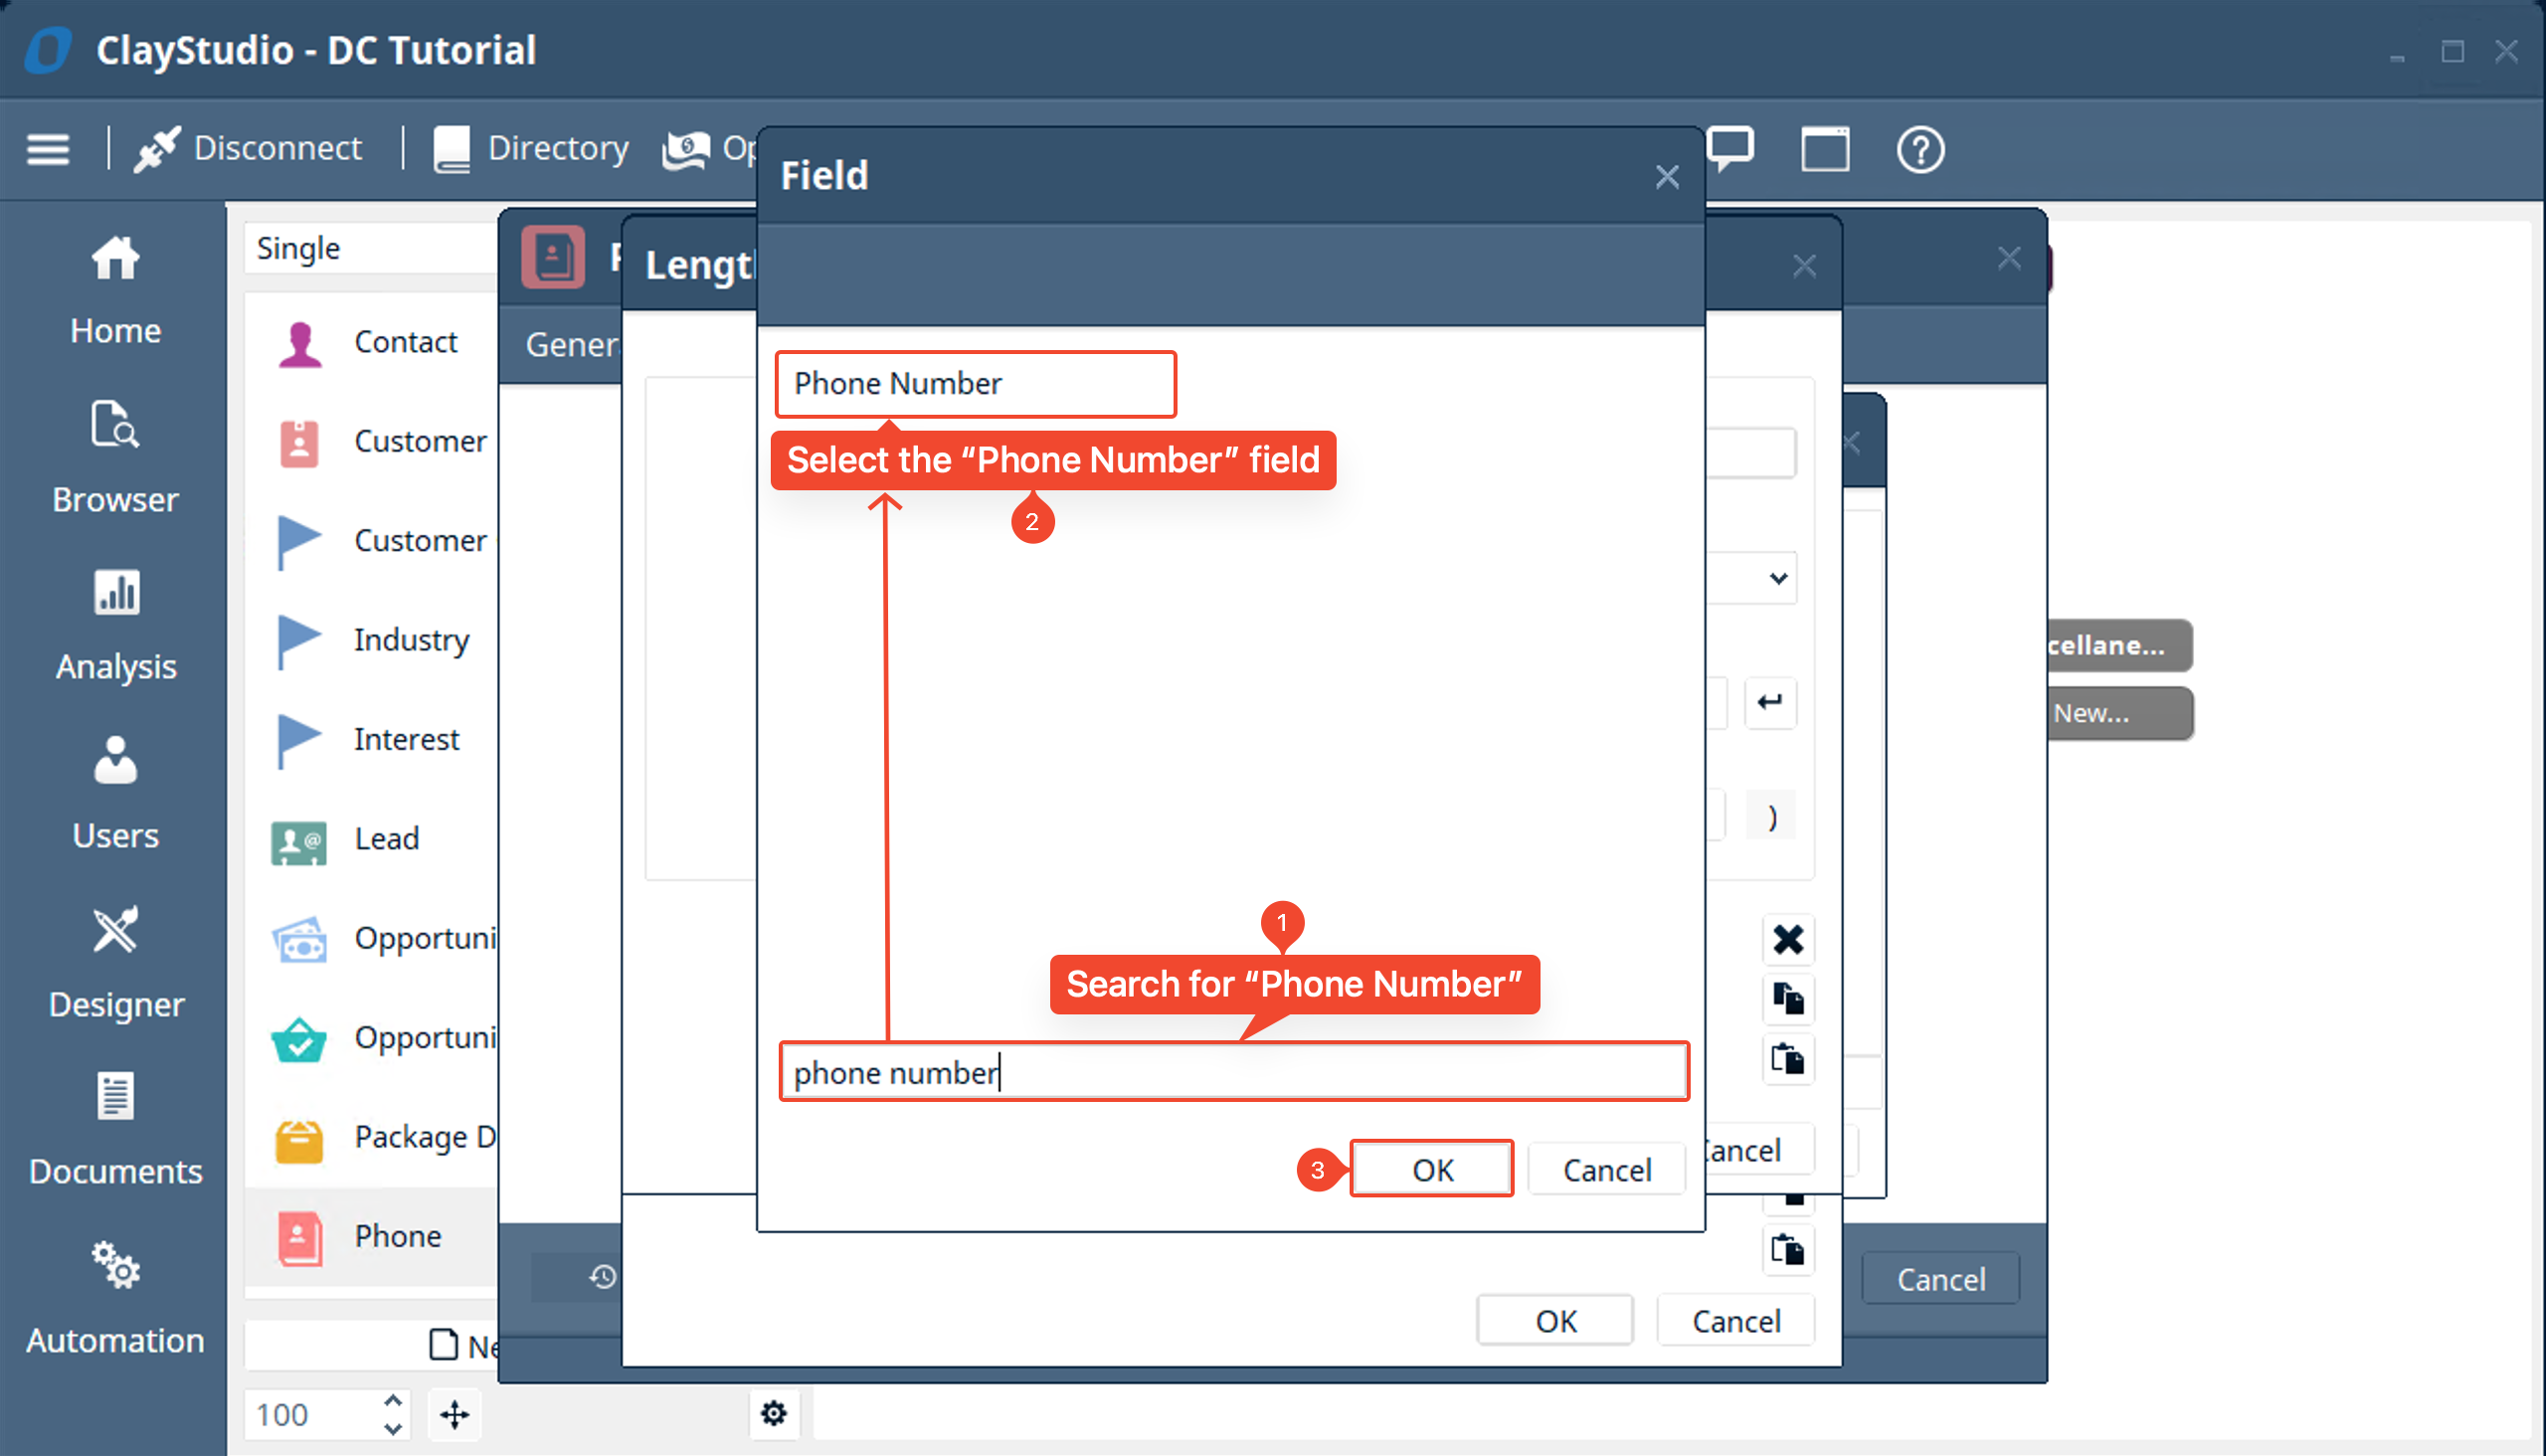
- Search for “Phone Number” and select the “Phone Number” field. Then click OK. This will choose the “Phone Number” field for the “Length” function
- The “Phone:Phone Number” field displayed. Click OK
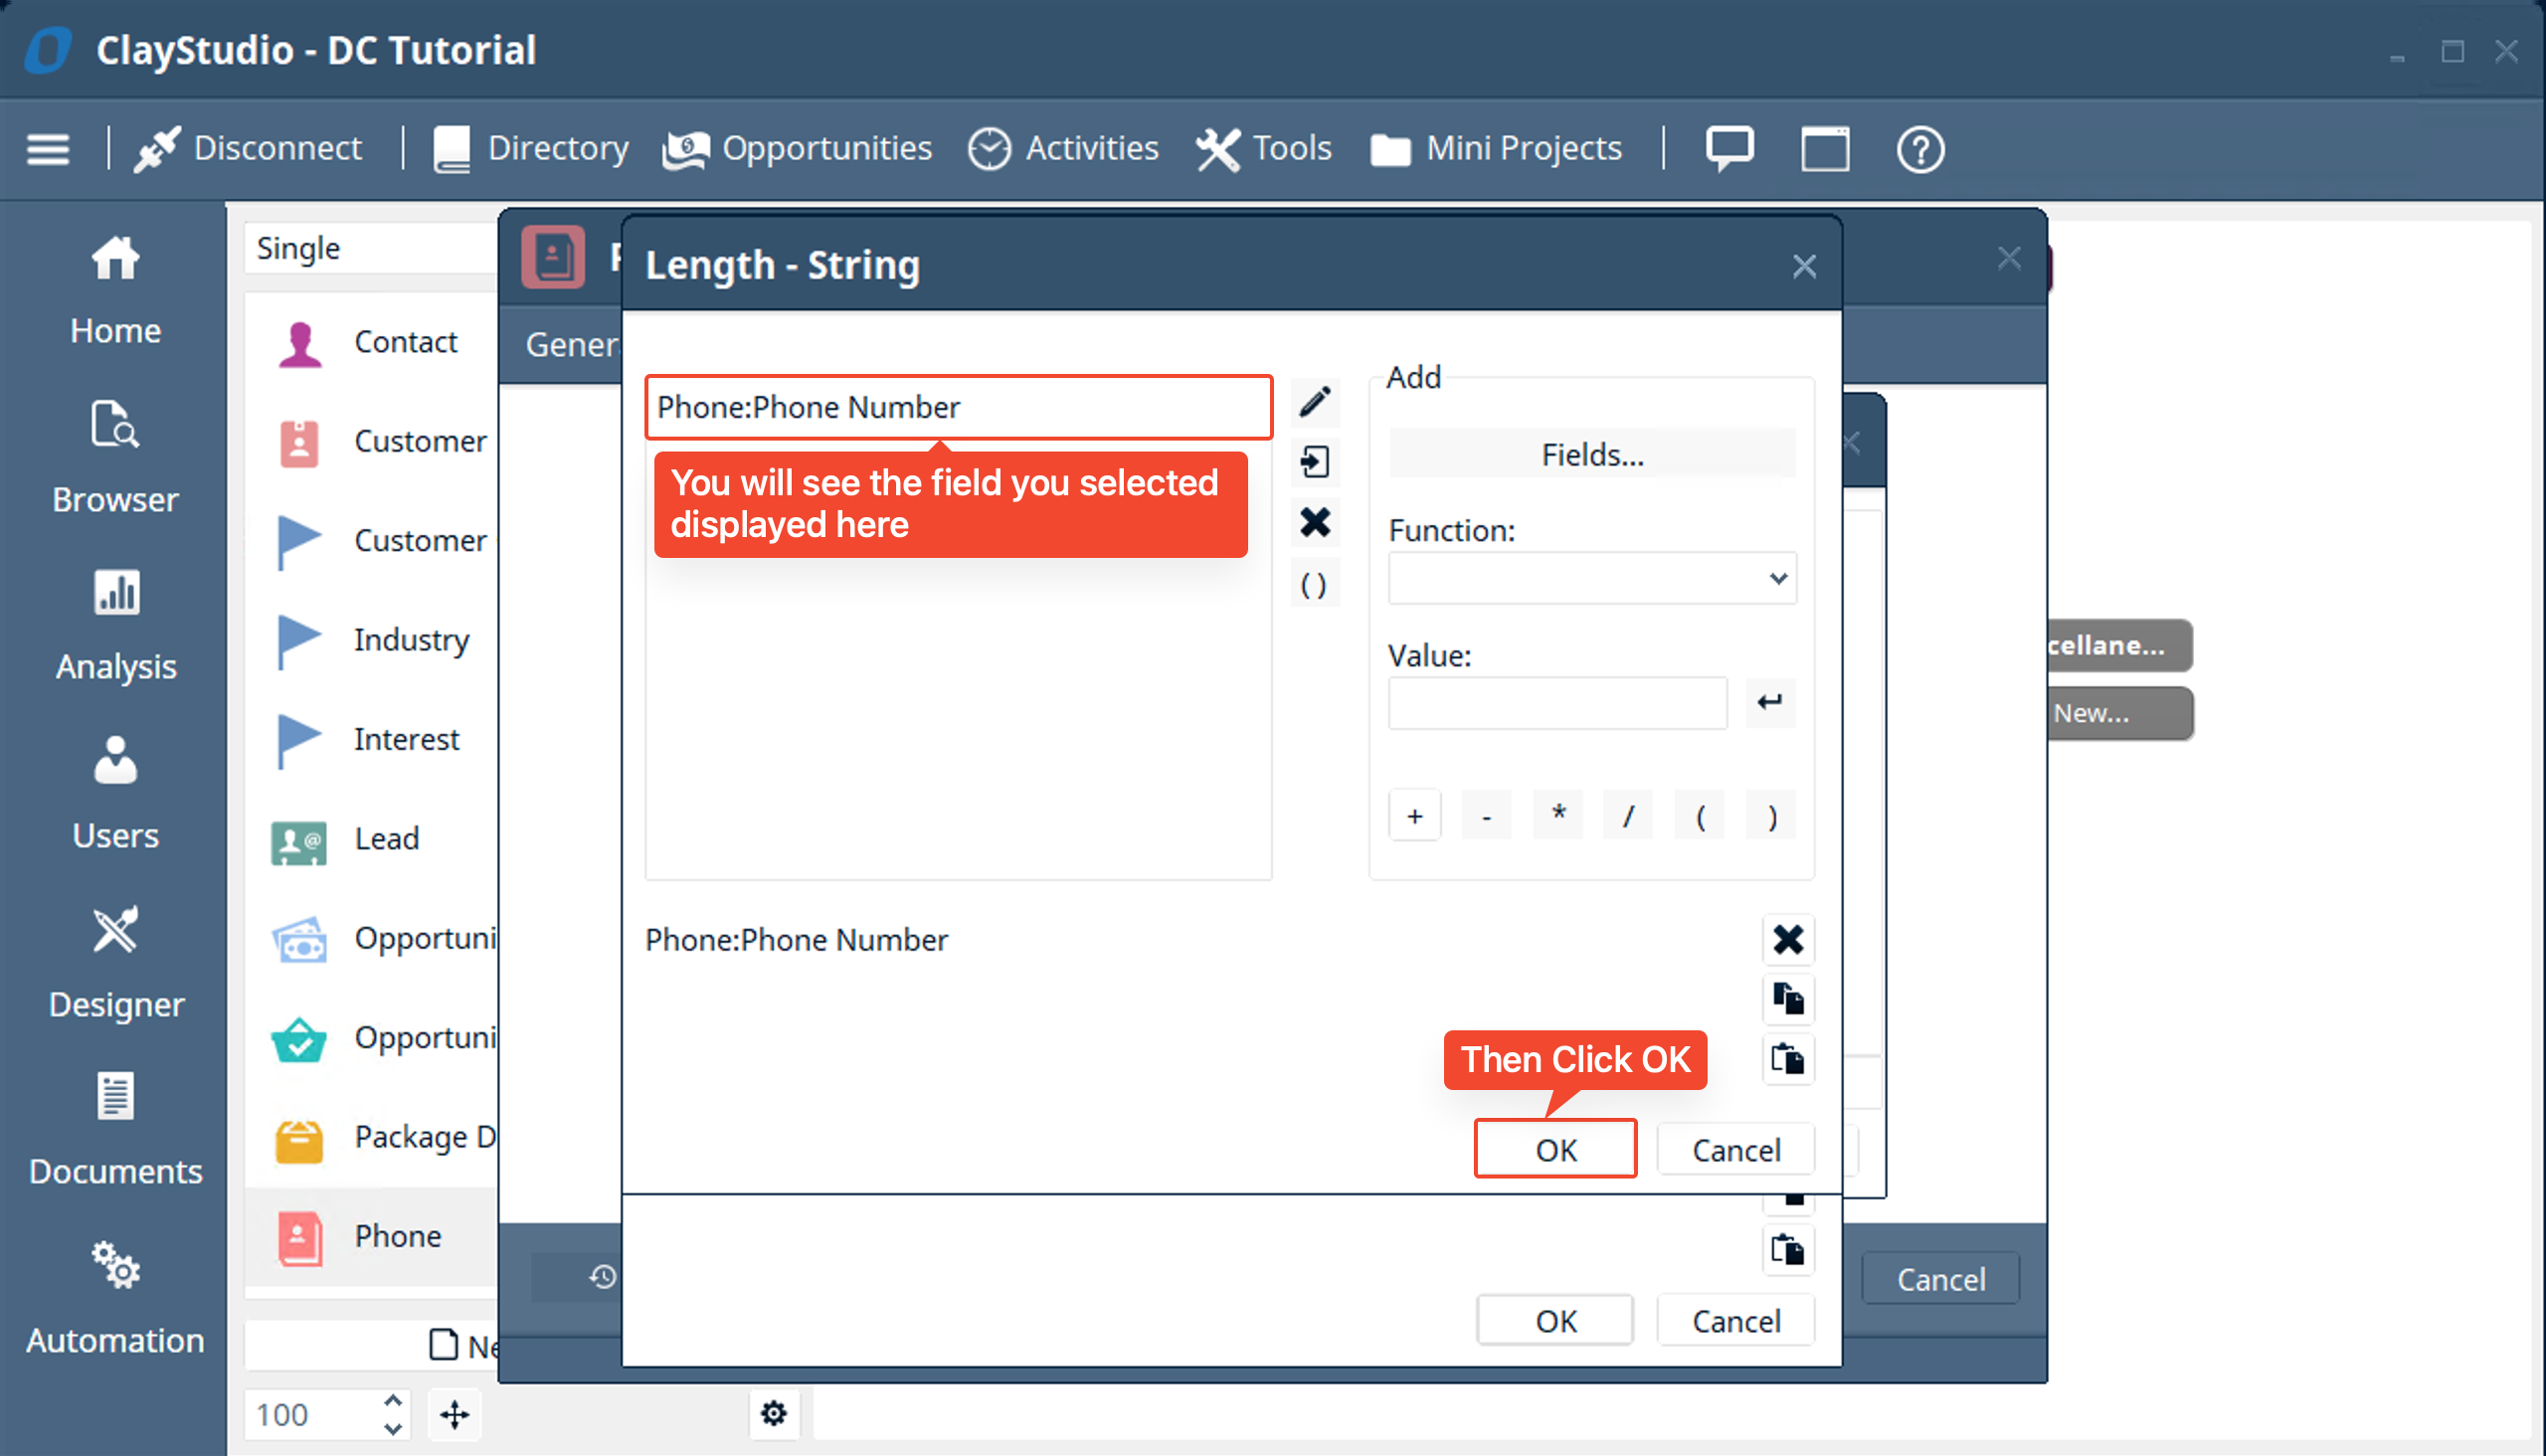
- Again you’ll see the “Phone:Phone Number” field that will be inputed to the “Length” function. Click OK
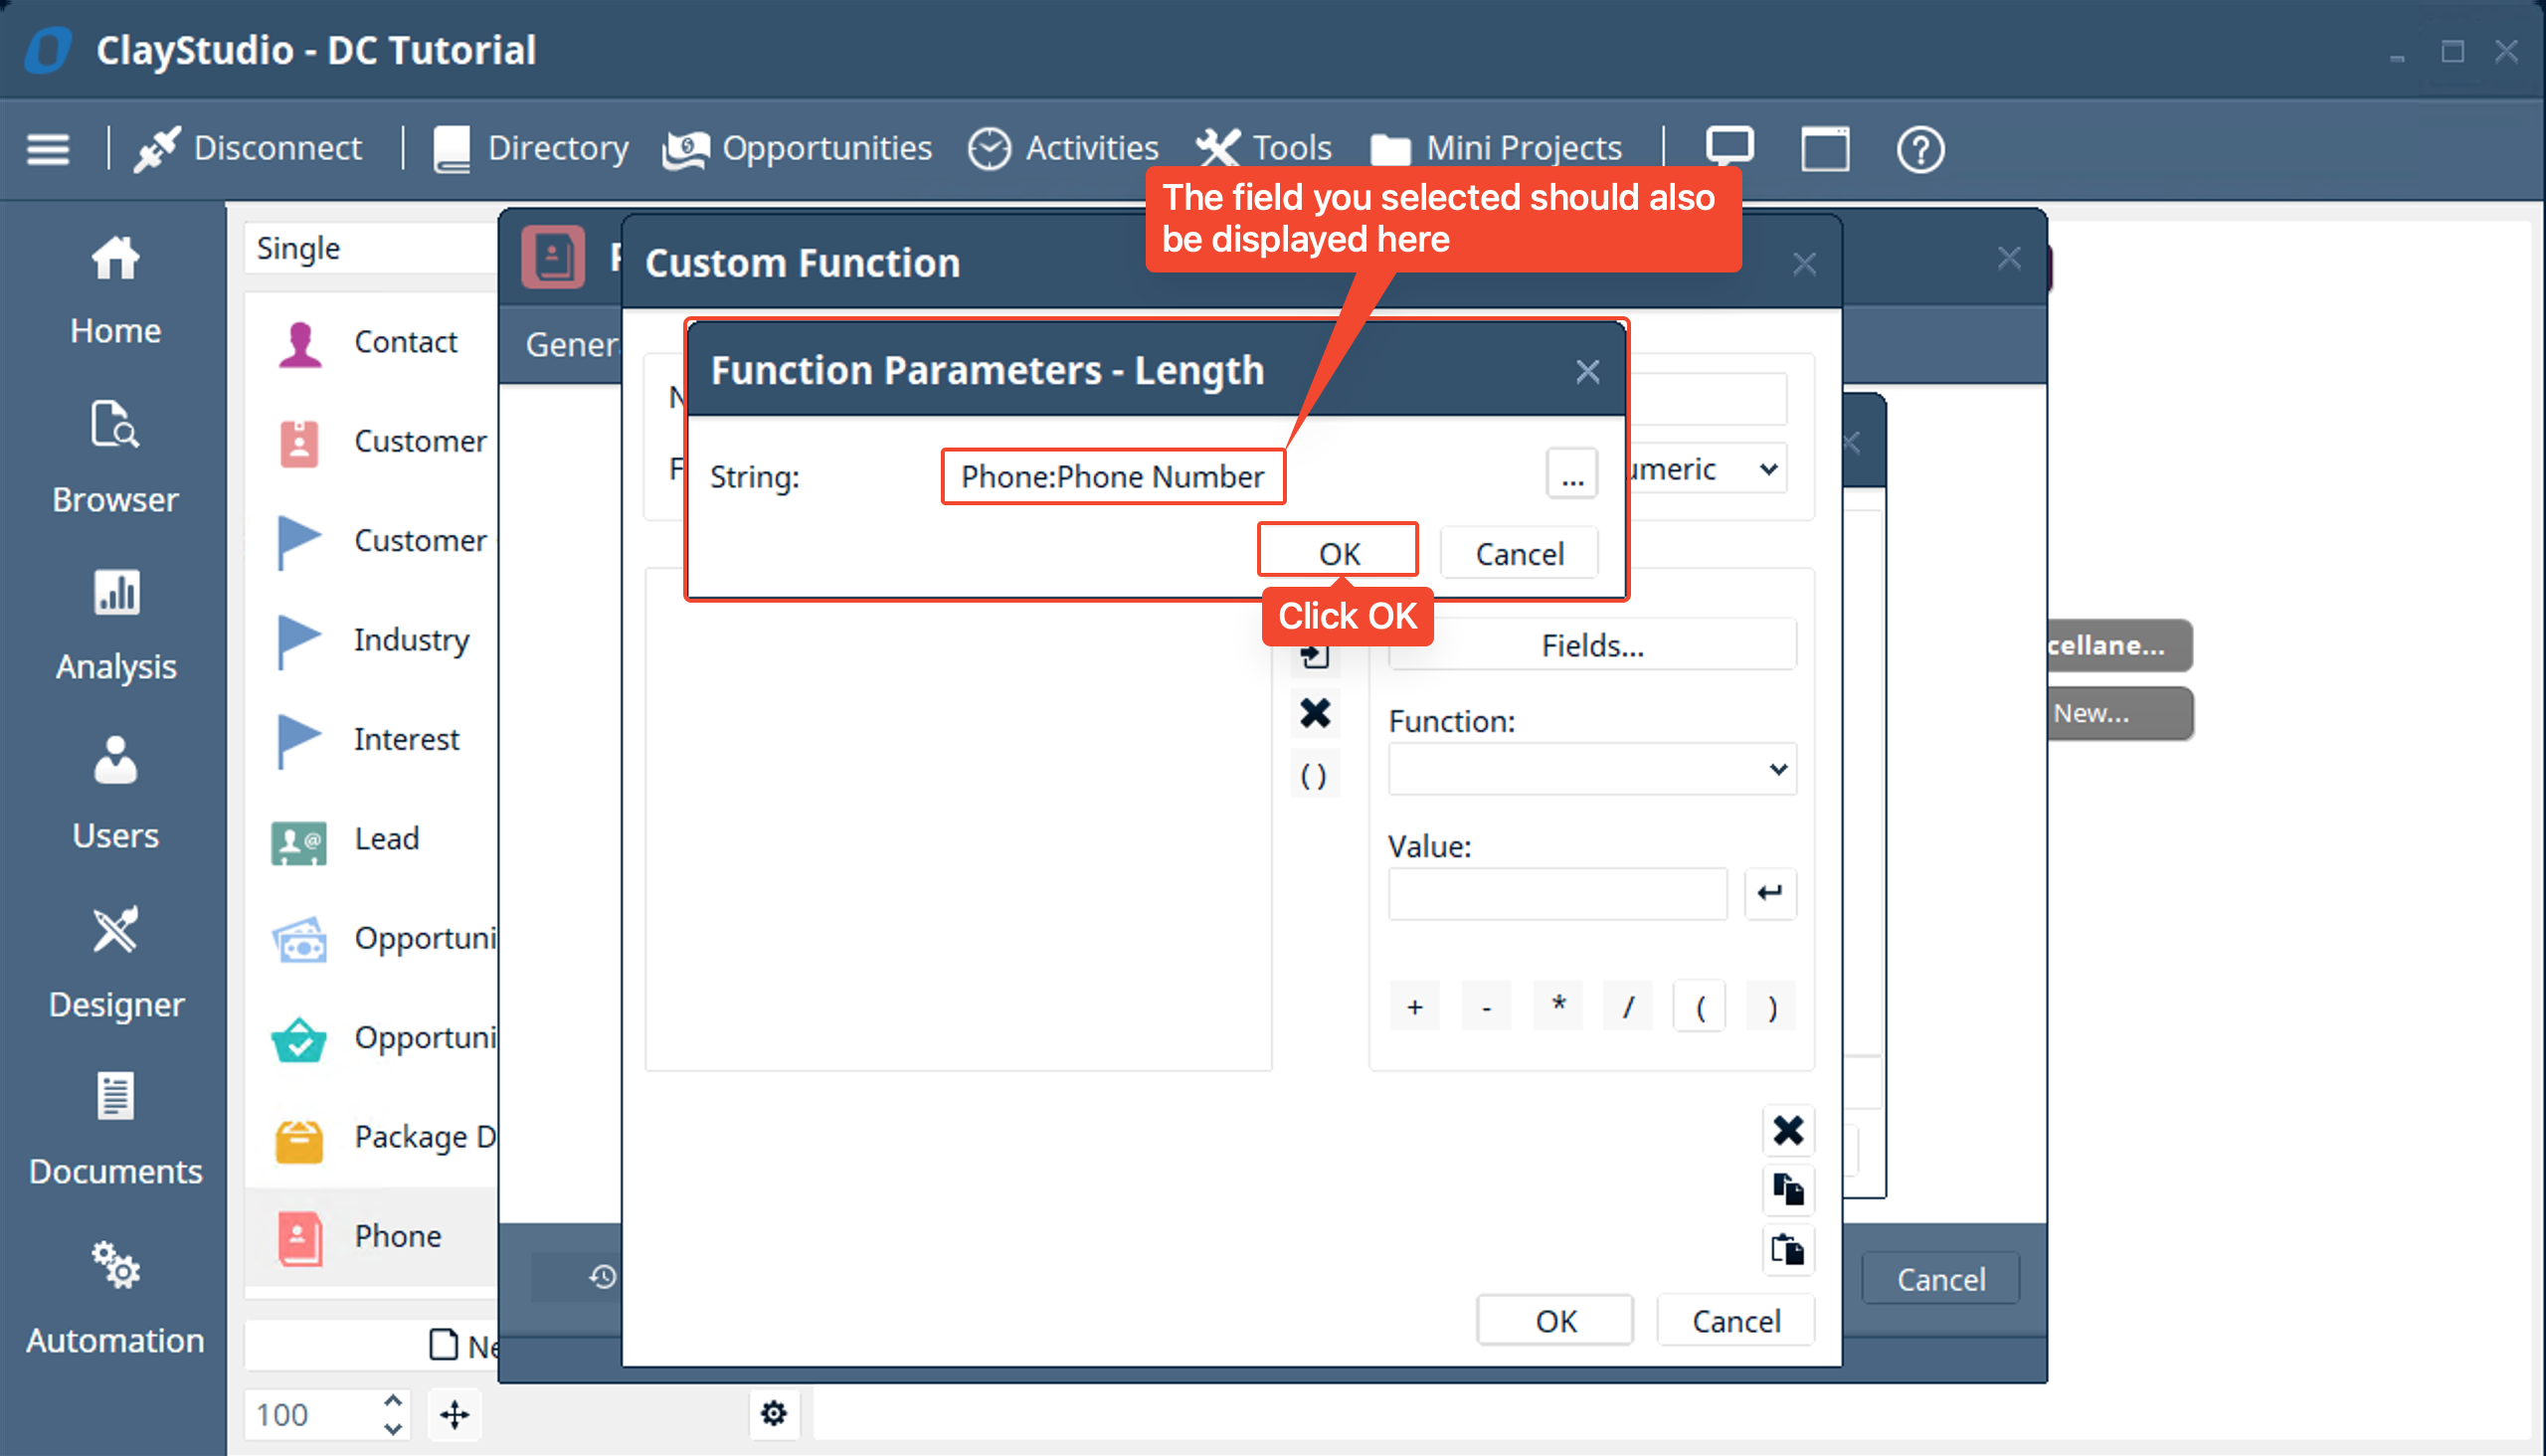
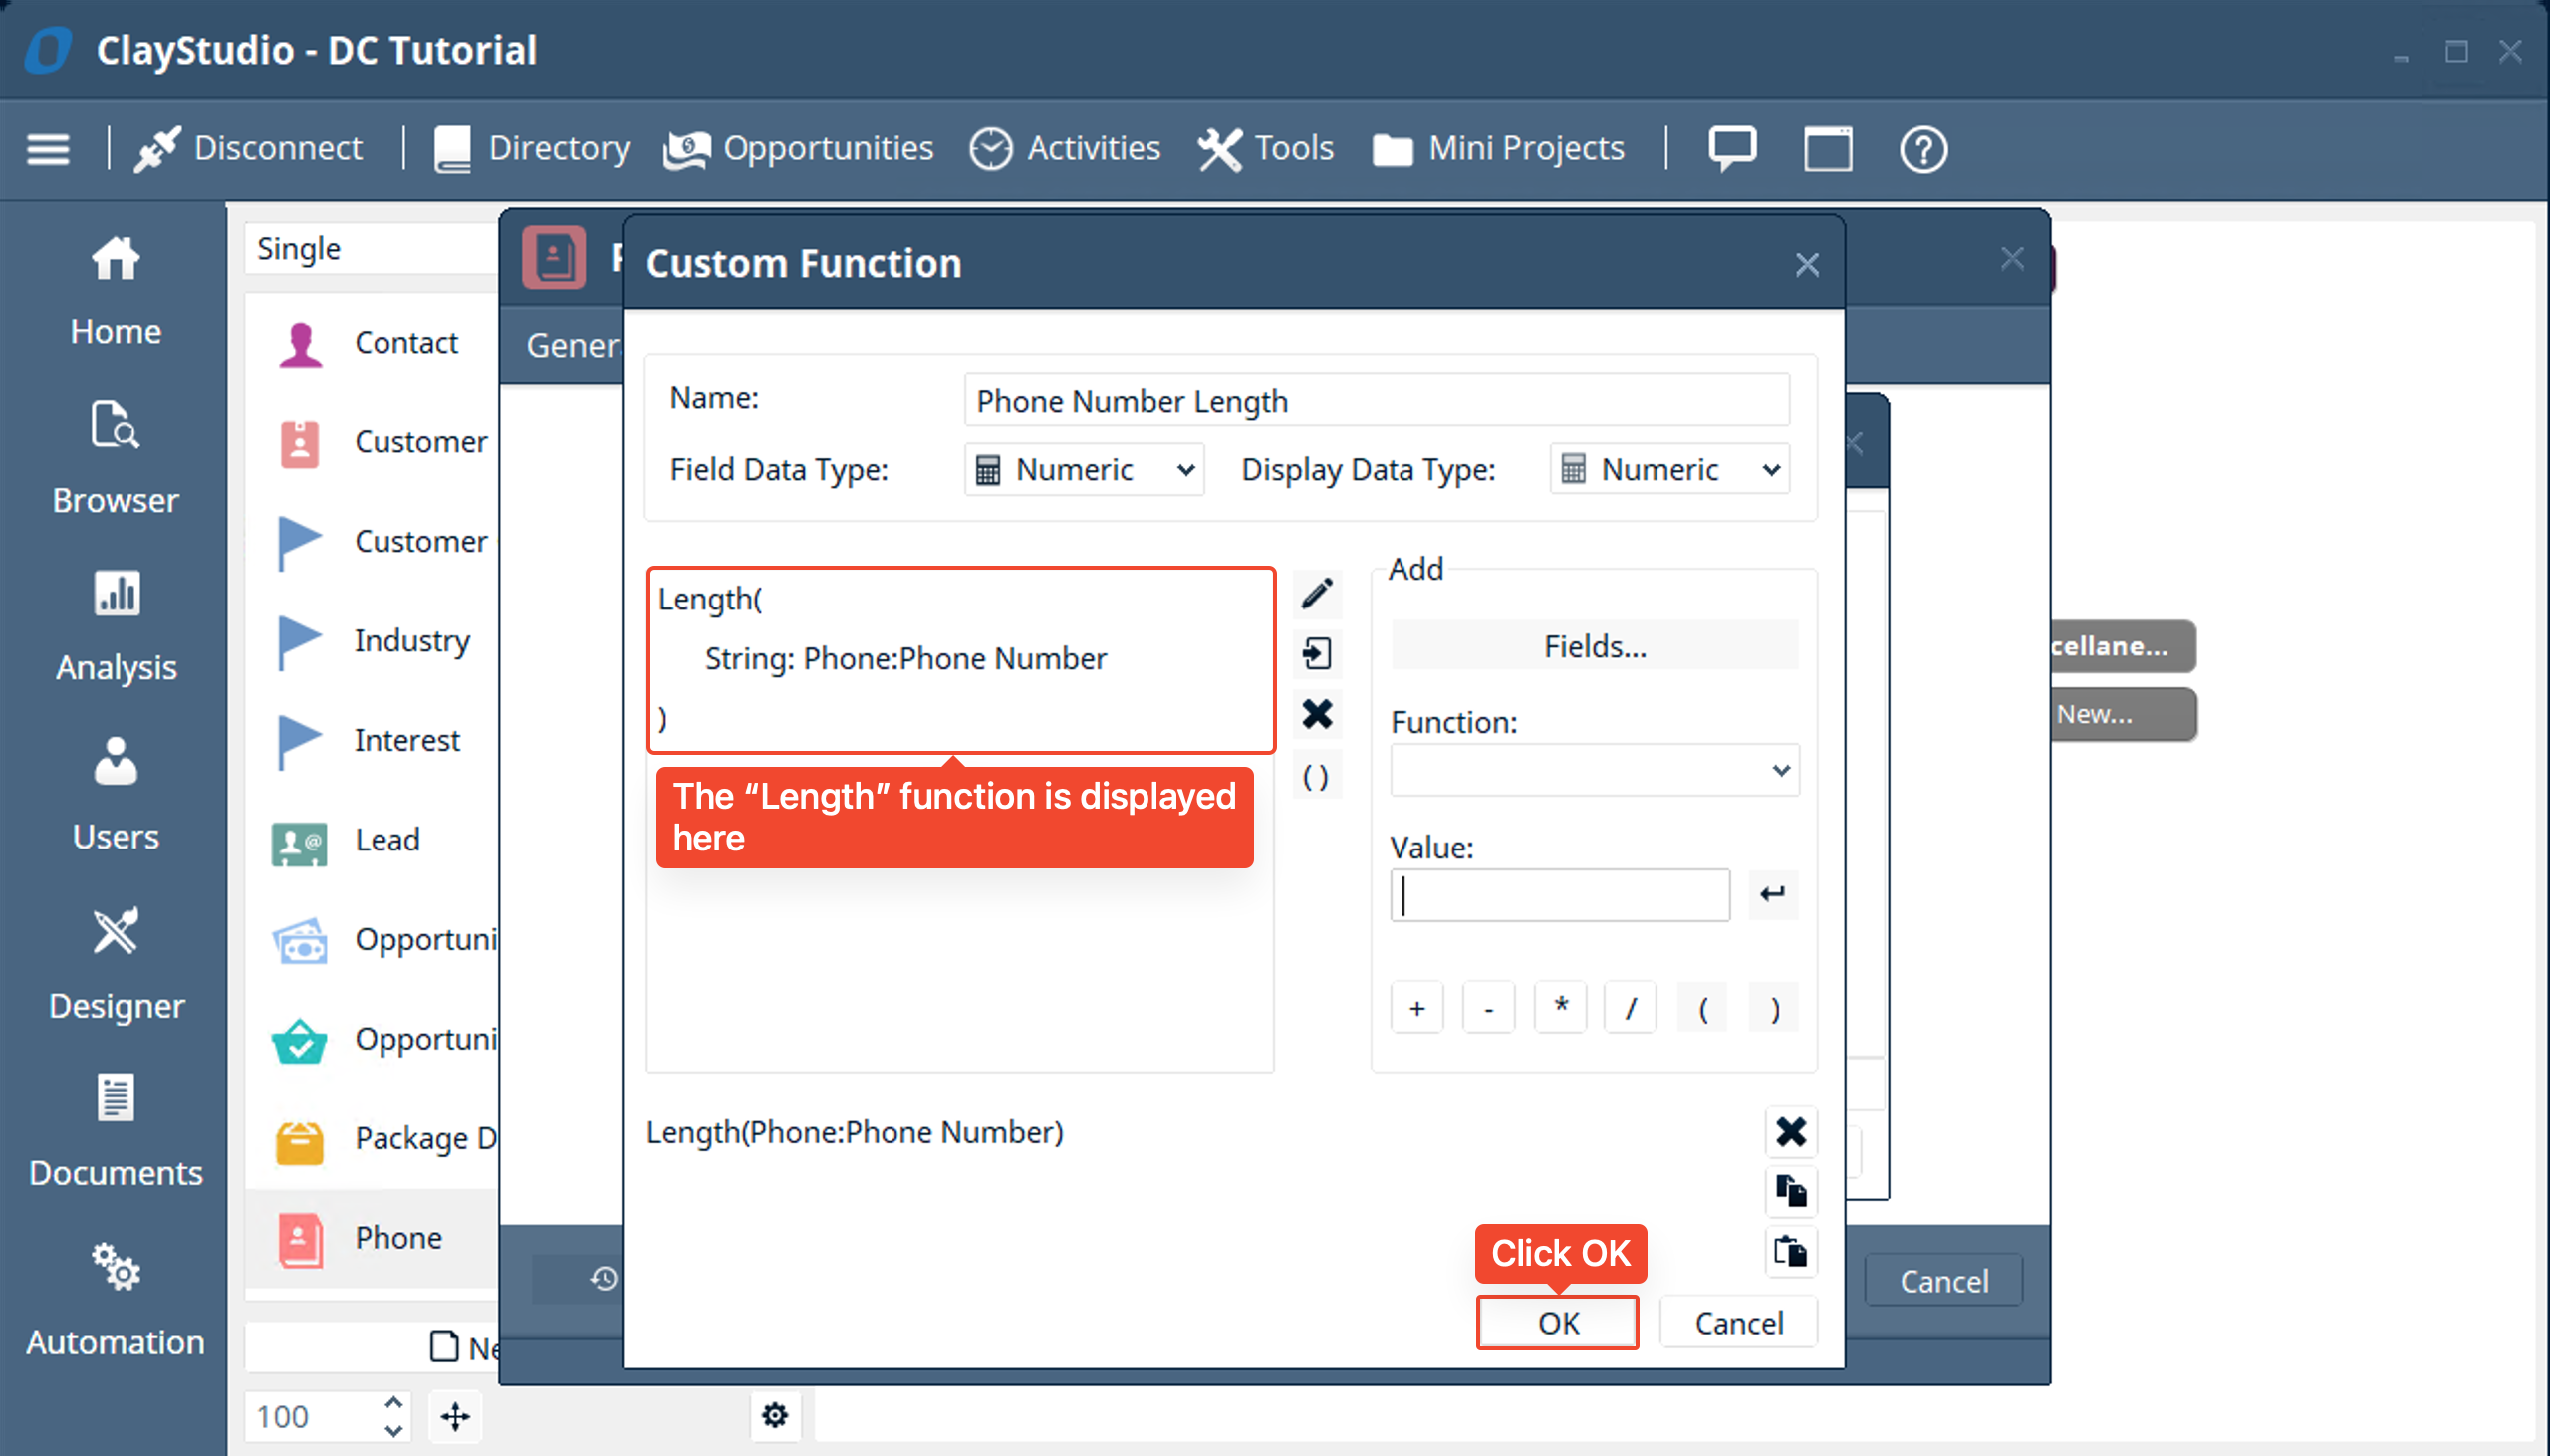
- Lastly in this “Custom Function” window you’ll see the “Length” function with its parameters displayed. Click OK to finish making the “Custom Function Filter”
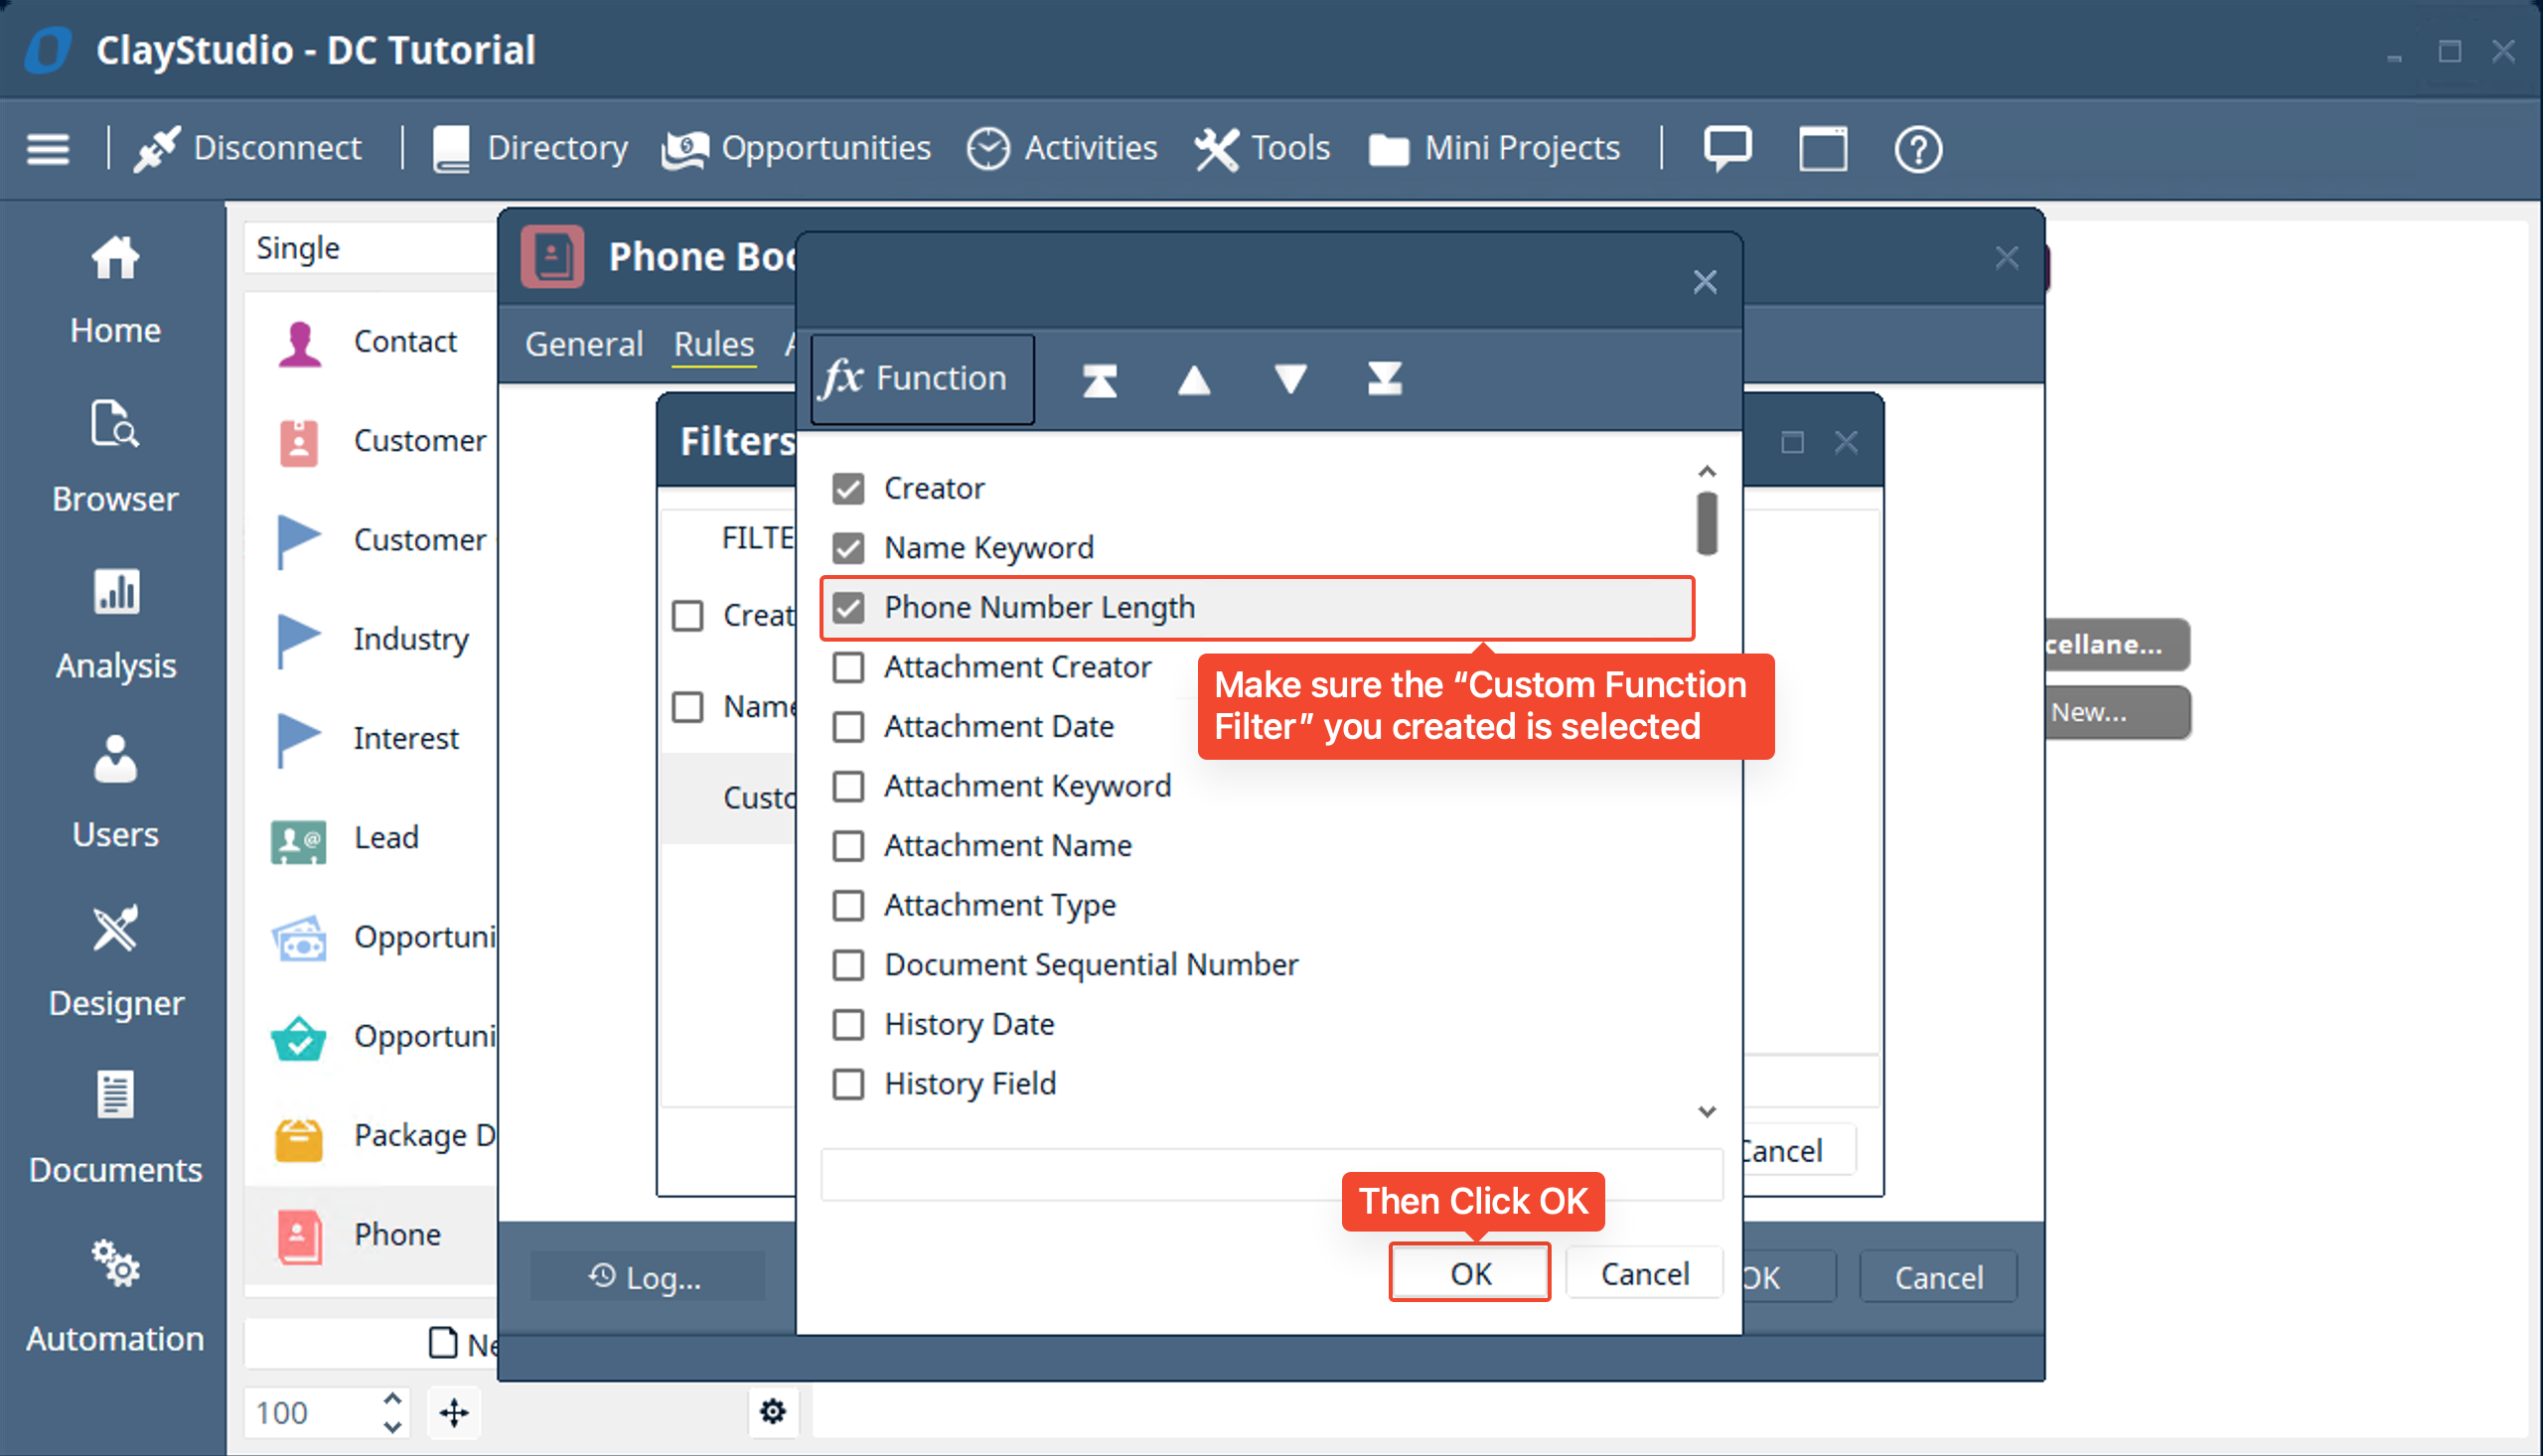
- Make sure the custom function filter you created is selected and then click OK
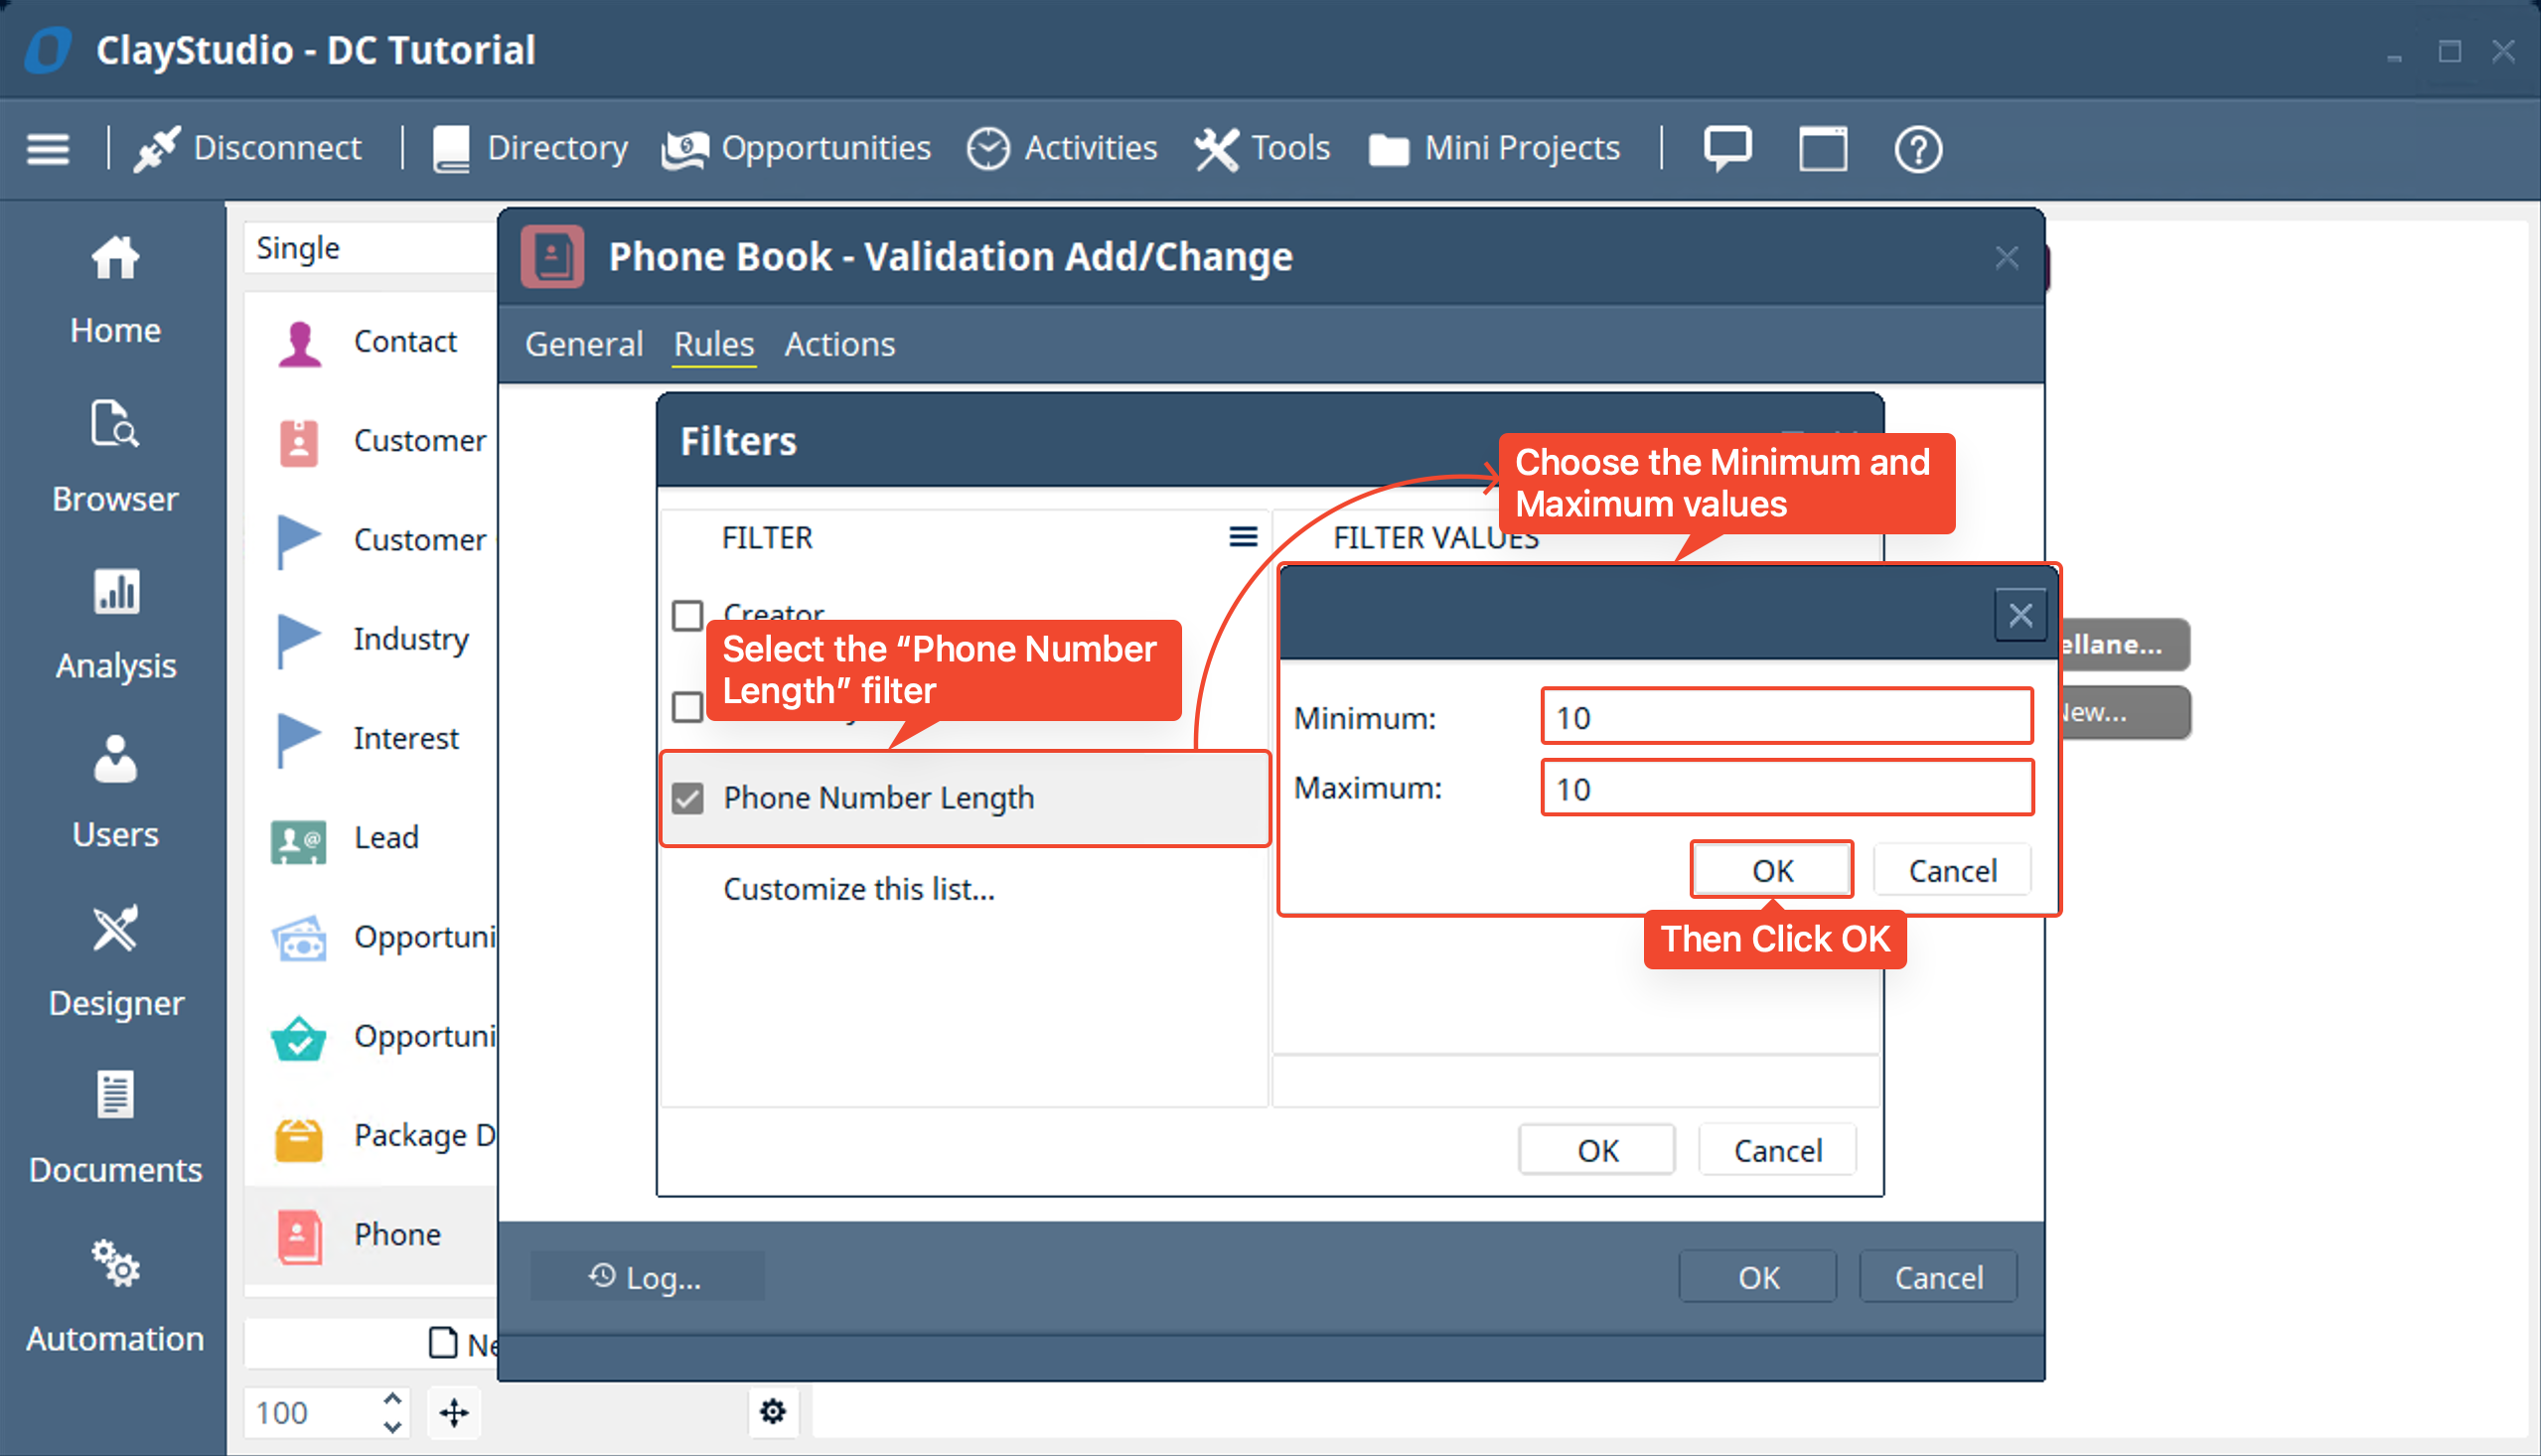
- Select the “Phone Number Length” custom function filter you just created. A small window asking for a “Minimum” and “Maximum” value pops up. Enter “10” for both. Then Click OK
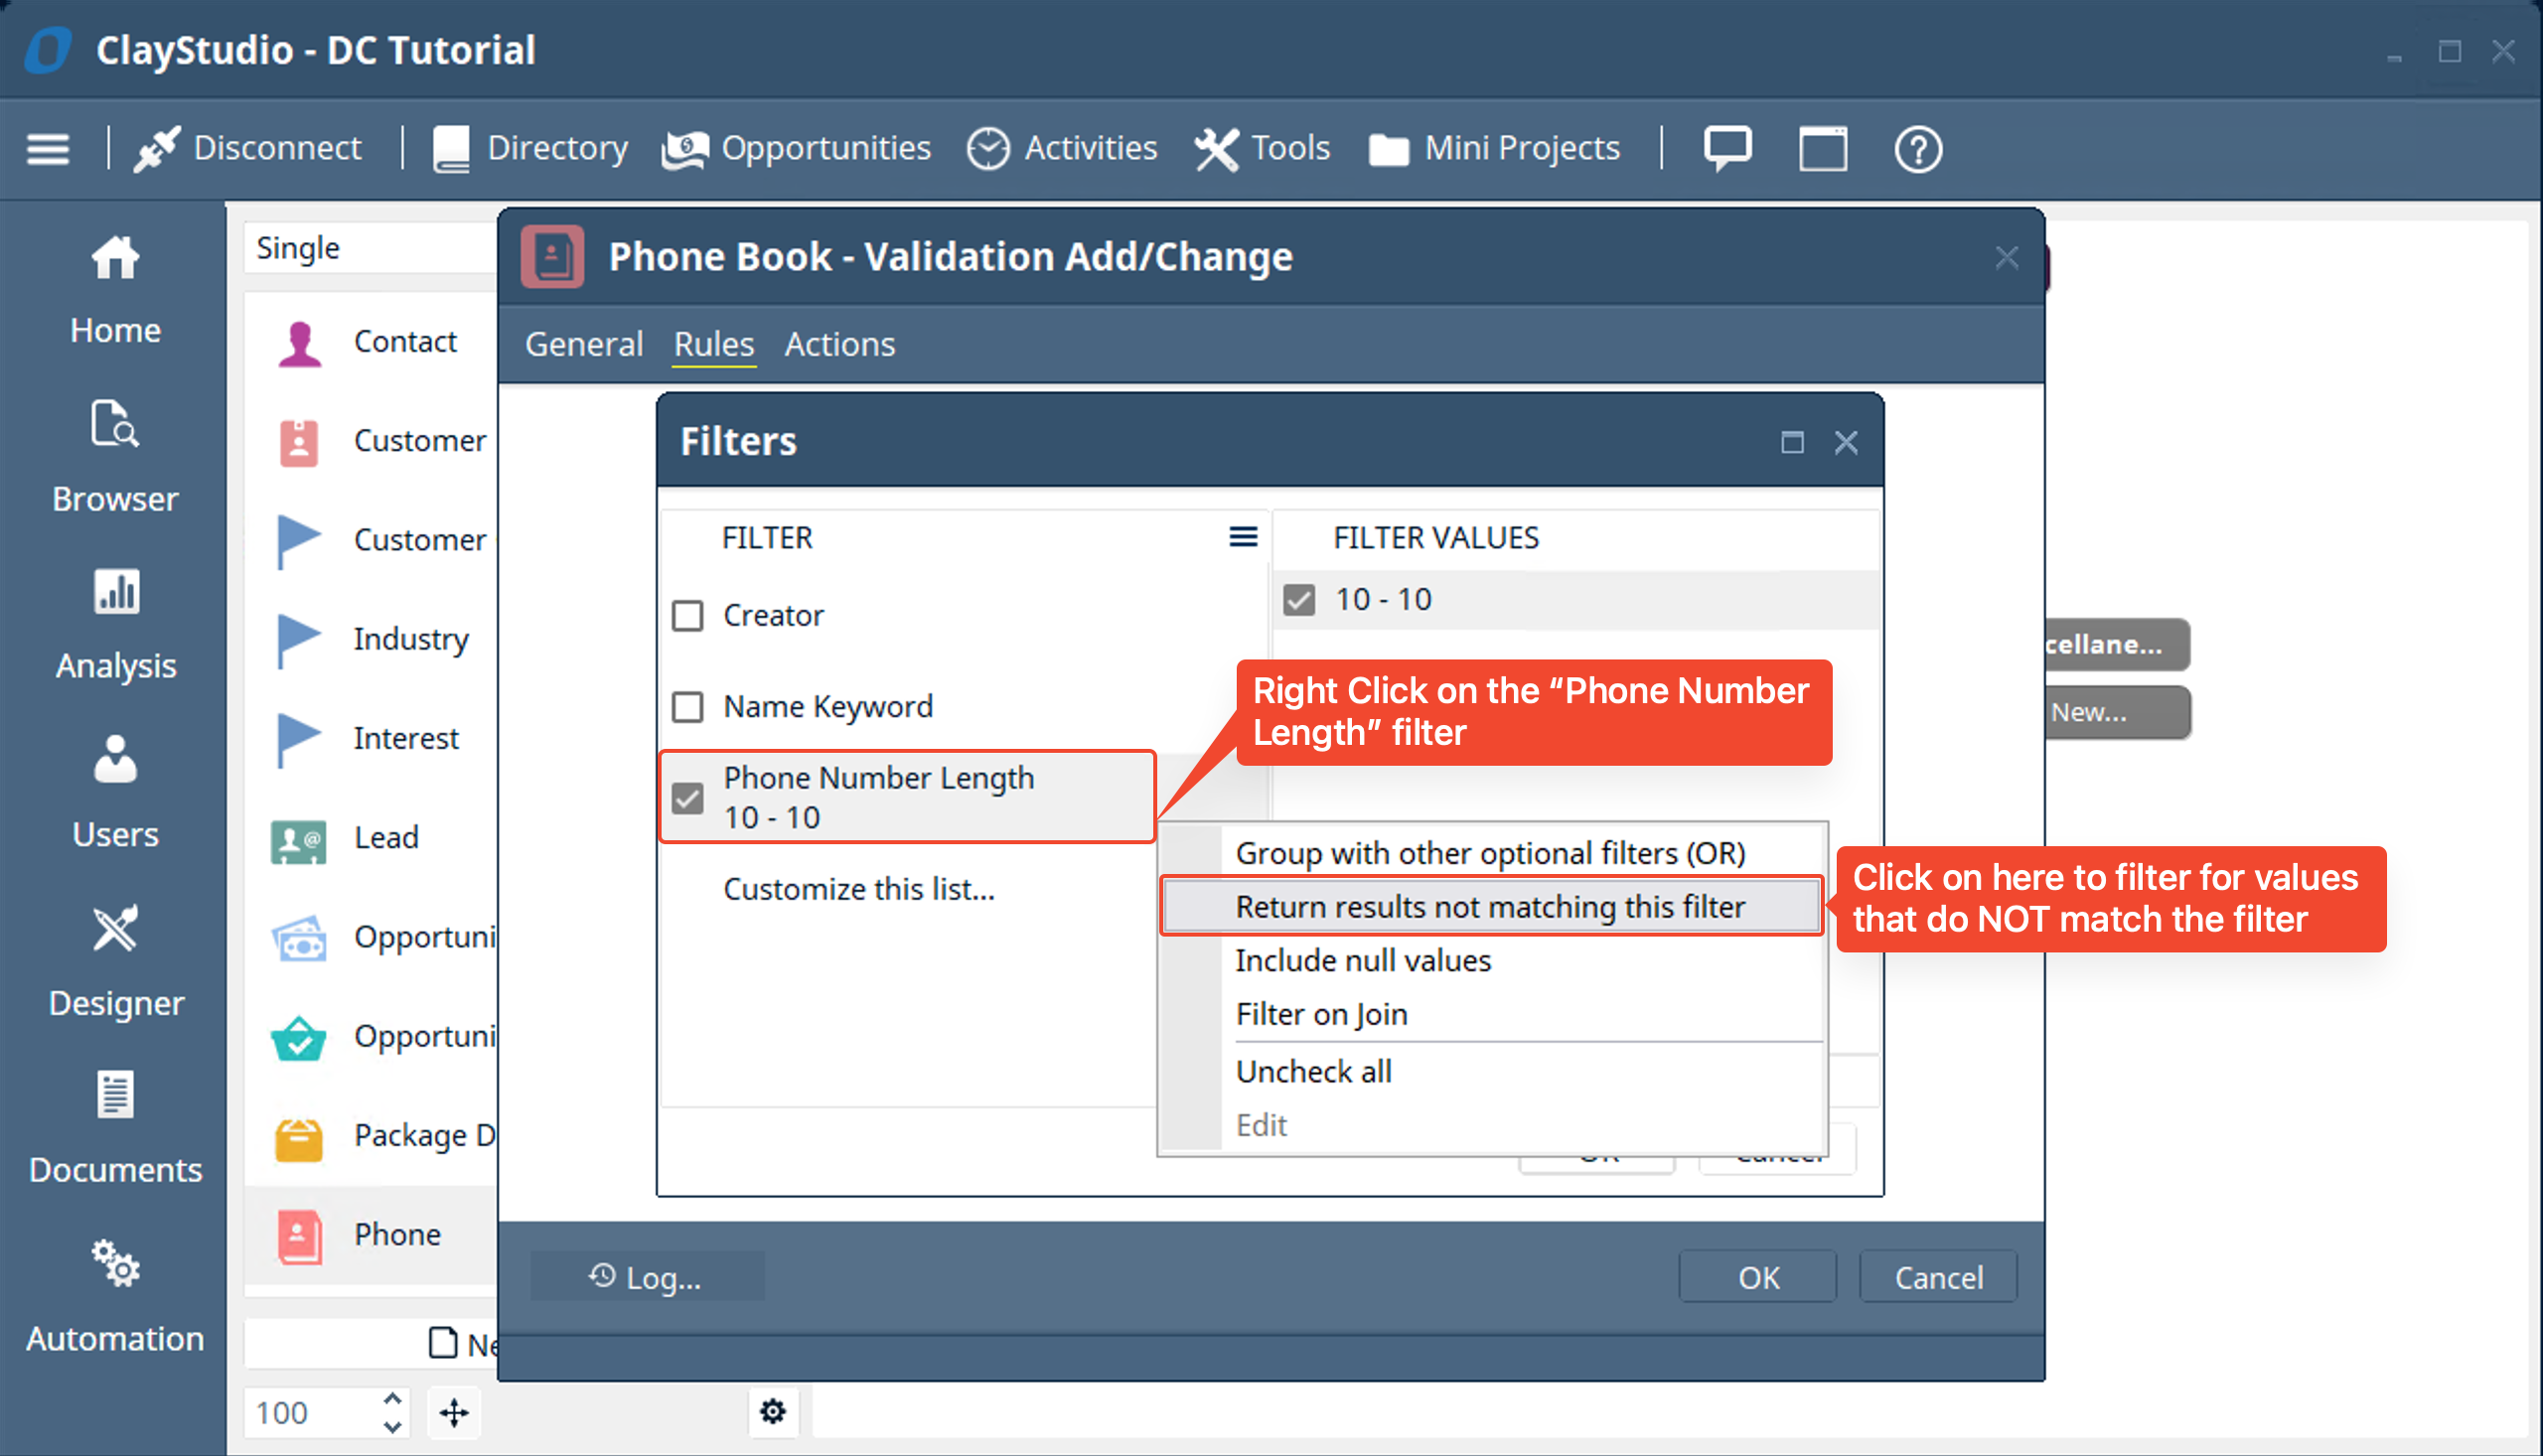
- Next, we want to specify that the automation will only run if the “Phone Number Length” is NOT 10 digits. Right click on the “Phone Number Length” filter and select “Return results not matching this filter”
- Since we only want phone numbers that are 10 digits in length to be in our phone book, if we set the filter values for the minimum and maximum to be 10 this will cause the error message to pop up only if the “Phone Number Length” equals 10. BUT, we want the error message to pop up if the “Phone Number Length” is NOT EQUAL to 10.
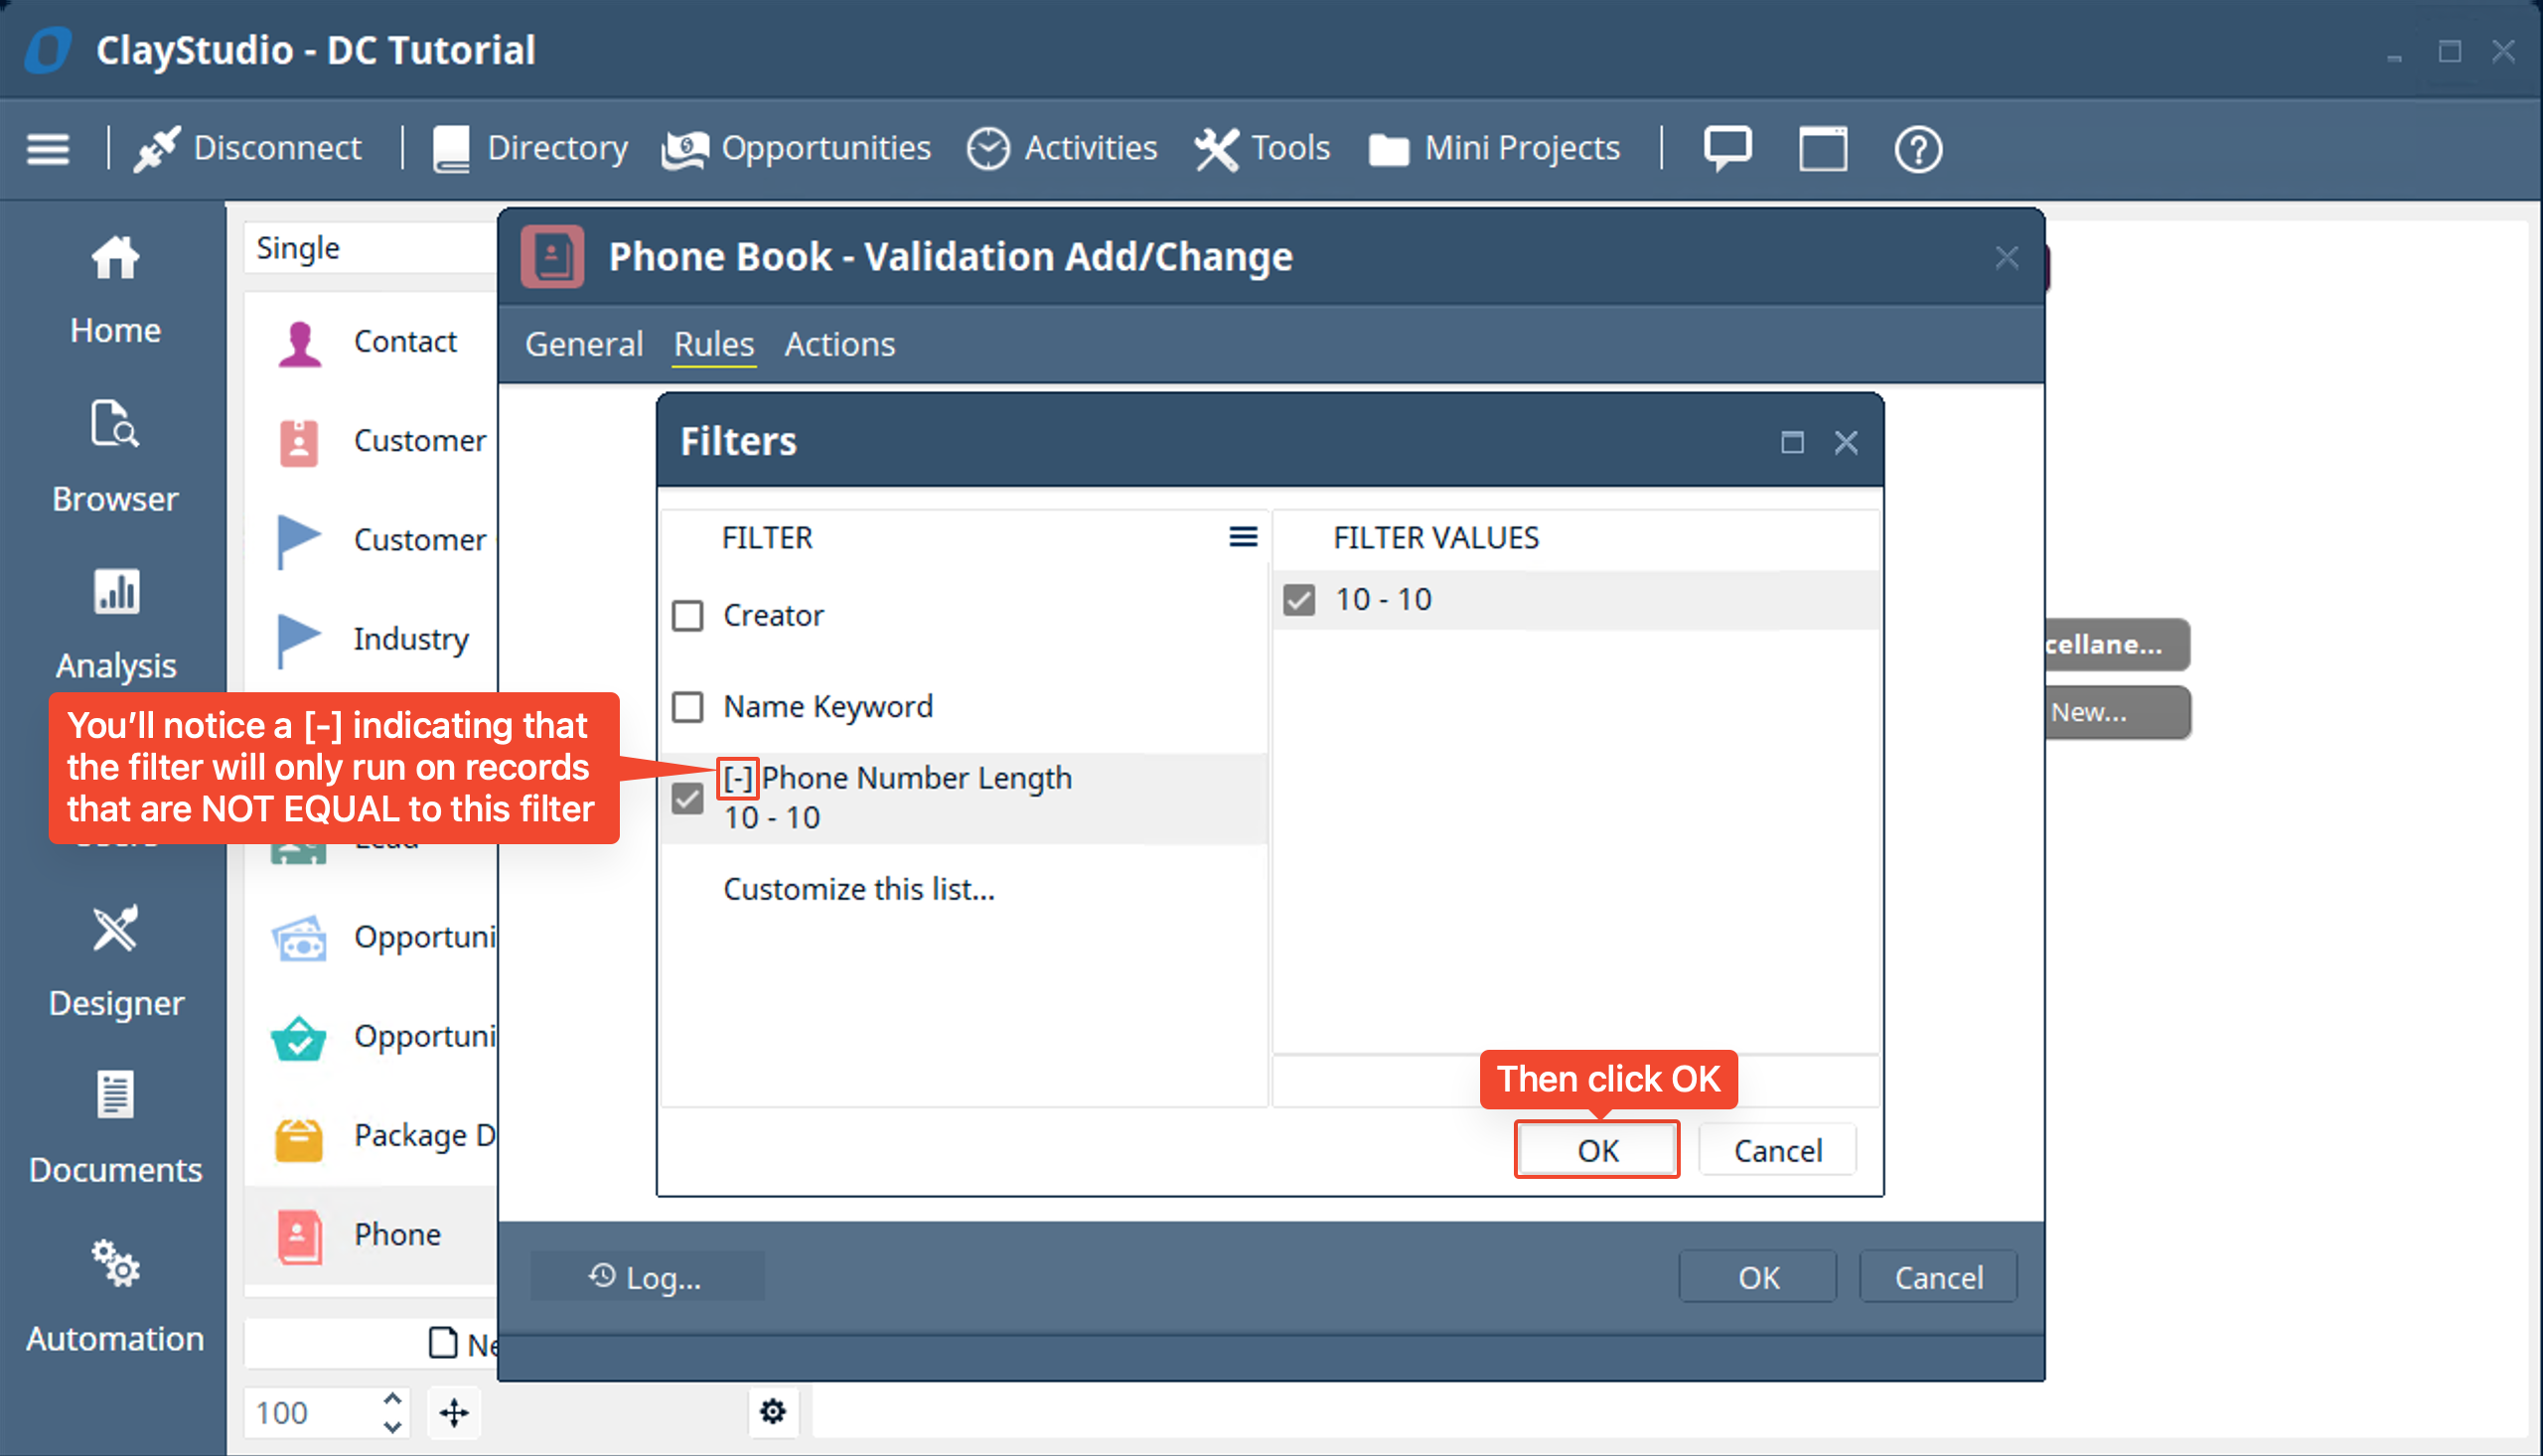
- You’ll notice a [-] indicator next to the filter to show you that this filter is for all values that DO NOT EQUAL the “Filter Value” selected for the filter. Click OK
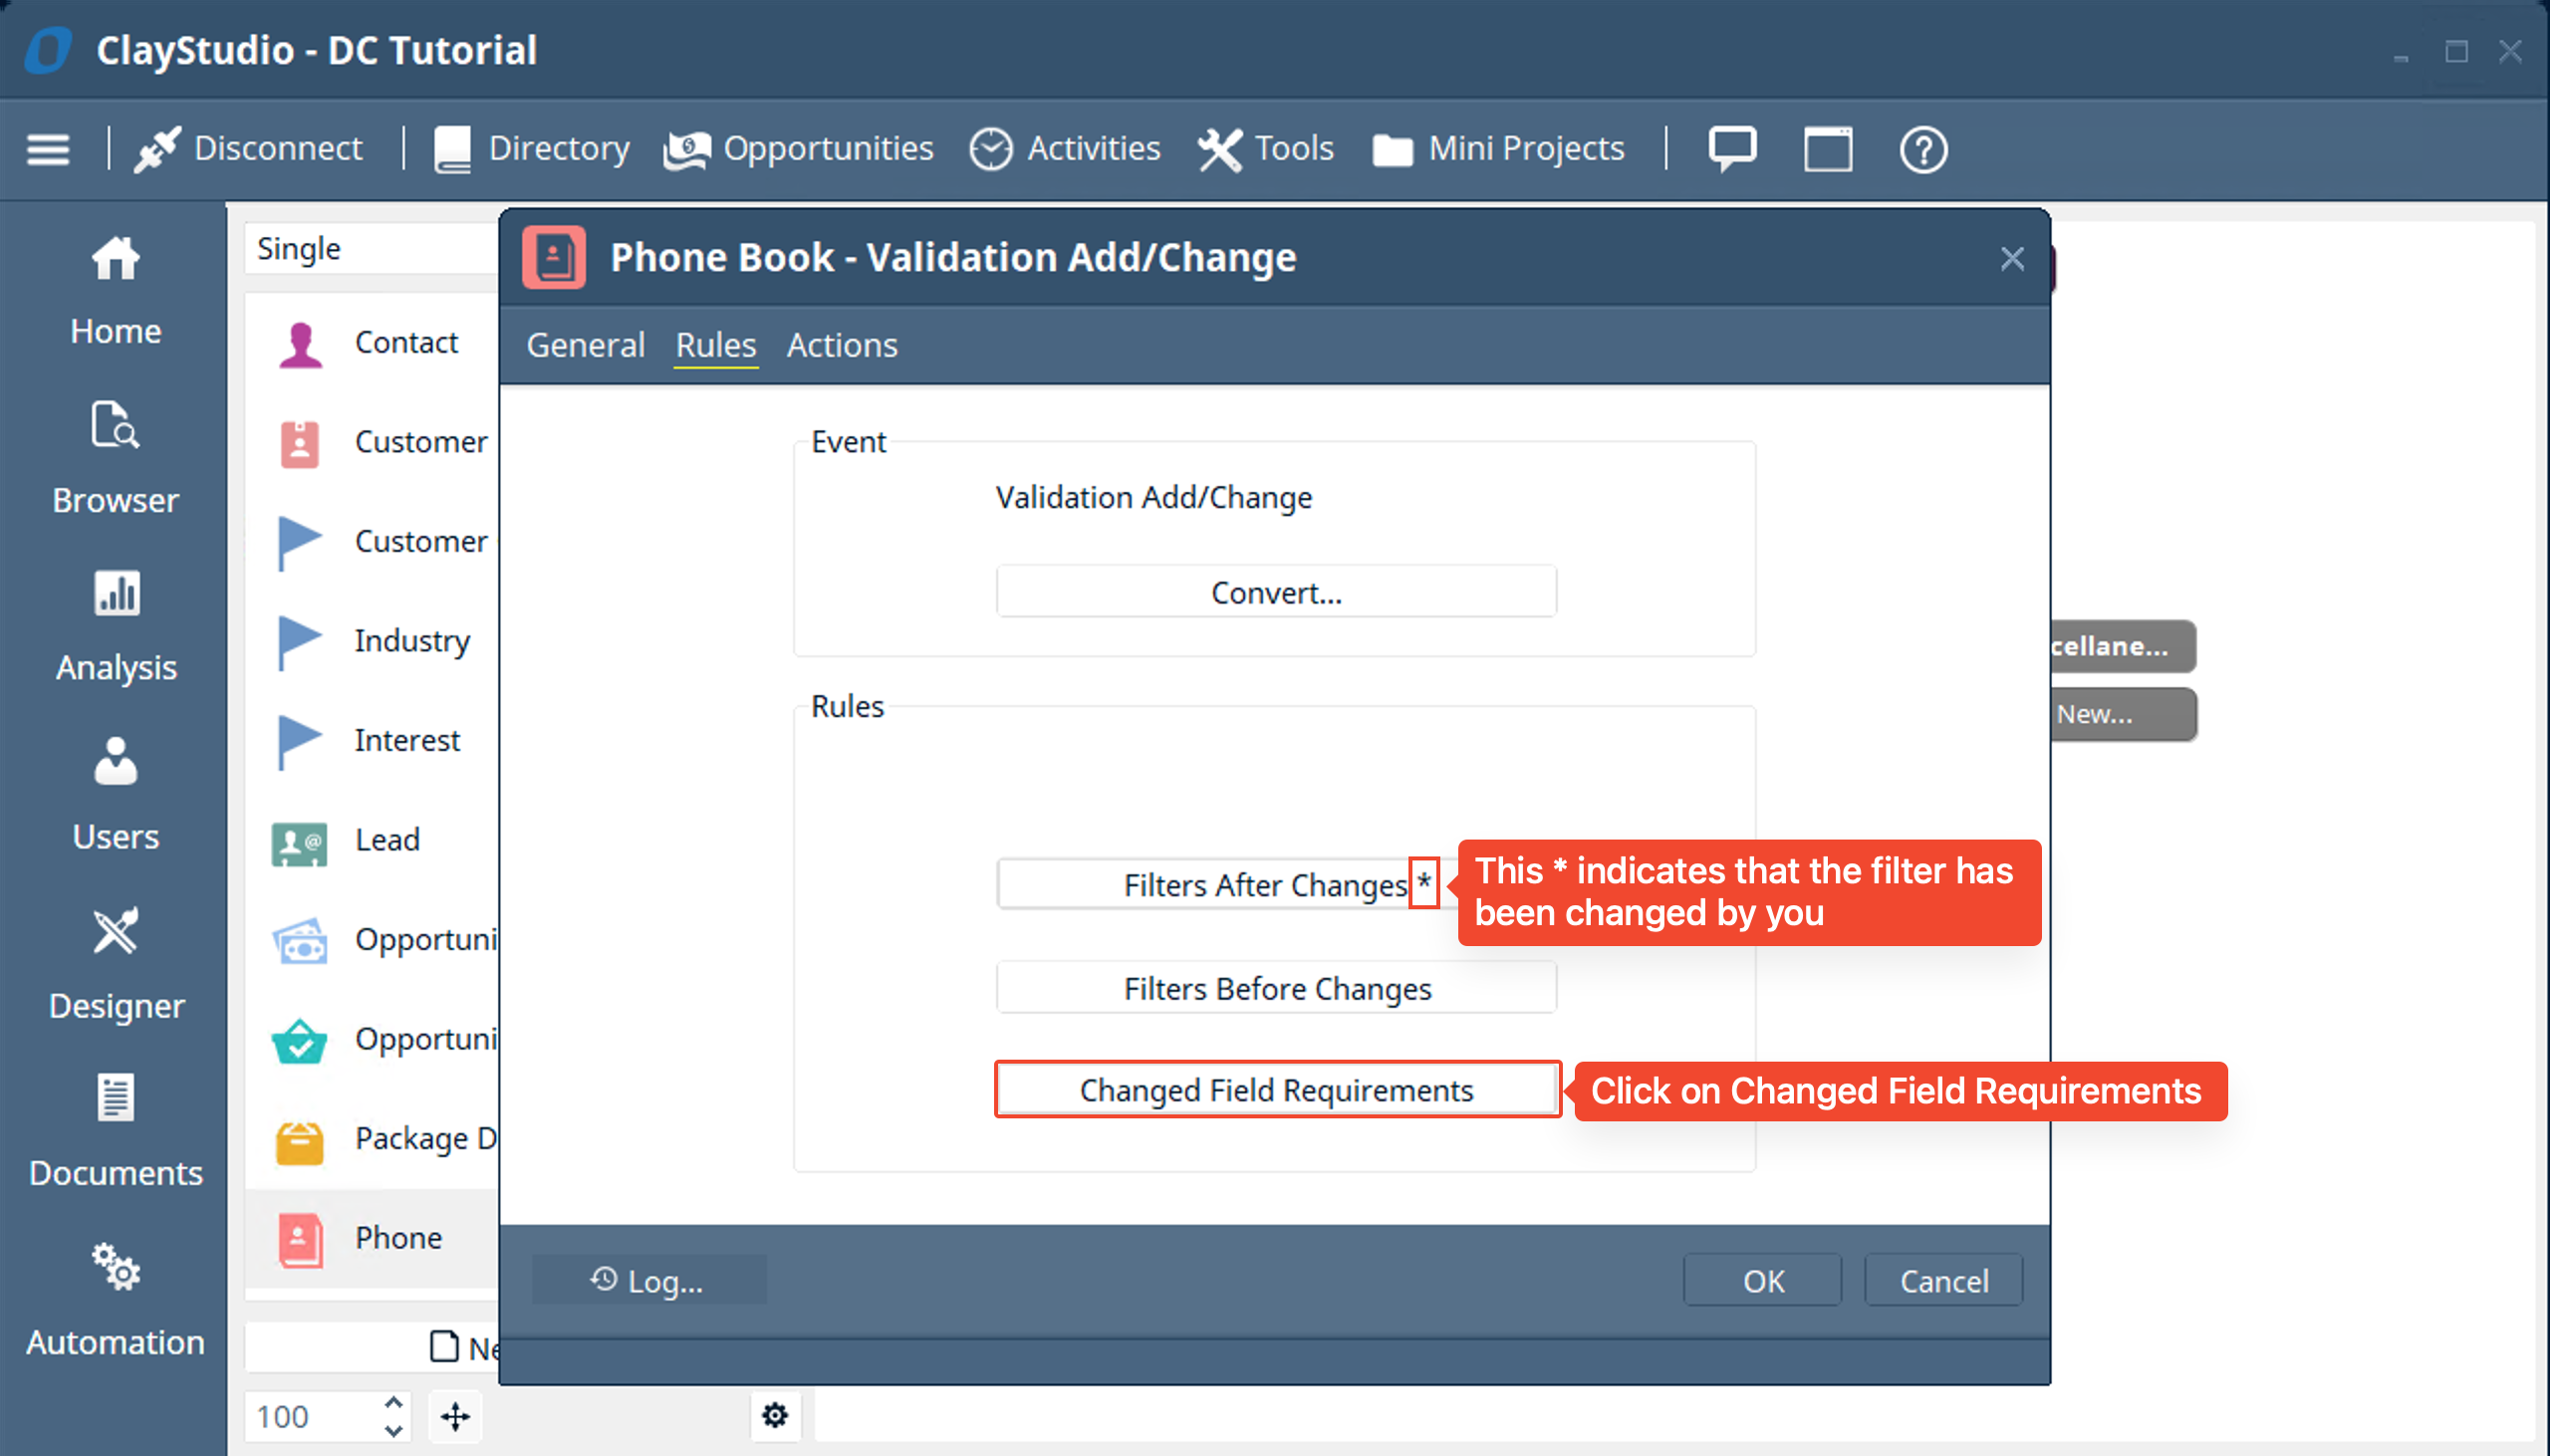
- Next we want to make sure that this automation will only run if the “Phone Number” field itself is changed. To do that we click on “Changed Field Requirements”
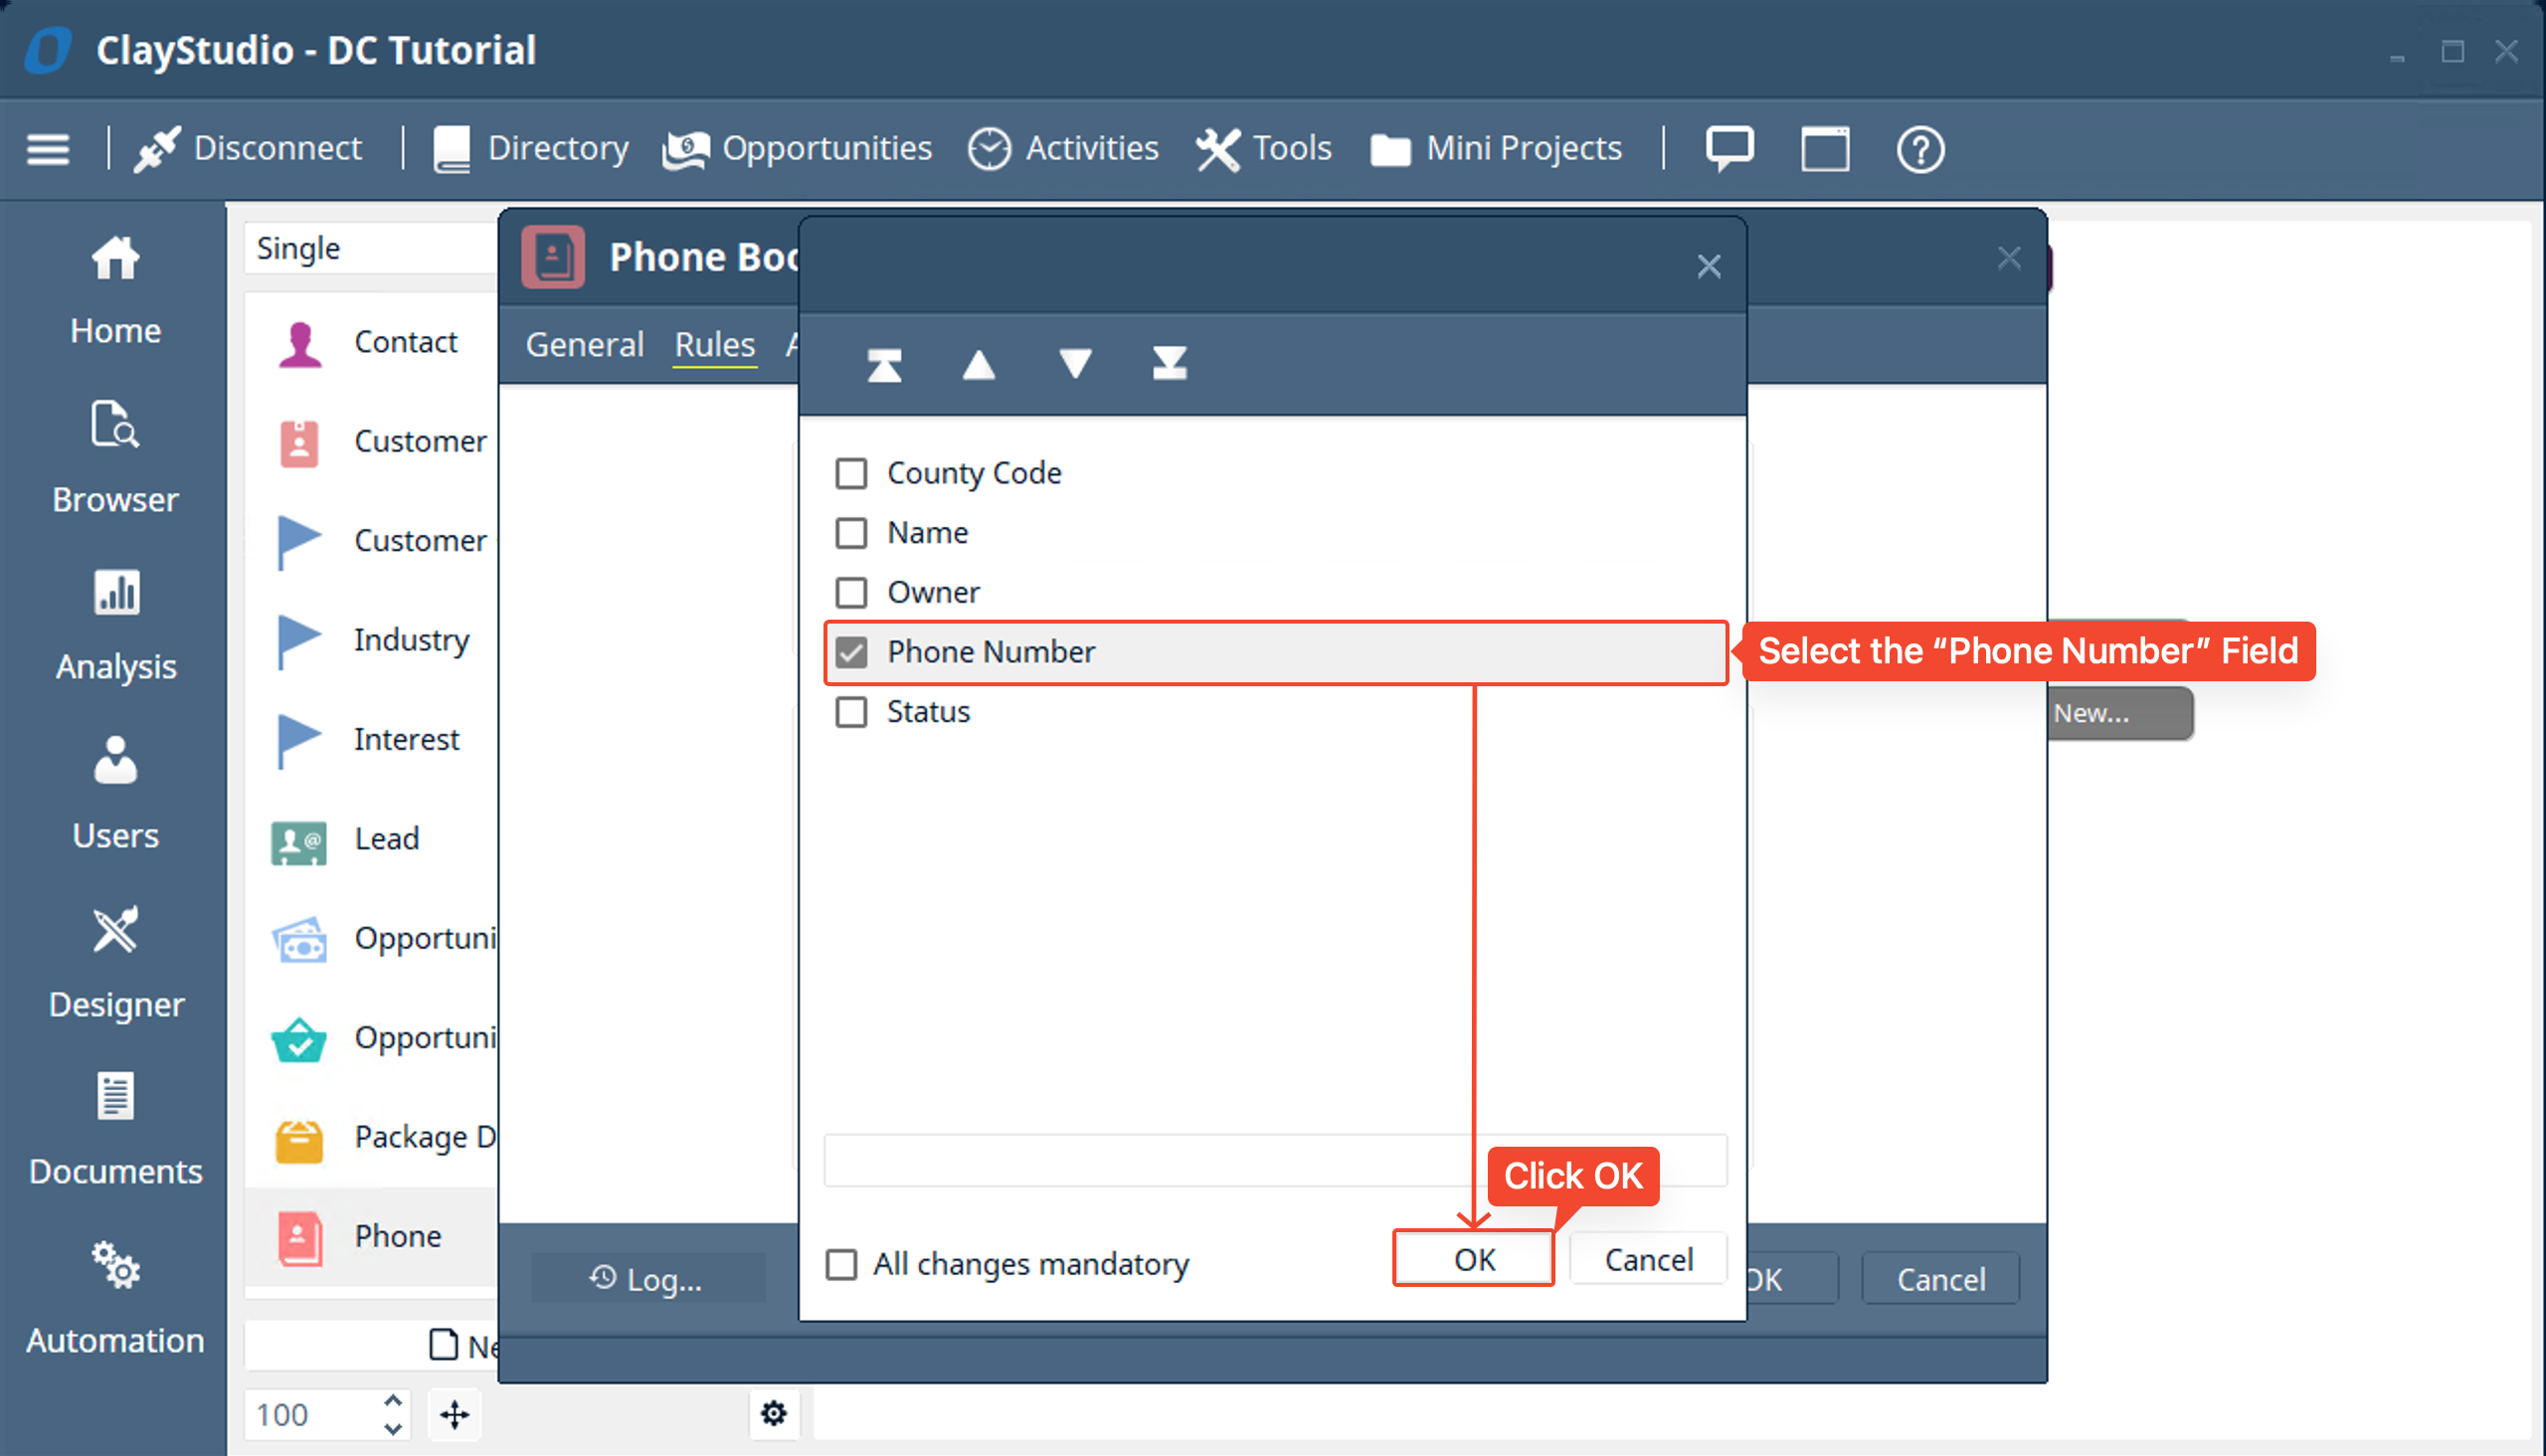
- Select the “Phone Number” field and click OK
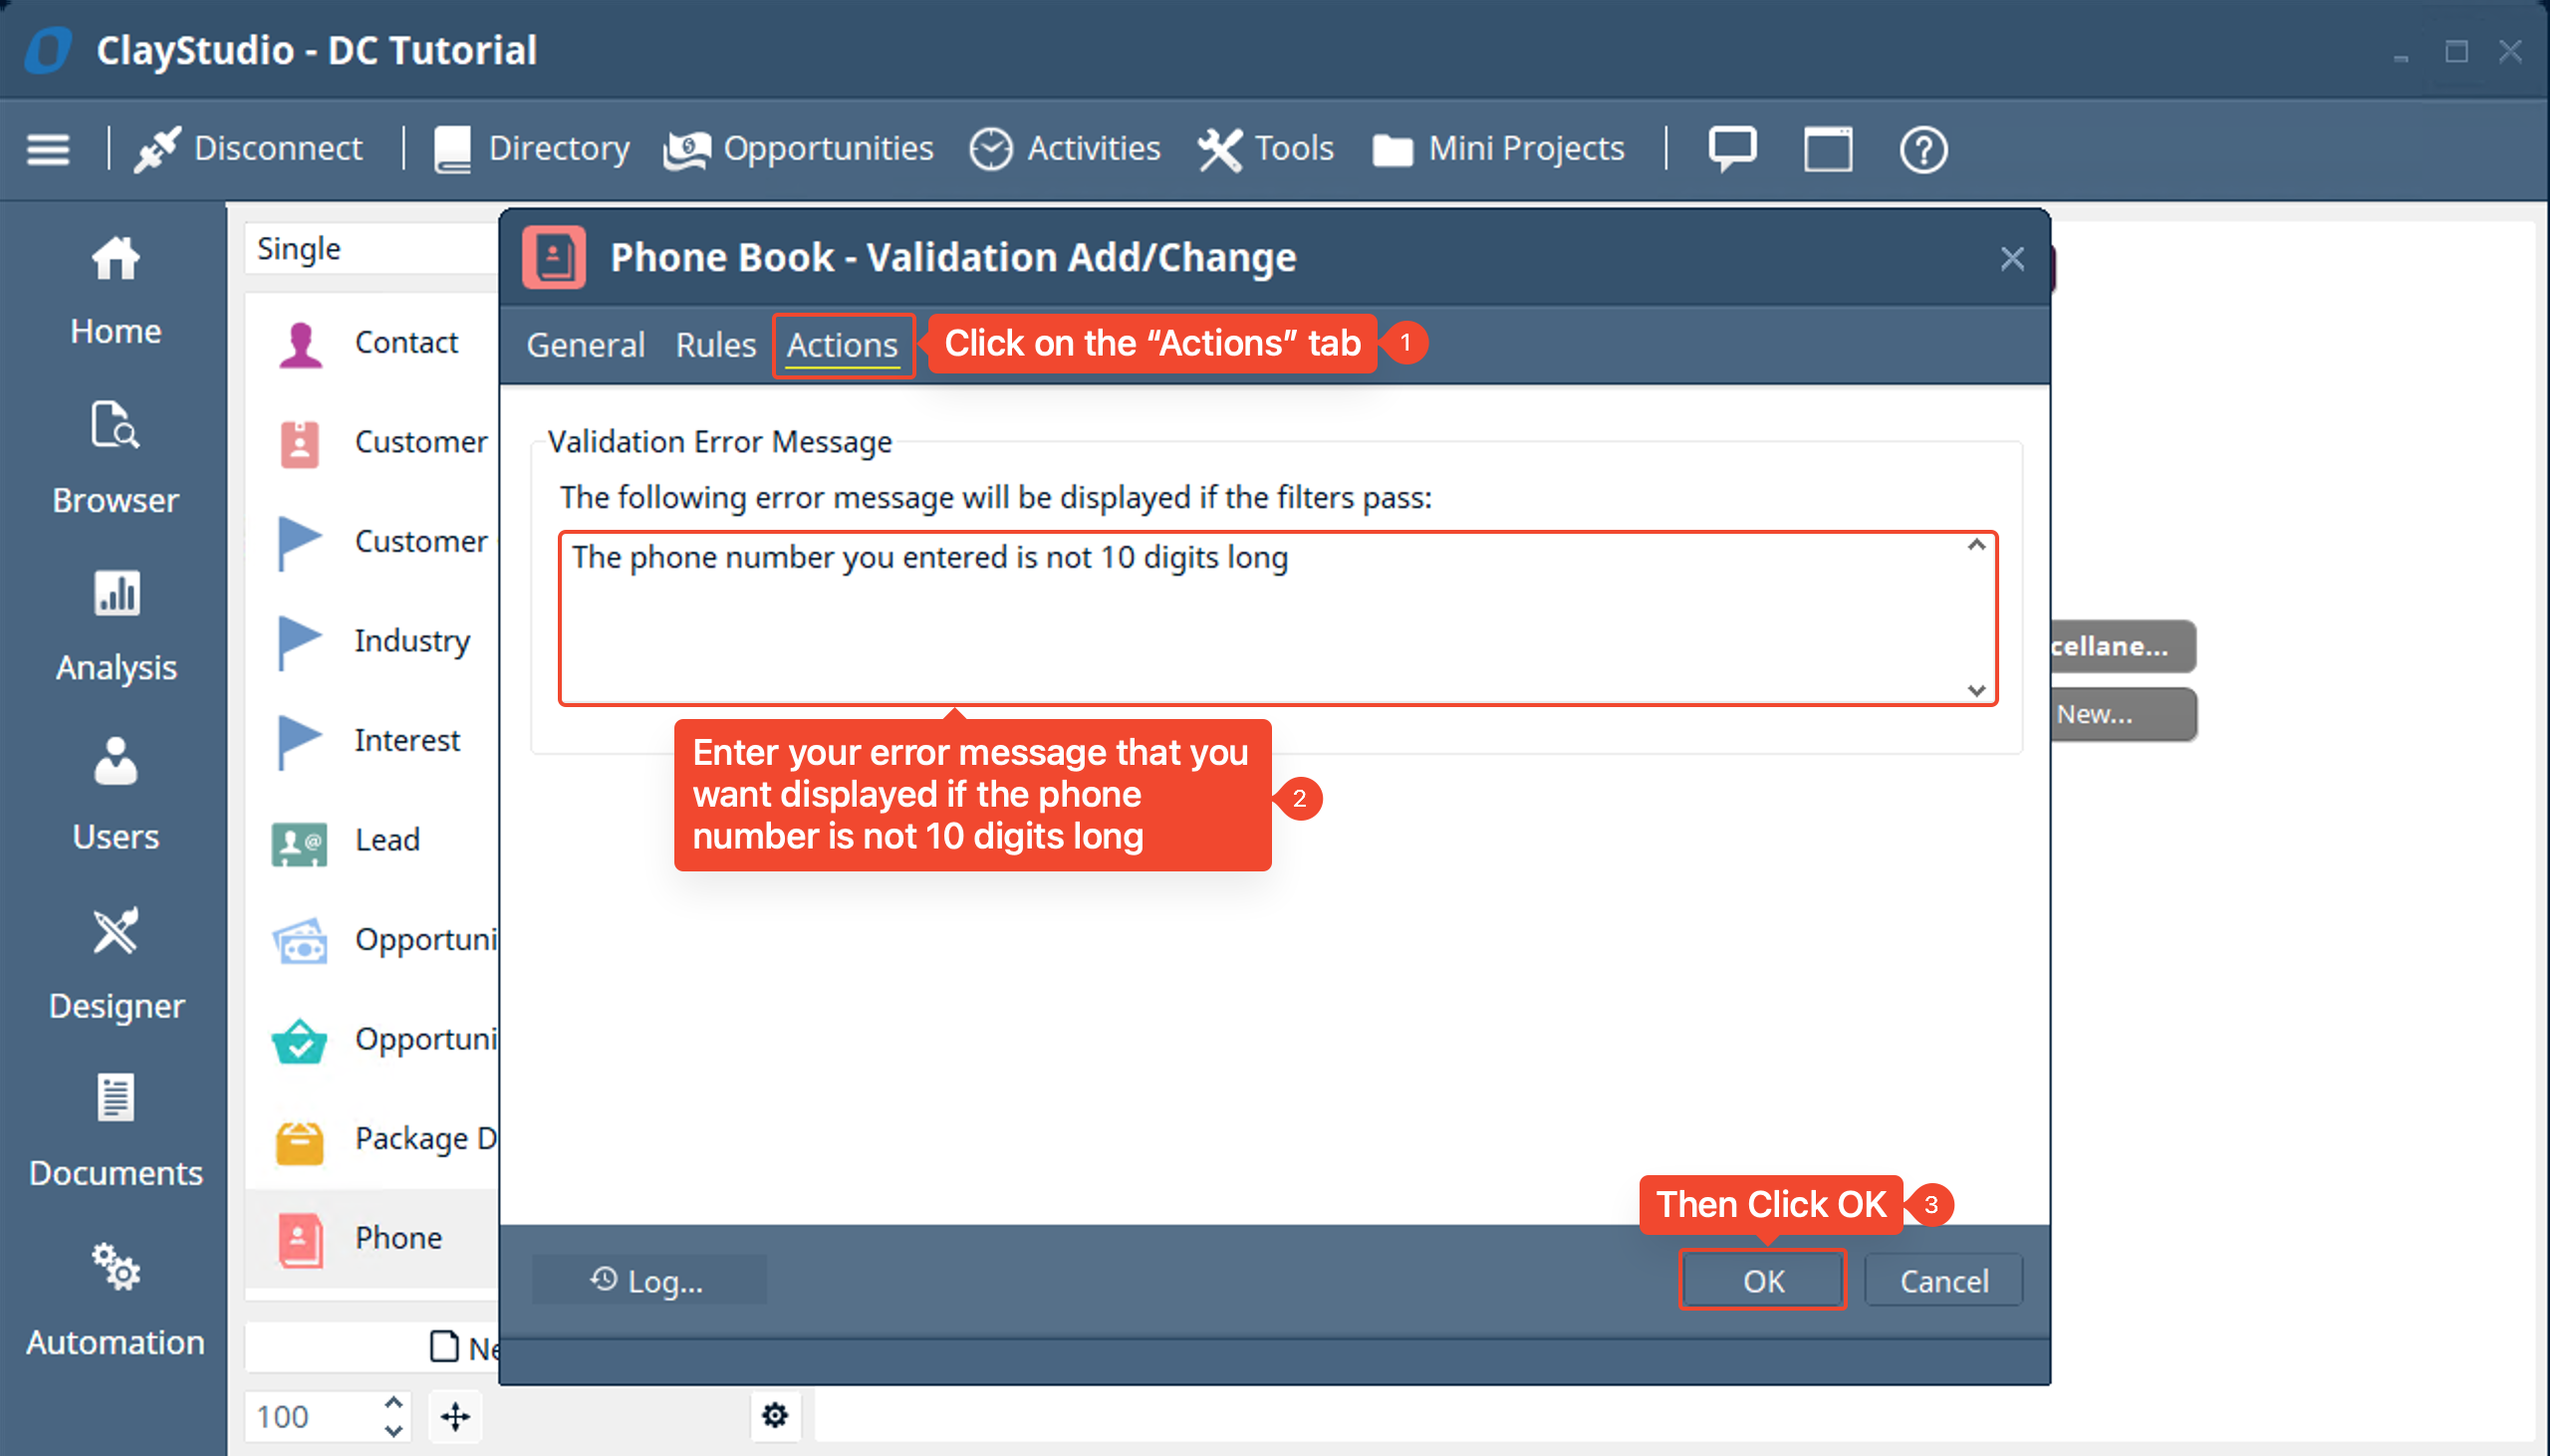
- Next click on the “Actions” tab. Here you’ll be able to enter the custom error message you want to pop up if the “Phone Number Length” is indeed not 10 digits long. Then click OK to complete the “Validation Automation”
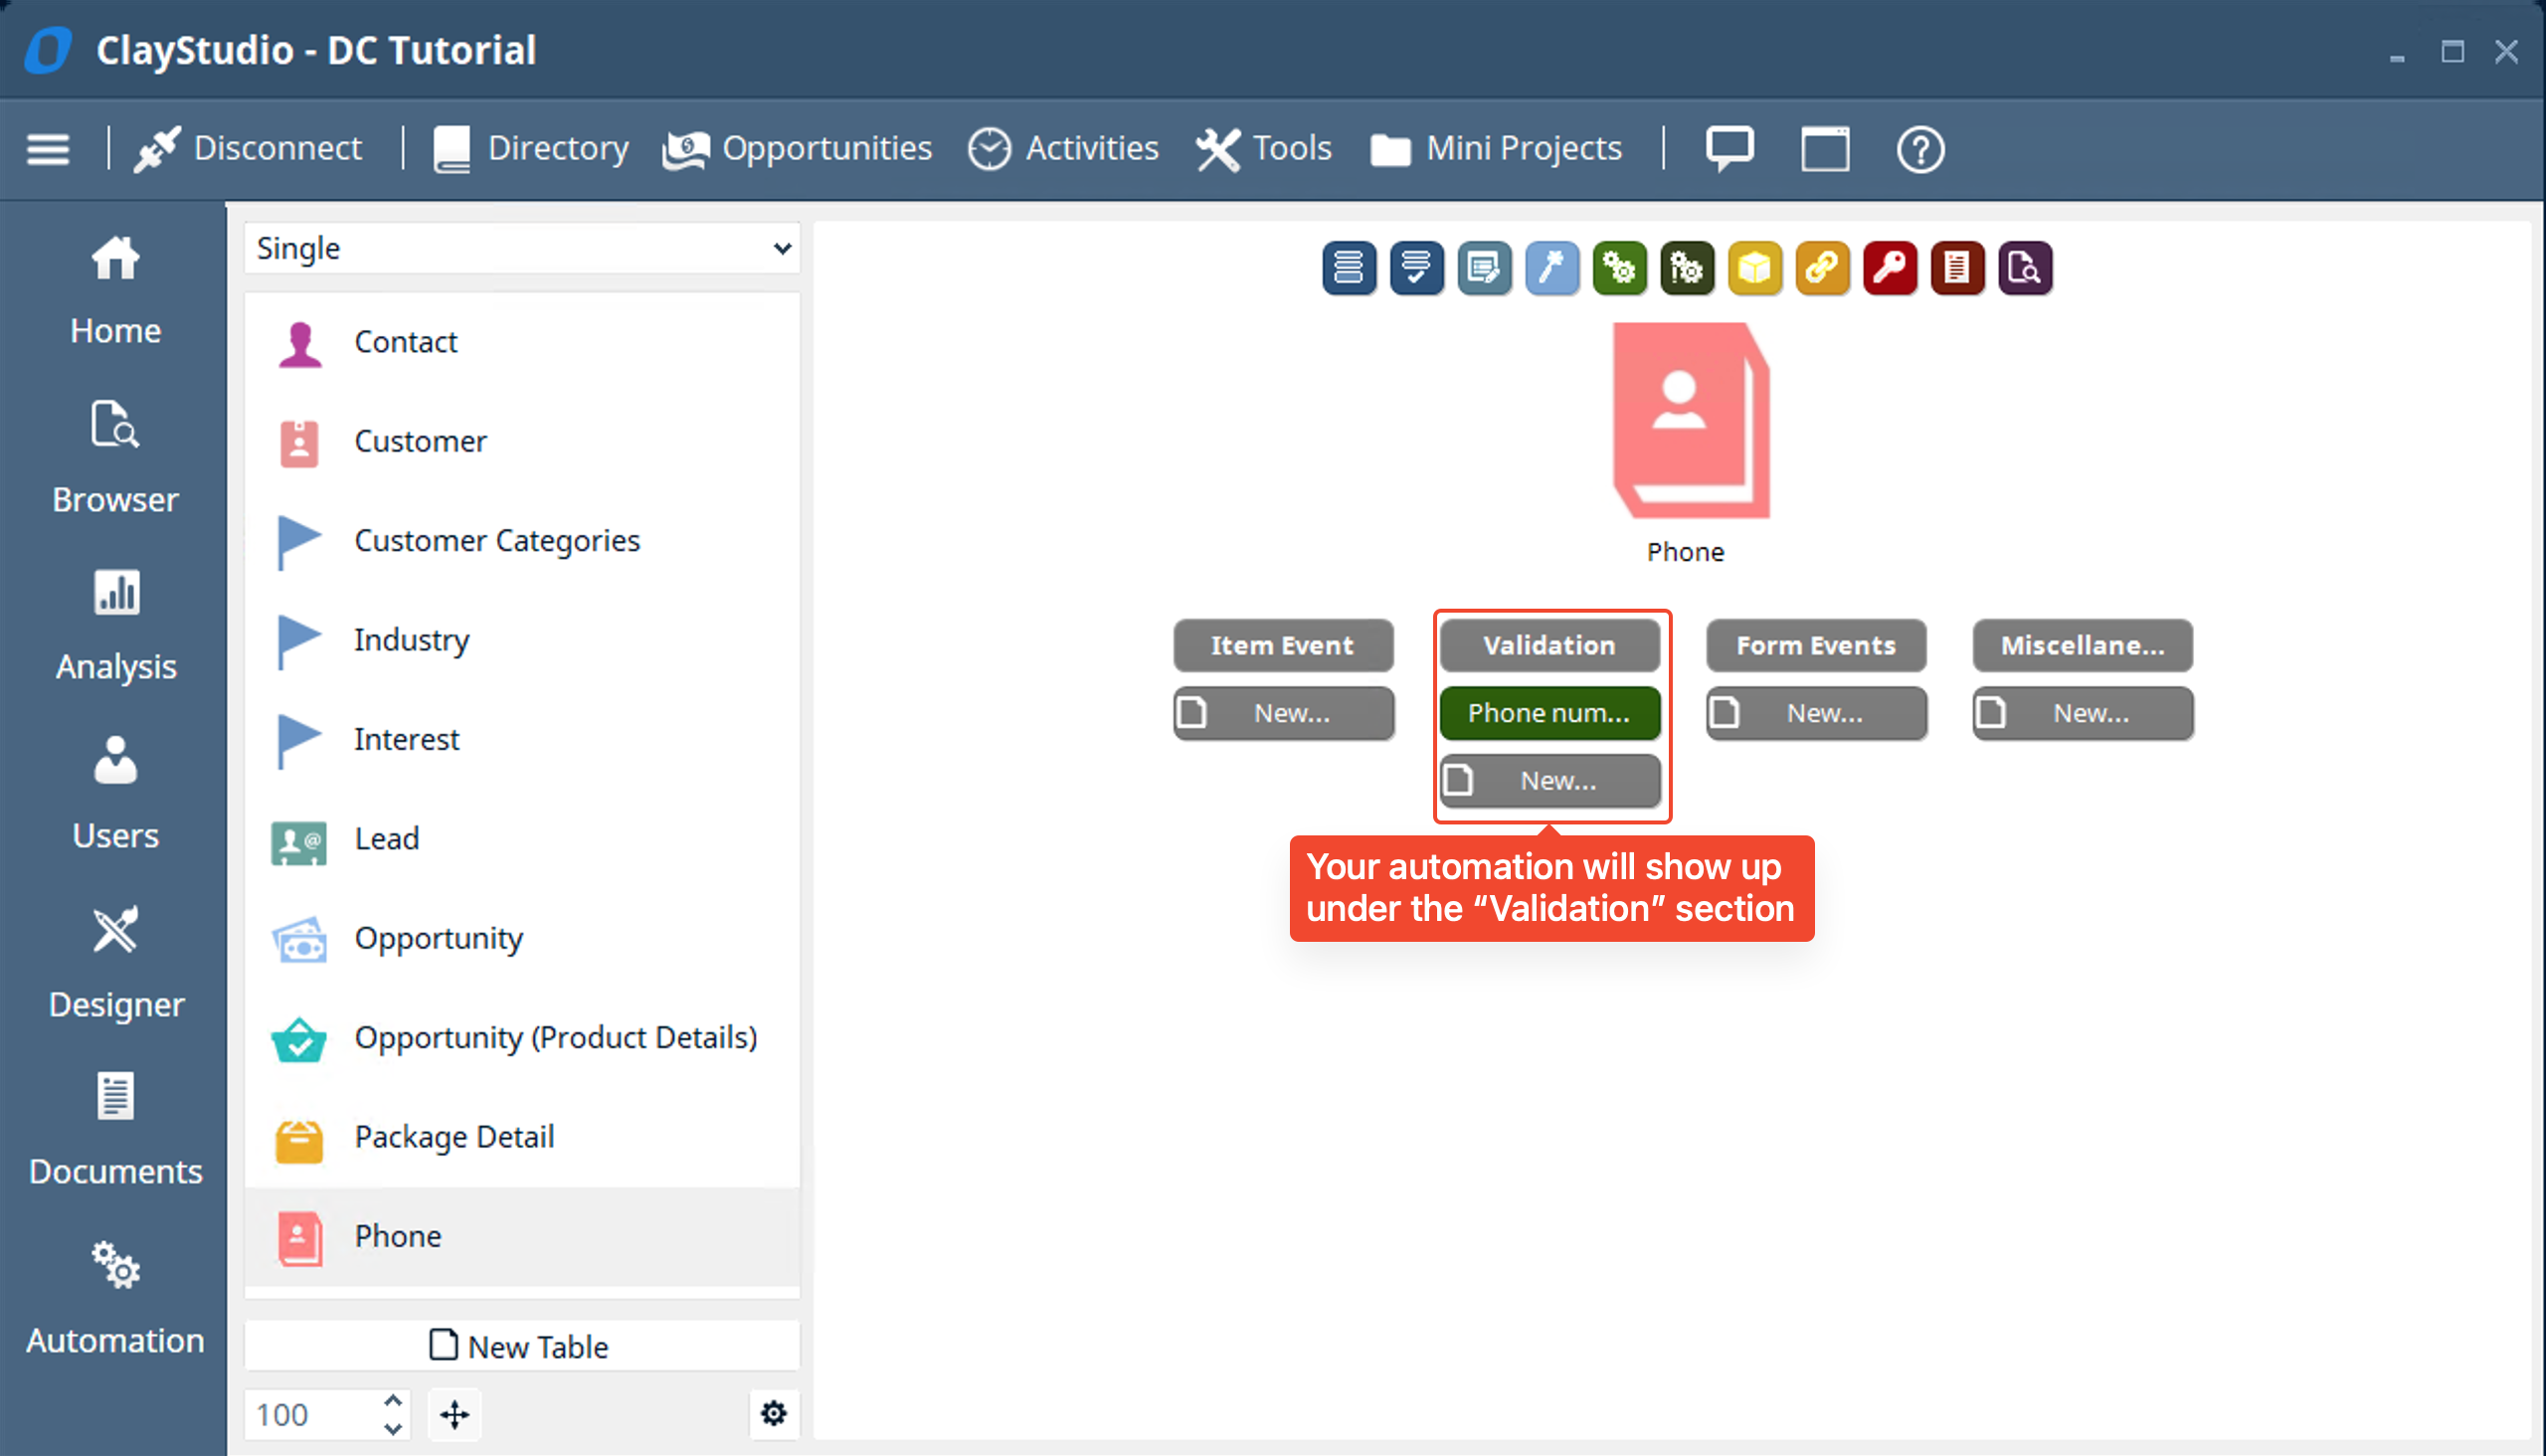
- Your automation will show up in the “Validation” section. You can click on the automation to view and edit it.
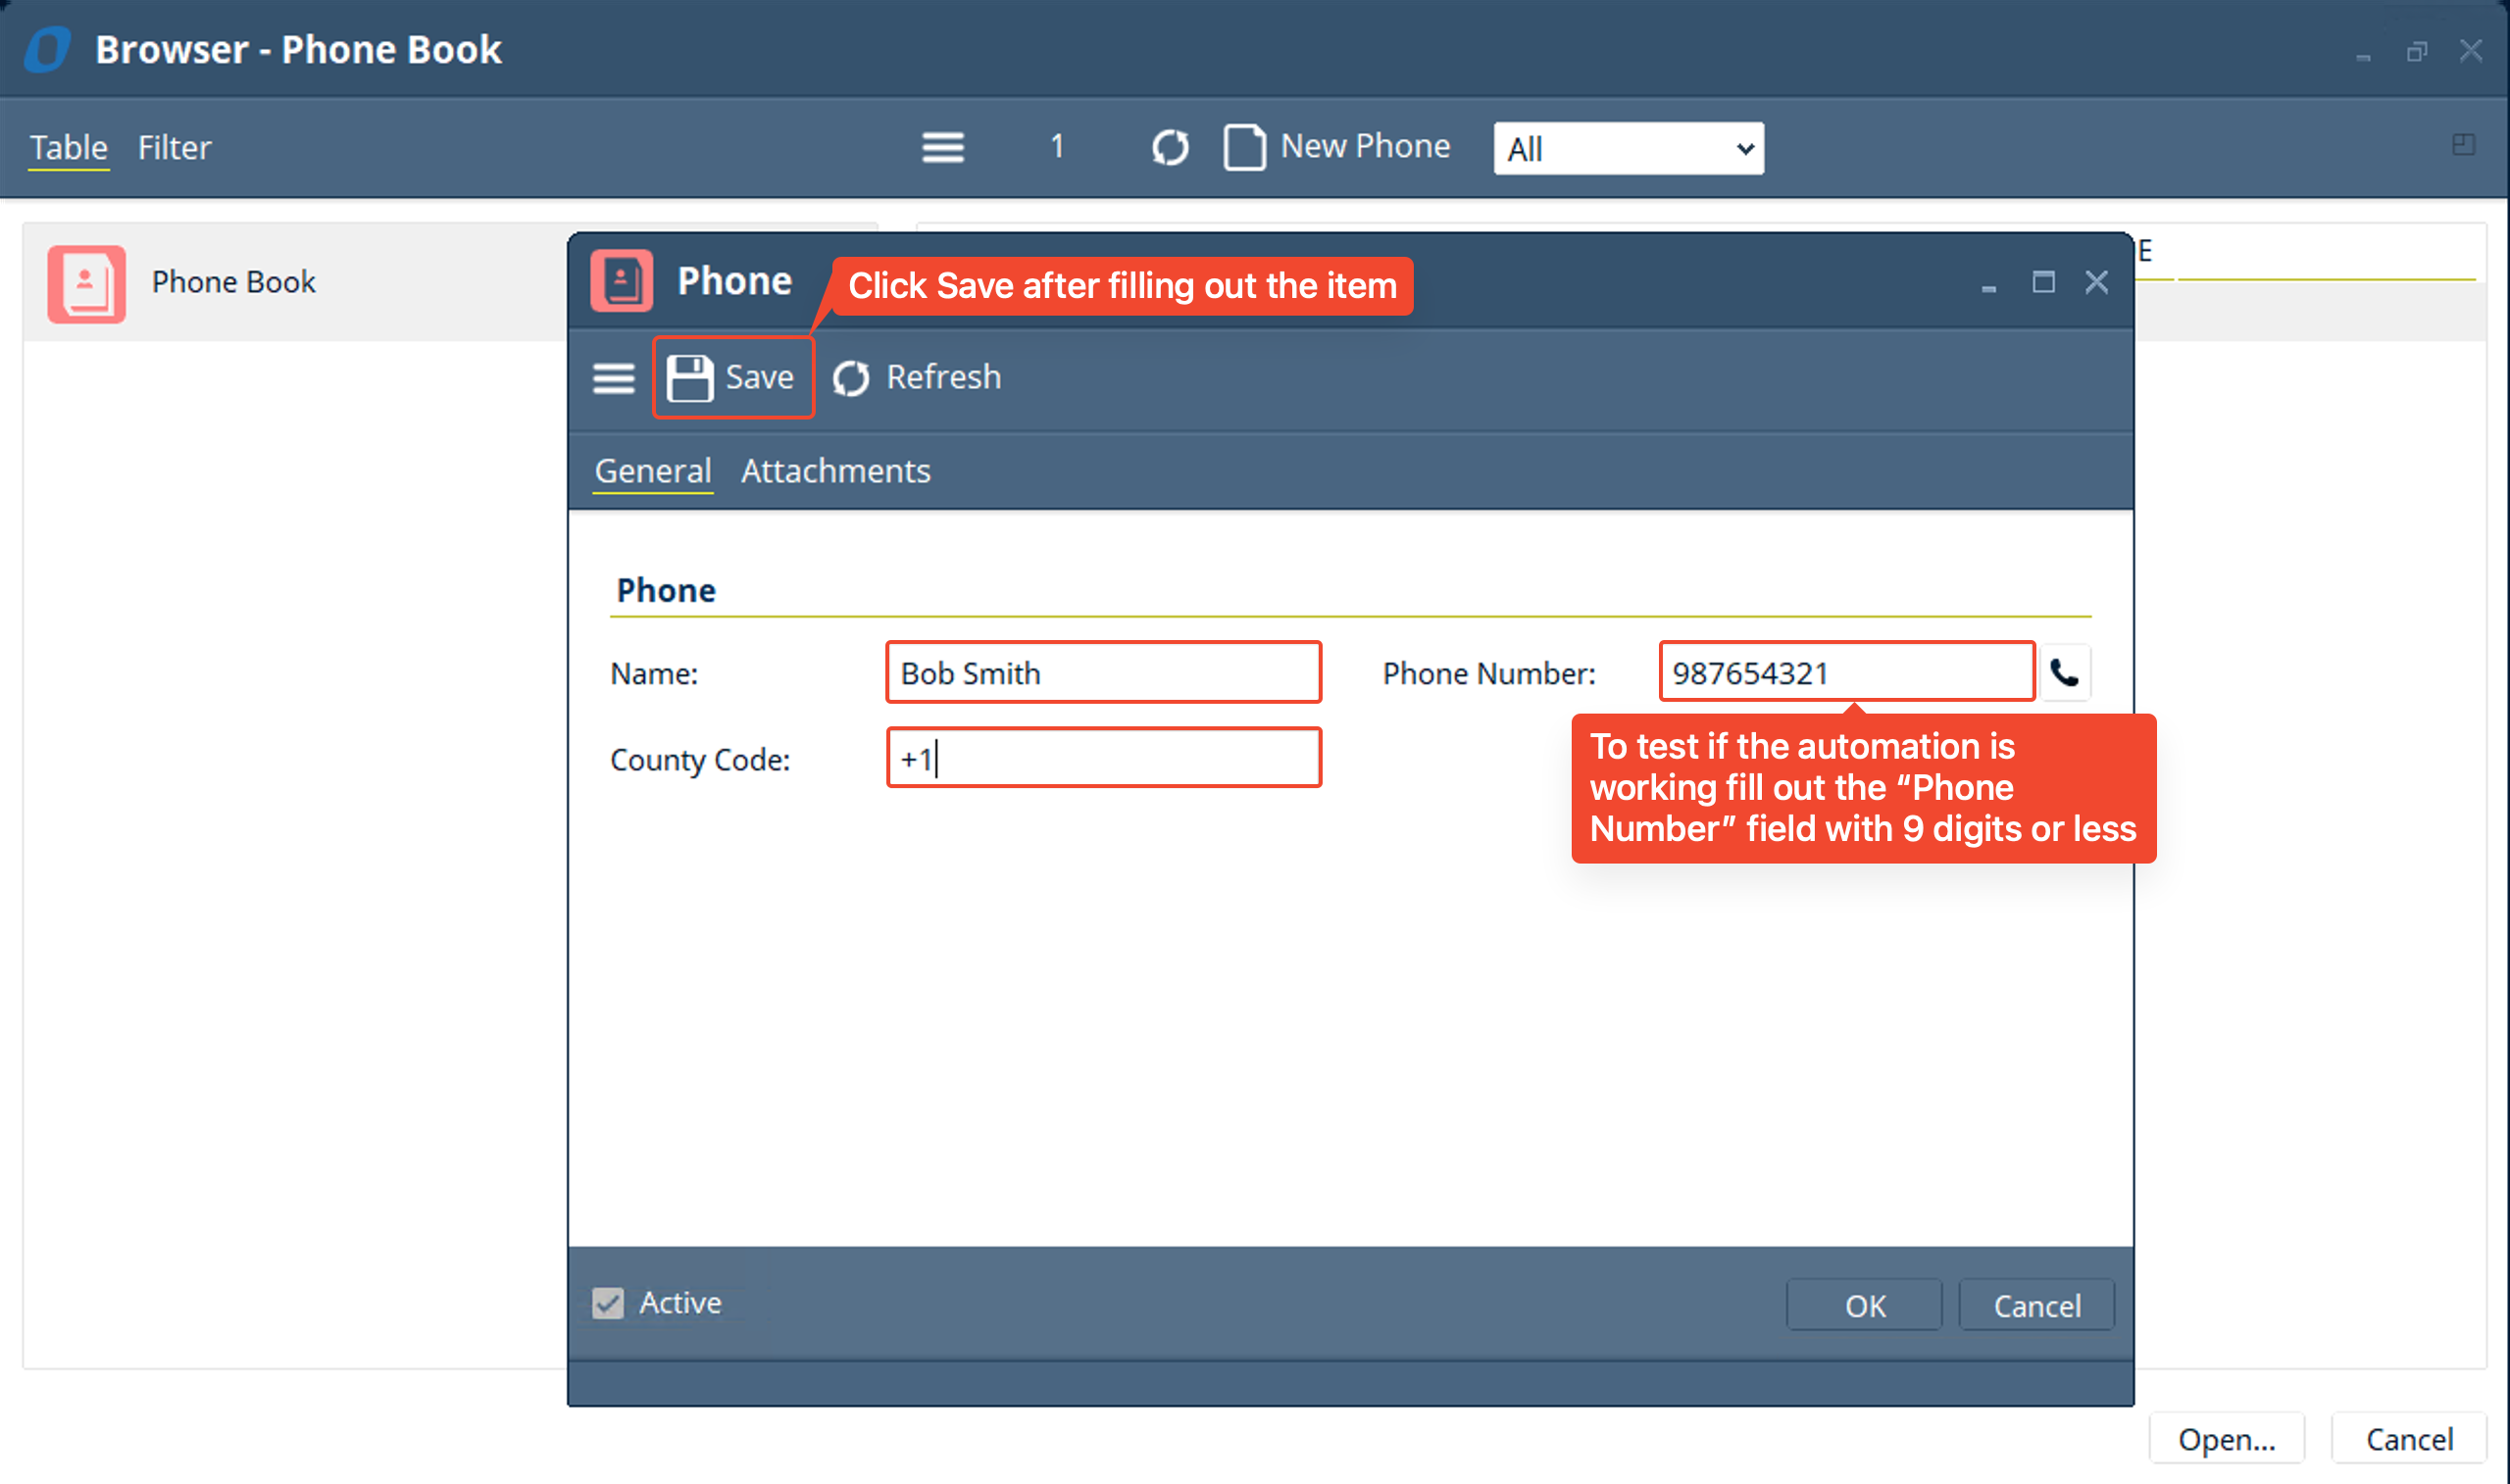
- Now let’s test to see if out automation works. Click on the “Browser tool” like we did before in this mini project and add a “New Phone”. Fill out the Name, Phone Number, and Country Code. To test if the automation is working we will want to have 9 or less digits in the “Phone Number” field.
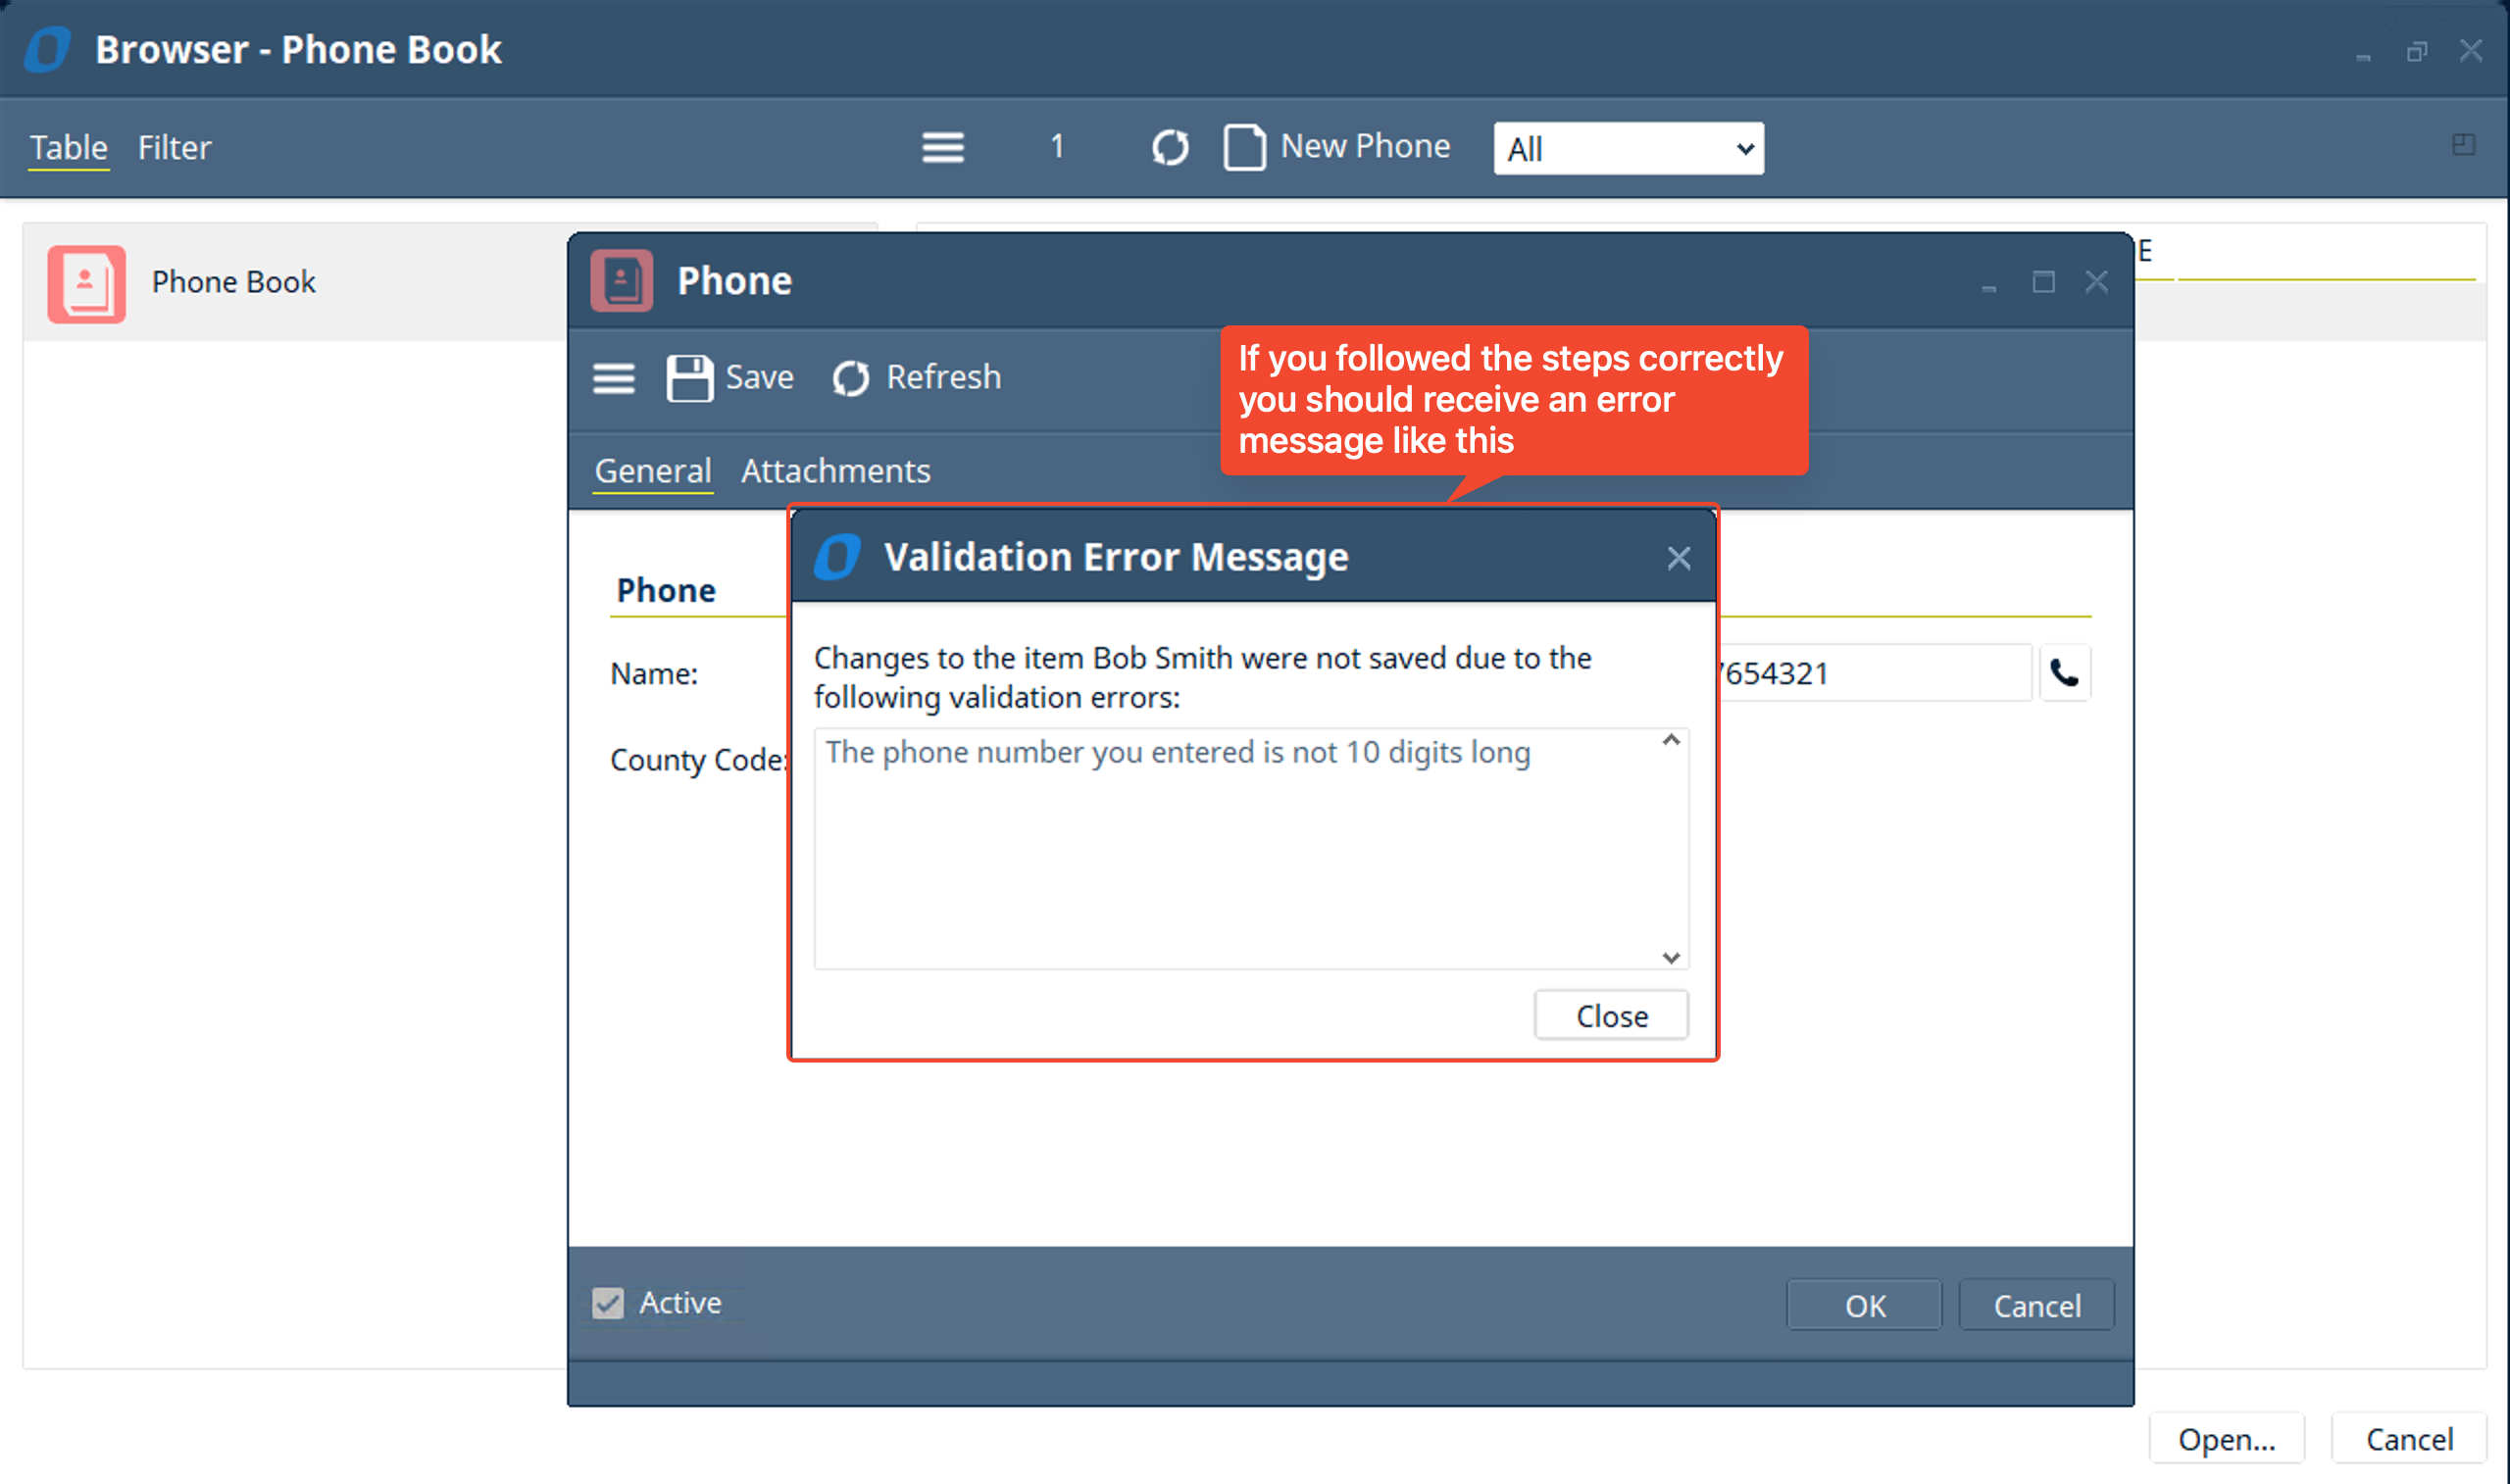
- If everything was done properly the custom error message you put in the “Validation Automation” should pop up
- Lastly click “Close” on that error message and make sure the “Phone Number” field is 10 digits long and “Save”. The “Phone” item should now be added without an error message.
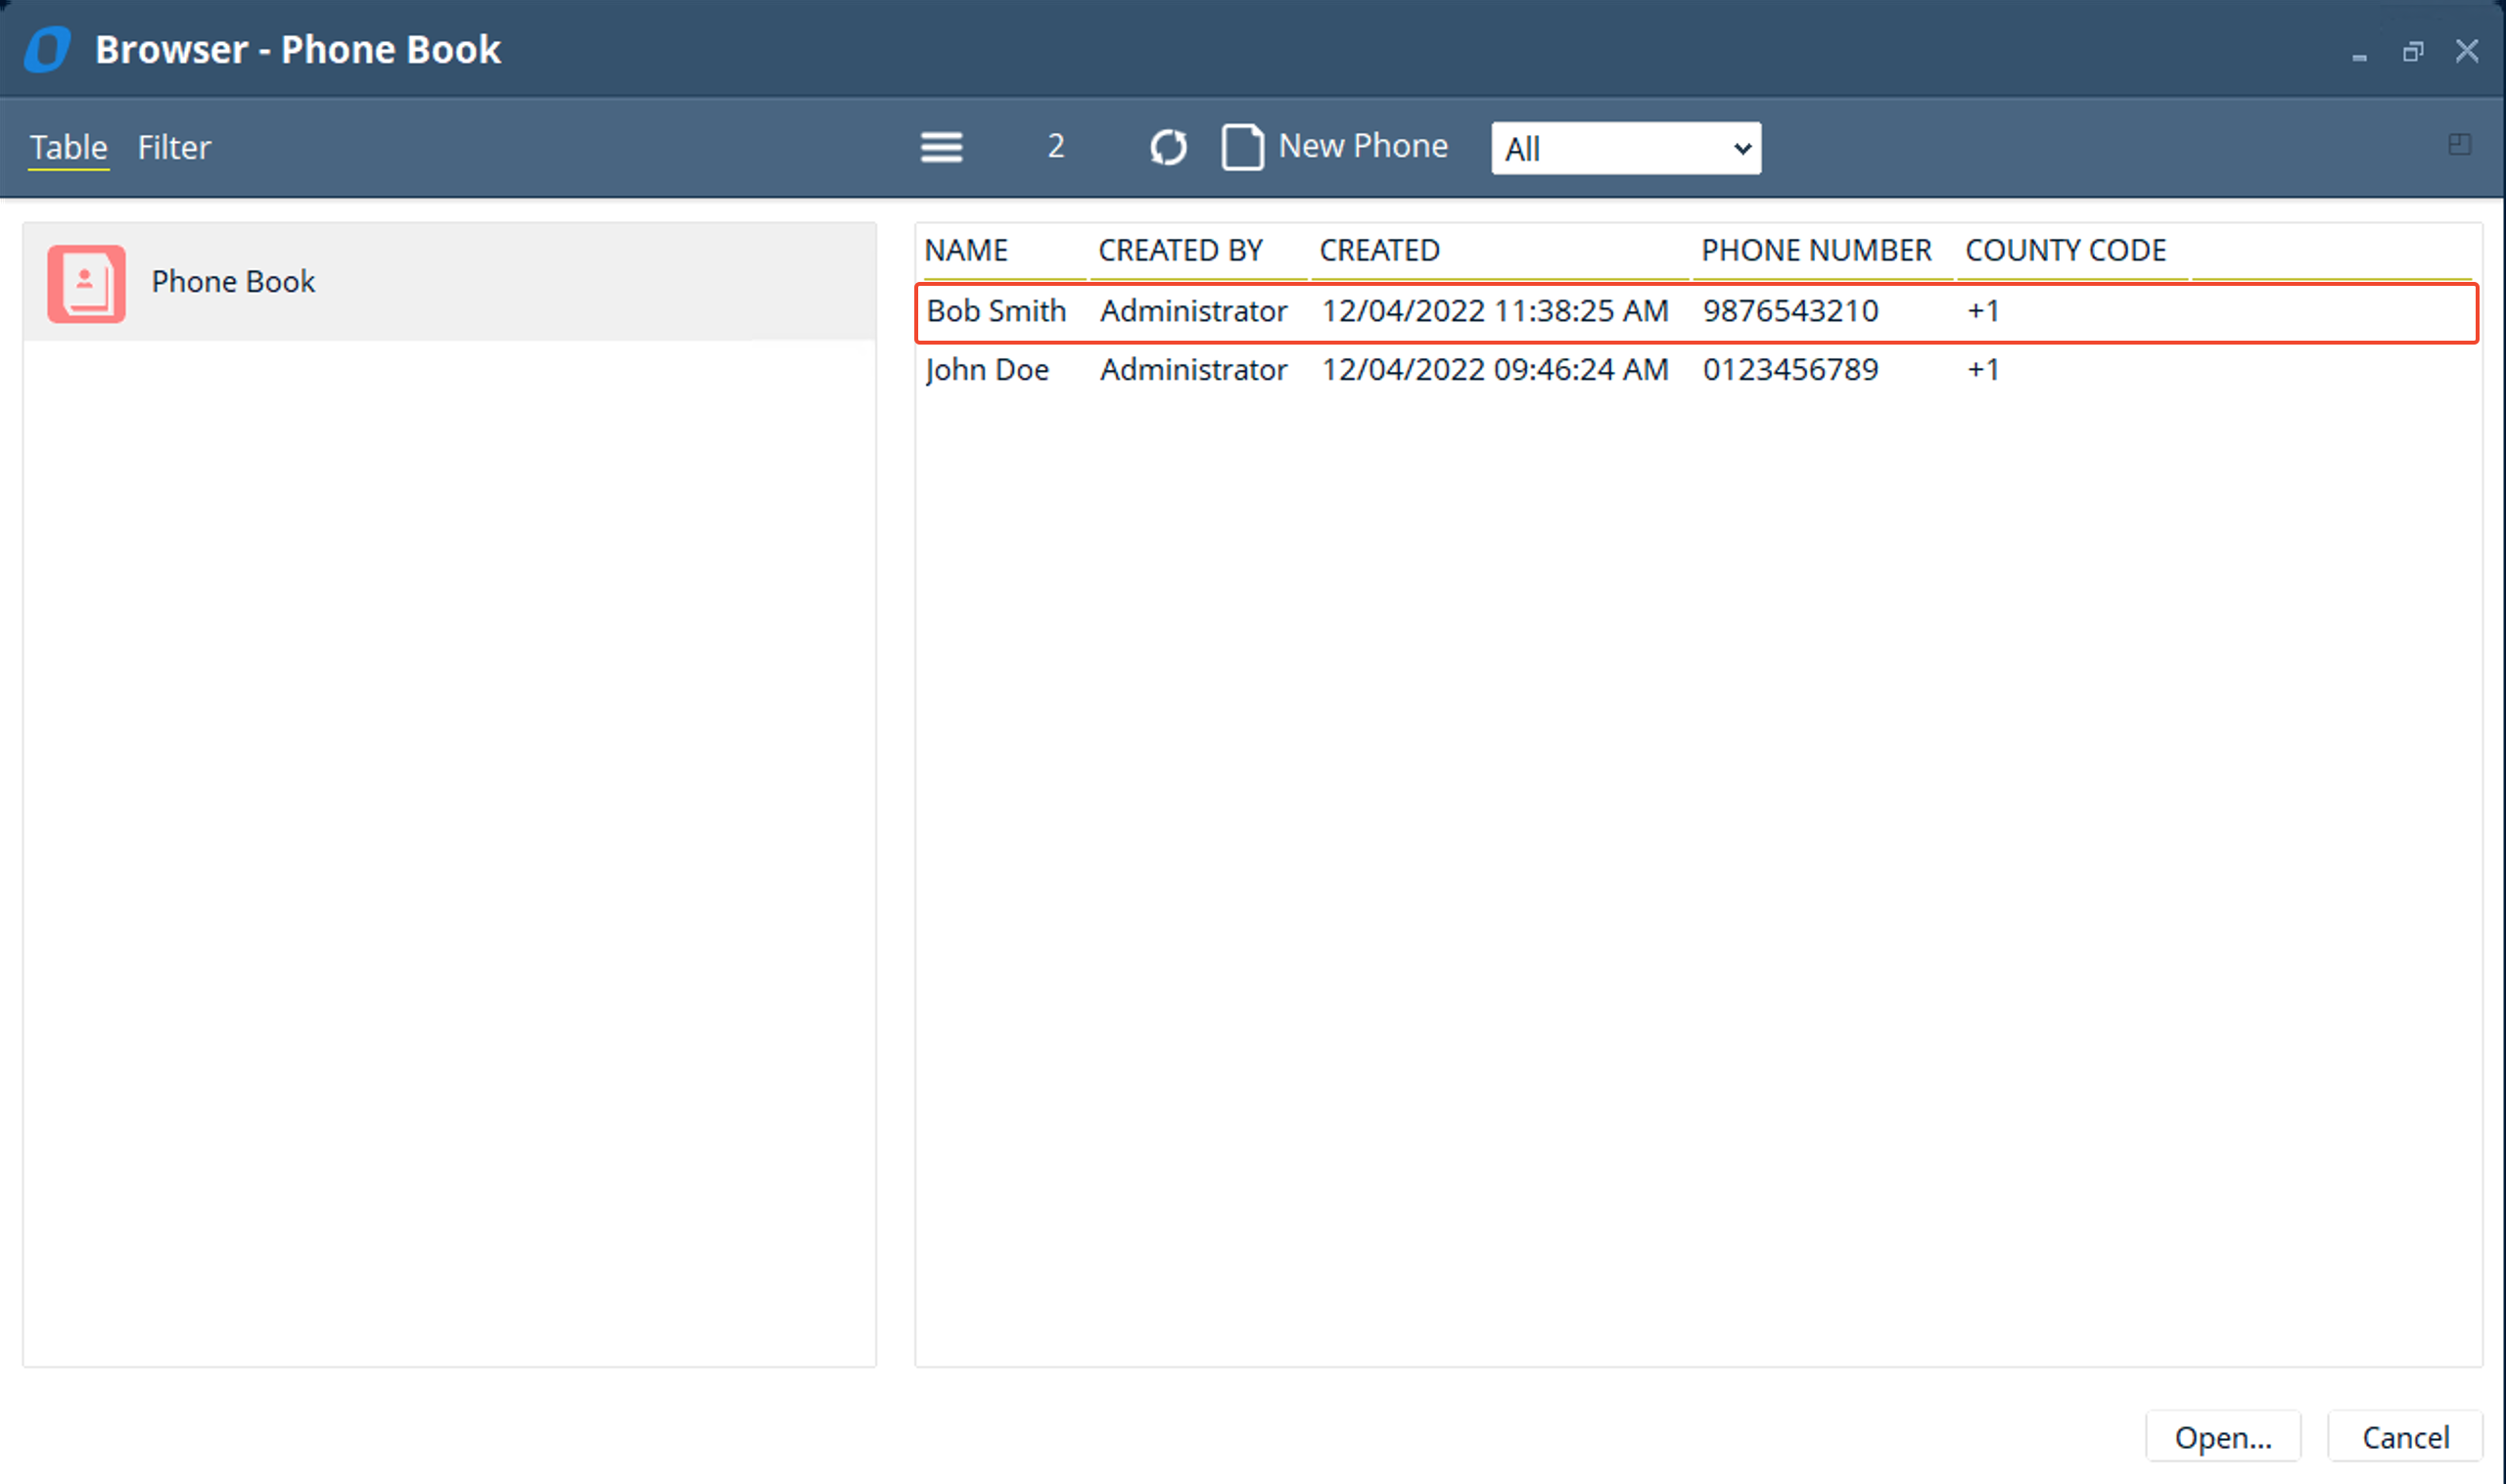
- Congratulations! you successfully added your own custom error message to make sure data is properly added to your phone book database
Challenge
The challenge for this mini project is to add another field to hold the “Extension” of the phone number since sometimes you will want to store a specific extension for the phone number you want to save.
HINT