Order Management
 Level | 2 |
|---|---|
| Core? | Core |
 Duration | 20 minutes |
| Duration (minutes) | 20 |
 Learn | Analysis ToolCreate User ActionCustom FunctionField PropertiesFlat Table AnalysisLinked FieldsRelated ItemsUser Actions Tool |
 Prerequisite | Adding DataFieldsFiltersTables |
Intro
Are you looking for an easy way to manage Orders for your store? Look no further! With Digital-Clay, you can easily link two tables together with a linked field, allowing you to add multiple Order Items to a single Order. In this project, you will learn how to create a solution to manage Orders, and the basics of linking two tables together.
What you will learn
- WHAT a linked field is
- HOW to link two tables together
- WHY you would want to link two tables together
- WHAT are field properties
- WHAT a create action is
- HOW to make a create action
- WHAT a list of items is
- WHAT a list of related items are
- HOW to do math with linked tables
- WHAT does the AnalysisQuery function do
- HOW to use the analysis tool and flat list to do aggregations on data
FAQs
- What is a linked field?
A linked field is a field in a table that allows you to link two tables together.
- How do I link two tables together?
To link two tables together, you need to create a linked field in one of the tables. This will create a link group in both directions, allowing you to filter records in both tables.
- Why would I want to link two tables together?
Linking two tables together can be useful if you need to create relationships between different records. For example, if you need to add multiple items to an Order, you can link the Order table to the Item table with a linked field.
- What are field properties?
Field properties are settings that you can use to customize a field in a table. Field properties allow you to customize things like data type, visibility, and more.
- What is a create action?
A create action is a way to quickly create a new record in a table. Create actions can be used to quickly create new records, such as Orders or Items.
- How do I make a create action?
To make a create action, you need to go to the table settings and click on the "Create Action" tab. From there, you can customize the create action and add it to your table.
- What is a list of items?
A list of items is a list of all the records in a table. It can be used to quickly view all the records in a table and make changes to them.
- What is a list of related items?
A list of related items is a list of all the records in a table that are related to another record. For example, if you link an Order table to an Item table, the list of related items would be a list of all the Items linked to an Order.
- How do I do math with linked tables?
You can use the AnalysisQuery function to do math with linked tables. The AnalysisQuery function allows you to do calculations on data from linked tables.
- What does the AnalysisQuery function do?
The AnalysisQuery function allows you to do calculations on data from linked tables. The AnalysisQuery function can be used to calculate things like total cost, average cost, and more.
- How do I use the analysis tool and flat list to do aggregations on data?
You can use the analysis tool and flat list to do aggregations on data. With the analysis tool, you can quickly aggregate data from linked tables, such as calculating the total cost of an Order by summing the cost of all the Items in the Order. The flat list can also be used to quickly view aggregated data from linked tables.
Instructions
- Lets say we want to create a solution to manage Orders in Digital-Clay for a clothing store. To create a solution to manage Orders you will need to create a table to hold the Order information and a table to hold the “Clothing Products” you want to add the the “Order”. When creating an “Order” we want to have fields for a “Order ID”, “Customer Name”, a “Order Date”, a “Total Cost”. We also want to be able to easily add “Clothing Products” to an Order and view a list of the “Clothing Products” currently attached to the “Order”. The “Clothing Products” table will contain fields for “Name”, “Type”, “Cost”, and the “Order” the “Clothing Product” is linked to
- To start we will create a table for “Clothing Products”.
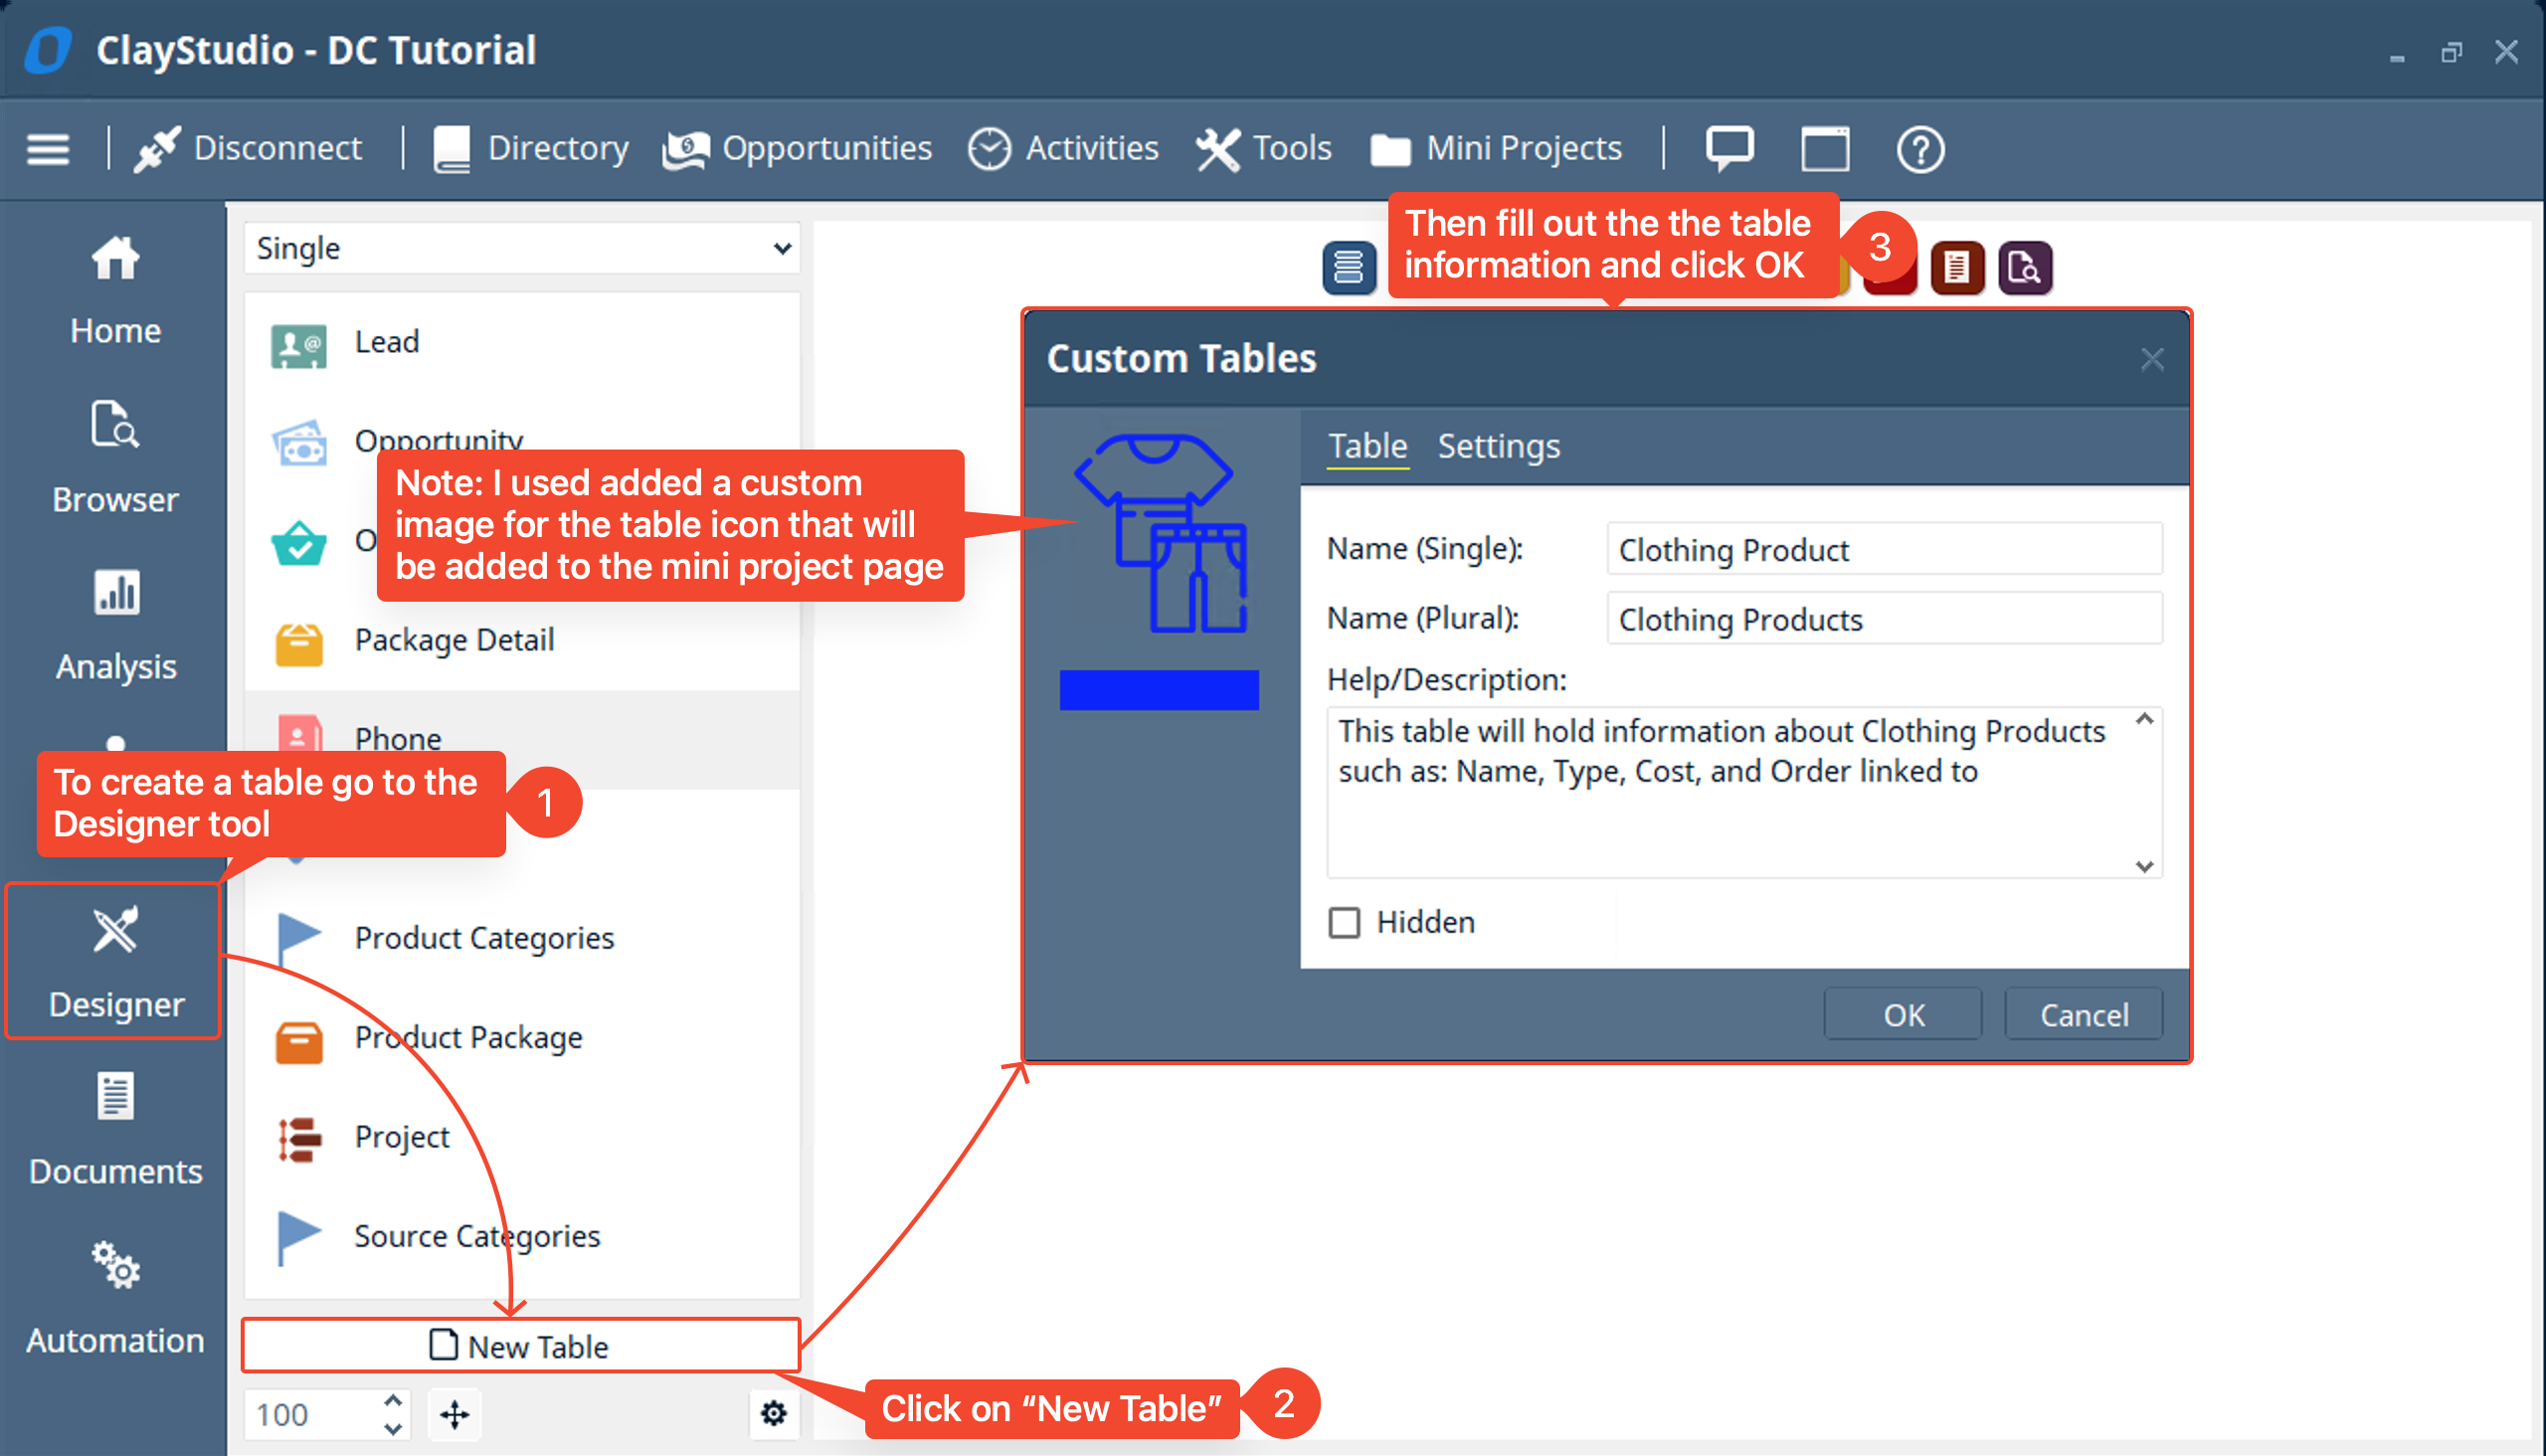
- Next we will add some fields to the “Clothing Product” table we created
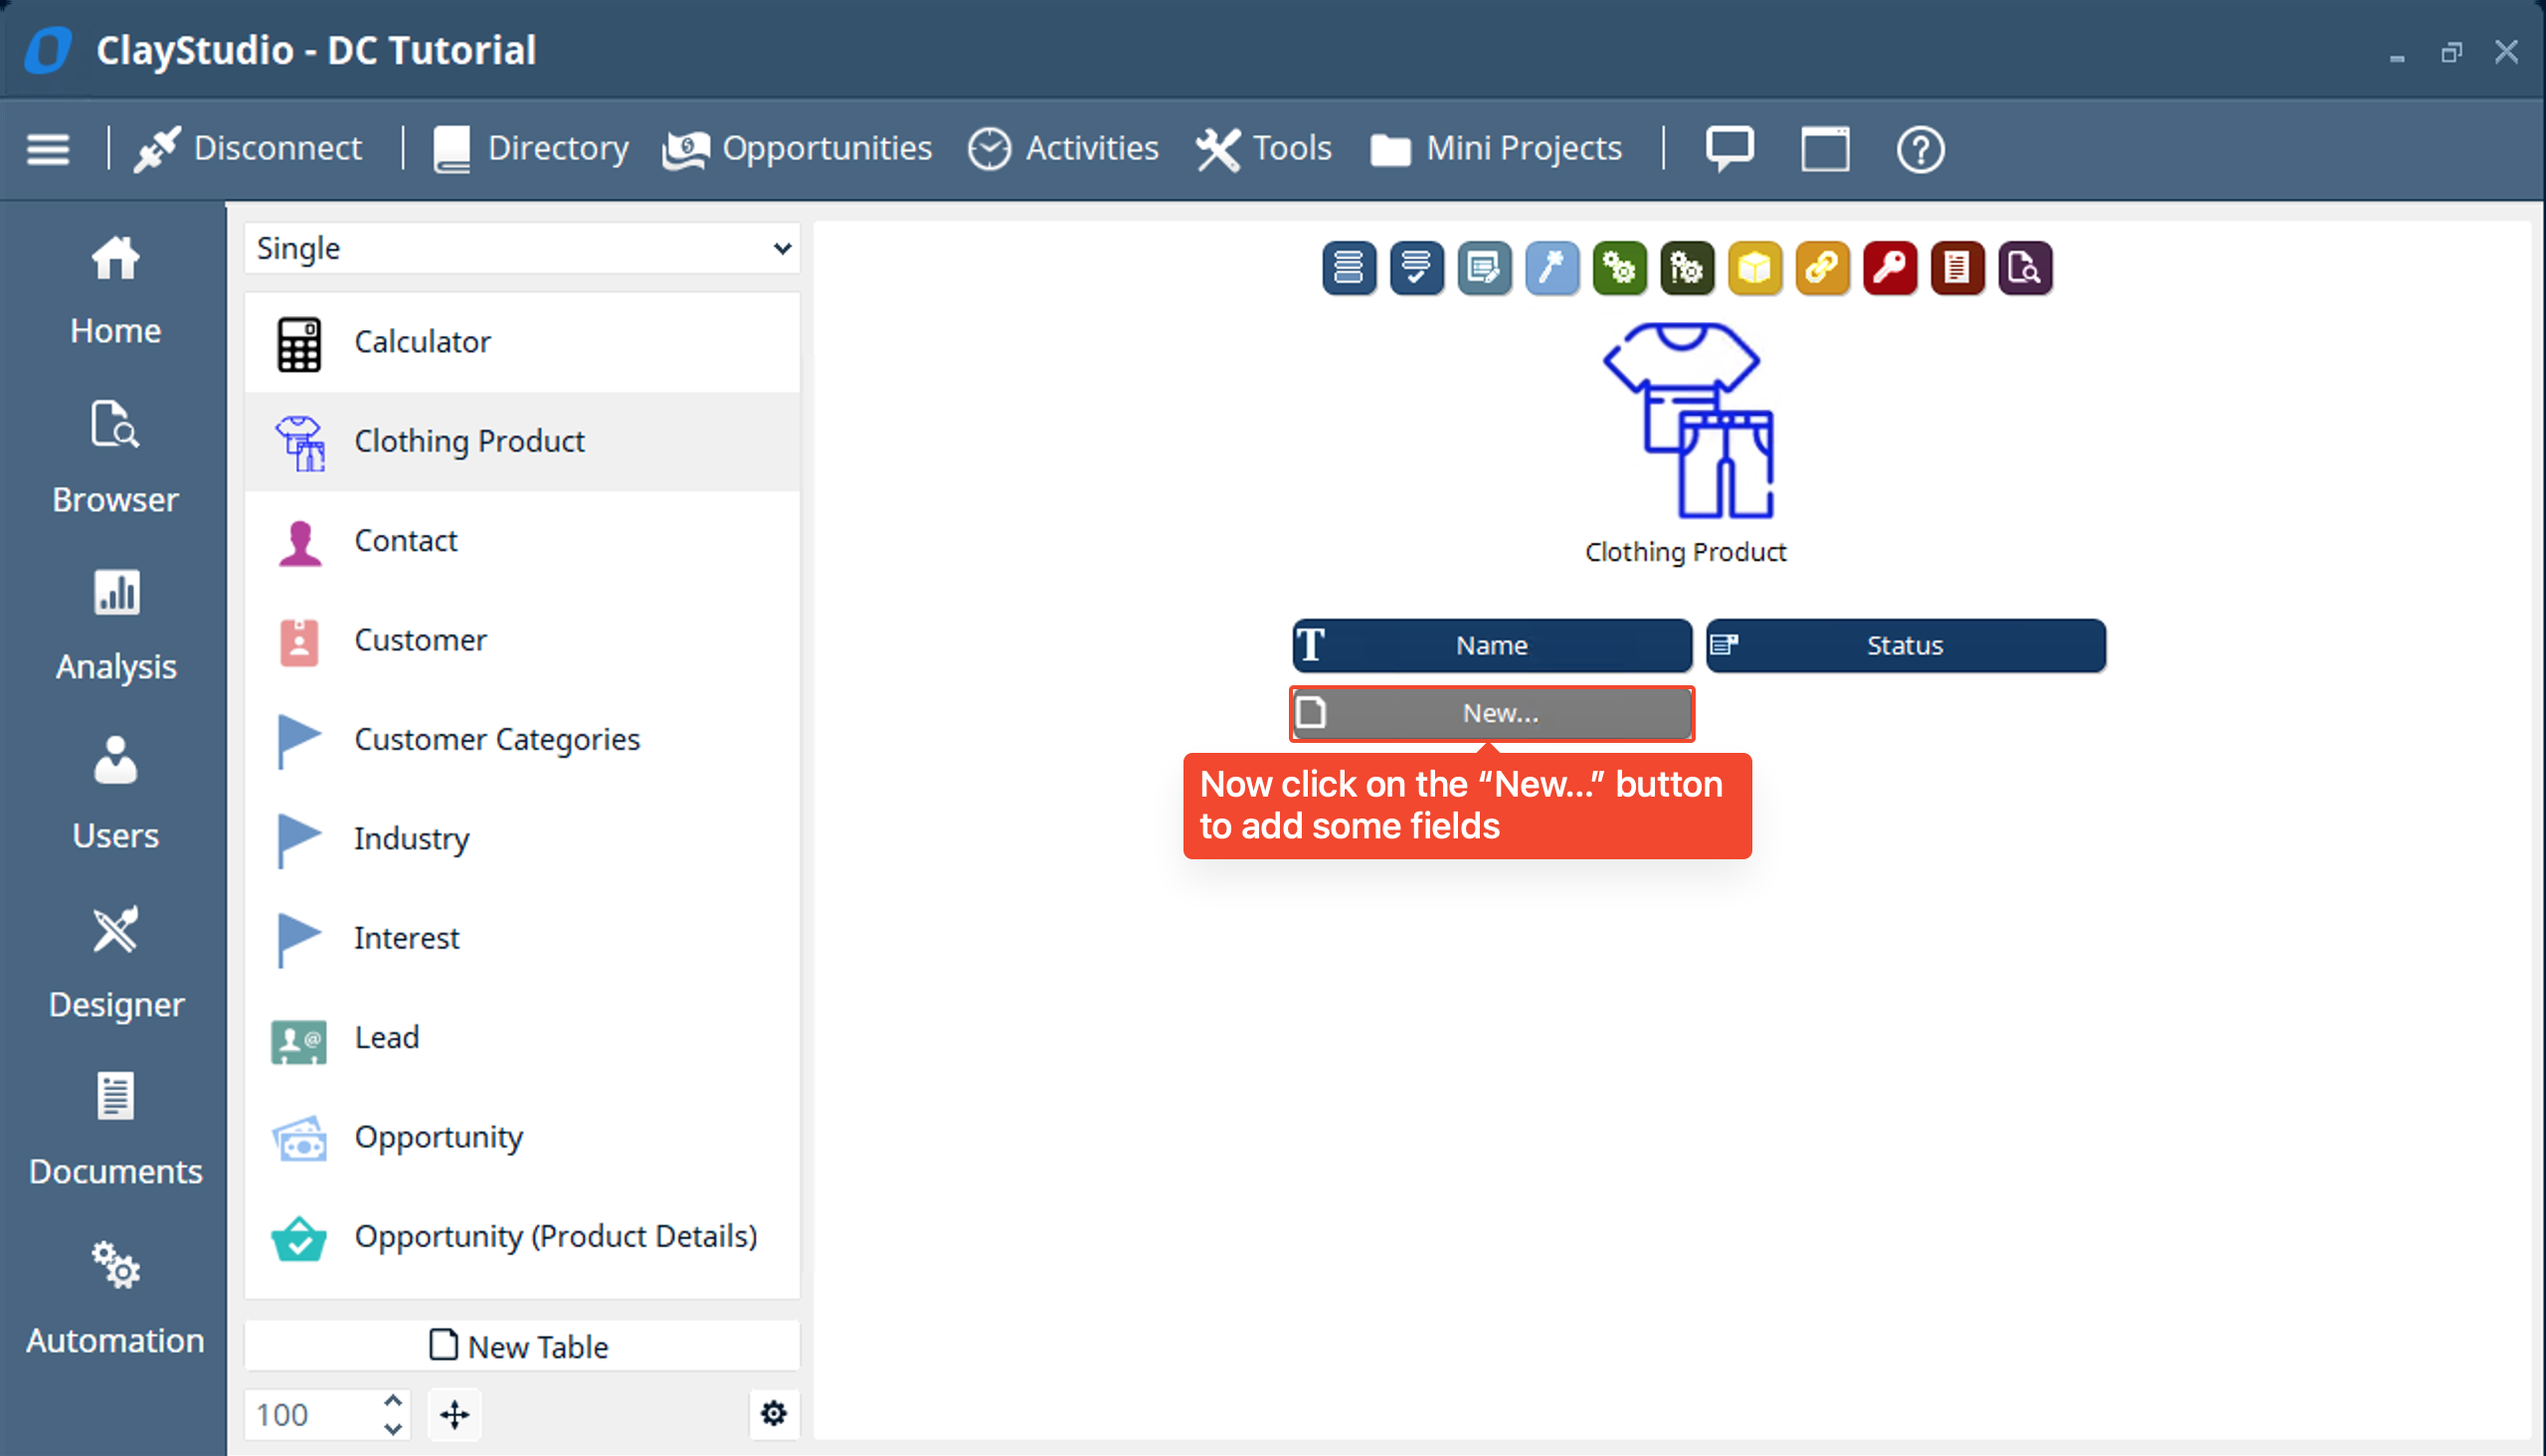
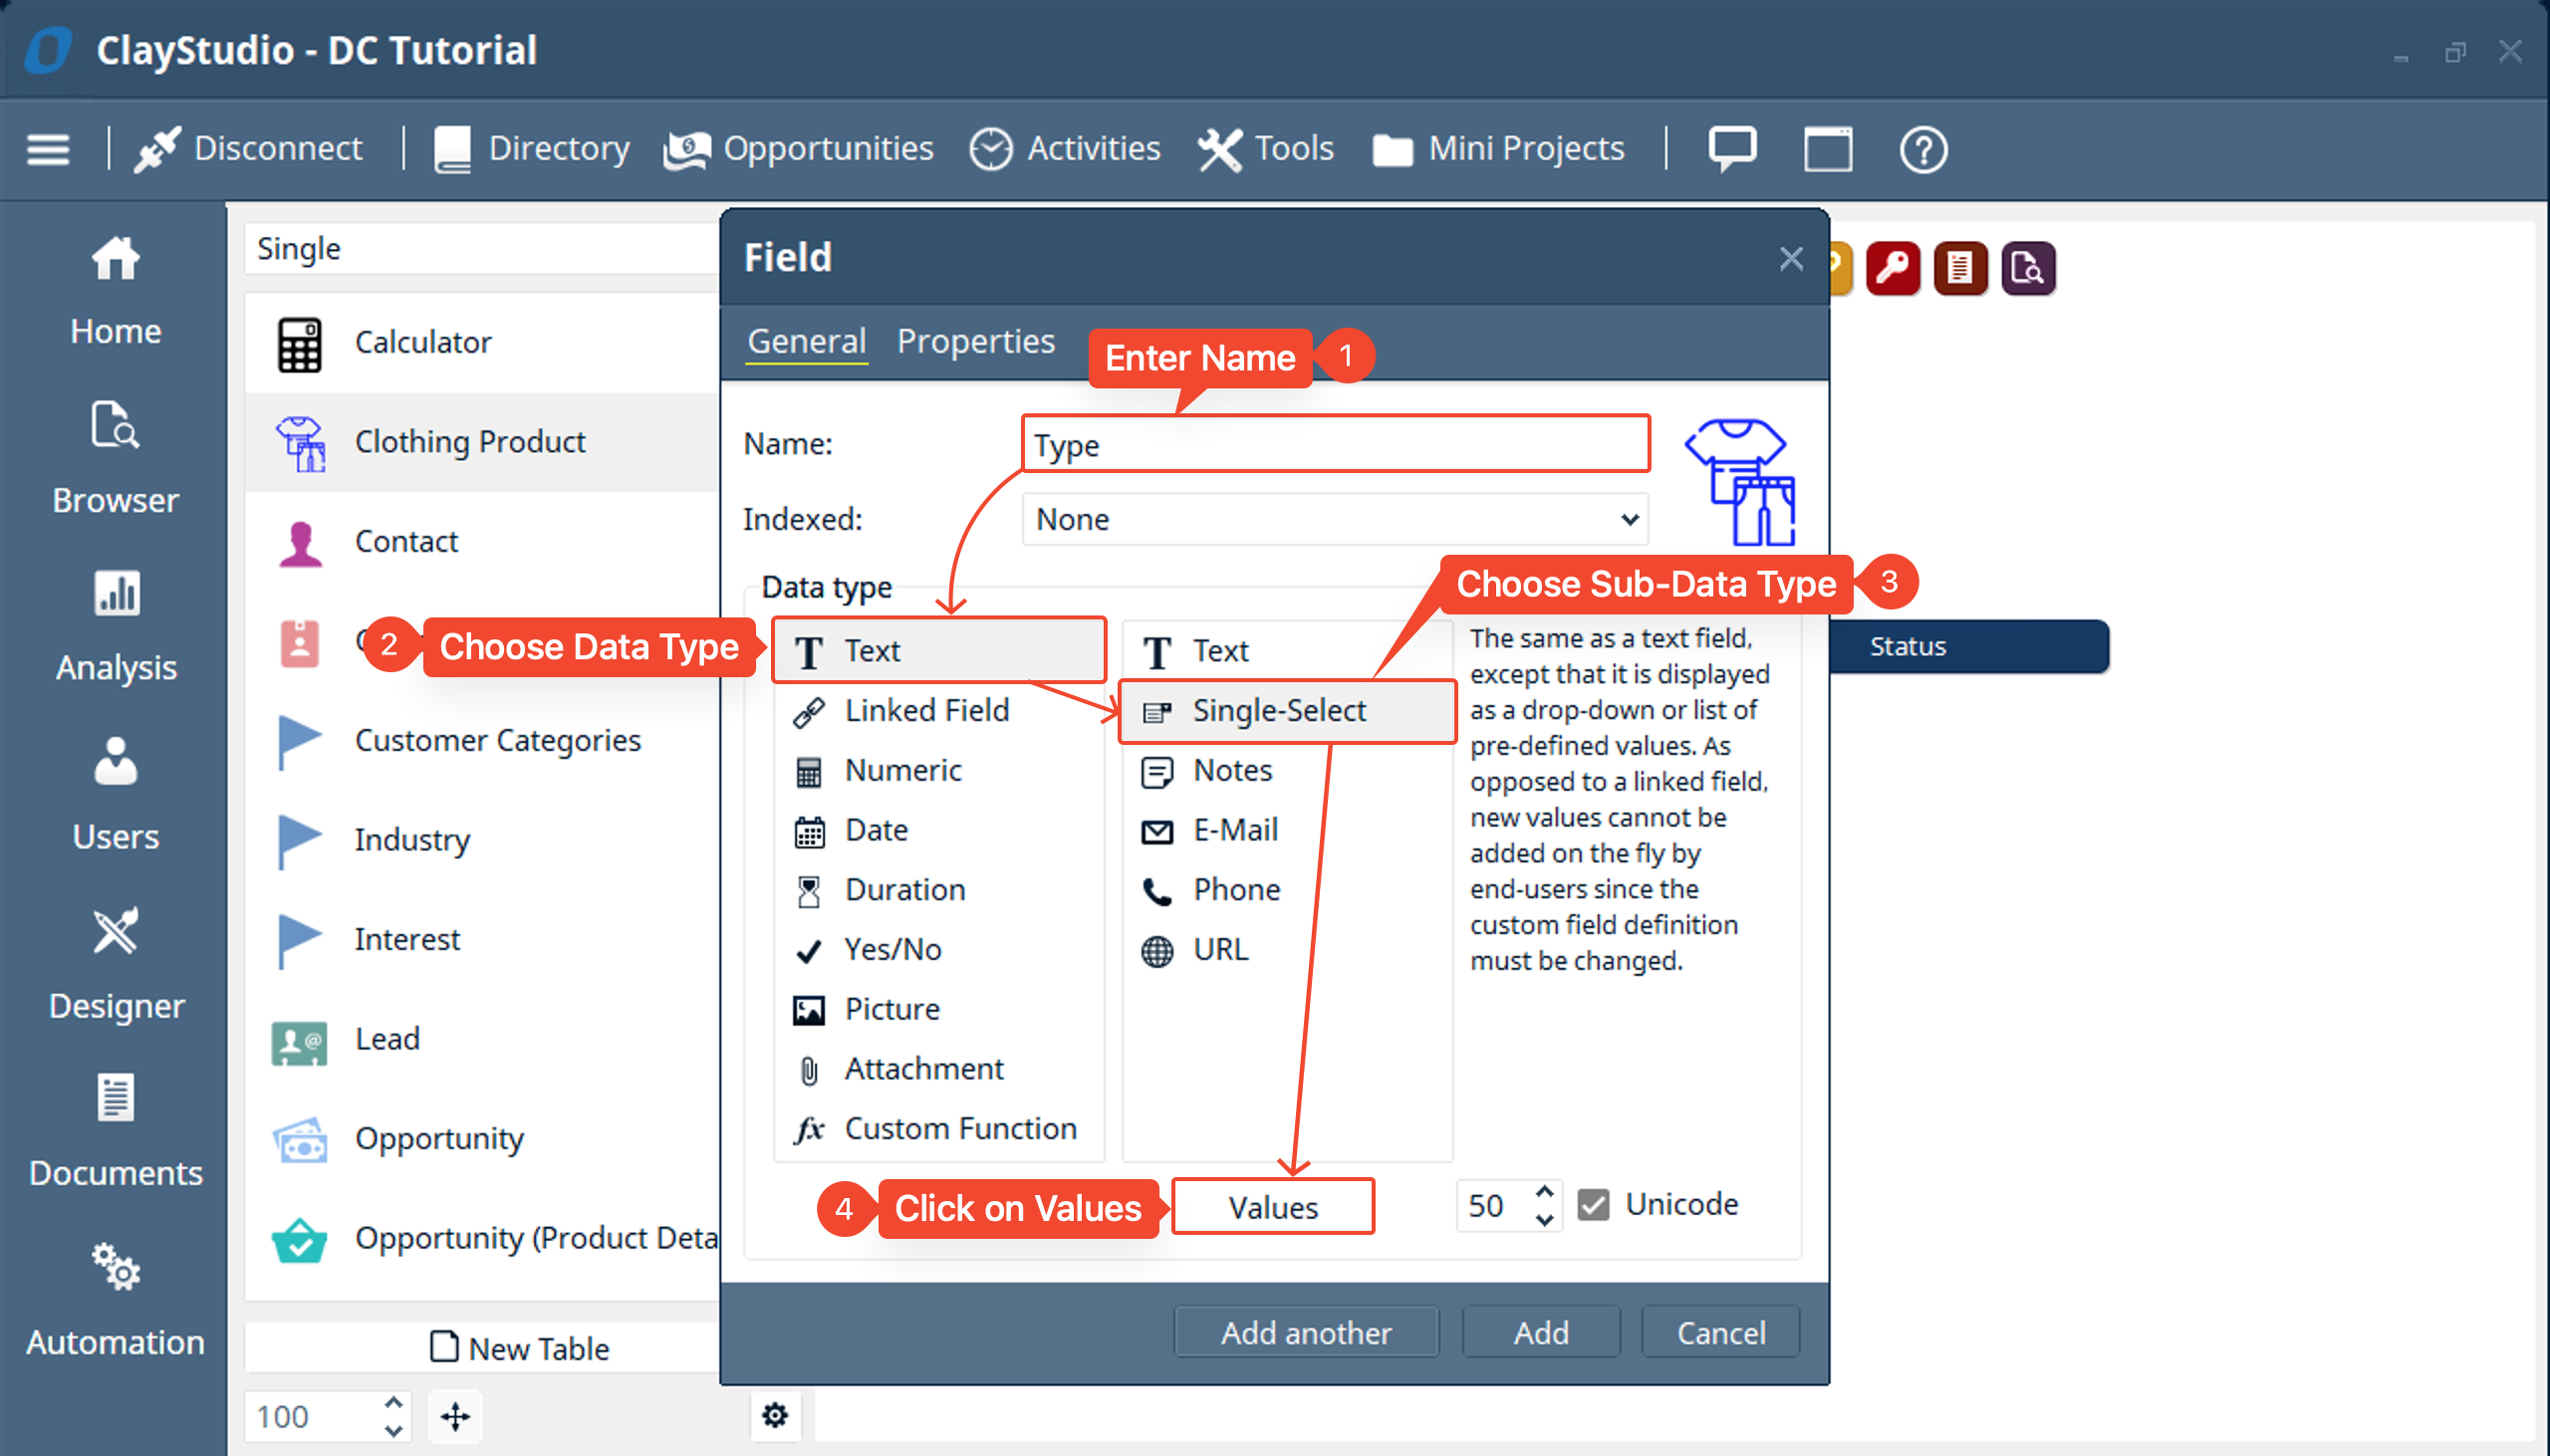
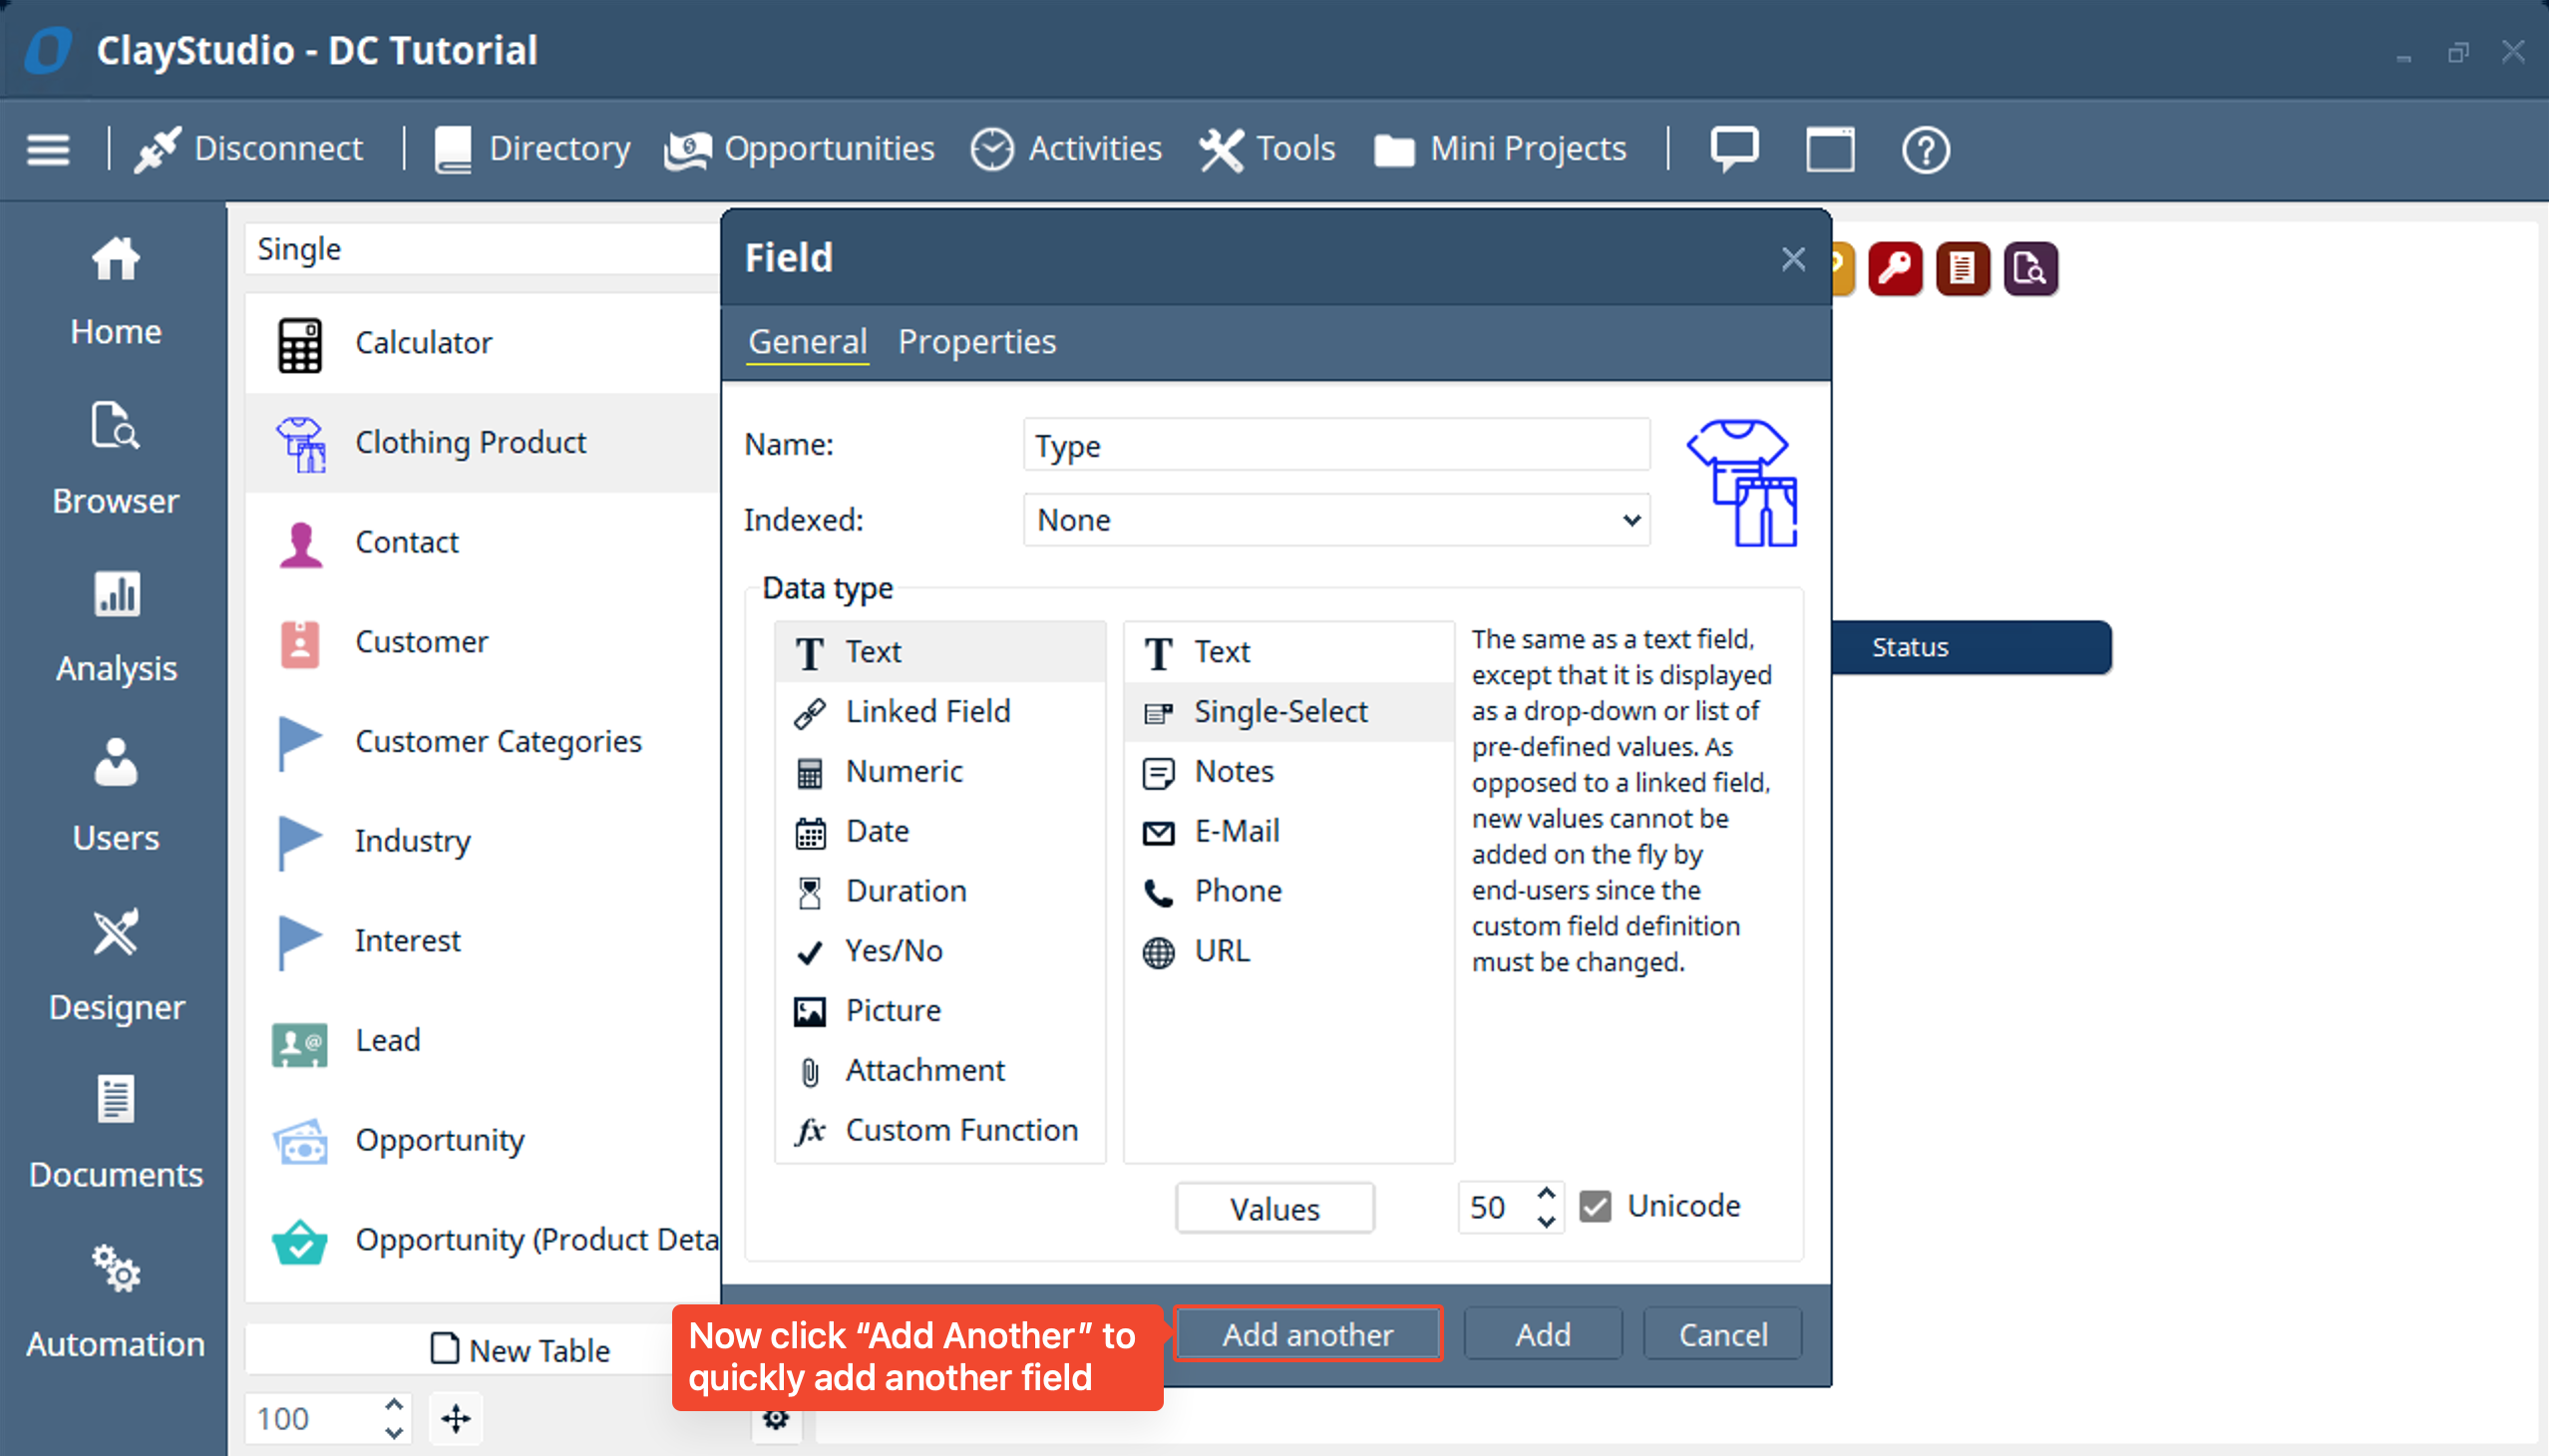
- Since we already have a name field built in we don’t need to create another one. We will add a field for “Type” and it will be a “Single Select” text field. When we select the “Single Select” data type we will see a “Values” button, click on it to add the values you want to choose from for the single select
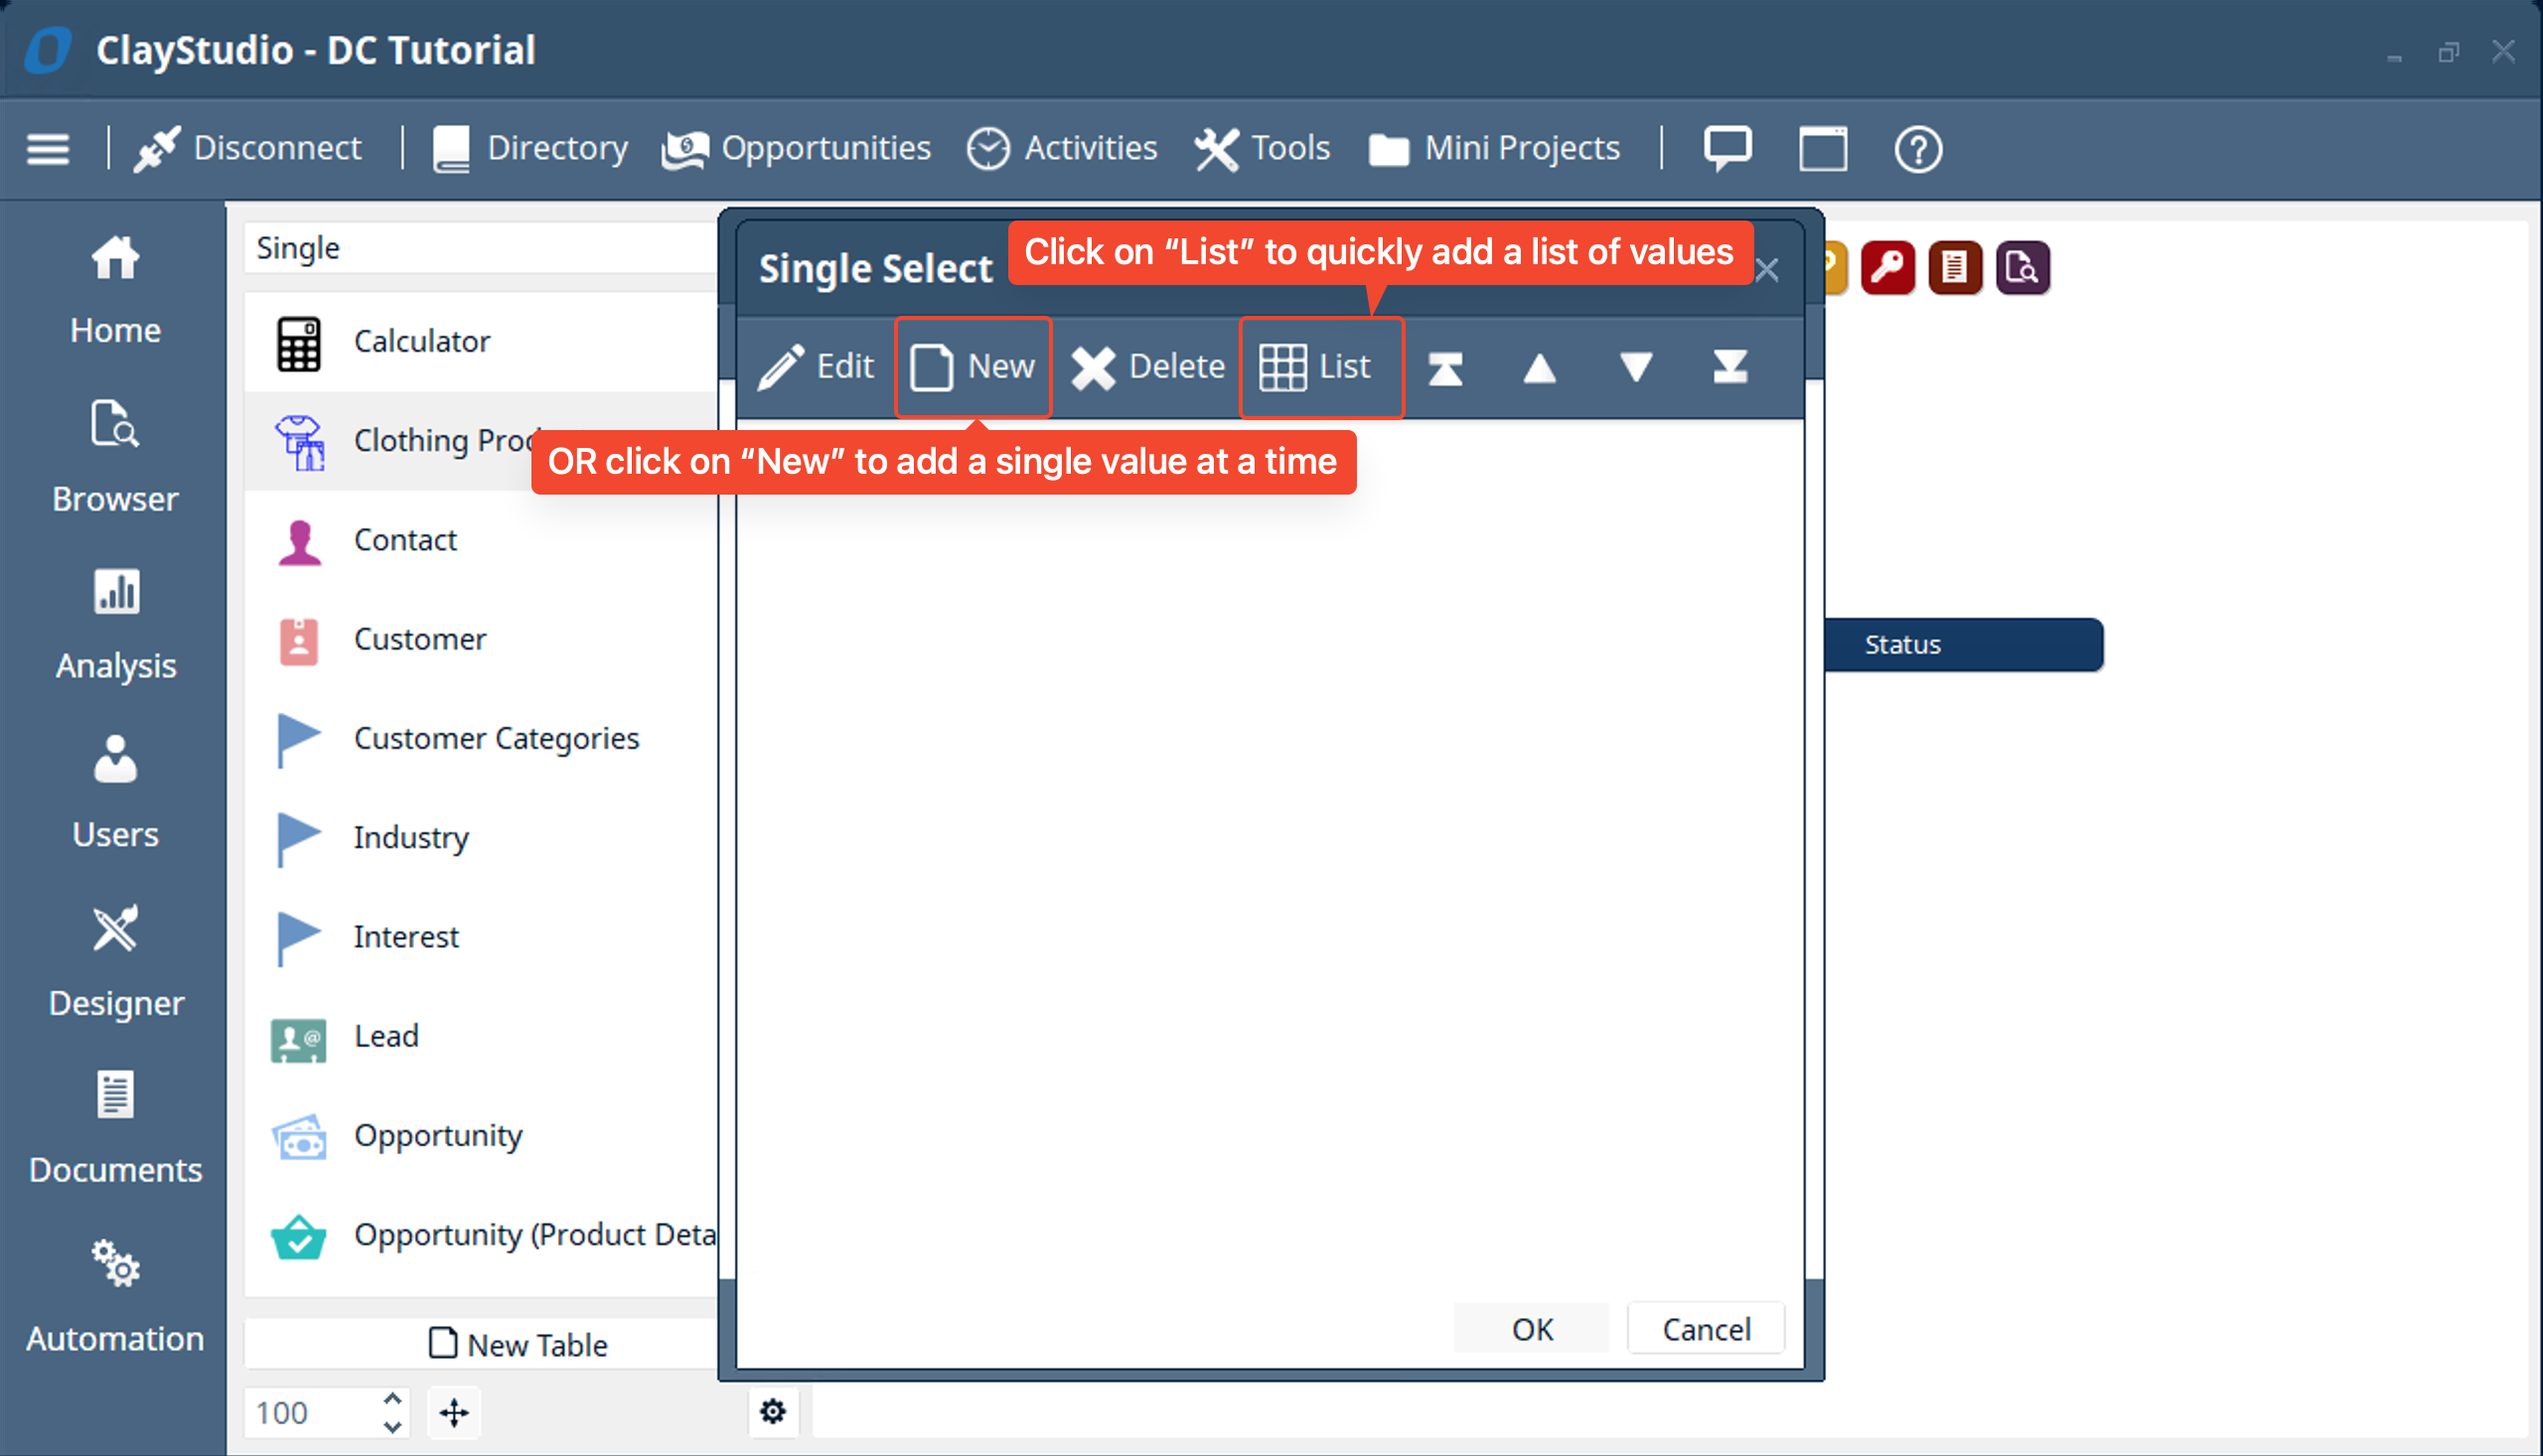
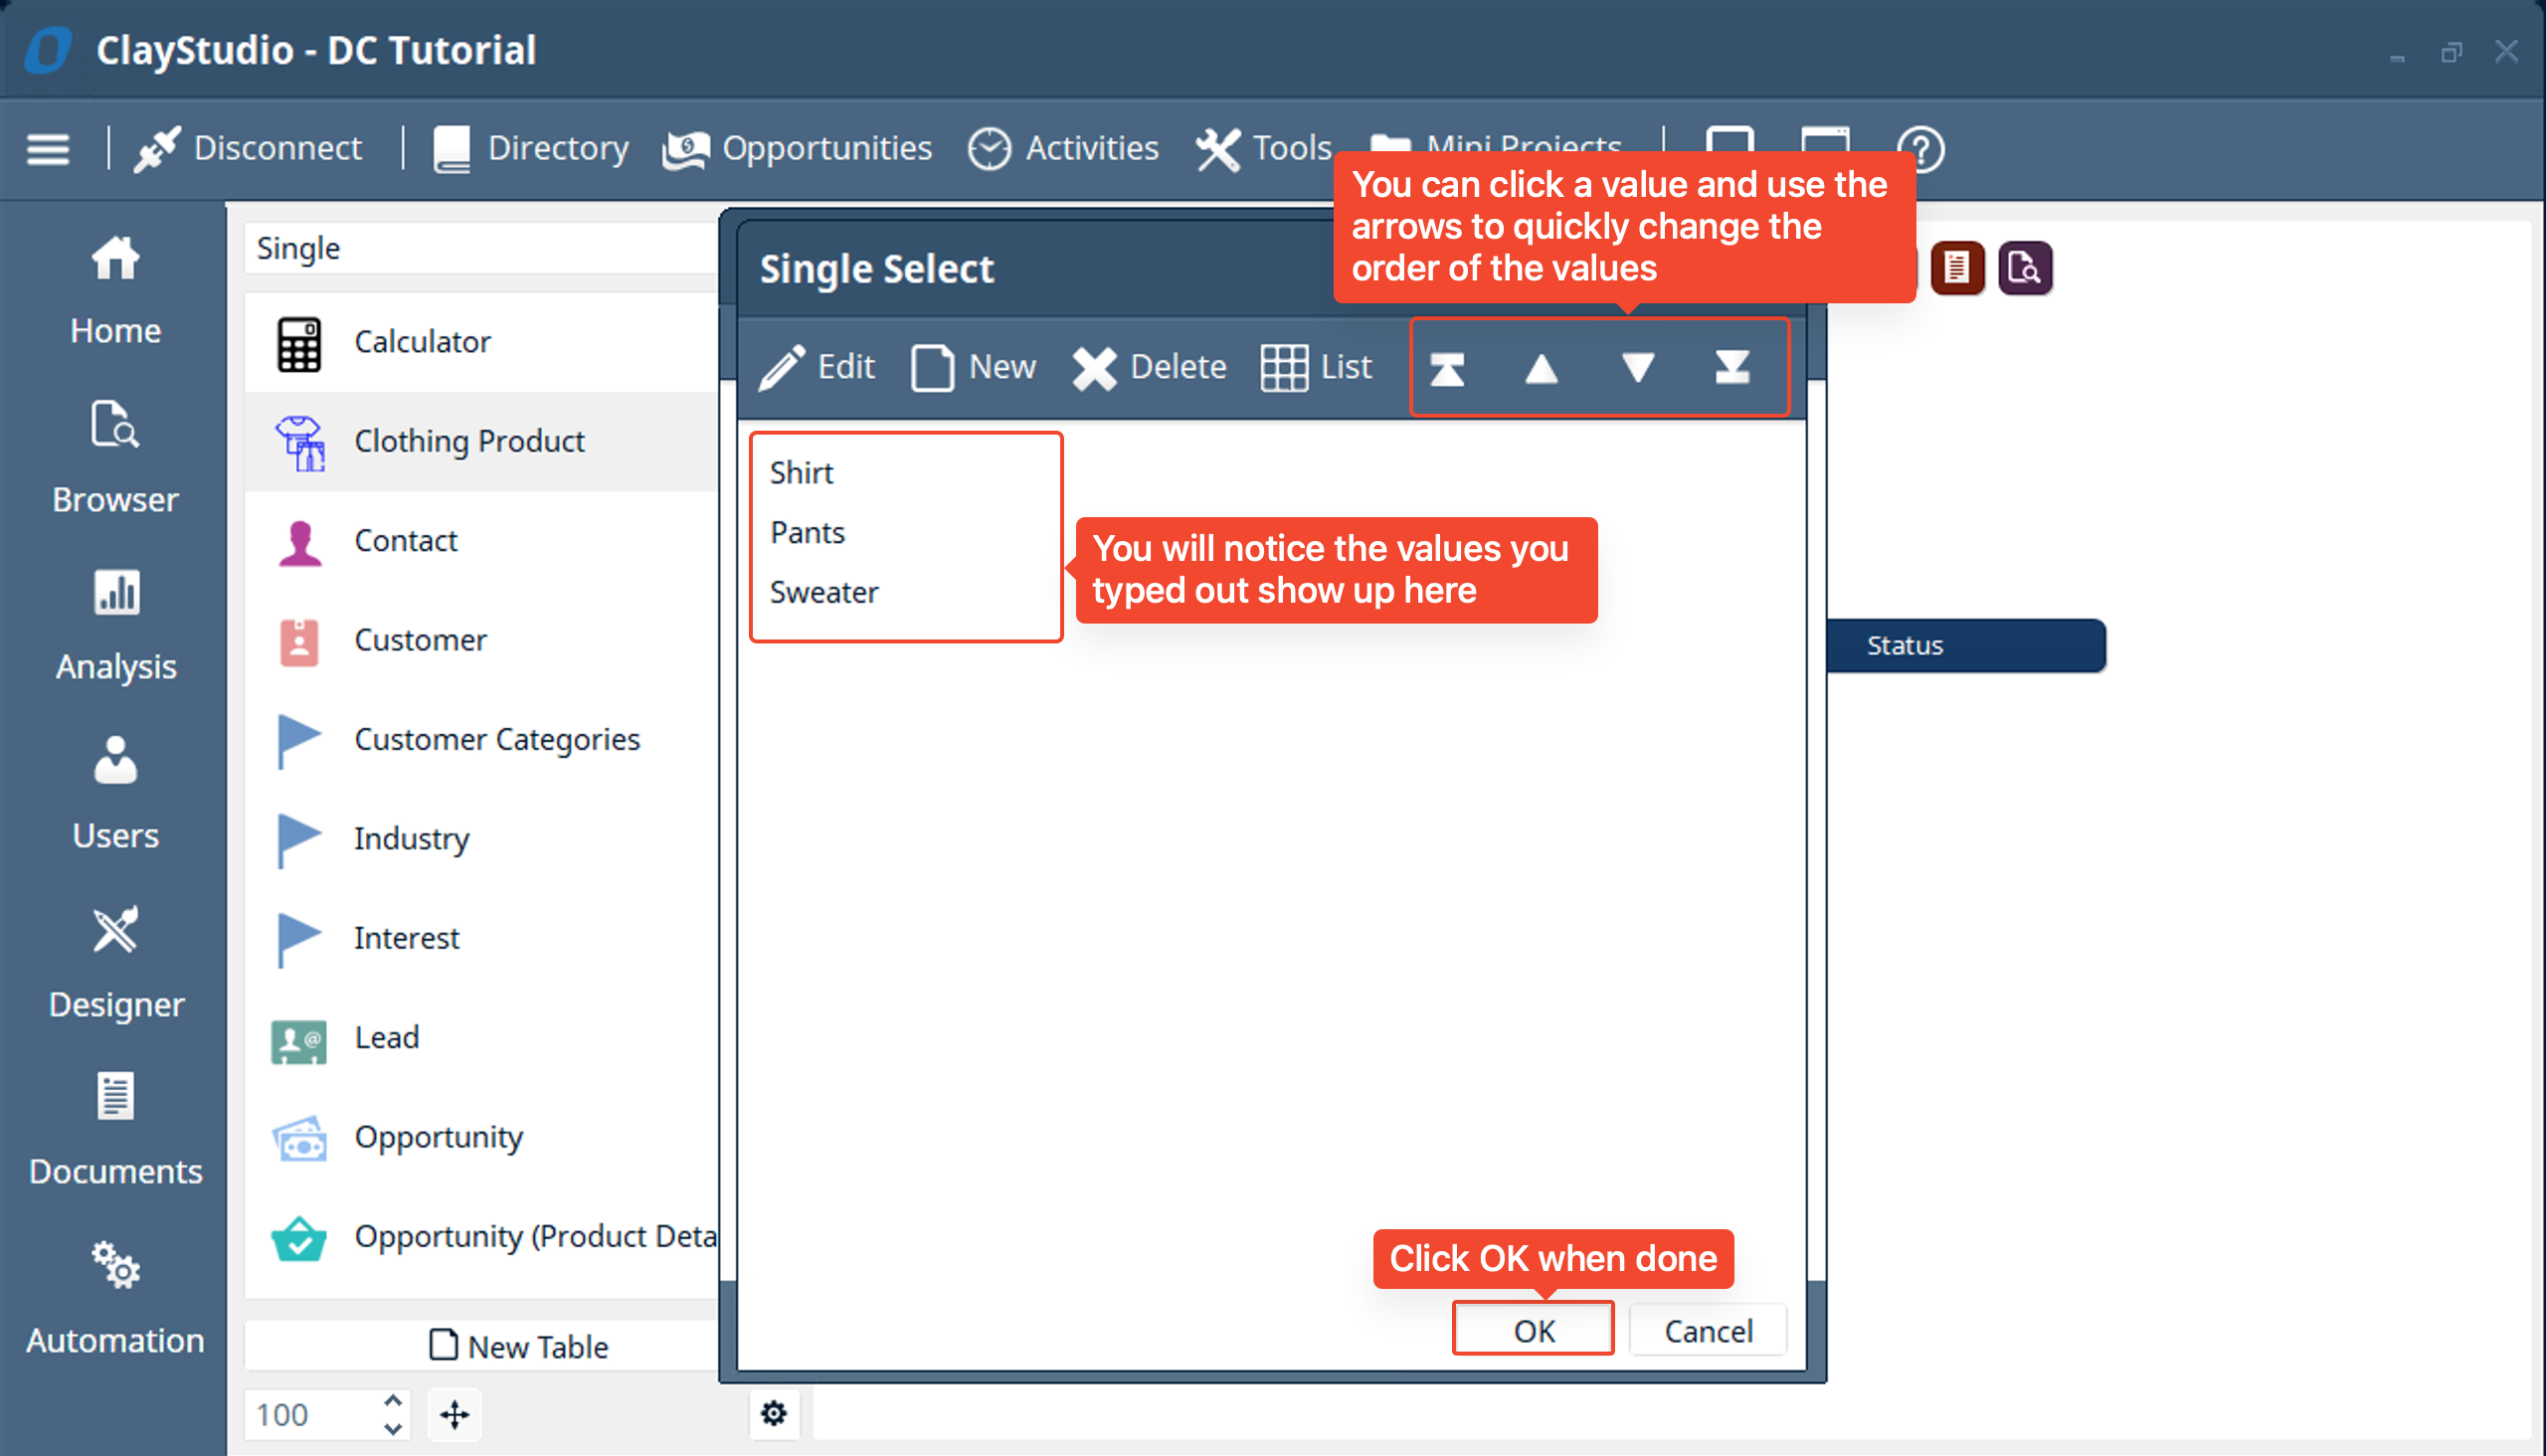
- A blank window labeled “Single Select” pops up. In the toolbar you see options like “Edit”, “New”, “Delete”, and “List” along with some arrows to order the values in the list. We will click on “List” to add a list of values.
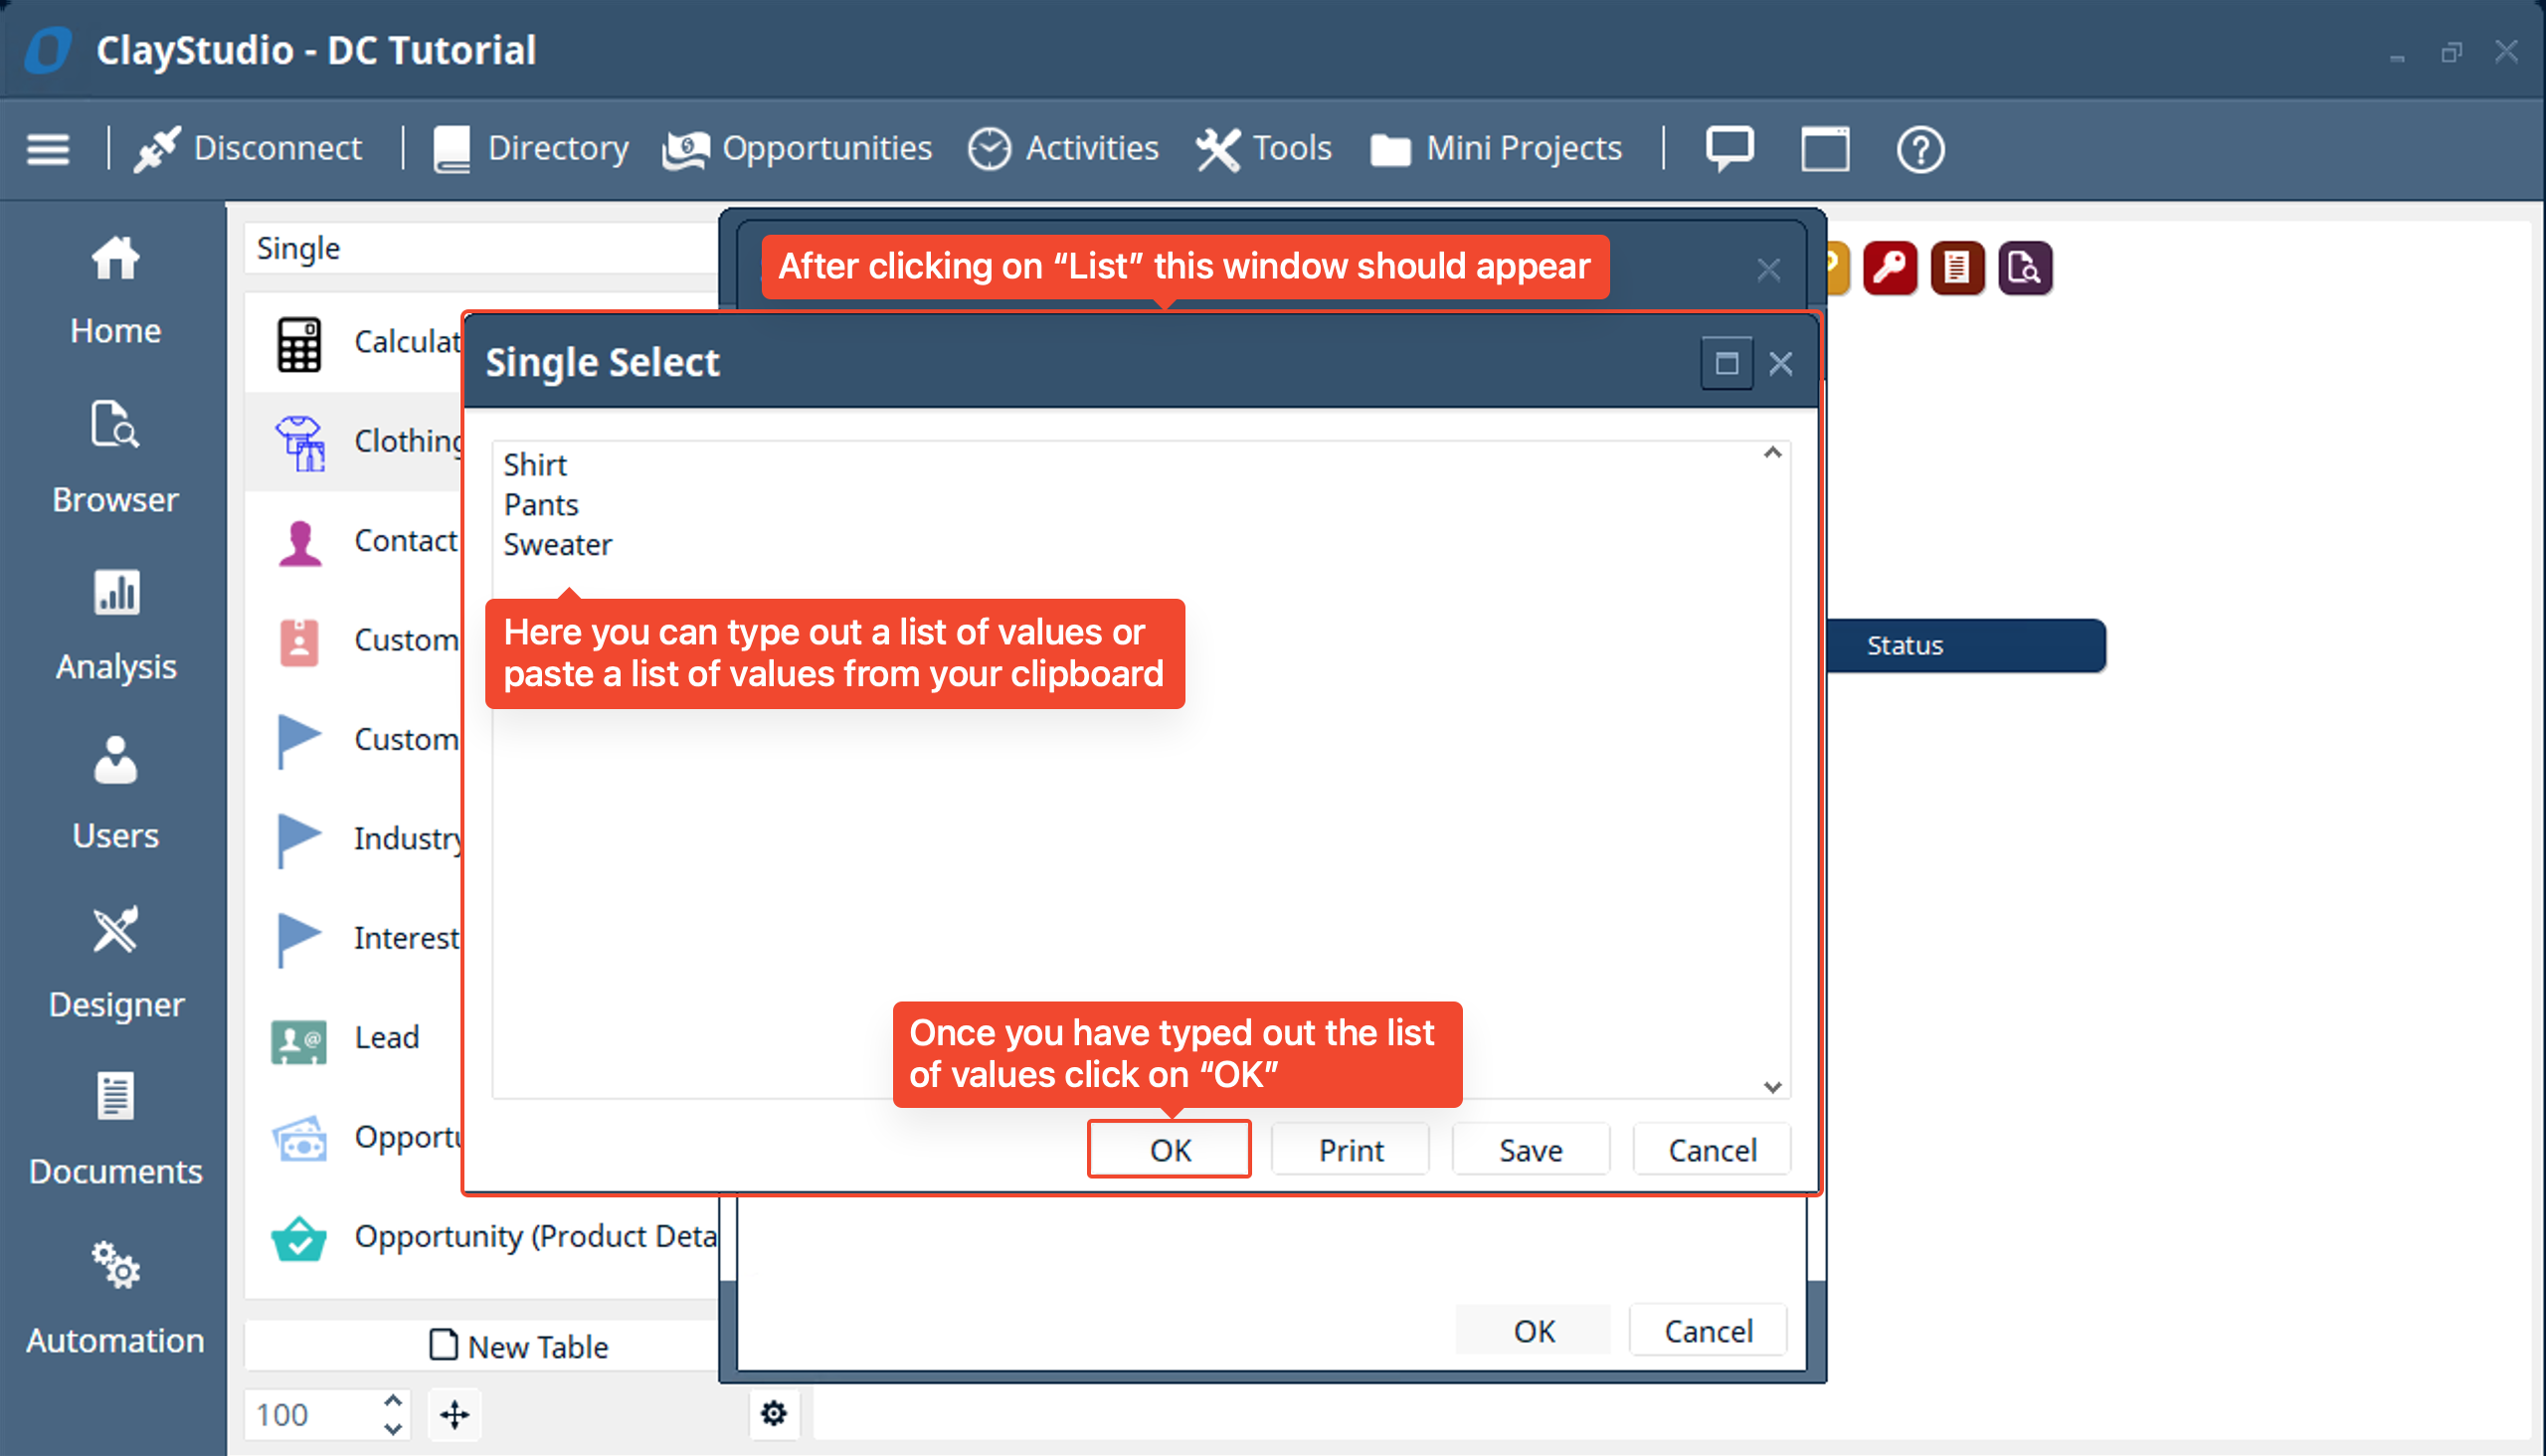
- We will type out the list of values for the “Type” of clothing that the product is. We will enter the following types: Shirt, Pants, and Sweater
- You will notice the values you types in the list will show up as individual value options for the single select field. You can reorder the values by selecting a specific value and clicking the arrow buttons labeled in the screenshot
- Now click on “Add Another at the bottom of the window so we can quickly add another field to the “Clothing Products” table
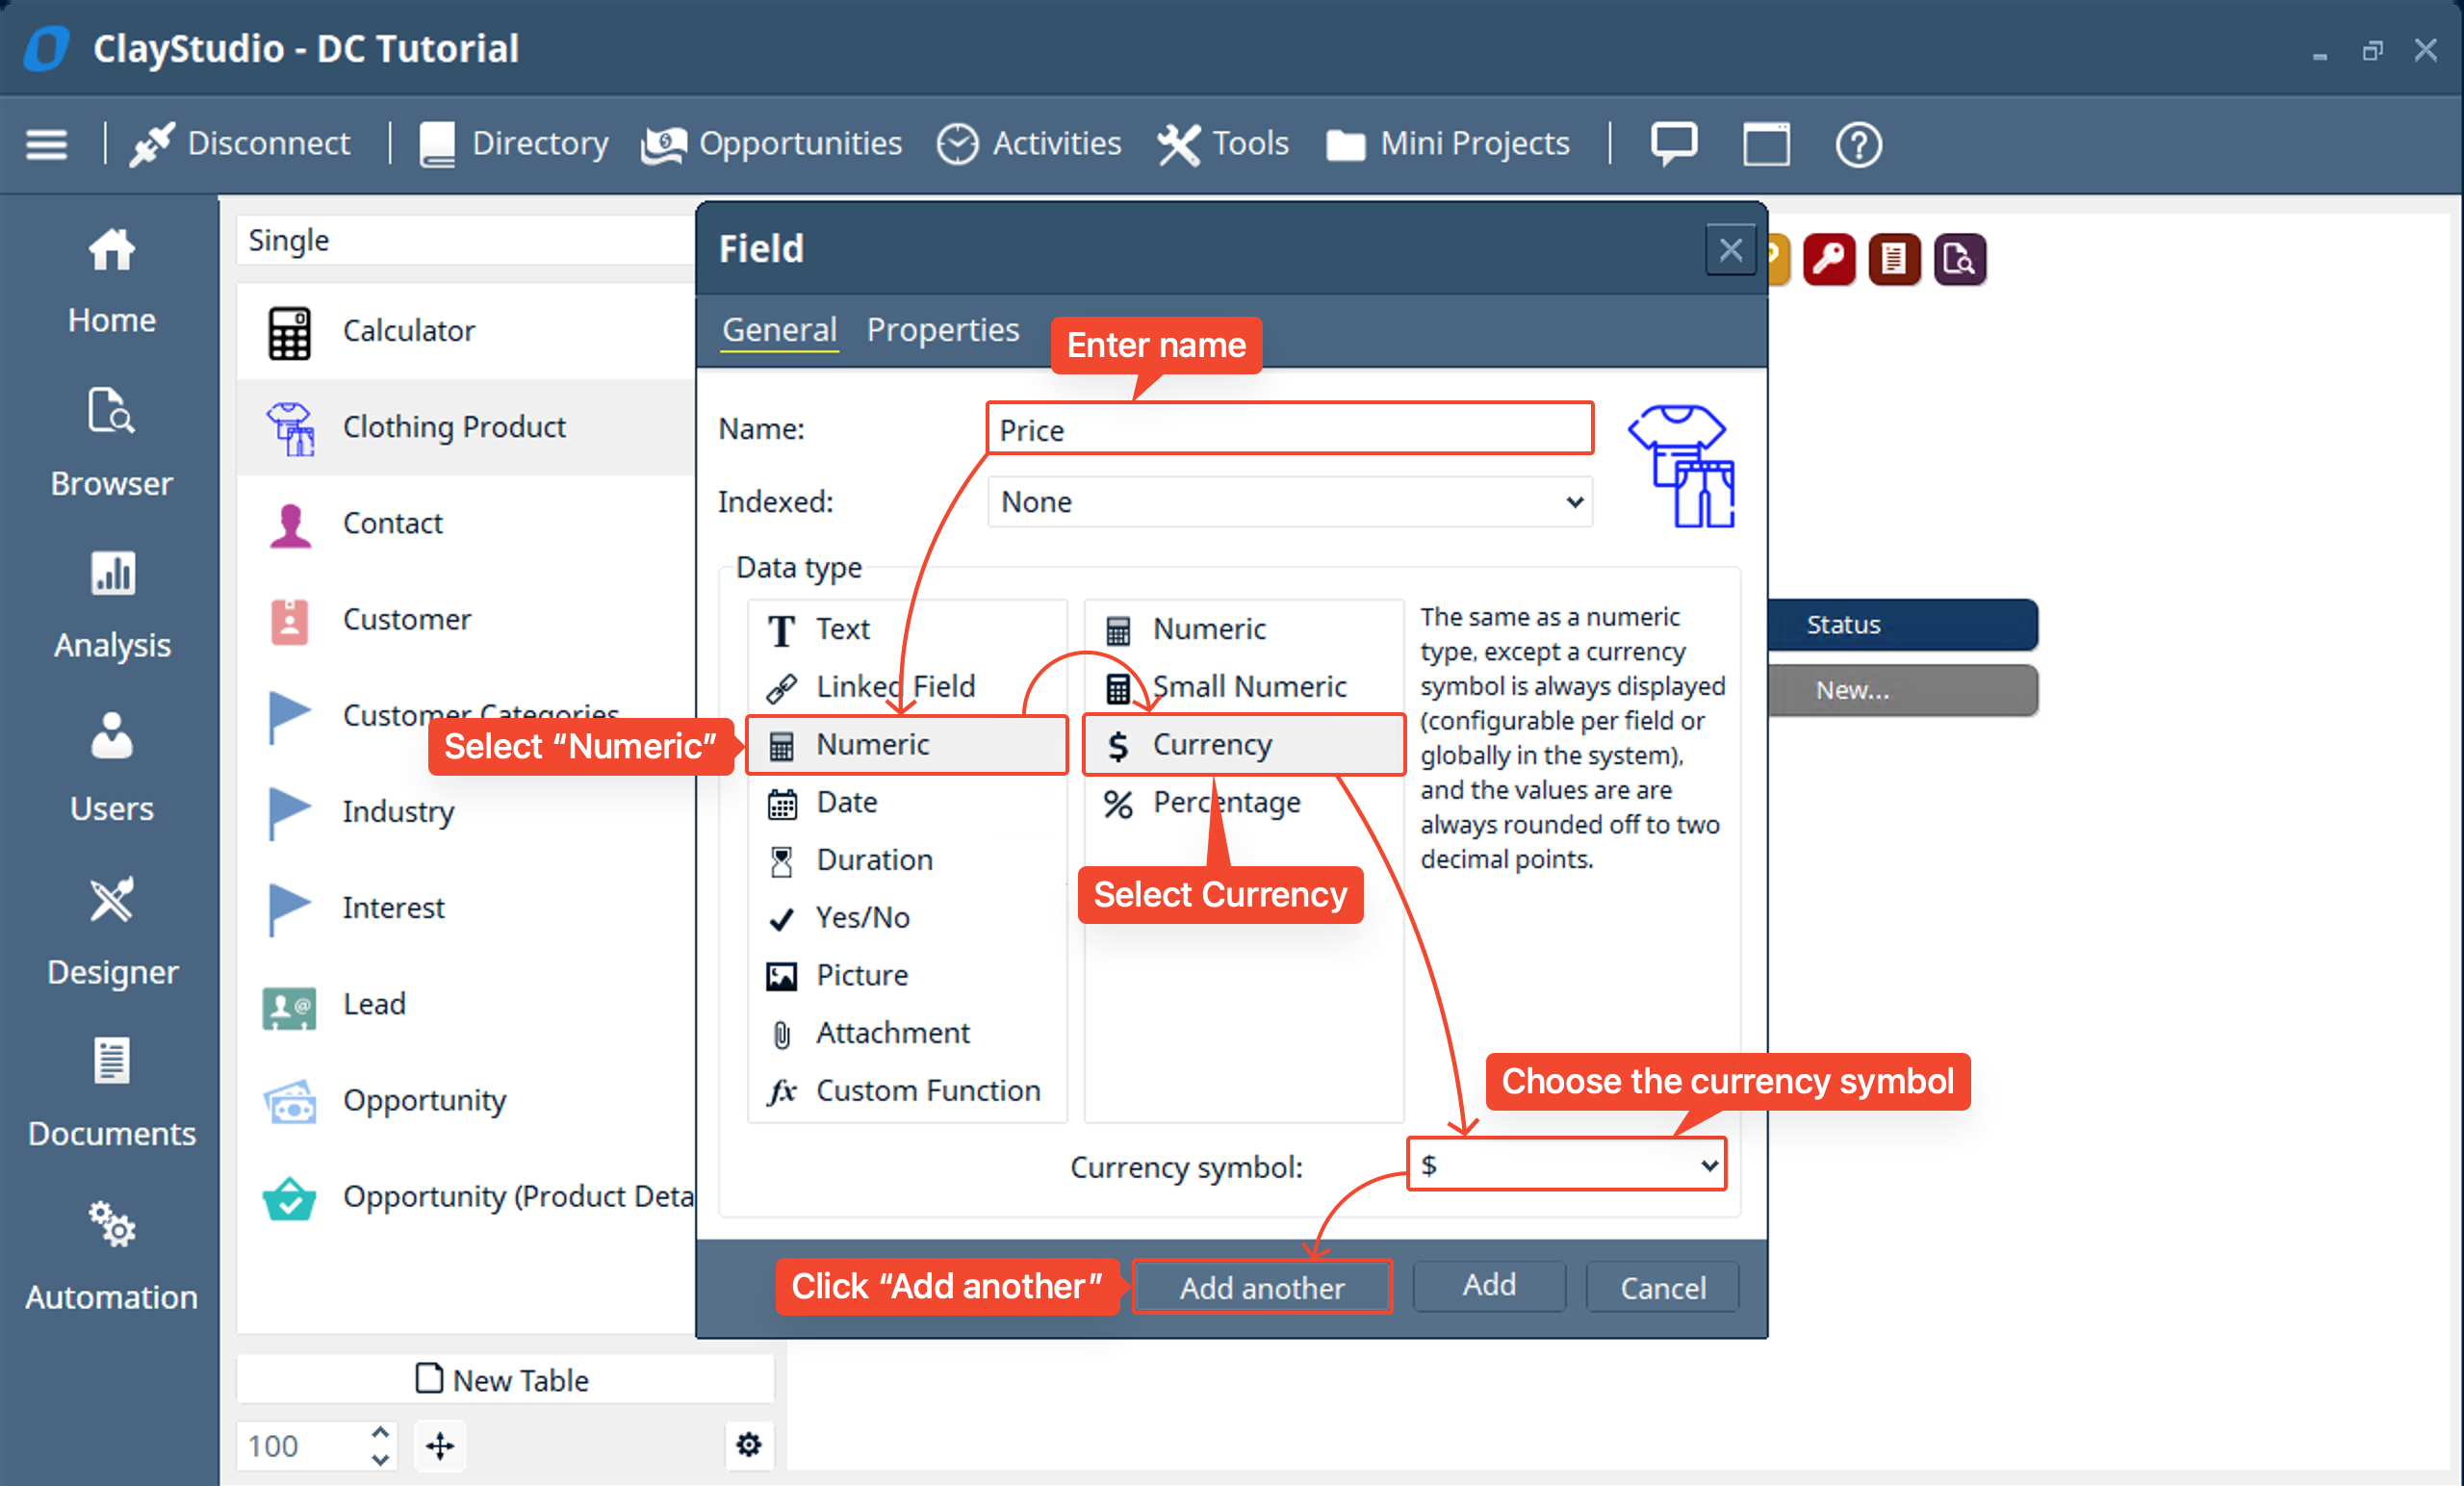
- We want to create “Price” field, this field should be a “Numeric” data type and we can select the sub data type to be “Currency”. This will allow us to display a currency symbol with the numeric field
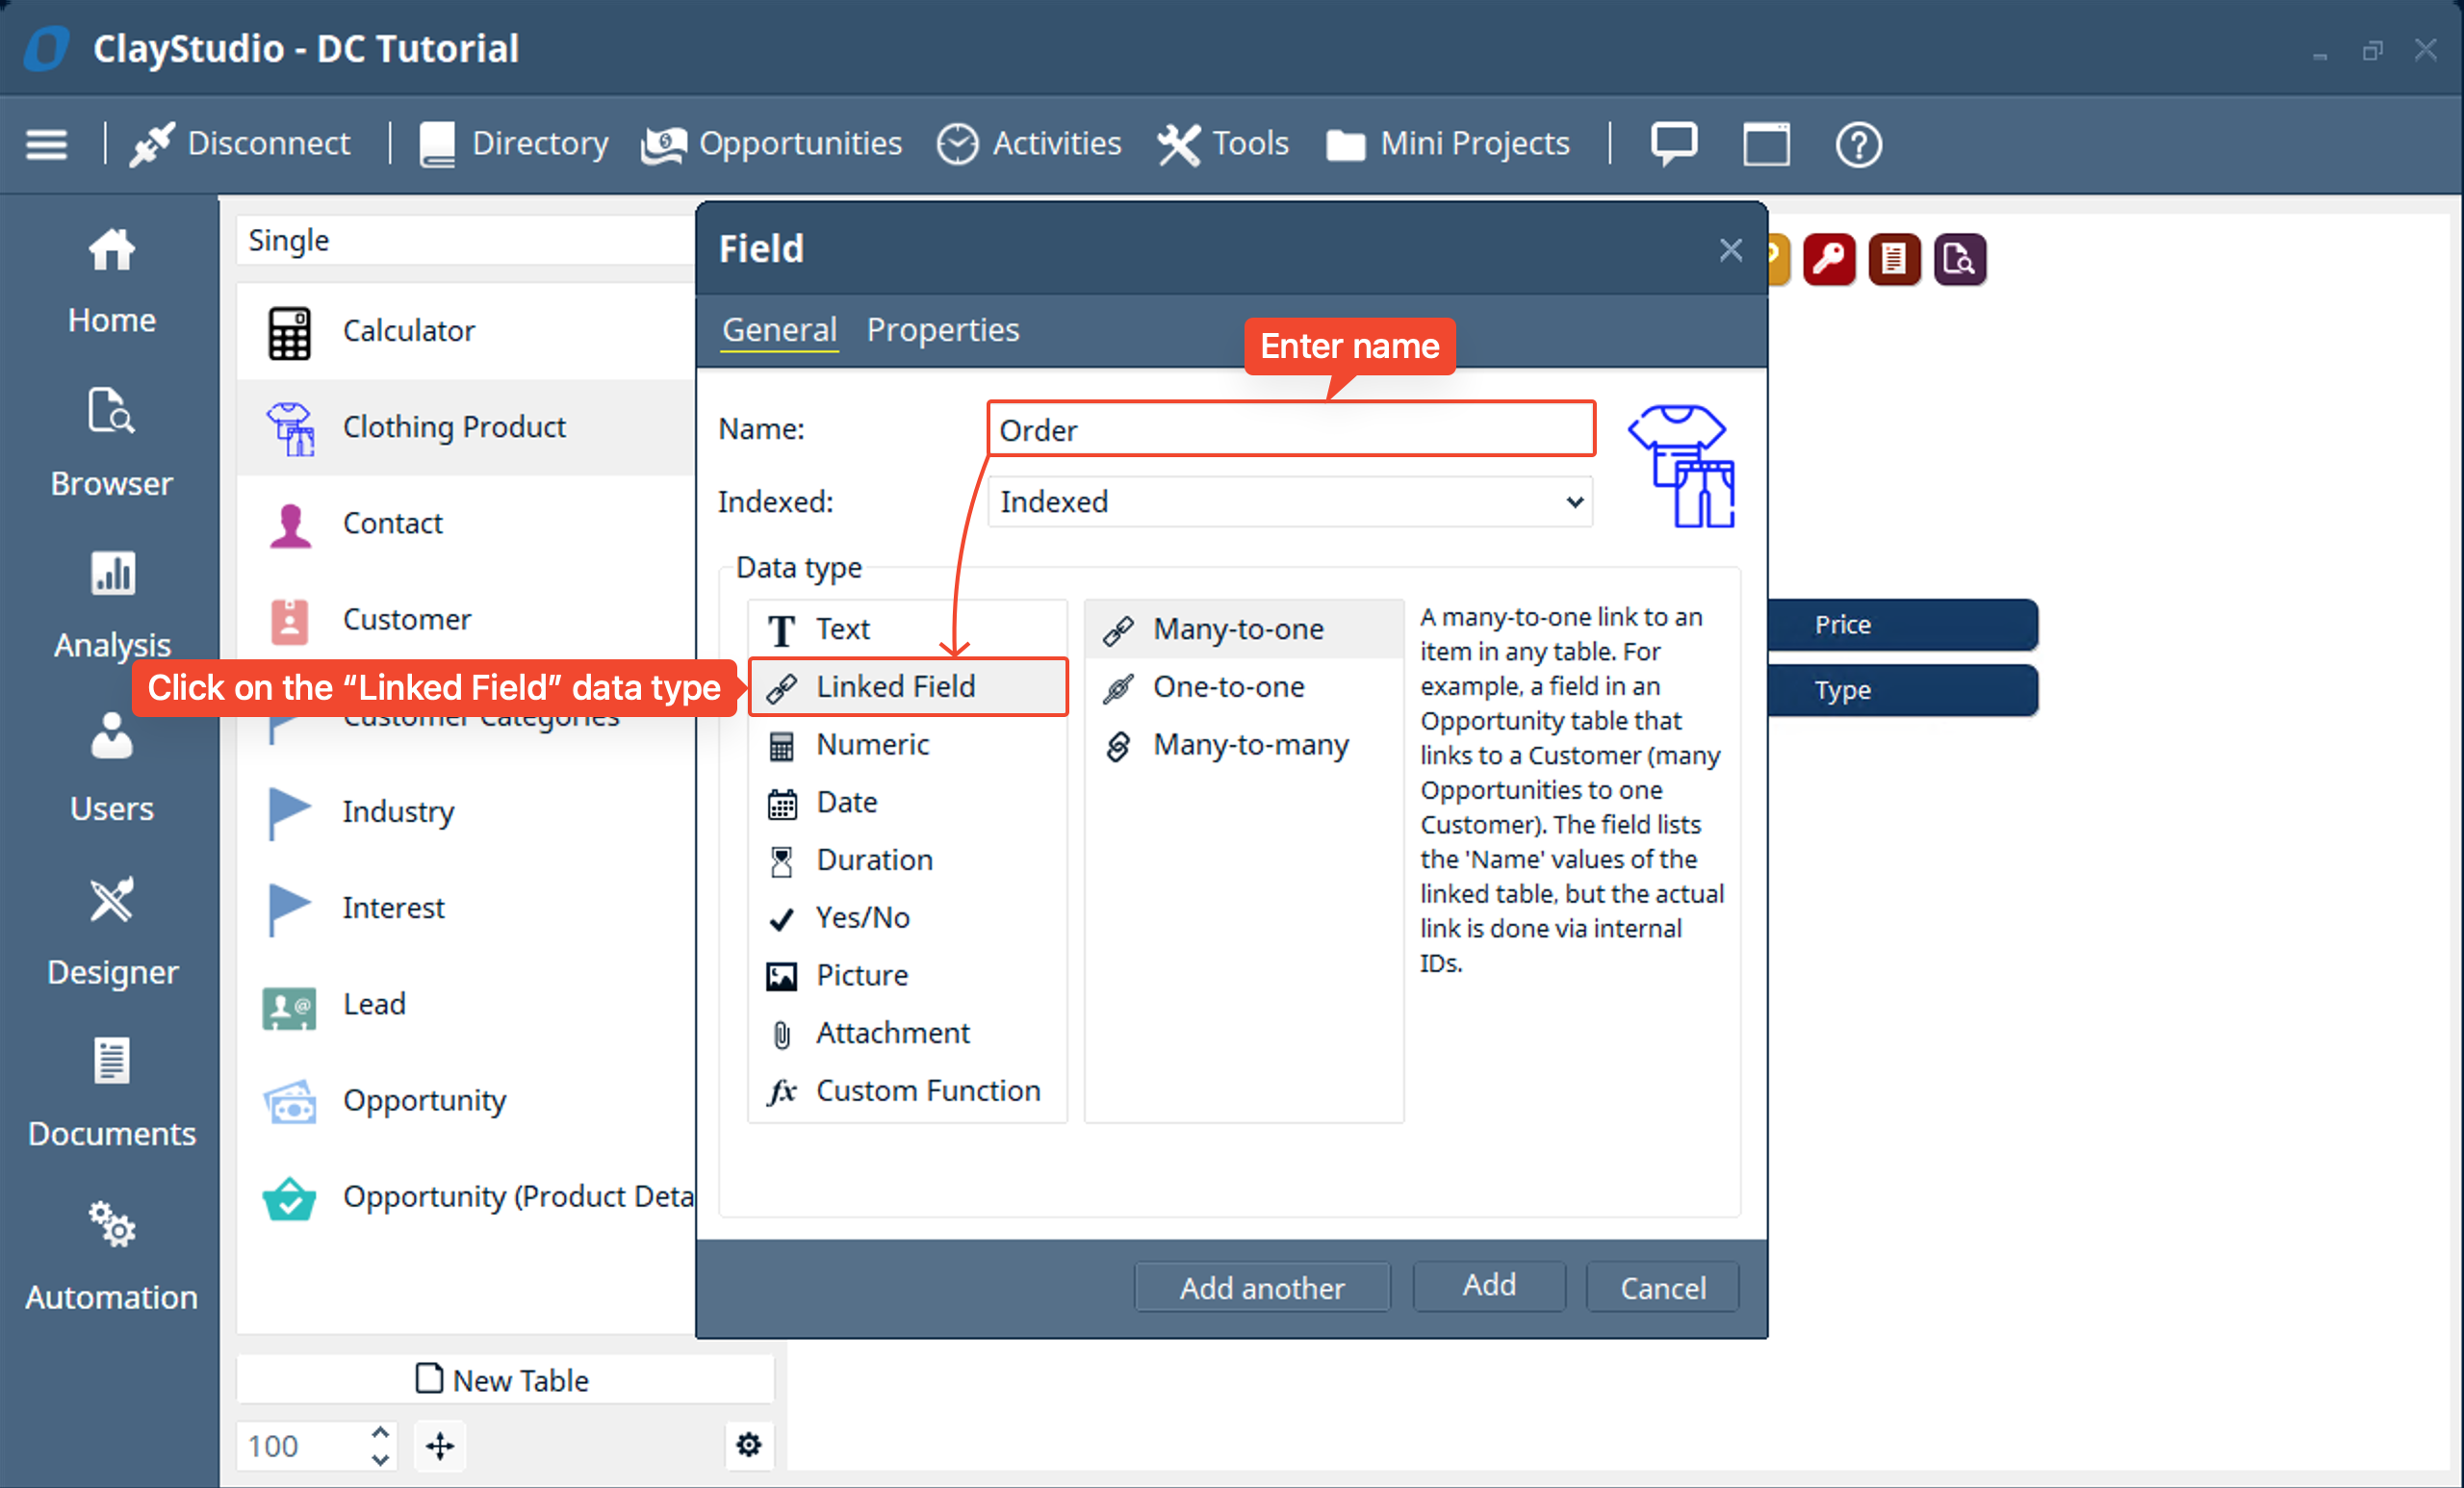
- Next we will create the field that will link the individual “Clothing Products” to individual “Orders.” To do that we will enter the name and select the “Linked field” data type.
- Note: There are many ways that you can link two tables together. In Digital-Clay we call linking two or more tables together a “Custom Link Group”. When a “Linked Field” is created it automatically creates a “Custom Link Group”. There are 3 different types of “Linked Fields” that can be created. For the purposes of this mini project we will be covering a use case of the “Many-to-one” link.
- Though we don’t currently have an “Orders” table to link the “Clothing Products” too. Digital-Clay offers the ability to create new a table on the spot from within the “Linked Field” data type selection. Clicking on the “New” icon on the right will allow you to easily create a new table and link to it
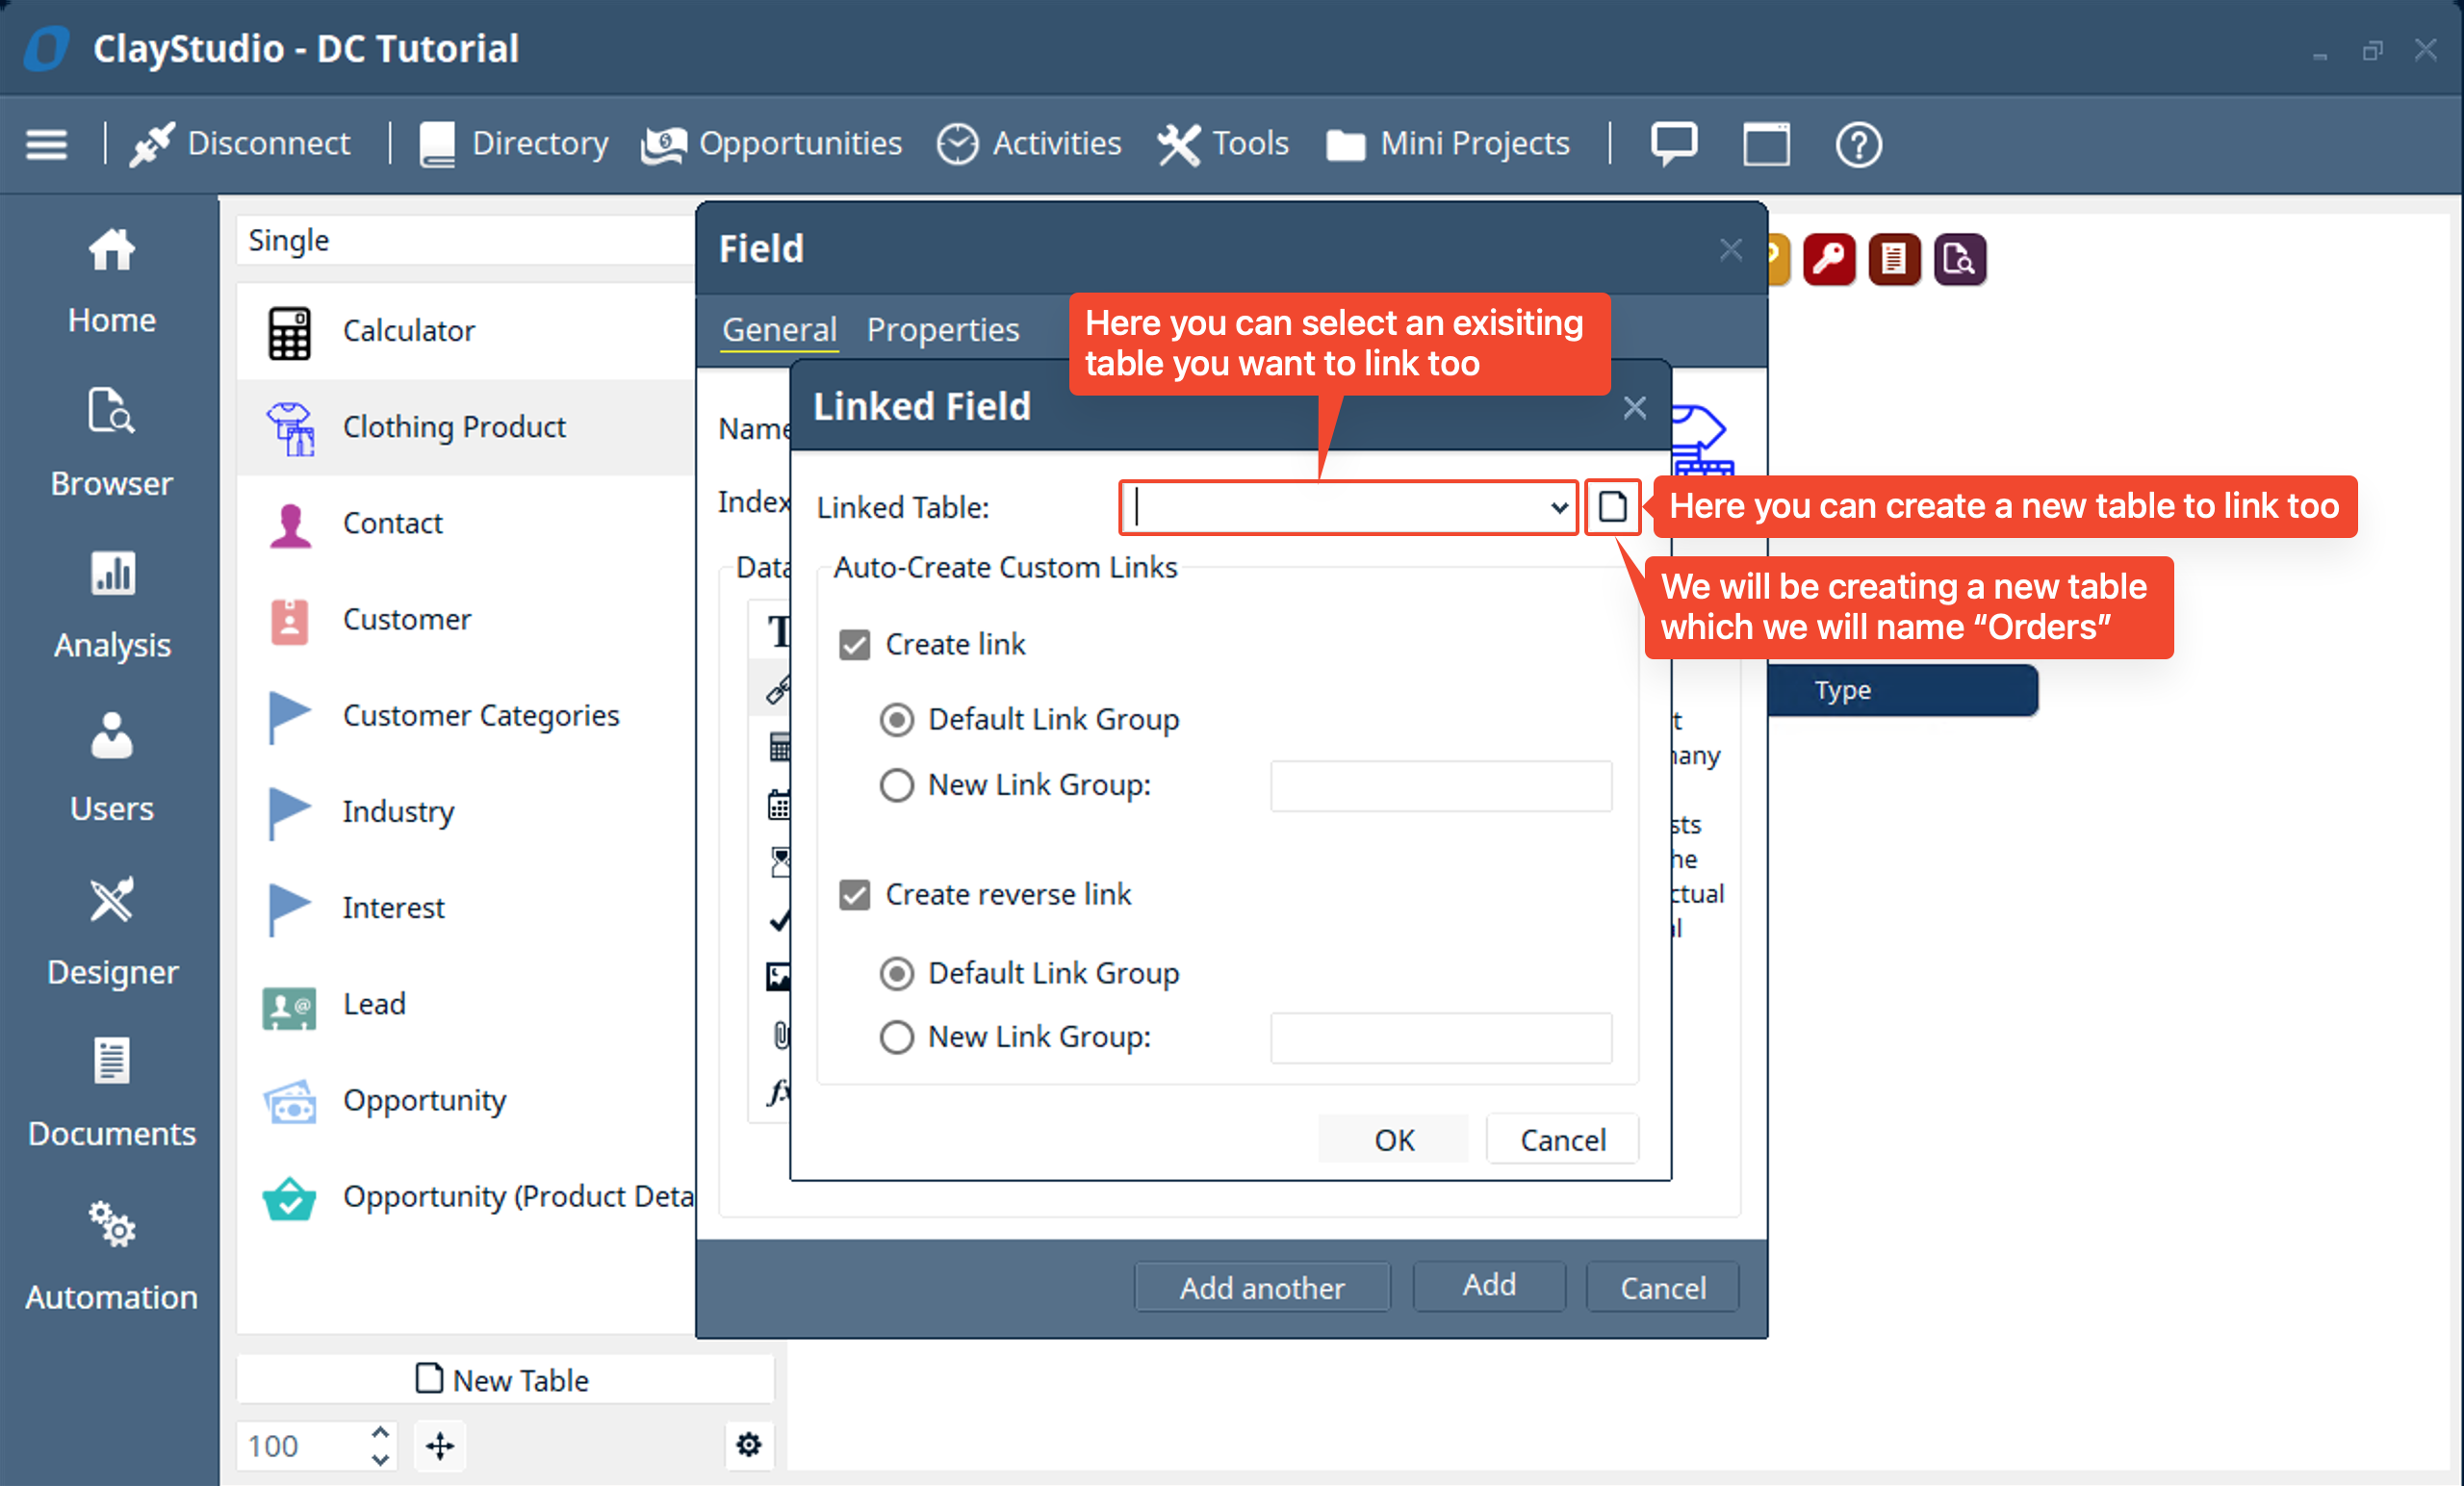
- After clicking the “New” button you will see a familiar window to create a new table. Fill out the new table with the information displayed in the screenshot below. Then click “OK” to create the table.
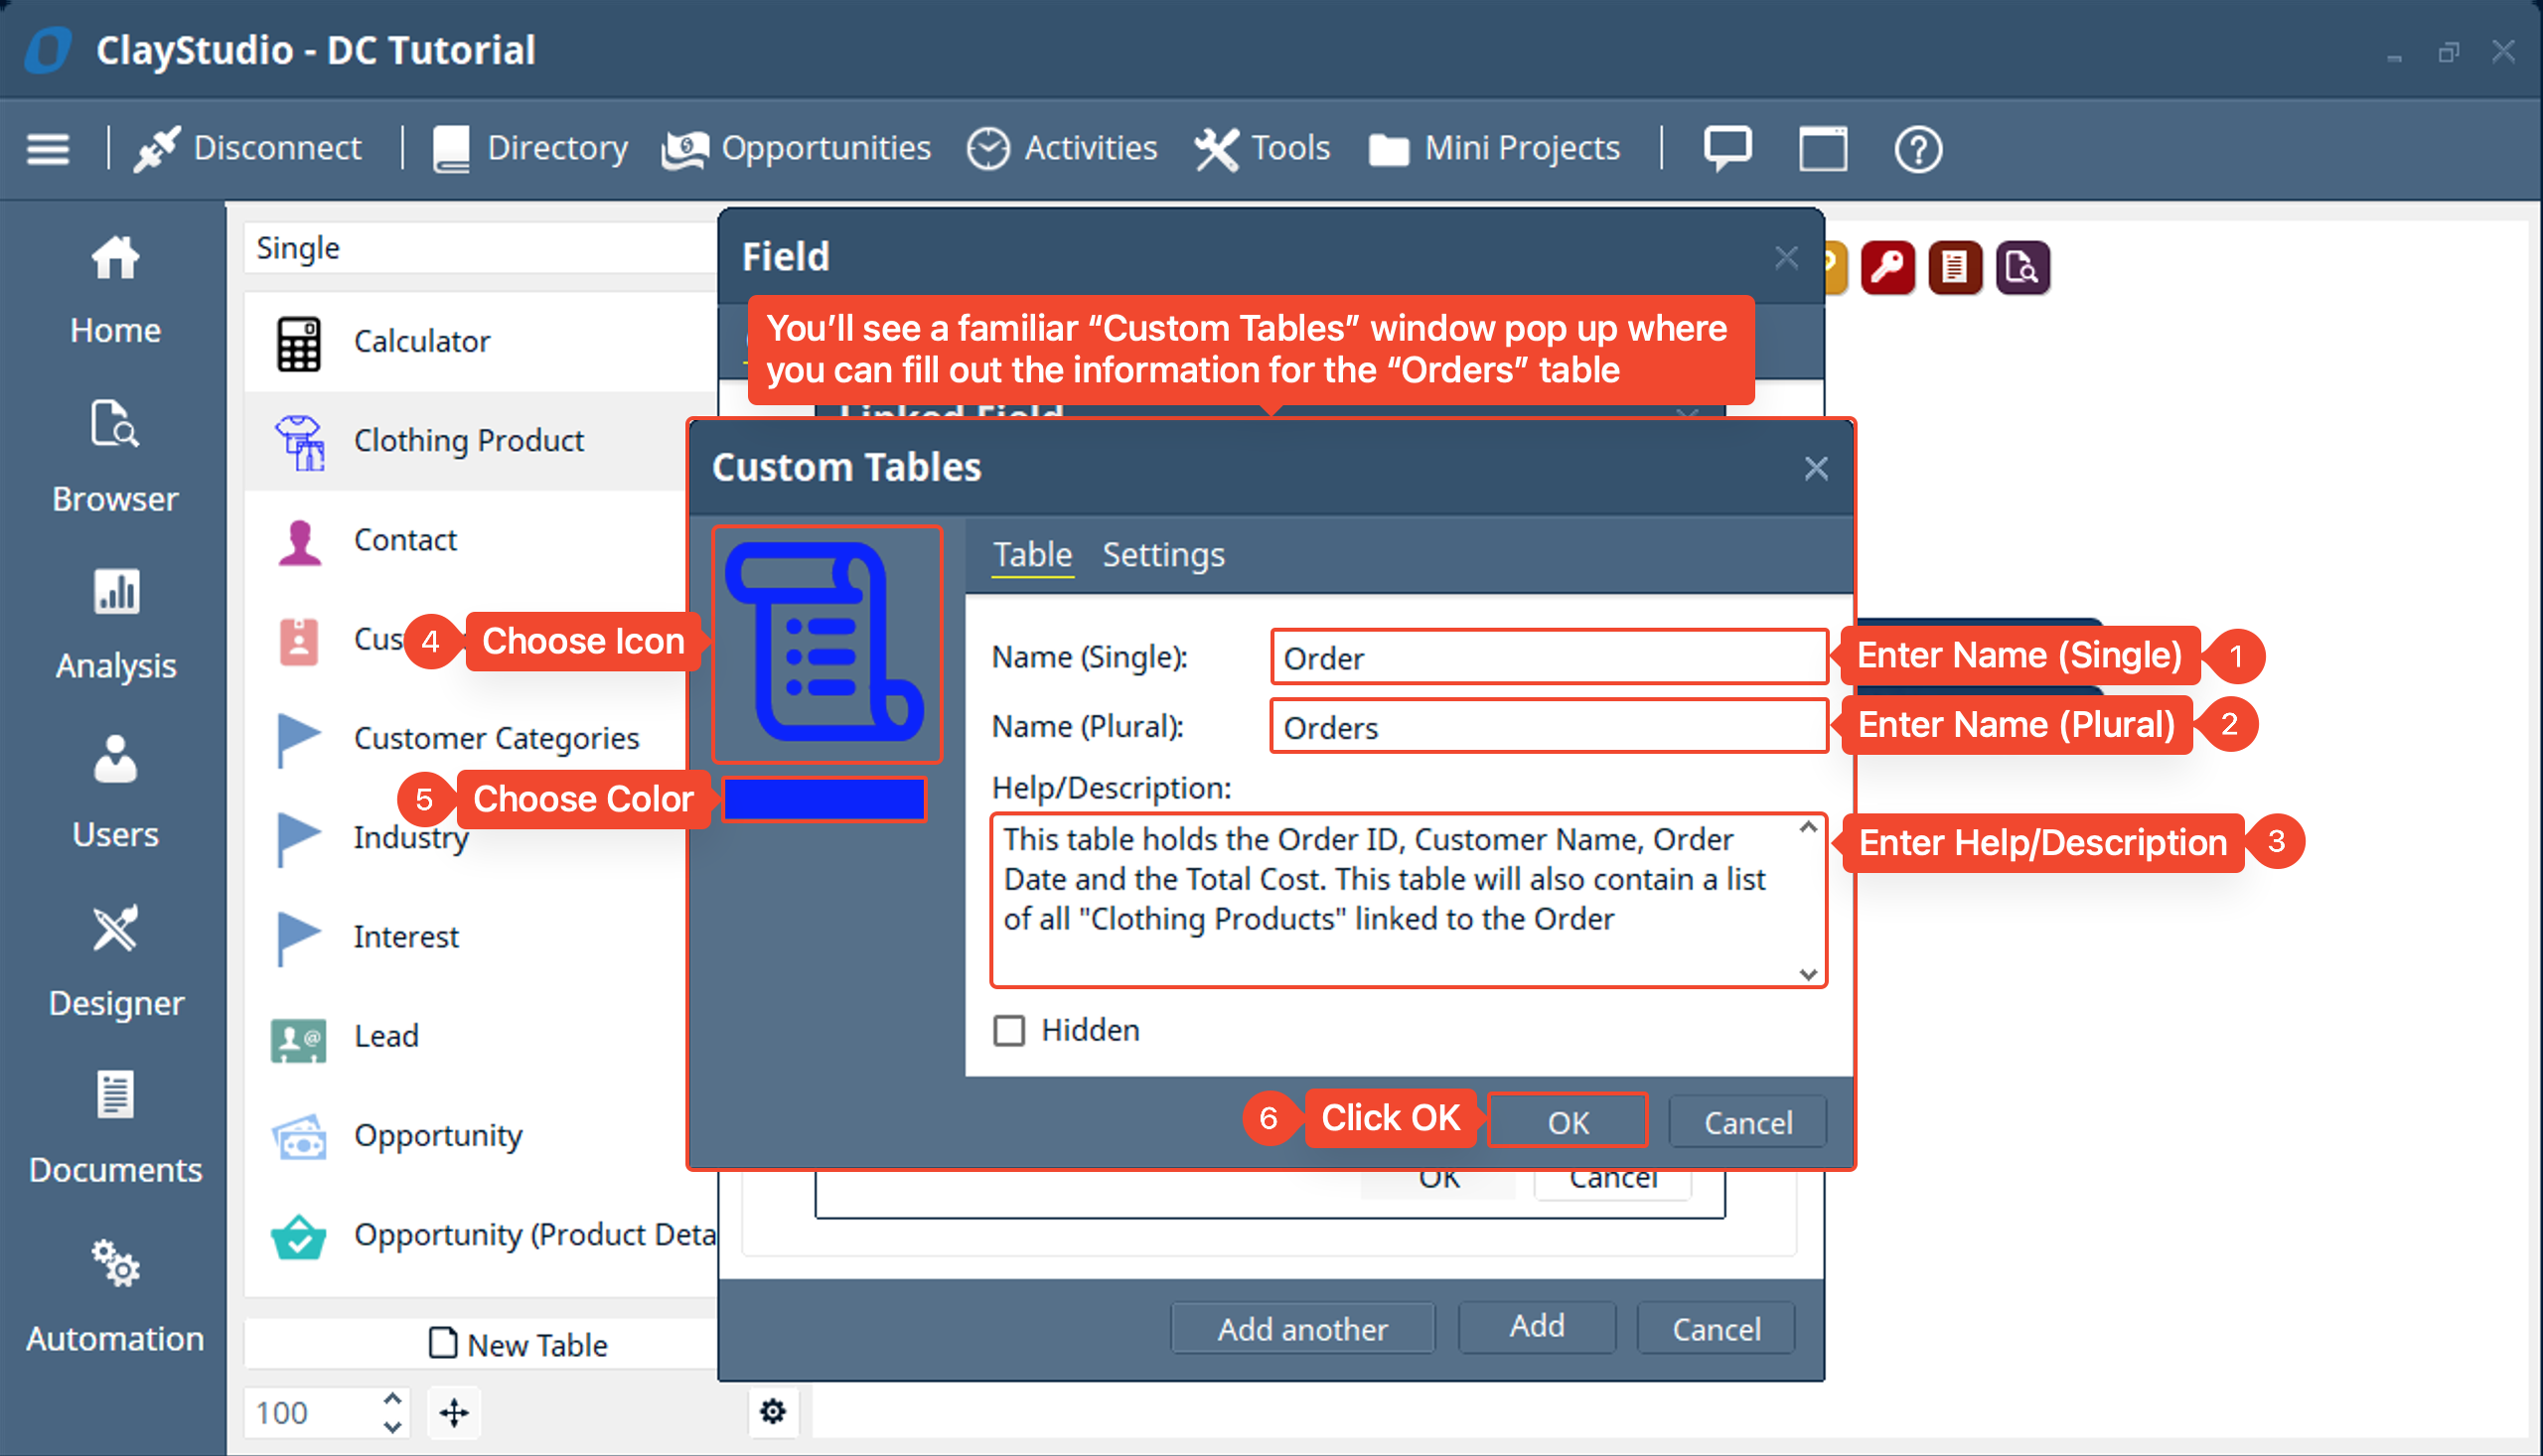
- You’ll notice the “Orders” table you just created gets auto-filled in the “Linked Table” dropdown. You’ also notice that Digital-Clay will automatically create a default custom link group for you in BOTH directions.
- What does it mean to have a custom link group in both directions?
- When you create a “Linked Field” between two tables two “Custom Link Group” is formed. One “Custom Link Group” is FROM the table you are creating the link group from (in this case its the “Clothing Products”) TO the table you are linking to (in this case the “Orders” table we just created. The second link that is created is the exact reverse of the first link, the link is FROM the table you linked to (the “Orders” table), TO the table you linked from (the “Clothing Products” table)
- Why is it important to know that the linked field has a custom link in both directions?
- When you create a “Linked Field” in a table the “Custom Link Group” that is formed from the “Base” table (in this case the “Clothing Product”) to the “Destination” table (in this case the “Orders” table) allows you to filter the base table by the destination table (for example, if you wanted to filter “Clothing Products” by the “Order” it is linked to, this link group allows you to do that). Conversely, the “Custom Link Group” that was formed in the reverse allows you to filter the destination table by the base table (for example, if you want to filter the “Orders” table by the “Clothing Products” linked to the order the reverse link would allow you to do that)
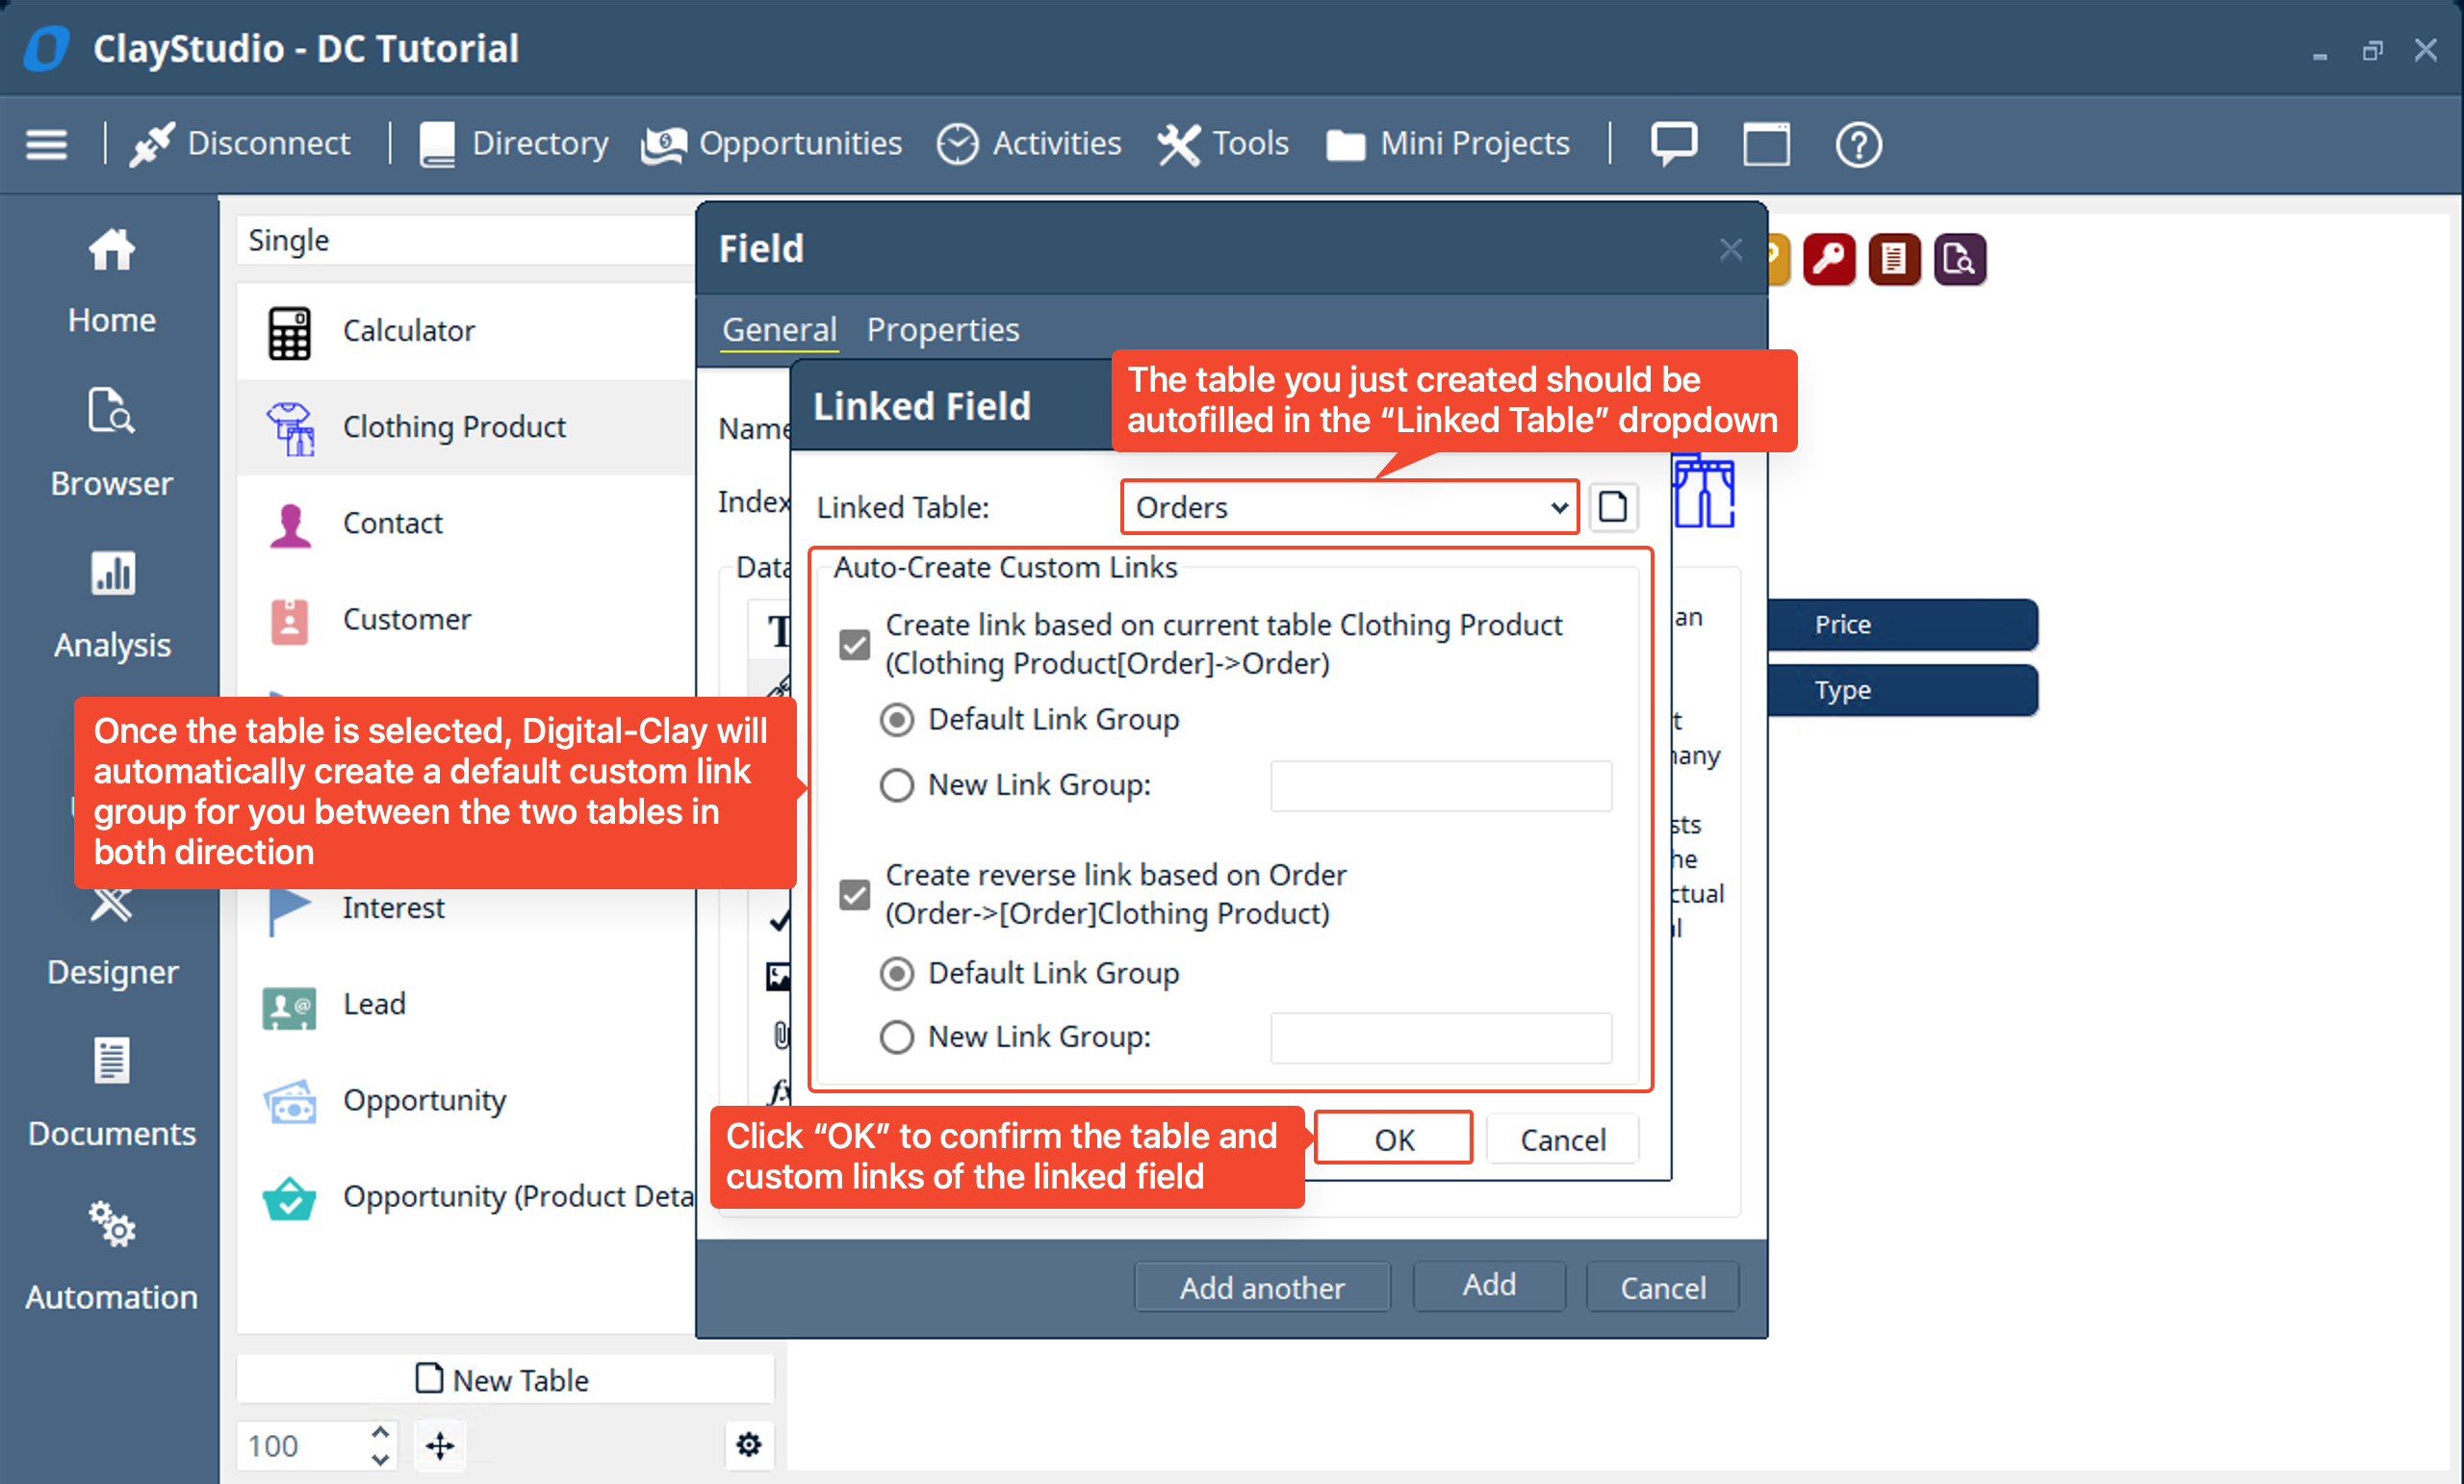
- Then select the “Many-to-one” sub data type and click “Add” to see the “Custom Fields” view of your table.
- Why specifically Many-to-one?
- A “many-to-one” linked field allows you to link MANY records from the base table (in this case MANY “Clothing Products”) to ONE record in the destination table (in this case ONE “Order” item). Since an “Order” should have the ability to add multiple “Clothing Products” to it, a many-to-one link from the “Clothing Products” to the “Order” should work correctly
- Why not use a Many-to-many?
- A “Many-to-many” linked field allows you to link MANY records in the base table to MANY records in the destination table. If we were to implement this in our mini project then it would make more sense (in terms of database structure) to put the “many-to-many” linked field in the “Order” table so that it can be the base table and have the destination be the “Clothing Products” table. This implementation would still work for this mini project, but would require more steps and add an extra level of complexity to this mini project to get the same final result. There are times where adding a many-to-many linked field makes more sense then in this mini project so to keep the database structure and functionality of the project simple and intuitive I chose to not use the many-to-many linked field option.
- Why specifically Many-to-one?
- You will notice an arrow to the right pointing FROM the “Clothing Products” to the “Order” and that the arrow is named “Order”. This comes from the “Linked Field” and the “Custom Link Group” that was just created. Now let’s click on the “Order” table as shown in the screenshot below
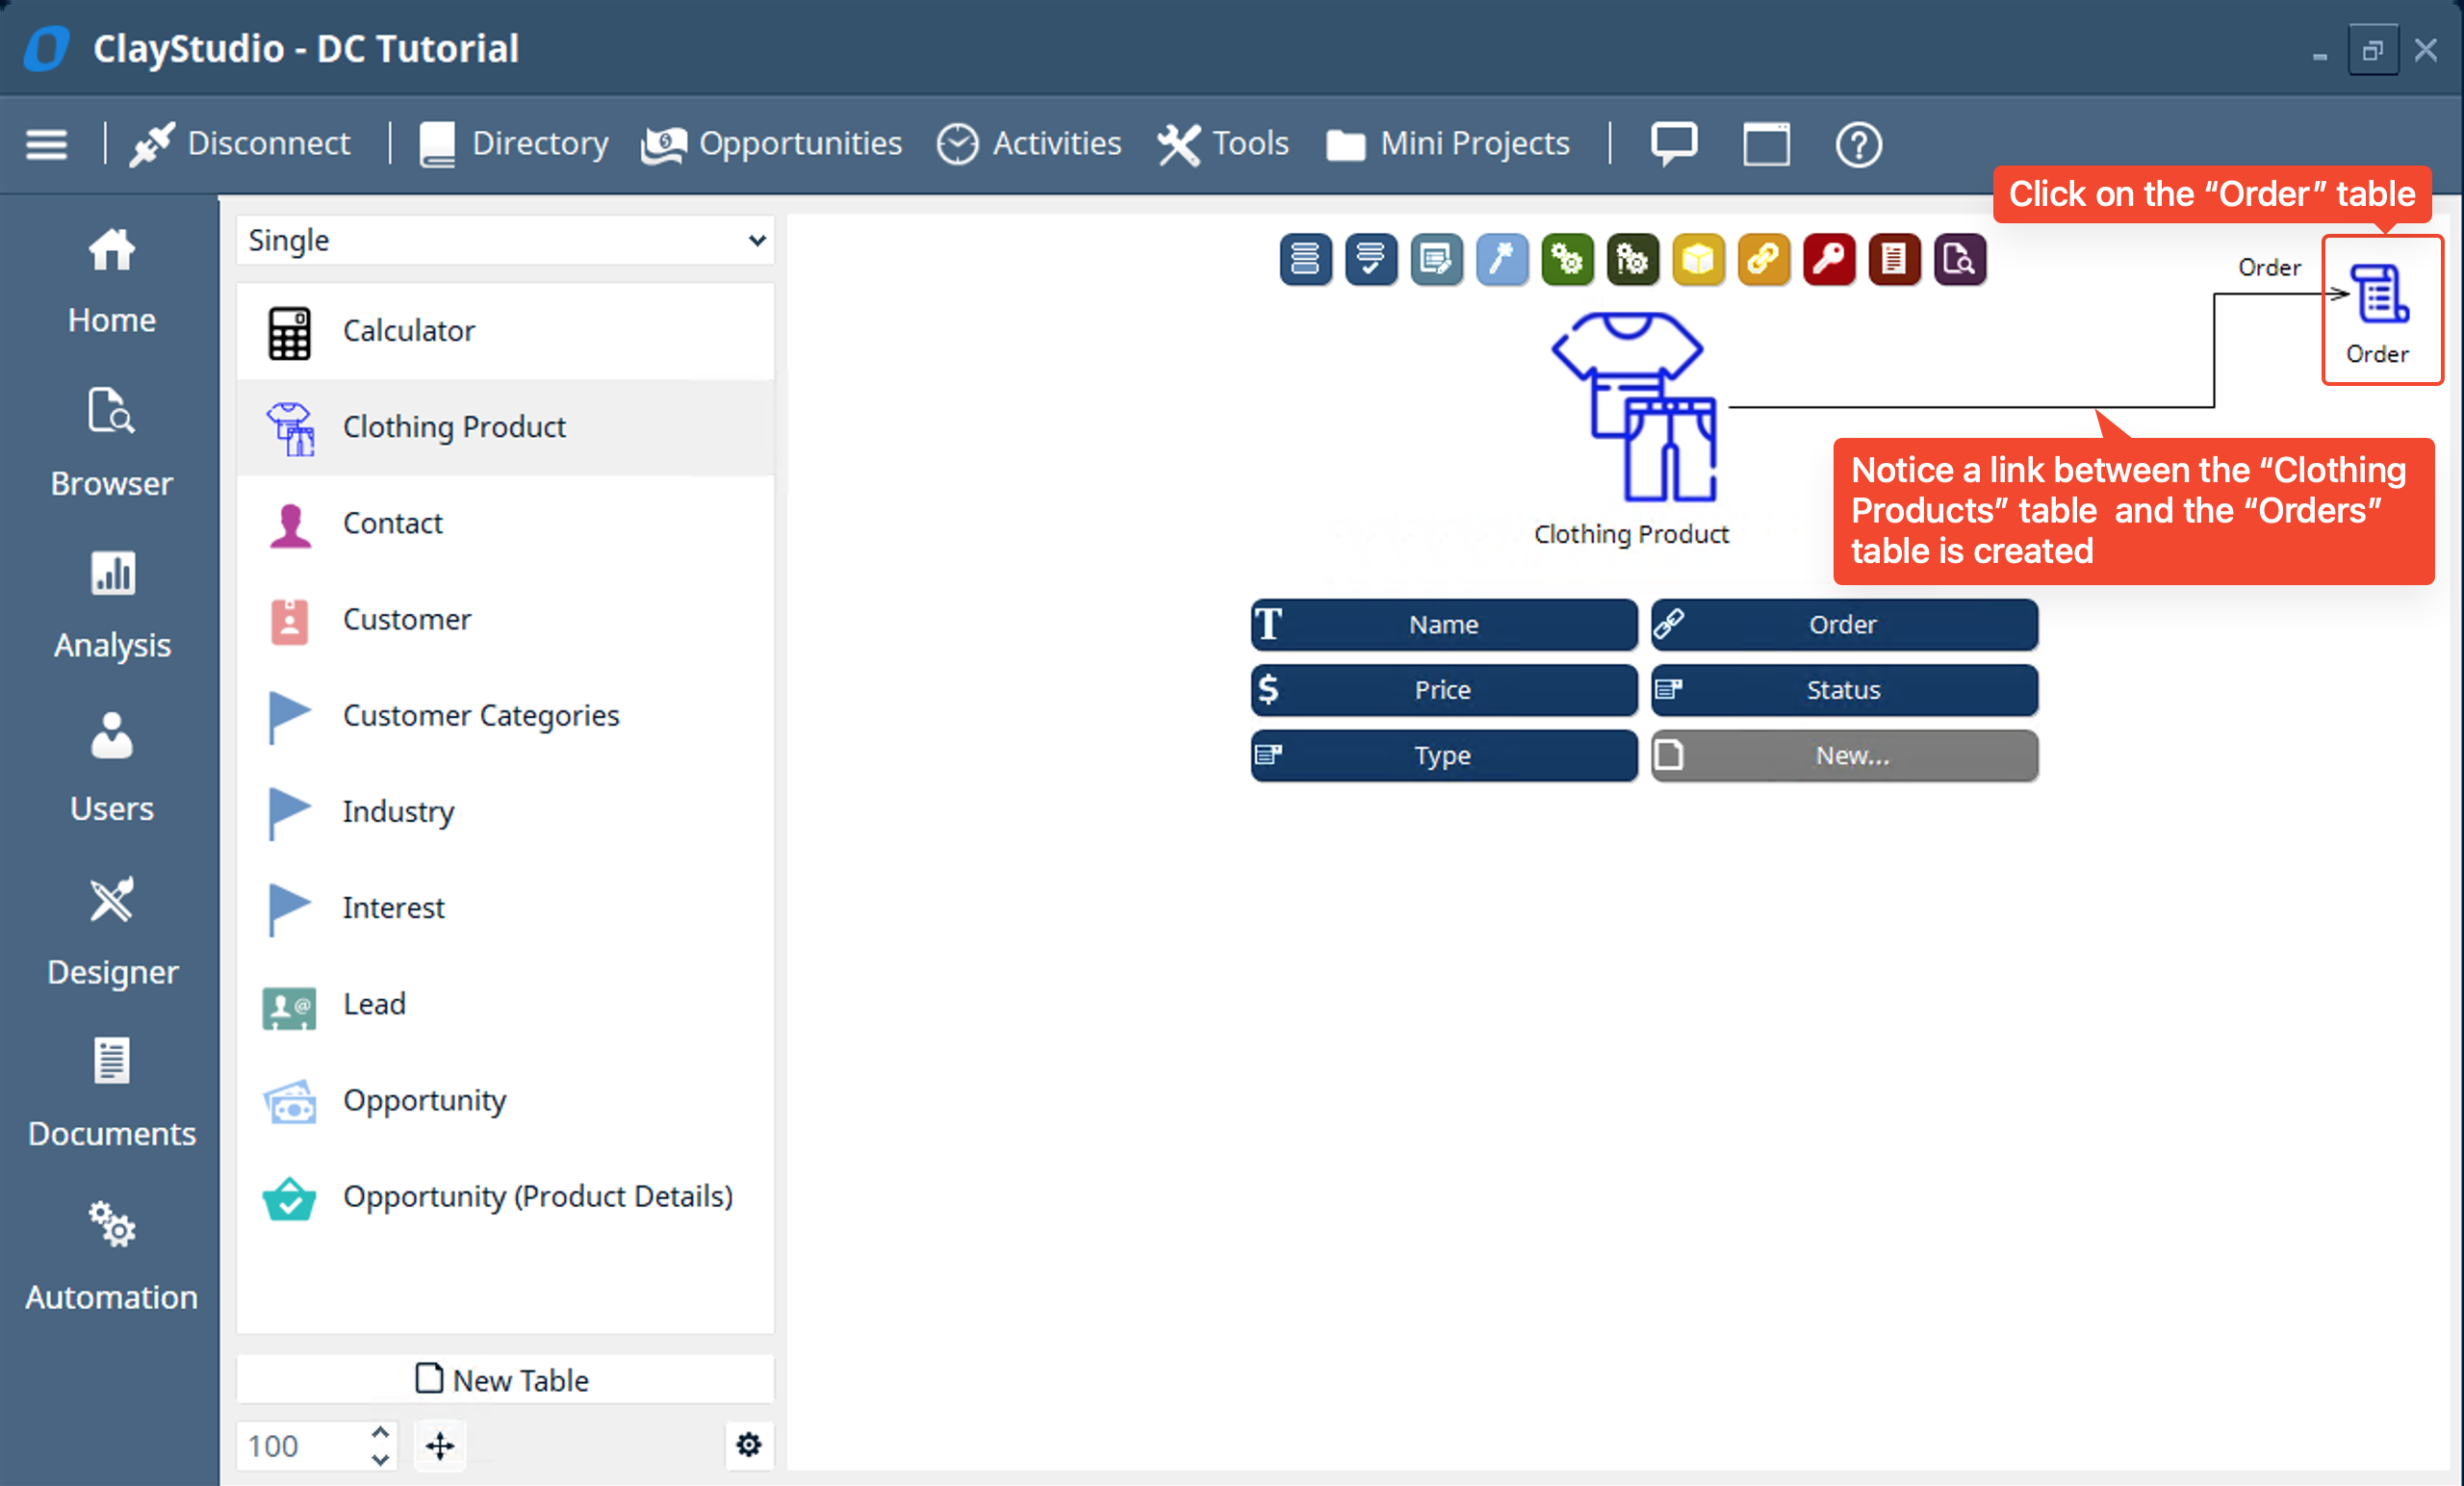
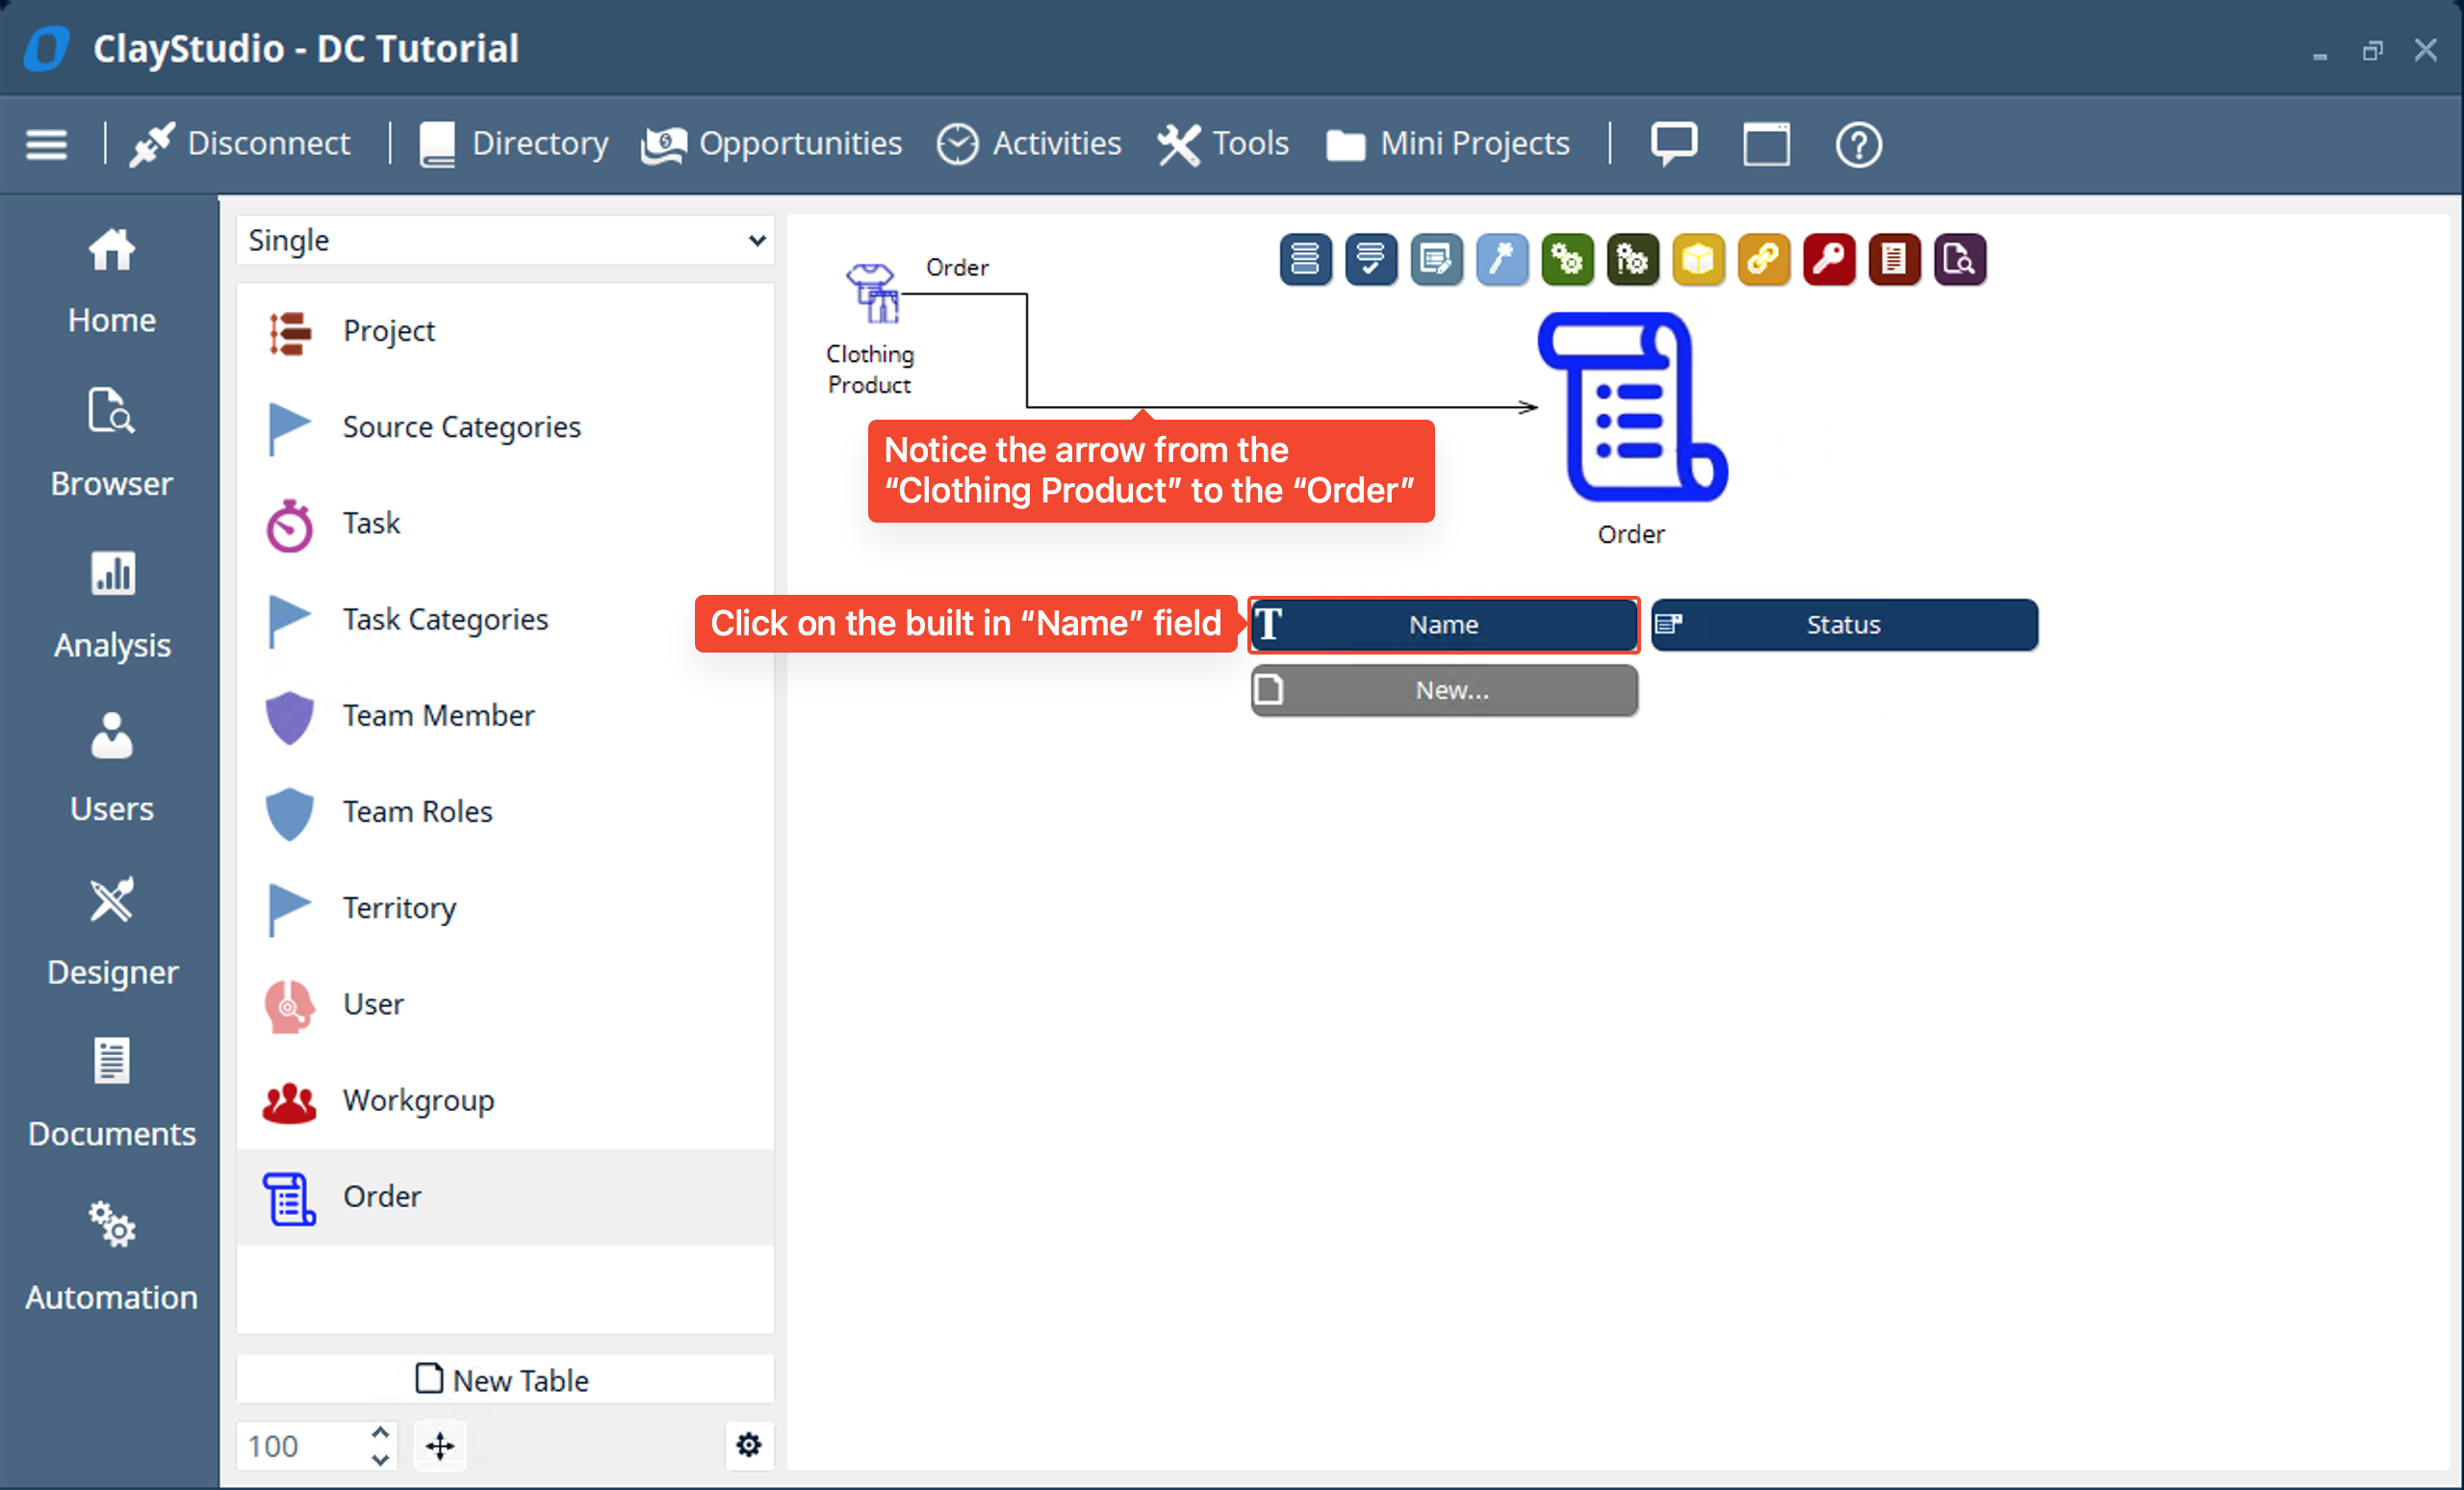
- You will notice when clicking on the “Order” table the arrow moves to the left side of the table indicating FROM where the “Linked Field” custom link group is coming from. Let’s click on “New…” to add a few fields. The field we want for the “Order” is an “Order ID” field that will be a sequential value starting from 1000 (meaning every time you create an order the ID will increment by 1 so if the first order is ID 1000 then second order is ID 1001 and so on). We can actually use the built in “Name” field in the table to do this. Let’s click on the “Name” field
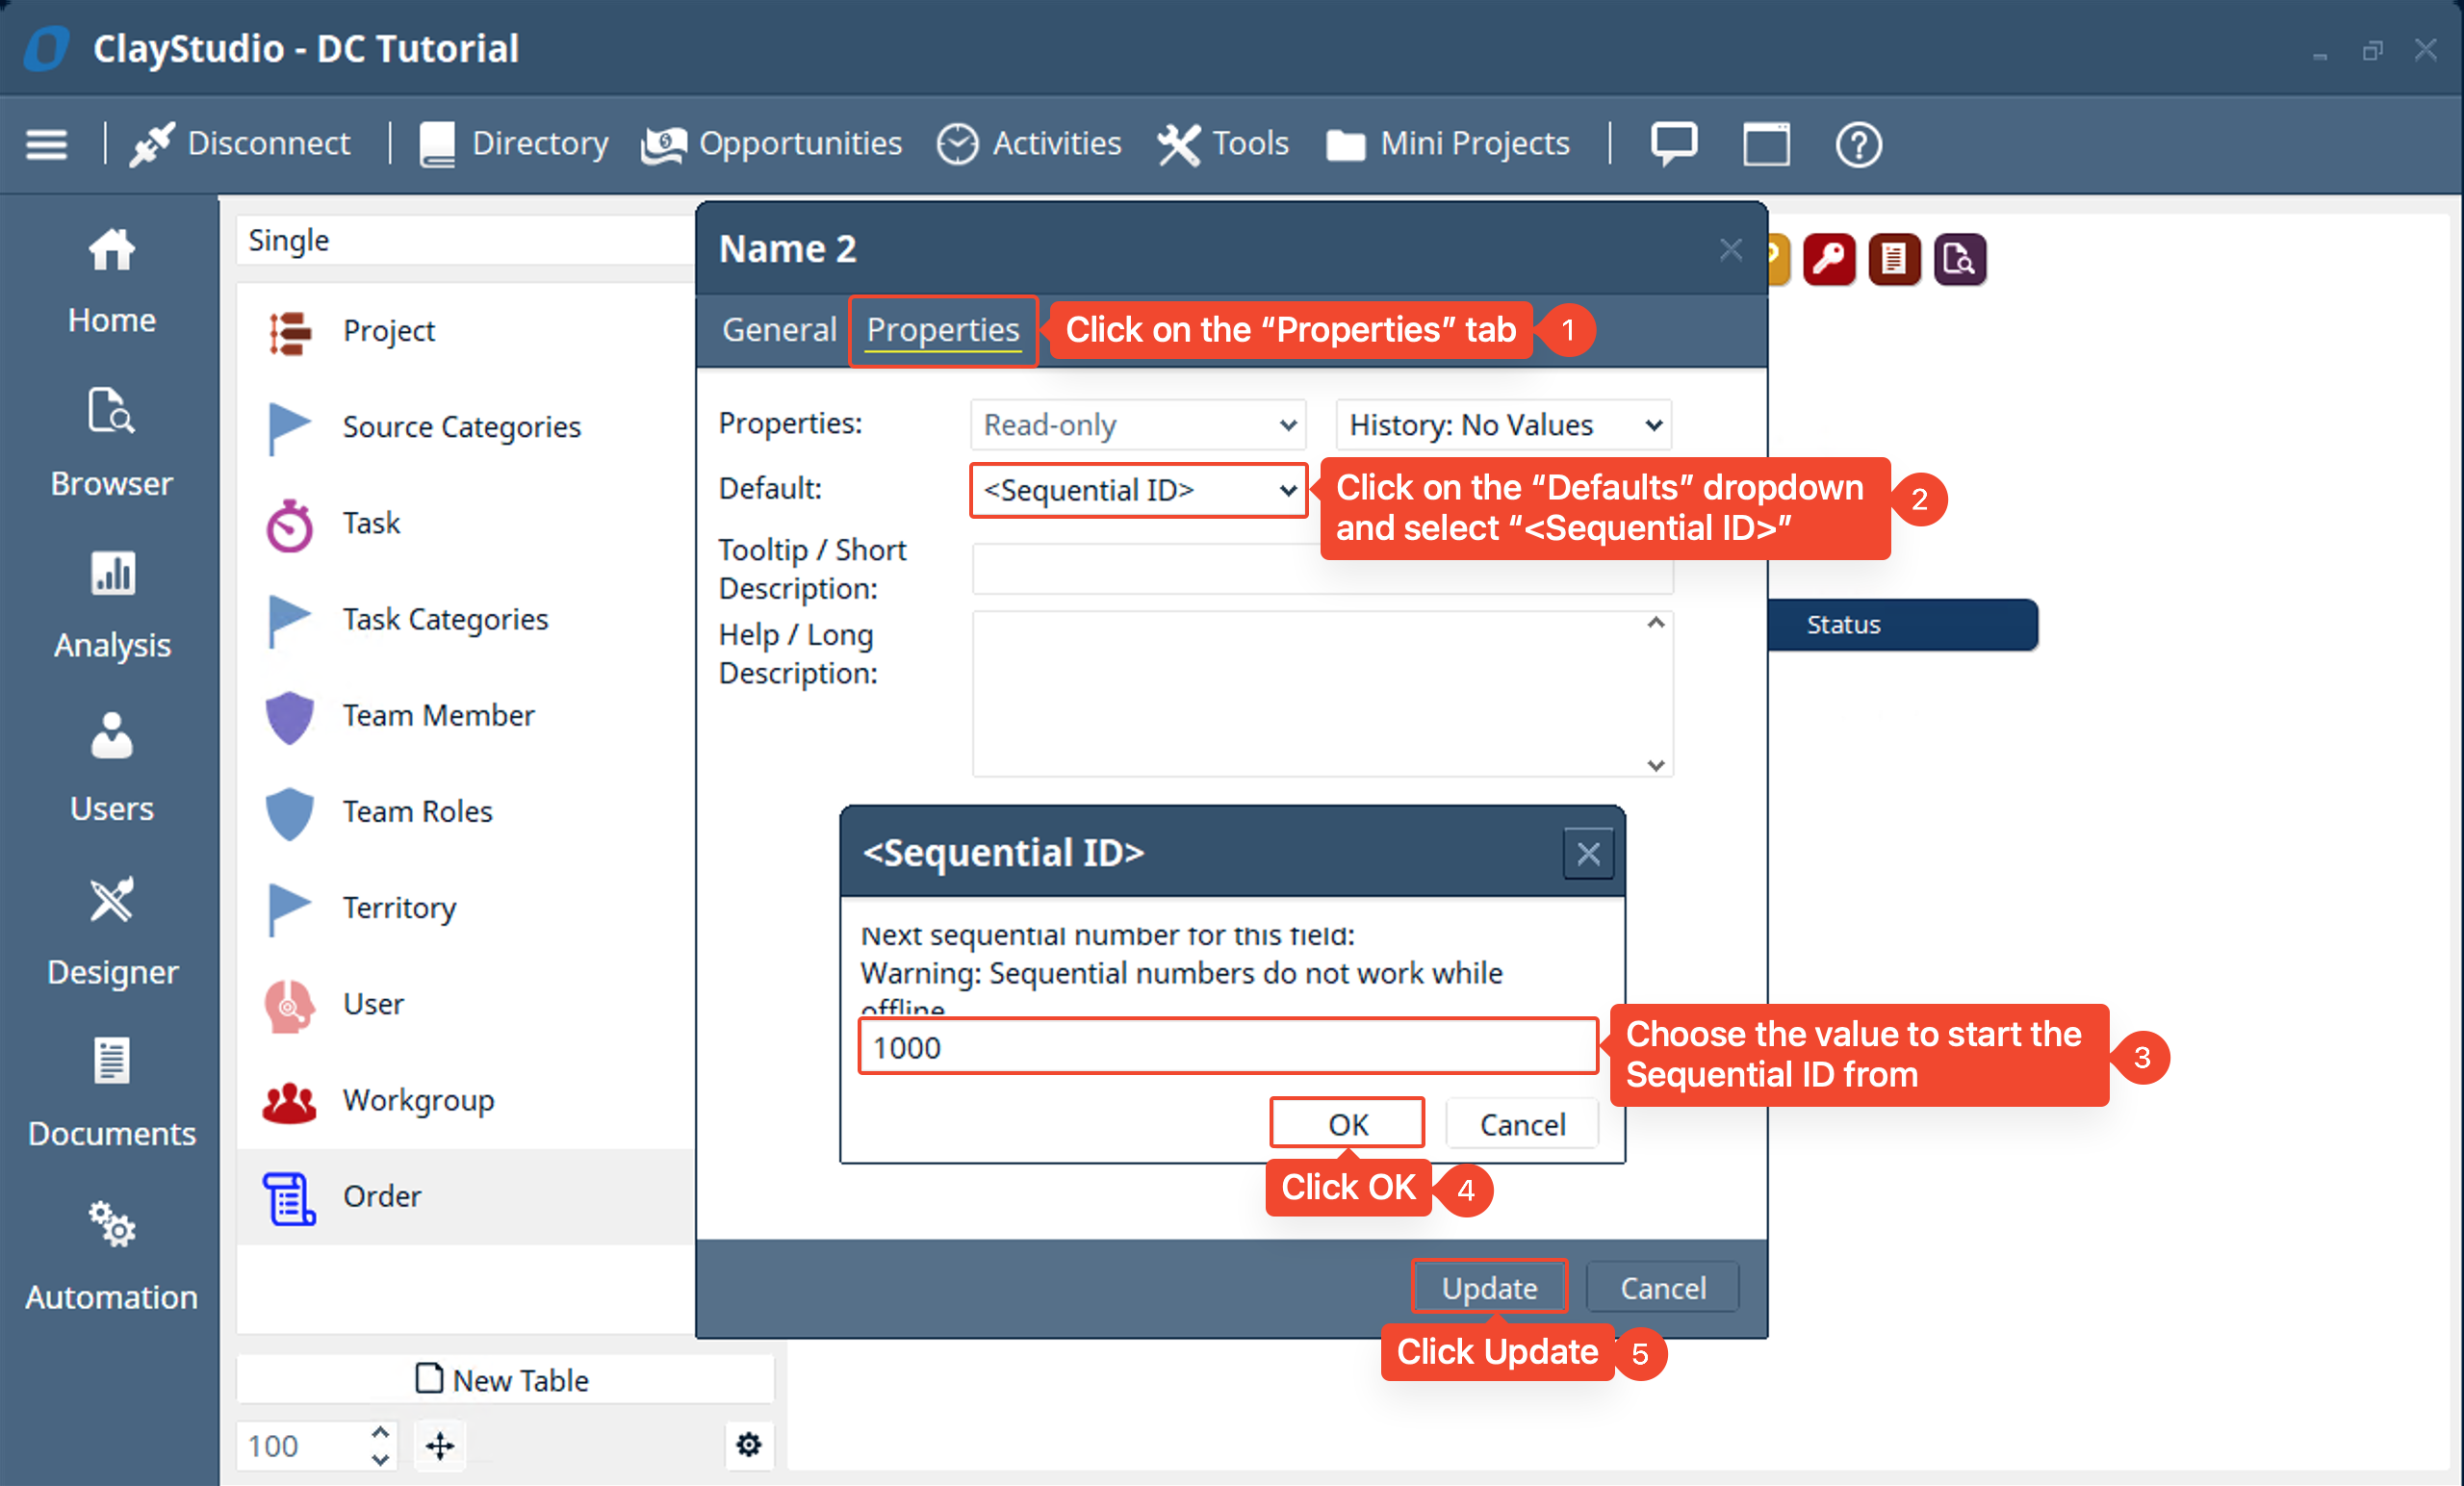
- The “Name” field window will pop up. Click on the “Properties” tab. We will click on the “Default” dropdown and select “<Sequential ID>” to make the name field an ID field which increments by 1 for each new “Order” record created. We will enter the value “1000” to start the Sequential ID field from, then click “OK” and “Update”
- Here you can edit the properties of a field such as if its read only, if it should be hidden, if it should store a history of the values previous values entered into the field, what the default value of the field should be, as-well as a couple description's.
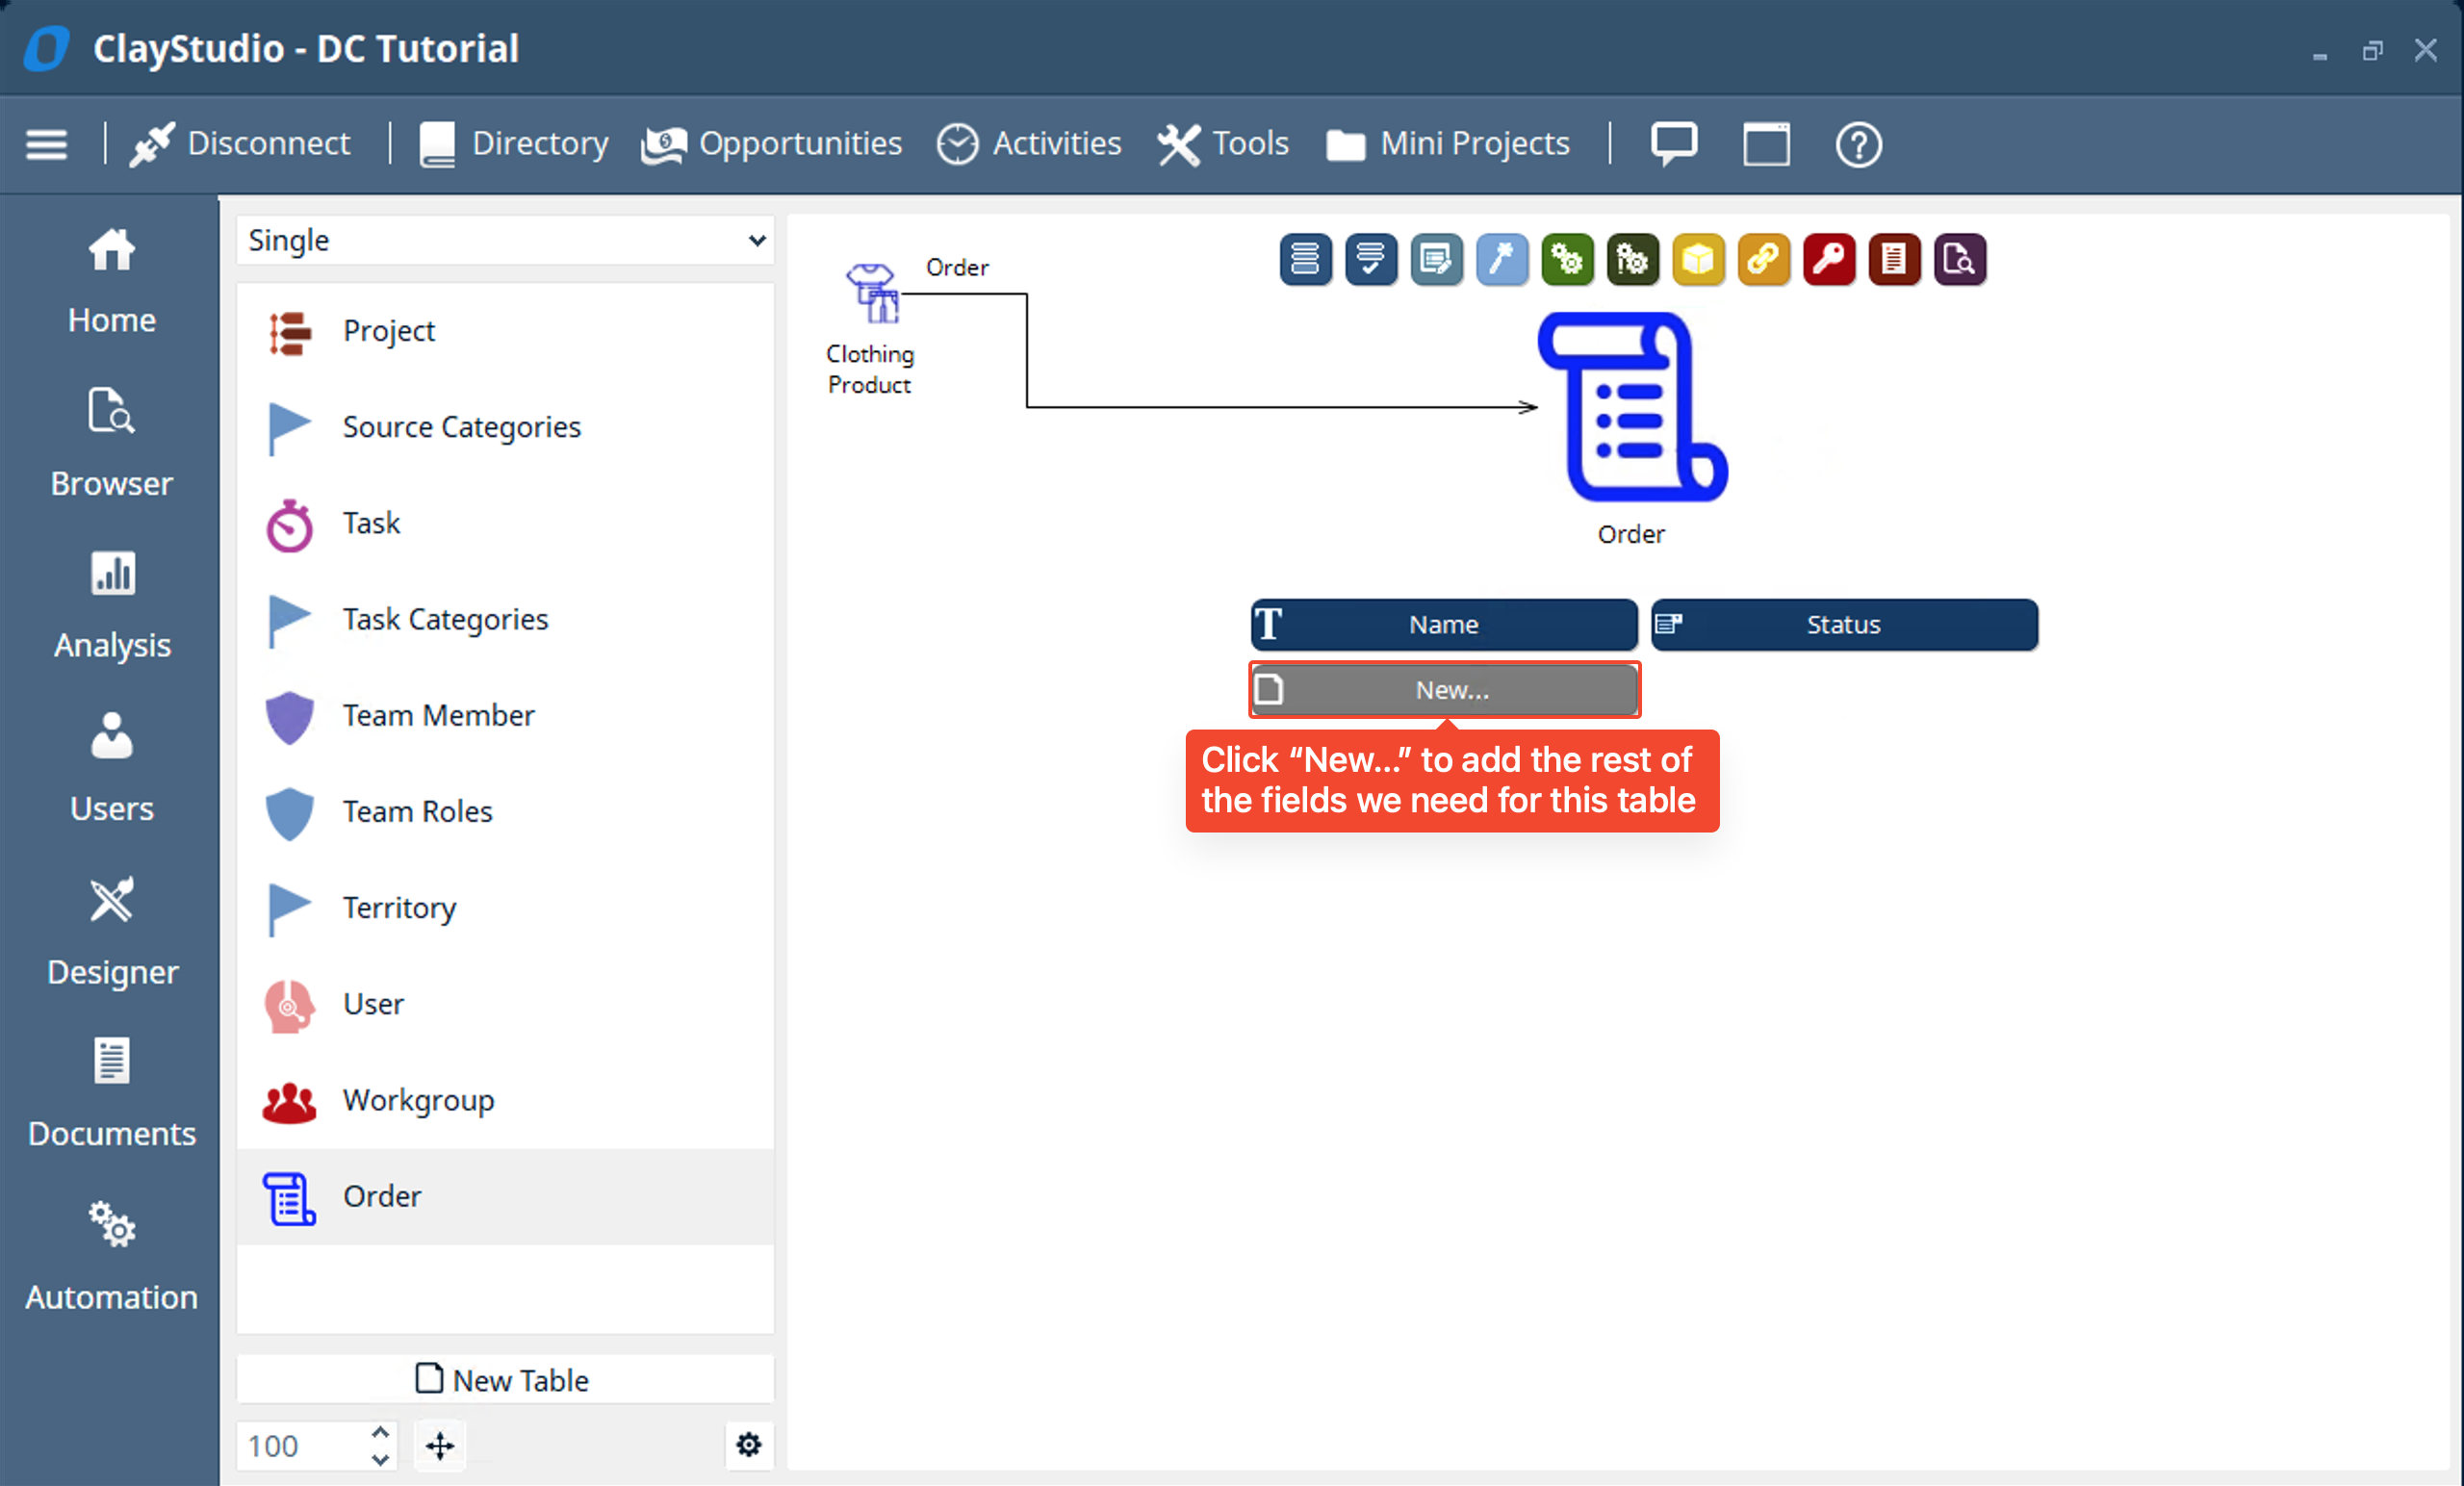
- Now that we updated the Name field to act as out “Order ID”, let’s click on “New…” to create a few more fields.
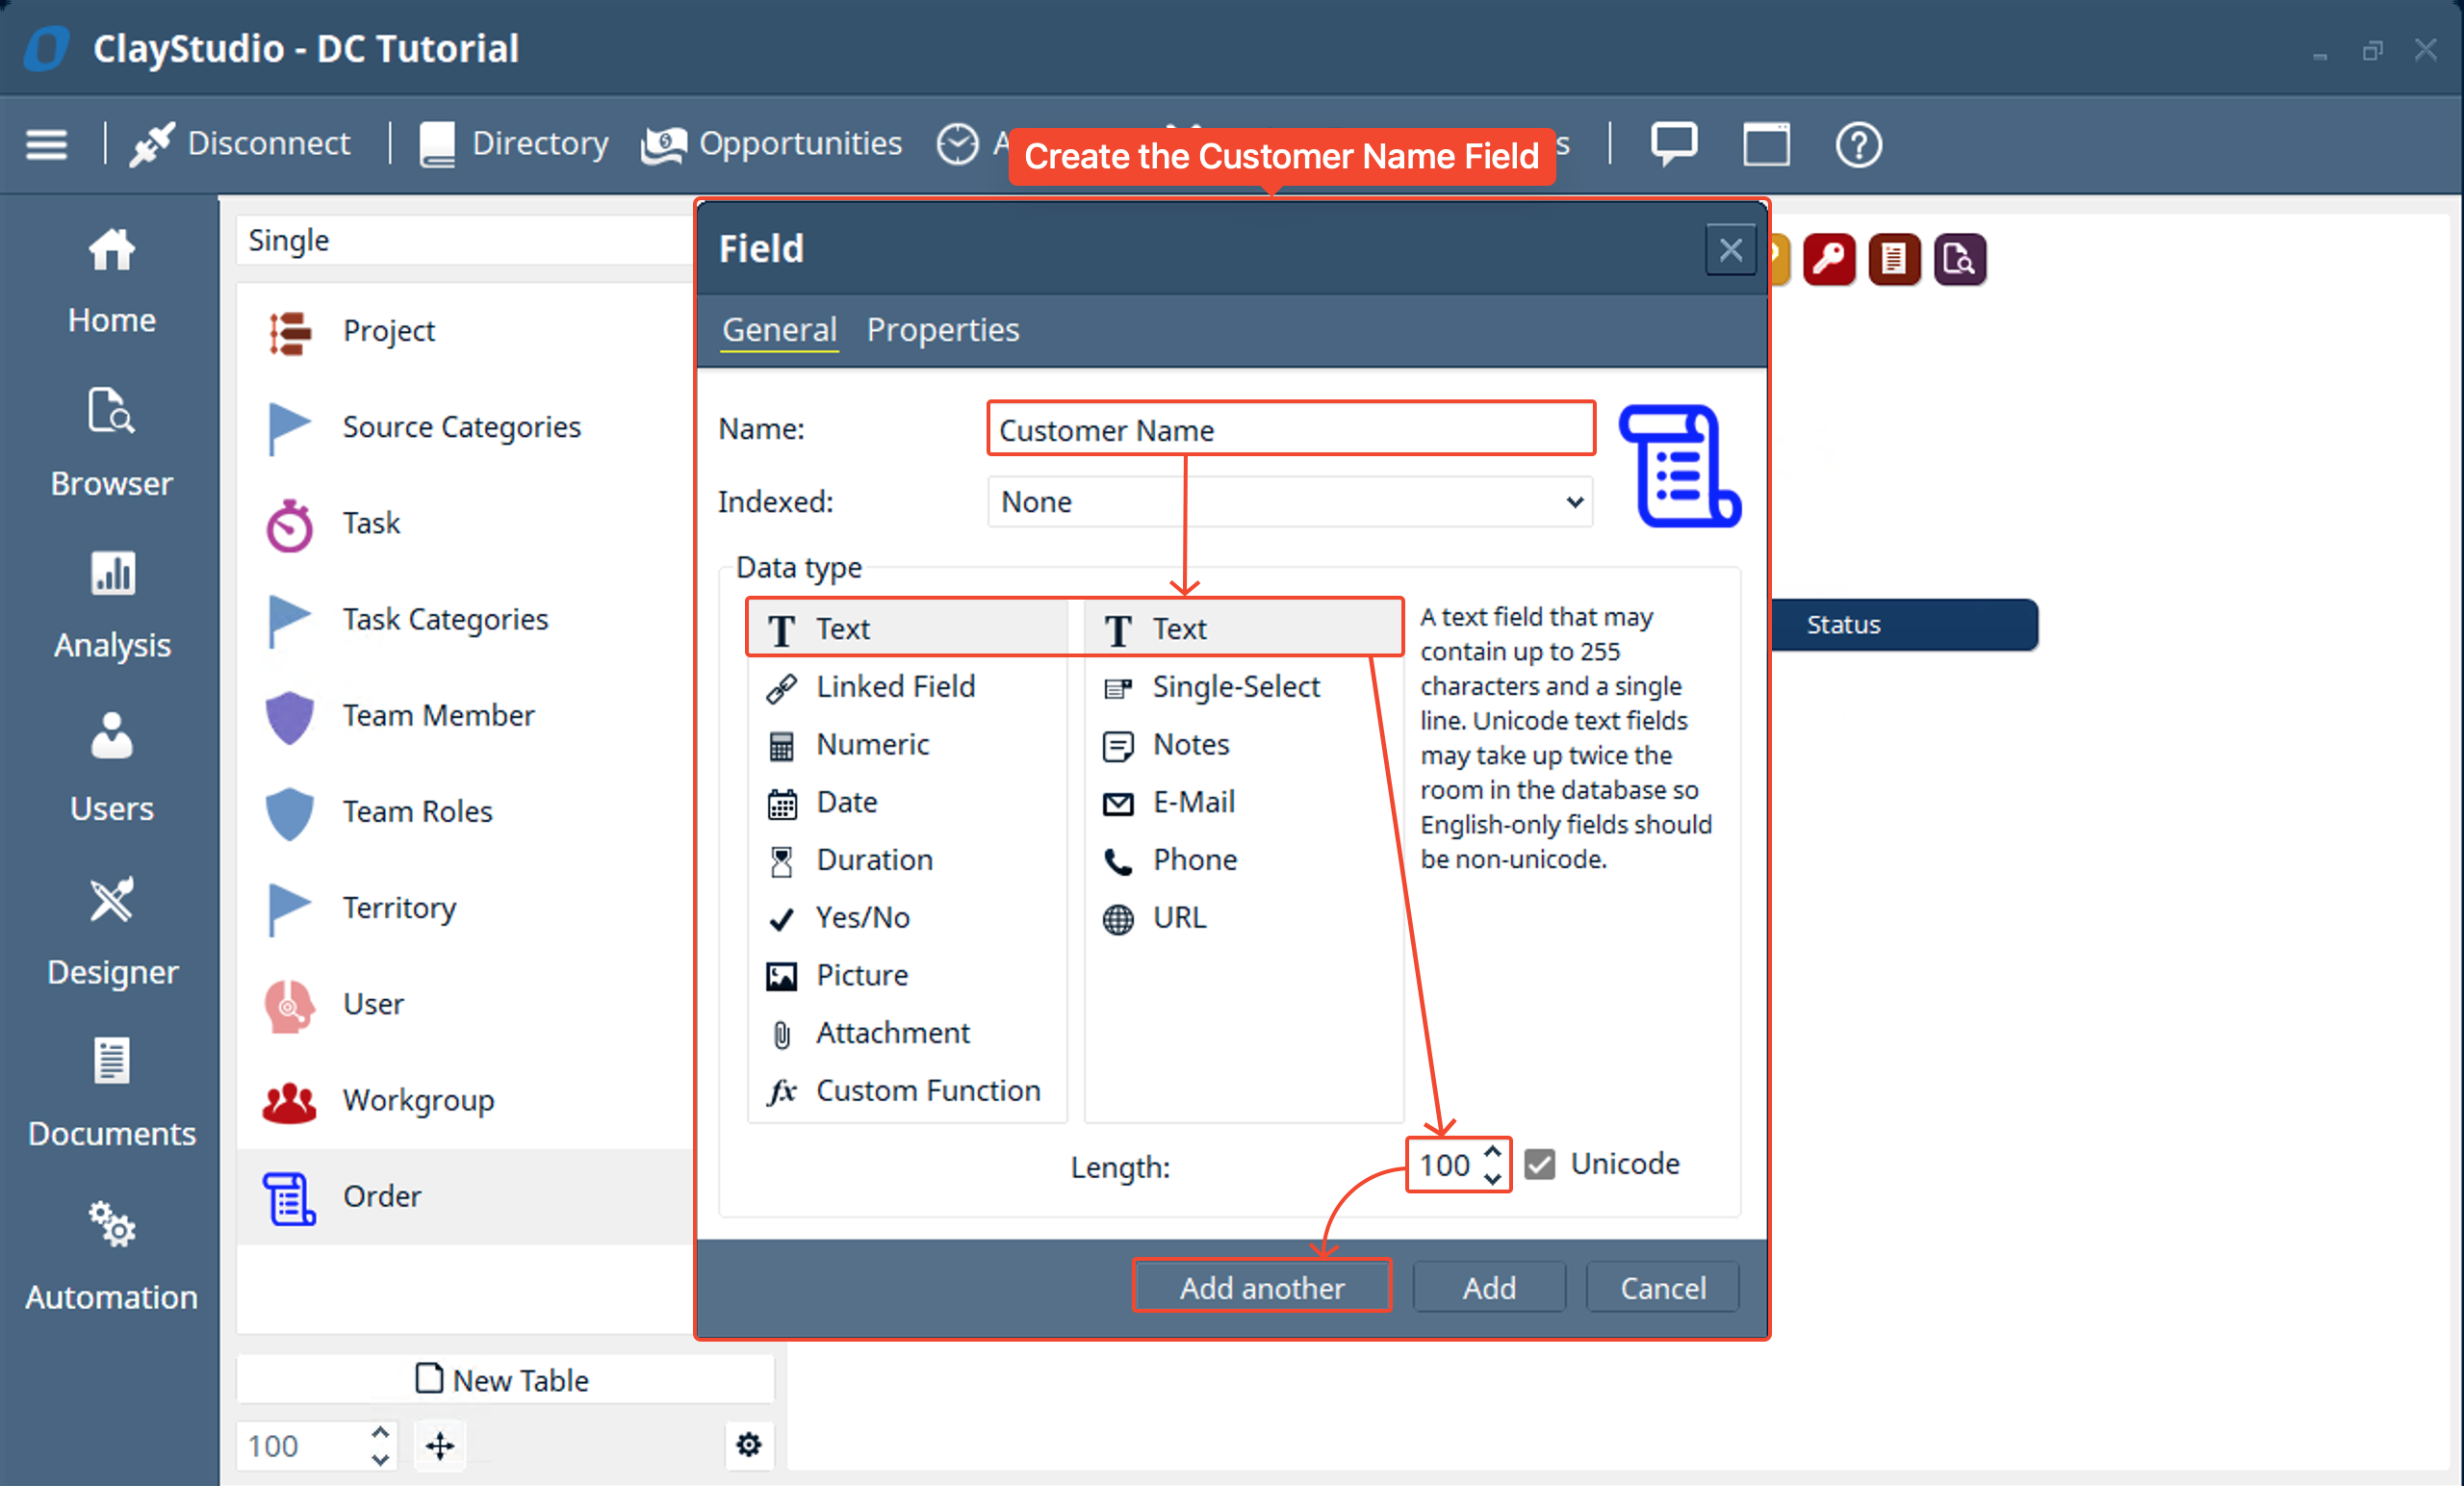
- Fill out the Customer Name field as shown in the screenshot below. We change the length of the field to be 100 characters long to account for very long names past the default length of a text field (which is 50 characters long)
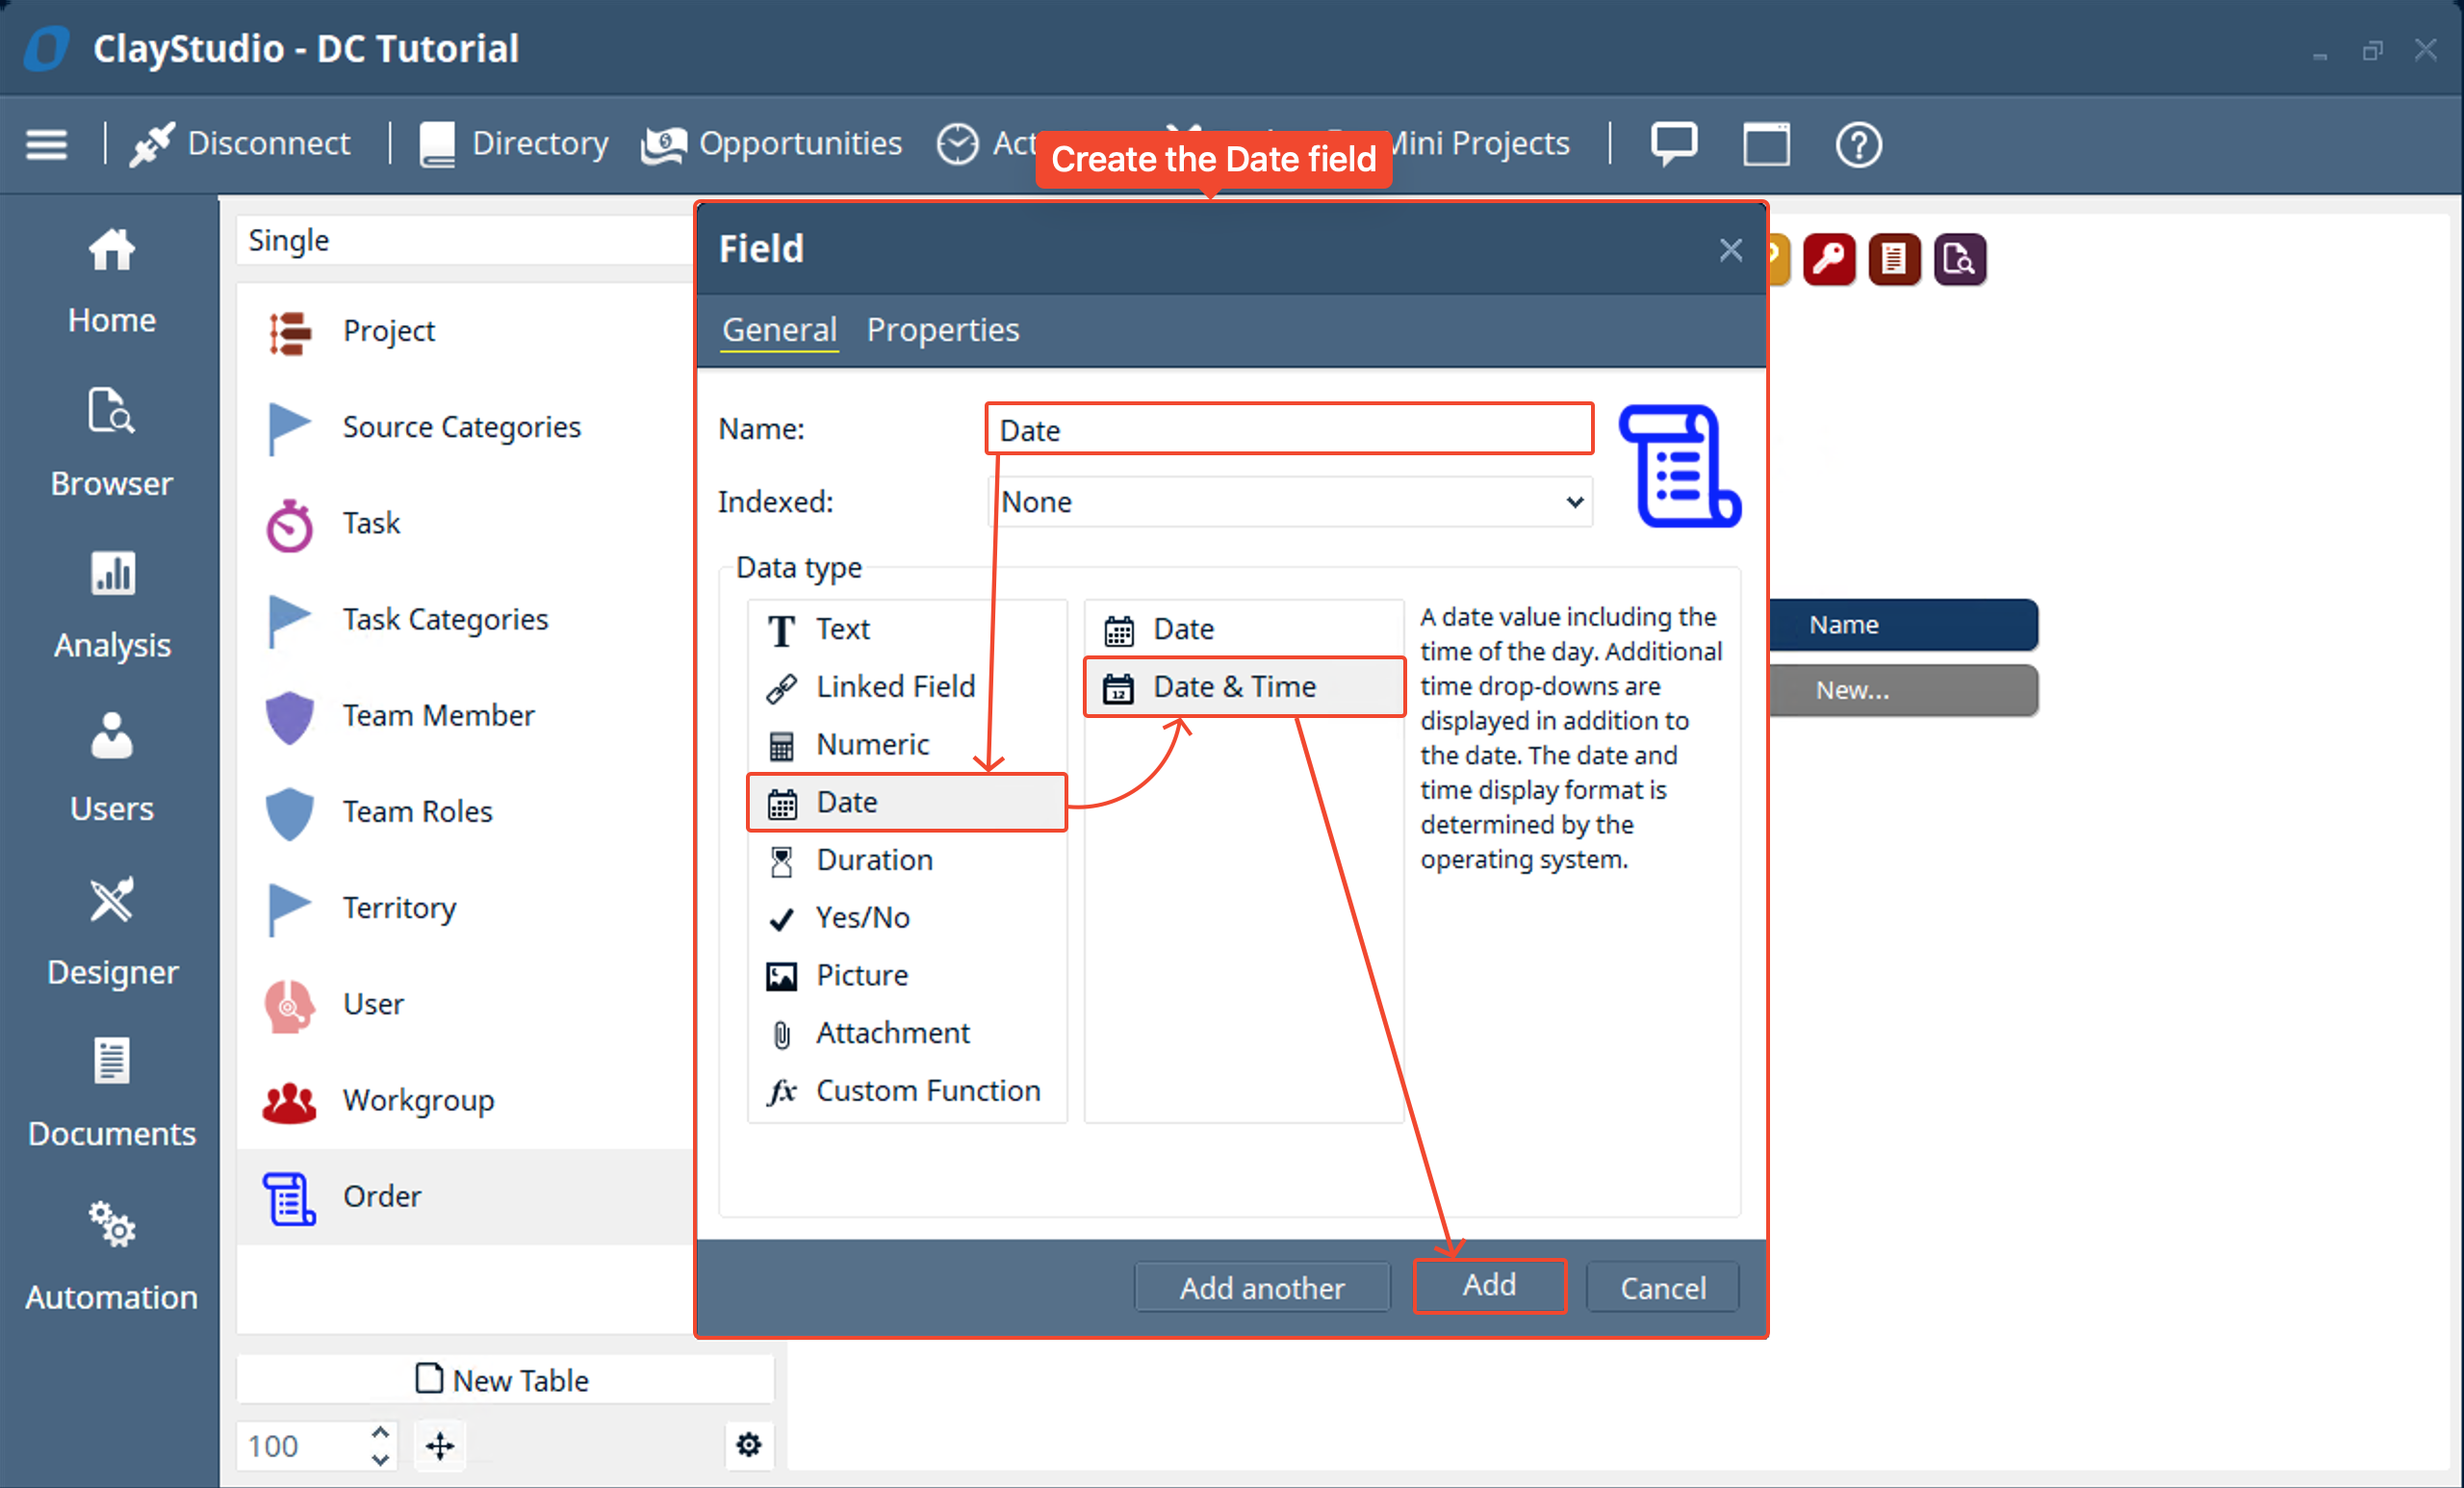
- Next fill out the field details for the “Date” field and add the field. Now we have
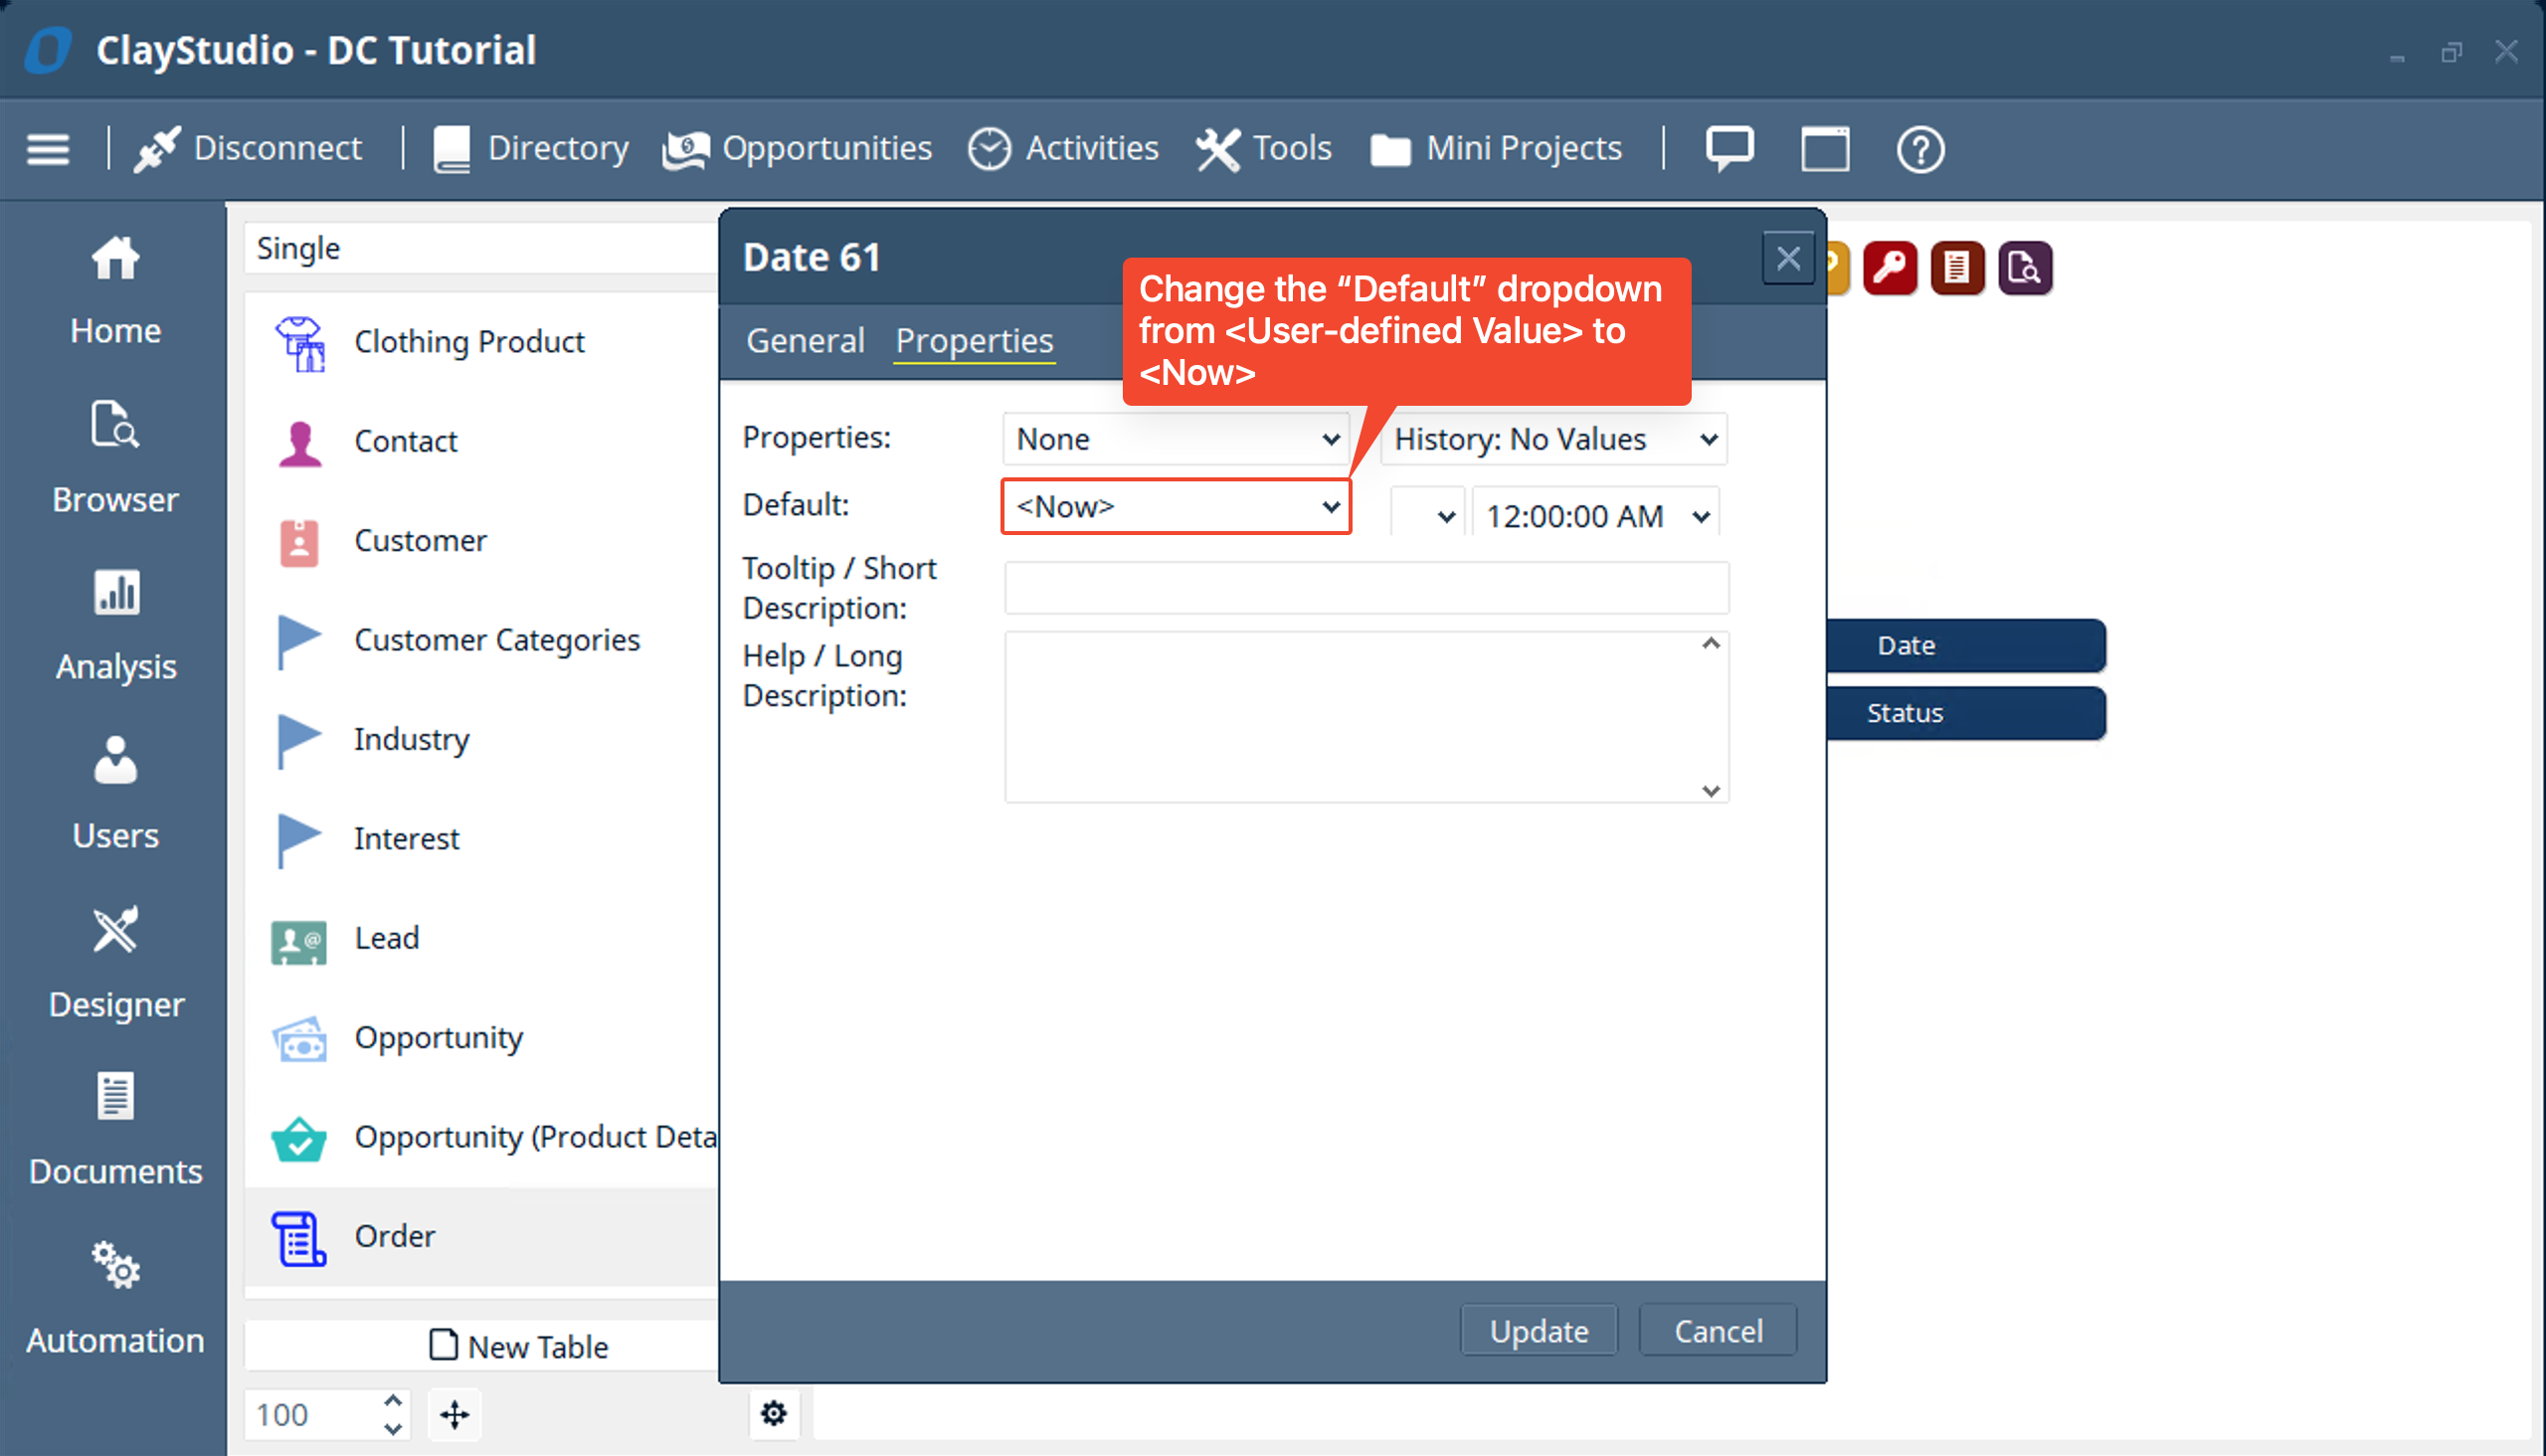
- Lastly, go back into the “Date” field you just created and go to the “Properties” tab and set the “Default” dropdown to be <Now>. This will cause new orders to have the default date and time be the current date and time.
- Now that we created our tables and most of our fields. Let’s create a user action that allows us to easily add a “Clothing Product” to an “Order”. This user action will add a convenient button to the toolbar that will let use add a “Clothing Product” and automatically link it to the “Order” without having to manually set it each time.
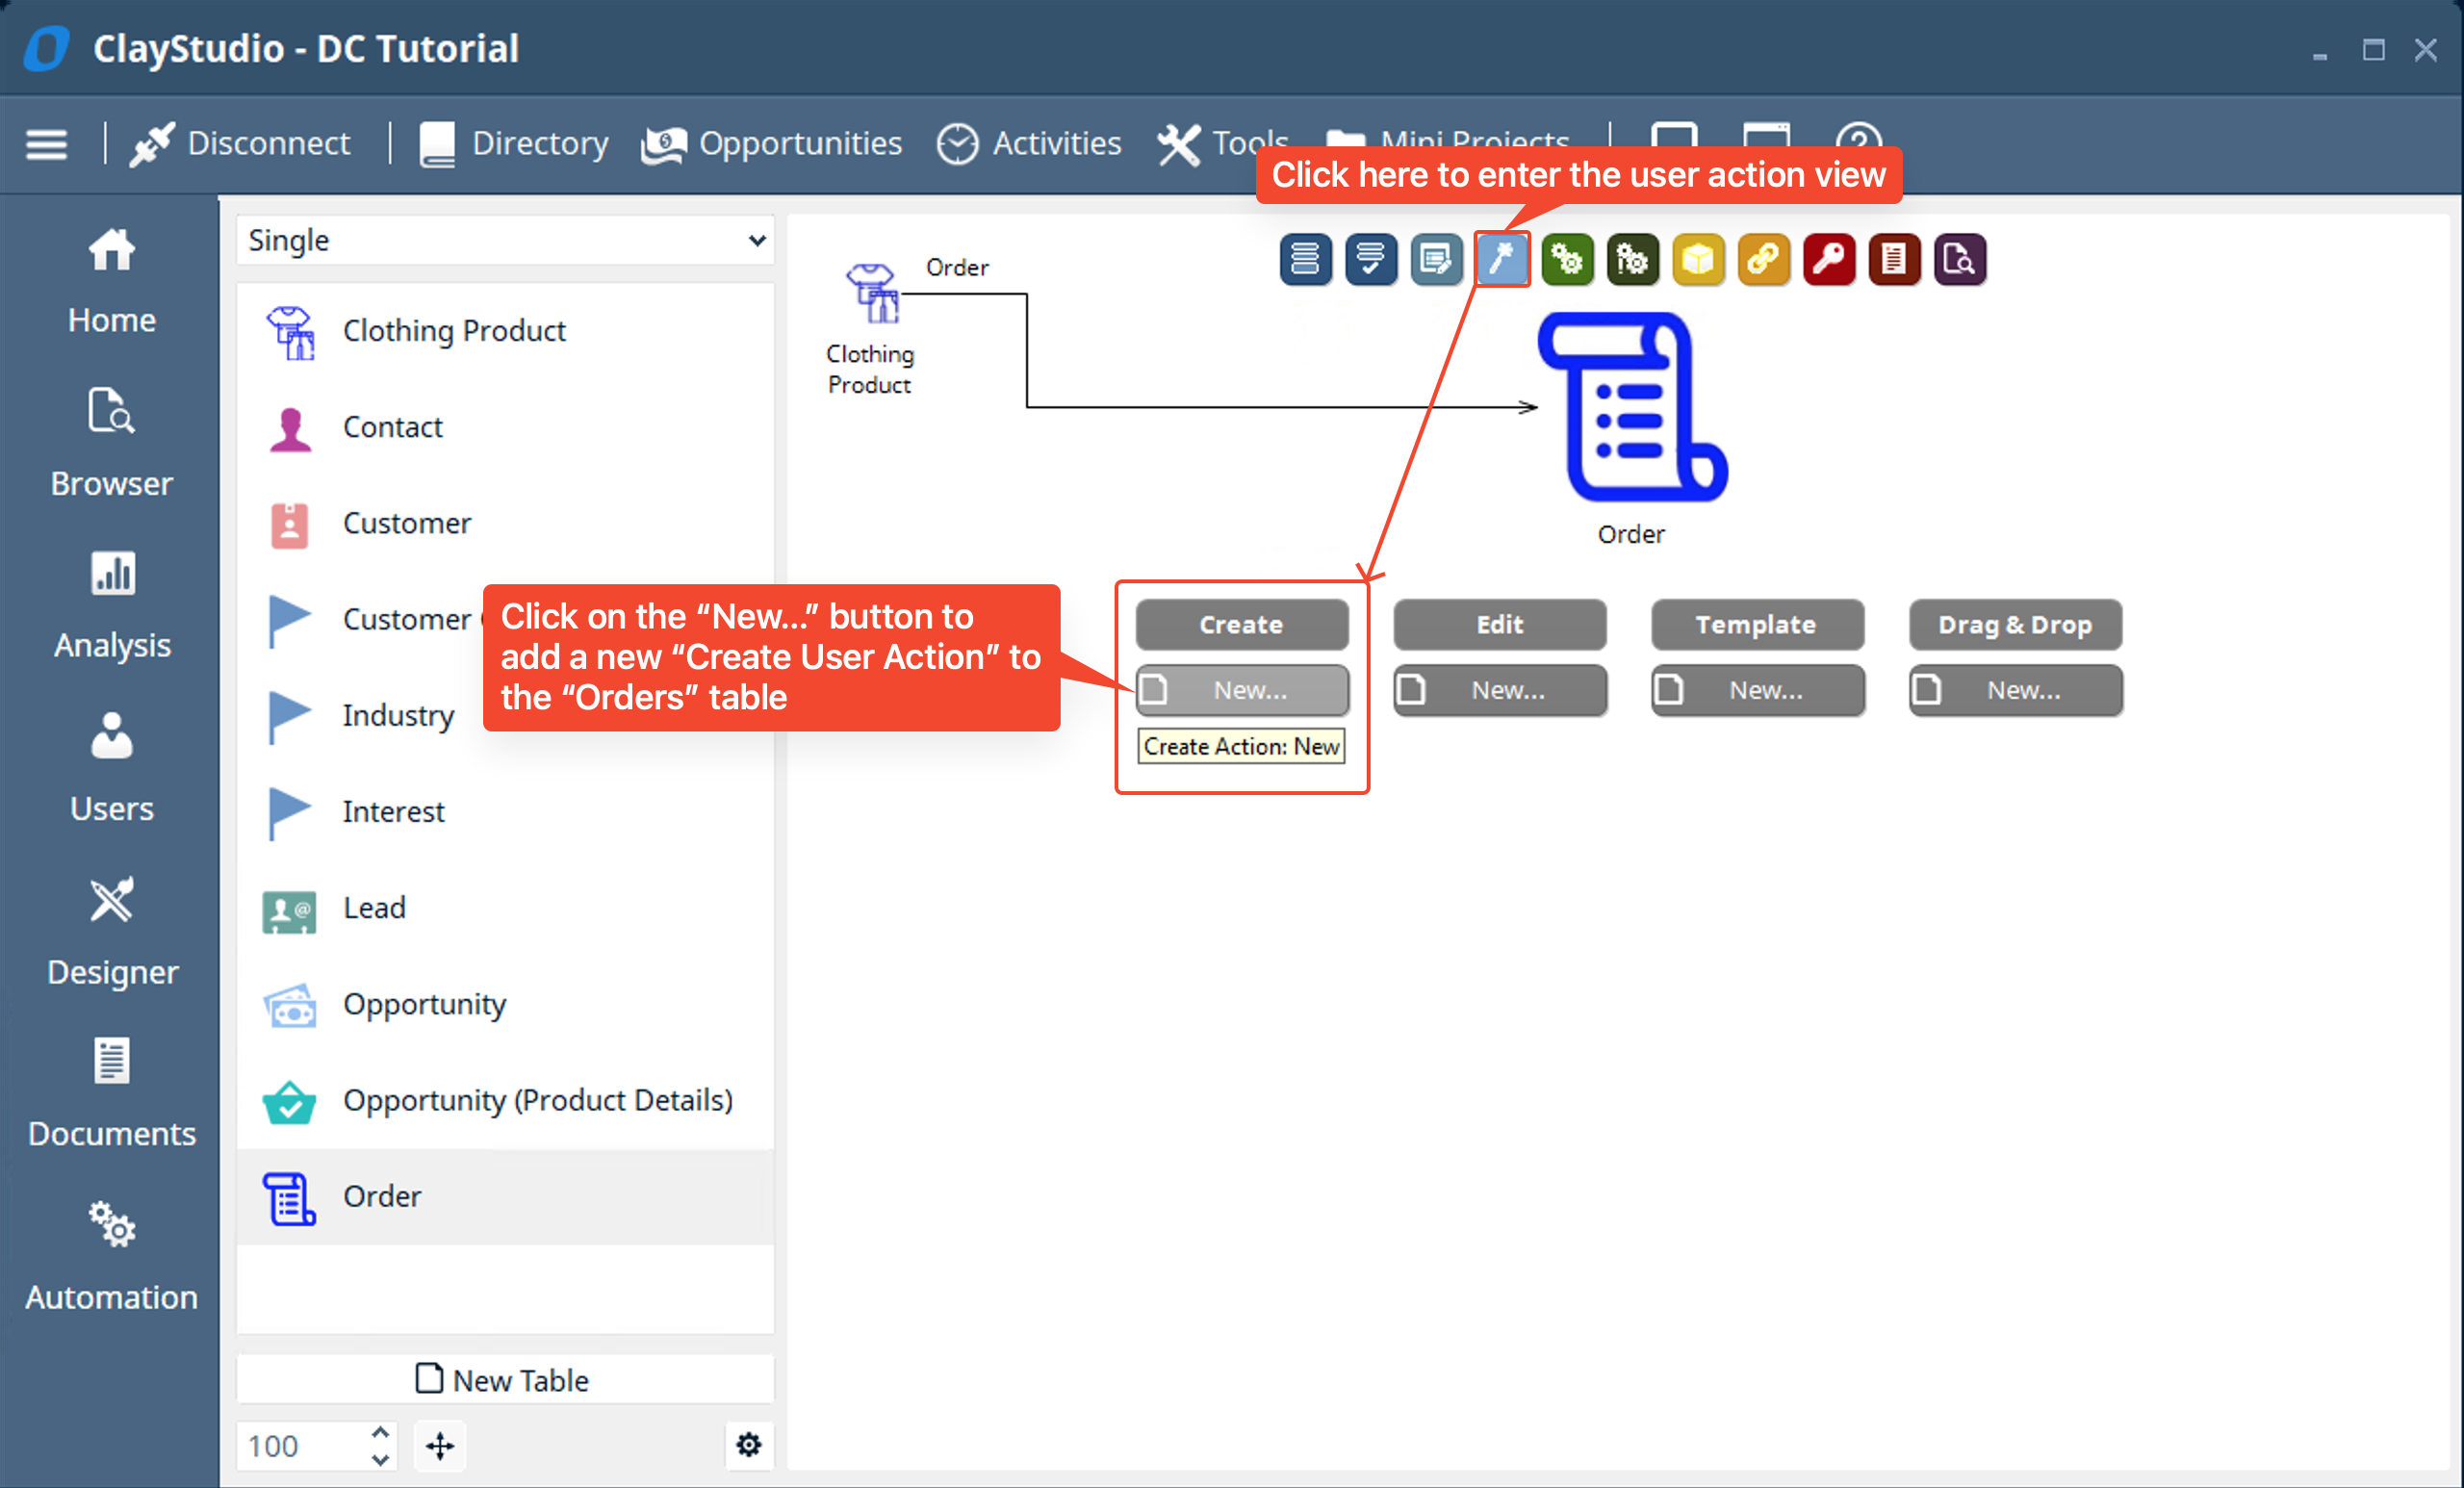
- There are a couple ways to create a user action for a table in Digital-Clay. One way is from within the table view in the designer (as indicated in the right side of the screenshot below) or from the toolbar menu (as indicated in the left side of the screenshot below). For this mini project guide we will be using the first way (the way indicated on the right side of the screenshot below) though the same result could be achieved with the other way
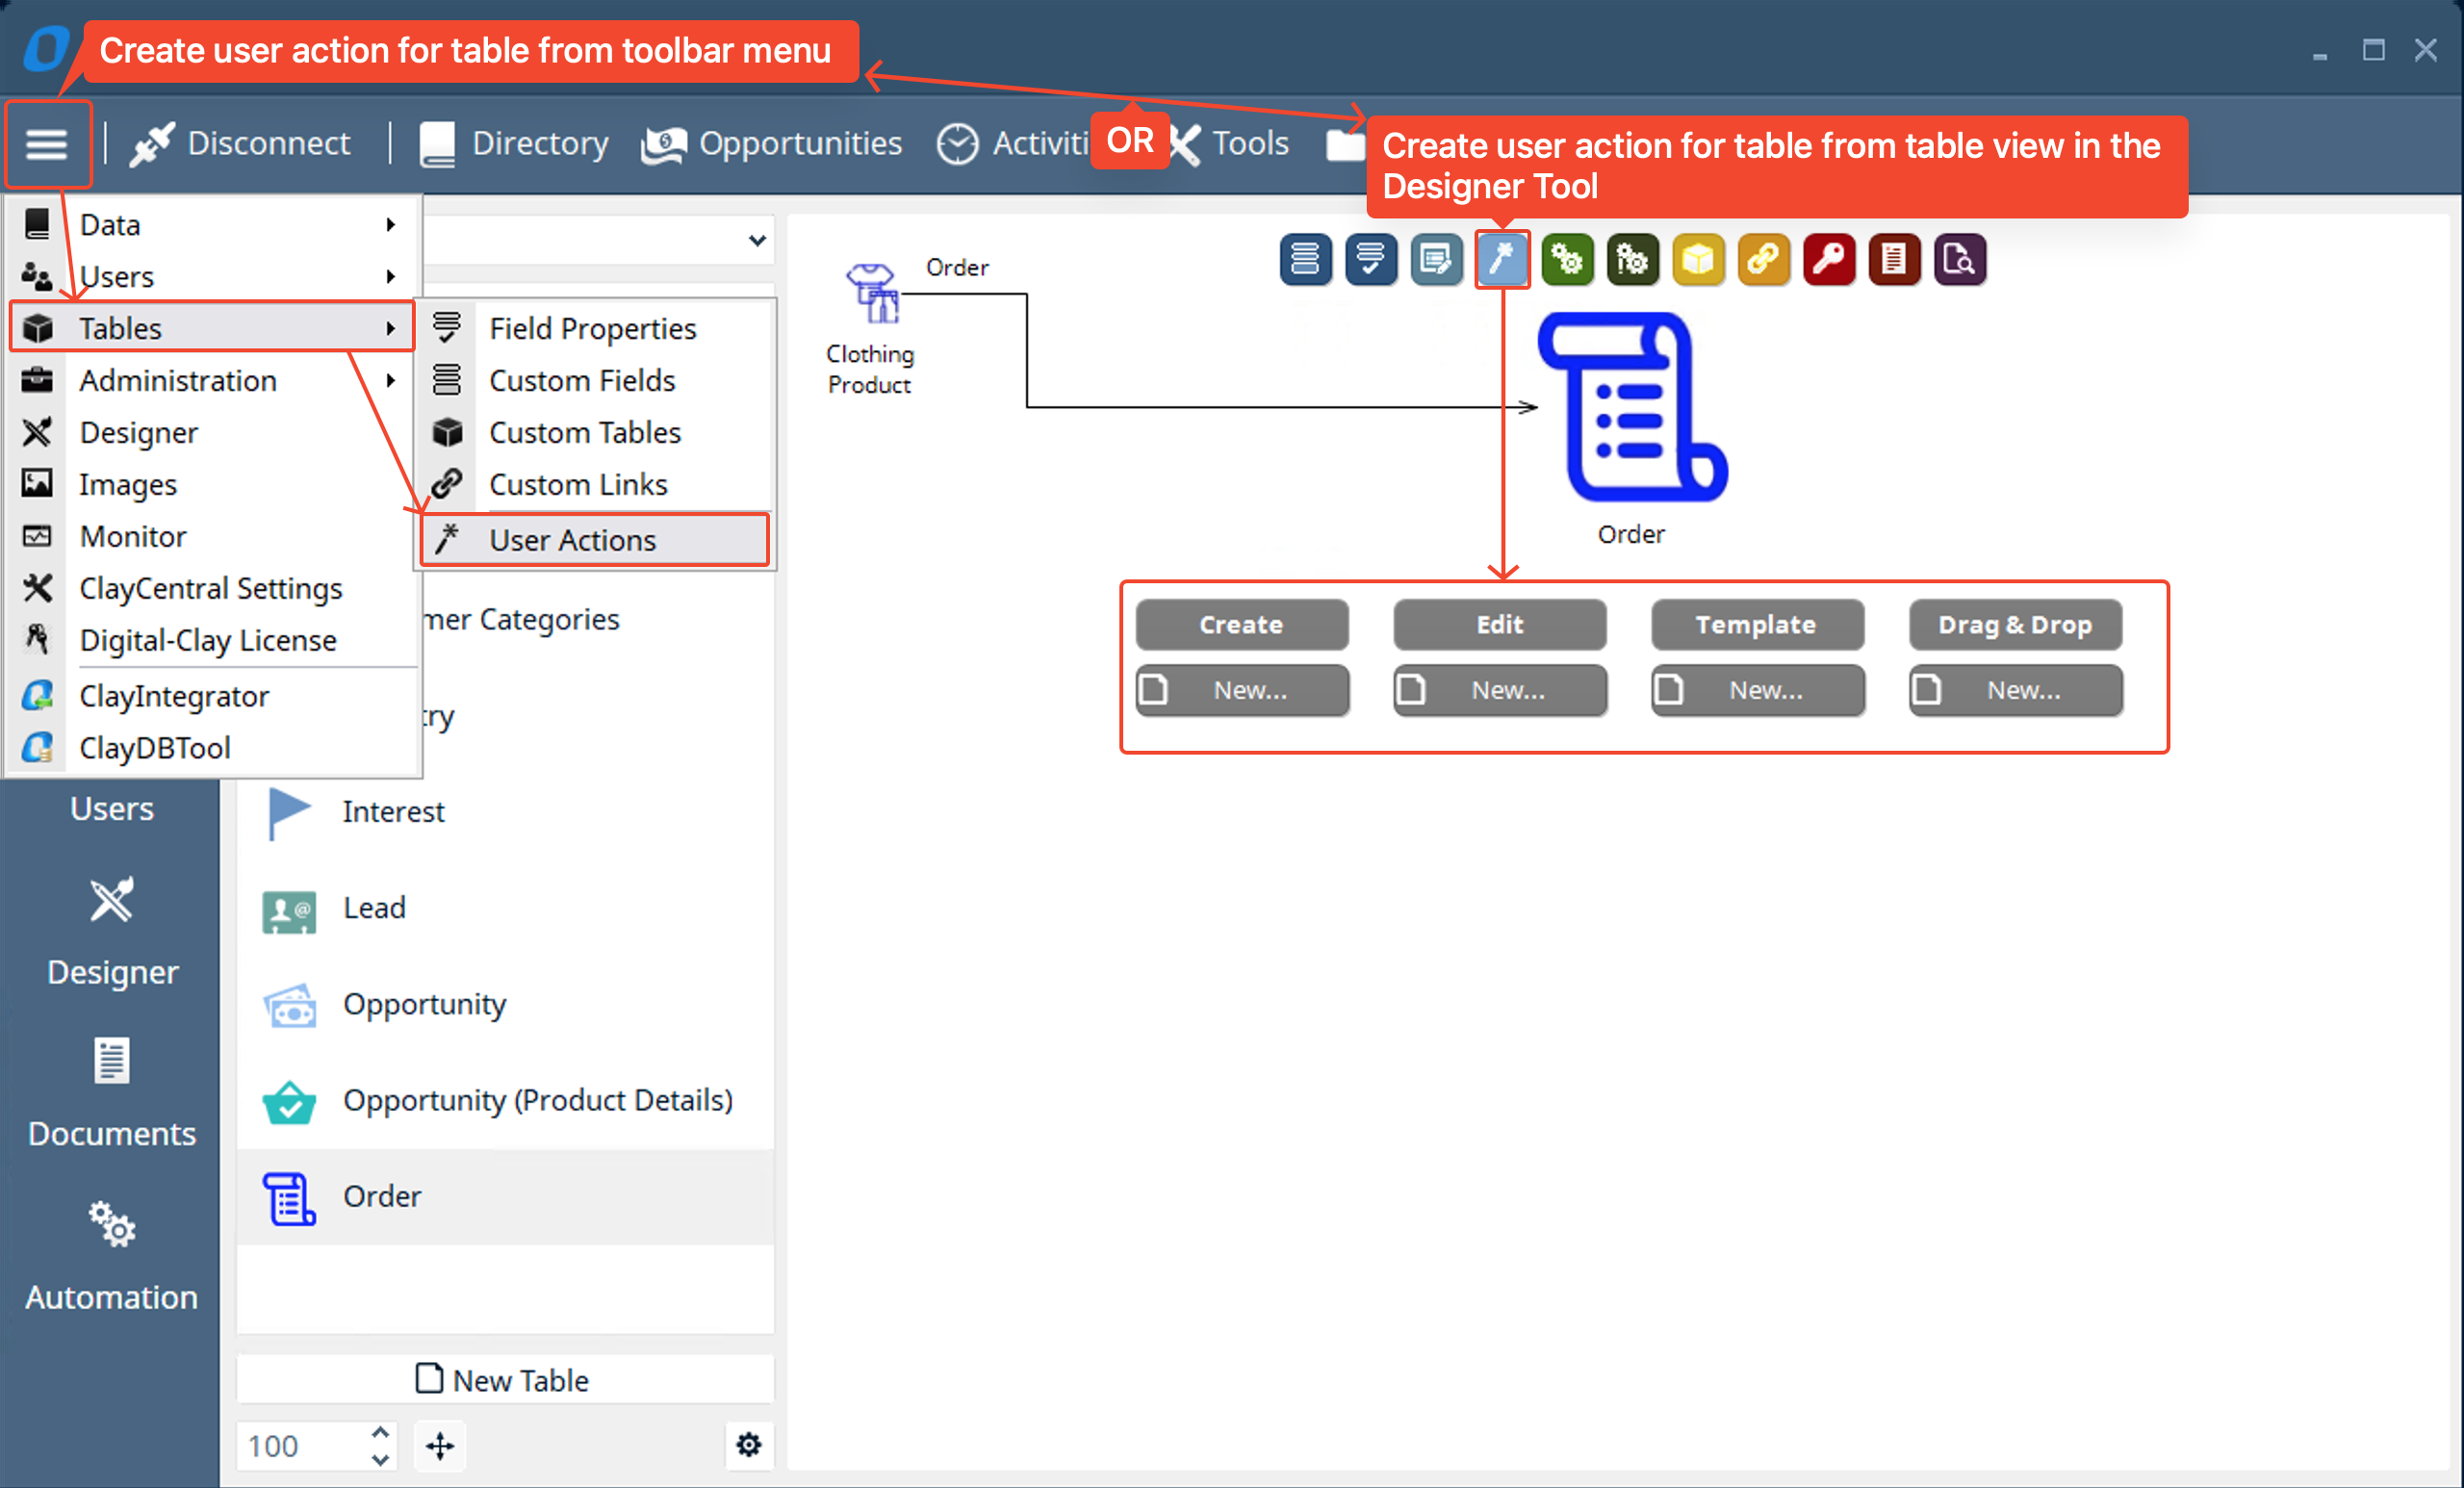
- So, after clicking on the blue wand icon in the table view we are given four options to choose from: Create, Edit, Template, and Drag & Drop. Since we want to create a “Clothing Product” to add to the “Order” we will use the “Create” user action.
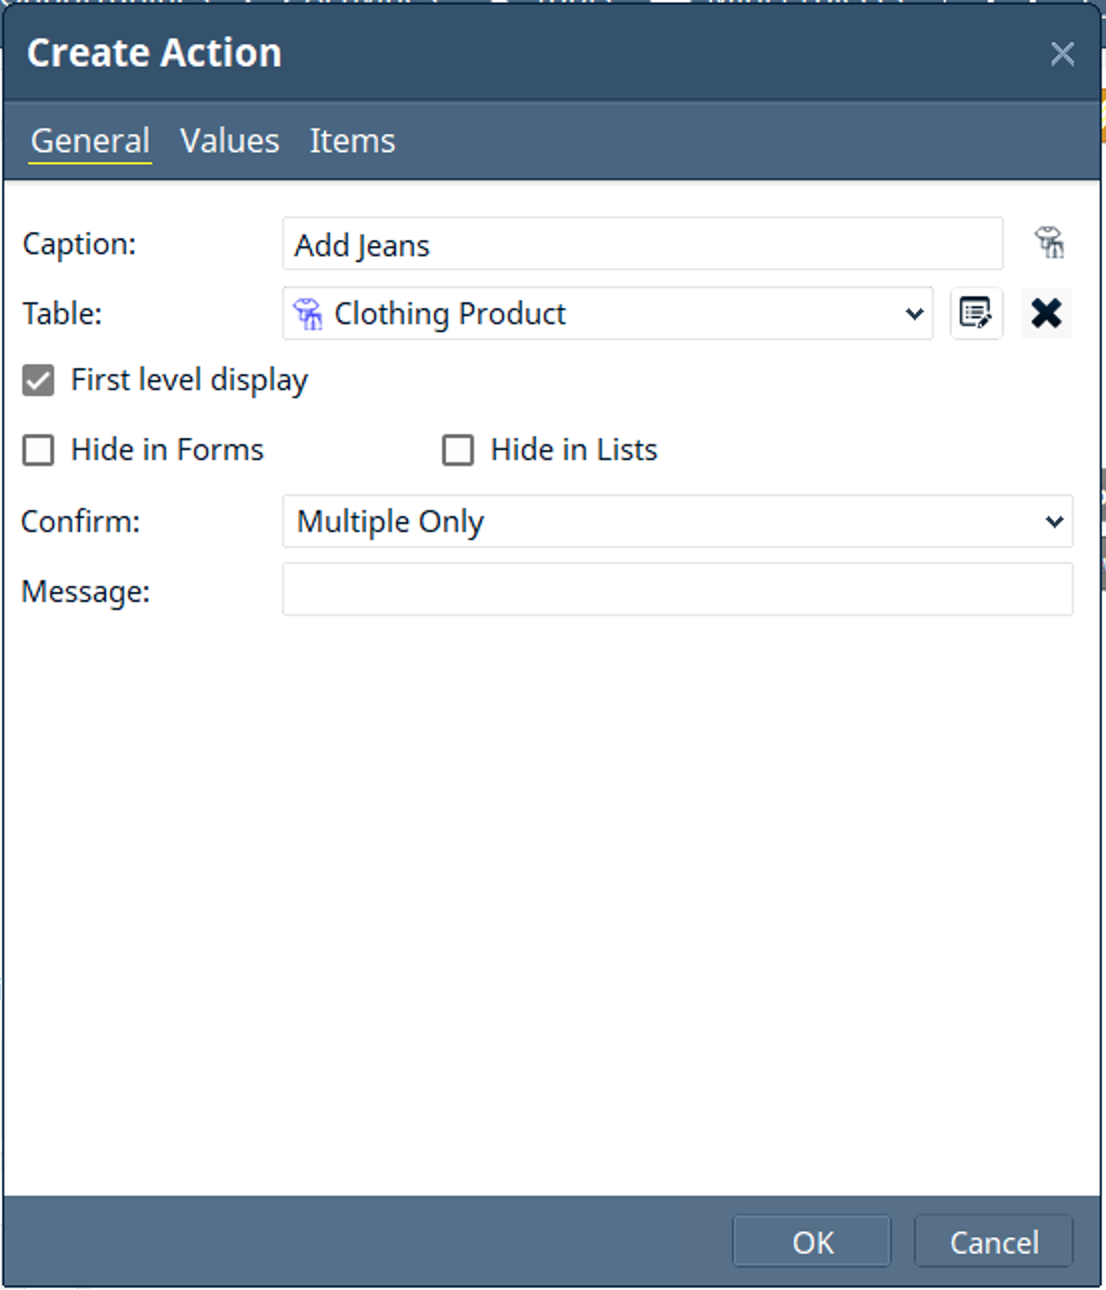
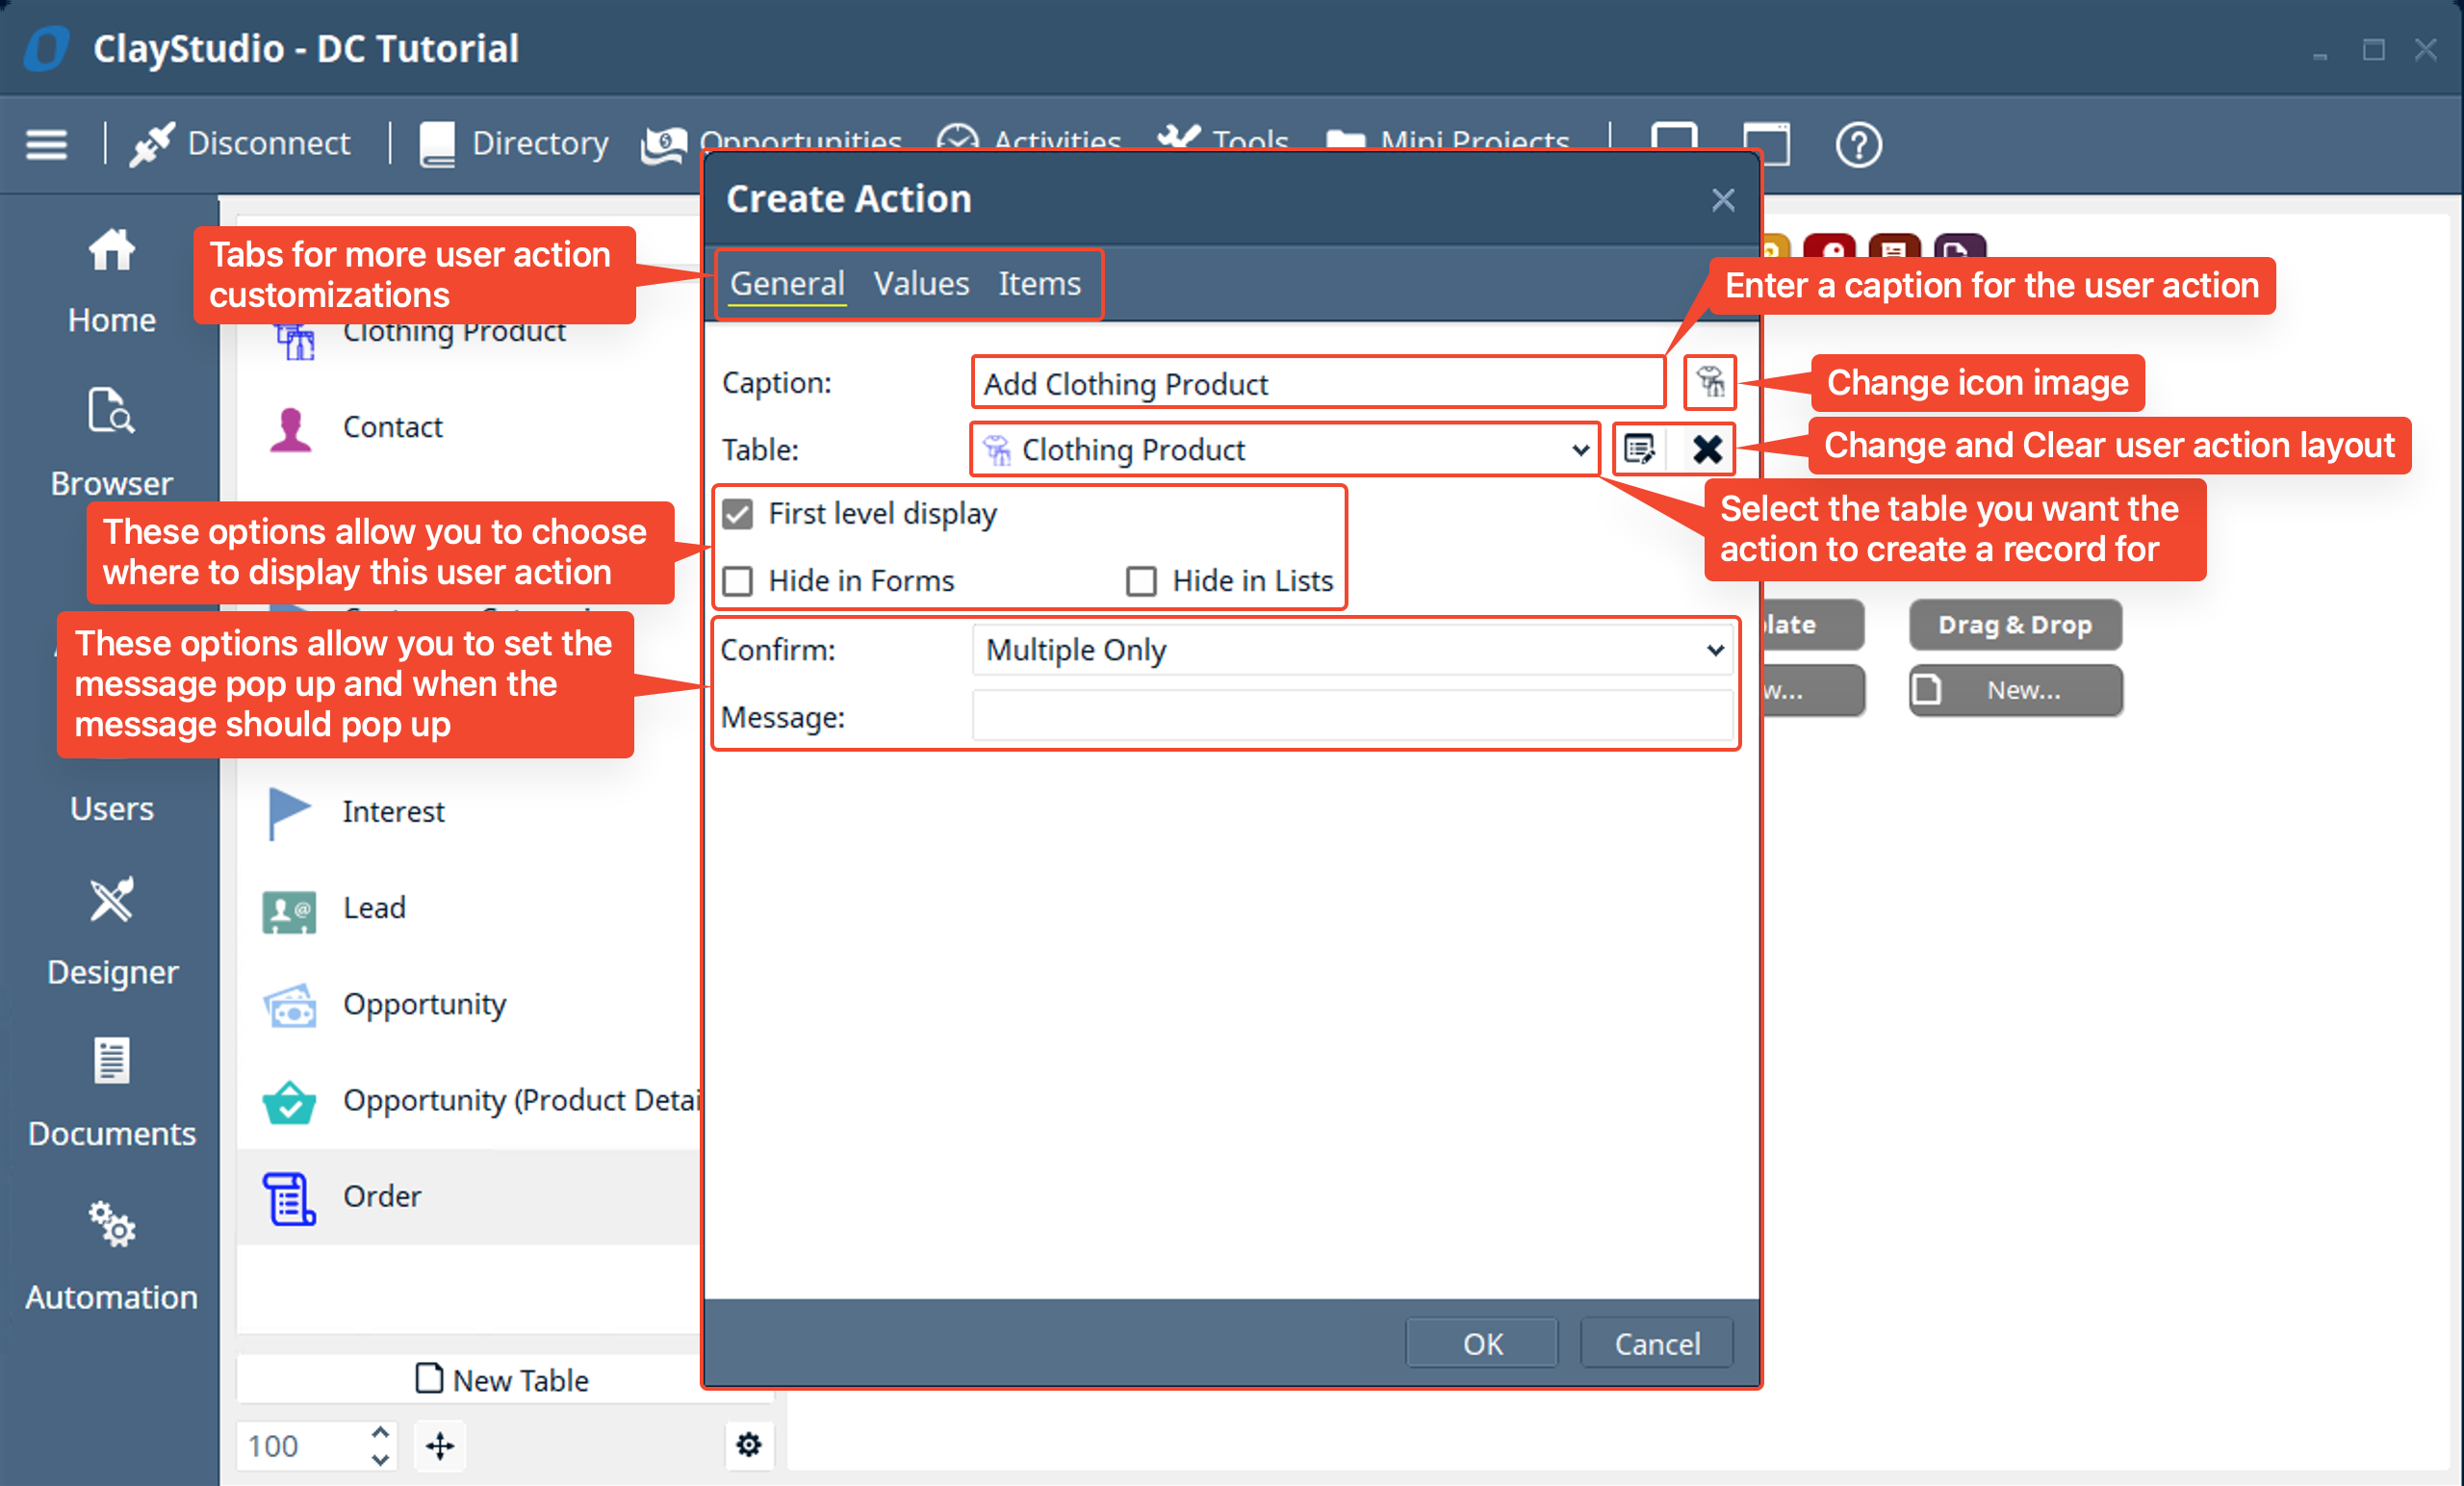
- In the create action window the first tab you see is the “General” tab. Here is where you name the action, set the table you want to create an item for, choose the display options, and set the pop up message options. Go ahead and set the values as you see it in the screenshot below.
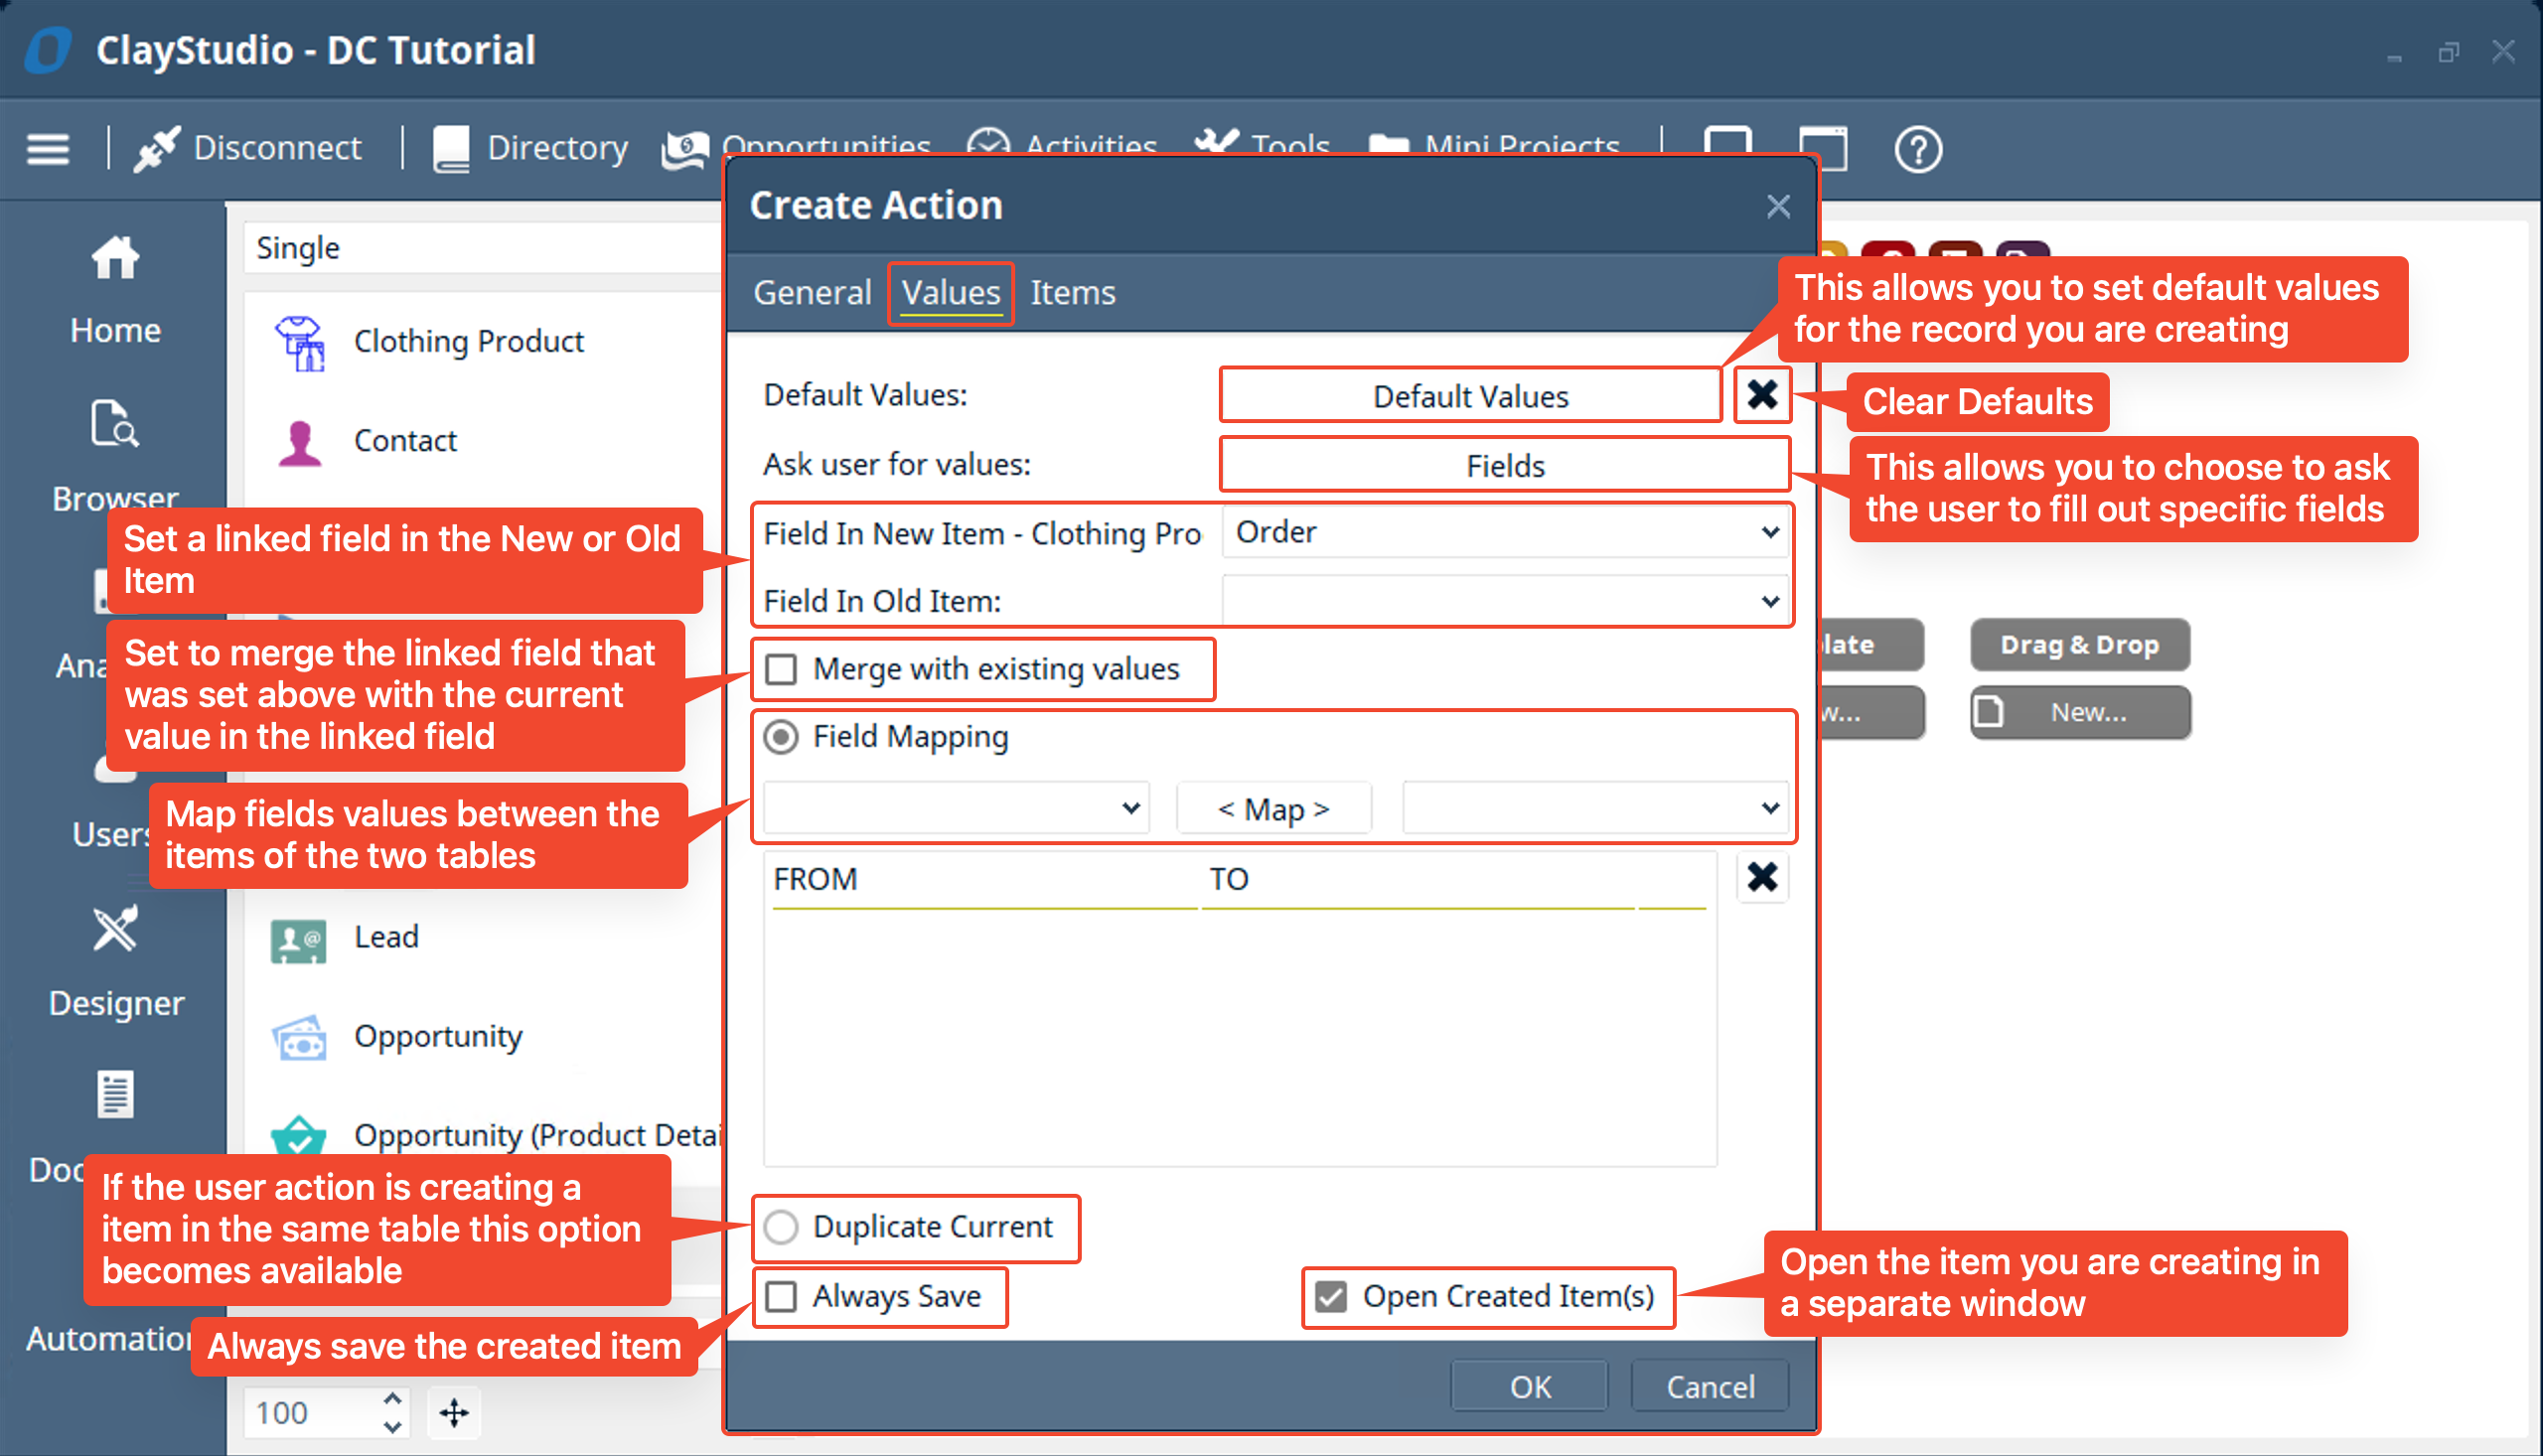
- The “Values” tab allows you to set the value options for the user action. Here you can select default values, ask the user for values of specific fields, automatically set the linked field of an old or new item, whether to merge the linked field value that was automatically set, map fields between items of the two tables, always save and/or open the created items. For now just fill in the “Order” value in the “Fields In New Item” drop down.
- If you are not seeing the “Order” option then you either did not create the linked field from the “Clothing Product” table to the “Orders” table OR you selected the wrong table in the “General” tab to create a record for (it should be “Clothing Product”)
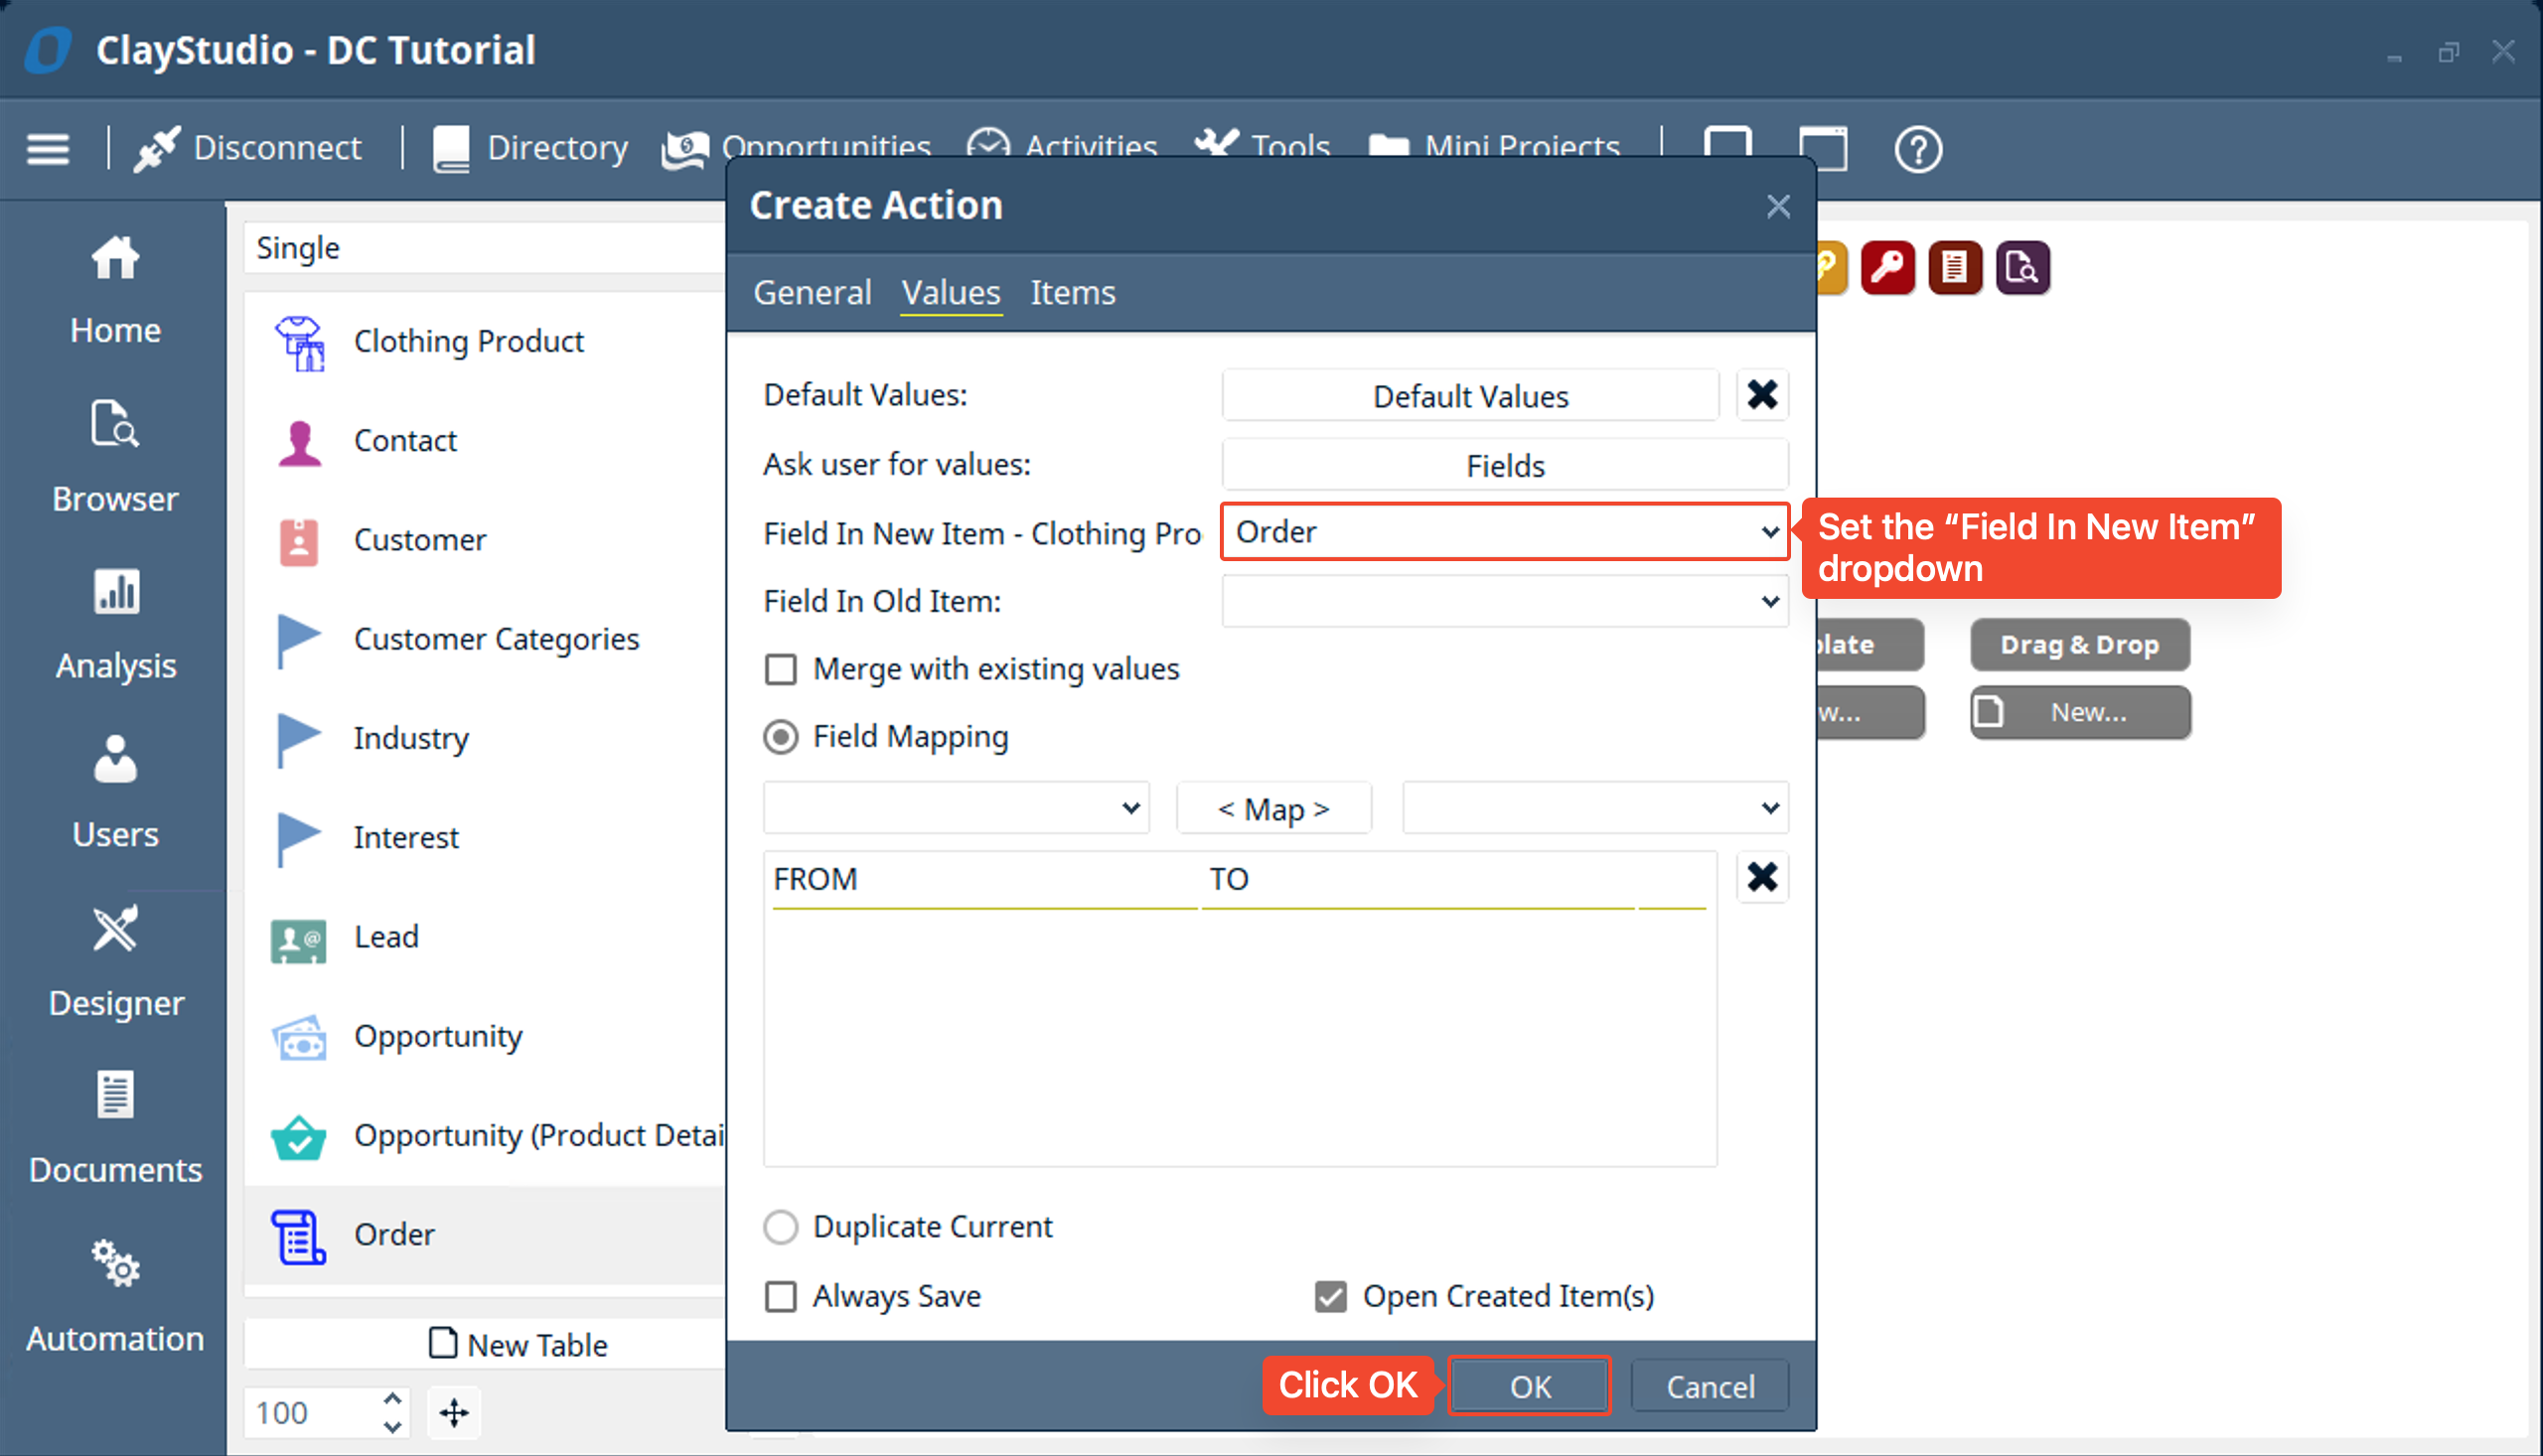
- As mentioned in the previous step fill out the “Field In New Item” to be “Order” then click “OK” to finish creating the user action.
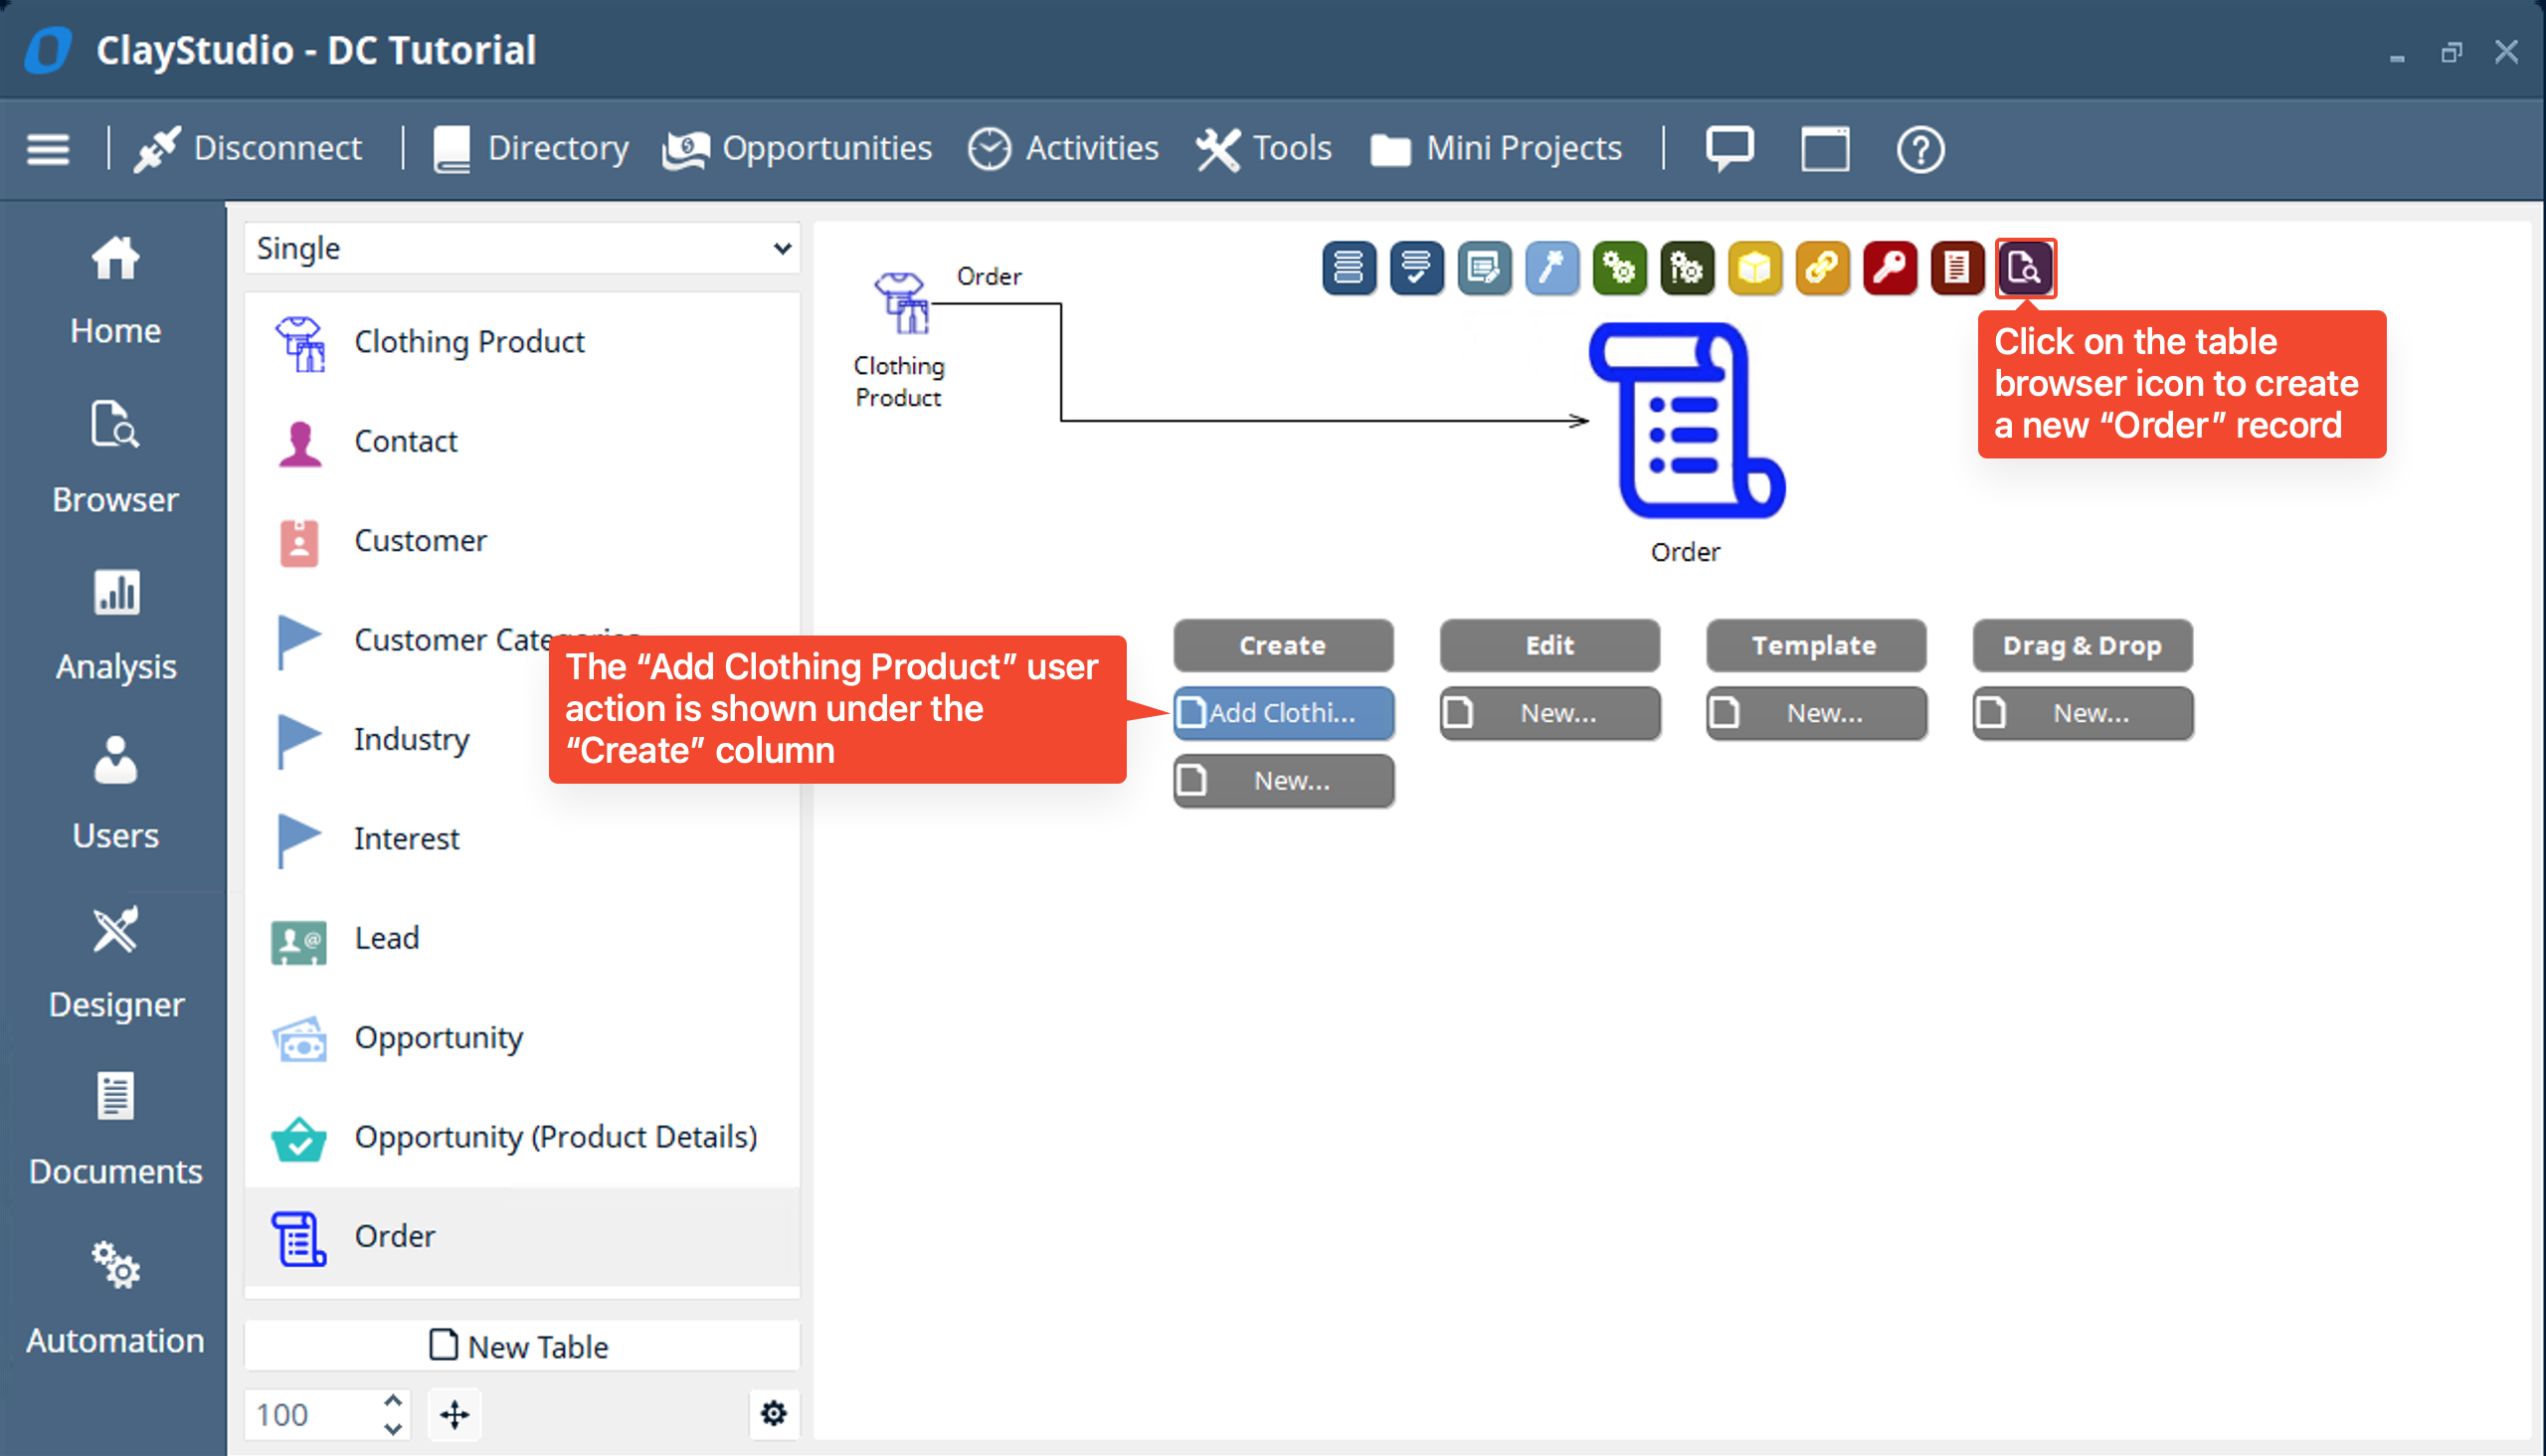
- You will see the user action you just created show up in the “Create” column in the user action section of the table. Now let’s create an “Order” record. Click on the table browser icon
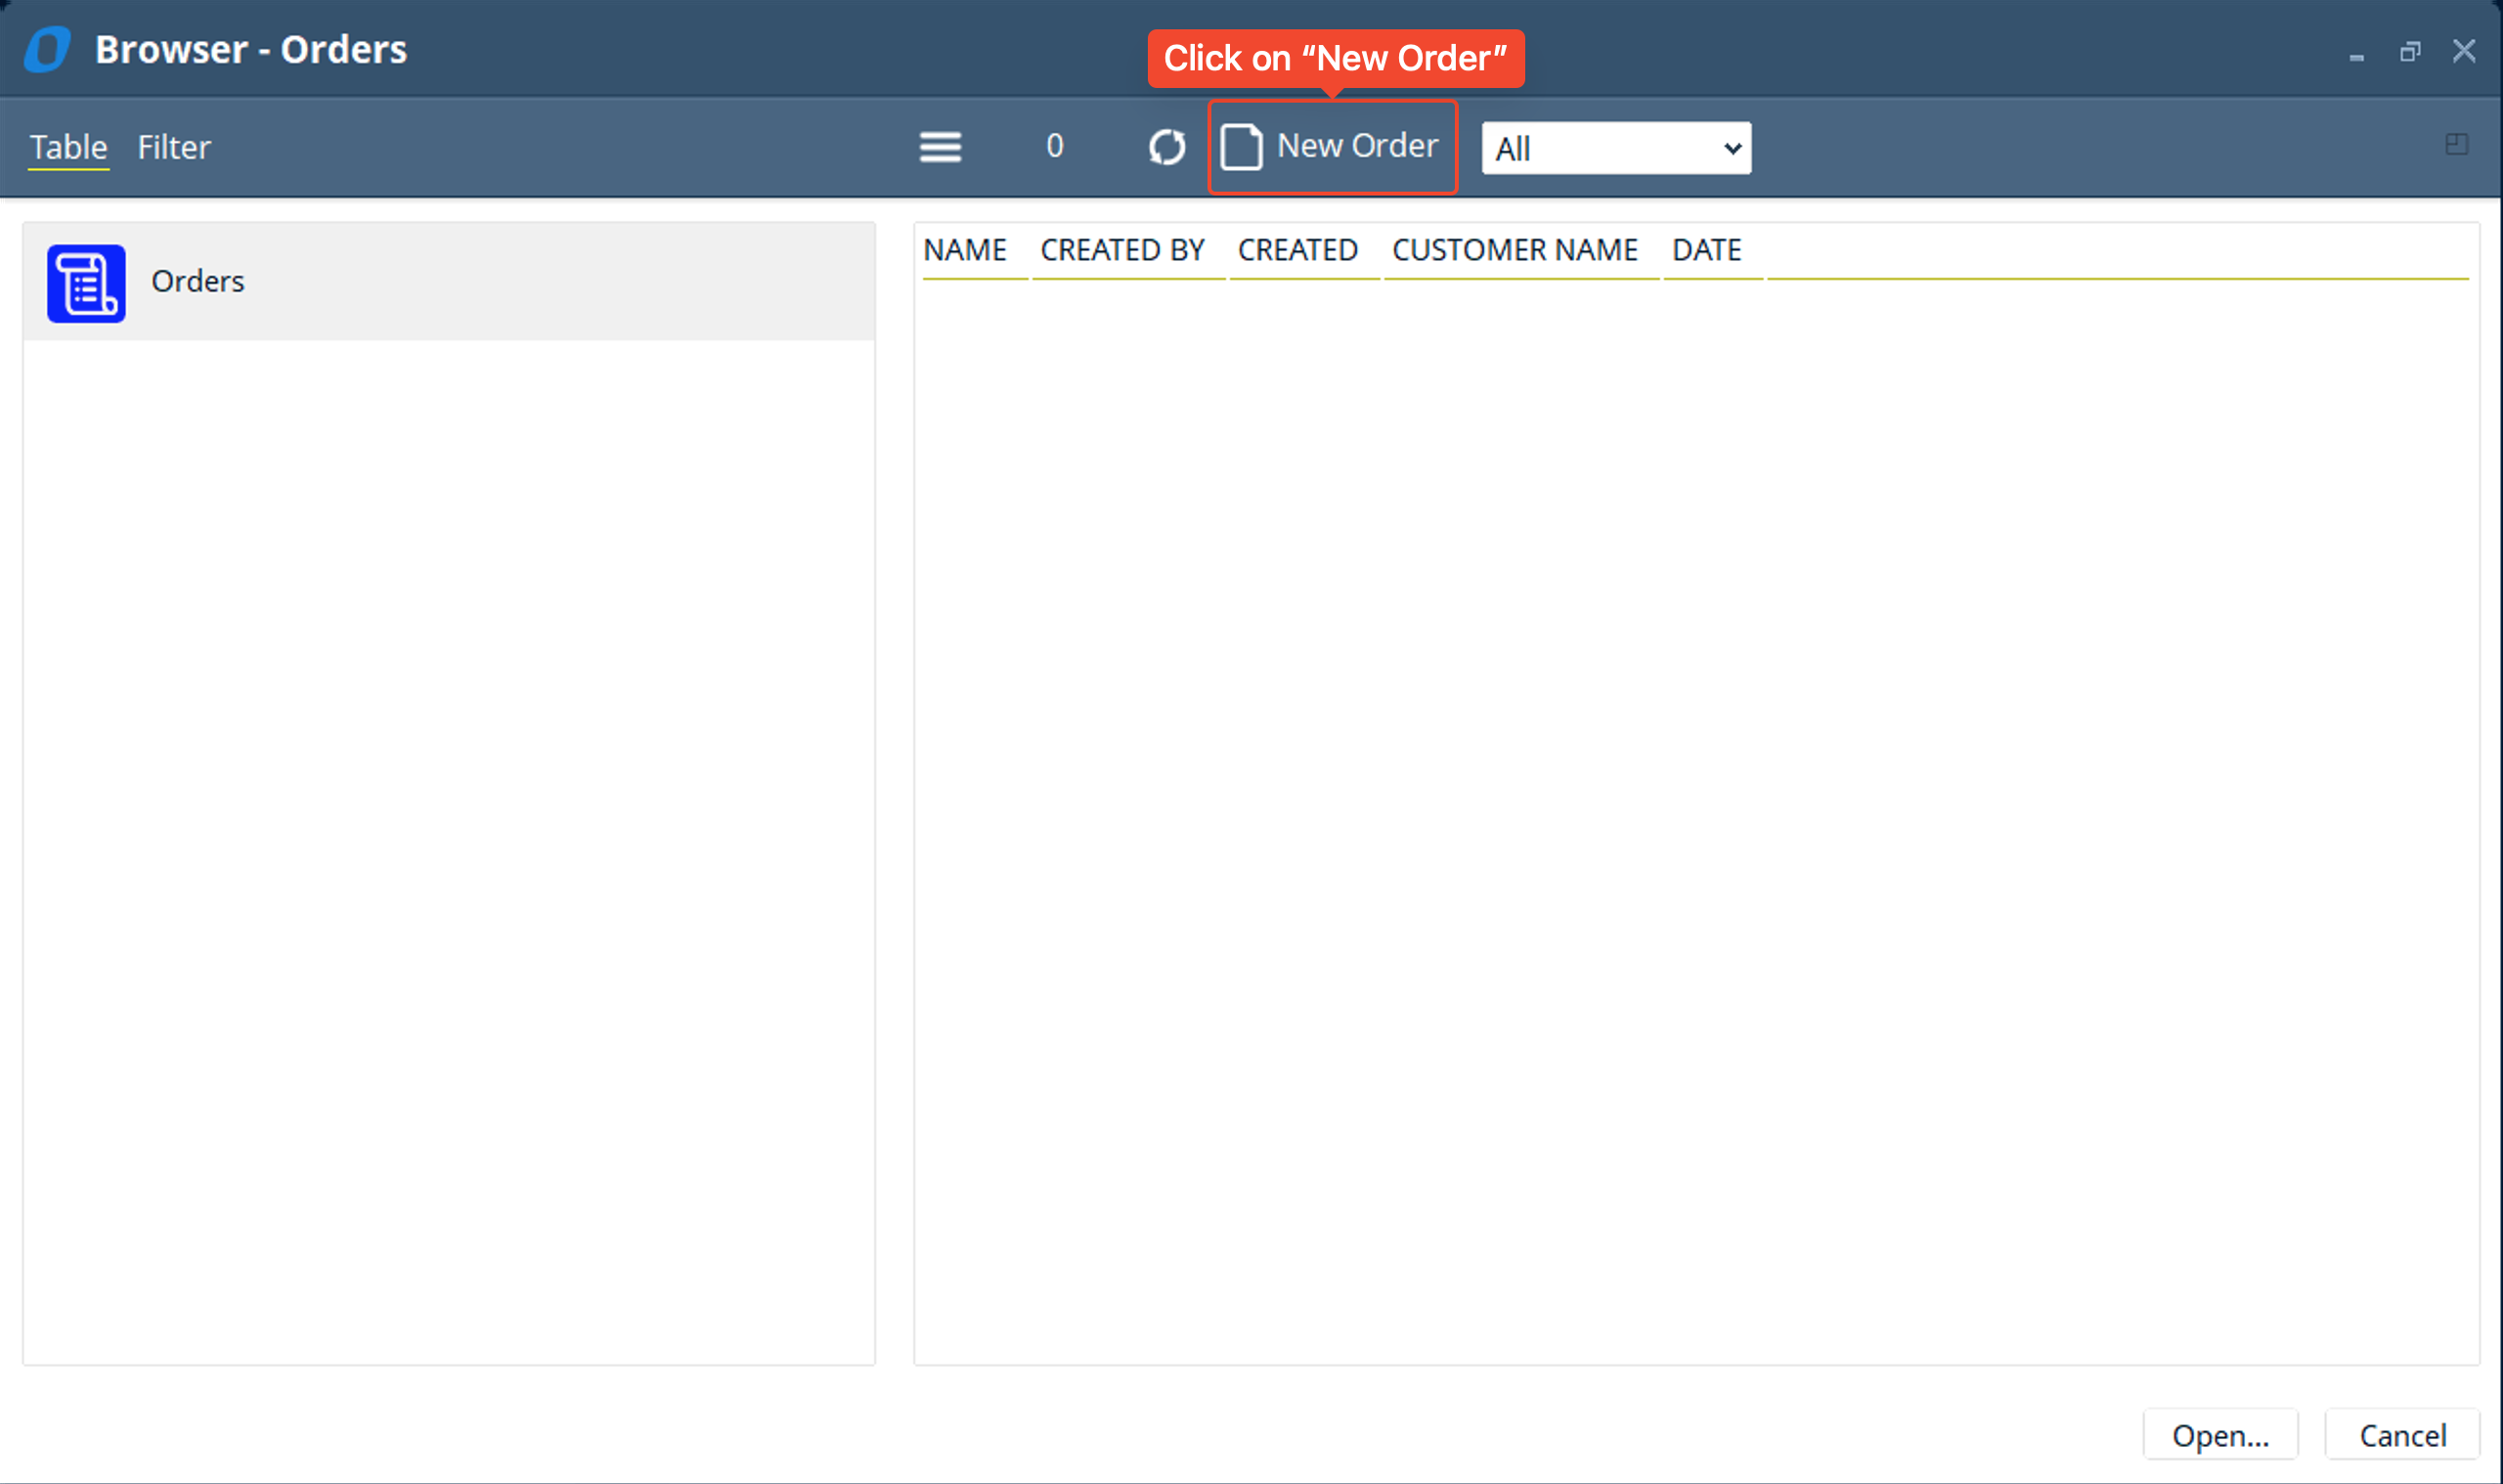
- A browser window will open where you can see all the “Orders” items in your system. Lets create a “Order” item for the “Orders” table by clicking on “New Order” button
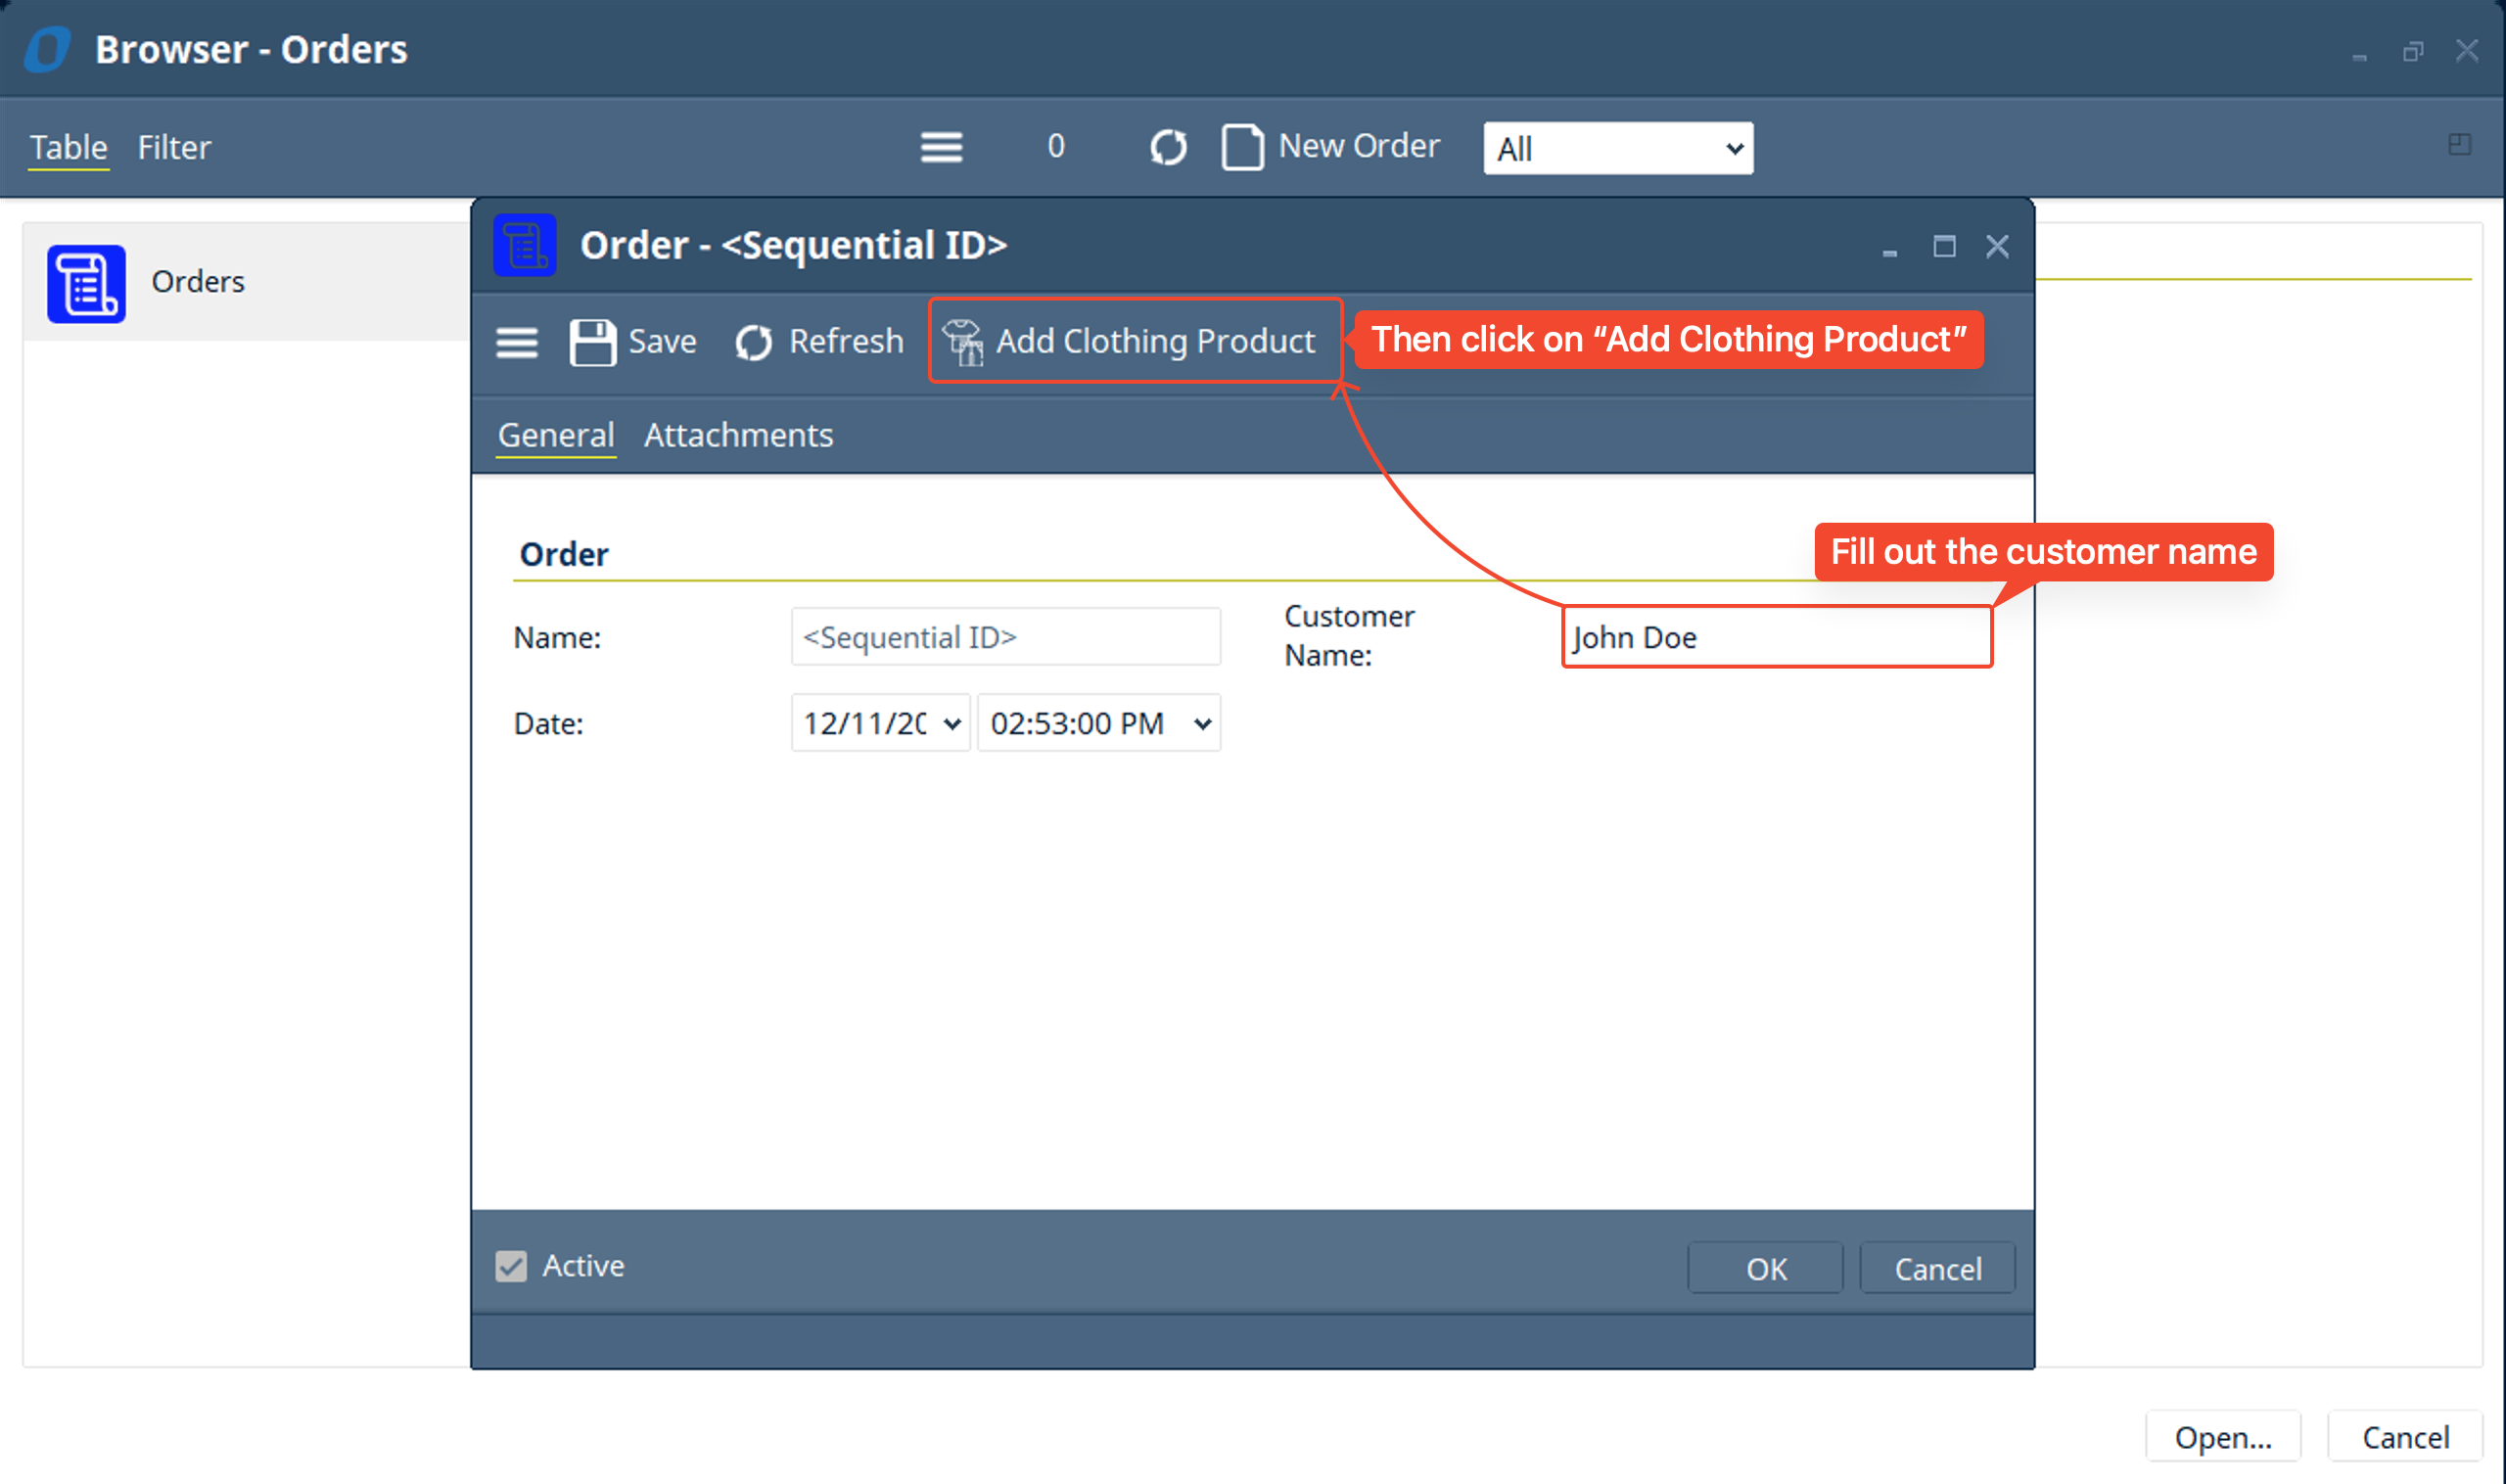
- An “Order - <Sequential ID> window pops up. You’ll notice the name and date are already filled out for you since you selected default options for these fields (when the “Order” is saved the <Sequential ID> value will be filled in the name of the “Order”). Fill out the “Customer Name” and then click on the toolbar option labeled “Add Clothing Product”. If prompted to save then click “Yes” to save the “Order” item and create the “Clothing Product”
- Note: The “Add Clothing Product” user action button is currently located in the “First Level Display” area of an item.
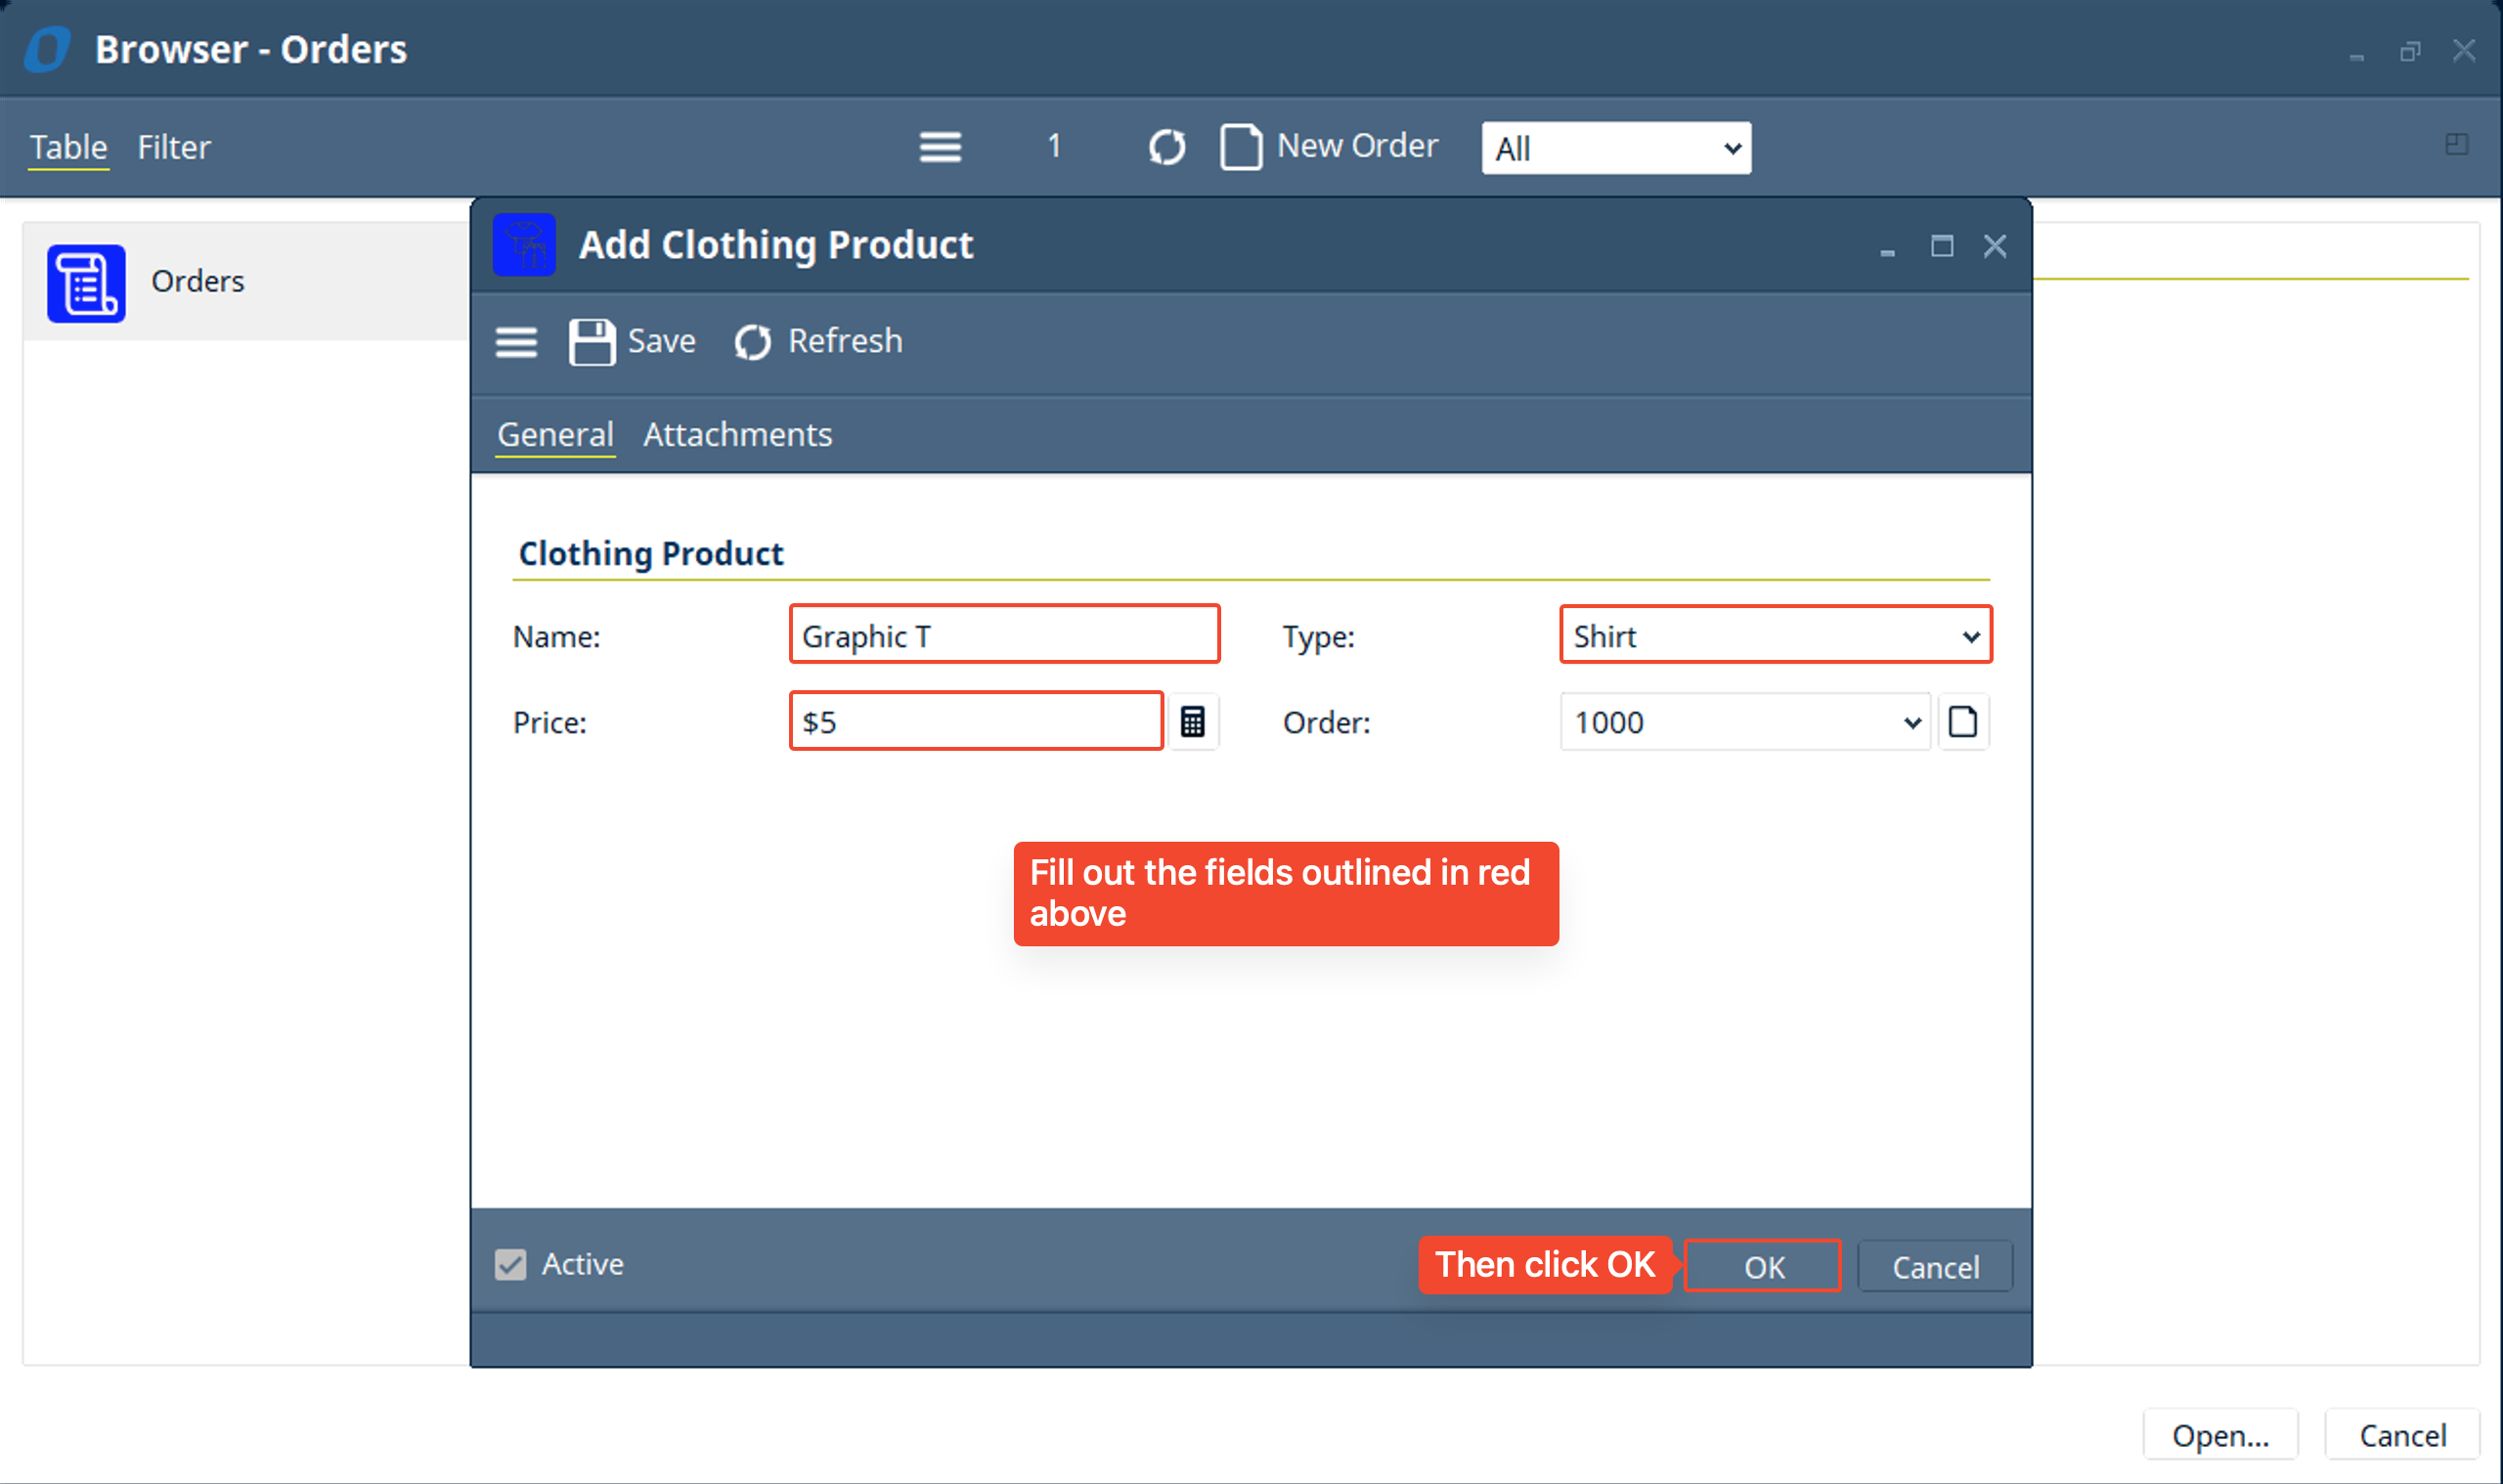
- You’ll notice the “Order” field is already filled out for you with the name of the order you created the “Clothing Product” from. This is because we set the “Field In New Item” option to be “Order” in the user action values tab. Fill out the rest of the fields for the clothing product and click OK.
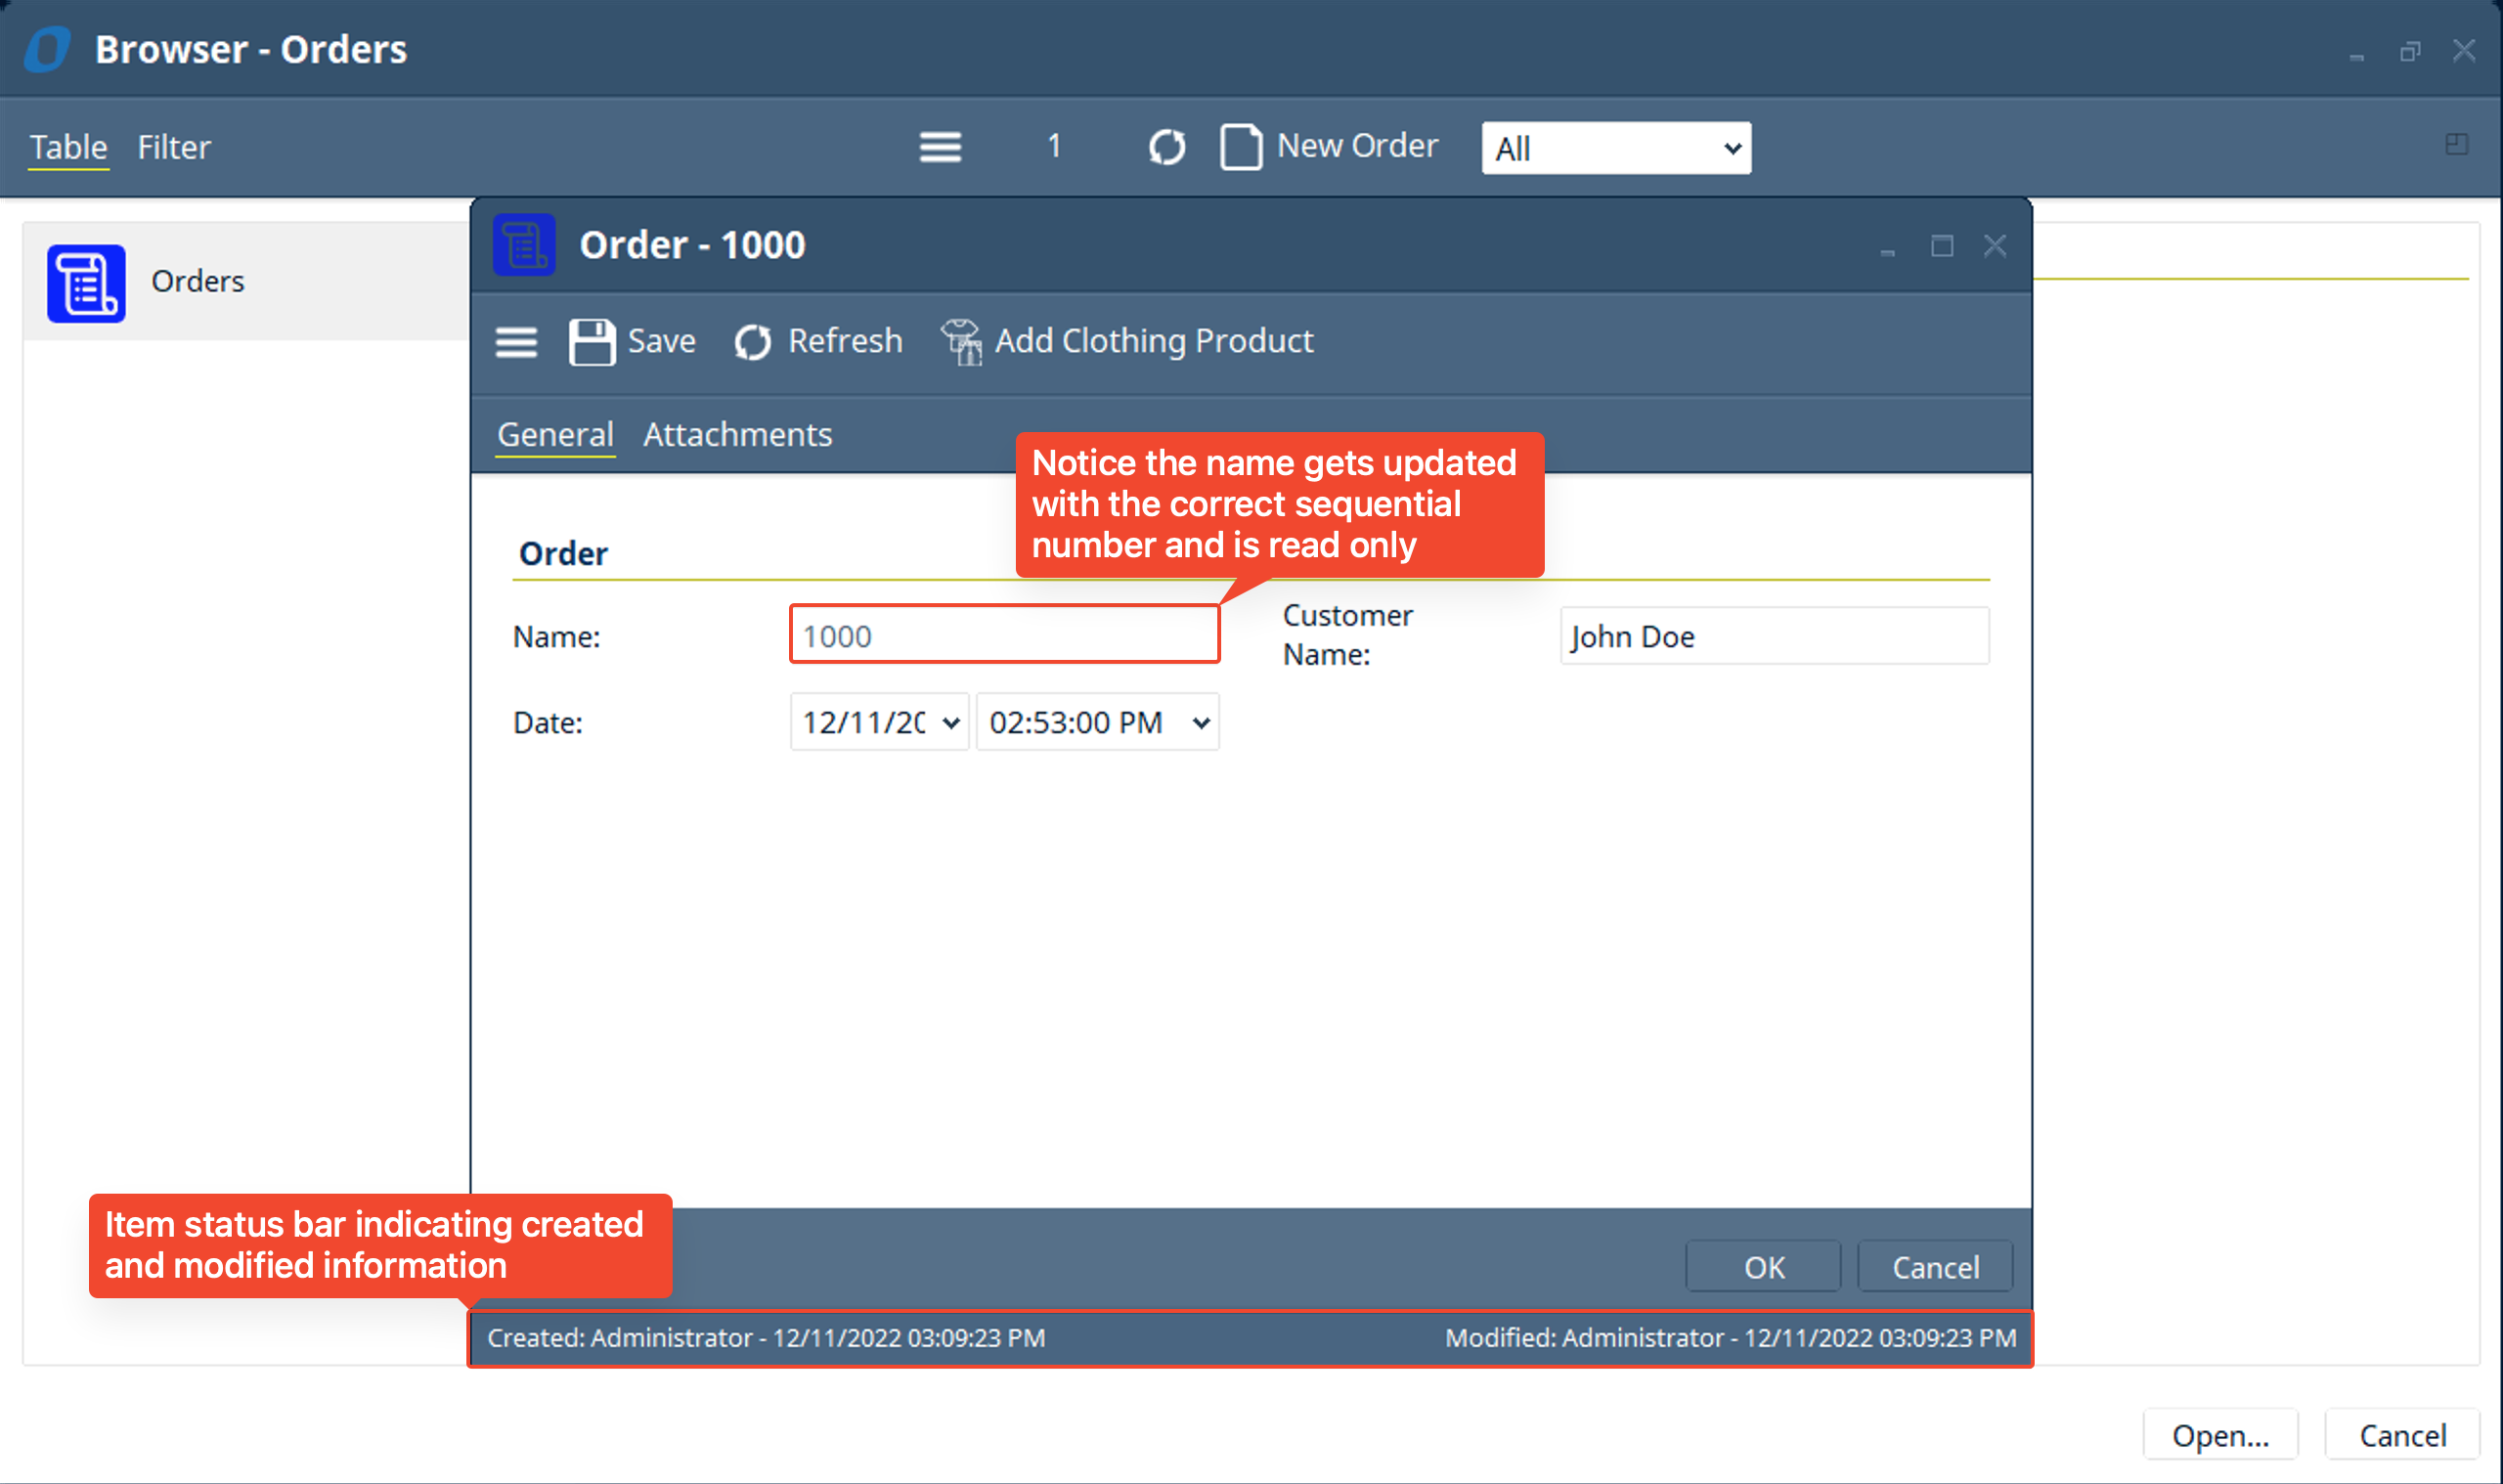
- Notice that the name gets updated to the correct Sequential ID and that the status bar at the bottom of the item gets updated with the created and modified information. You will also notice that at the moment you cannot see the “Clothing Product” that you added to the “Order”. So let us add functionality to view the “Clothing Products” that we add to an “Order” in the form of a list. Click OK to save the “Order” record
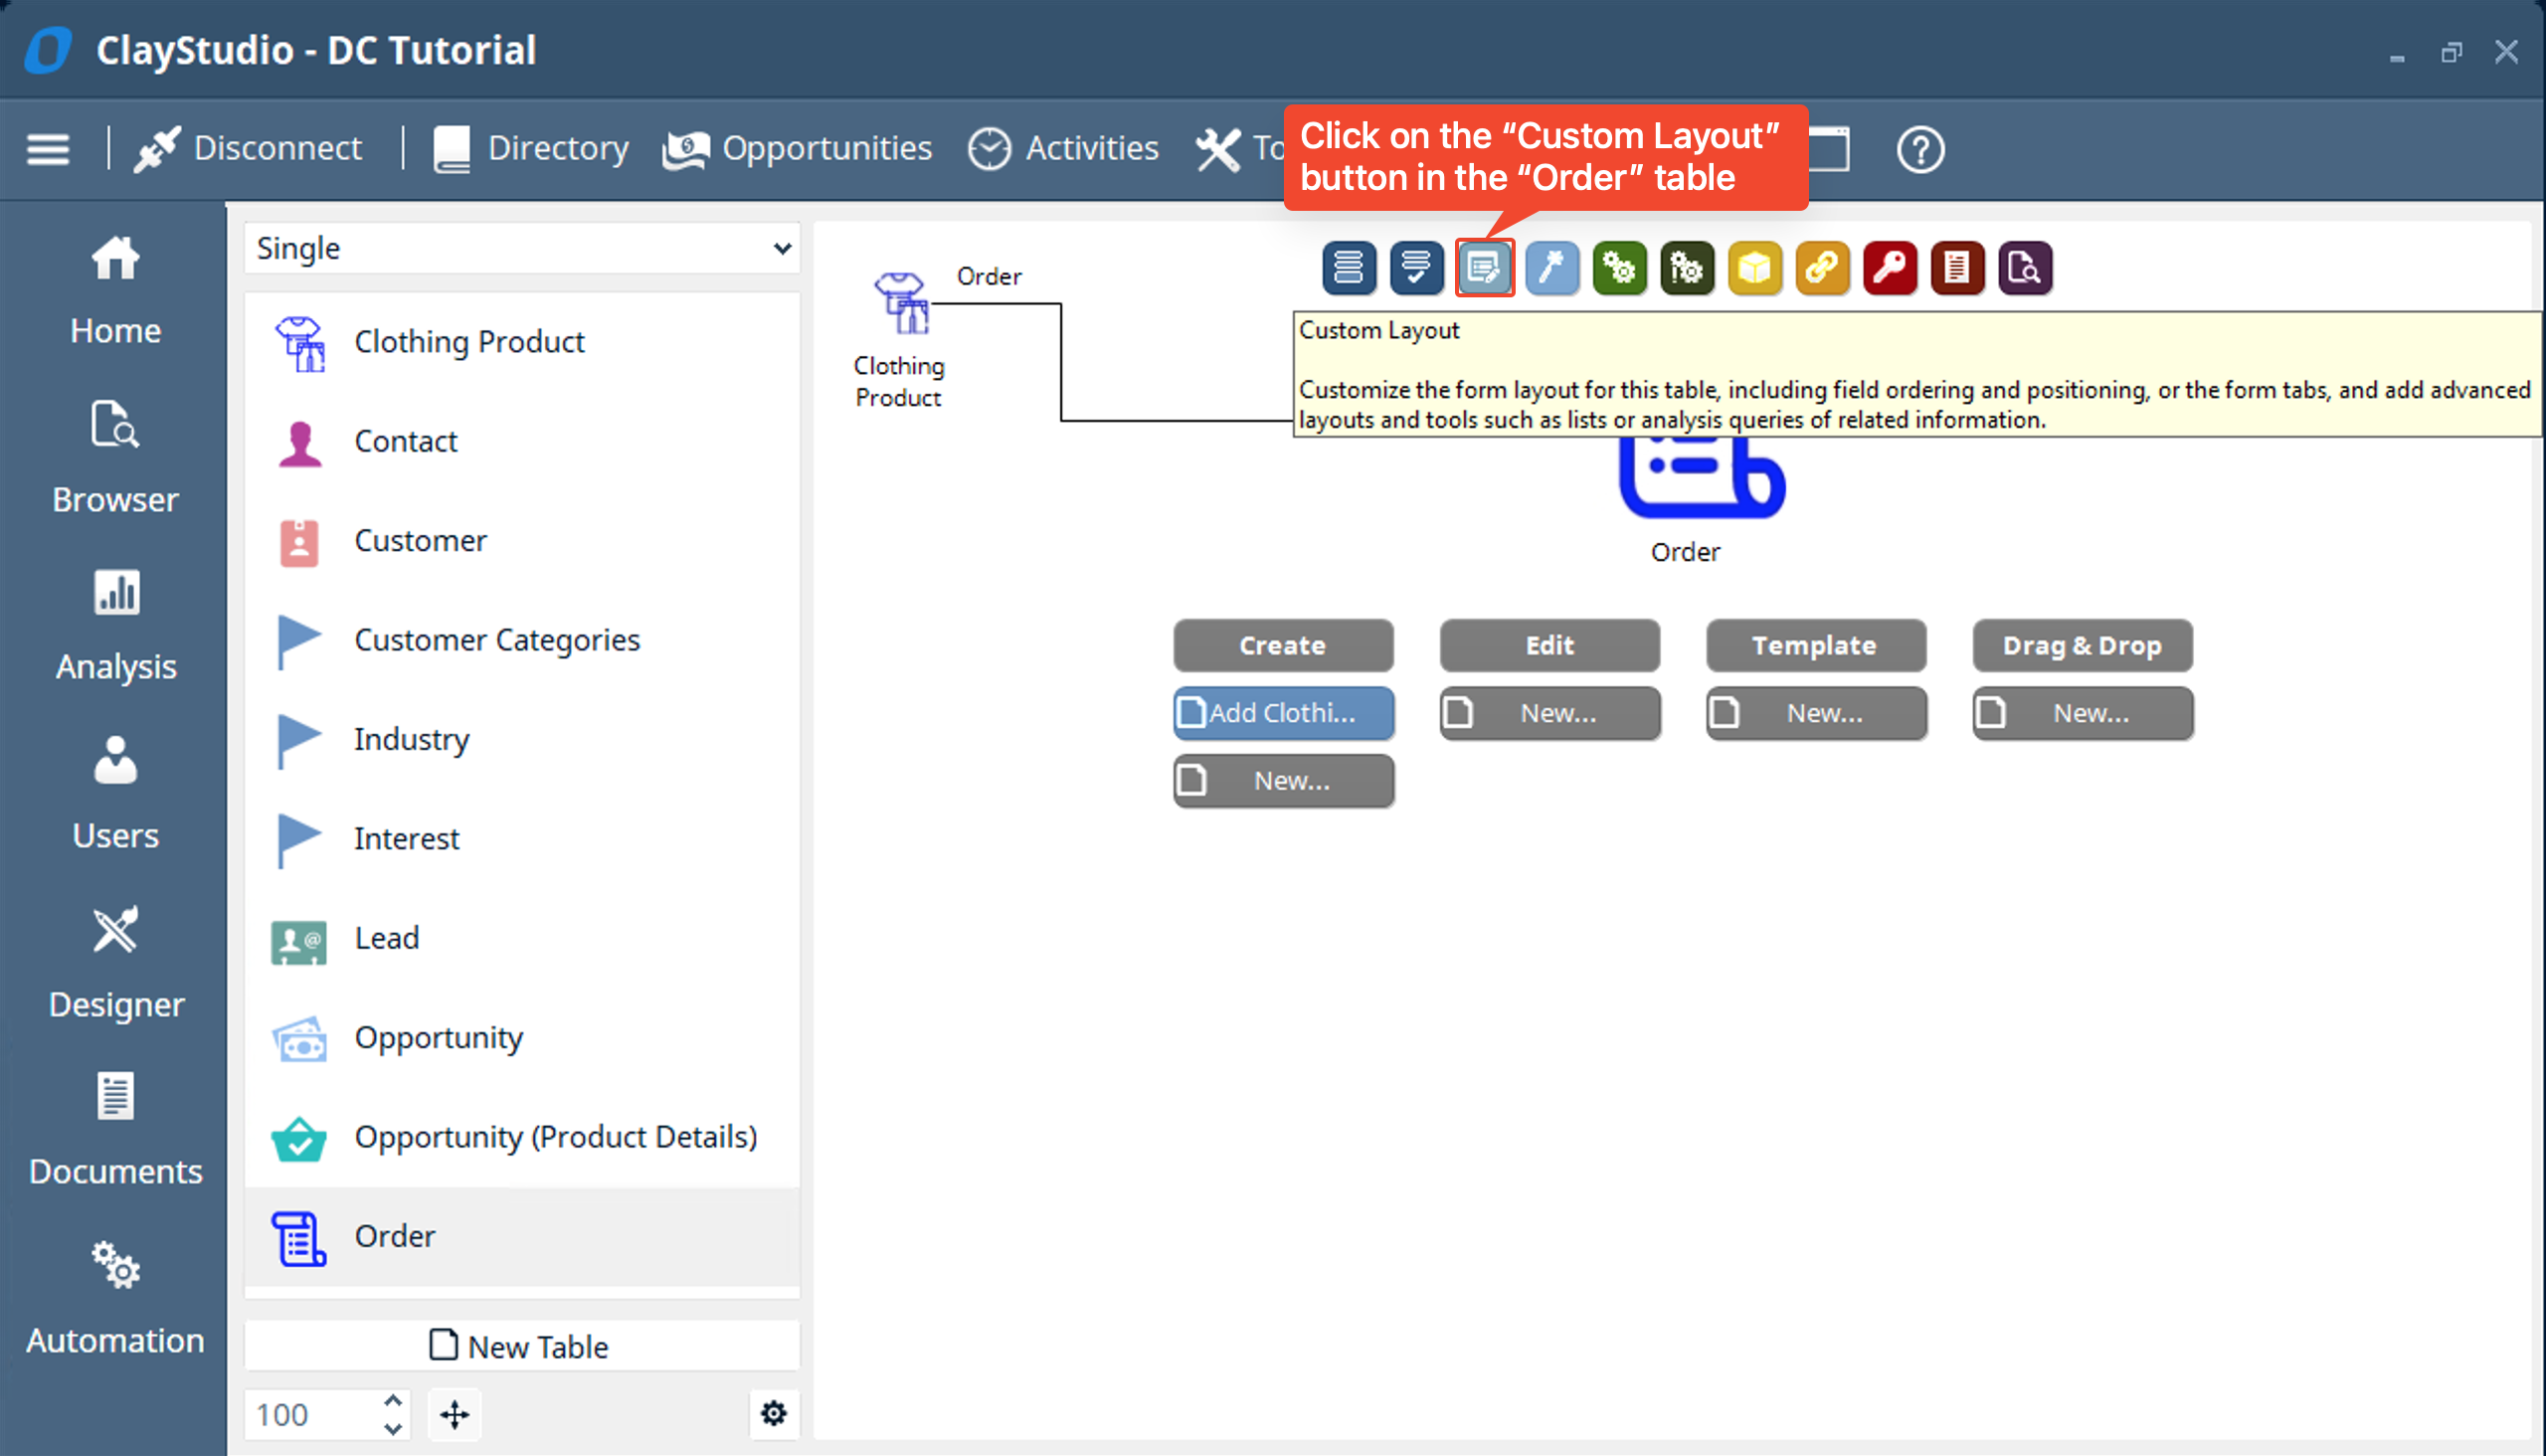
- Go back to the table view in the “Designer” and select the “Custom Layout” button in the “Order” table.
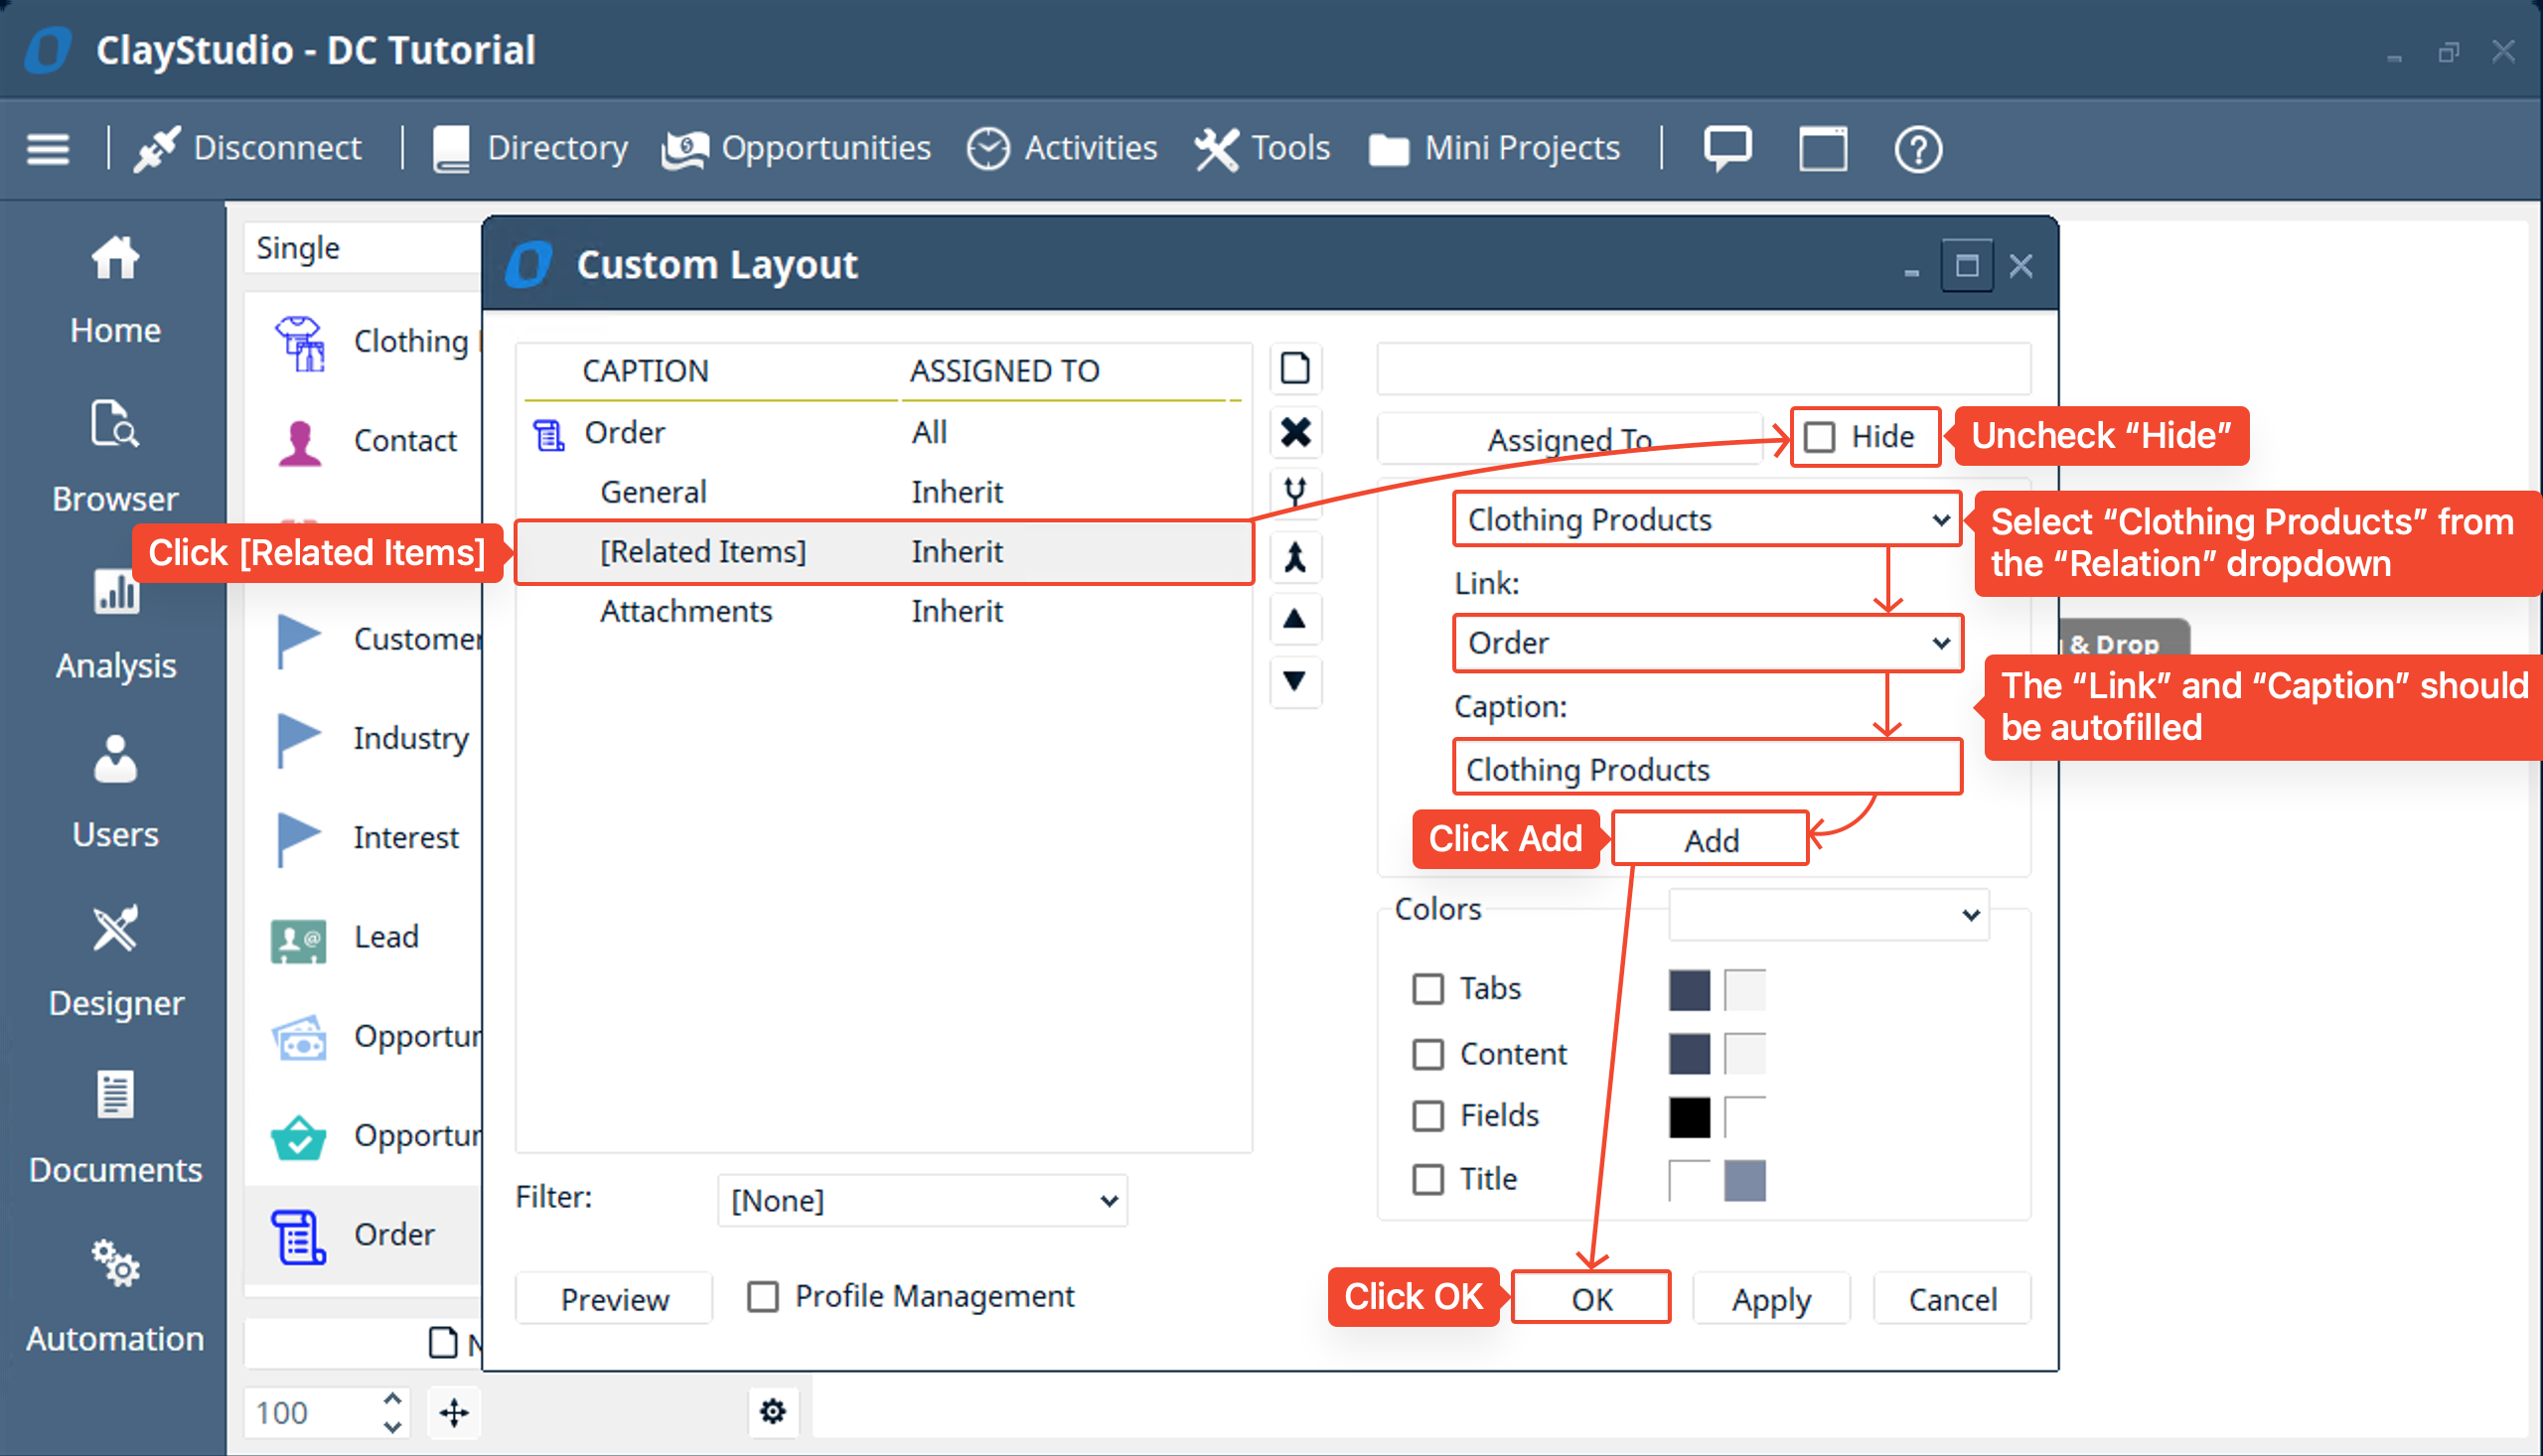
- There are a few ways to display a list for items related to specific table item. One way is to use the built in “Related Items” tab which is hidden by default. We will select the “[Related Items]” option, uncheck the hide option, and select “Clothing Products” from the dropdown below, then rest of the fields should automatically be filled out but can be changed if needed. When done… click “Add” and then click “OK”.
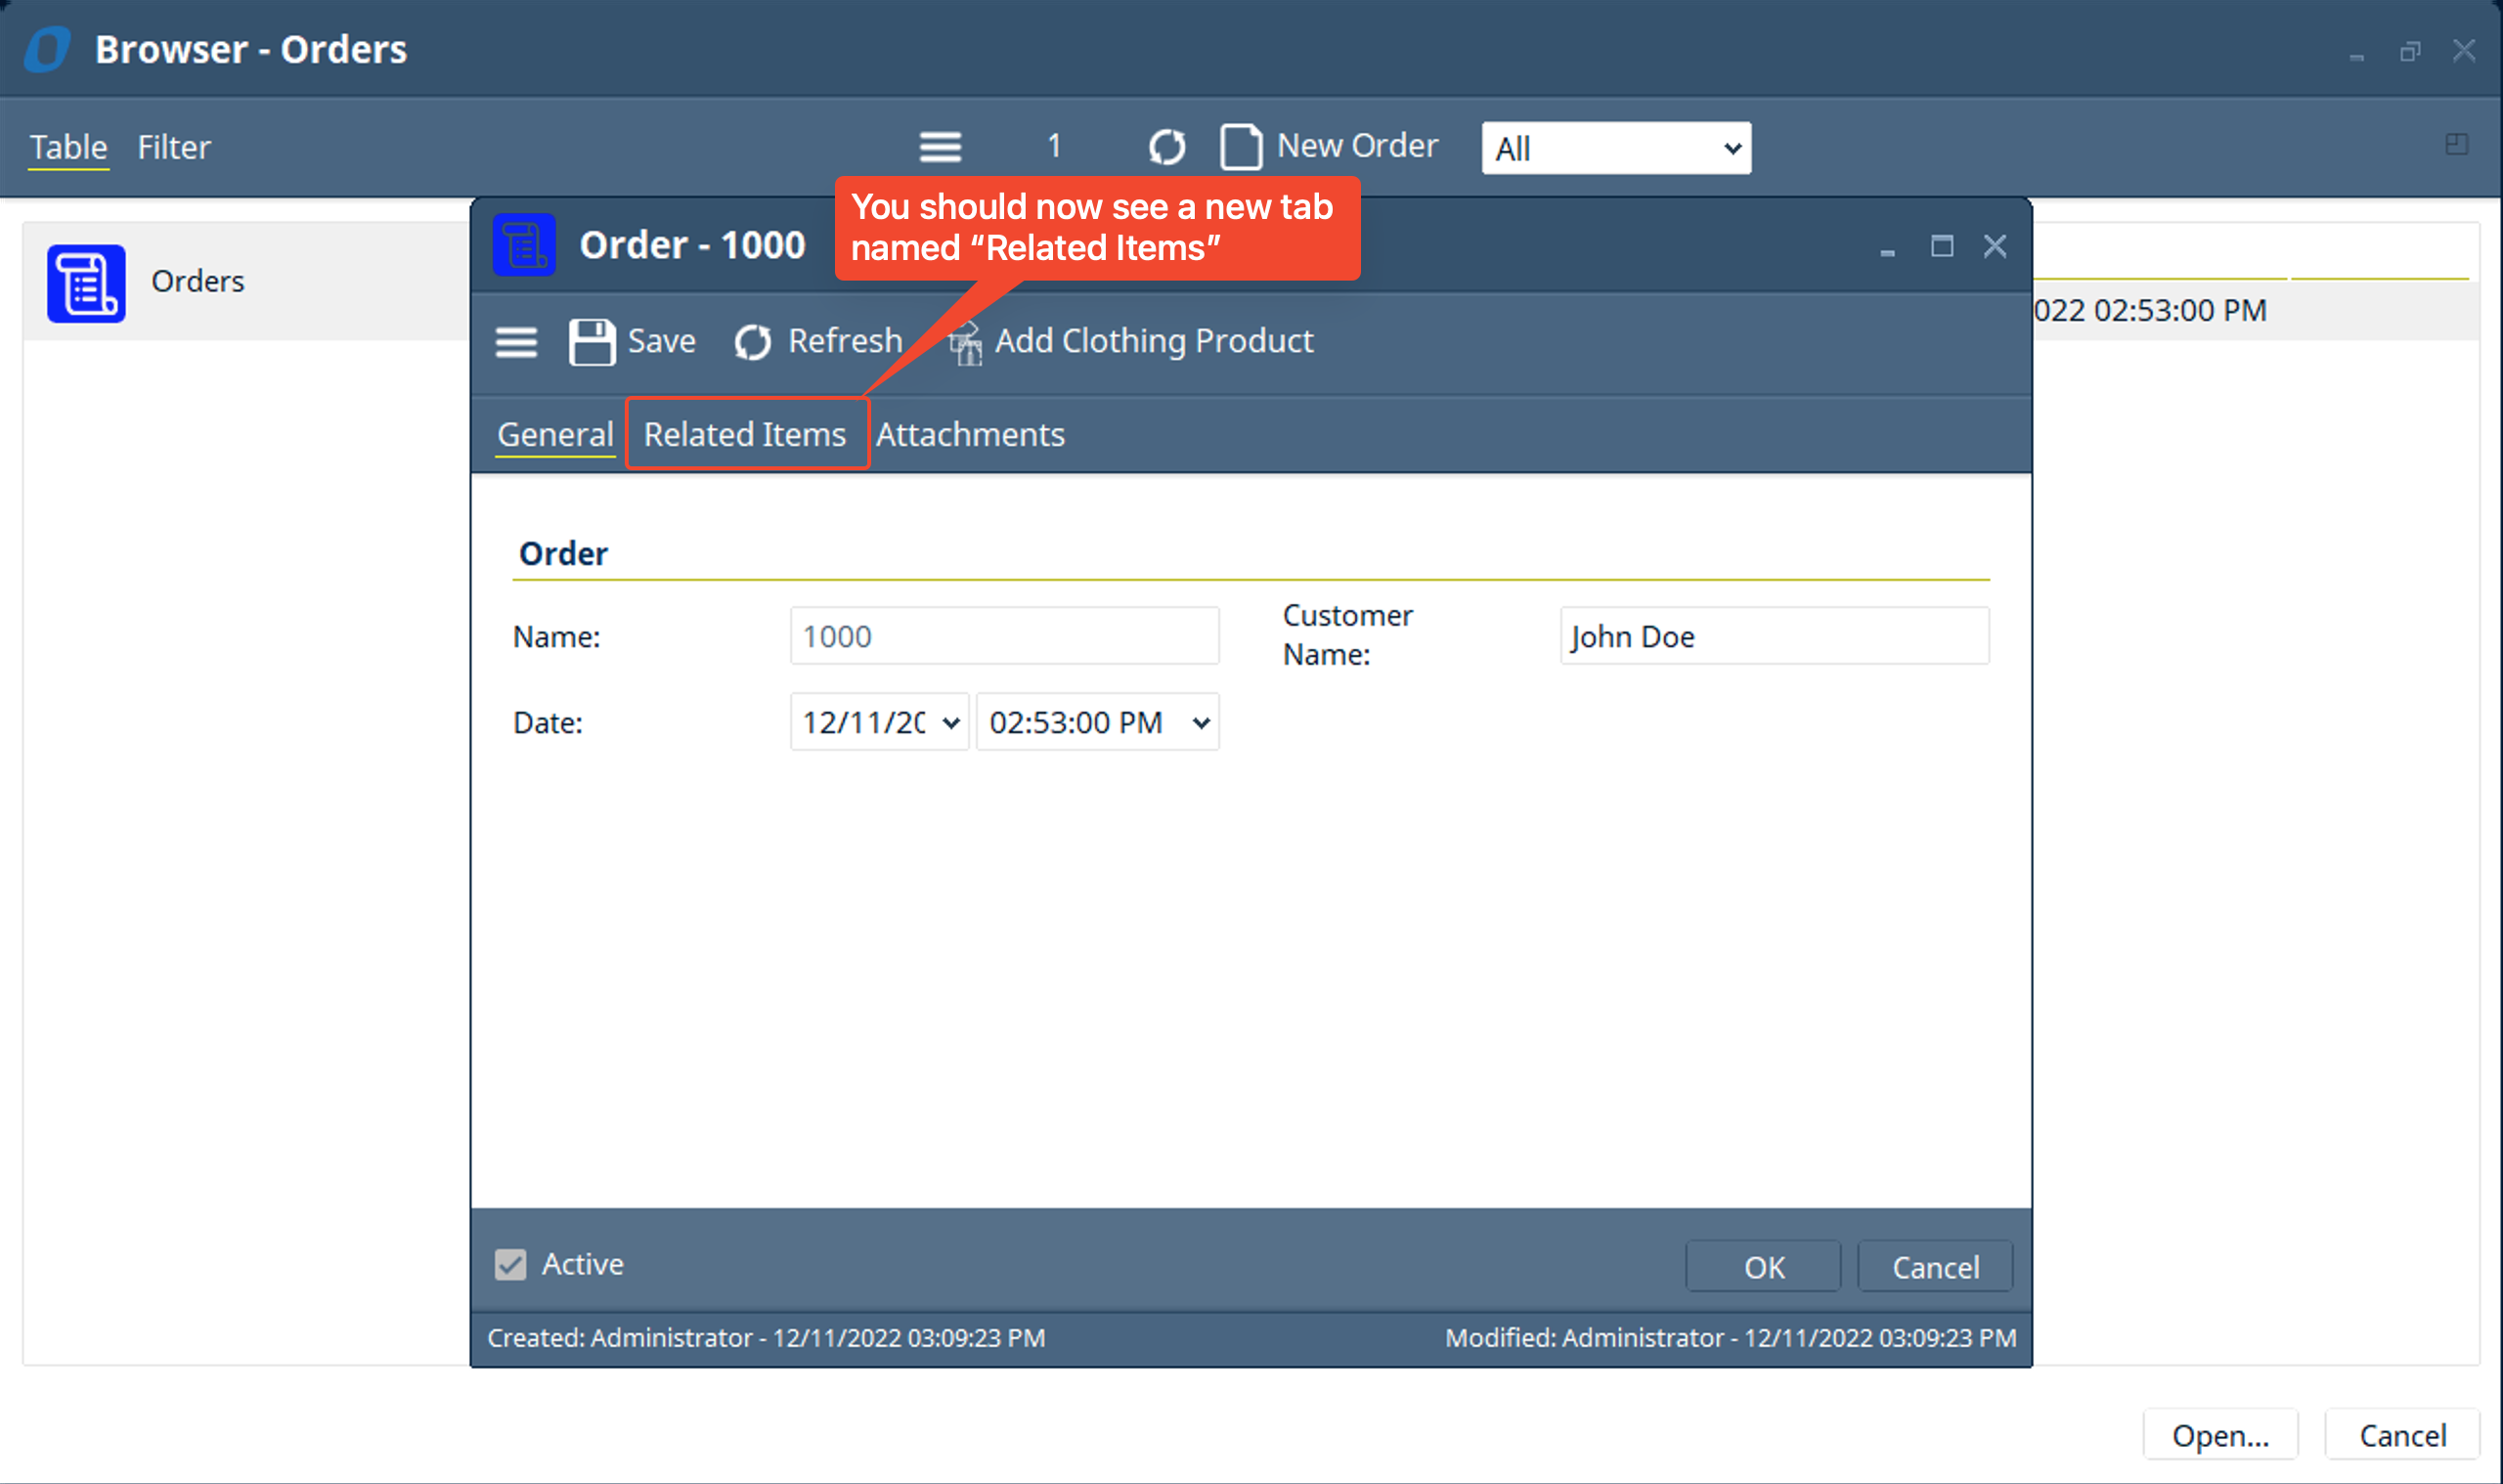
- Going back to the “Order” item in the browser view. You’ll see the “Related Items” tab you just setup in the custom layout window
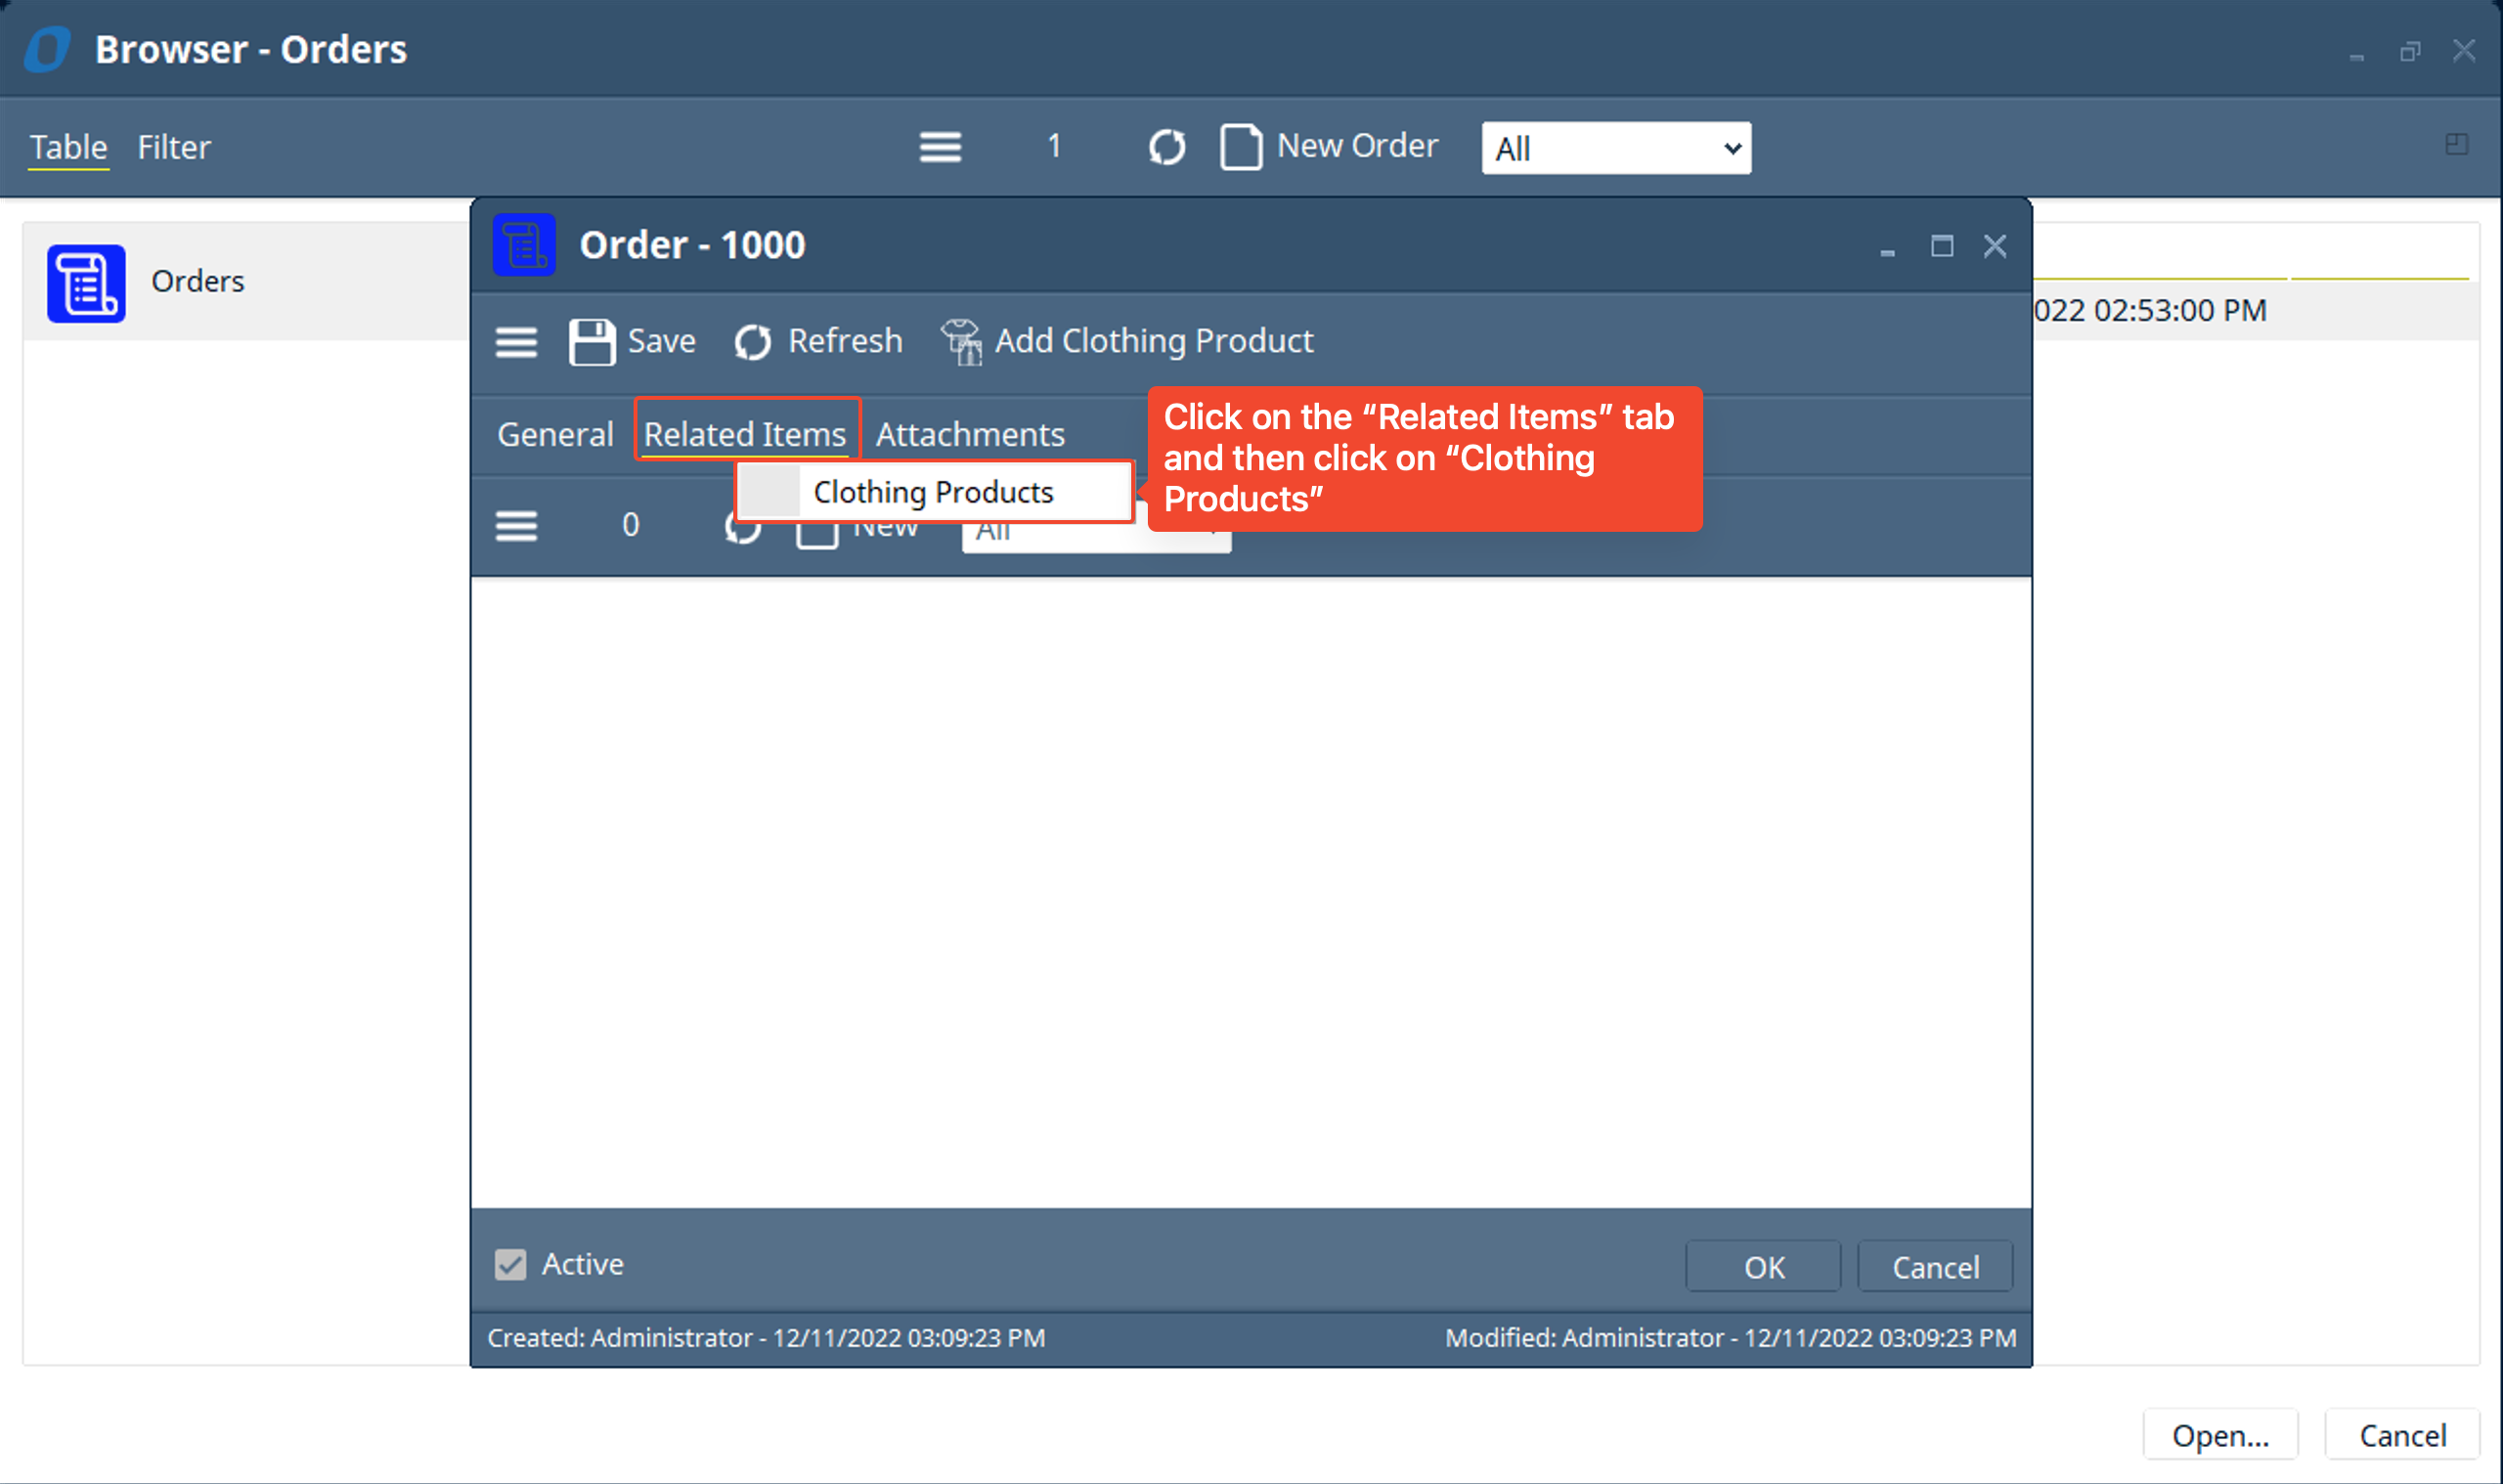
- Clicking on the “Related Items” tab prompts you to select which items you want to view. Select “Clothing Products” to show a list of the “Clothing Products” attached to this specific “Order”
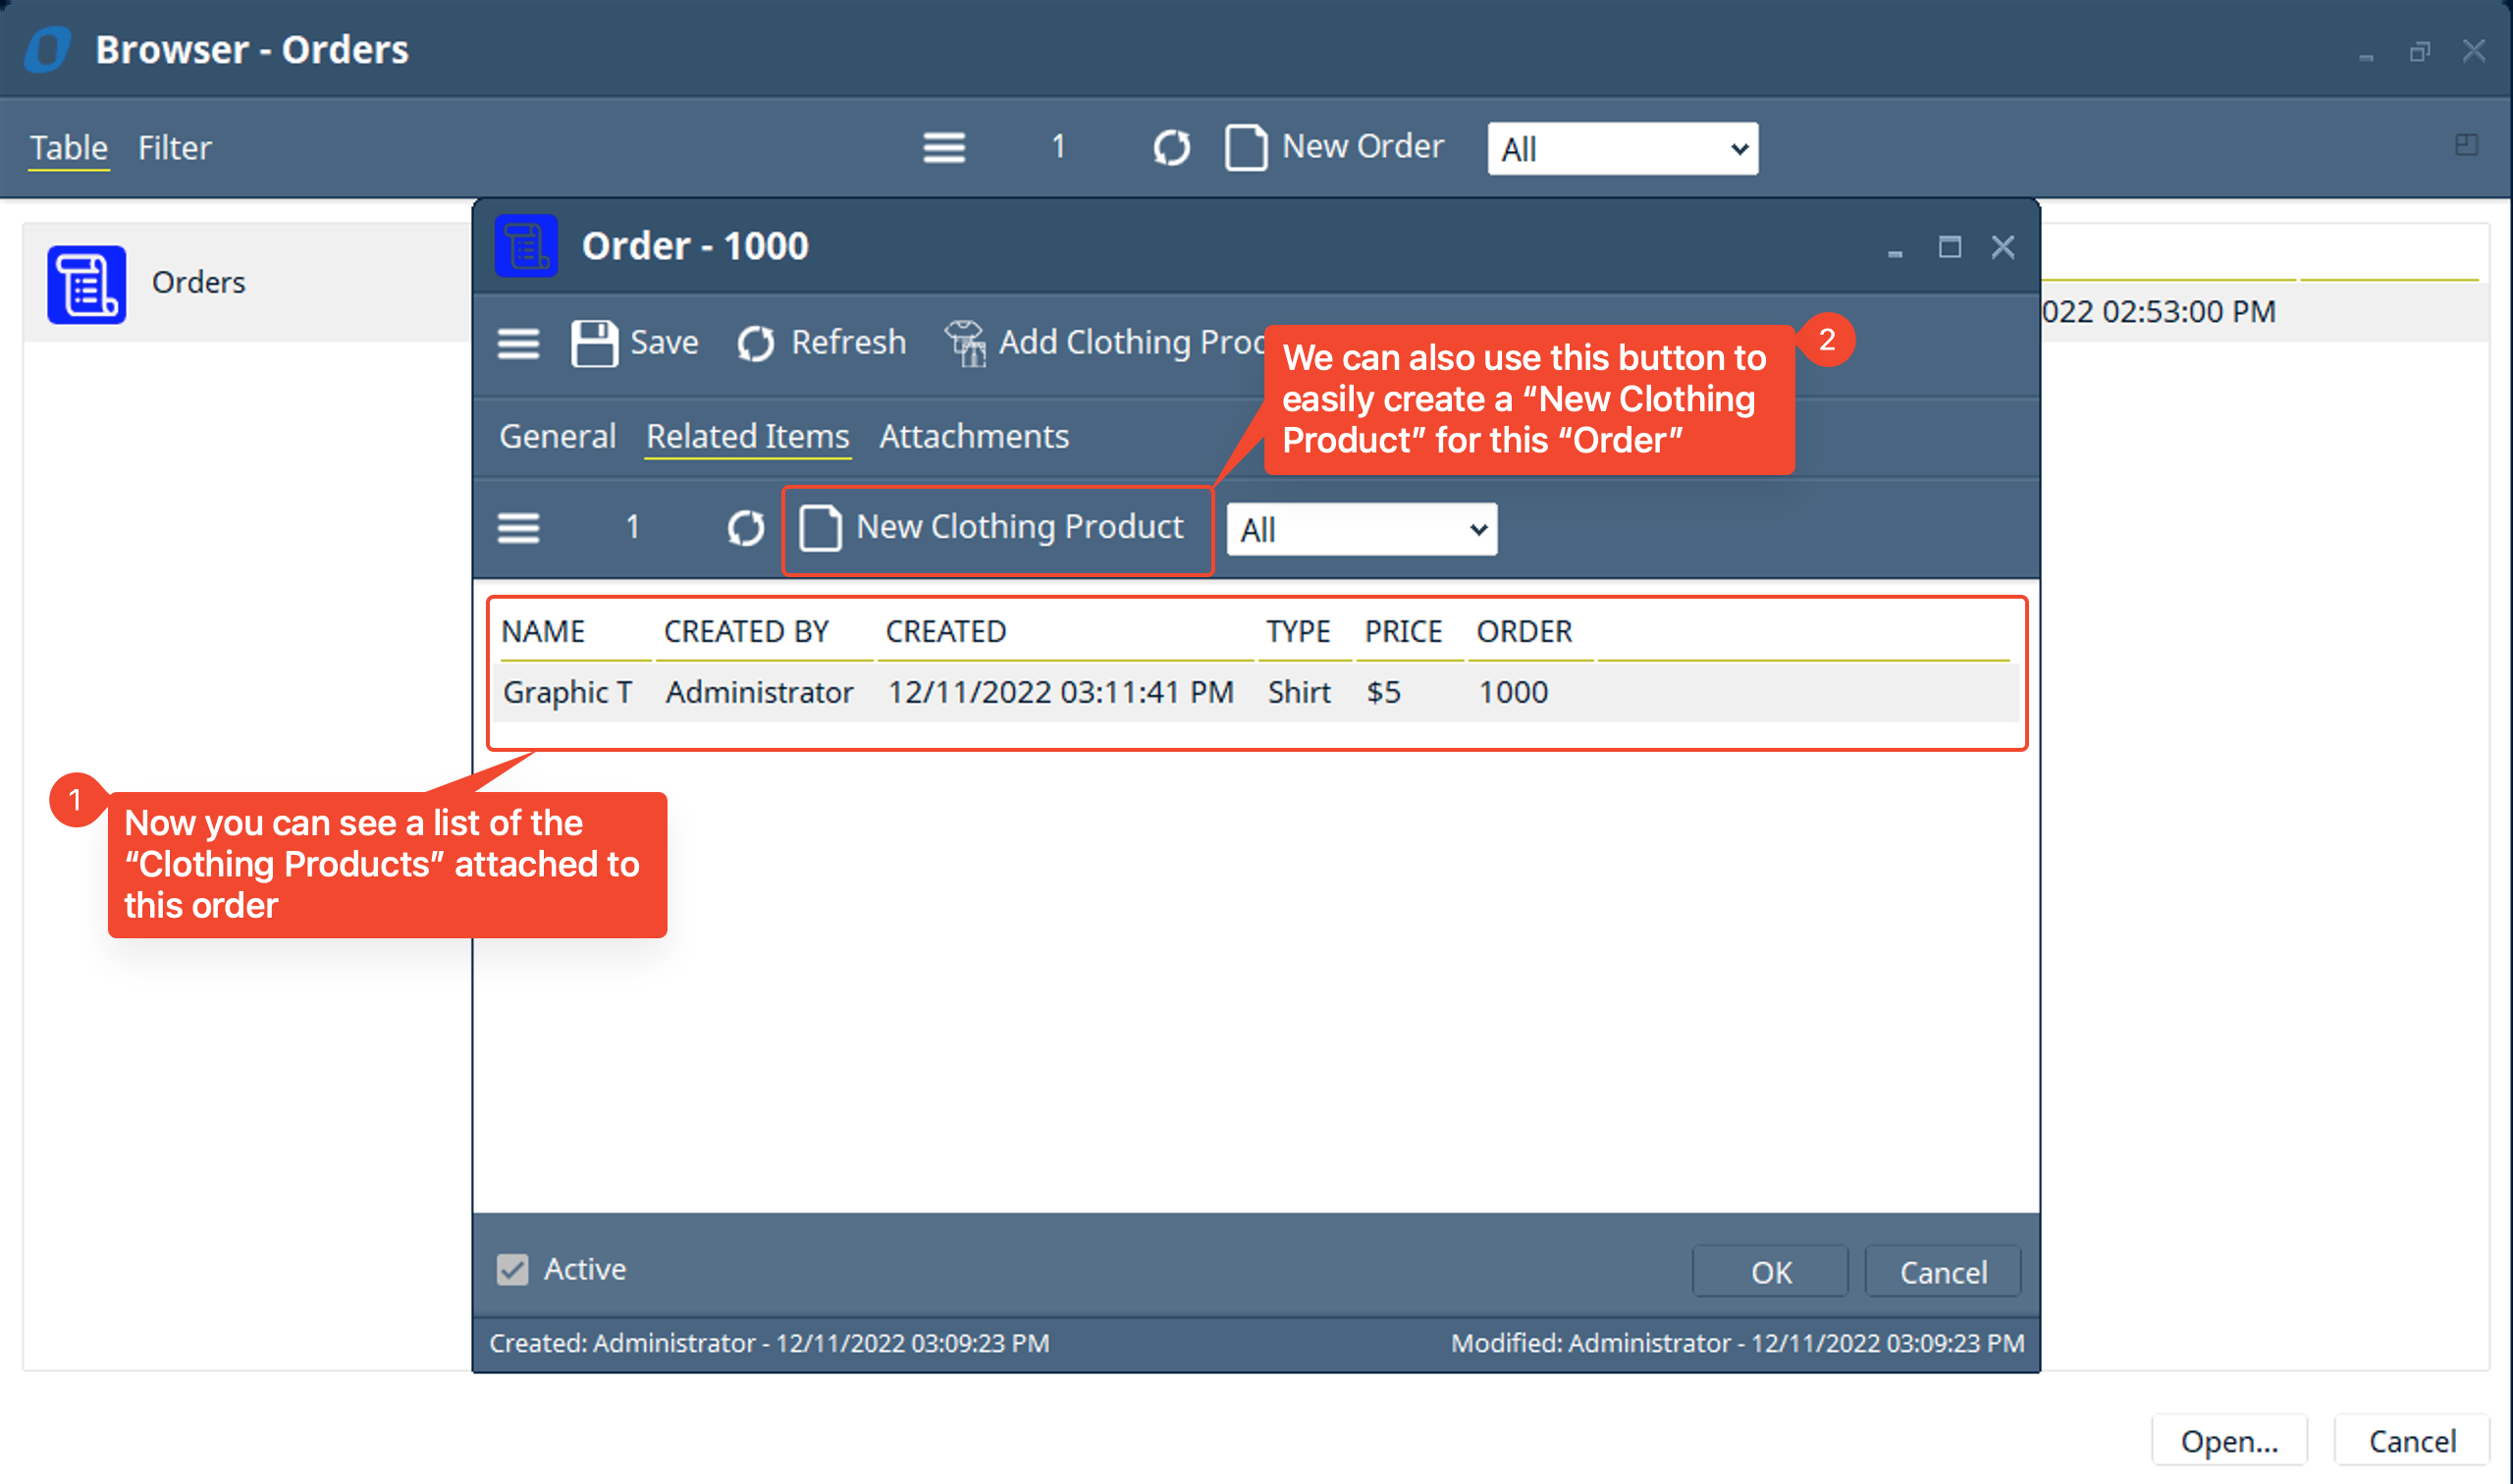
- You will see the list of “Clothing Products” attached to the “Order” get shown. You will also see a “New Clothing Product” which if you click on it will create a new “Clothing Product” and attach it to the current order. This is very similar to the “Add Clothing Product” user action we just created. Let’s close out of the “Order” item and “Browser” window and make another user action that is a bit more useful.
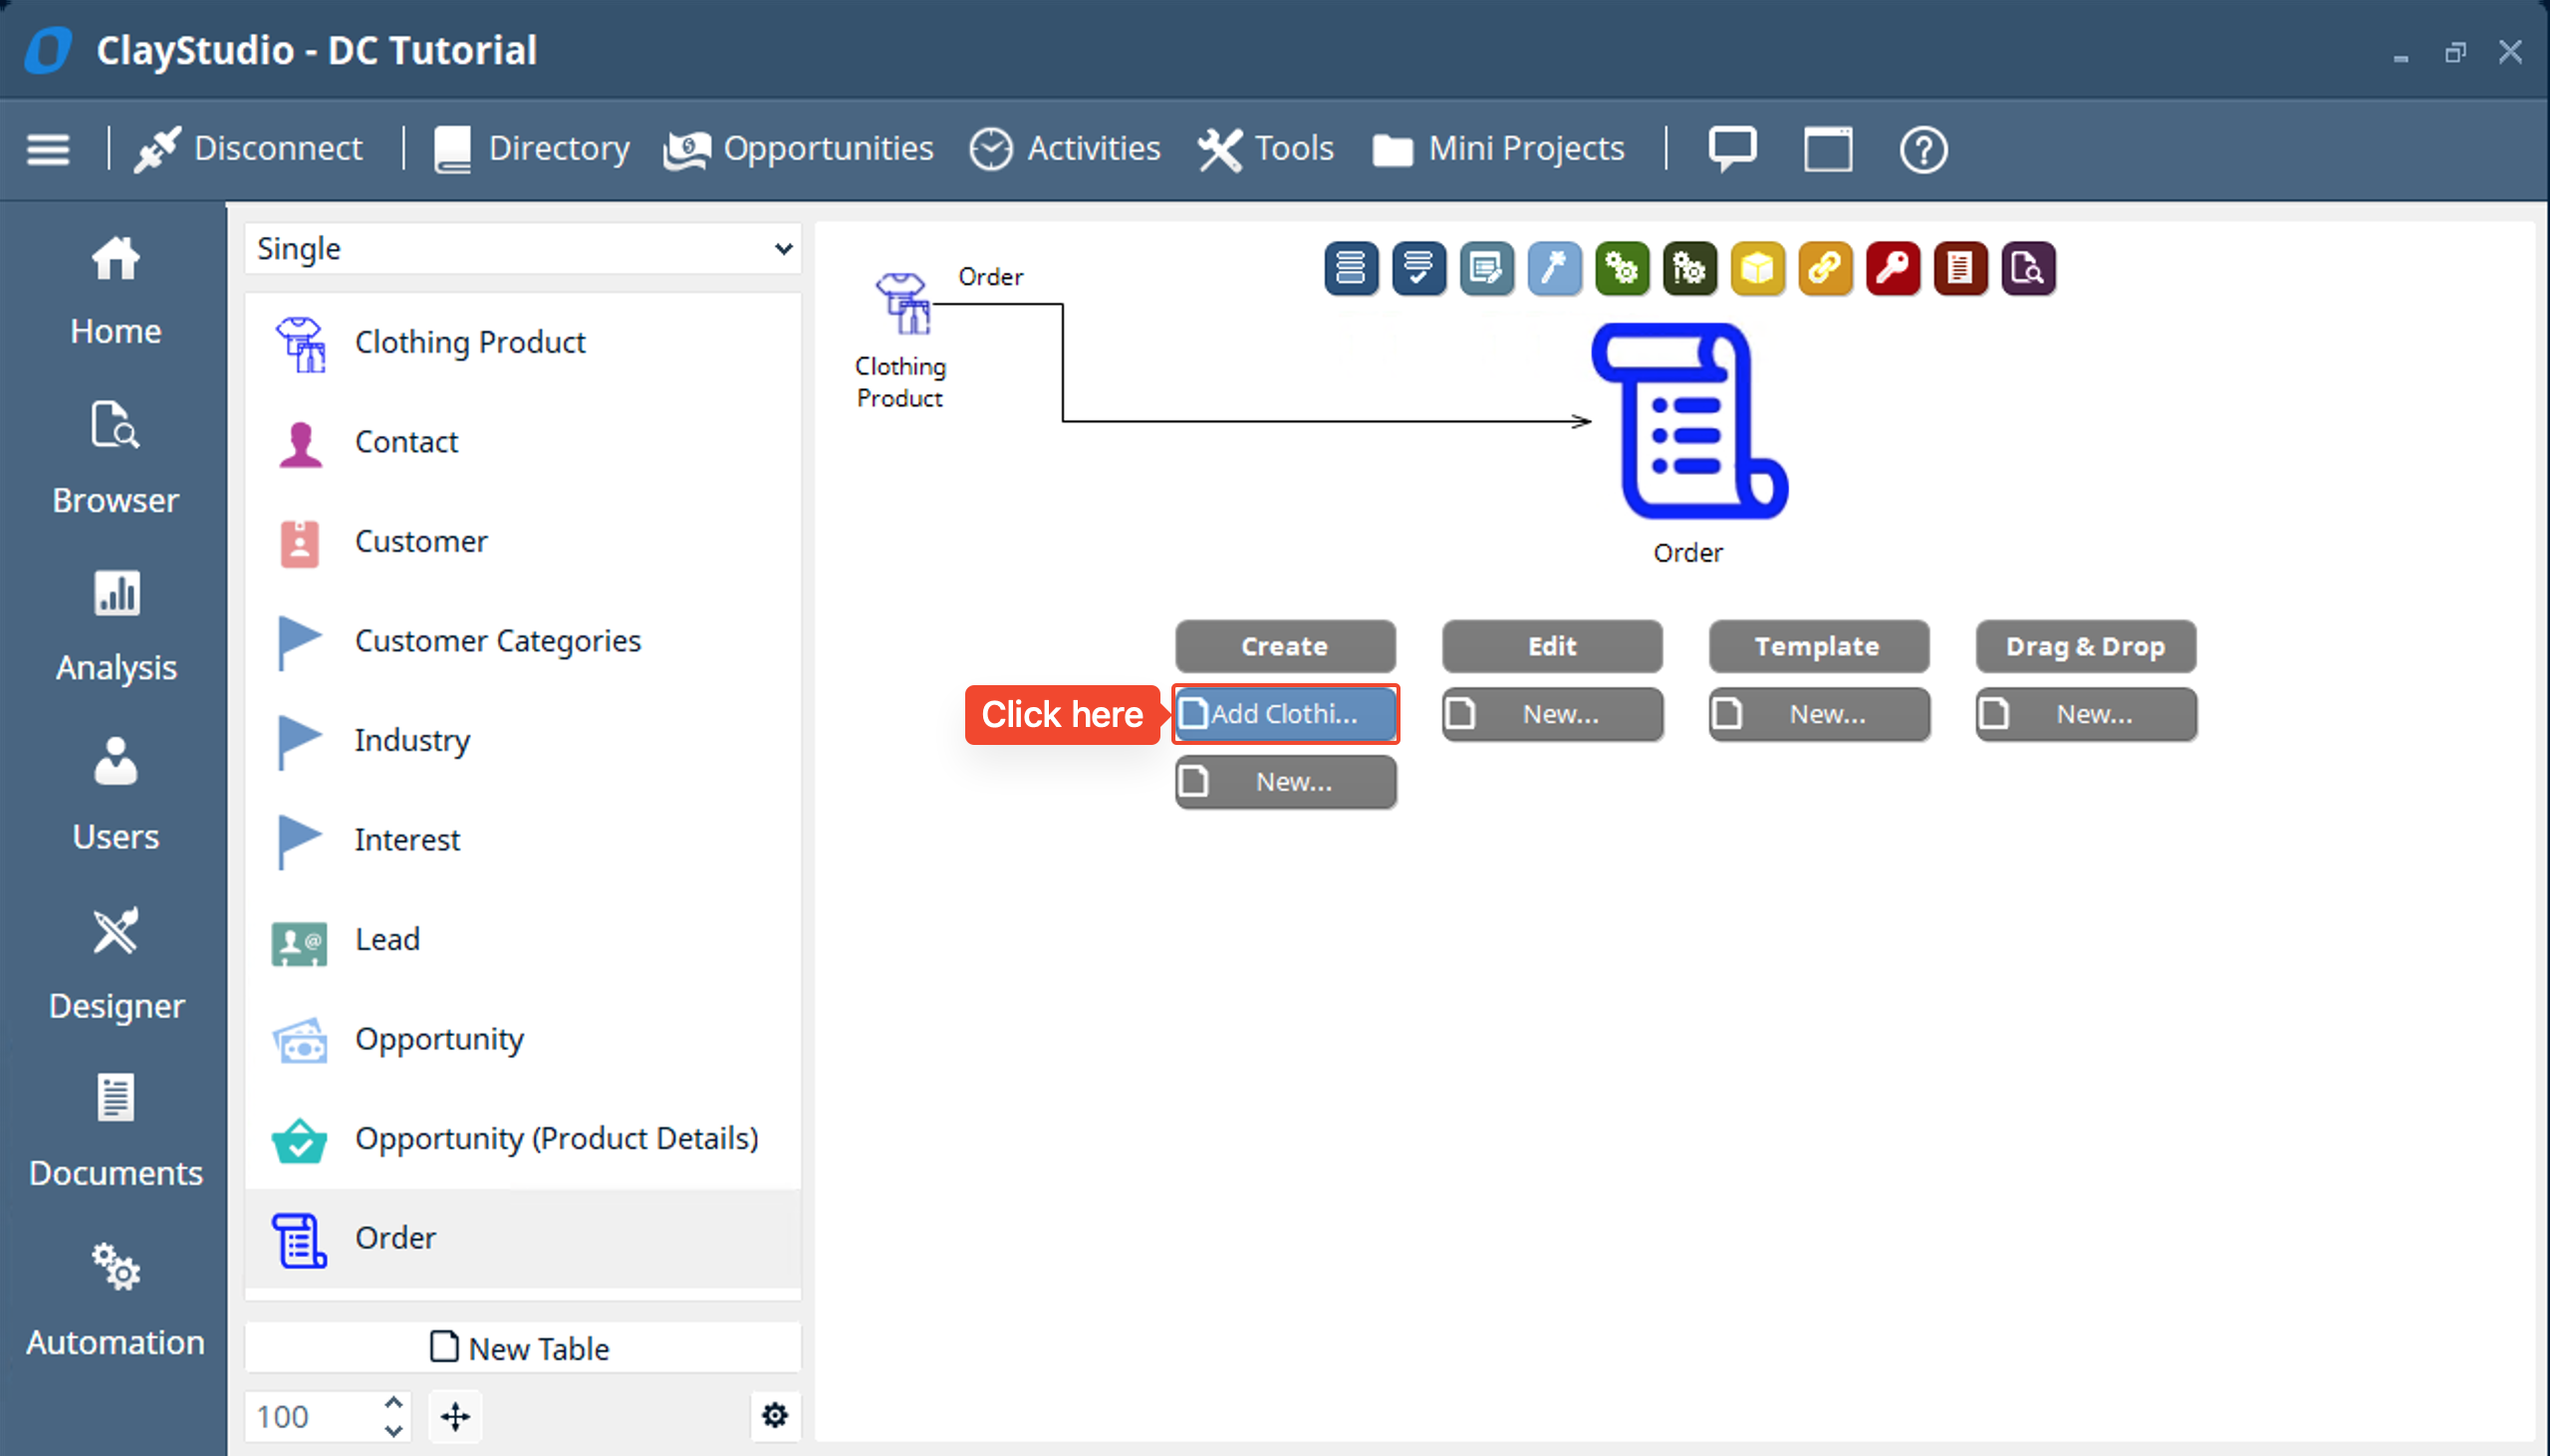
- Going back to the “User Action” view we will click on the “Add Clothing Product” create action.
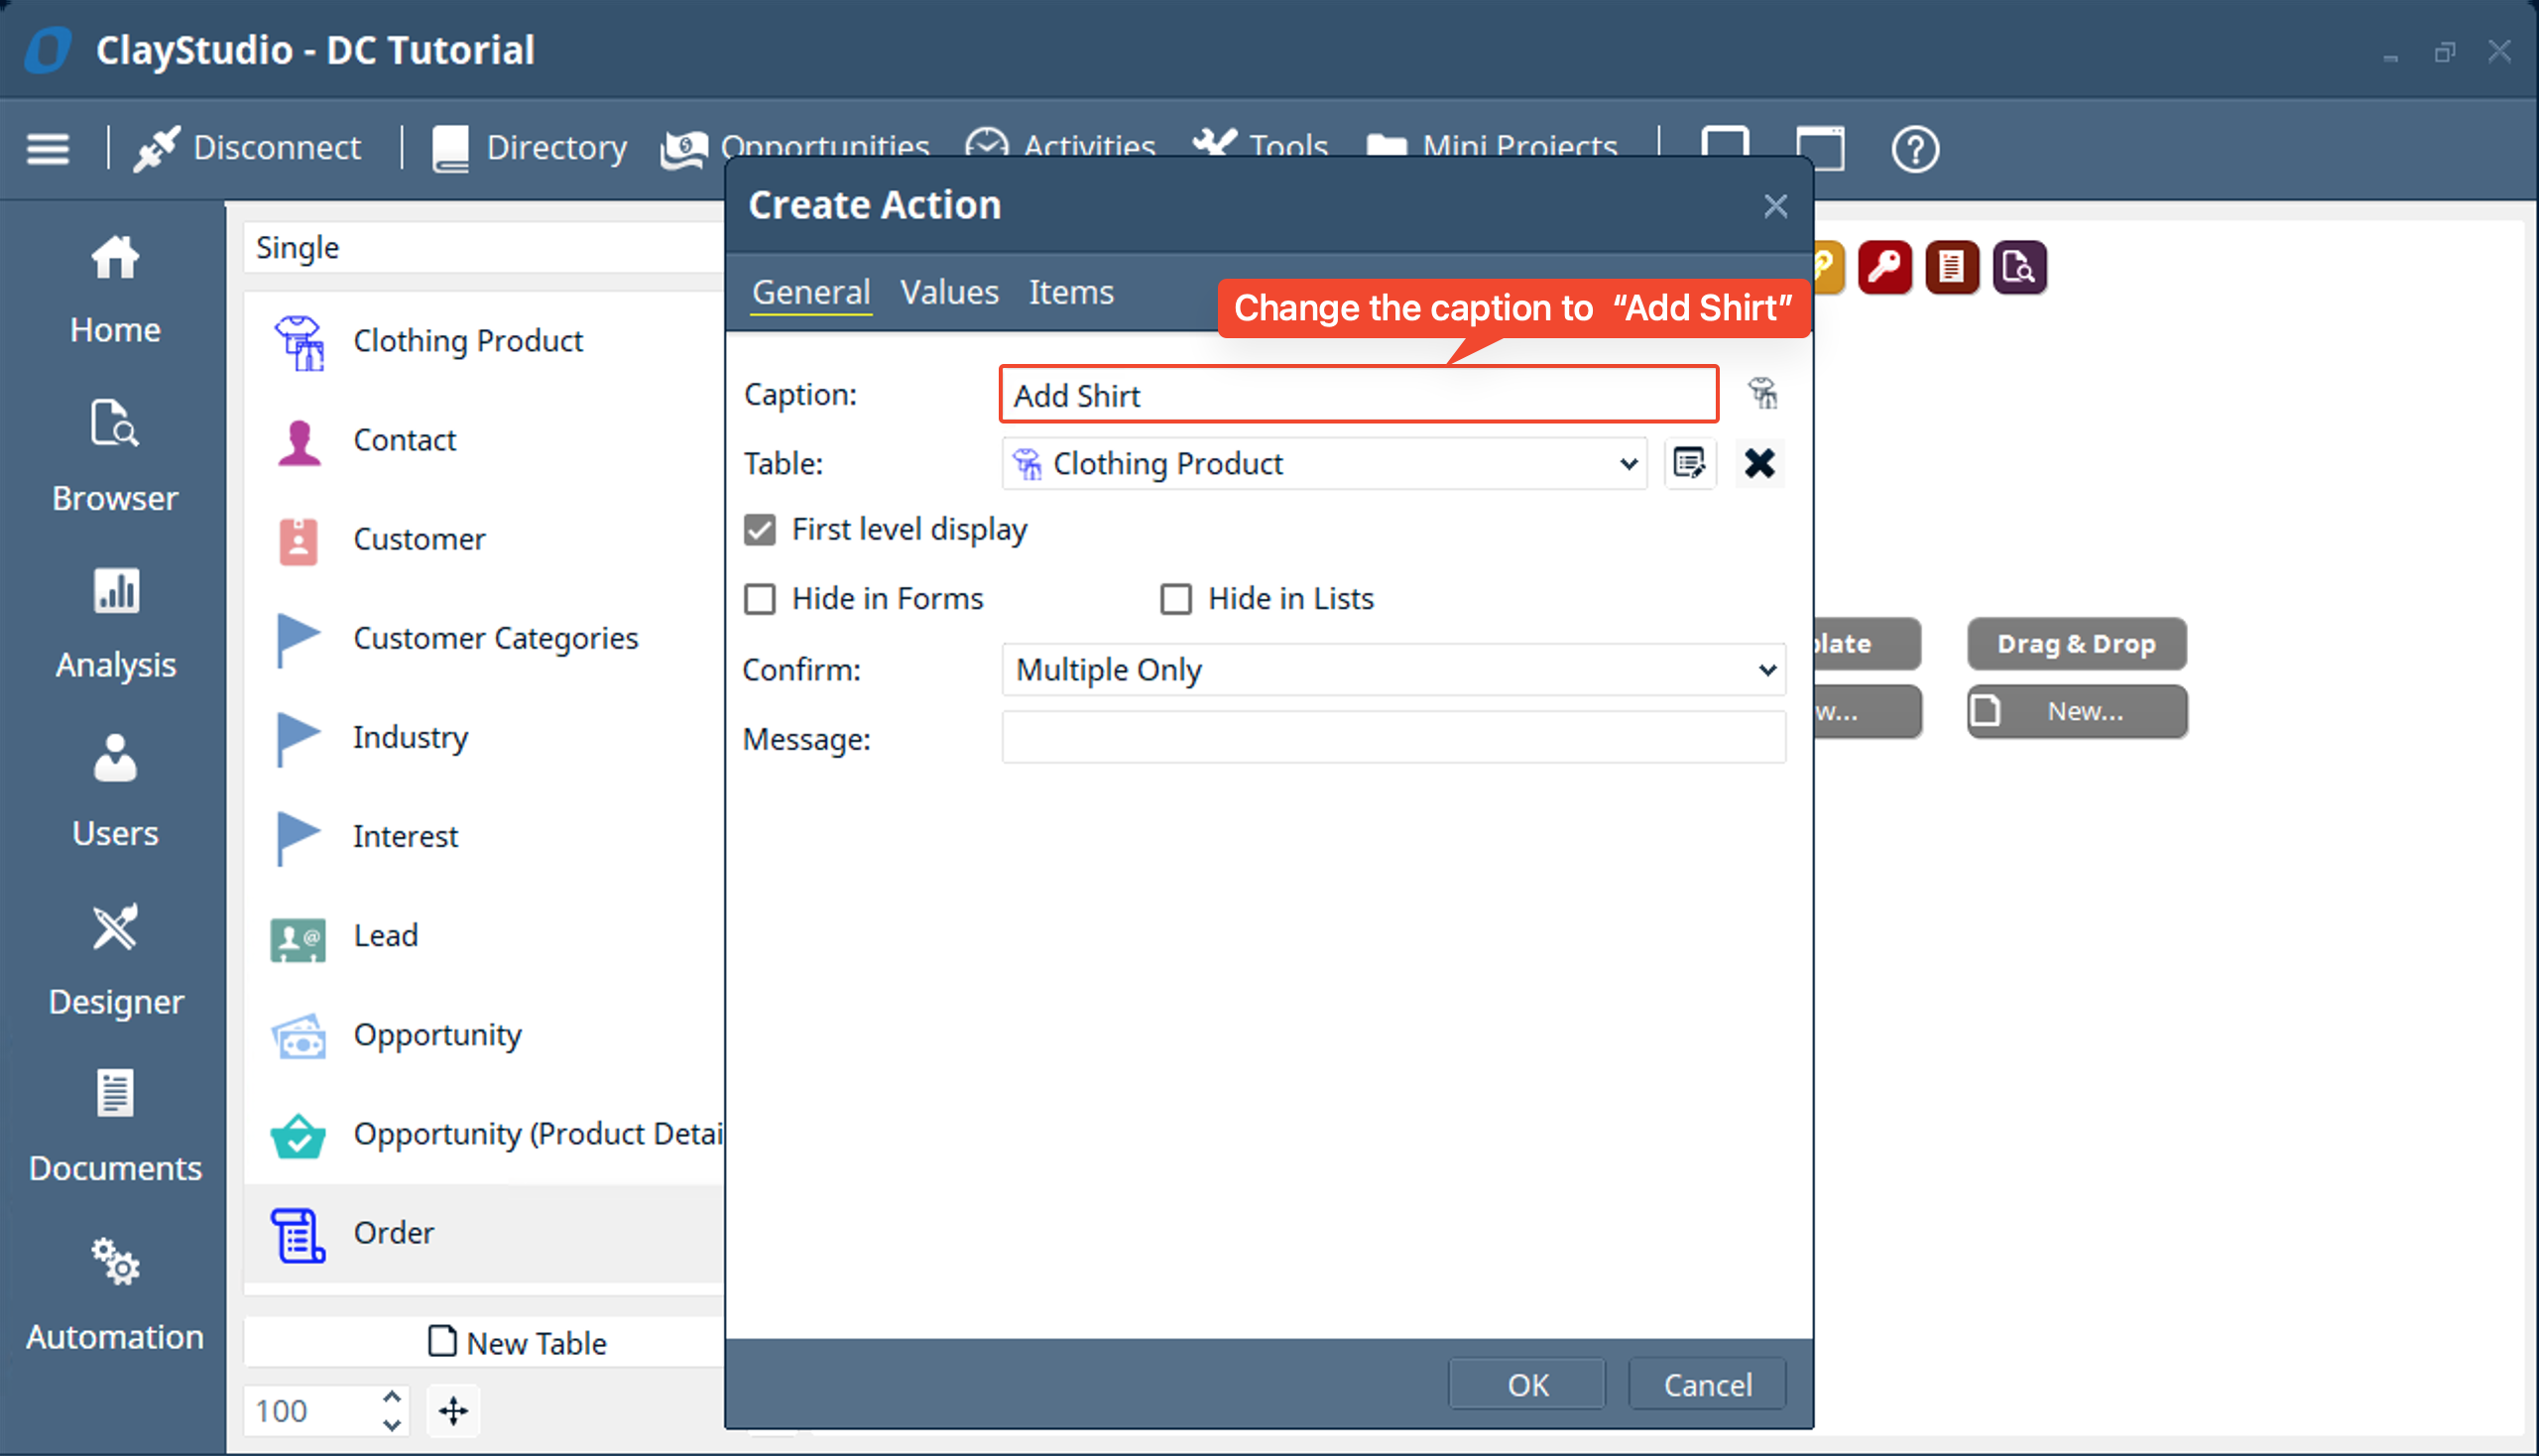
- We want to edit this user action to be able to quickly and easily add a “Clothing Product” that is already filled out with the information for a shirt. So first we will change the “Add Clothing Product” caption to “Add Shirt”
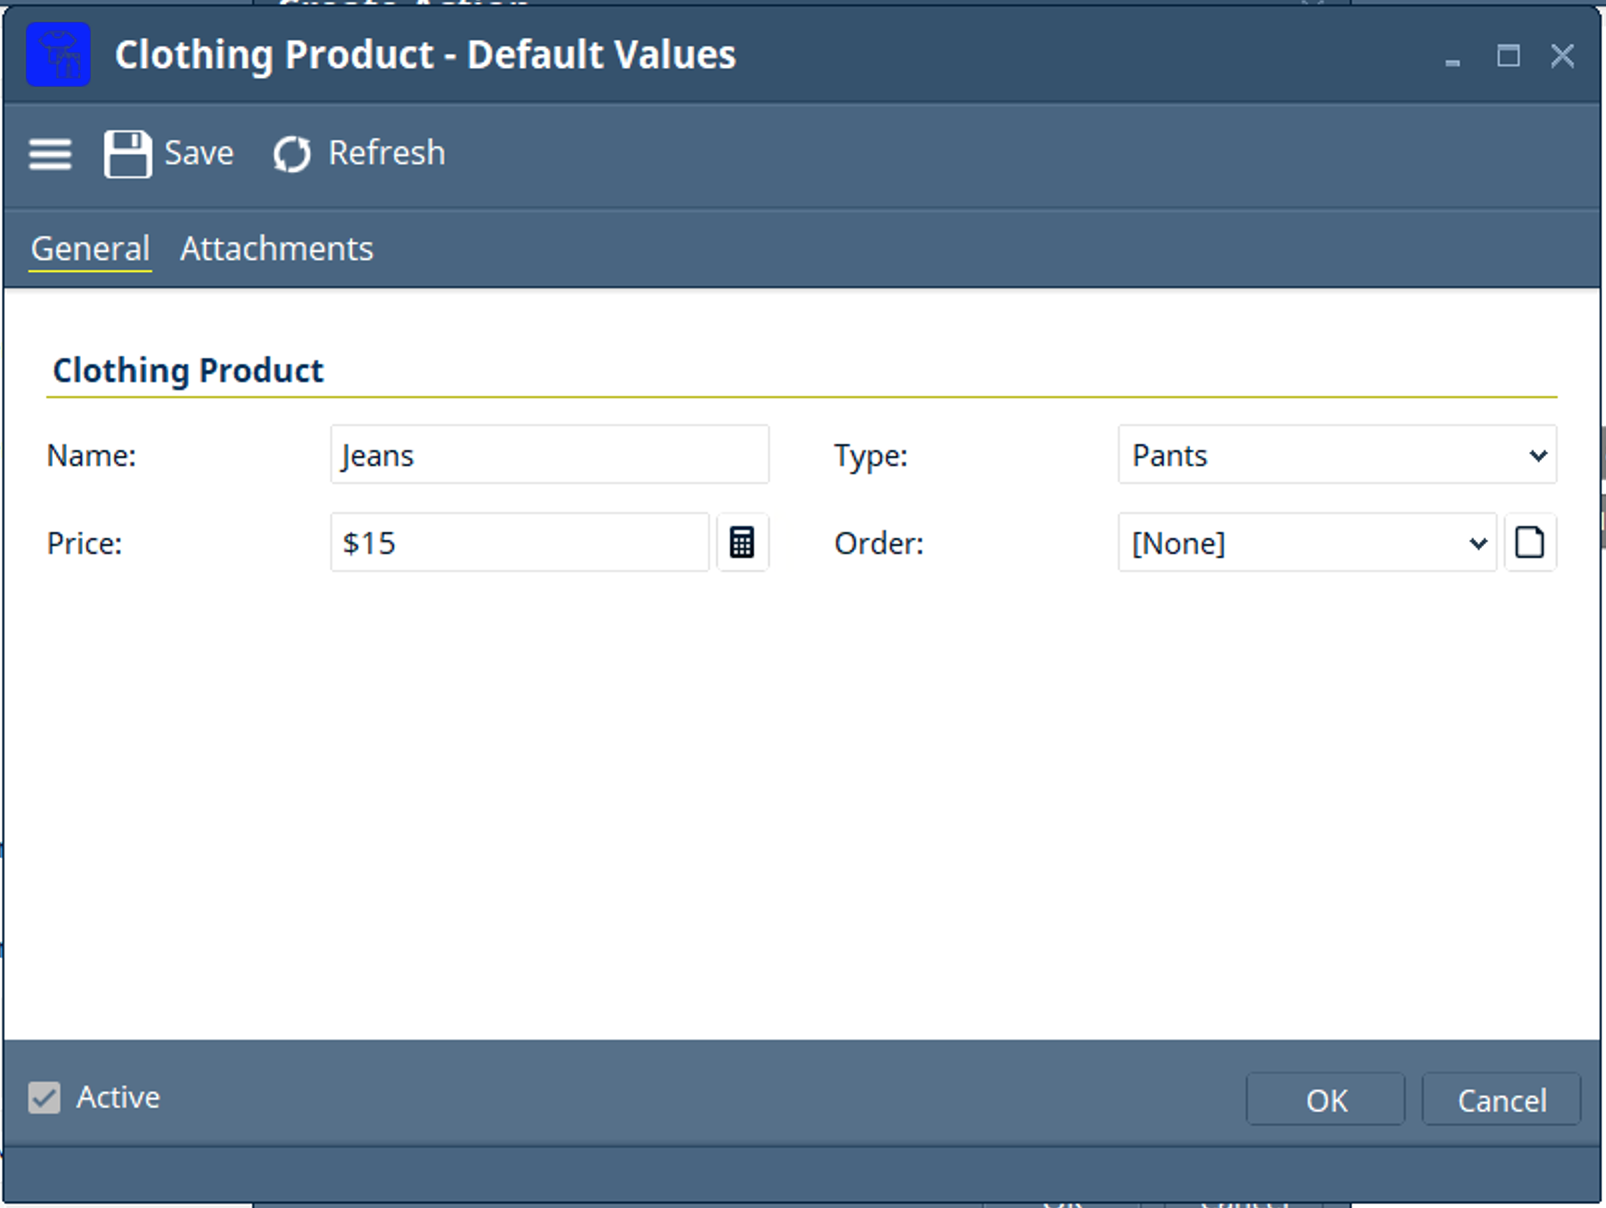
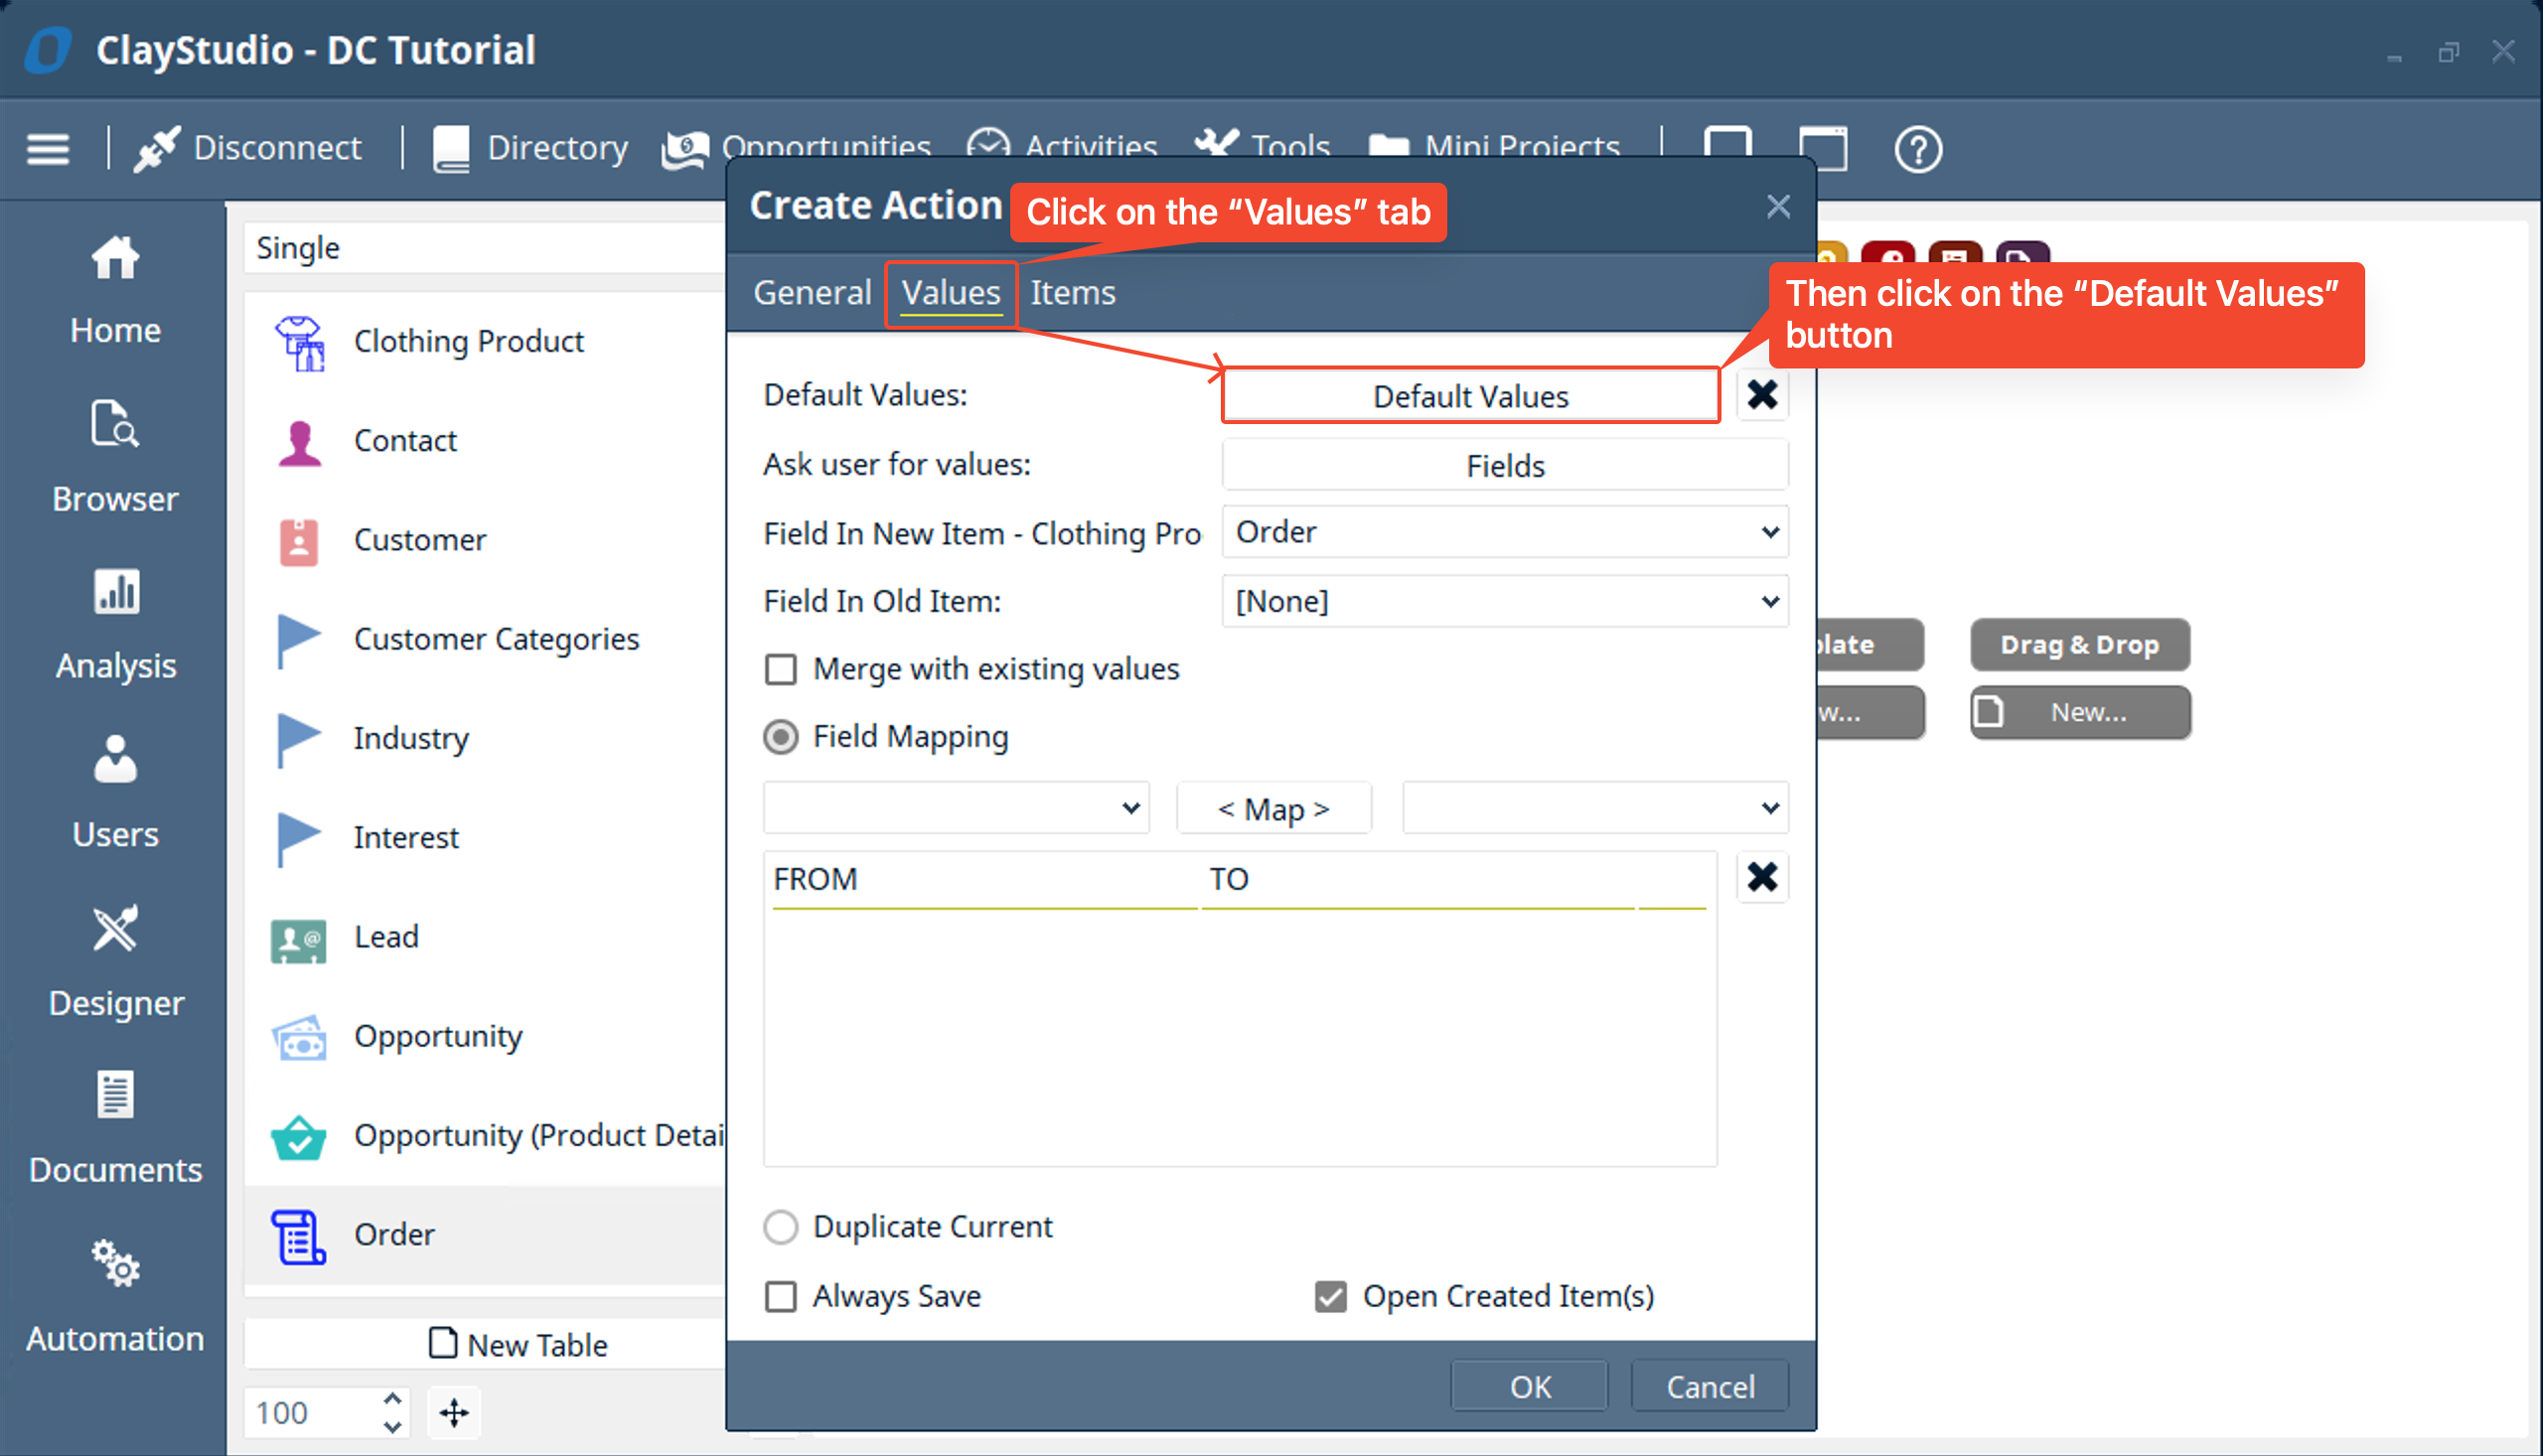
- Then click on the “Values” tab then click on the “Default Values” button so we can set the default values that will be filled when we click on the button to run the user action. In this case we want to fill out the “Clothing Product” so it resembles the information of adding a shirt.
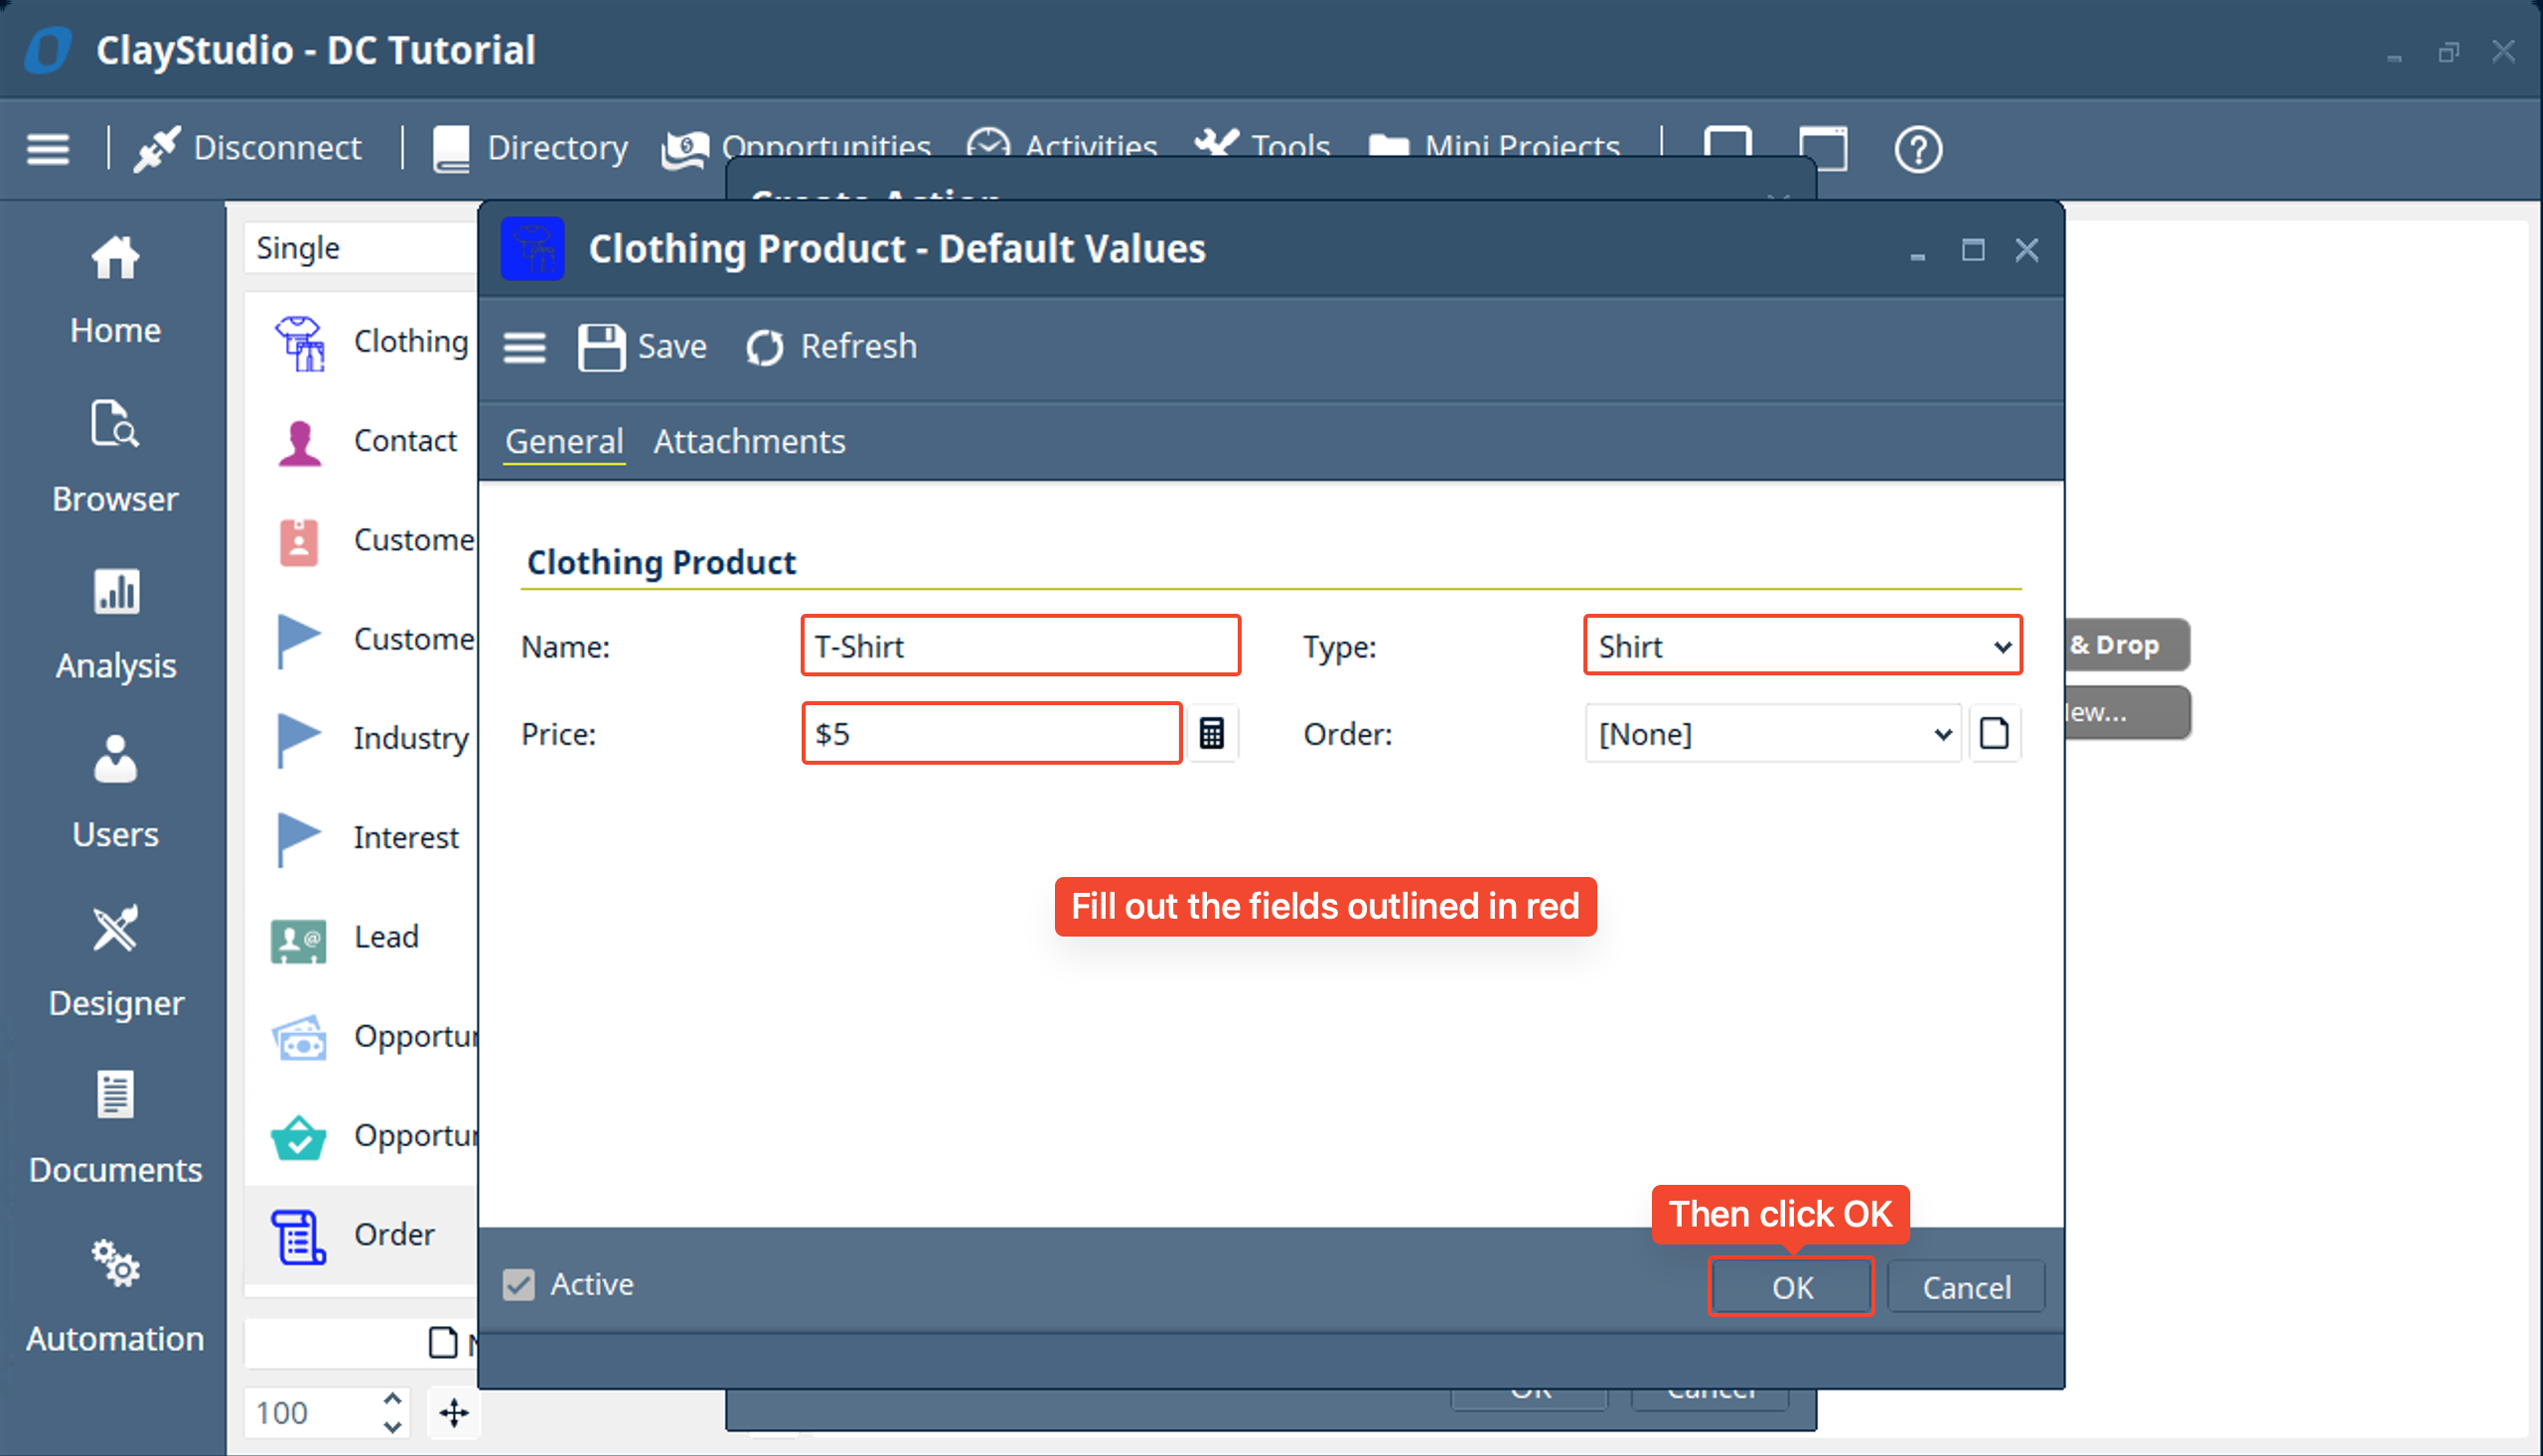
- A window to fill out the default values of the “Clothing Product” pops up. Fill out the fields outlined in red (Make sure NOT to fill out or select the “Order” in this window as it will be set through the “Field In New Item” dropdown). Then click OK
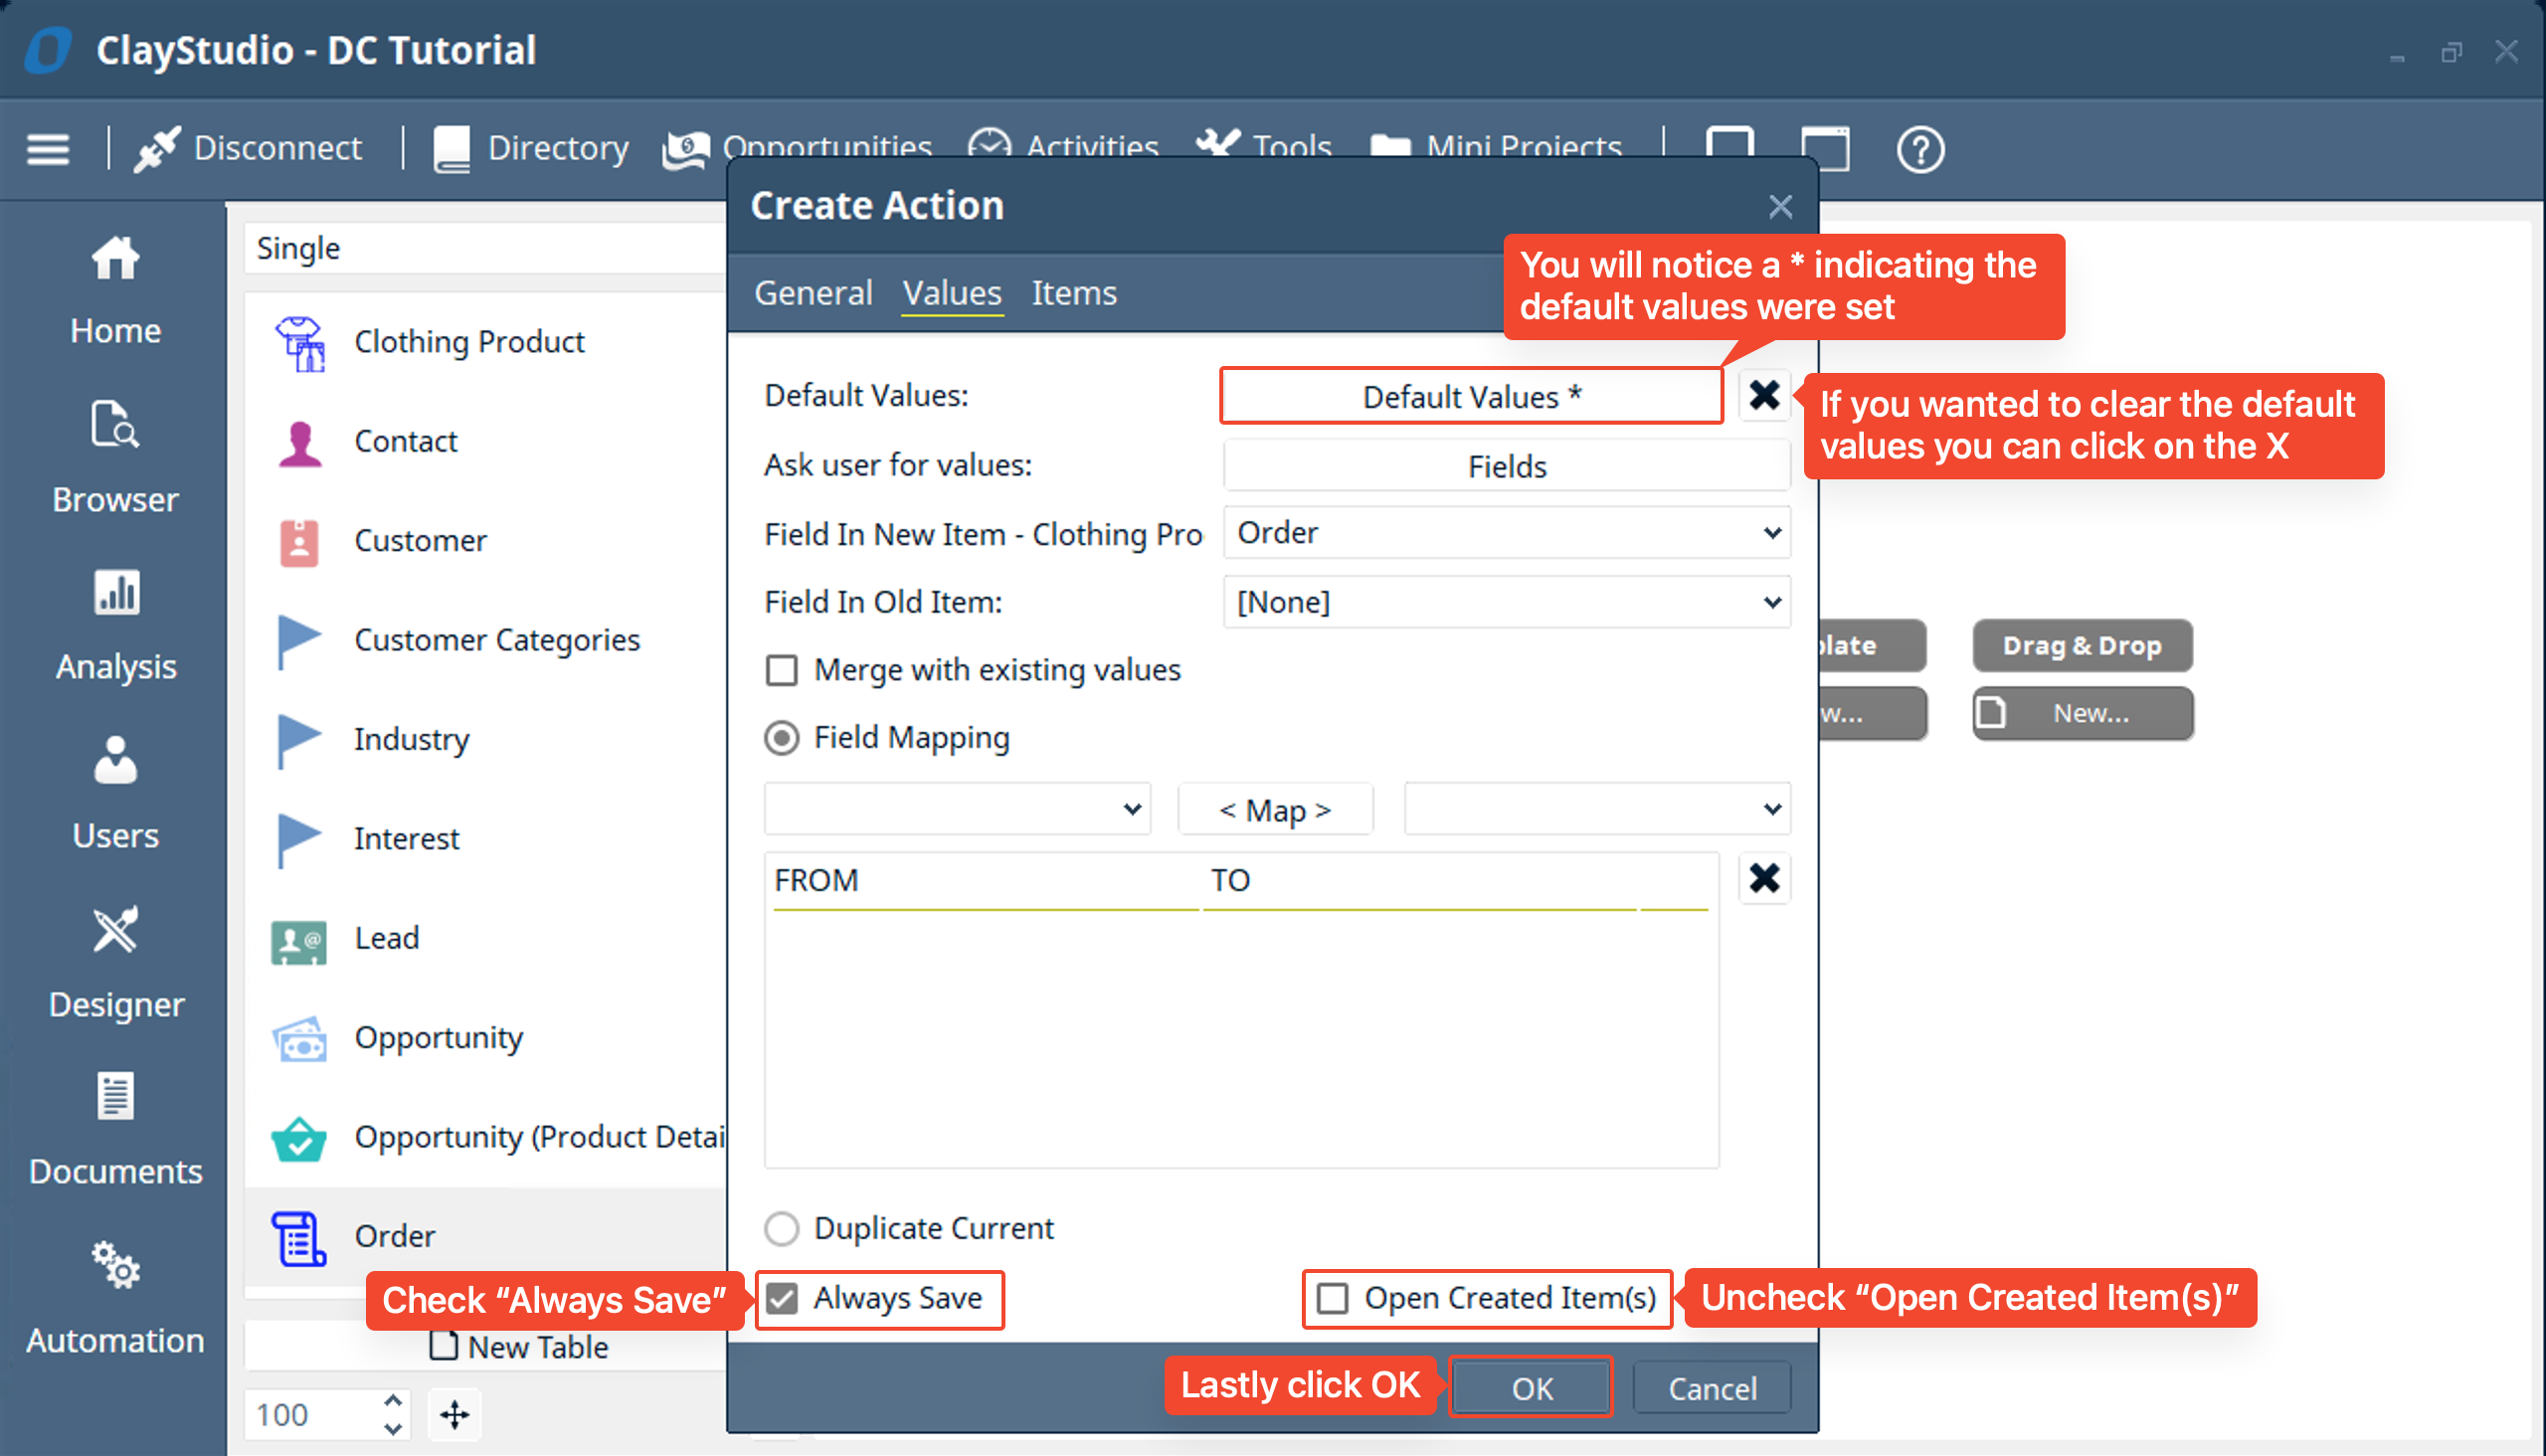
- You will notice a * show up next to the default values button indicating it has been modified. If you wanted to clear the default values you can do so by clicking on the X. Next make sure you check “Always Save” and uncheck “Open Created Item(s)” and then click OK.
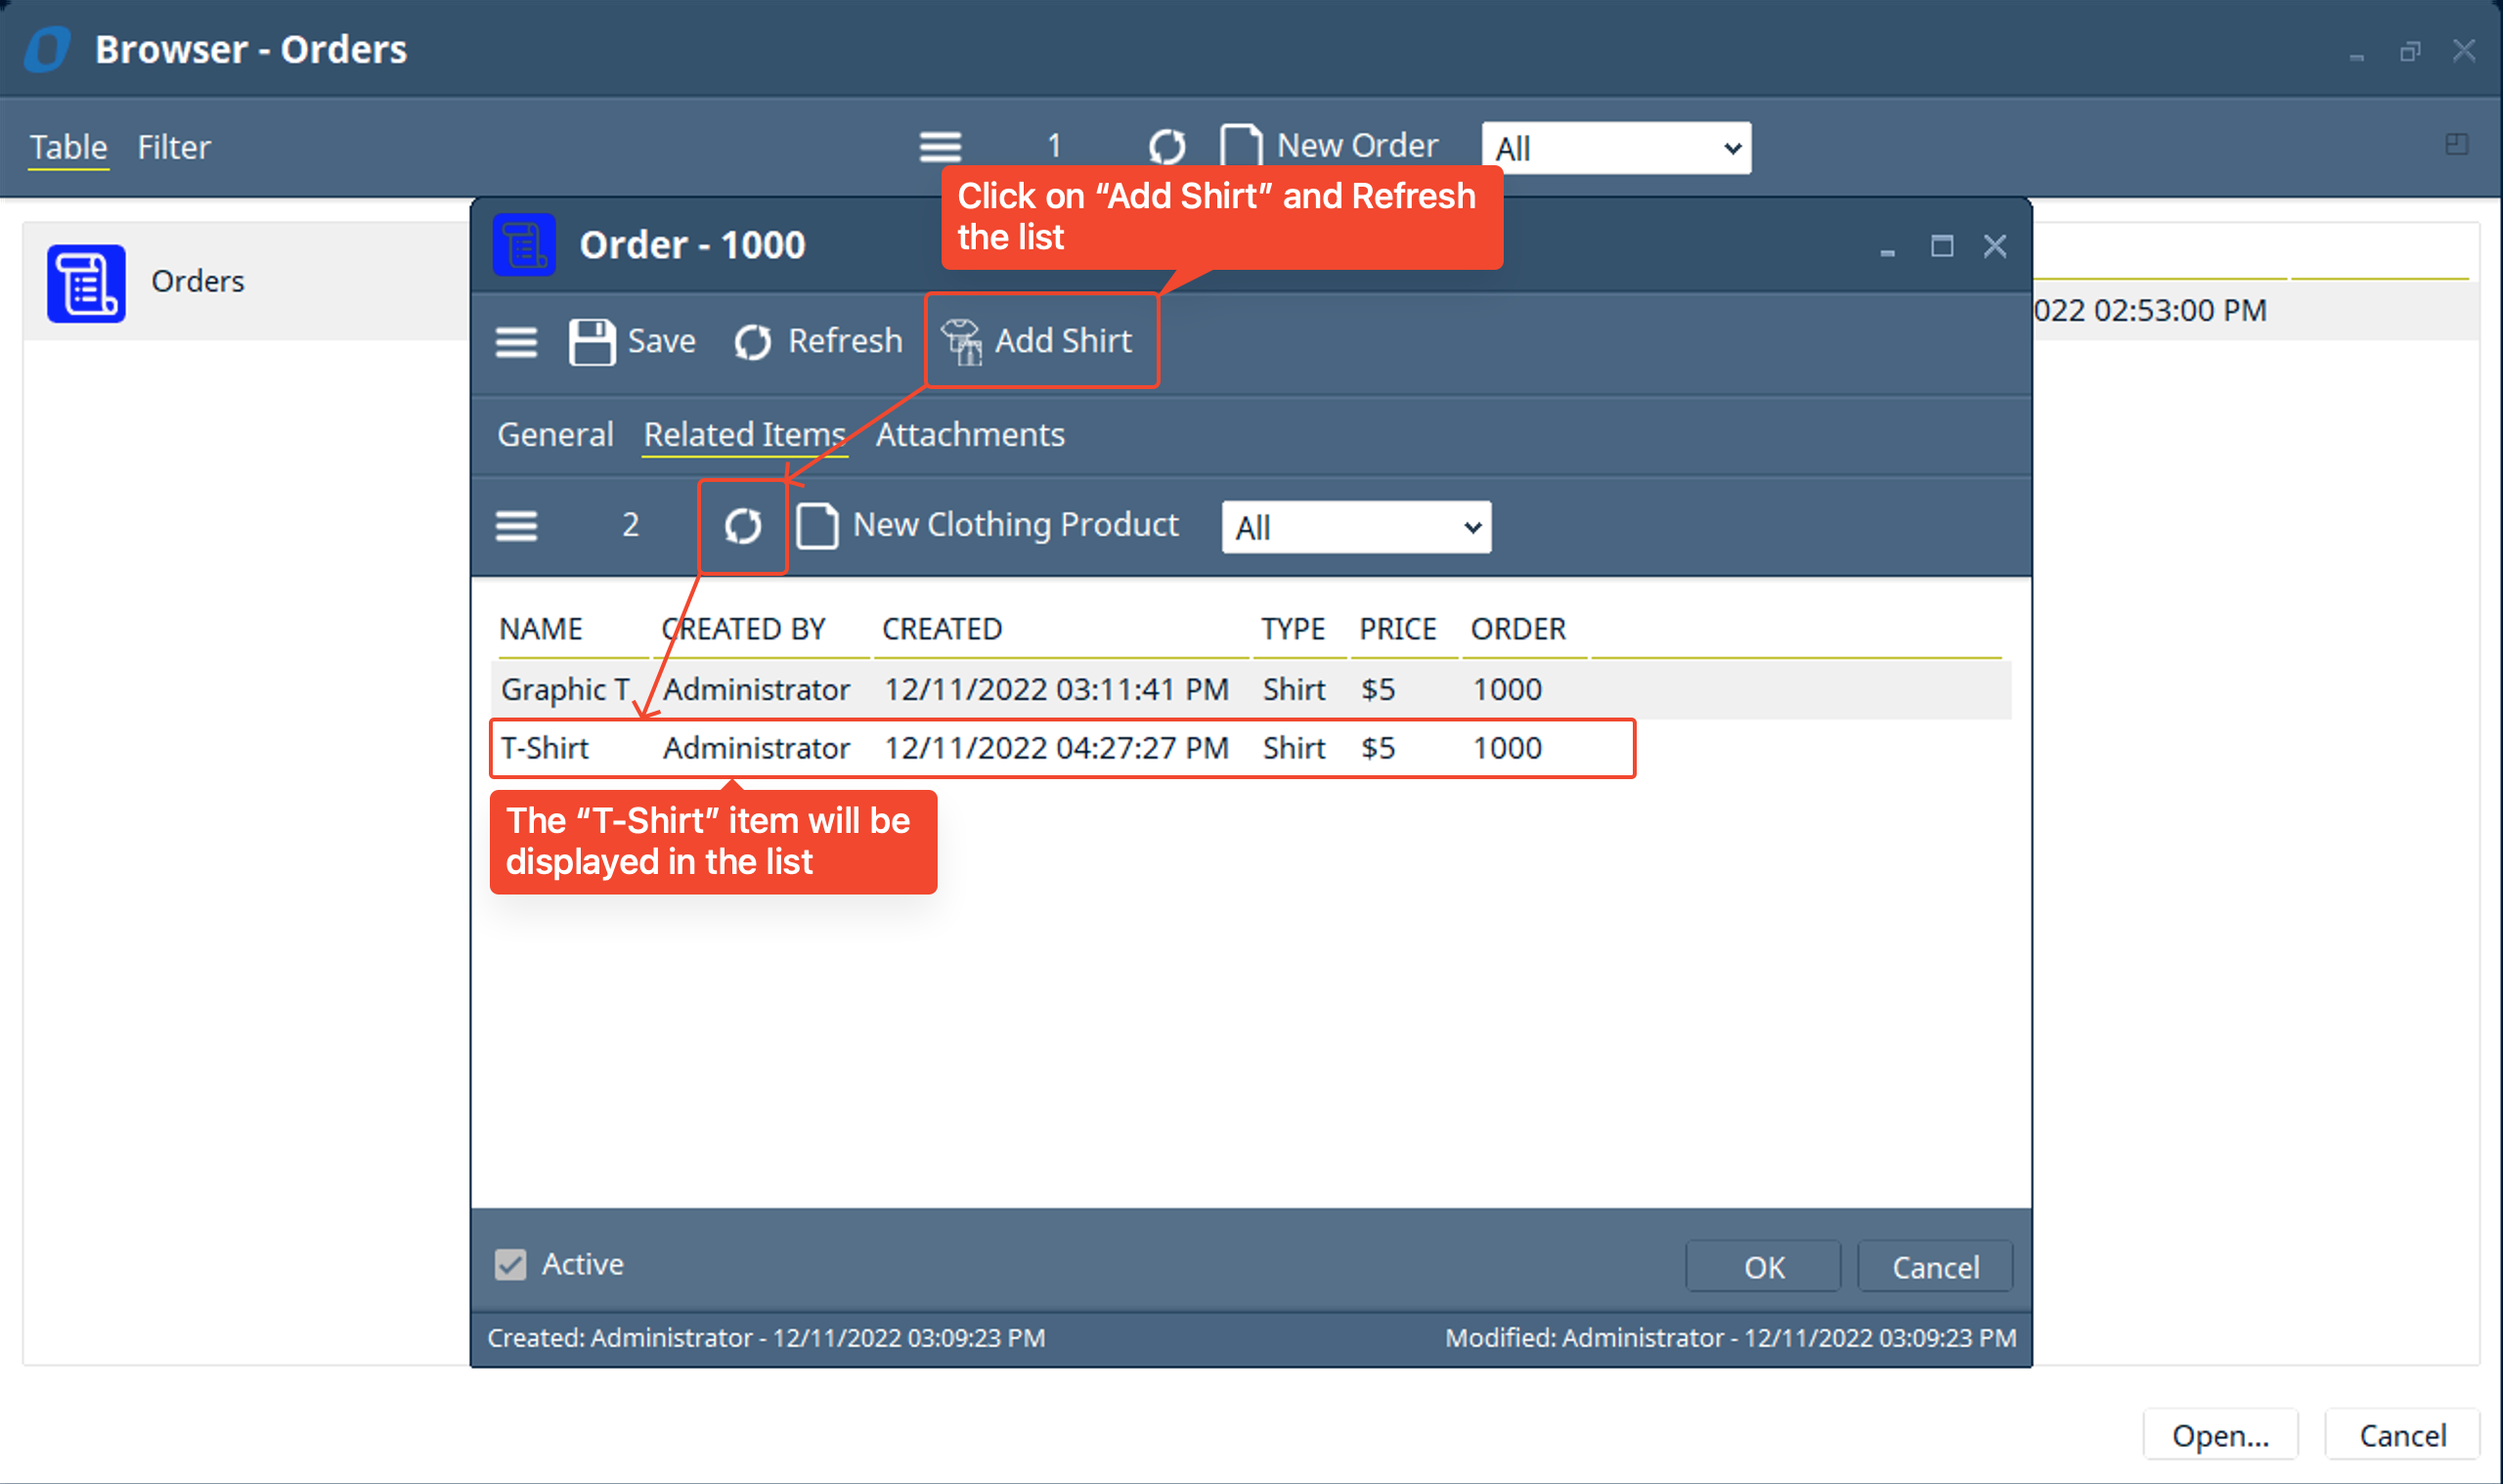
- Going back to the “Order”, we can click on “Add Shirt” and the T-Shirt should be displayed in the “Related Items”. Note: you might need to refresh to see the T-Shirt display in the list but this can be fixed in the layout options.
- Now let’s go back to the “Fields View” for the “Orders” table in the Designer and add a new “Custom Function” field. The custom function field will calculate the “Total Price” of the “Order” based on the “Clothing Products” linked to it.
- In the custom function window click on the “Function” dropdown and select “AnalysisQuery”. The AnalysisQuery function, in short, will allow you to easily sum up the values of the “Clothing Products” attached to an “Order”. In general, the Analysis tool is very useful for doing math on the values in records/items in your database.
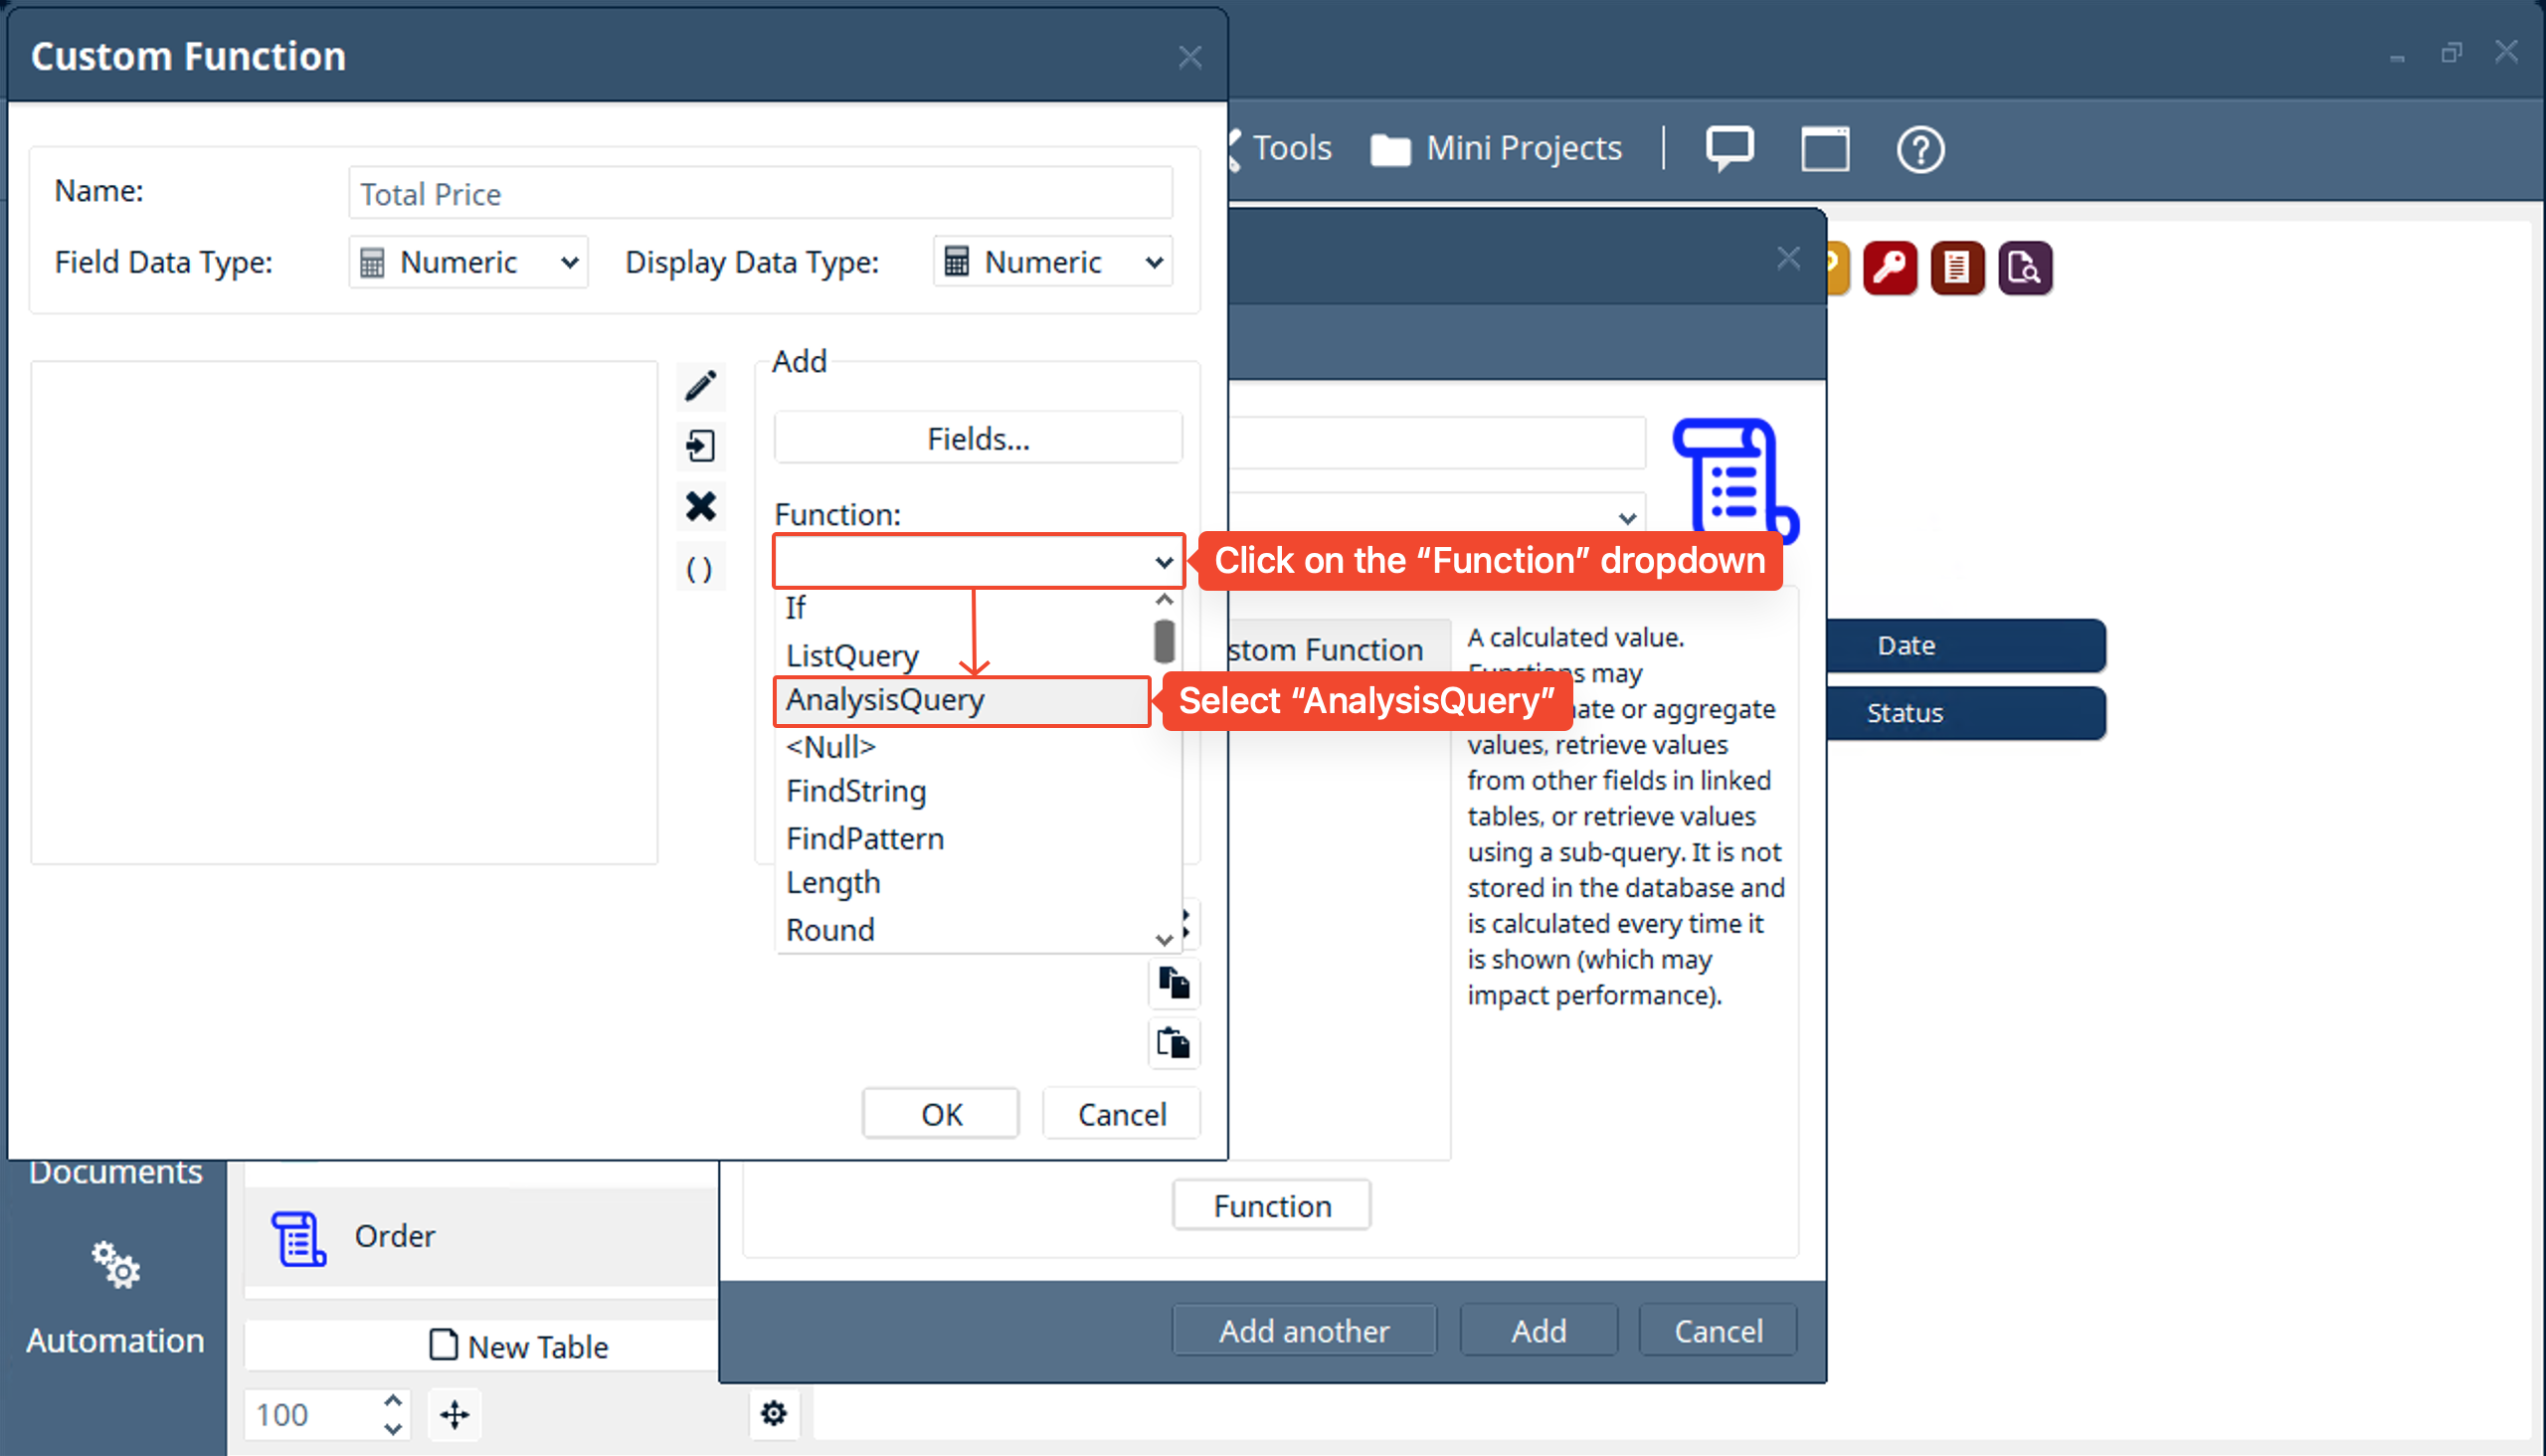
- In the small window labeled “Function Parameters - AnalysisQuery” select the button with the 3 dots labeled in the screenshot below
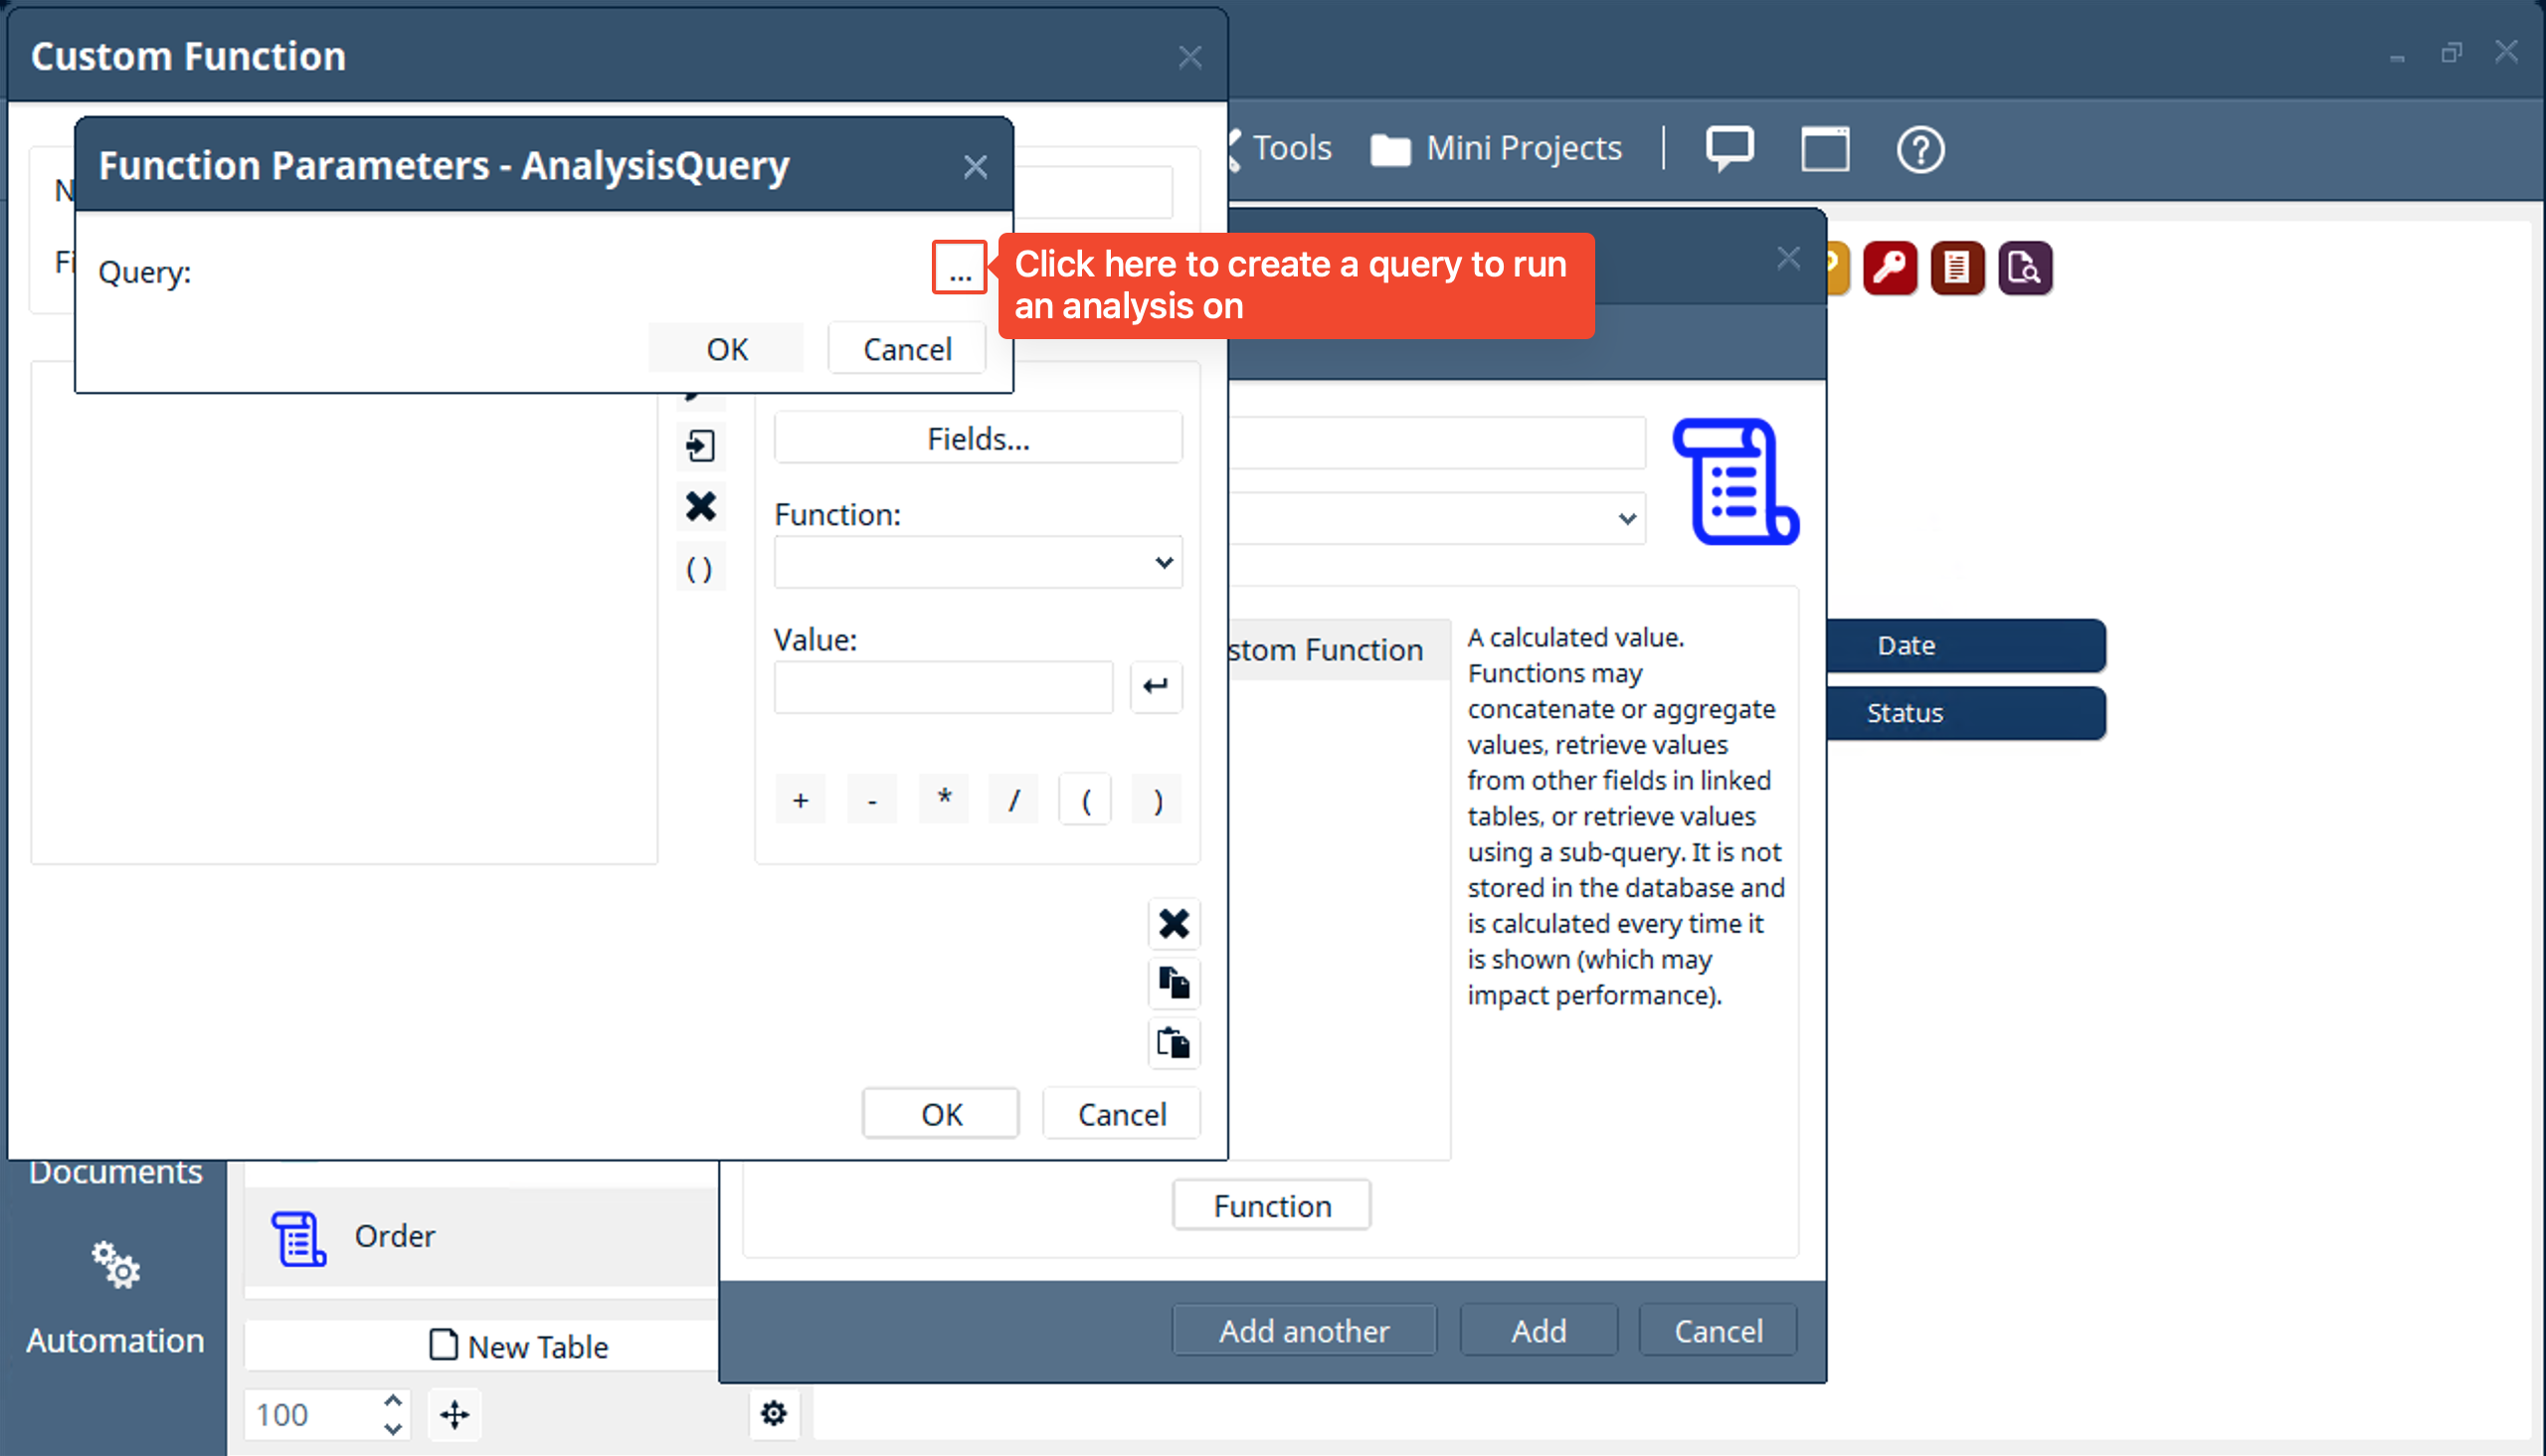
- Now, in the “Indicators” section, look for and select the “Clothing Product:Price”. It should be added to the “Columns” container and you’ll see all the prices of all the clothing products added up and displayed.
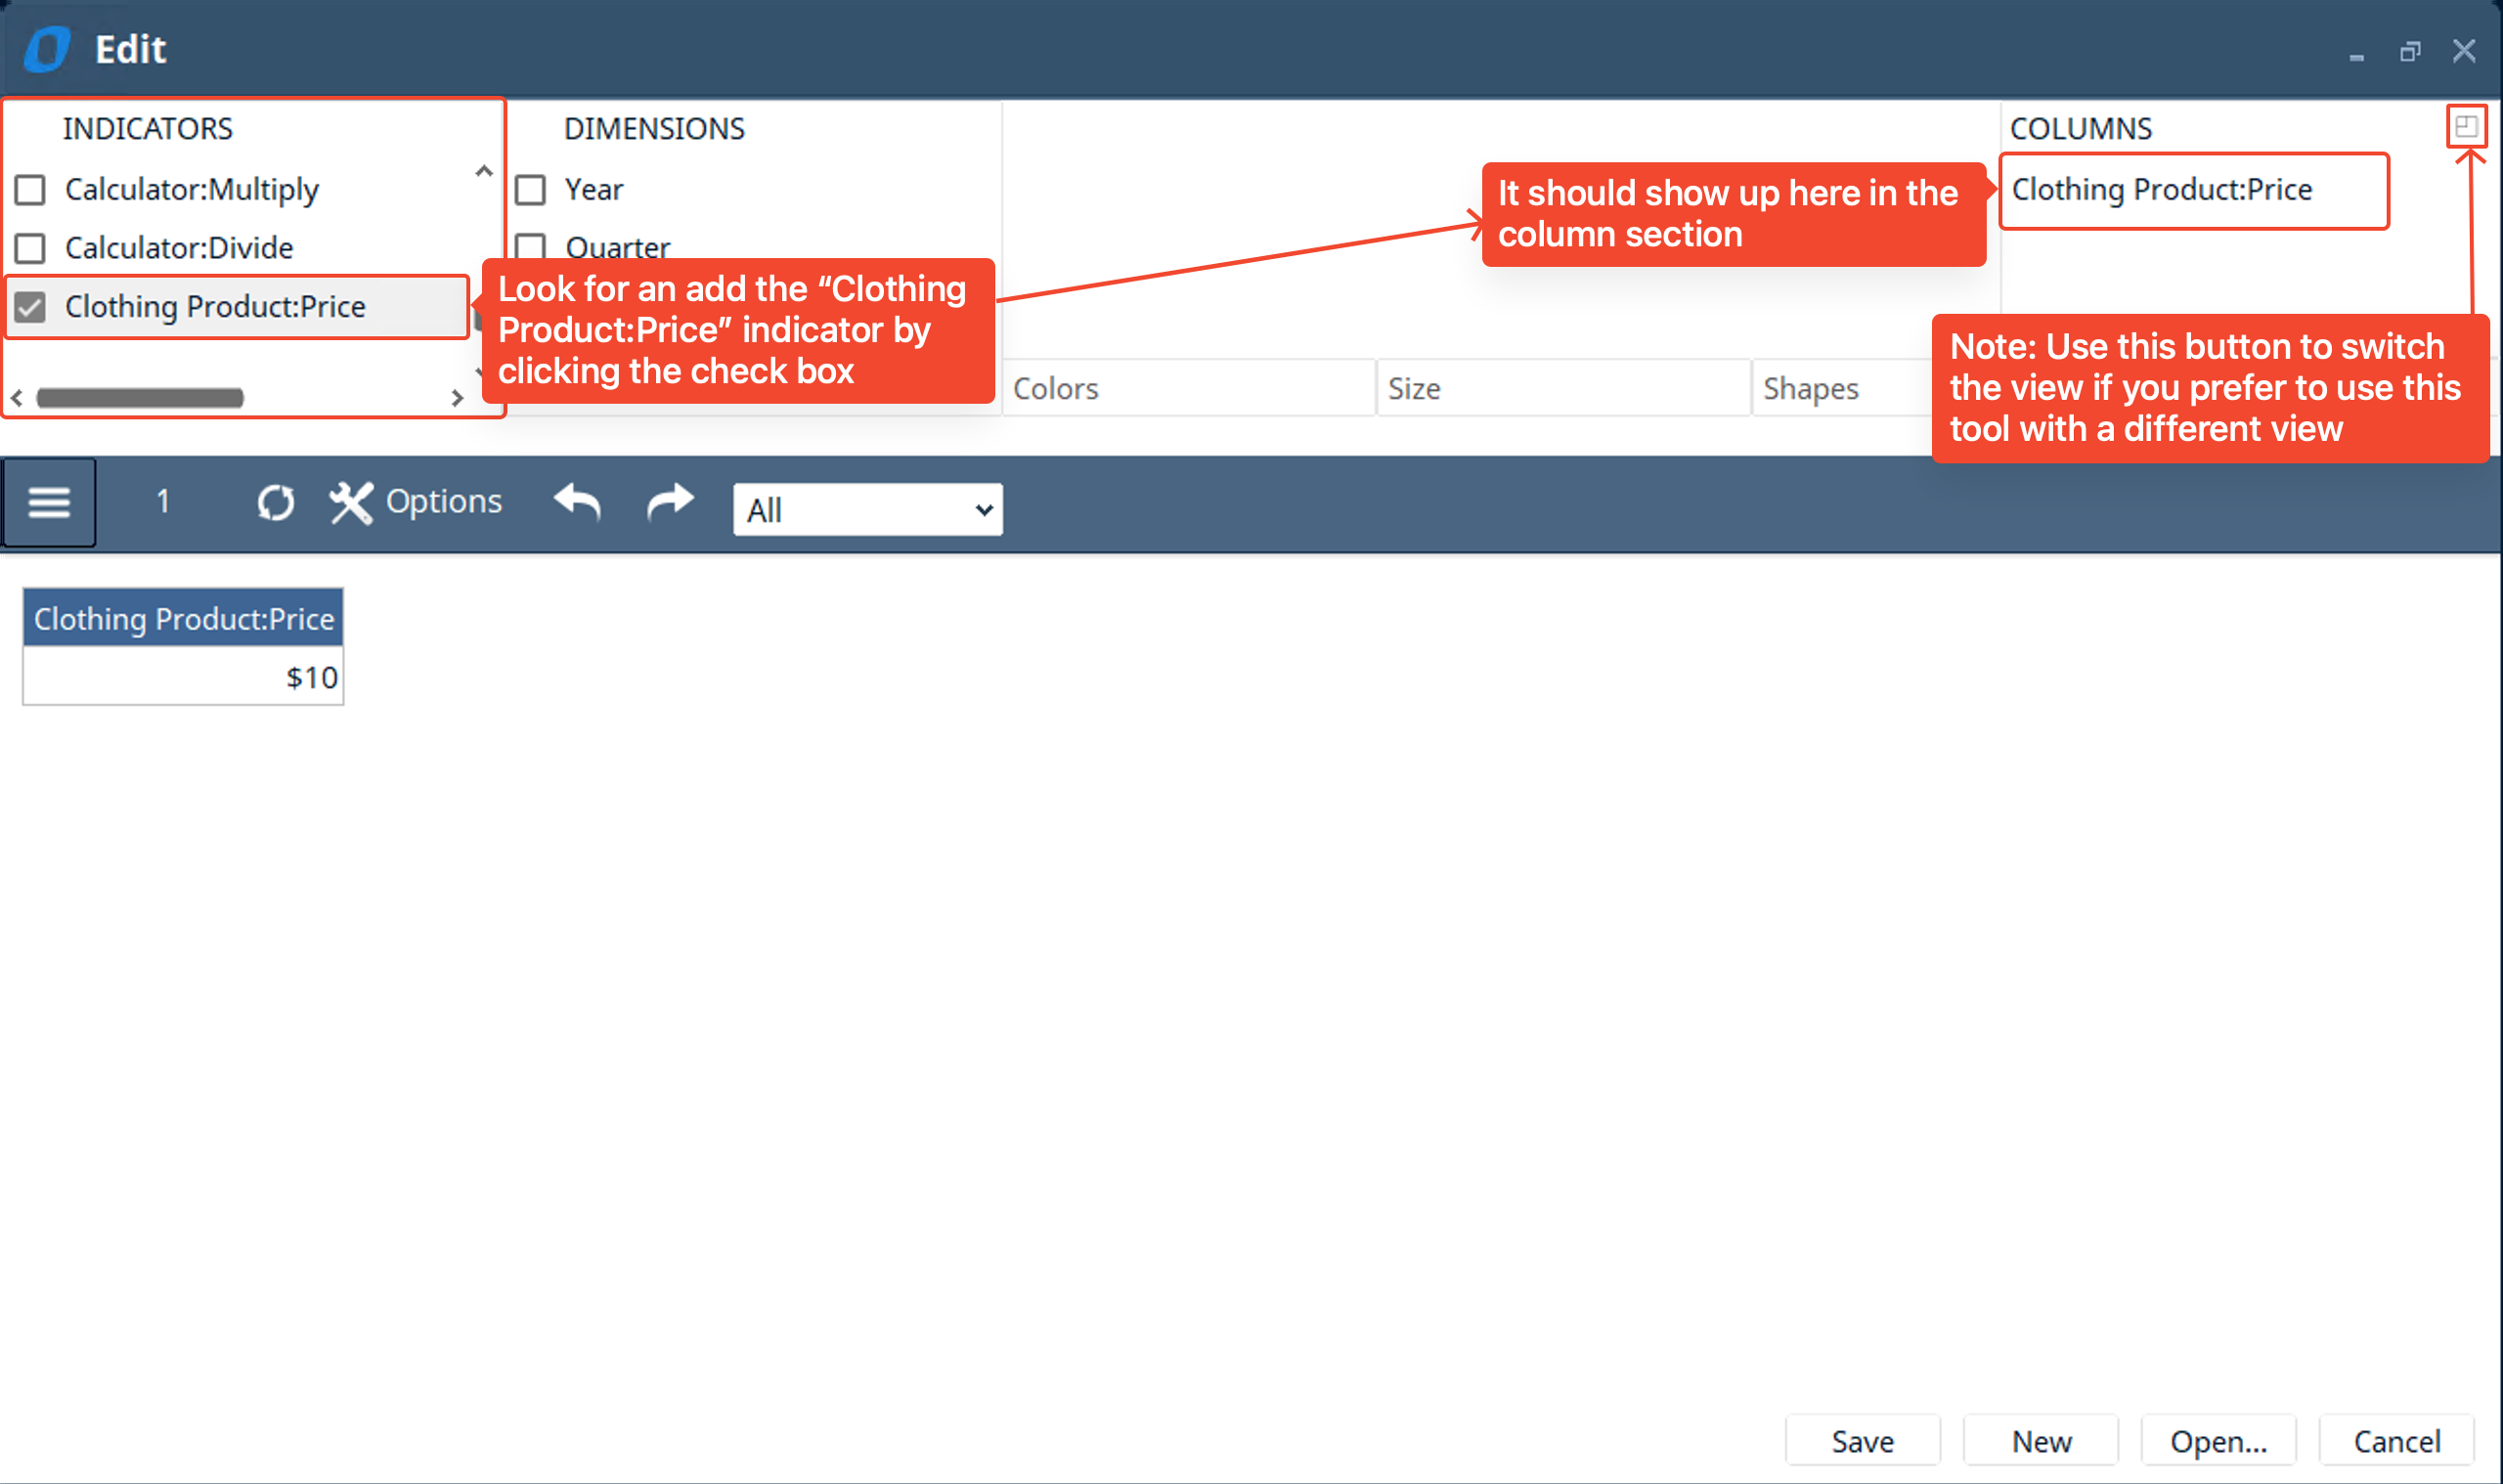
- The next thing we need to do is filter the “Clothing Product:Price” by the “Order” item it is attached to. So we do this by adding a filter to the analysis query. Since the “Order” filter isn’t shown right away we will customize the list of filters.
- To make it easier to search for the filter we want to use we can “Uncheck All” the selected filter options.
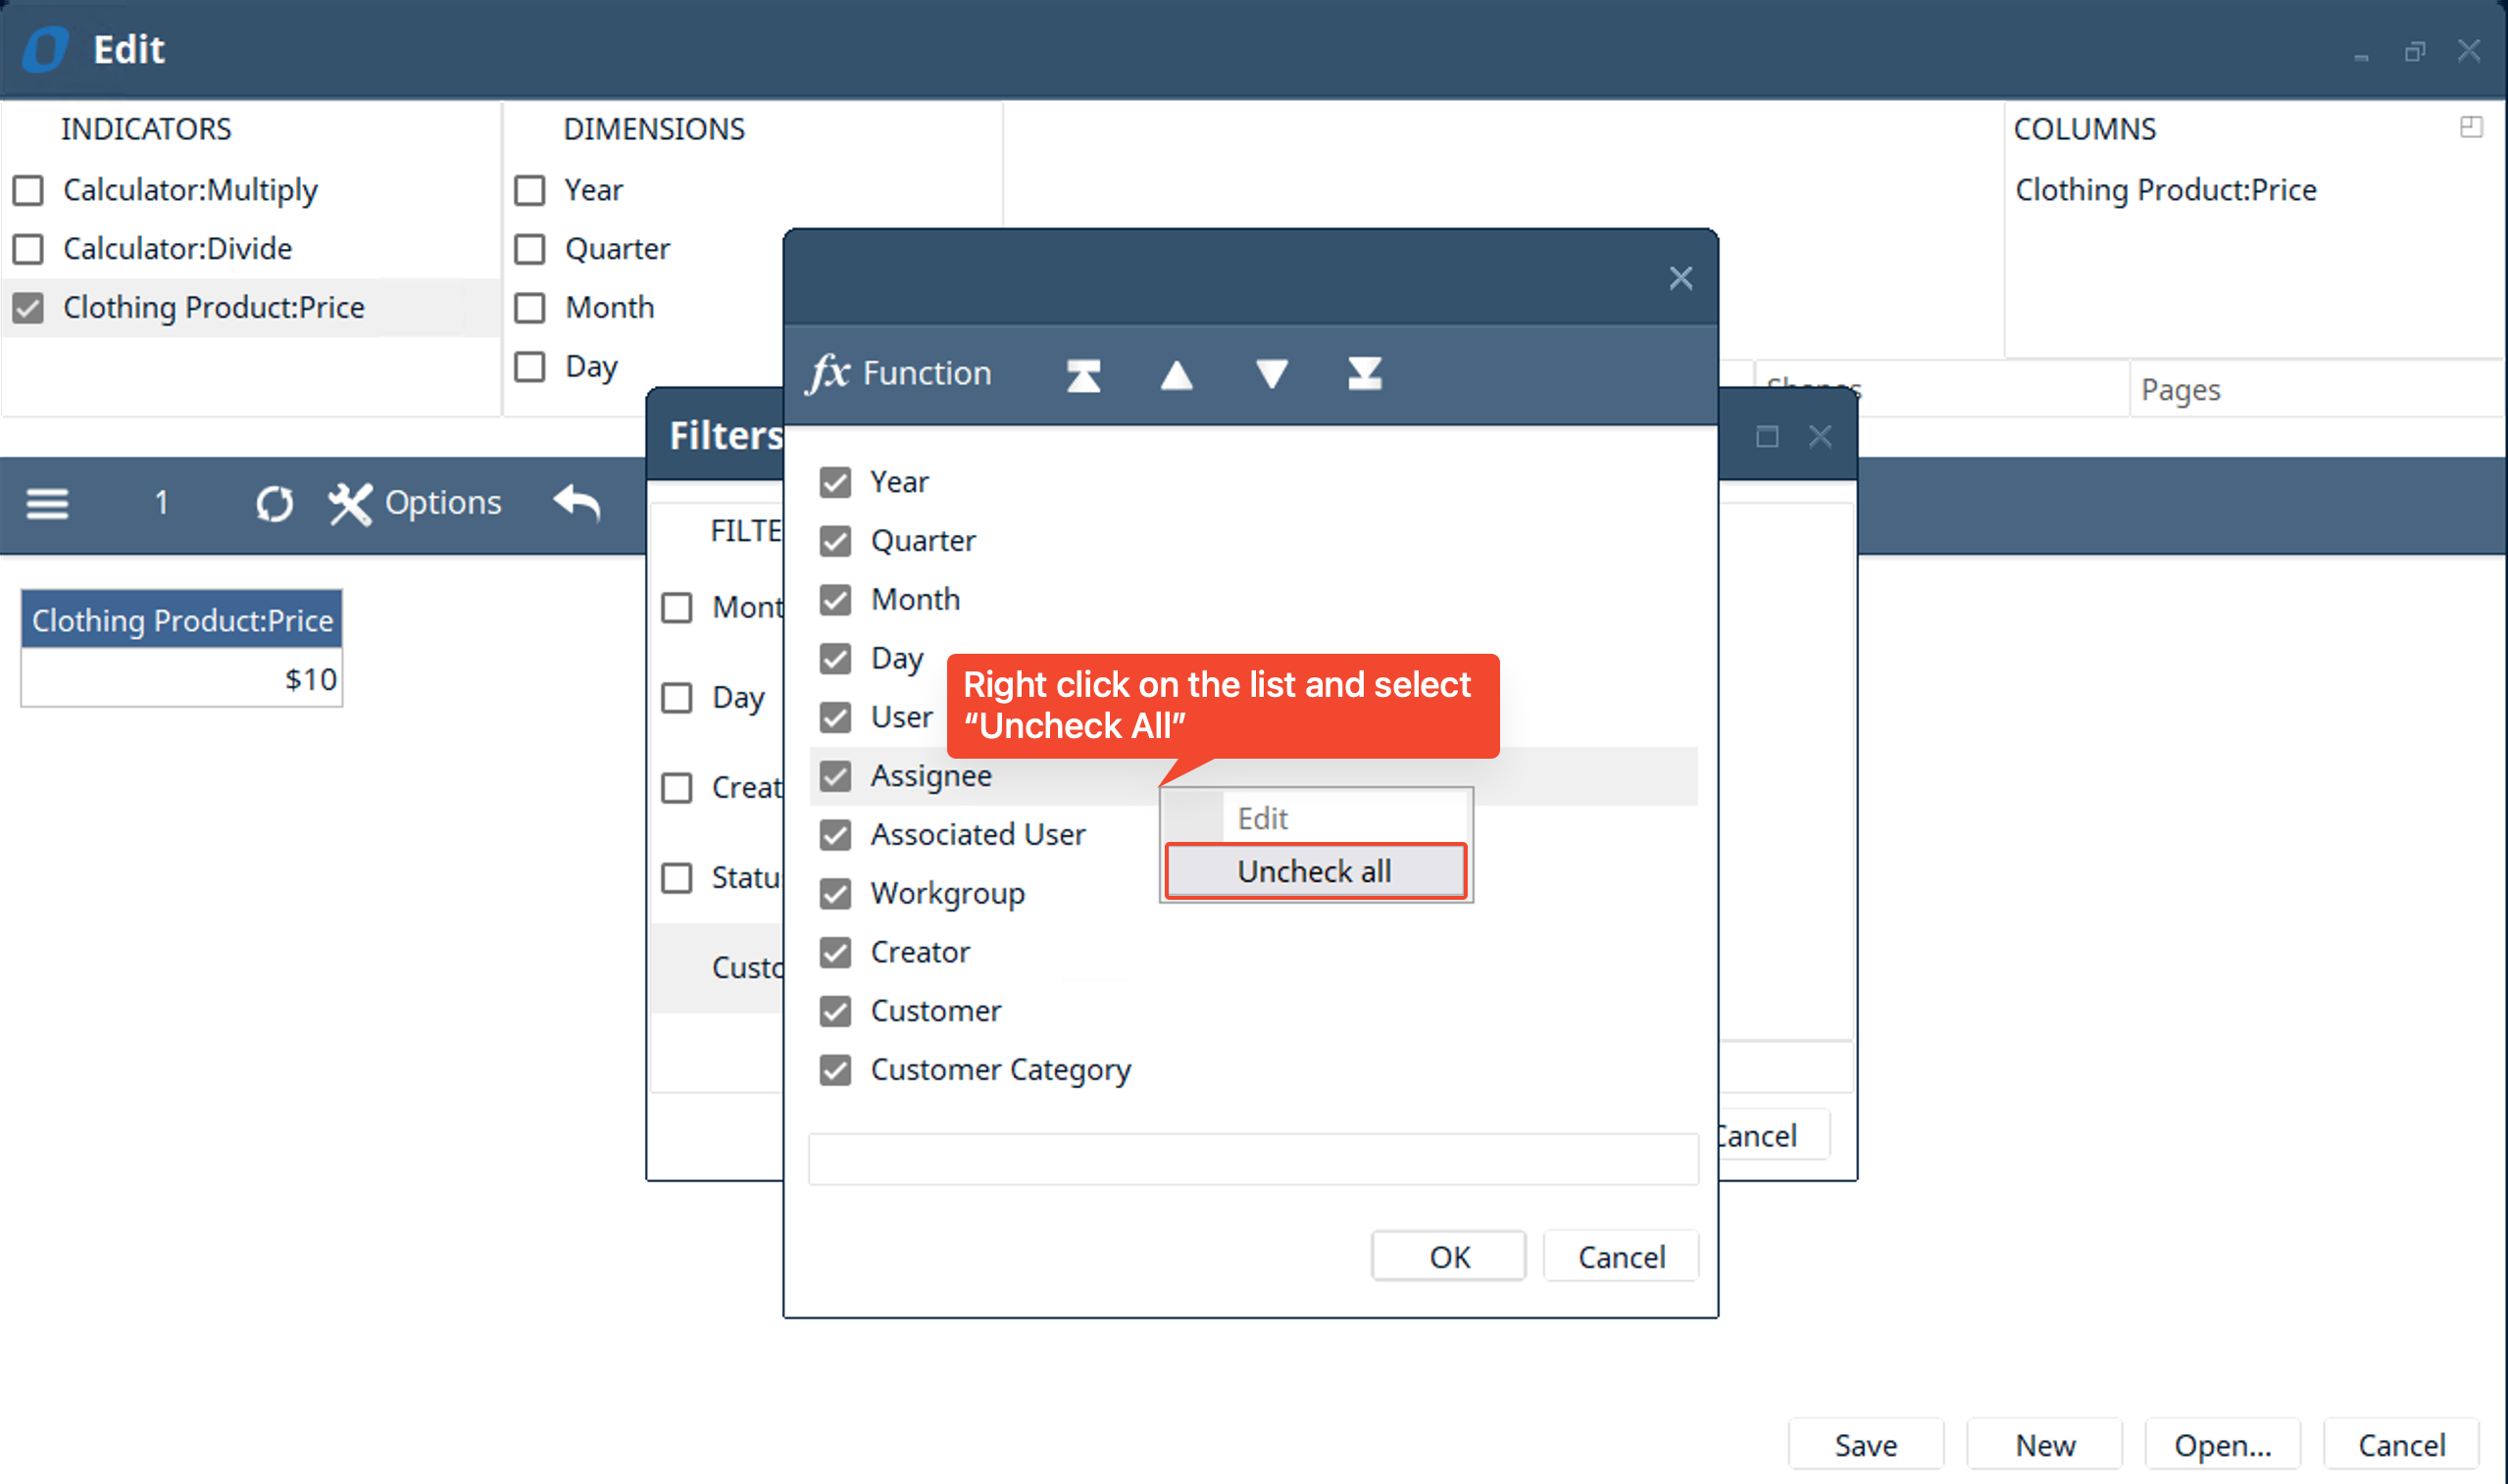
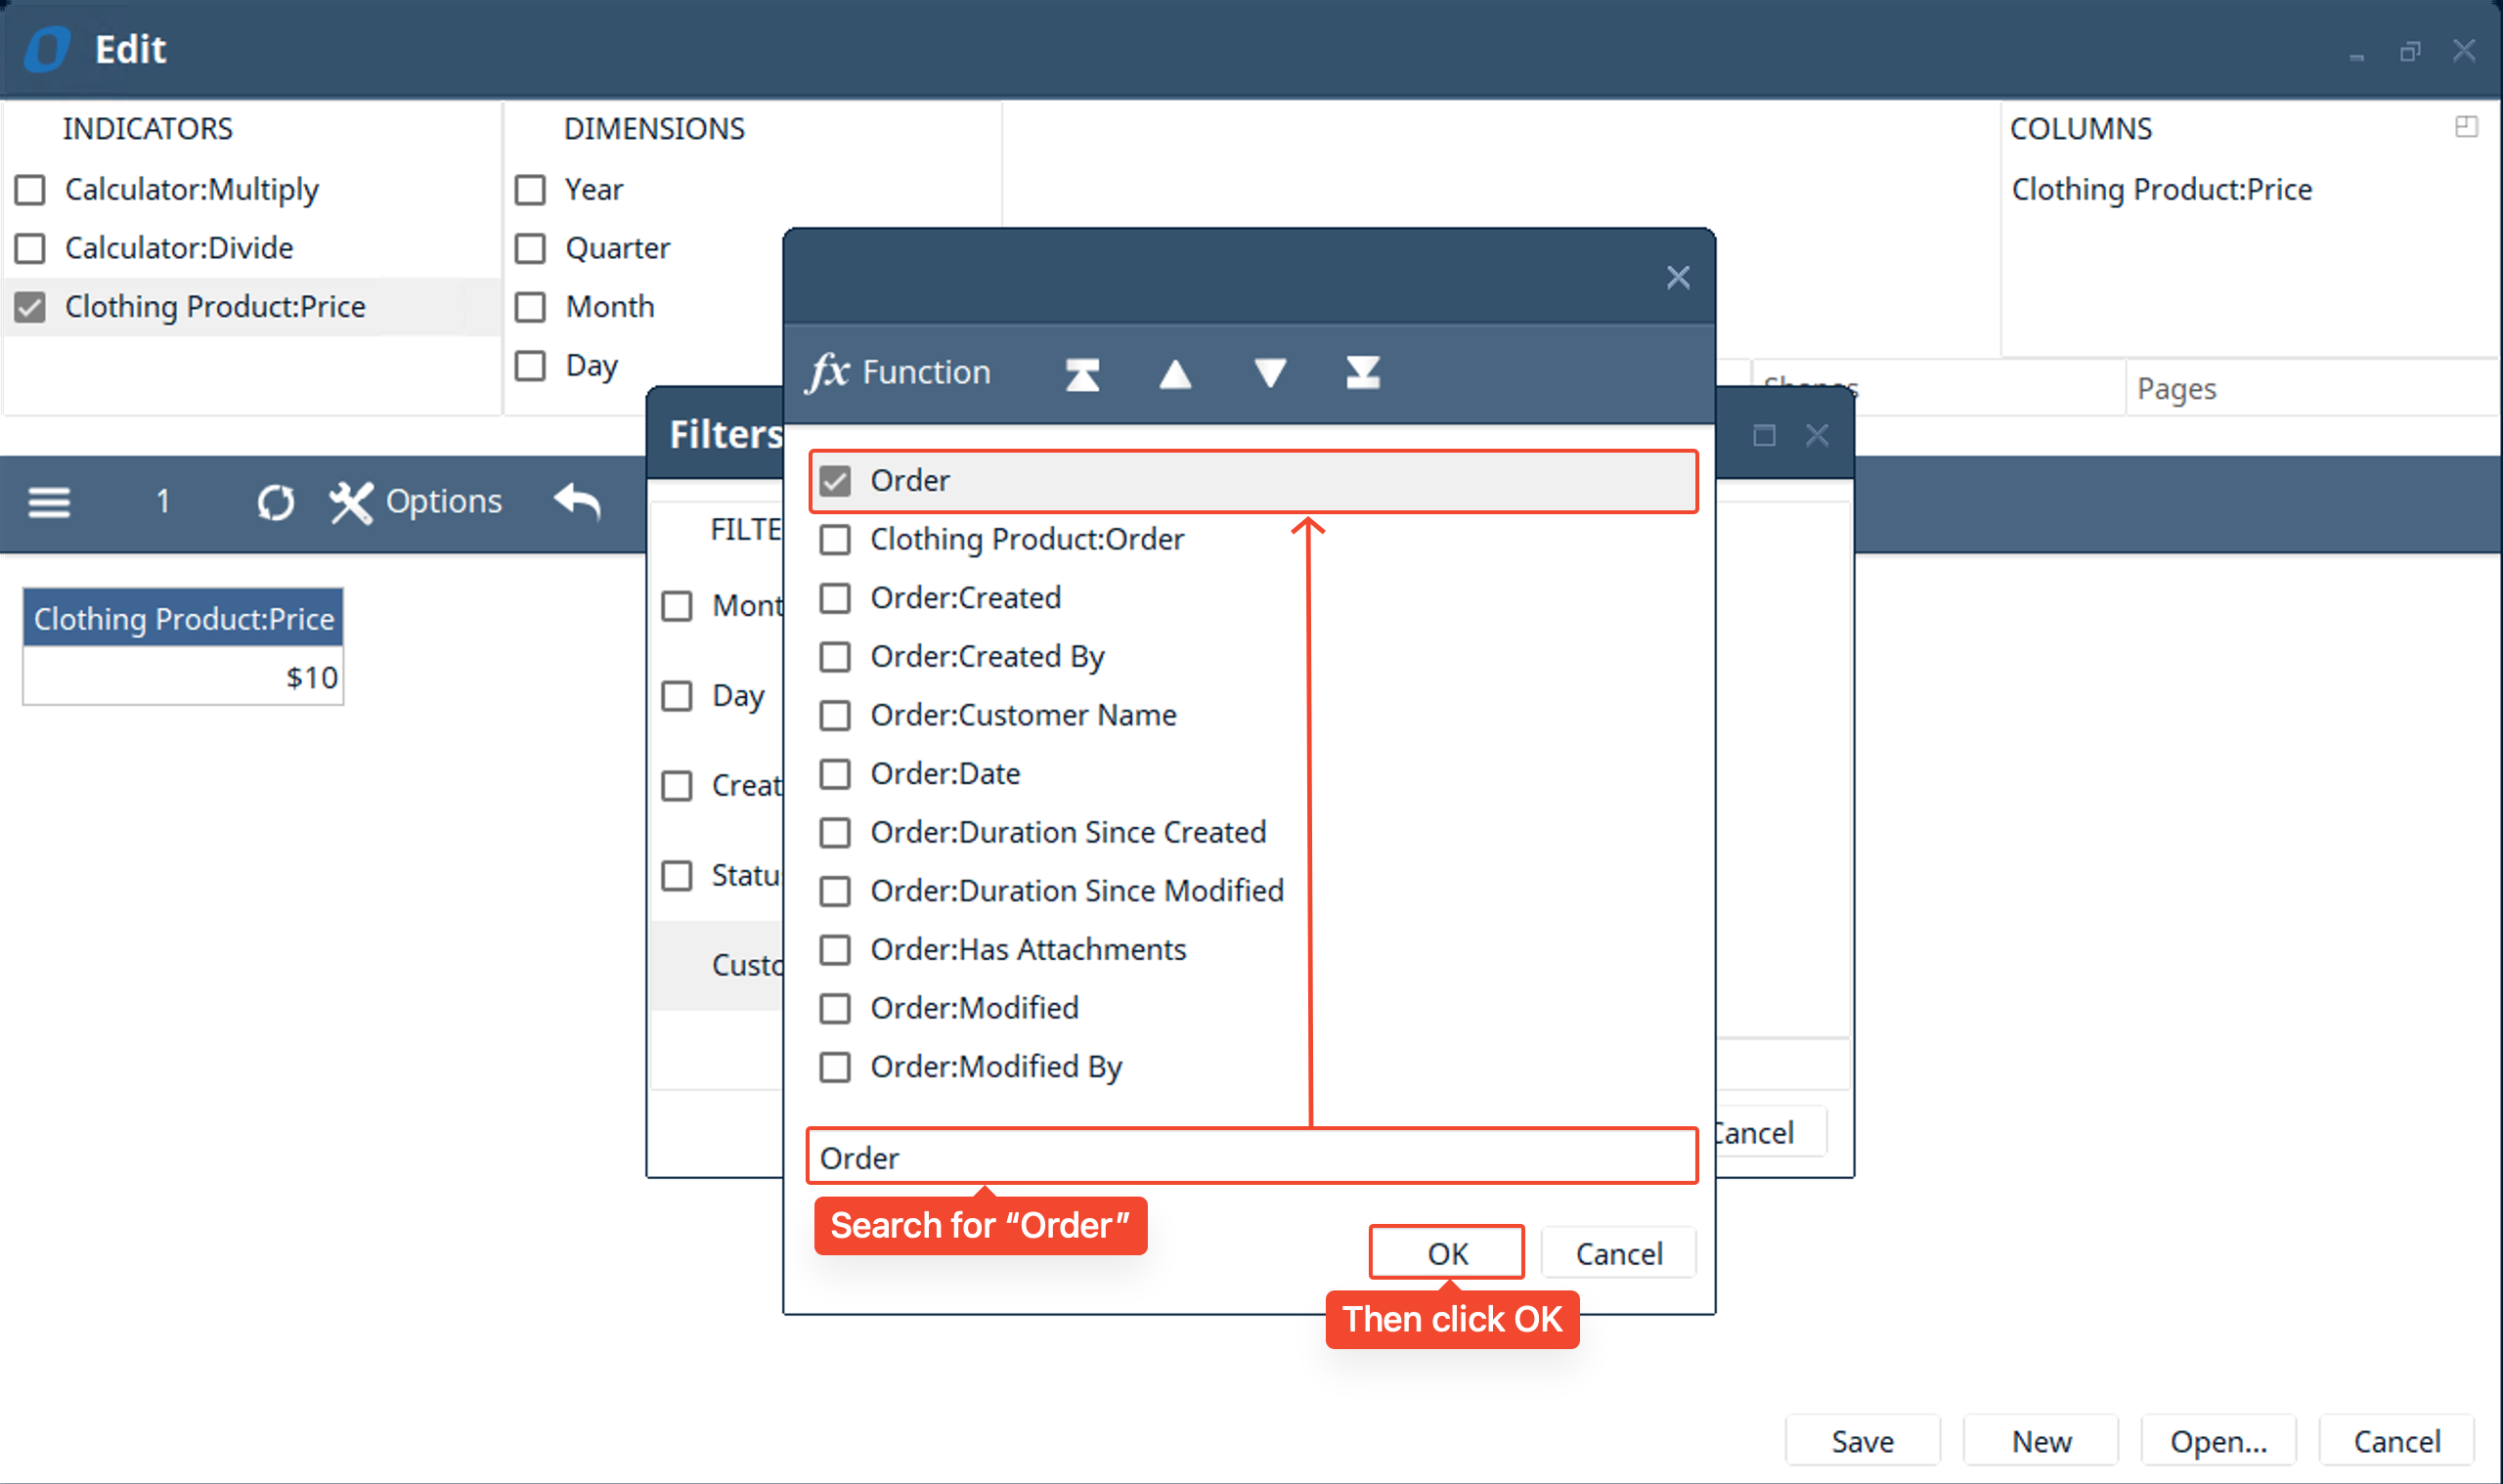
- Next search for “Order” and select the “Order” filter. Then click OK.
- Note: the reason we select the “Order” filter is because we are trying to calculate the total price of a specific “Order” based on the “Clothing Products” that are linked to it based on the linked field in the “Clothing Product” table to the “Order” table
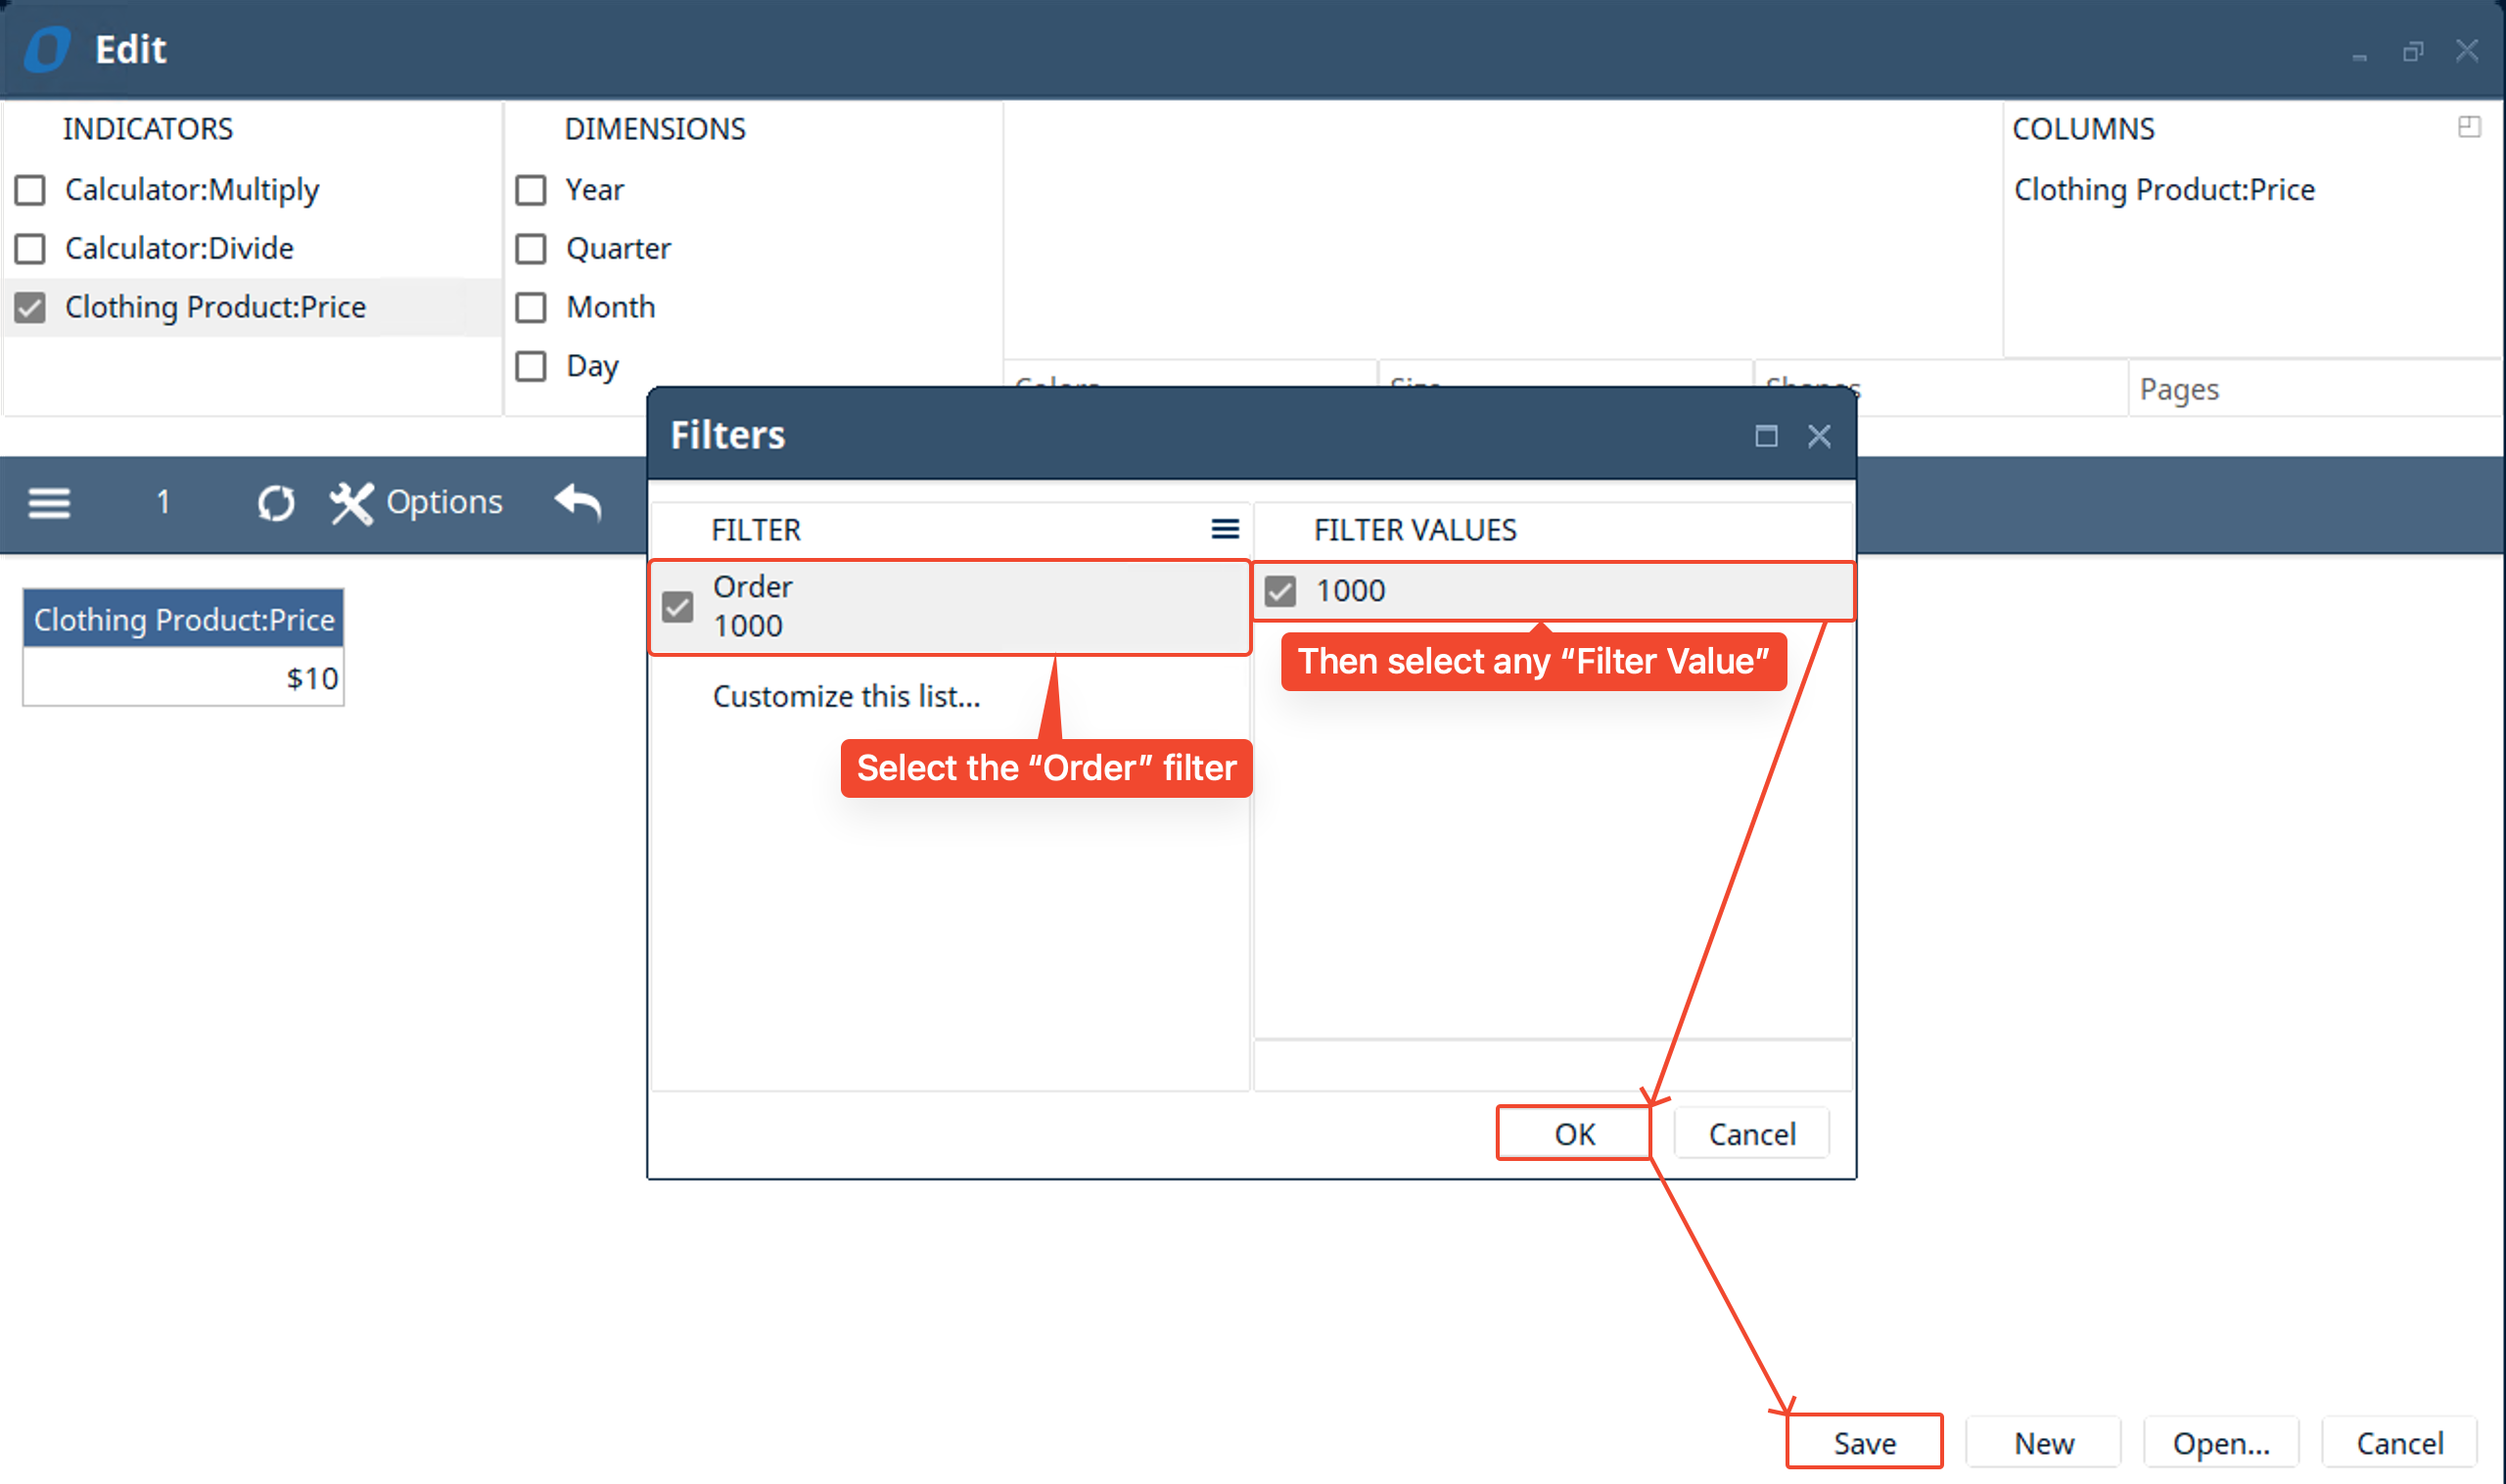
- Now select the “Order” filter and select any “Filter Value”. In this case I chose the 1000 Order. Then click OK and Save.
- This step is very important as it tells Digital-Clay to filter the clothing products prices by the order it is attached to.
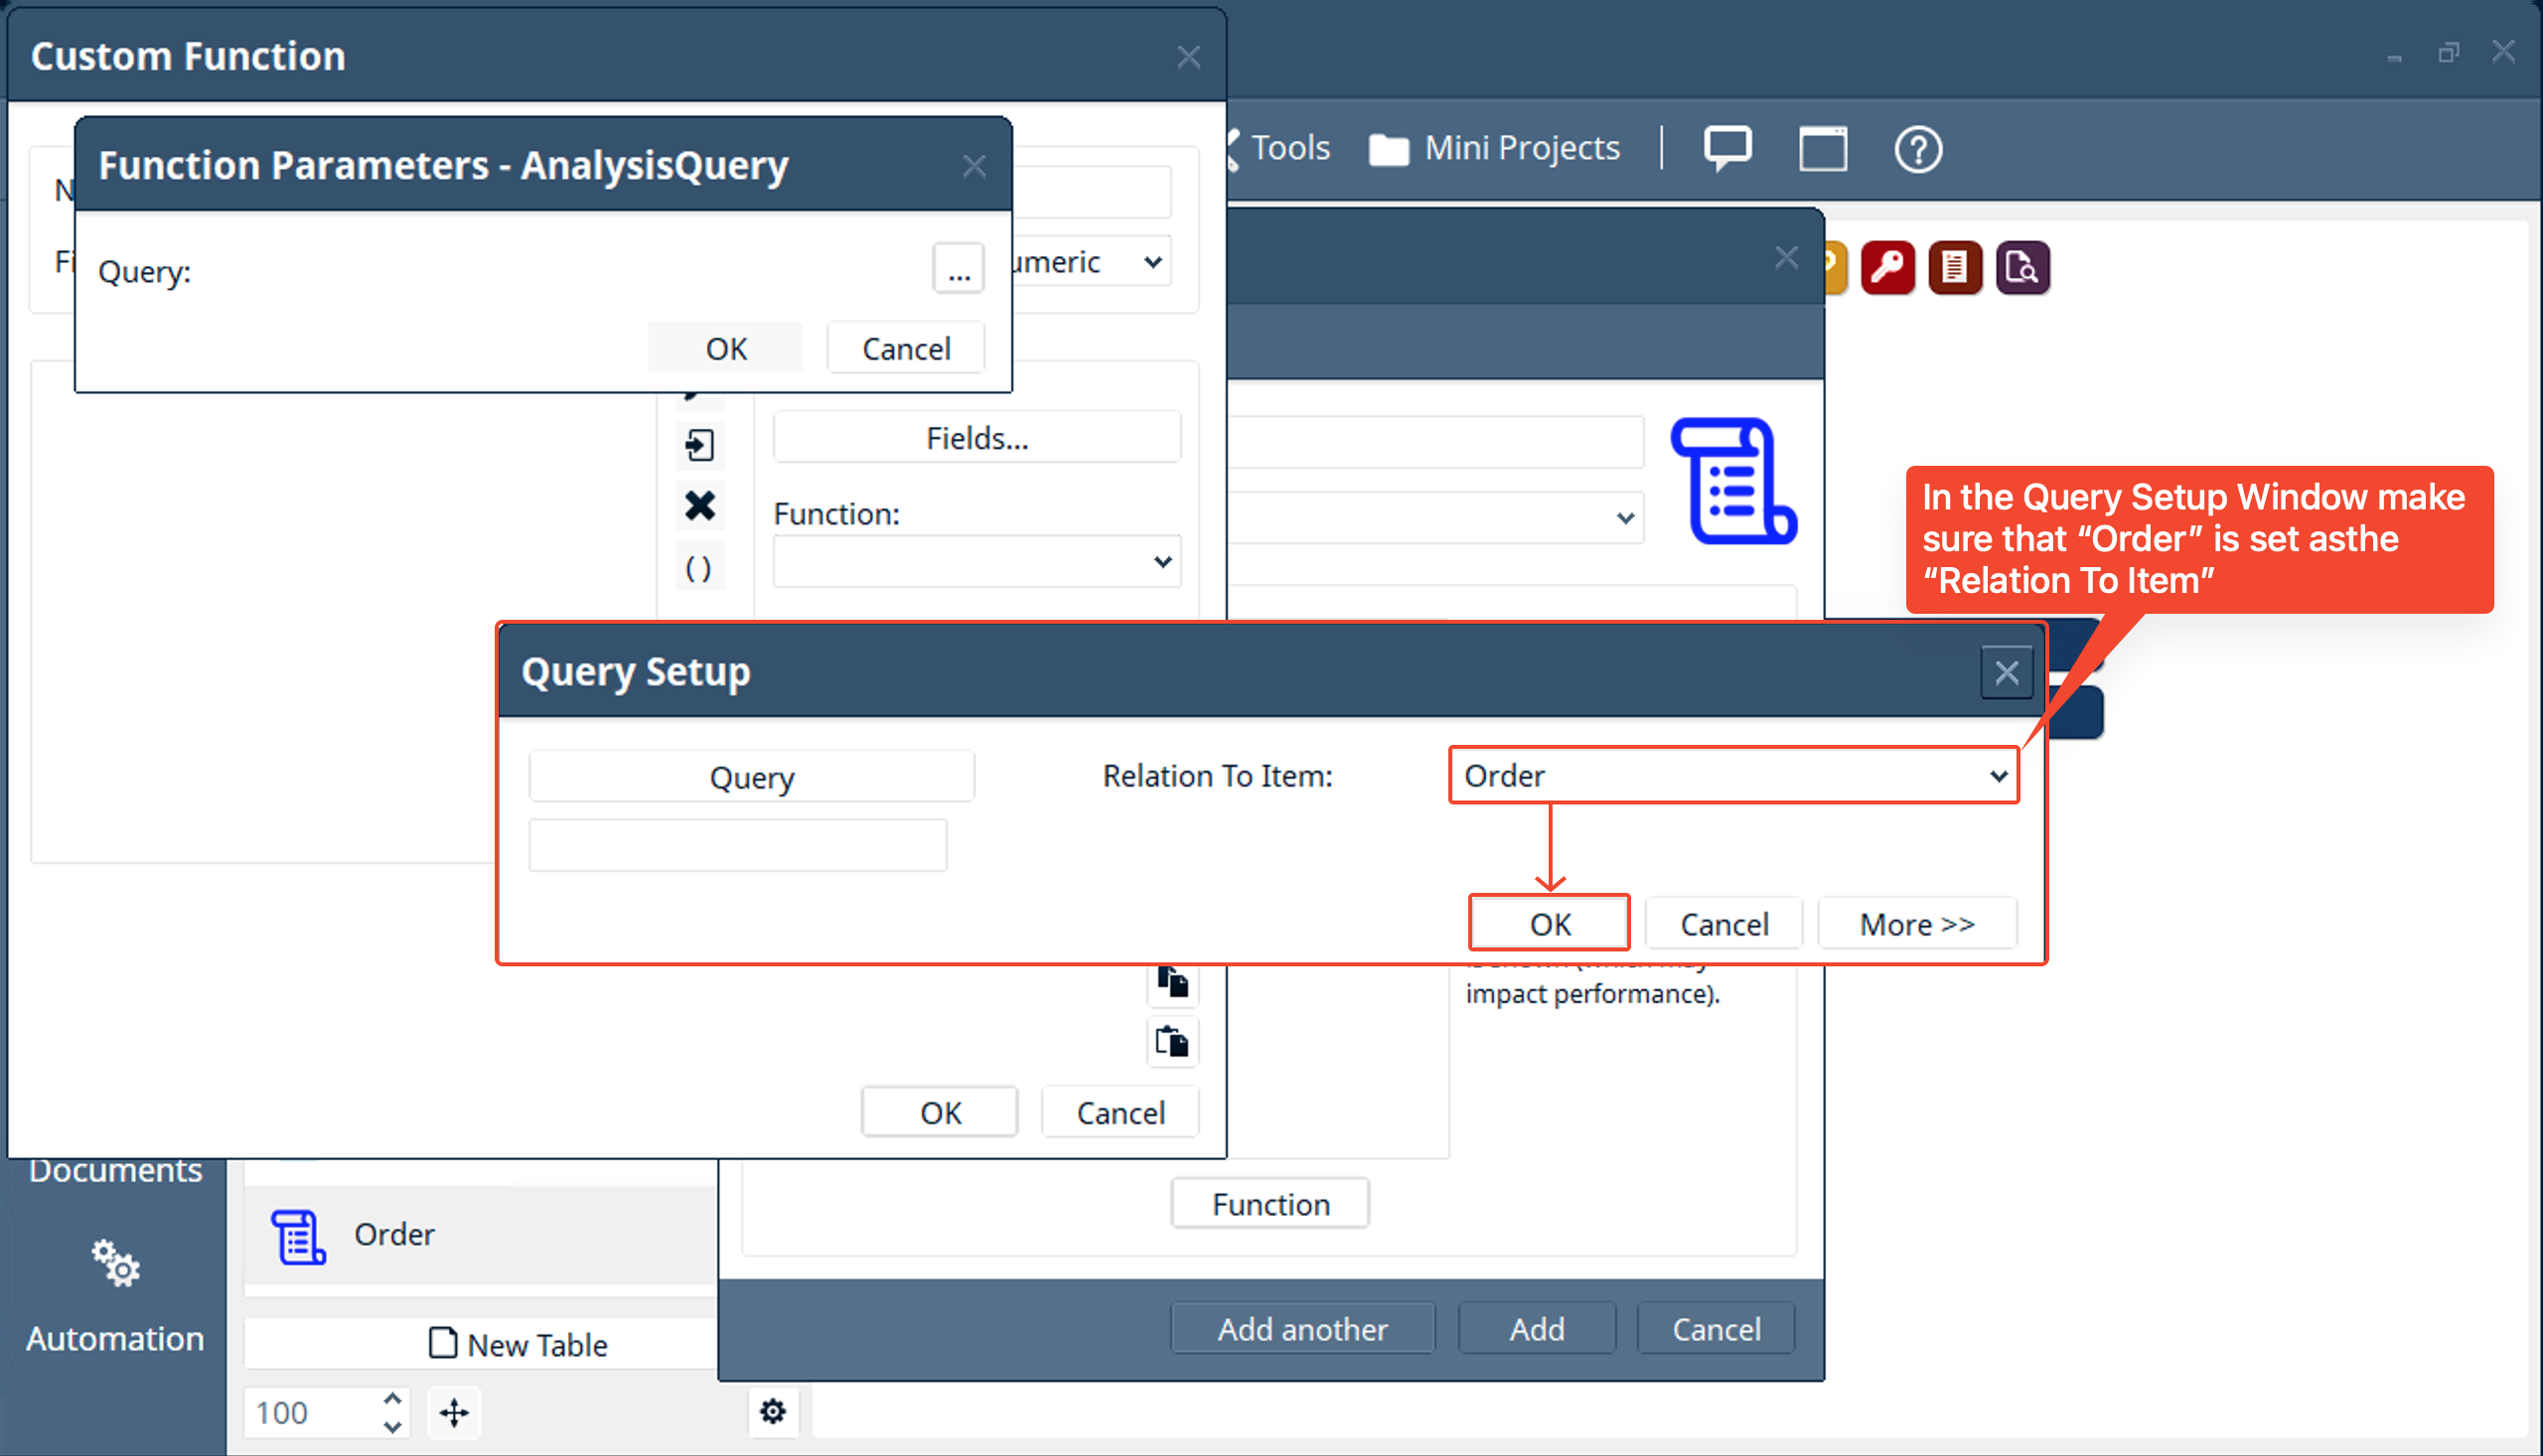
- In the “Query Setup” window make sure that “Order” is selected for “Relation To Item”, then click OK.
- This part is crucial to making sure the custom function only calculates the sum of the “Clothing Product:Price”. If the “Relation To Item” is not selected correctly then the custom function will output only the value for the filter you selected in the AnalysisQuery itself and not change dynamically based on the “Order” being viewed.
- Click OK on the “Function Parameters - AnalysisQuery” window.
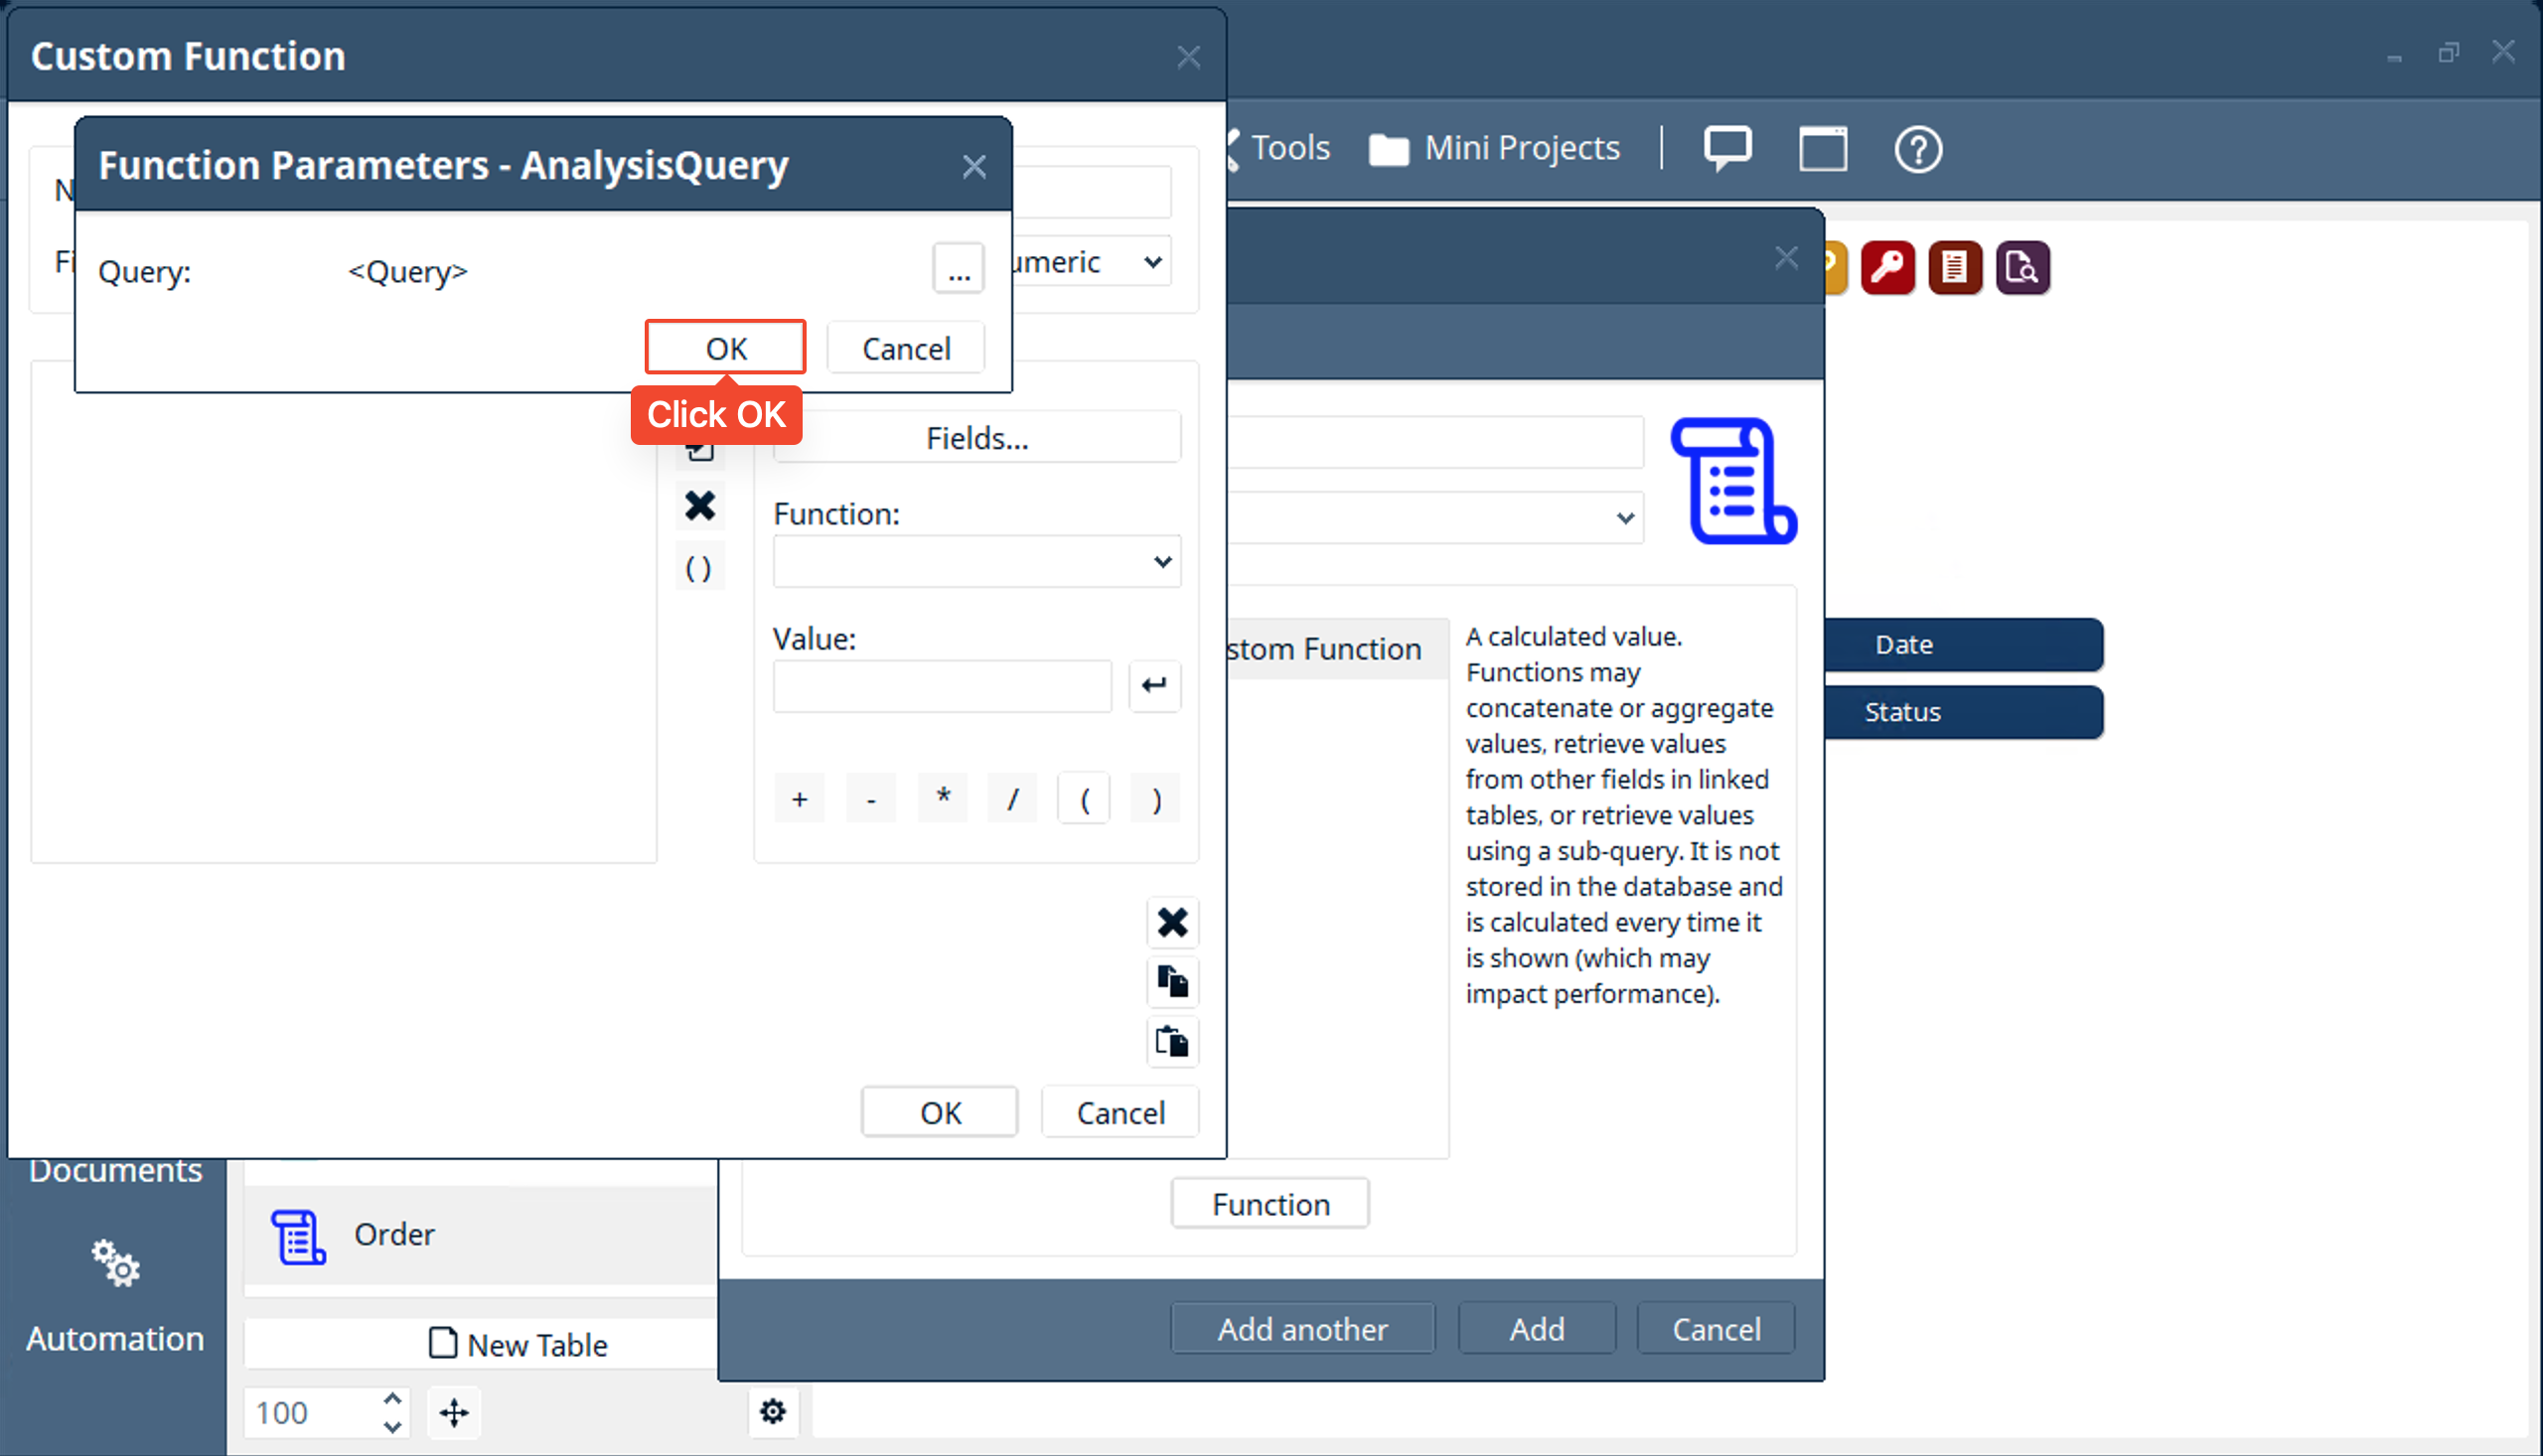
- Change the “Display Data Type” to “Currency” then click OK and then Add the field to the “Orders” table.
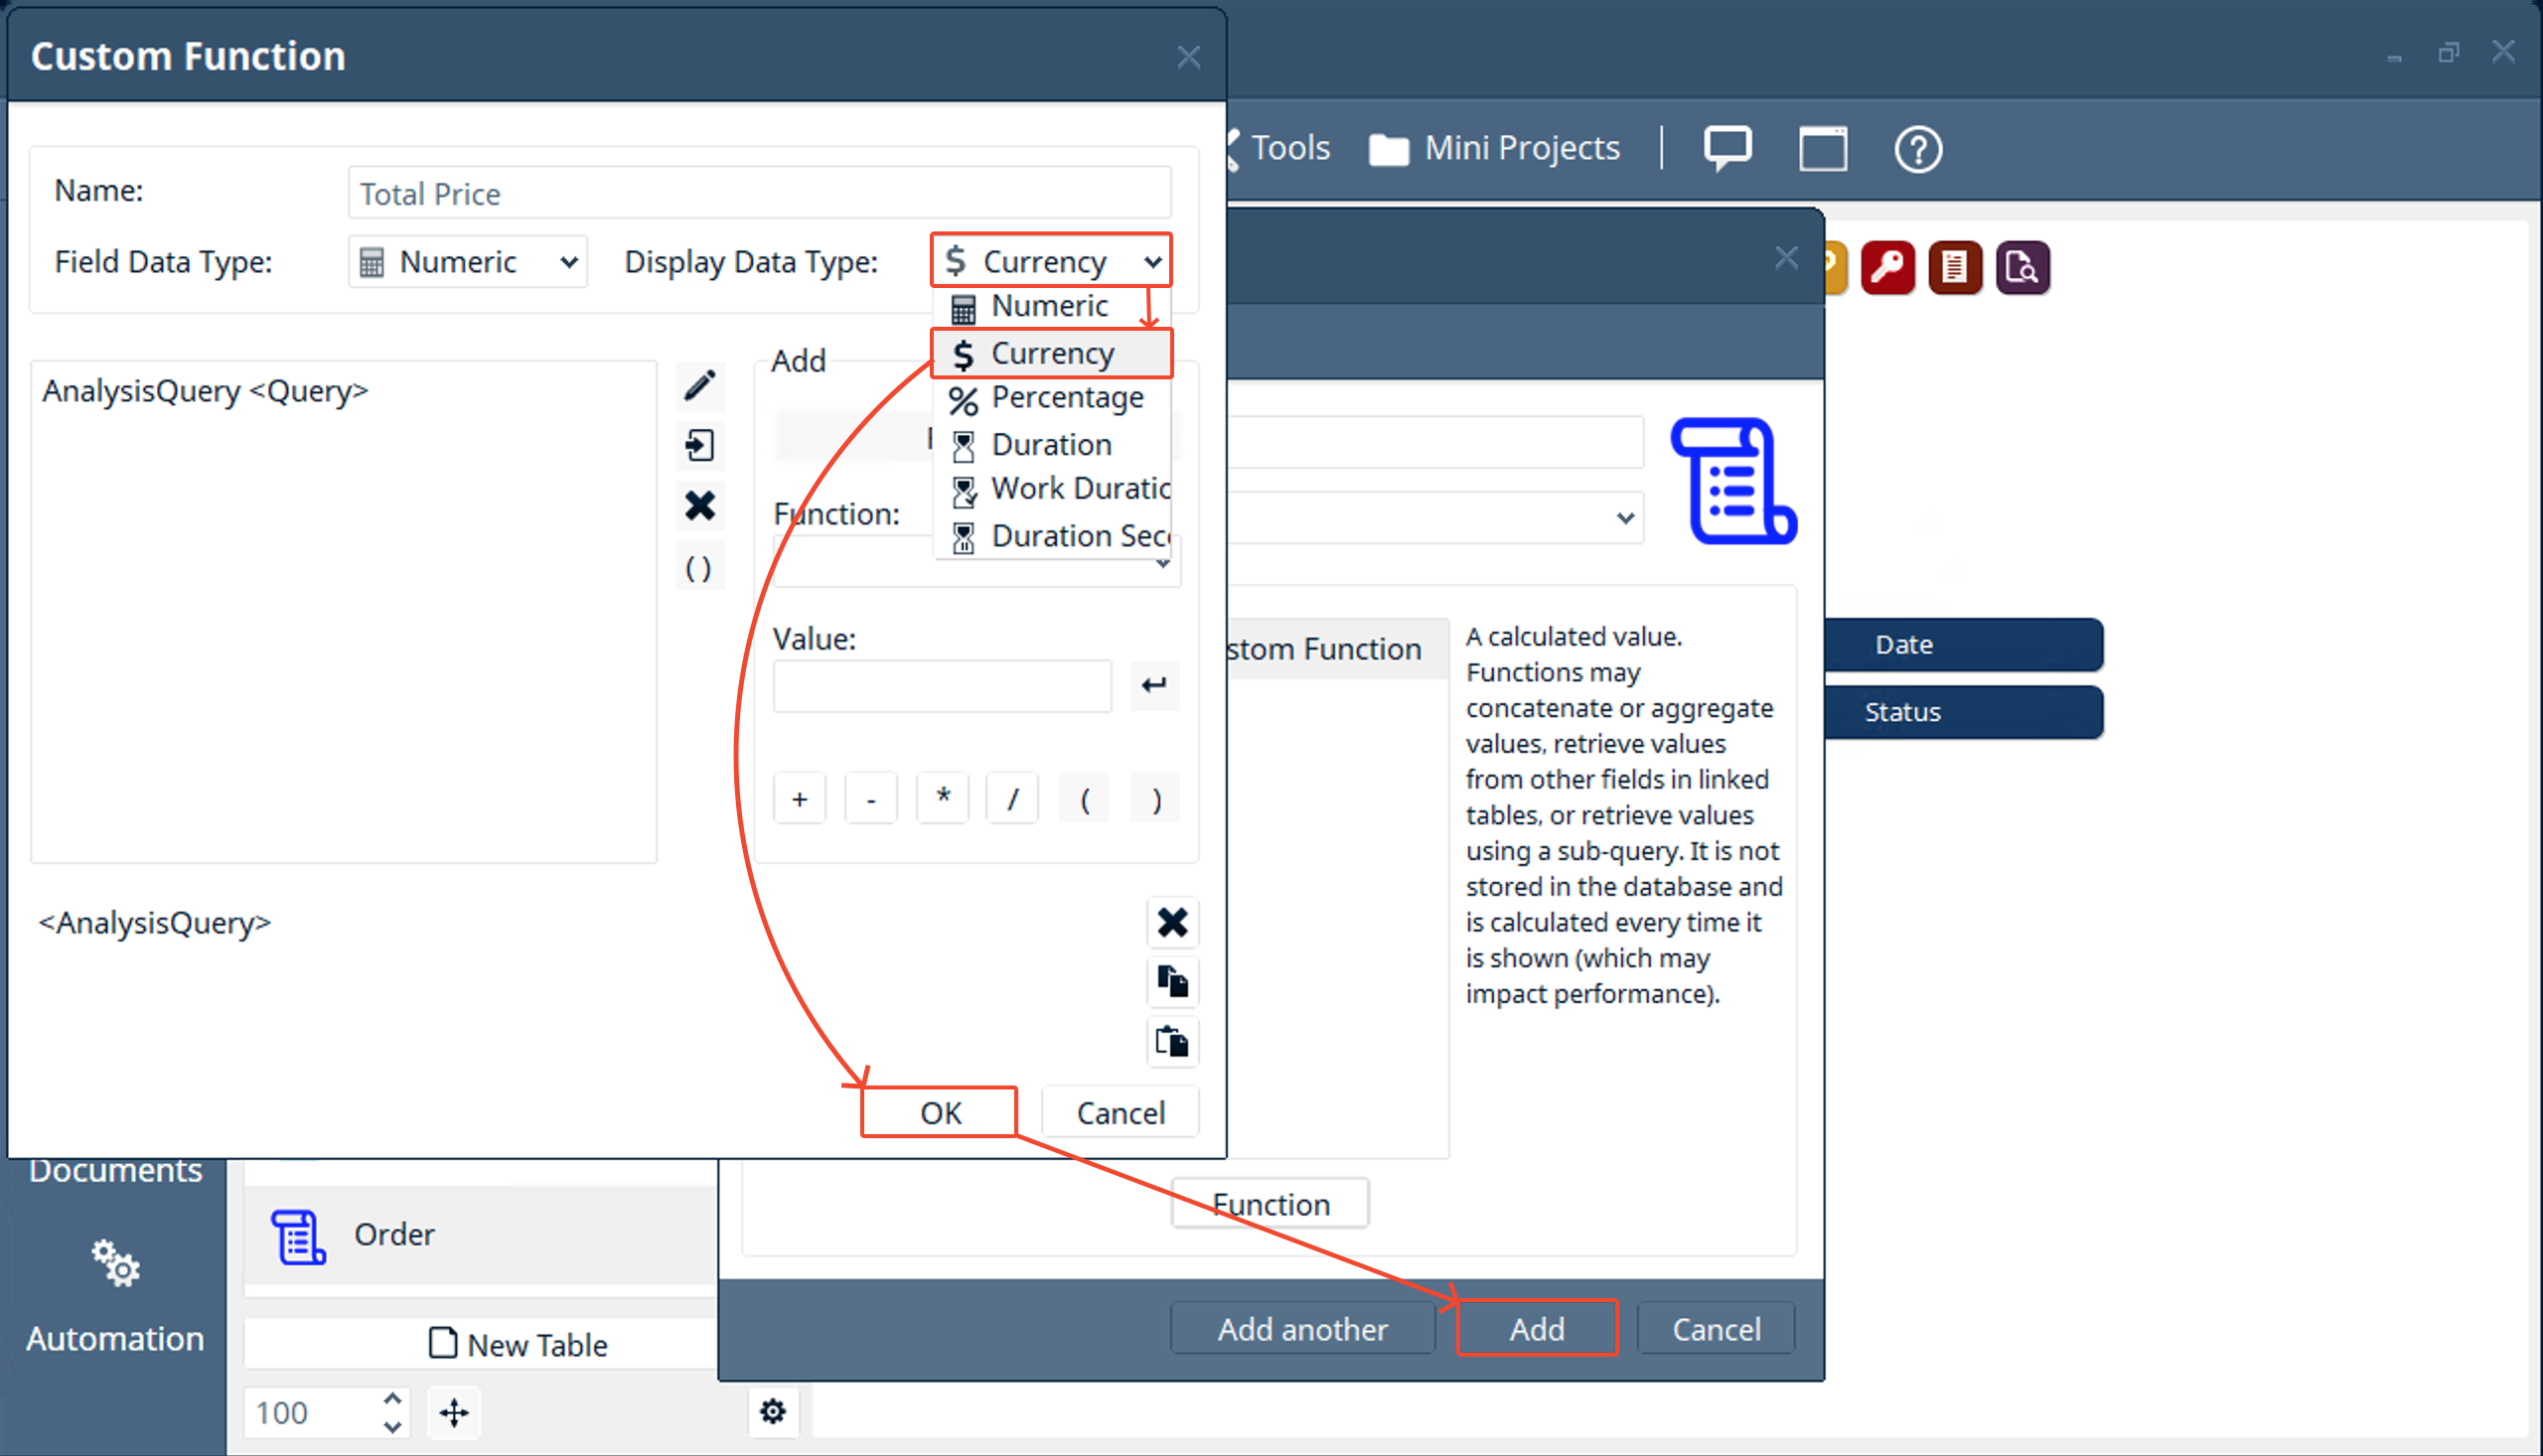
- Now if we go back to the “Browser View”. We will notice a column labeled “Total Price” that calculates the total price of the order. Let’s create a new order to see how this works.
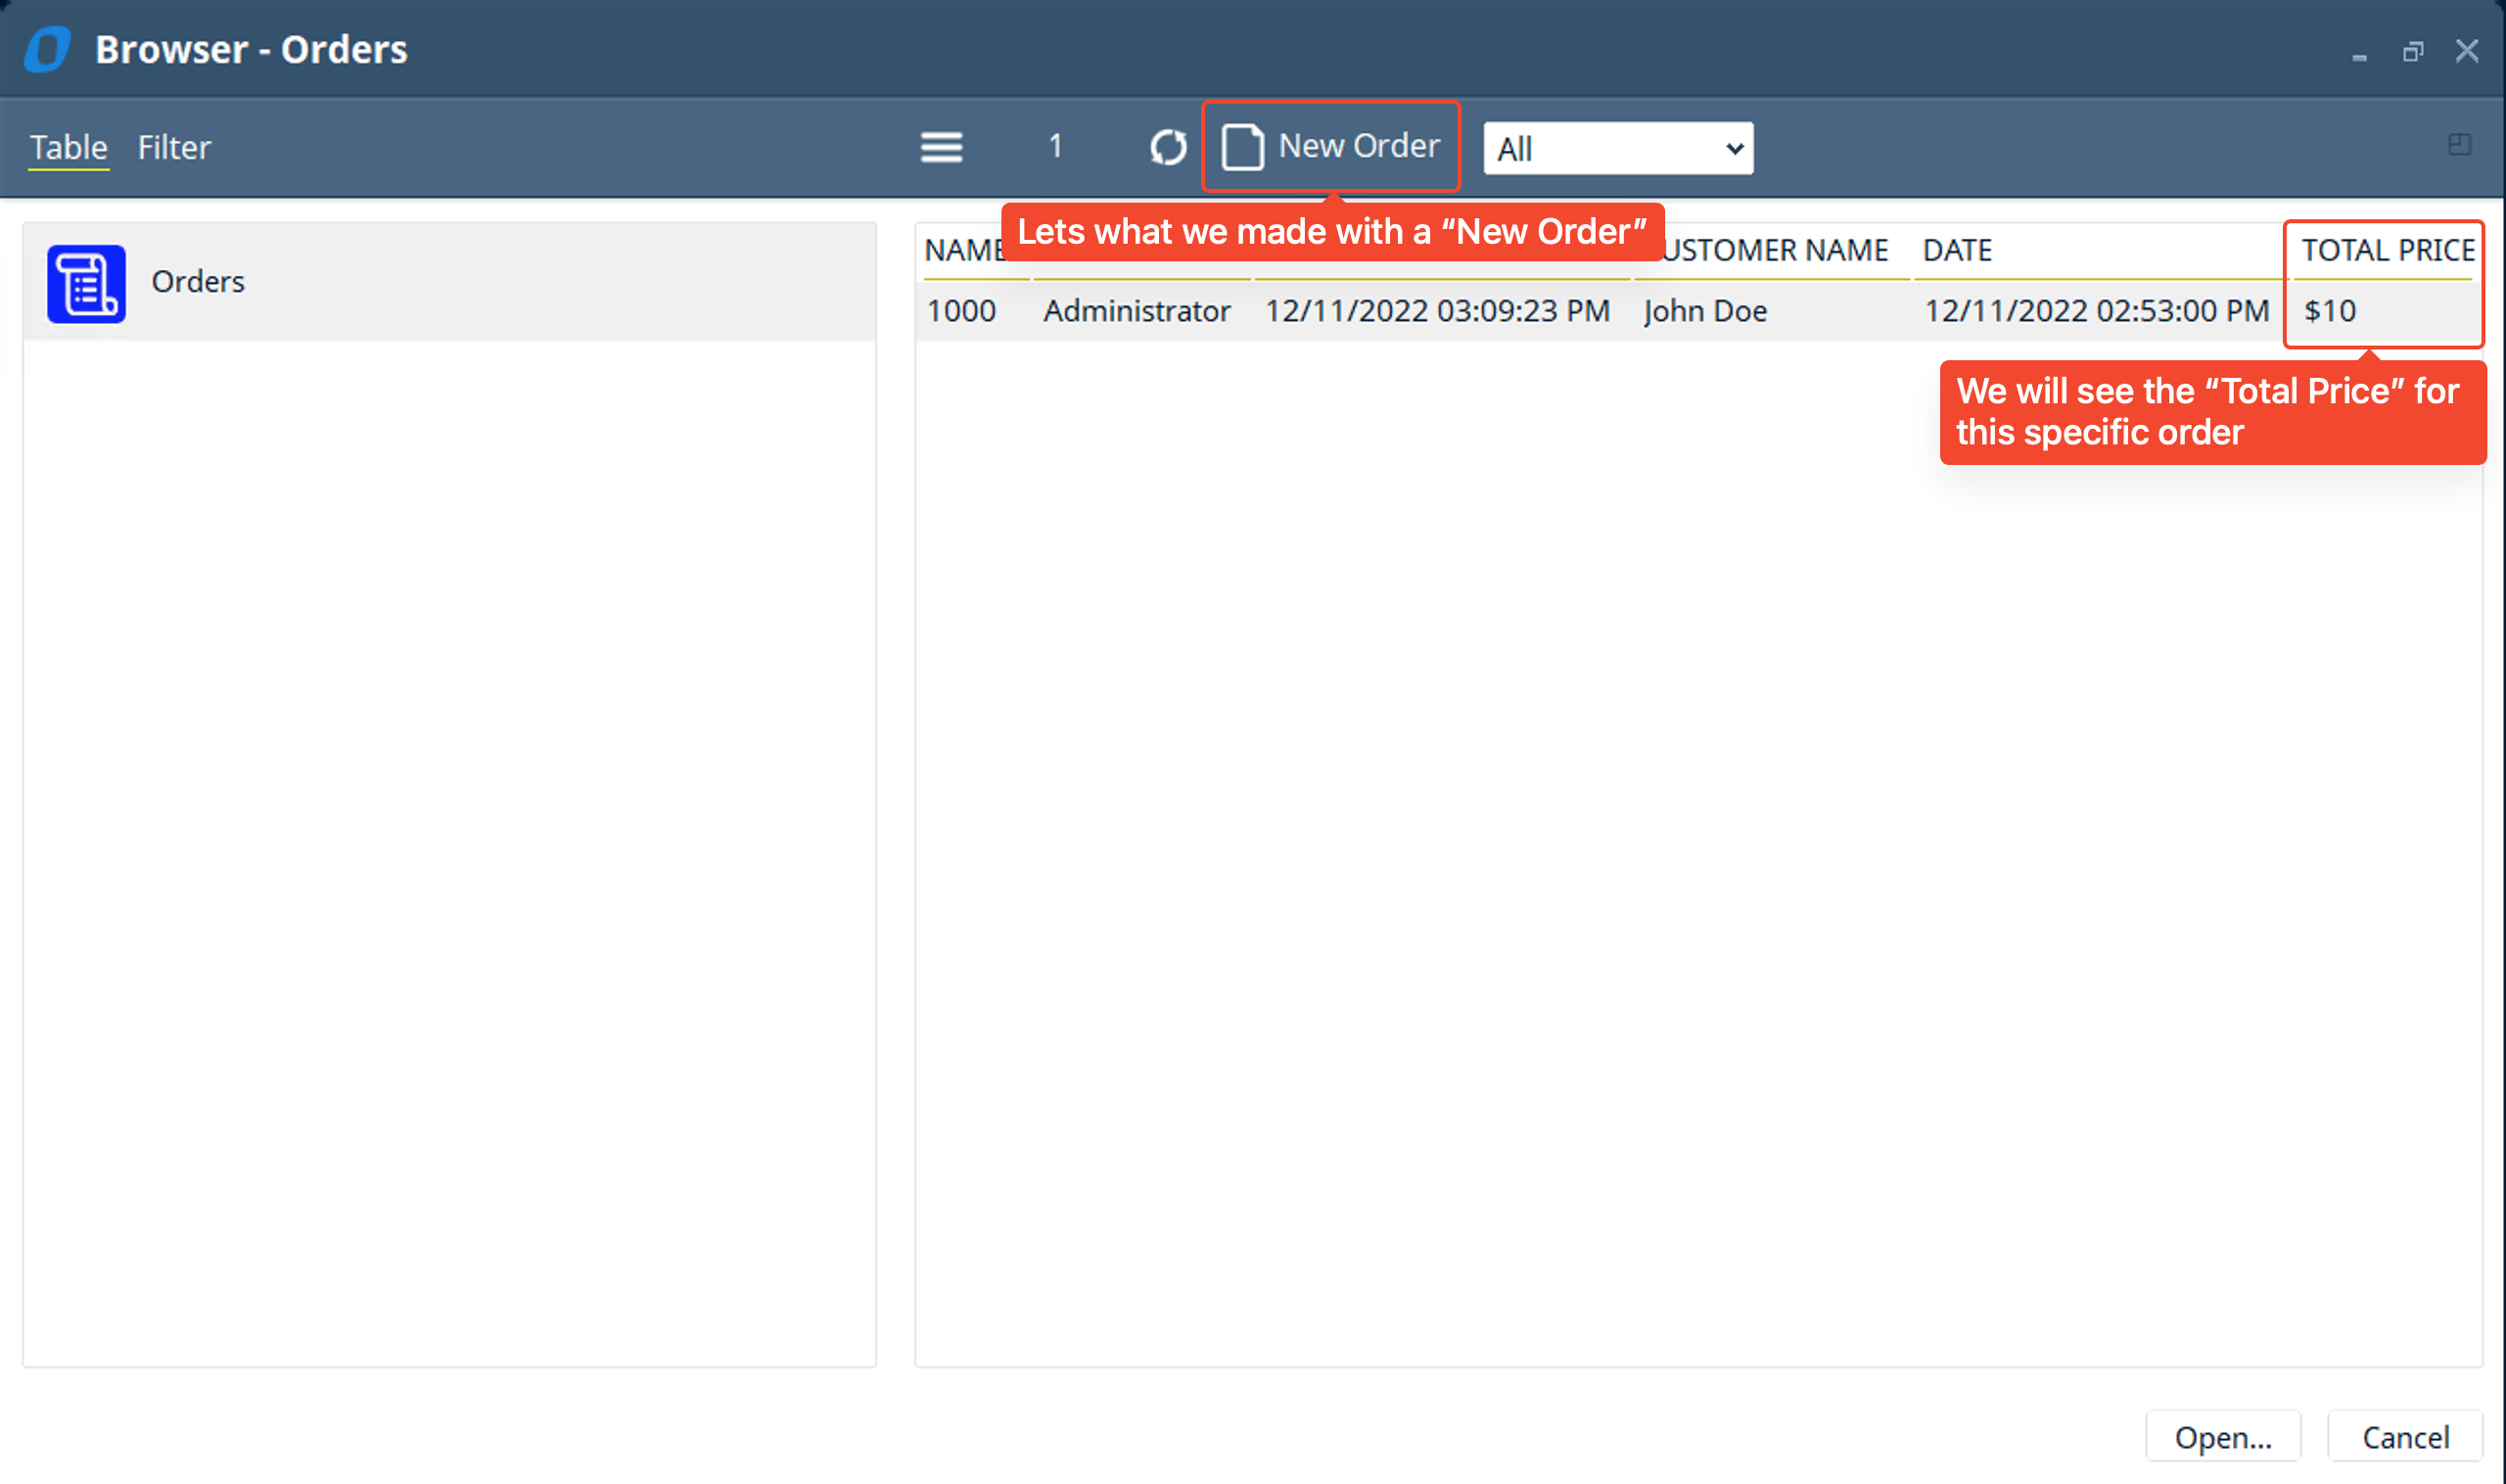
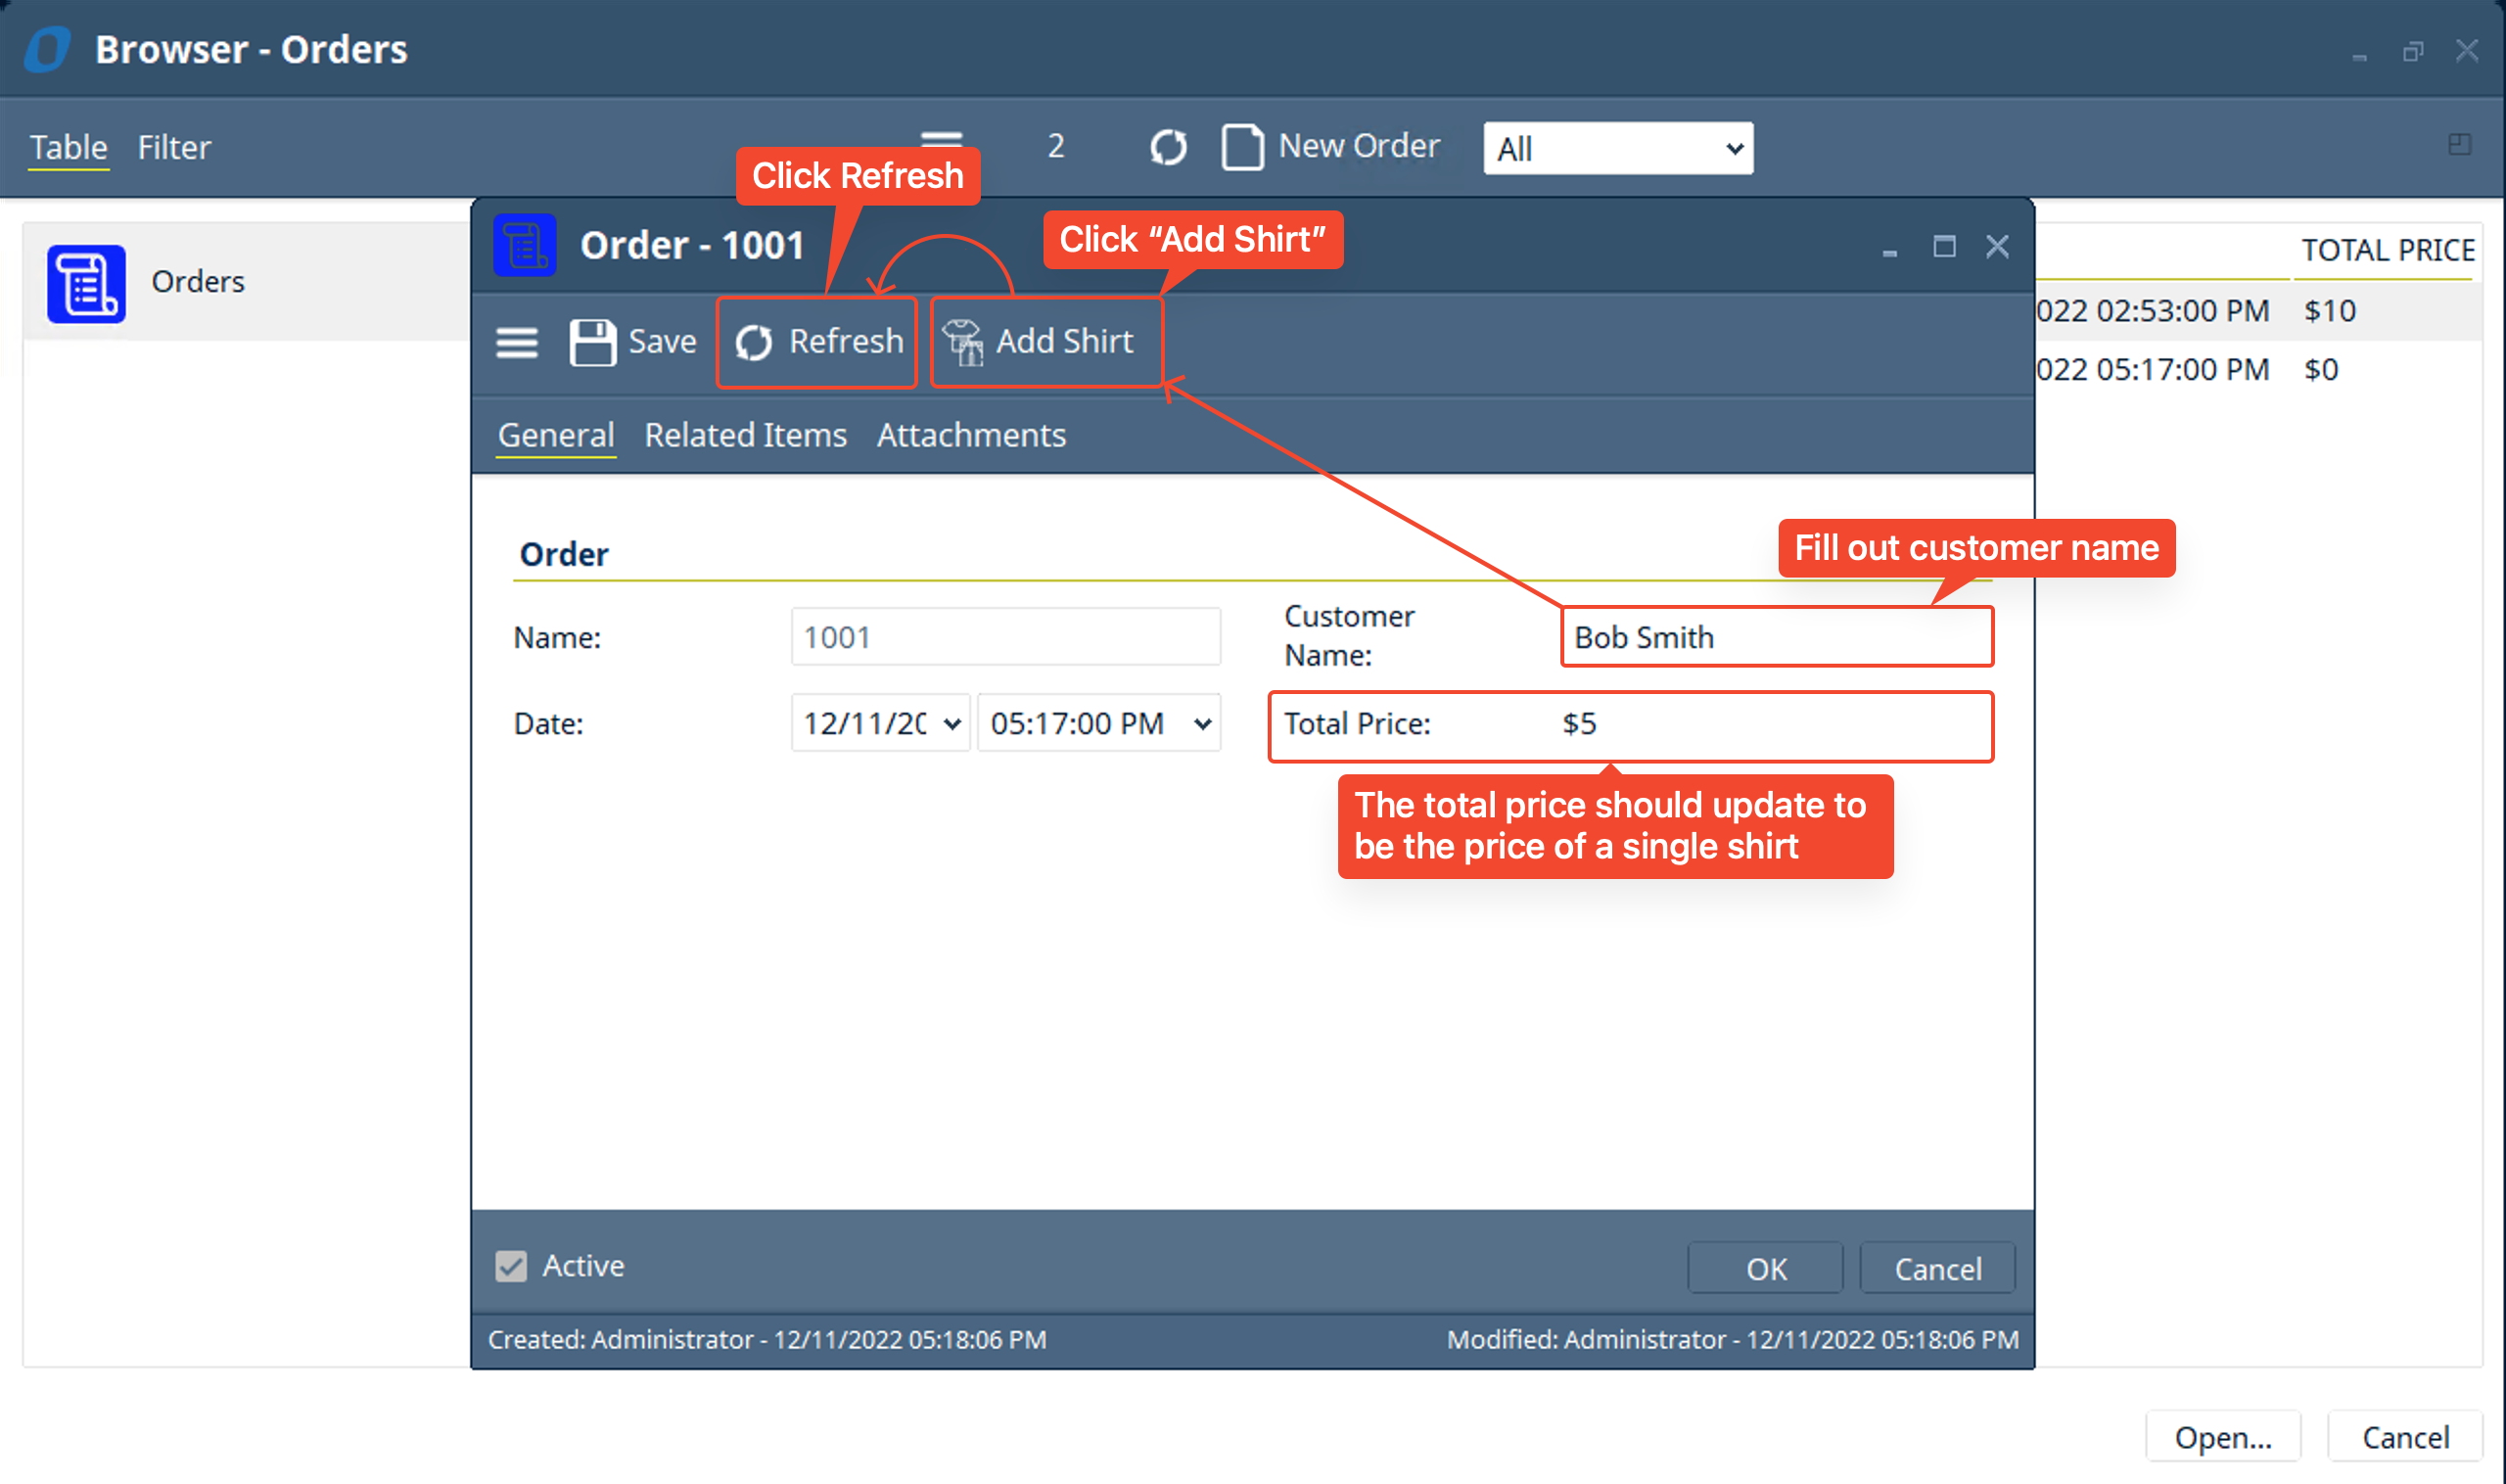
- Create a new order, fill out the customer name and add a shirt using the toolbar option “Add Shirt” then click refresh. Total Price field will update to the price of the current order being shown based on the “Clothing Products” linked to the “Order”.
- Congratulations! You just completed the “Order Management” mini project.
- What does it mean to have a custom link group in both directions?
Challenge
The challenge for this mini project is to create two more “Create User Actions” for other clothing product types
Hint