Hour Tracking
 Level | 2 |
|---|---|
| Core? | Core |
 Duration | 40 minutes |
| Duration (minutes) | 40 |
 Learn | Browser ToolDashboardsItem Event AutomationLayoutsList of ItemsToolbarUser Actions Tool |
 Prerequisite | Analysis ToolCreate User ActionCustom FunctionDesigner ToolField PropertiesFieldsFlat Table AnalysisLinked FieldsTables |
Intro
This tutorial will show you how to create a simple hour tracking database solution to keep track of the hours you work for different clients. You will be able to create a custom layout that you can use to view your hours worked for a certain client, or for the current or previous month. You will also learn how to add an analysis like a graph or statistic to your dashboard, and how to create a button to easily add items to a table from the dashboard. Finally, you will learn how to set the name field with an automation.
What you will learn
- HOW to create a new custom layout
- HOW to customize a layout
- HOW to show a list of items in a layout or dashboard
- WHAT IS THE DIFFERENCE between a layout and a dashboard
- HOW to use an add an analysis like a graph/statistic to a dashboard
- HOW to create a button and customize it to easily add items to a table from a dashboard
- WHAT is the custom link tool
- HOW to use the custom link tool to make a custom link through multiple linked fields
- HOW to automatically set the name field with an automation
FAQs
- What is a “Before Add/Change” automation event?
- A “Before Add/Change” automation event is a type of automation event that occurs after you click the “Save” button but before the record is actually saved. This type of event is used to set the name field before the record is saved when added or changed.
- What do I need to do to create an hour tracking database?
- To create an hour tracking database in Digital-Clay, you will need to create a few tables: a table that will hold the hours worked, a table that will hold the client information, and a table that will hold the client projects. These tables will be linked together with linked fields and a custom dashboard will be created to easily view and add hours to the hour tracker solution.
- How do I create a table to hold the clients’ information?
- To create a table for clients’ information, first click on the “Tables” tab in the Digital-Clay menu, then select the “Create a New Table” option. Enter the table name, then select the fields you would like to add, such as Phone Number, Email Address, and Notes.
- How do I add fields to the table?
- To add fields to the table, go to the “Table View” and click on the “Add a Field” button. Enter the field name, then select the field type and click “Create”.
- How do I set up an automation to automatically fill out the “Name” field?
- To set up an automation to automatically fill out the “Name” field, go to the “Automation View” in the “Hour” table and click on the “New…” button under “Item Event”. In the “New Automation Event Handler” window, select the “Before Add/Change” event, then click OK. In the “General” tab, set the “Name” and “Description” fields and make sure you check “Always run on new values”.
- How do I set the “Date” field in the “Hours” table to the current date?
- To set the “Date” field in the “Hours” table to the current date, click on the “Date” field and set the default field properties to be “<Now>” so that by default a new “Hours” record has the current date.
- What is the “Change Field Requirements” button used for?
- The “Change Field Requirements” button is used to add rules to an automation. When you click on this button, you can select the fields you want to check to see if they were changed, then click OK. This will link the automation to a change in any of the selected fields.
- What does the “Set Field” action do?
- The “Set Field” action is used to set the value of a field in a record. This action can be used to set the value of a field to a specific value, or to a value from another field in the same record.
- What is the difference between a layout and a dashboard?
- A layout is a page that displays a single item from a table, such as a client or project. A dashboard is a page that displays multiple items from a table, such as a list of clients or projects. Dashboards can also include visualizations such as graphs and statistics.
- How do I create a custom link through multiple linked fields?
- To create a custom link through multiple linked fields, use the “Custom Link Tool” located in the “Table View”. This tool allows you to create a custom link between two or more linked fields in a table.
Instructions
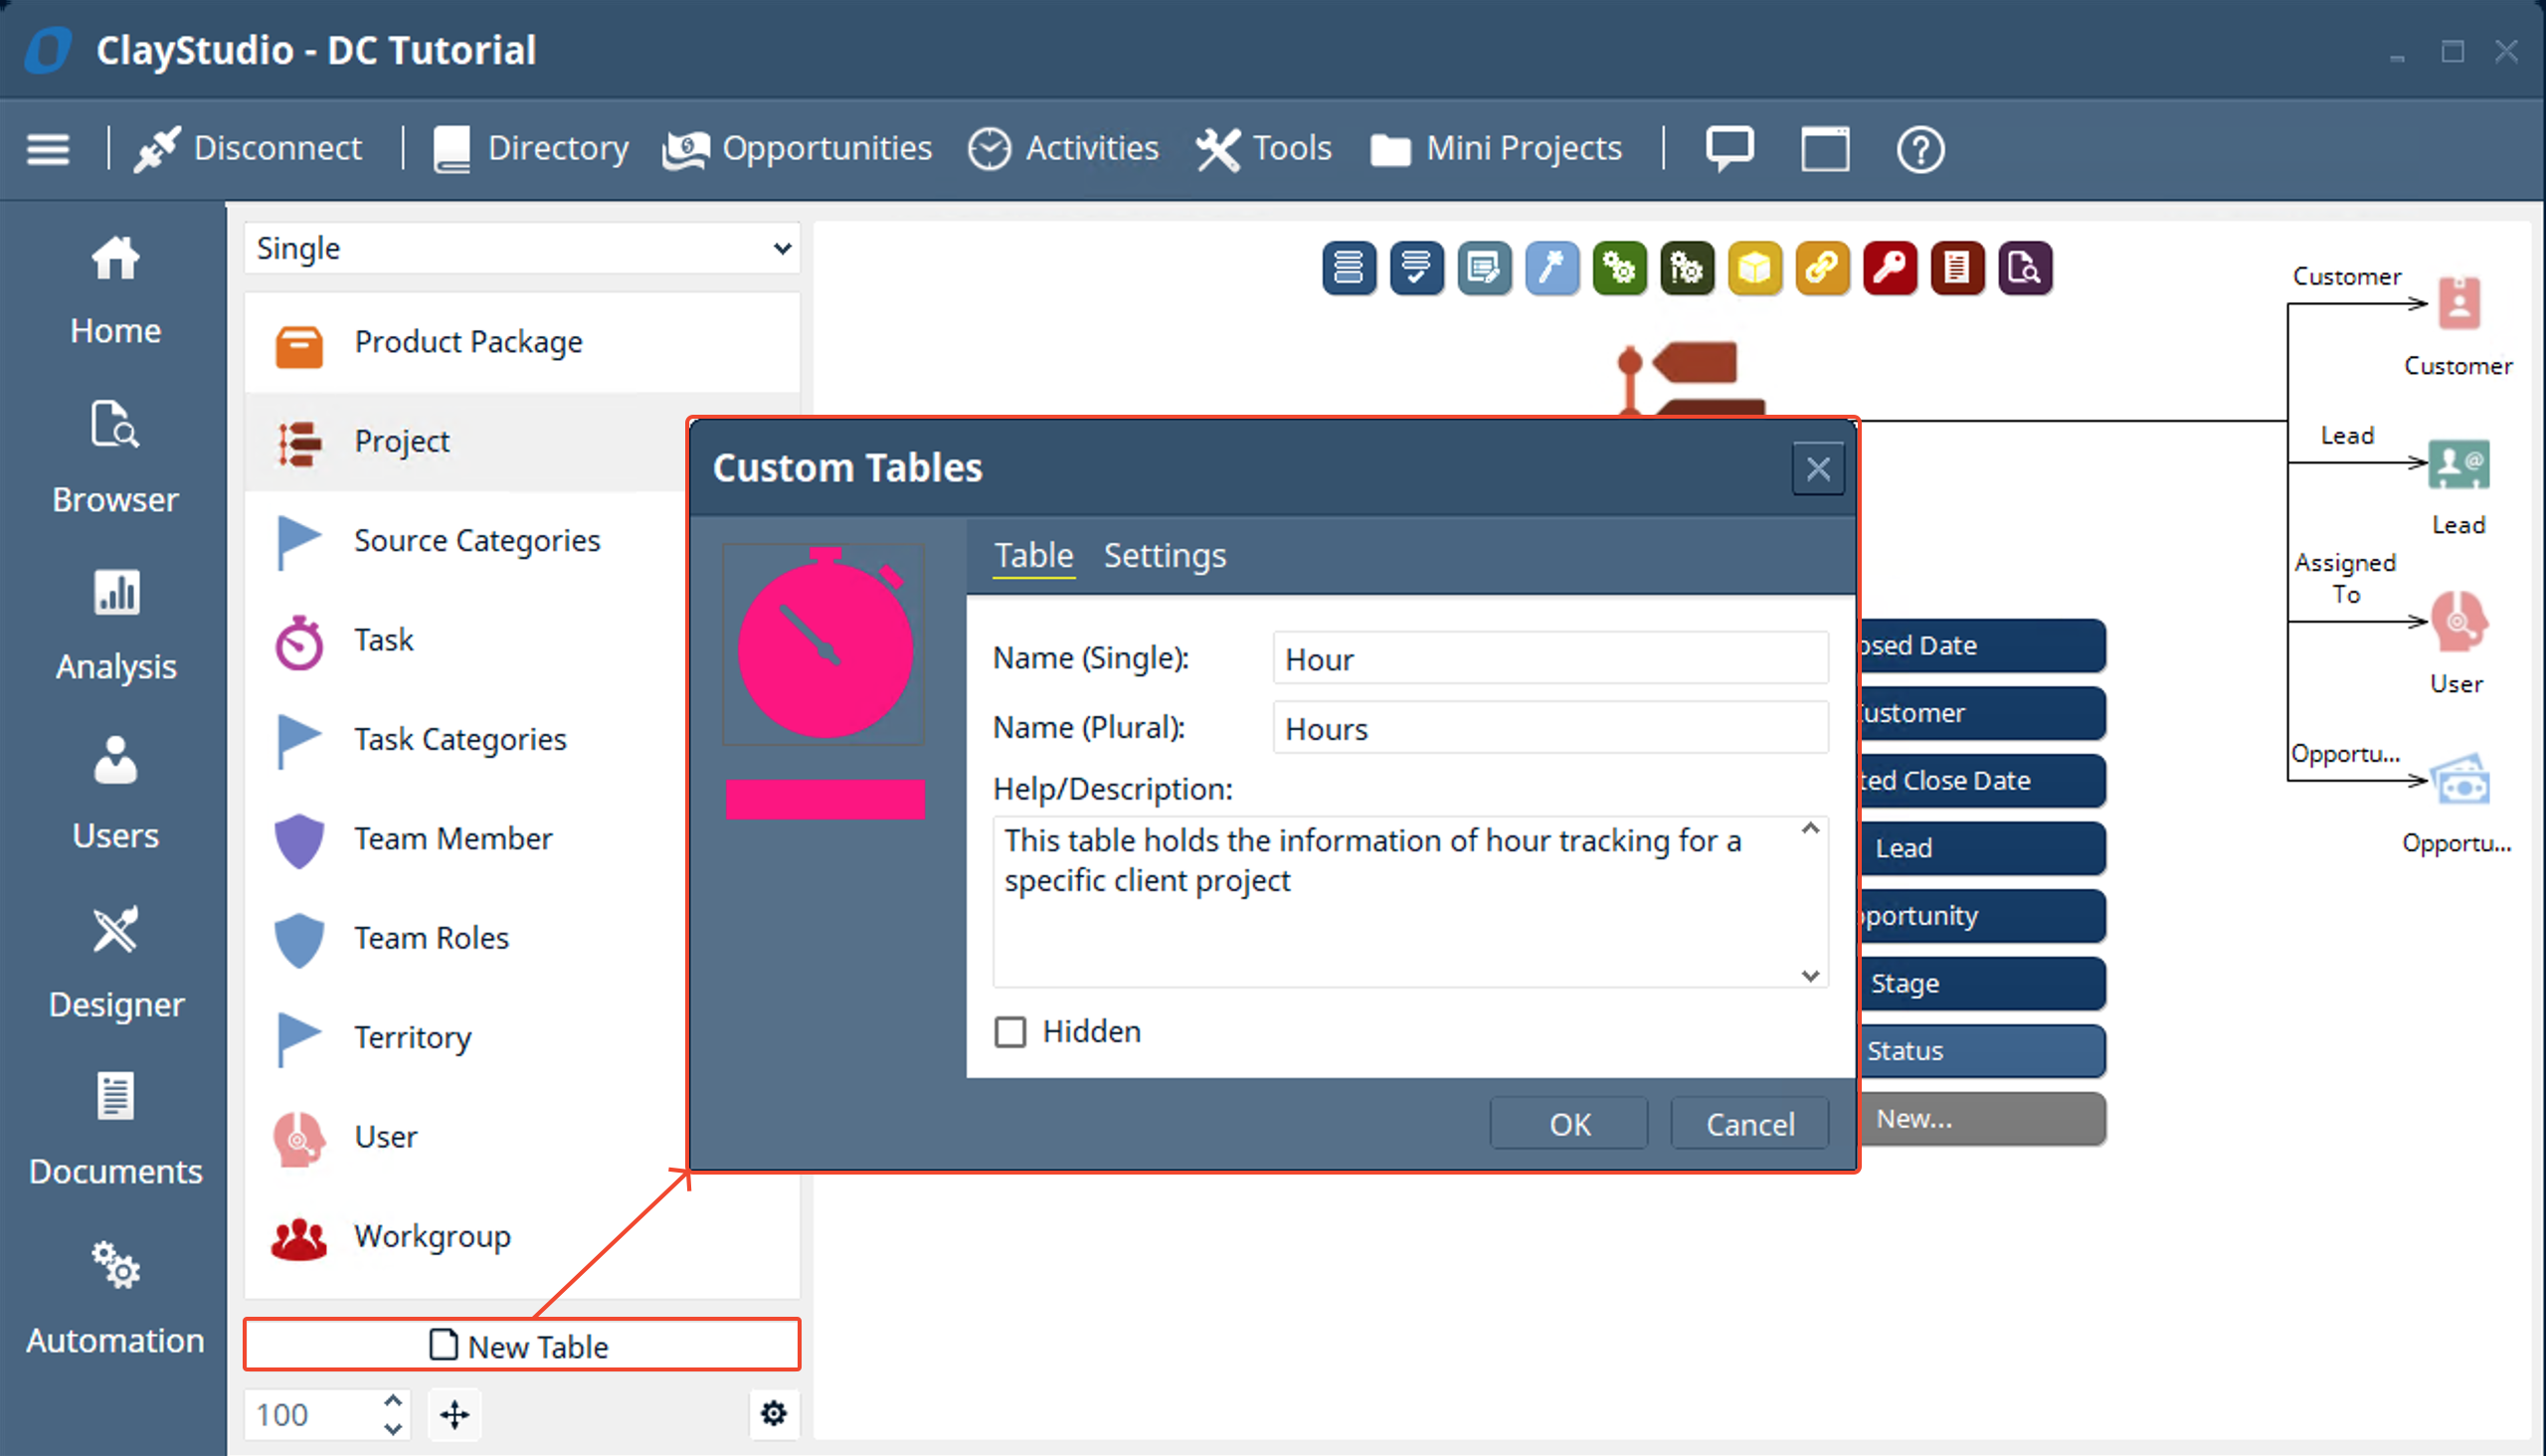
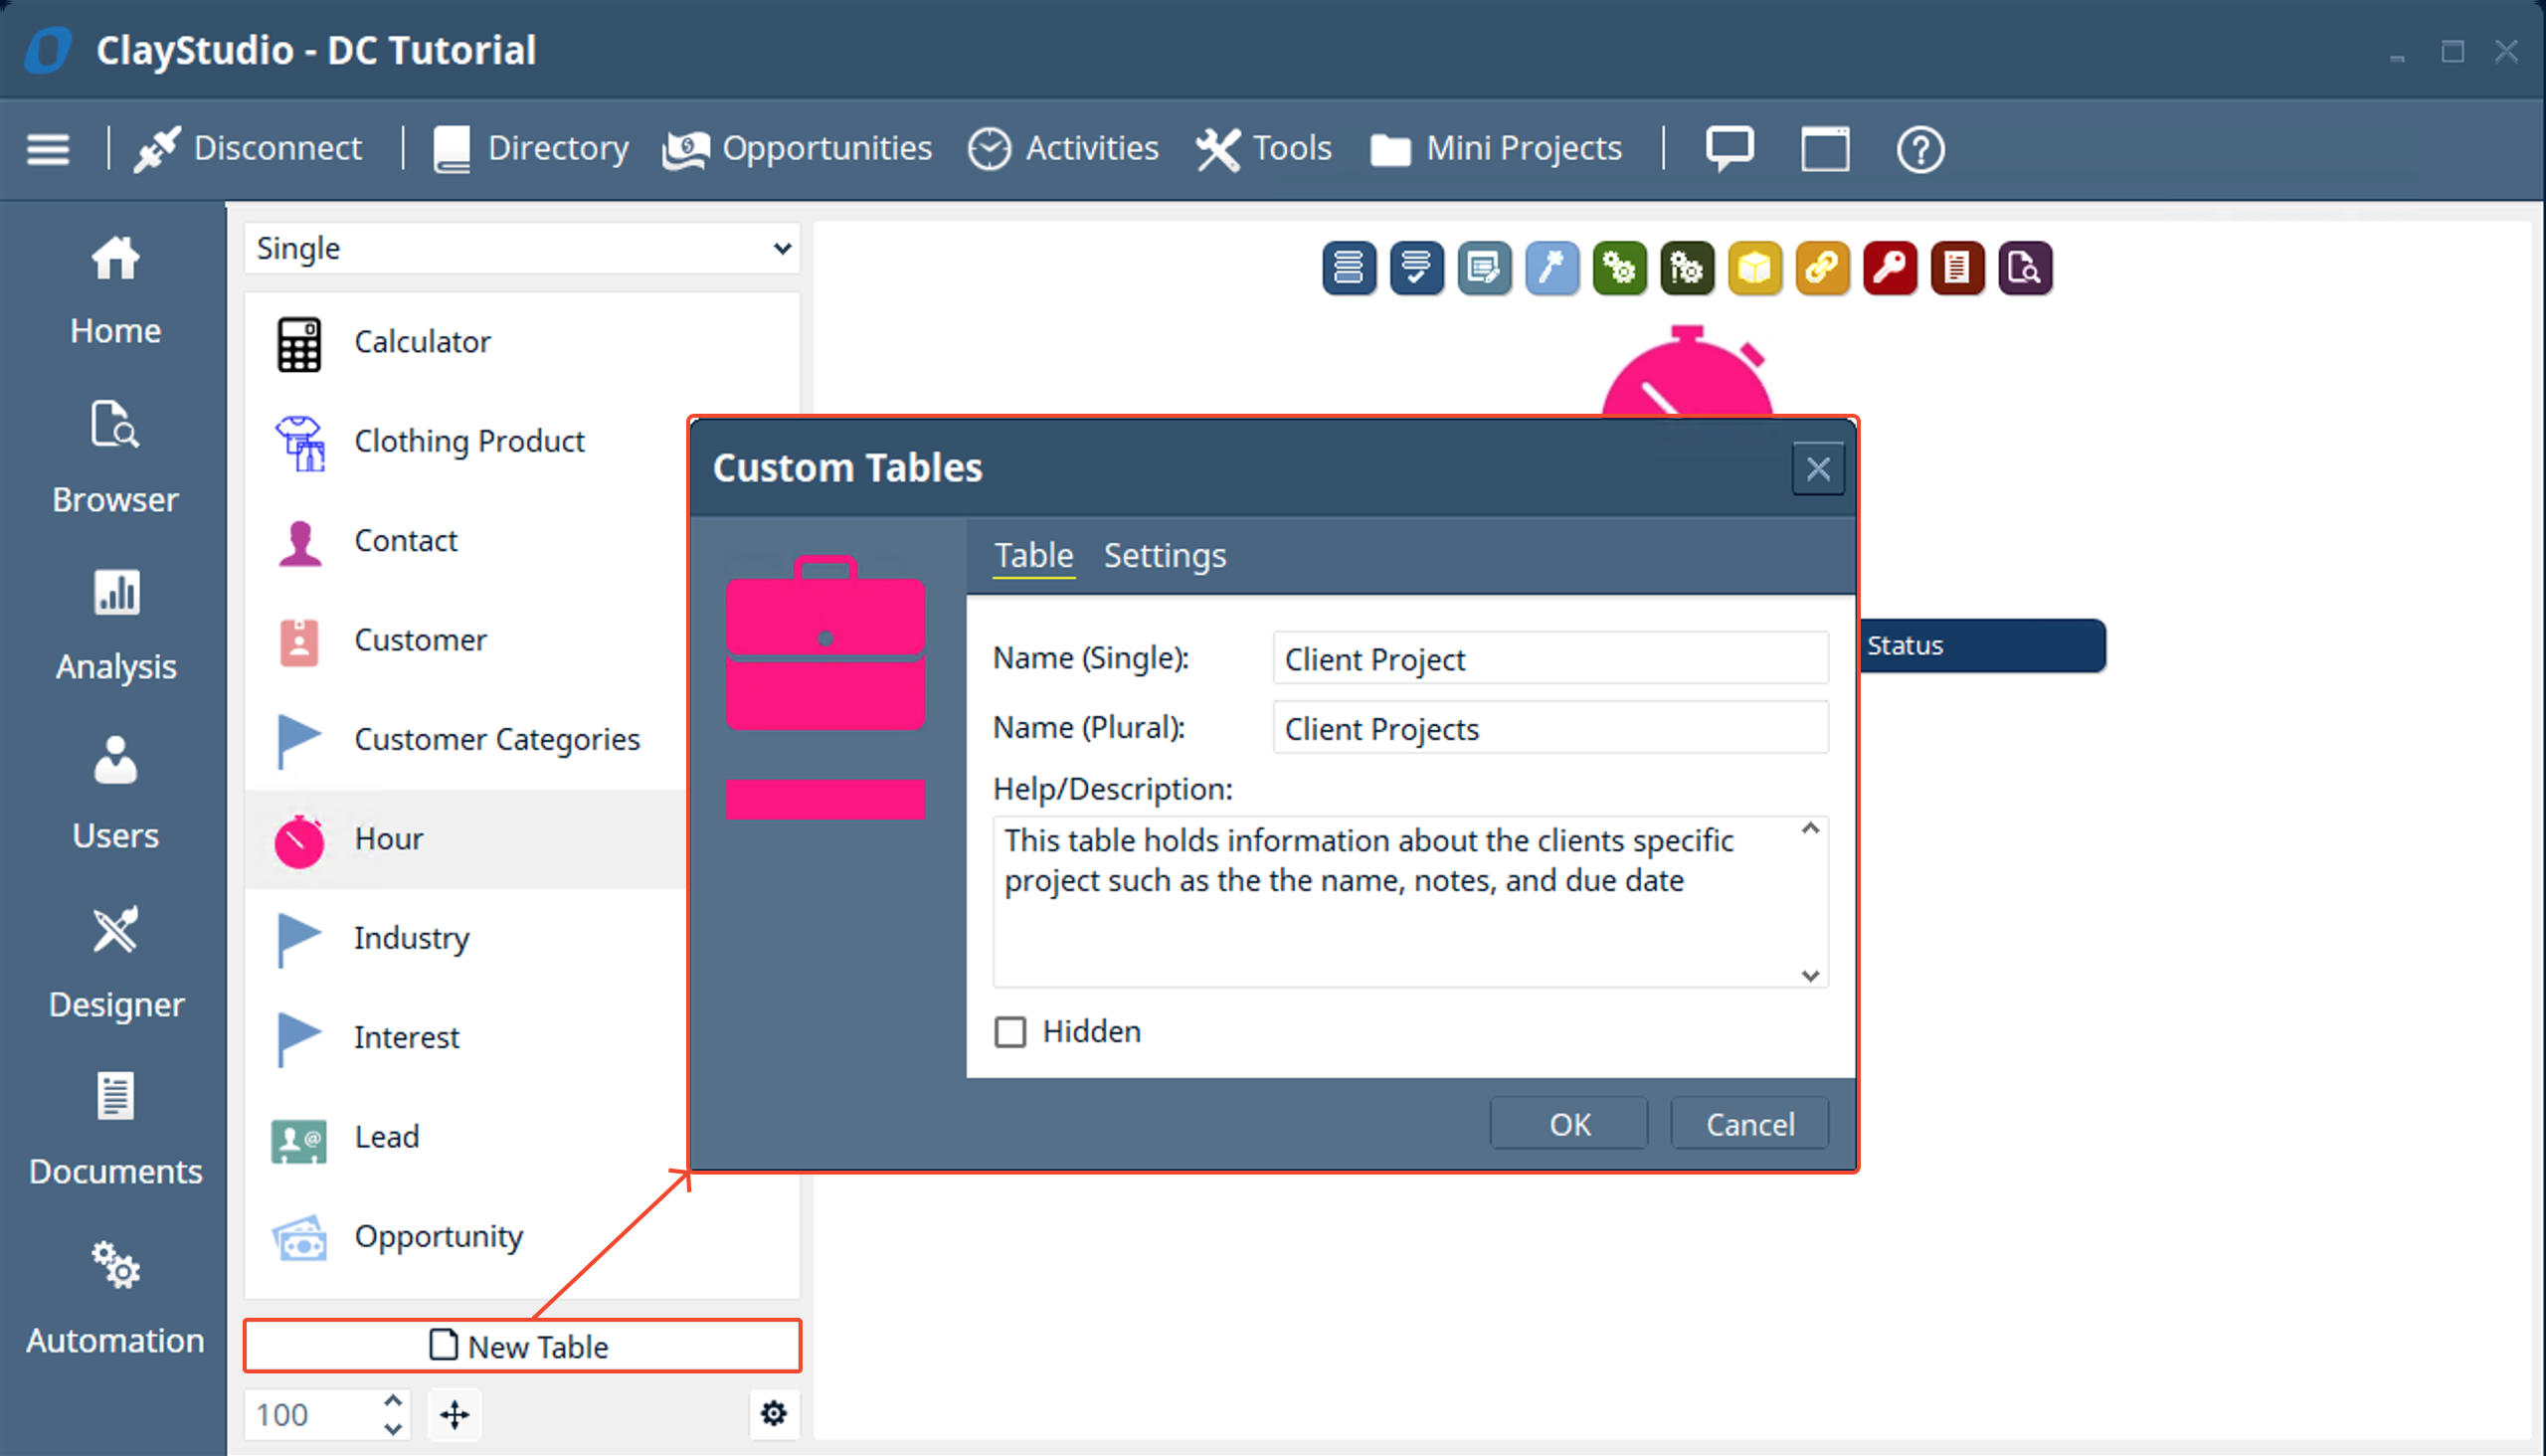
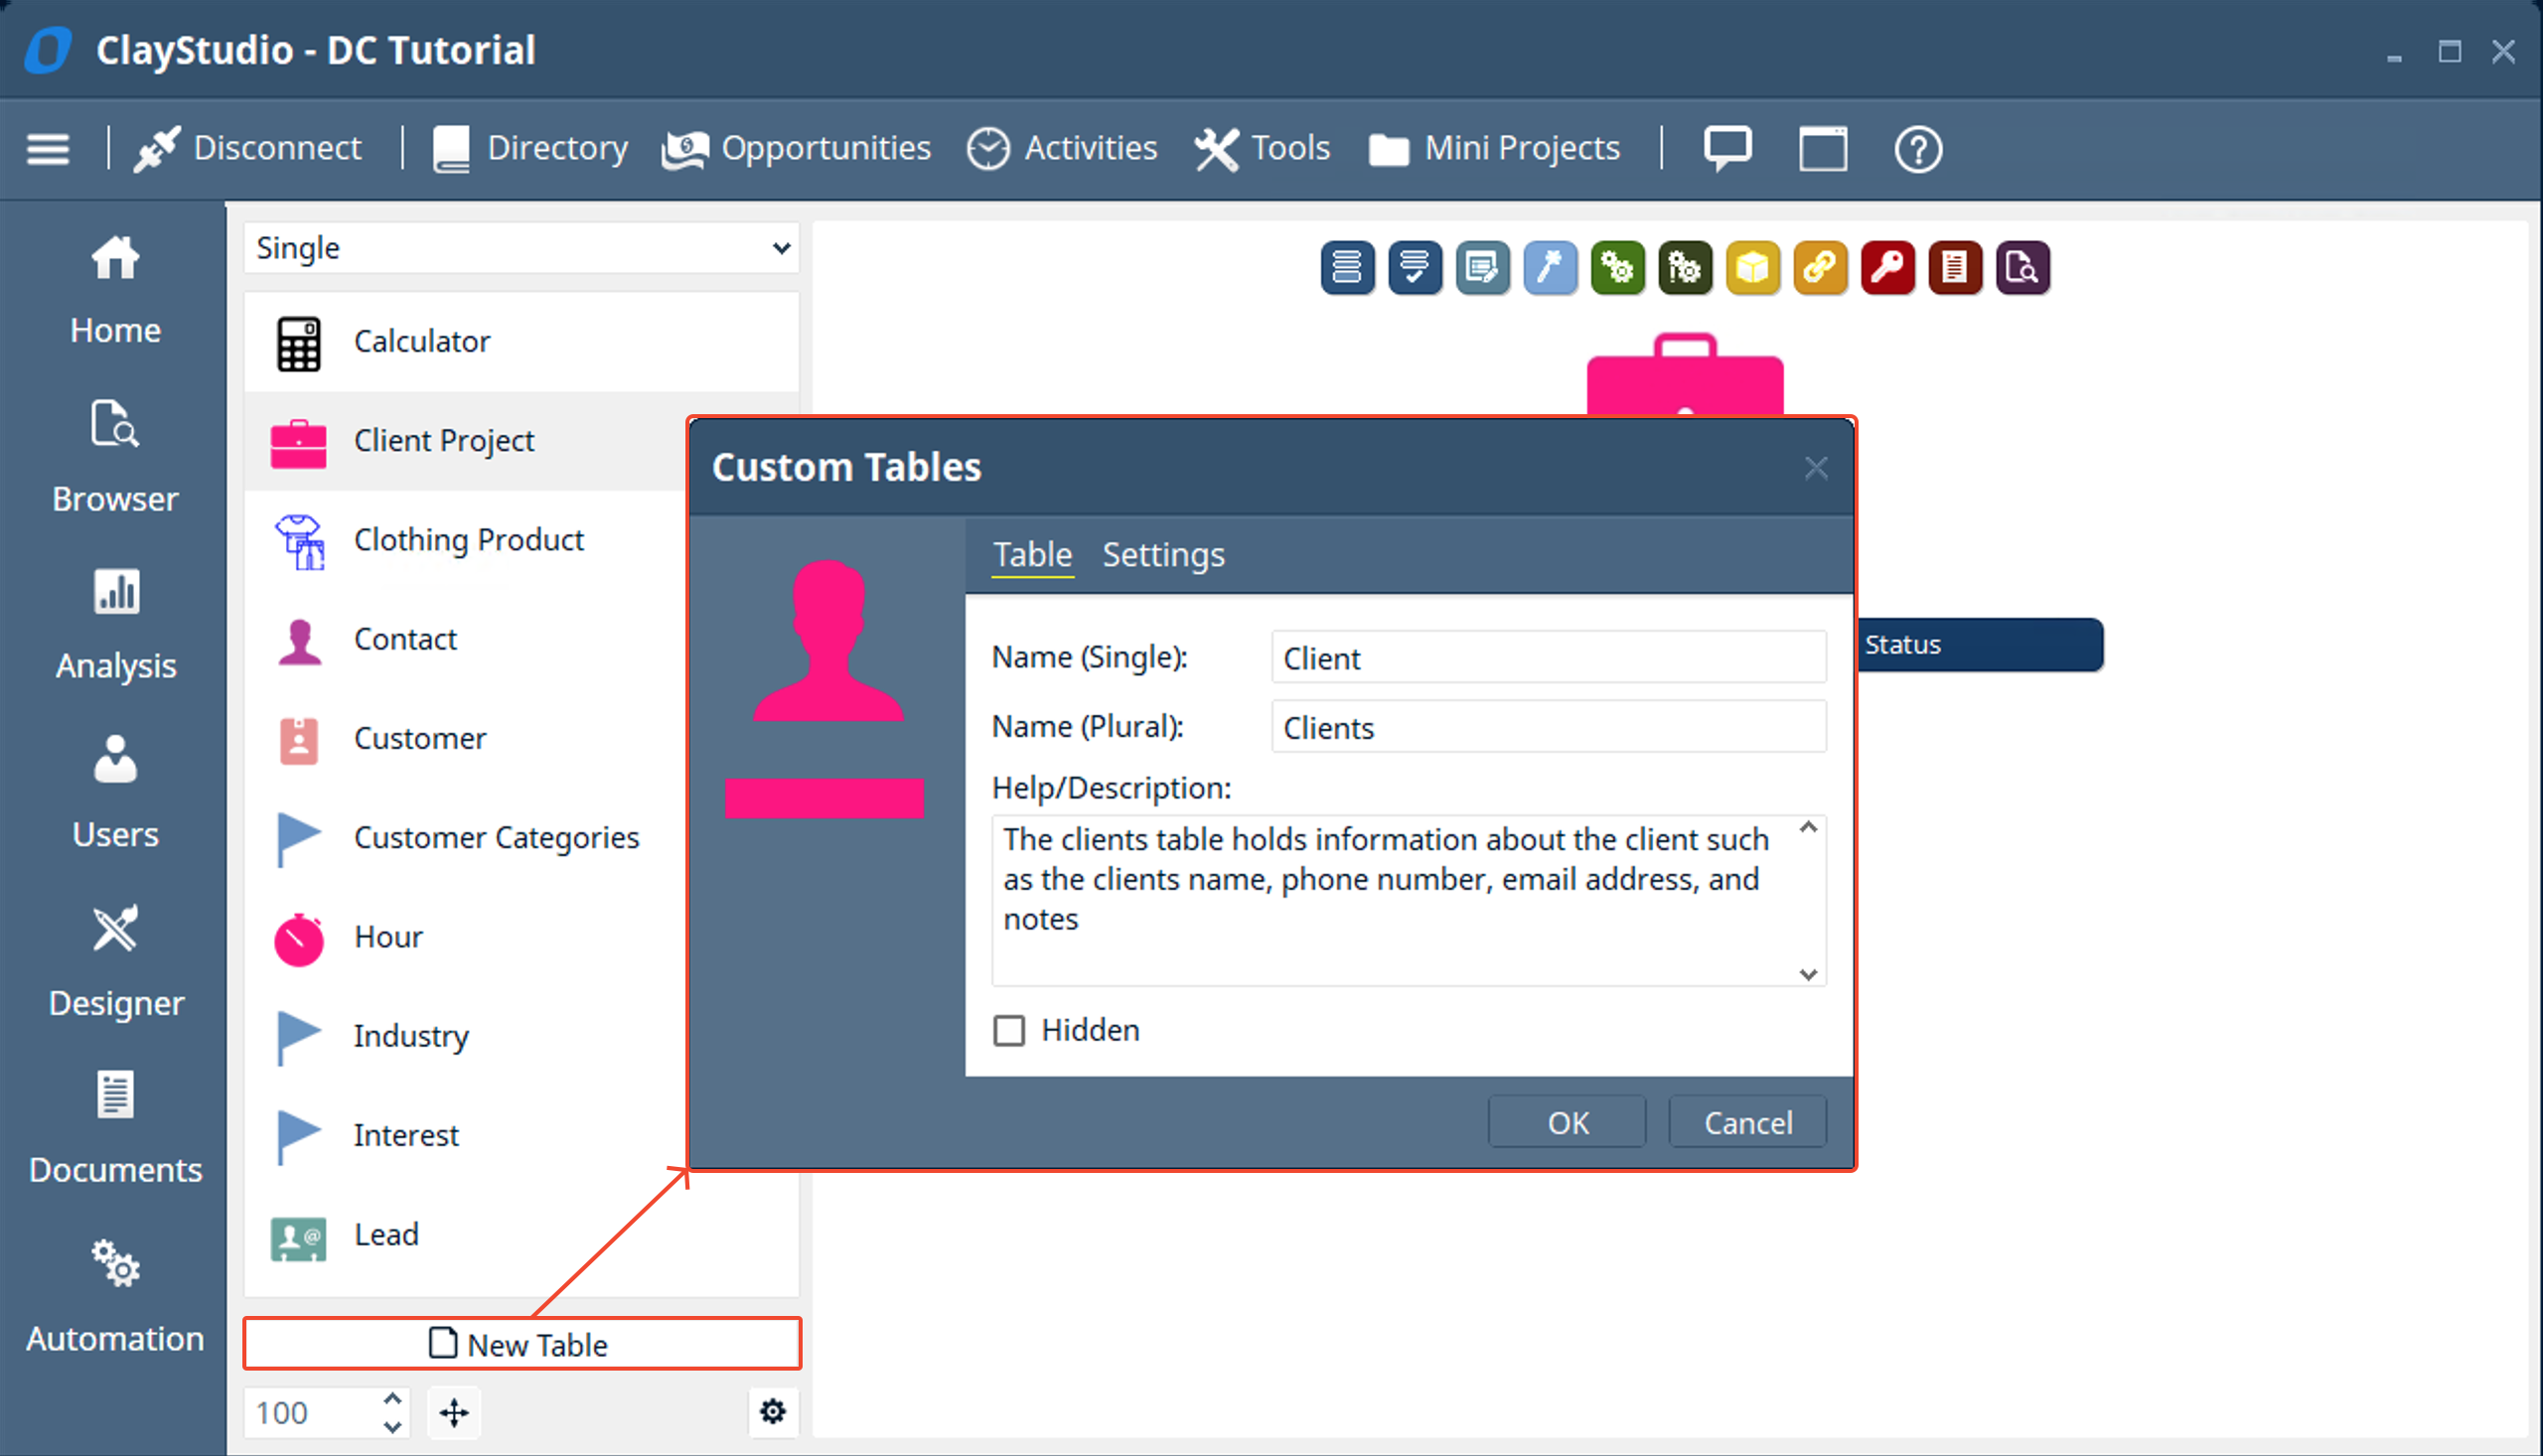
- Let’s say we want to create a solution for freelancers to track the hours they worked for clients on specific projects. To create a solution that would do this in Digital-Clay it would require a few tables: a table that will hold the hours worked, a table that will hold the client information, and a table that will hold the client projects. These tables will be linked together with linked fields and a custom dashboard will be created to easily view and add hours to the hour tracker solution.
- To start we will create the following tables as shown in the screenshots below:
- Next, in the “Clients” table lets add fields for: Phone Number, Email Address, and Notes
- Notice I don’t specifically add a Name field since the table is created with a name field by default
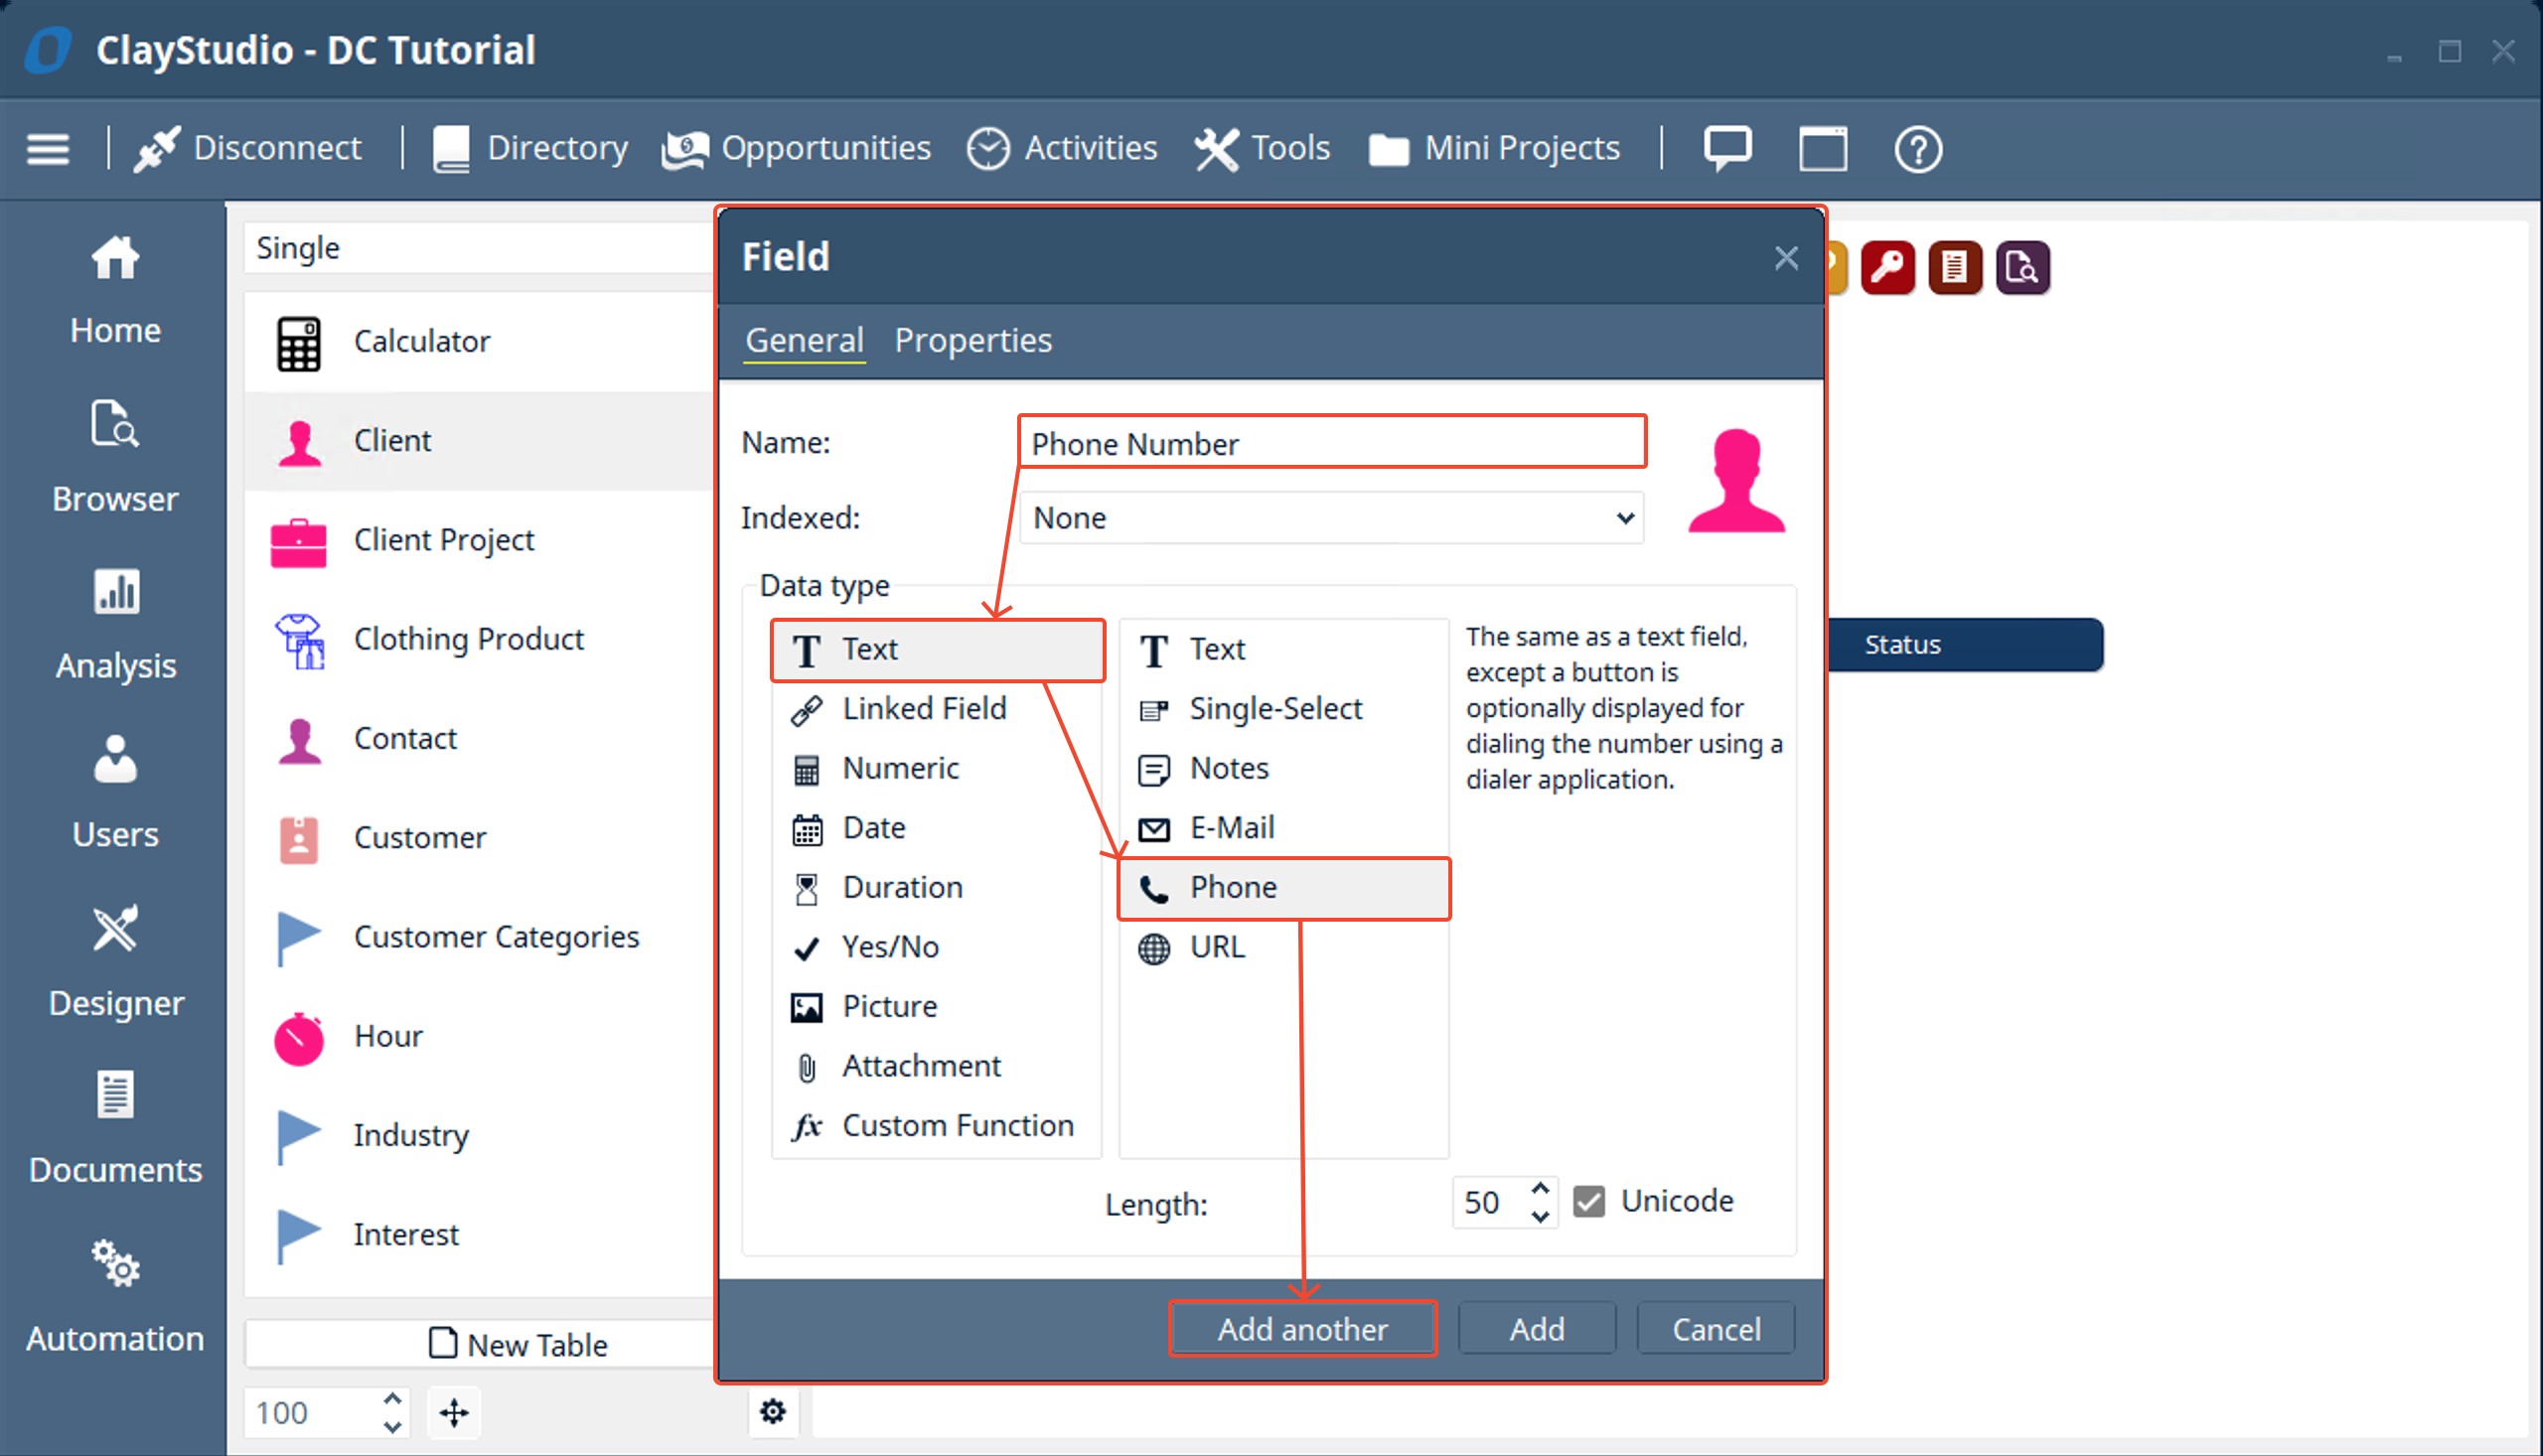
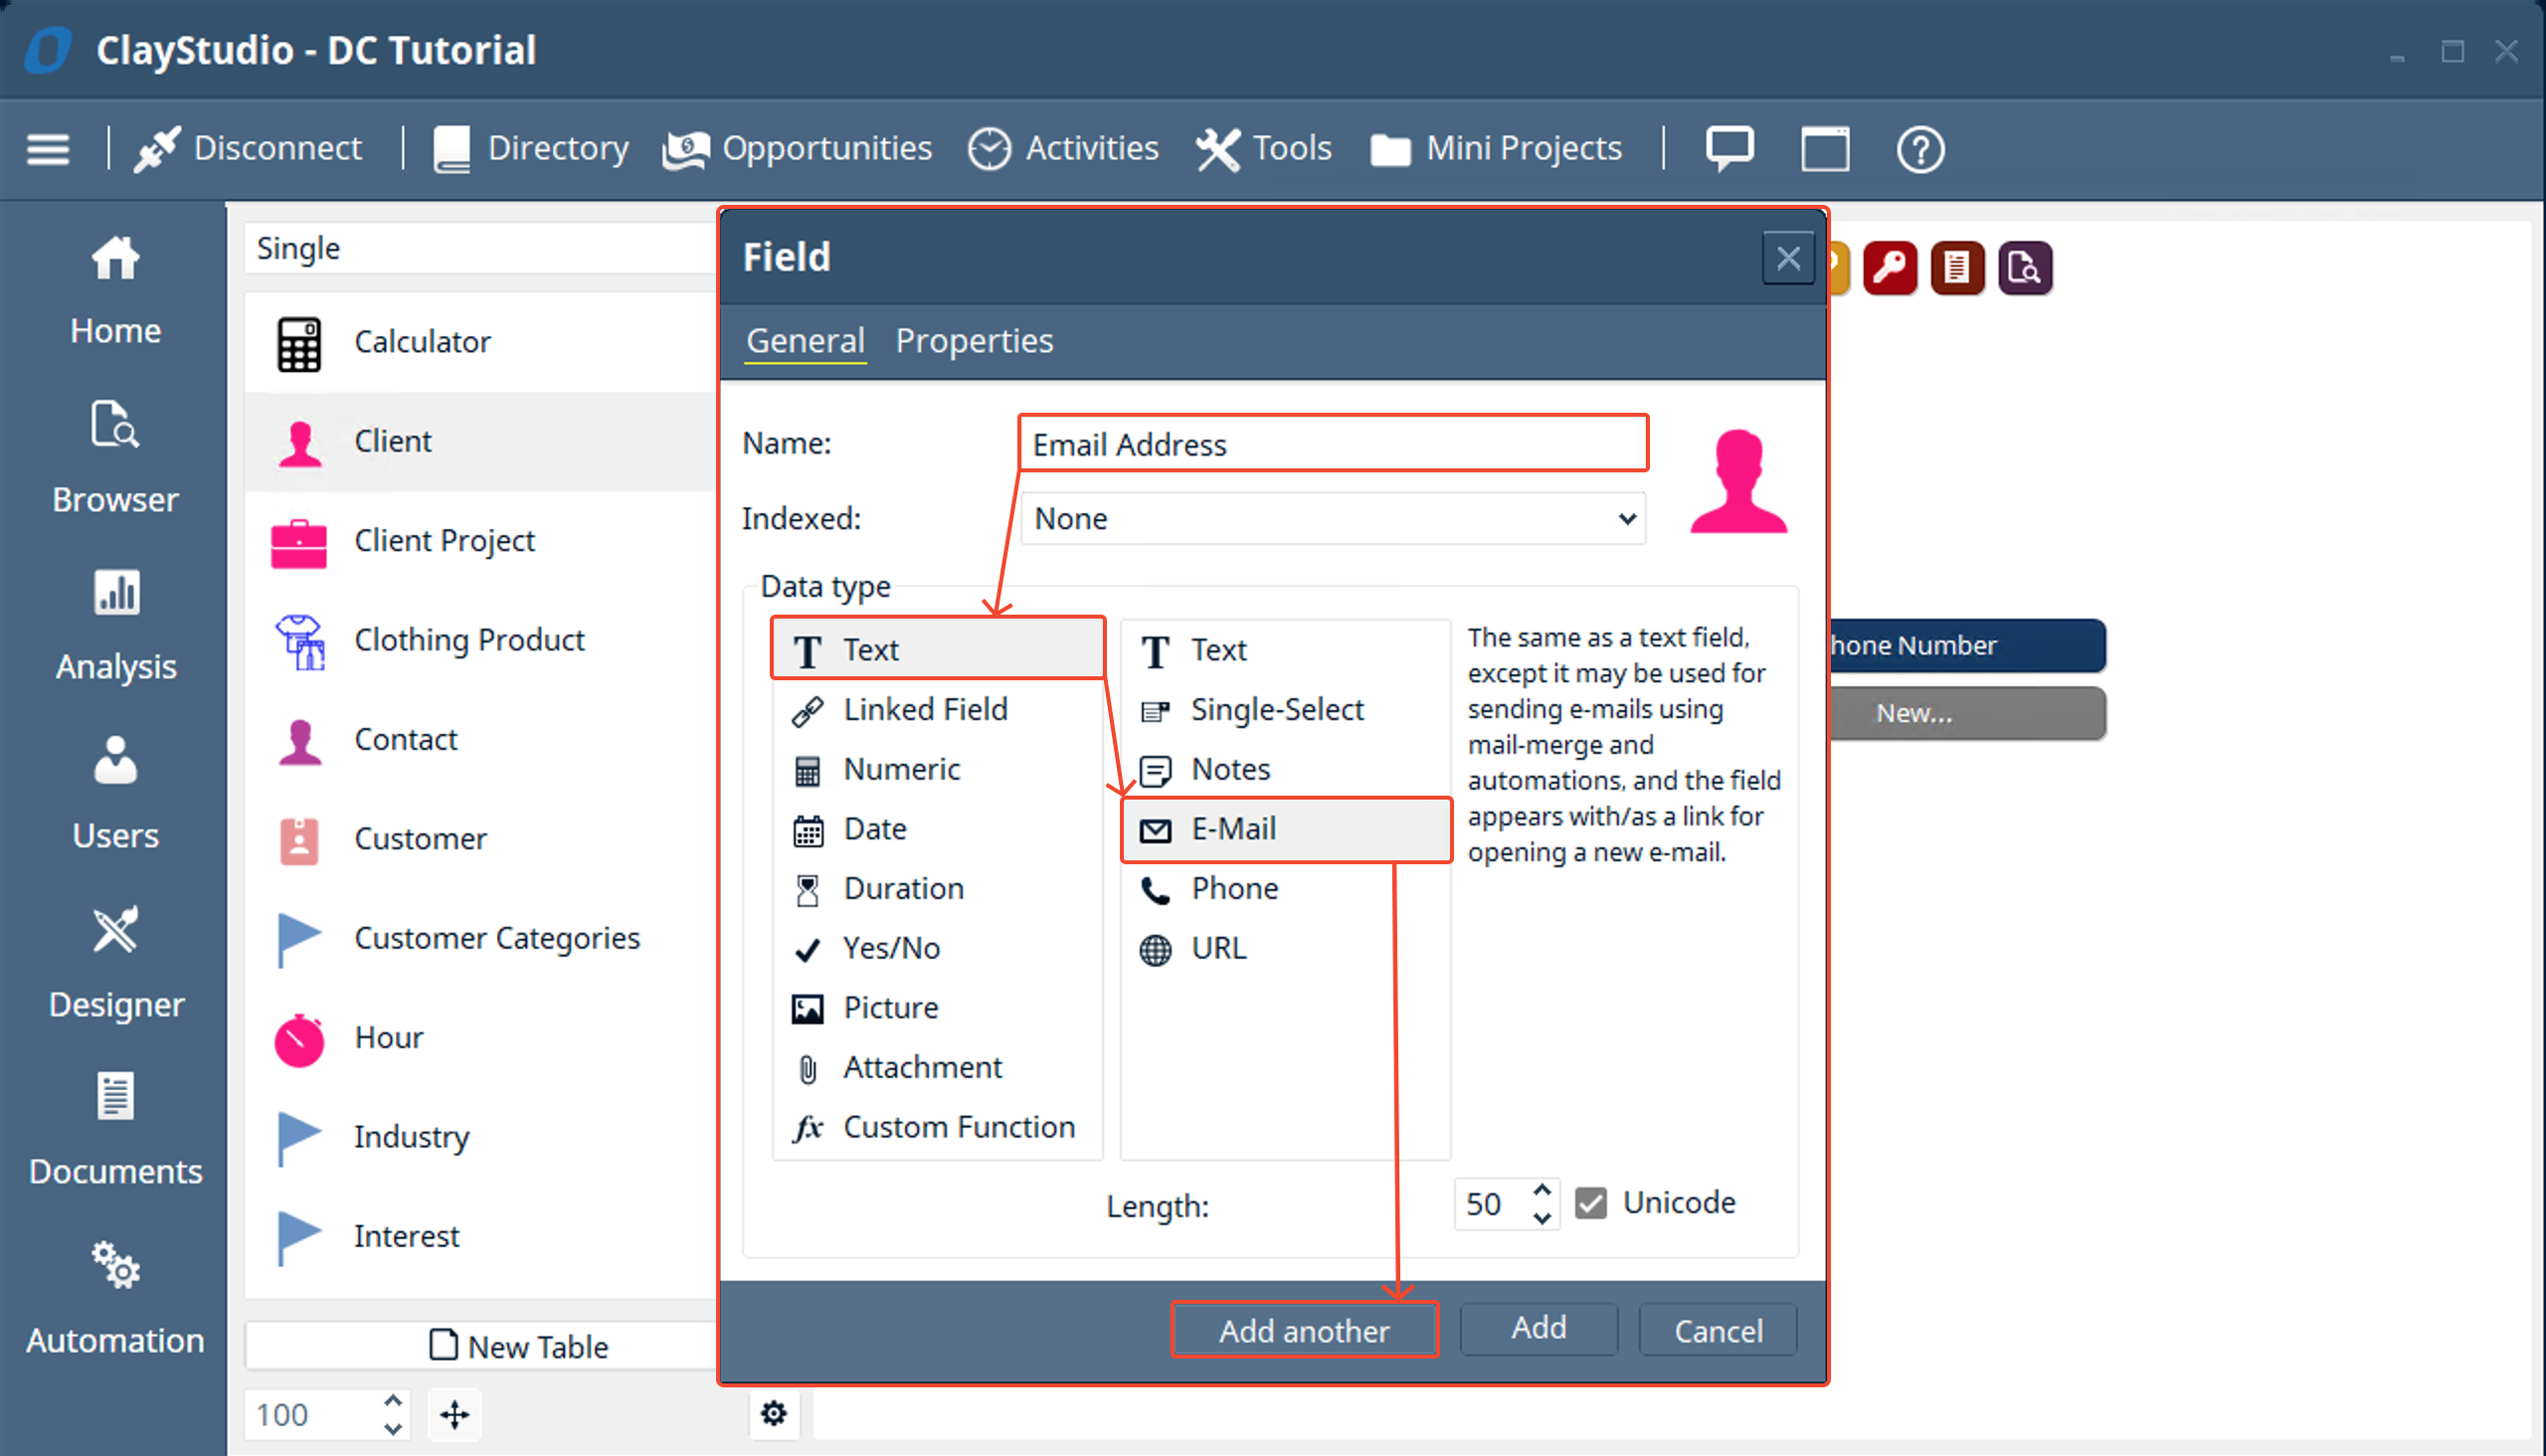
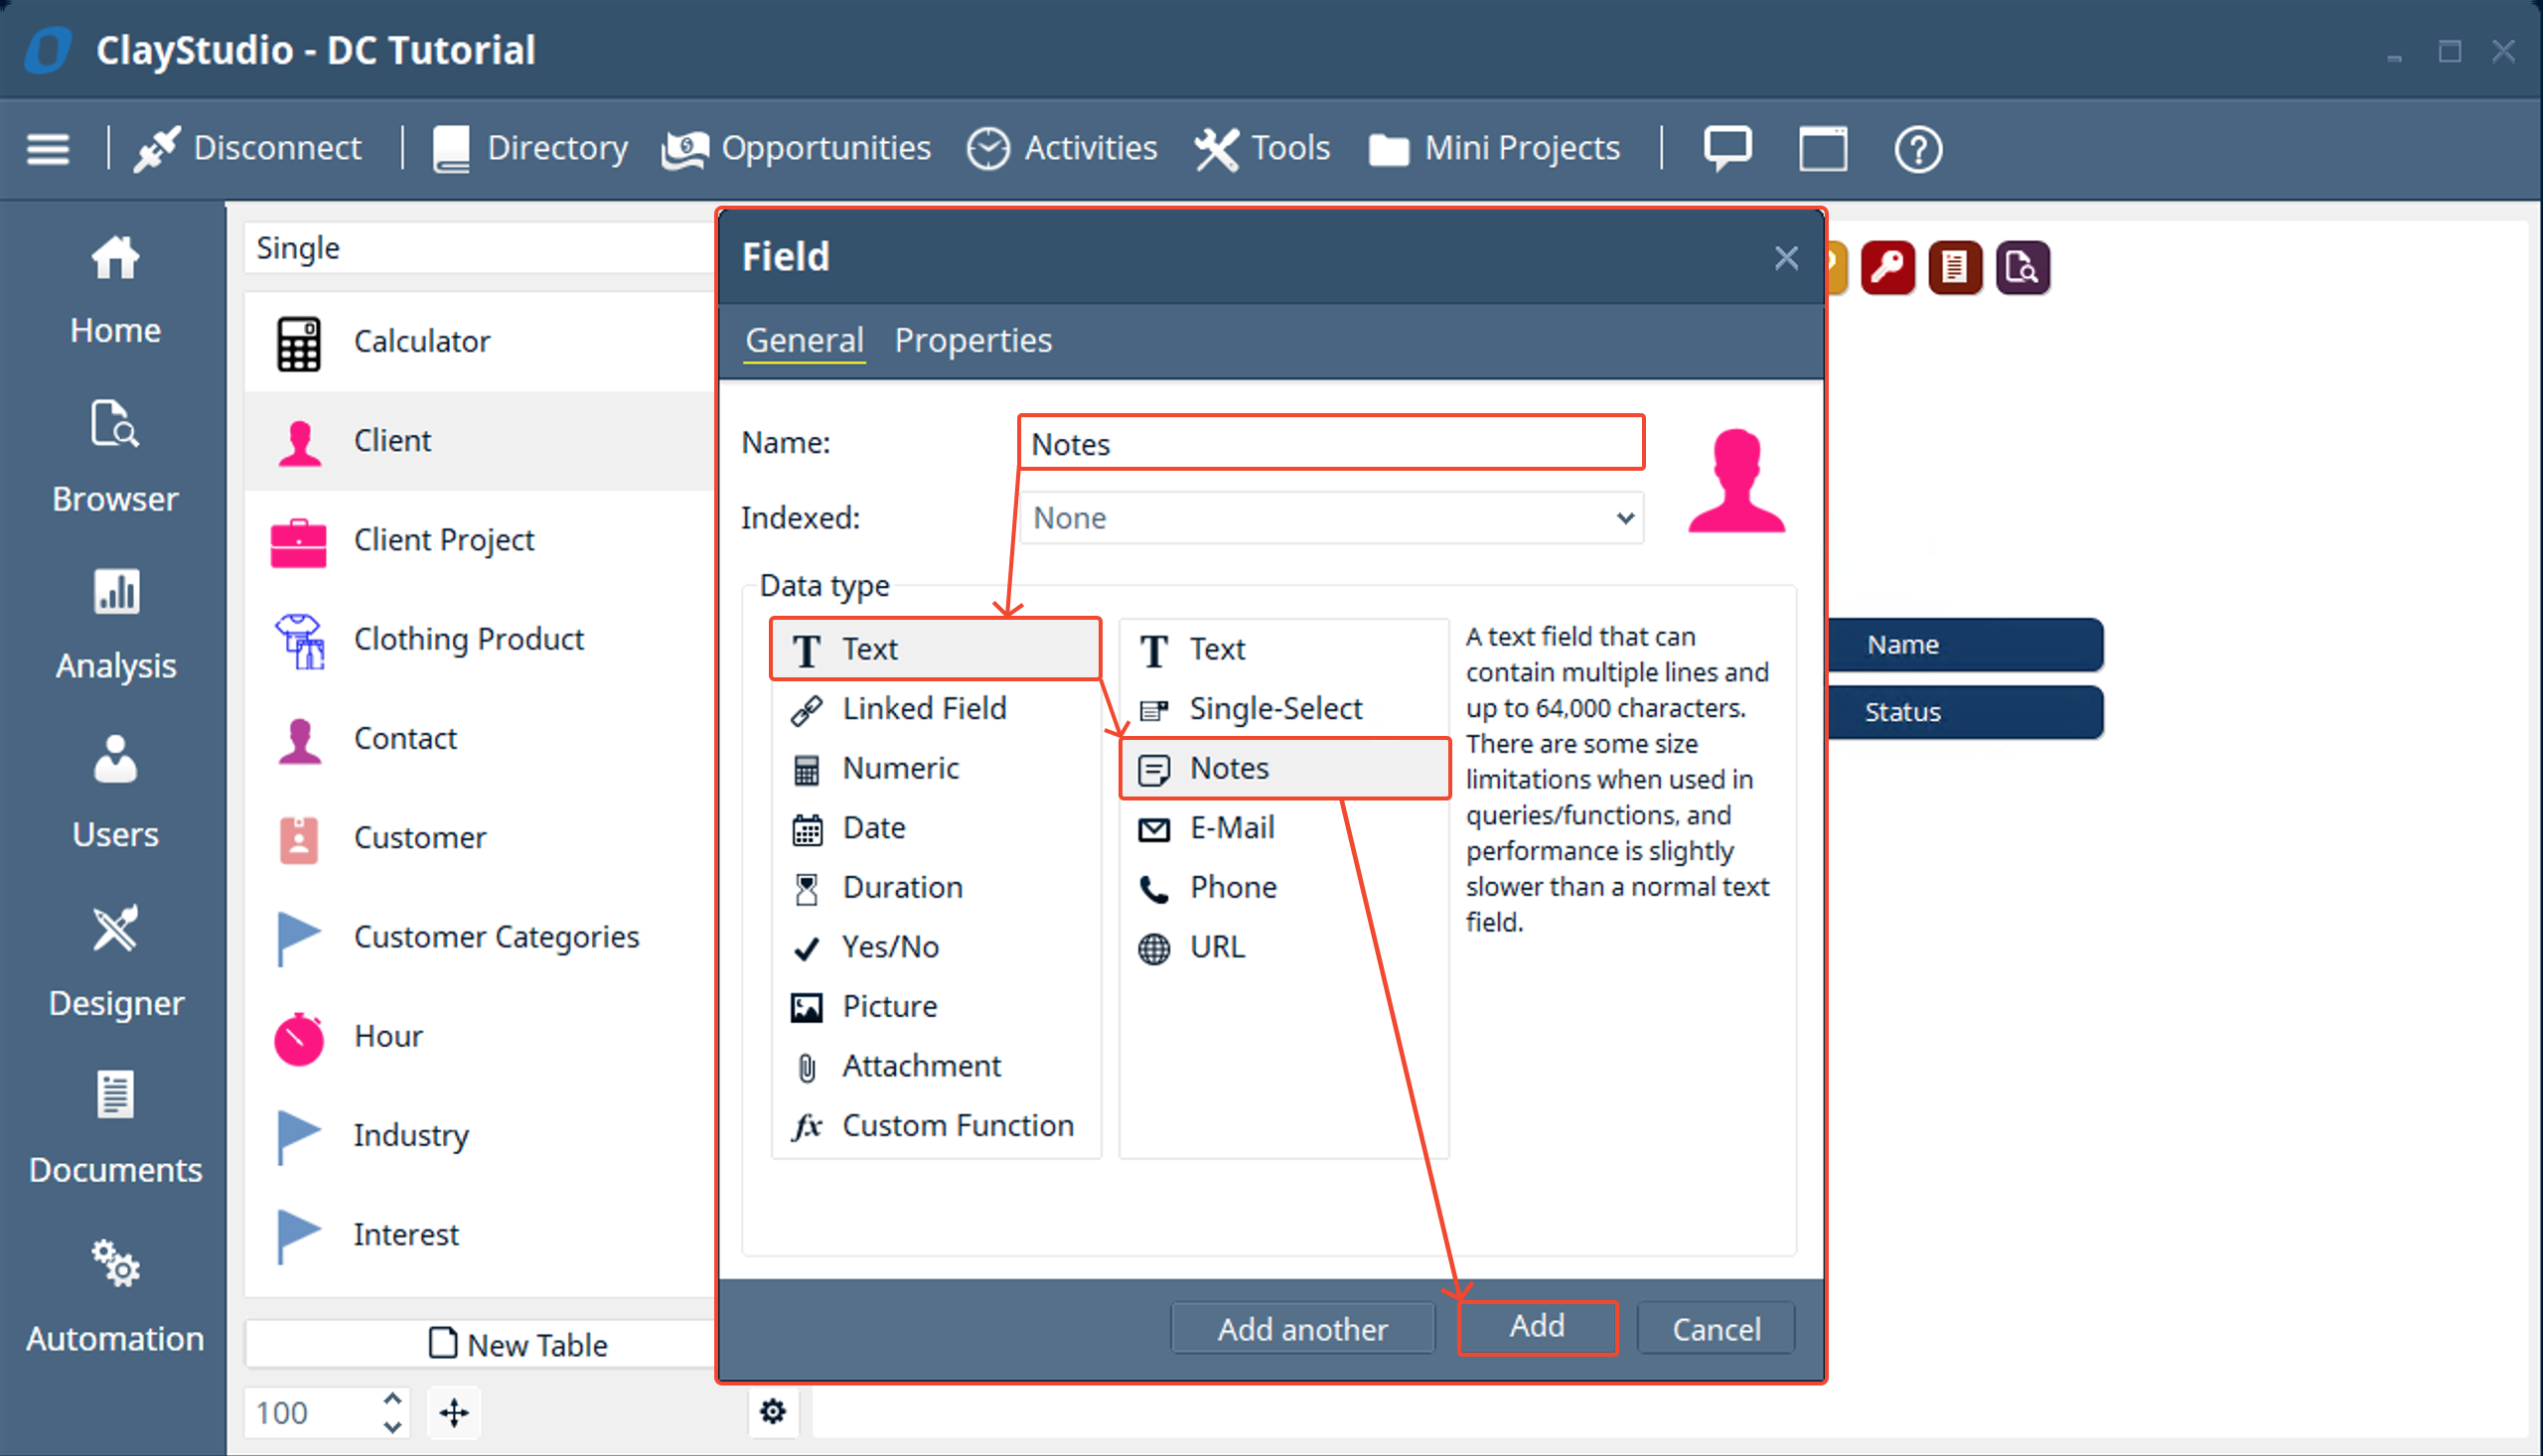
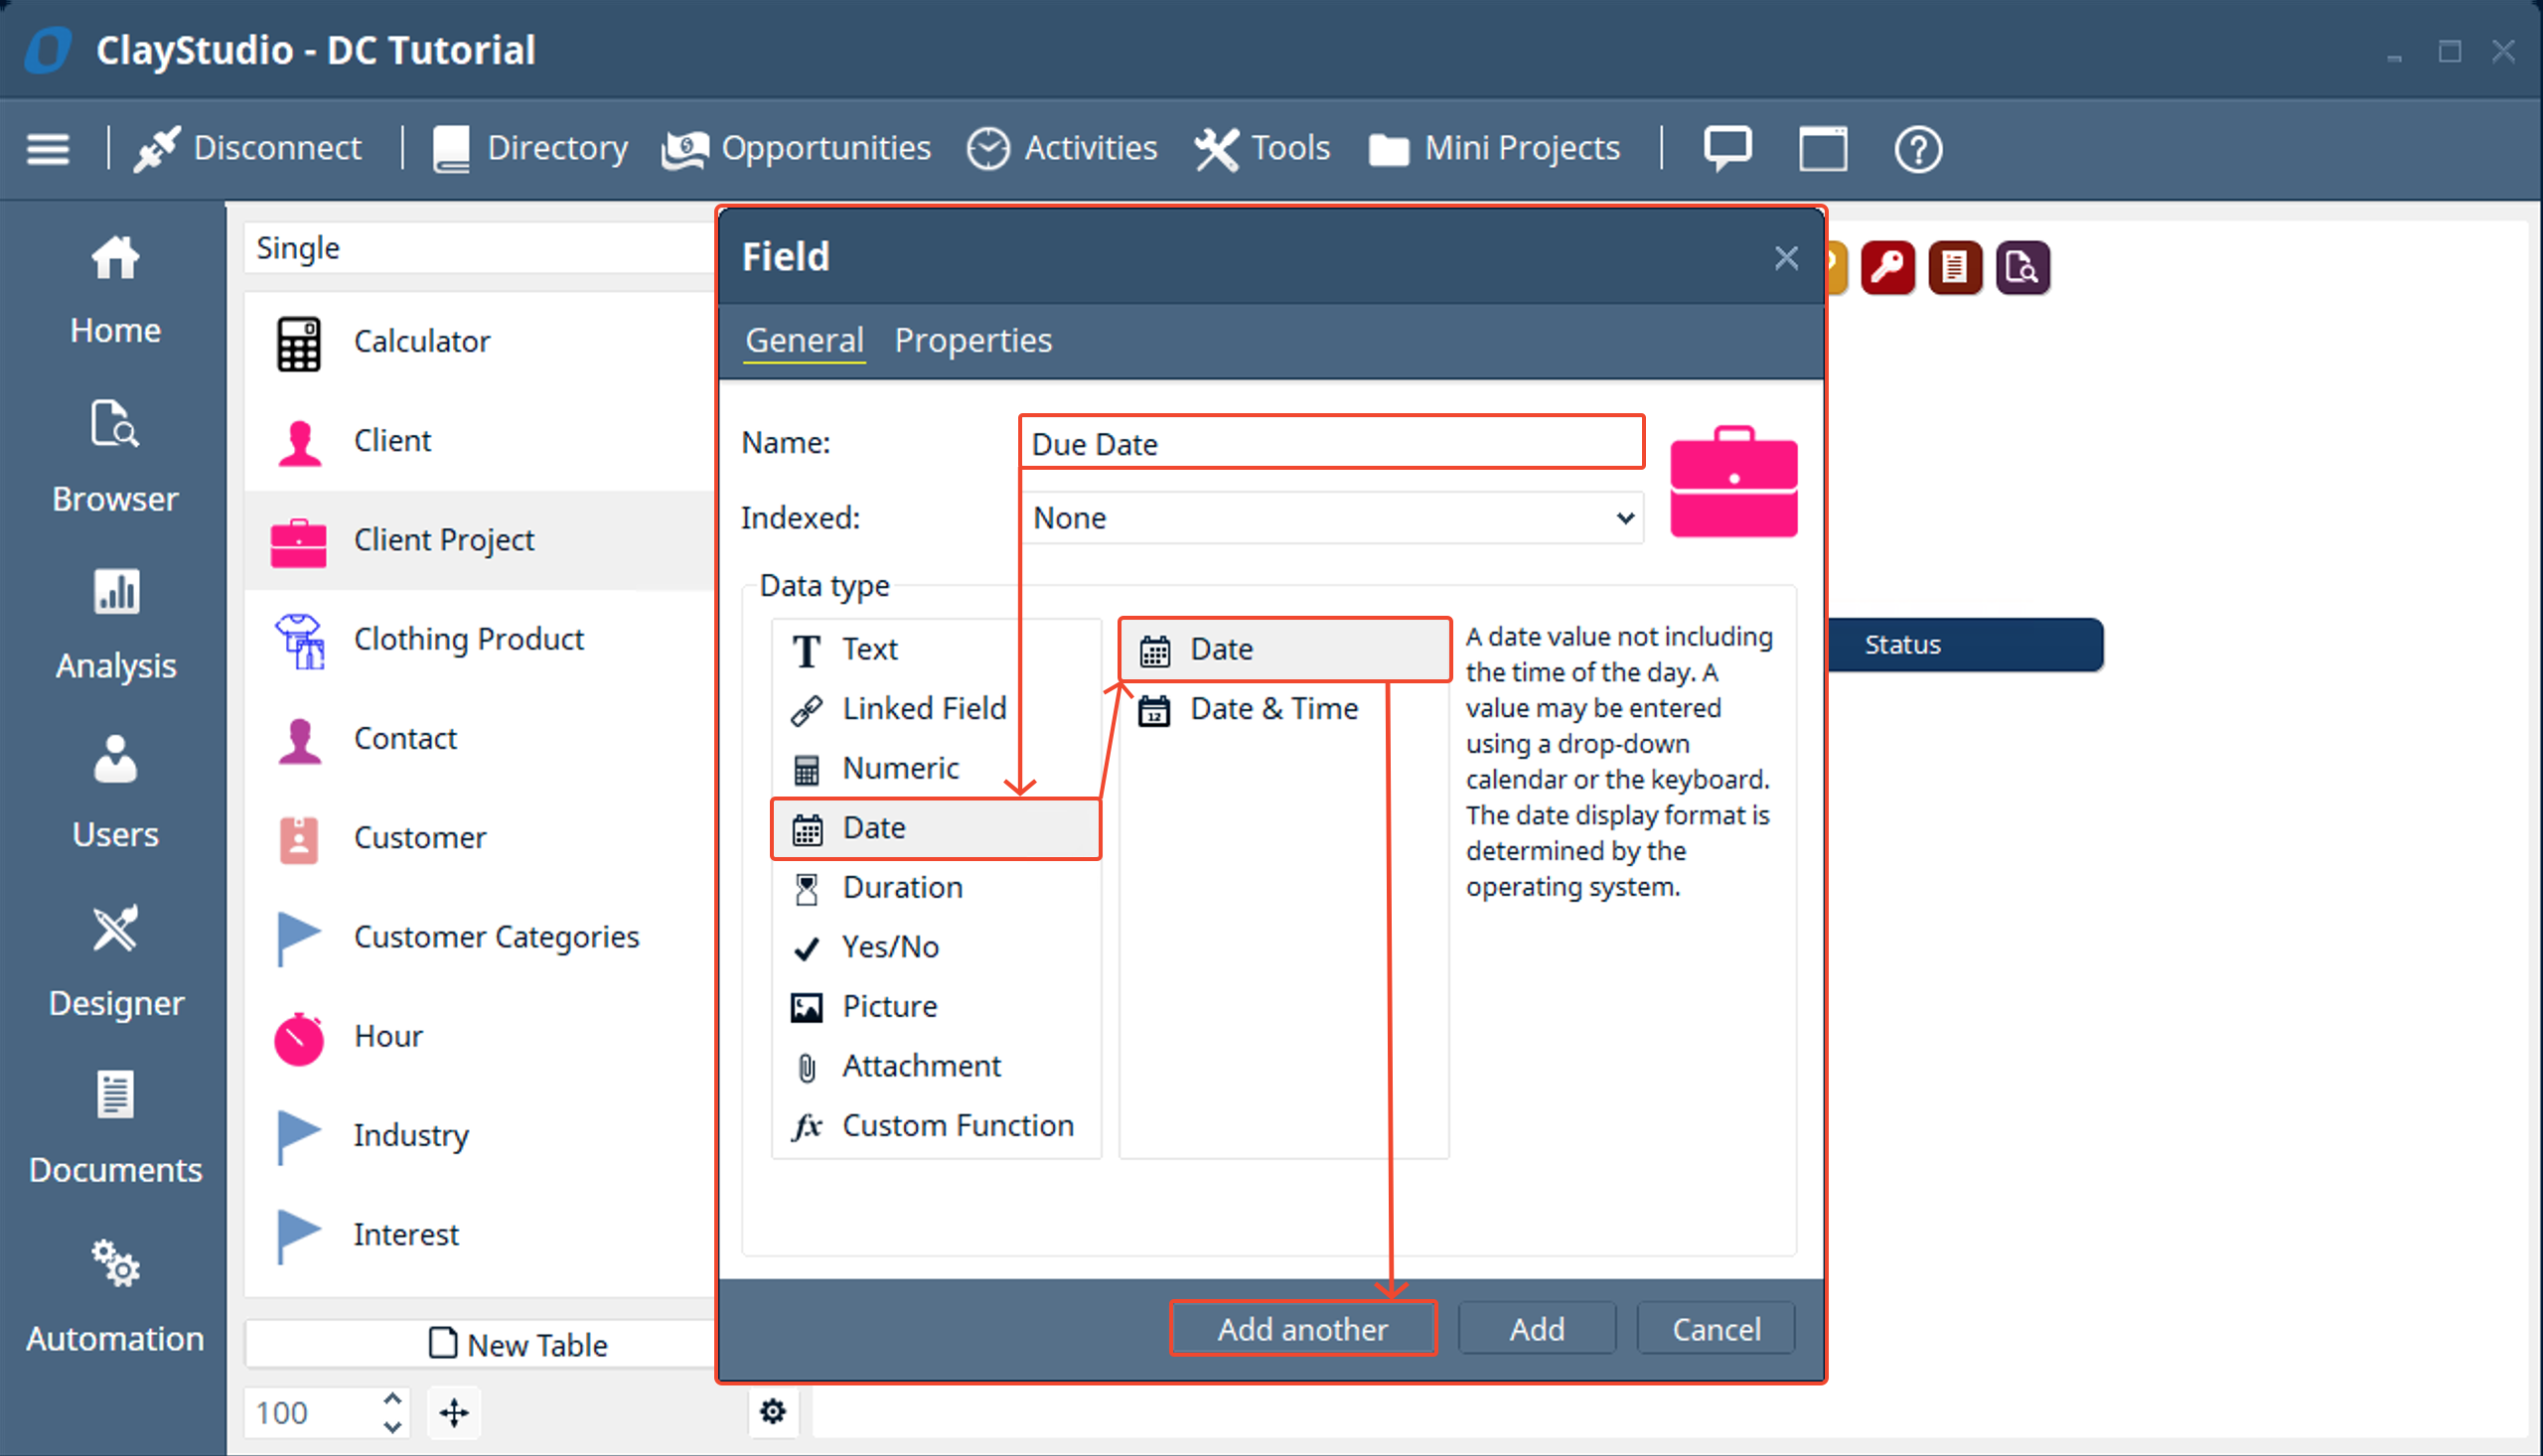
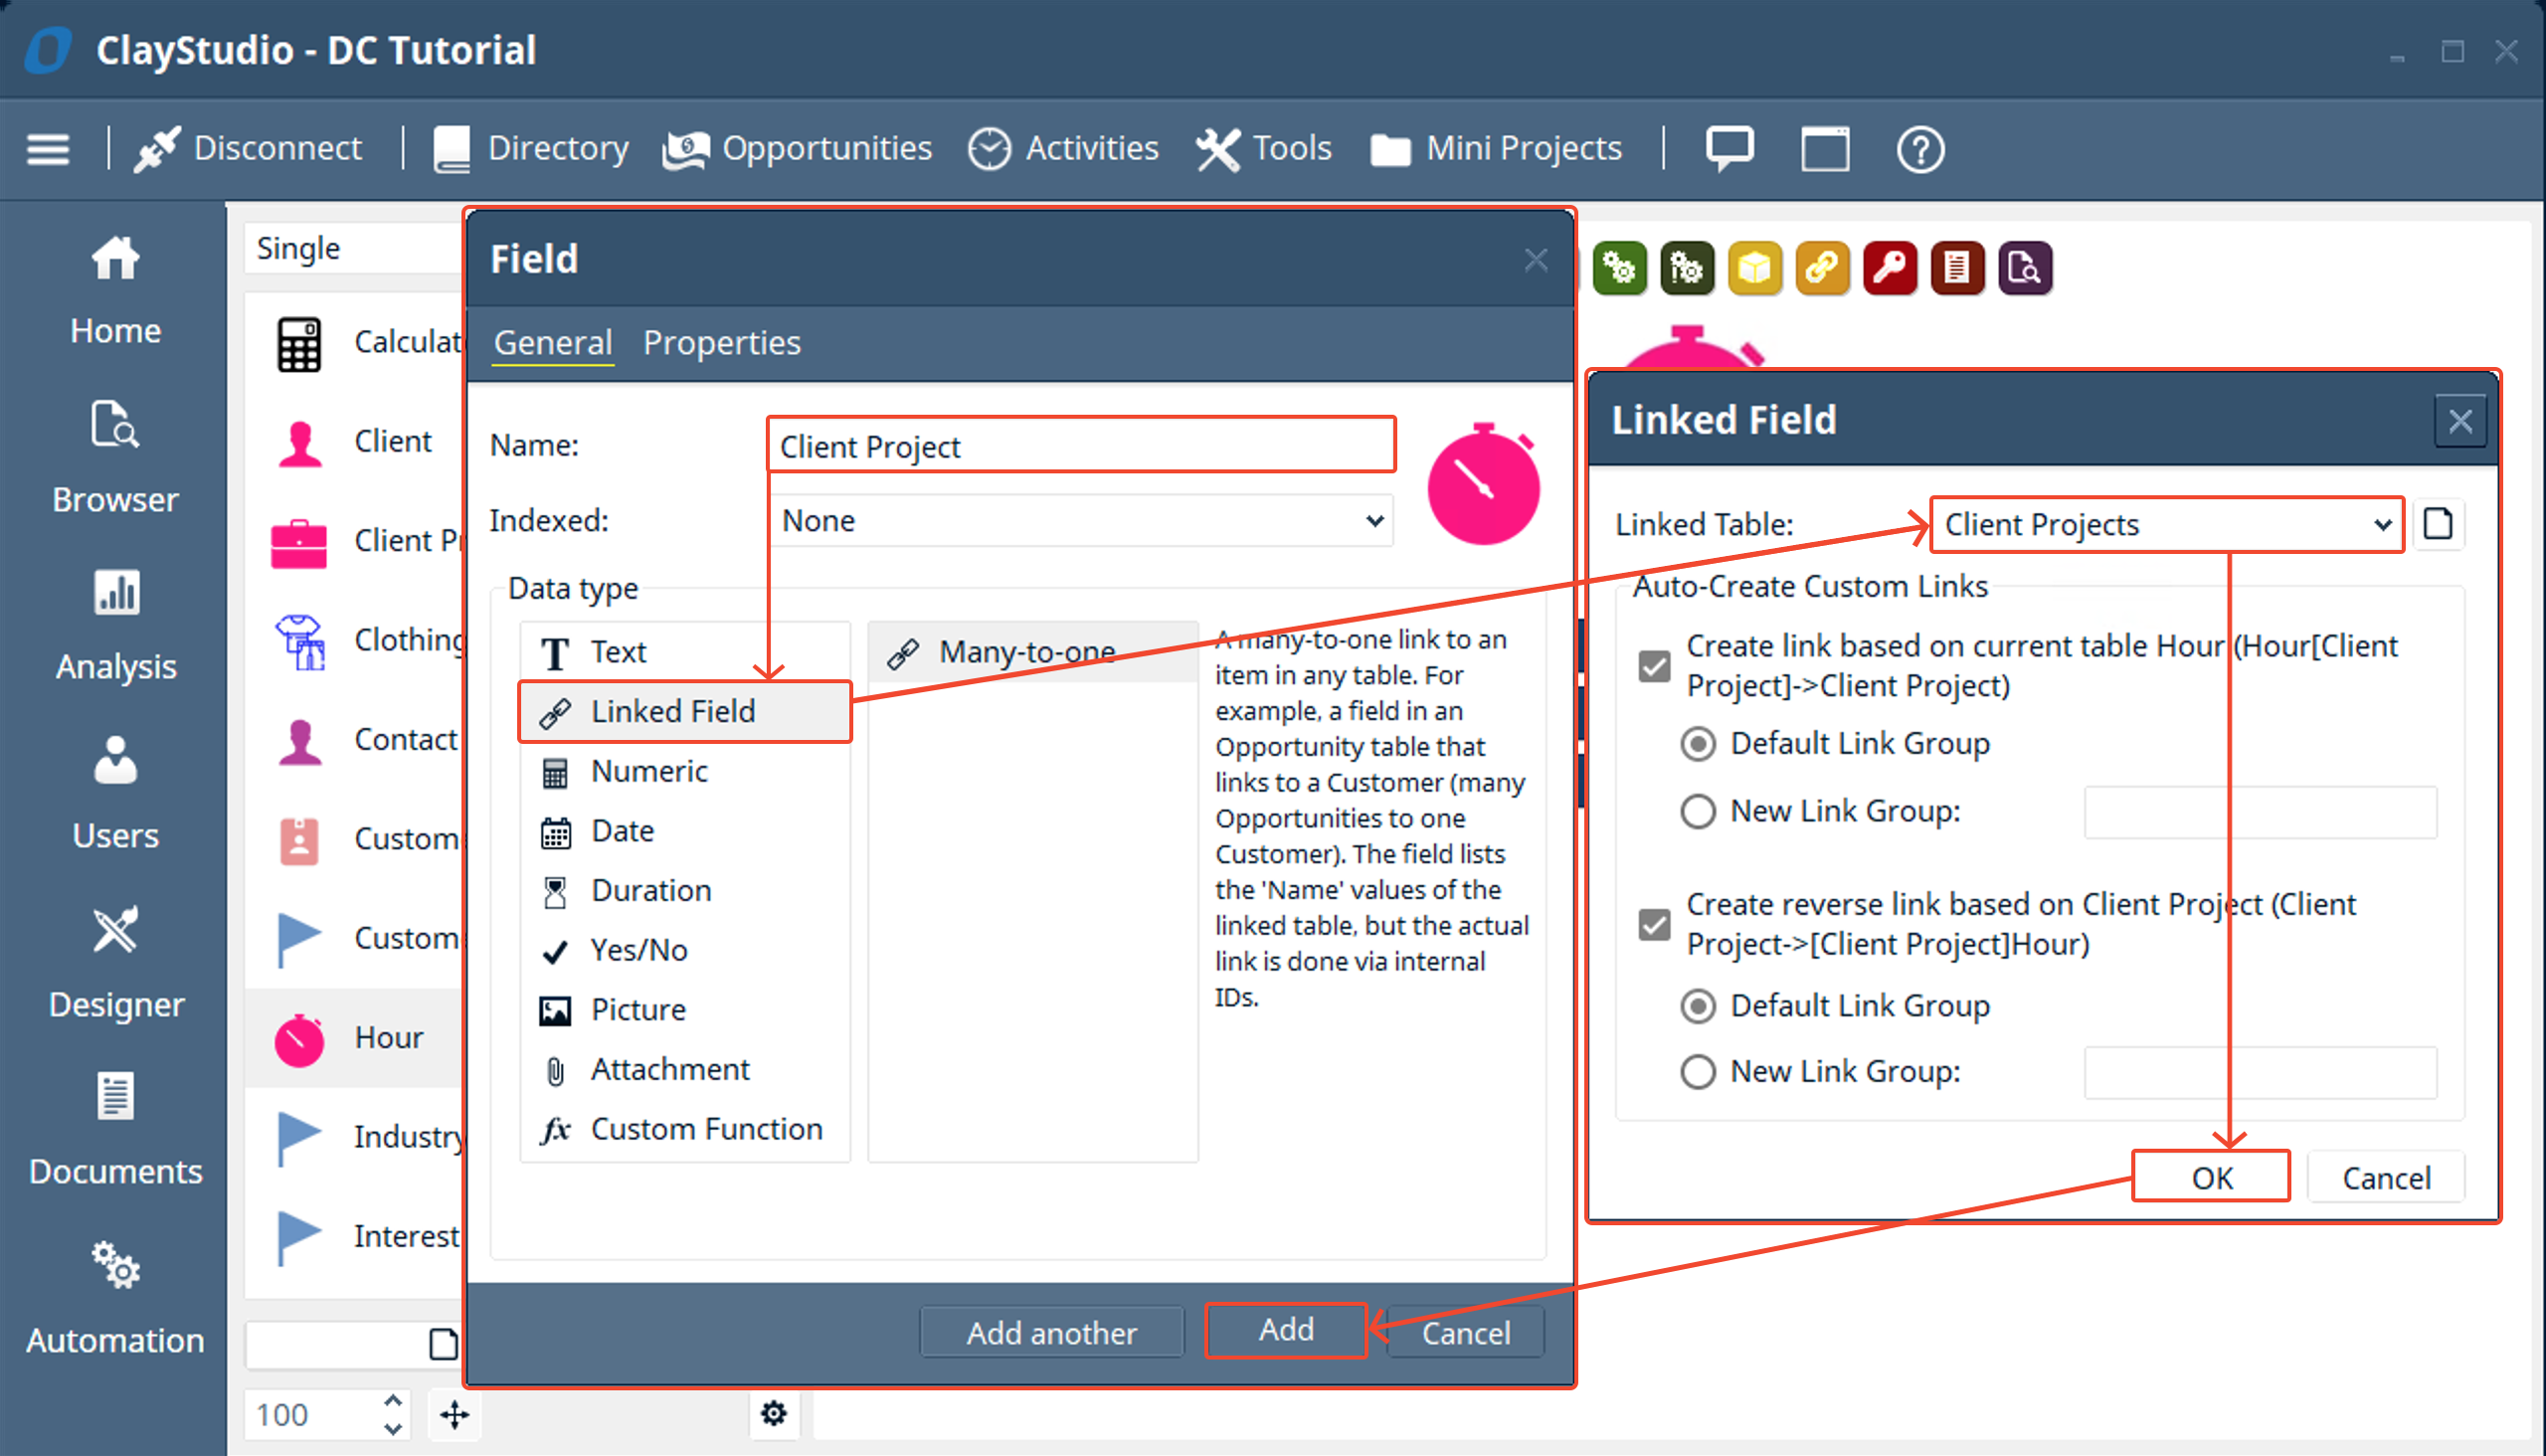
- In the “Client Projects” table lets add fields for: Due Date, Notes, and a many-to-one linked field to the “Client” table
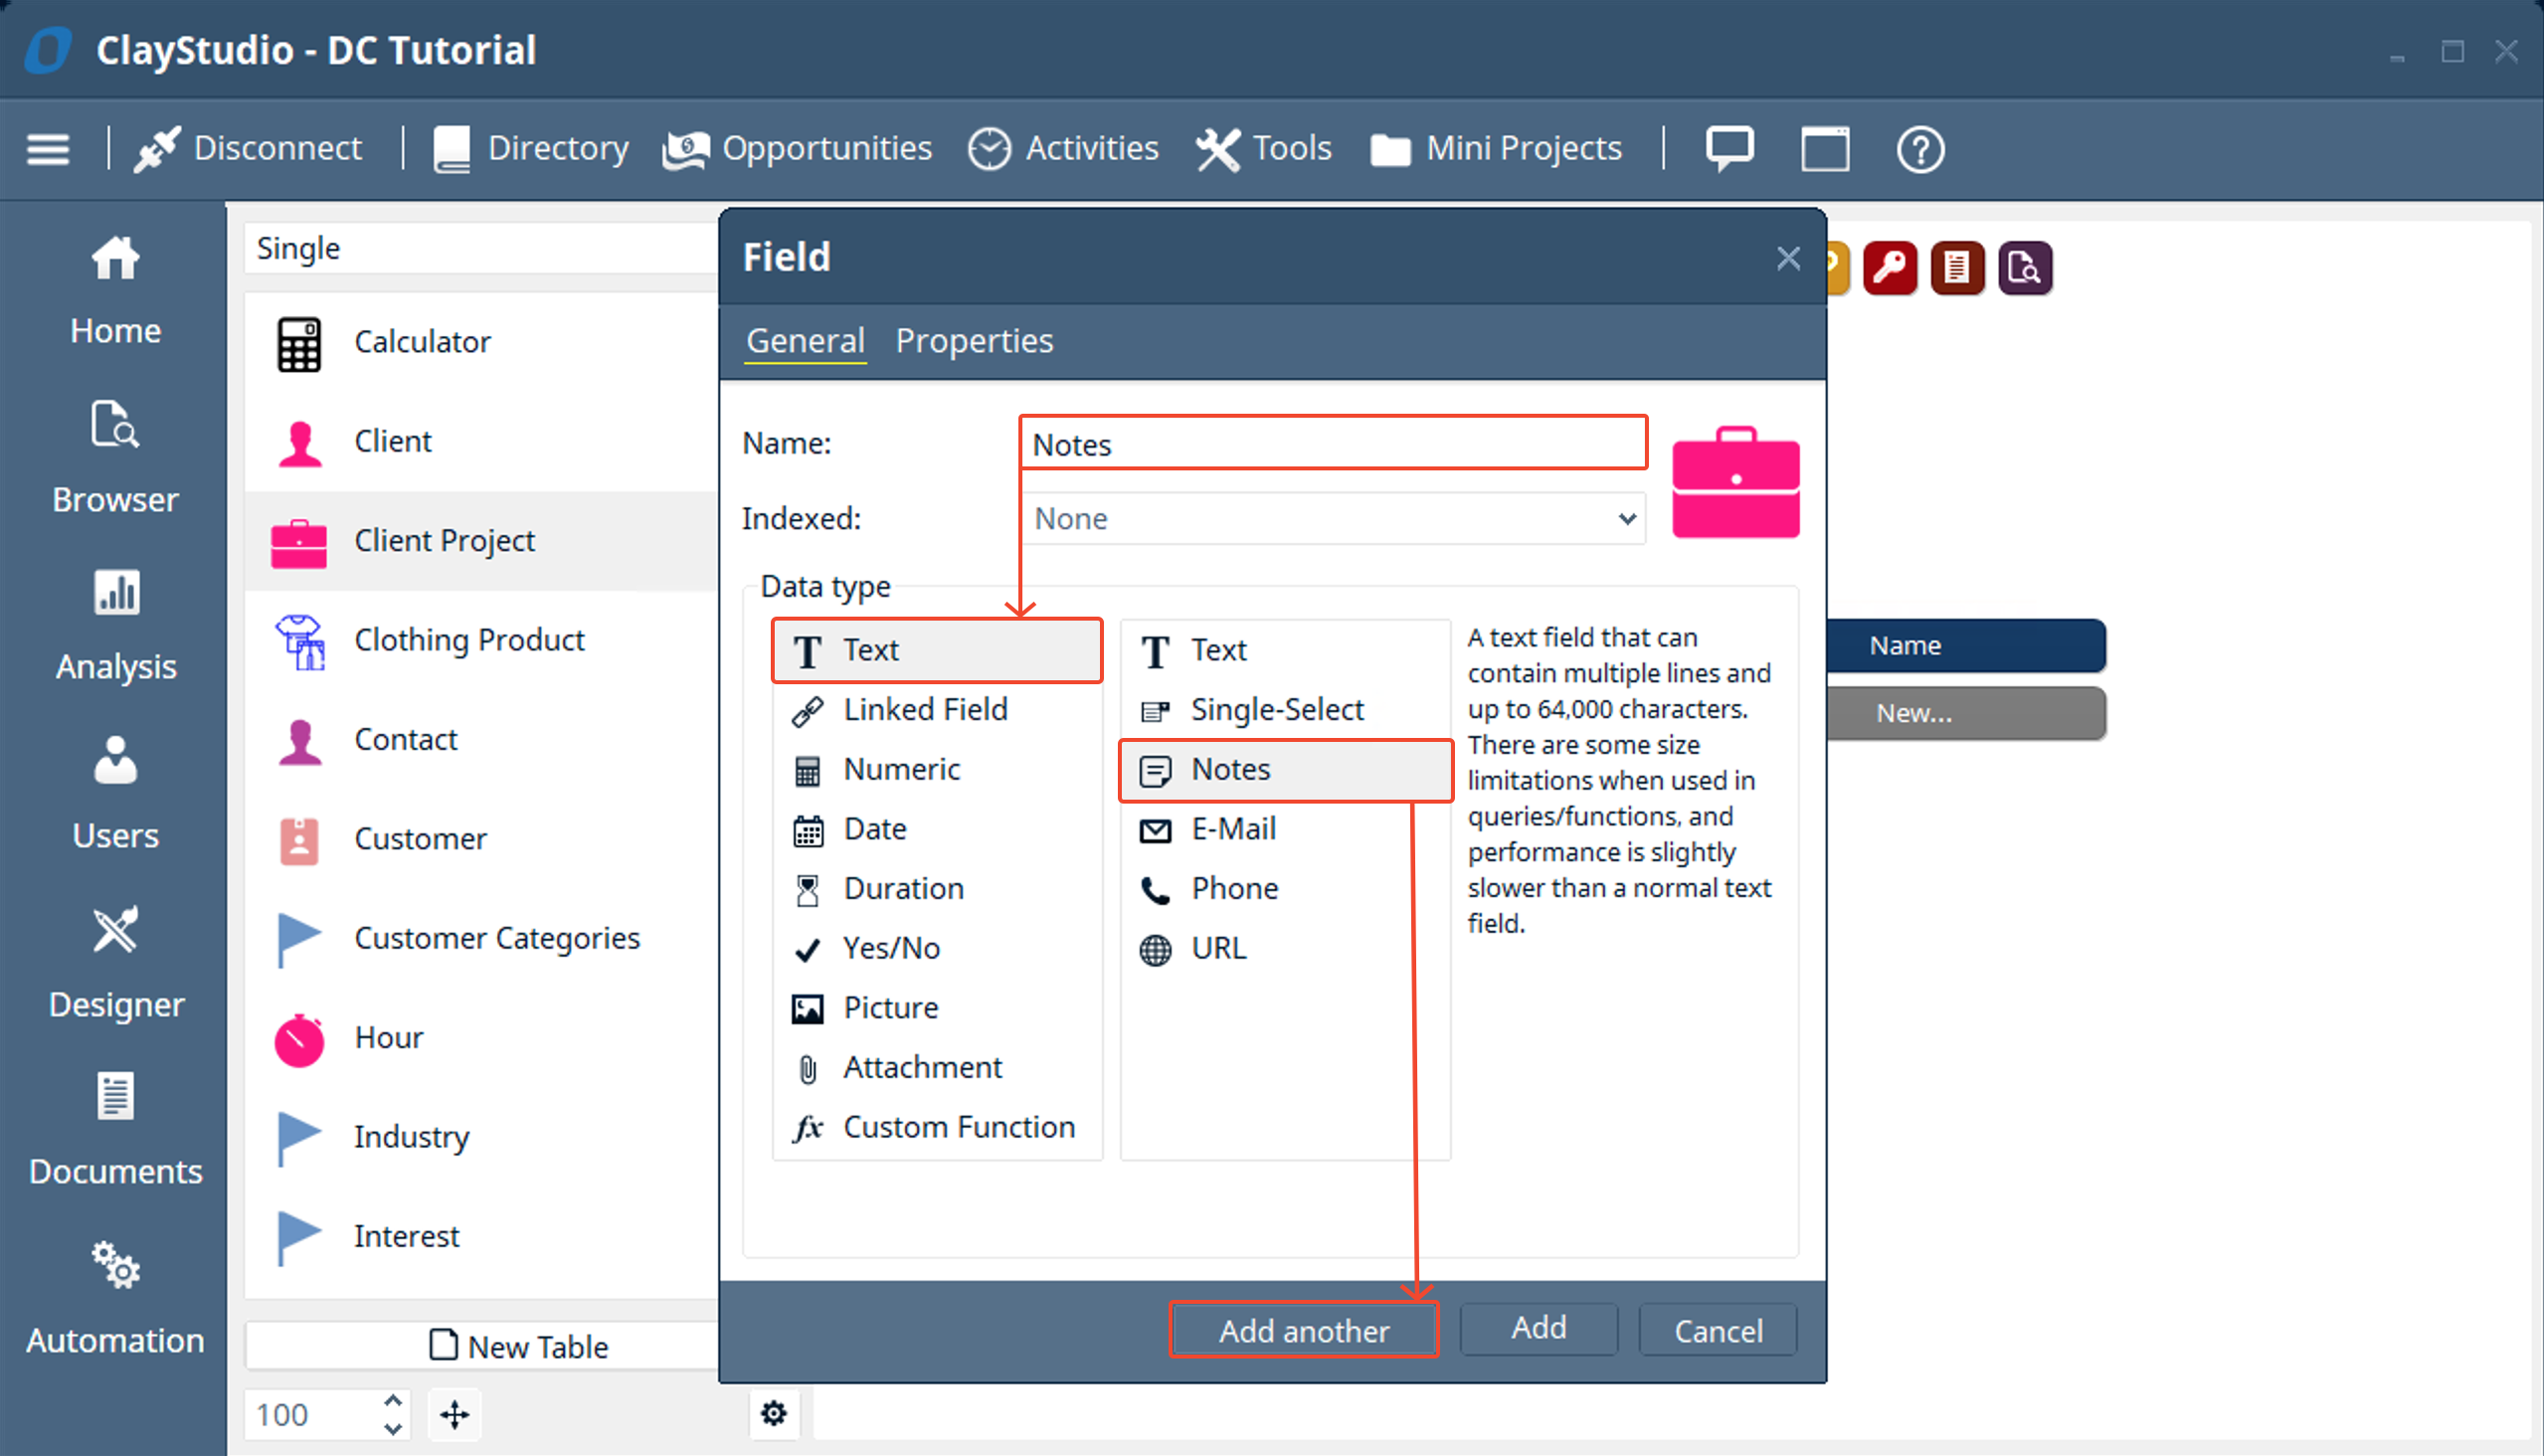
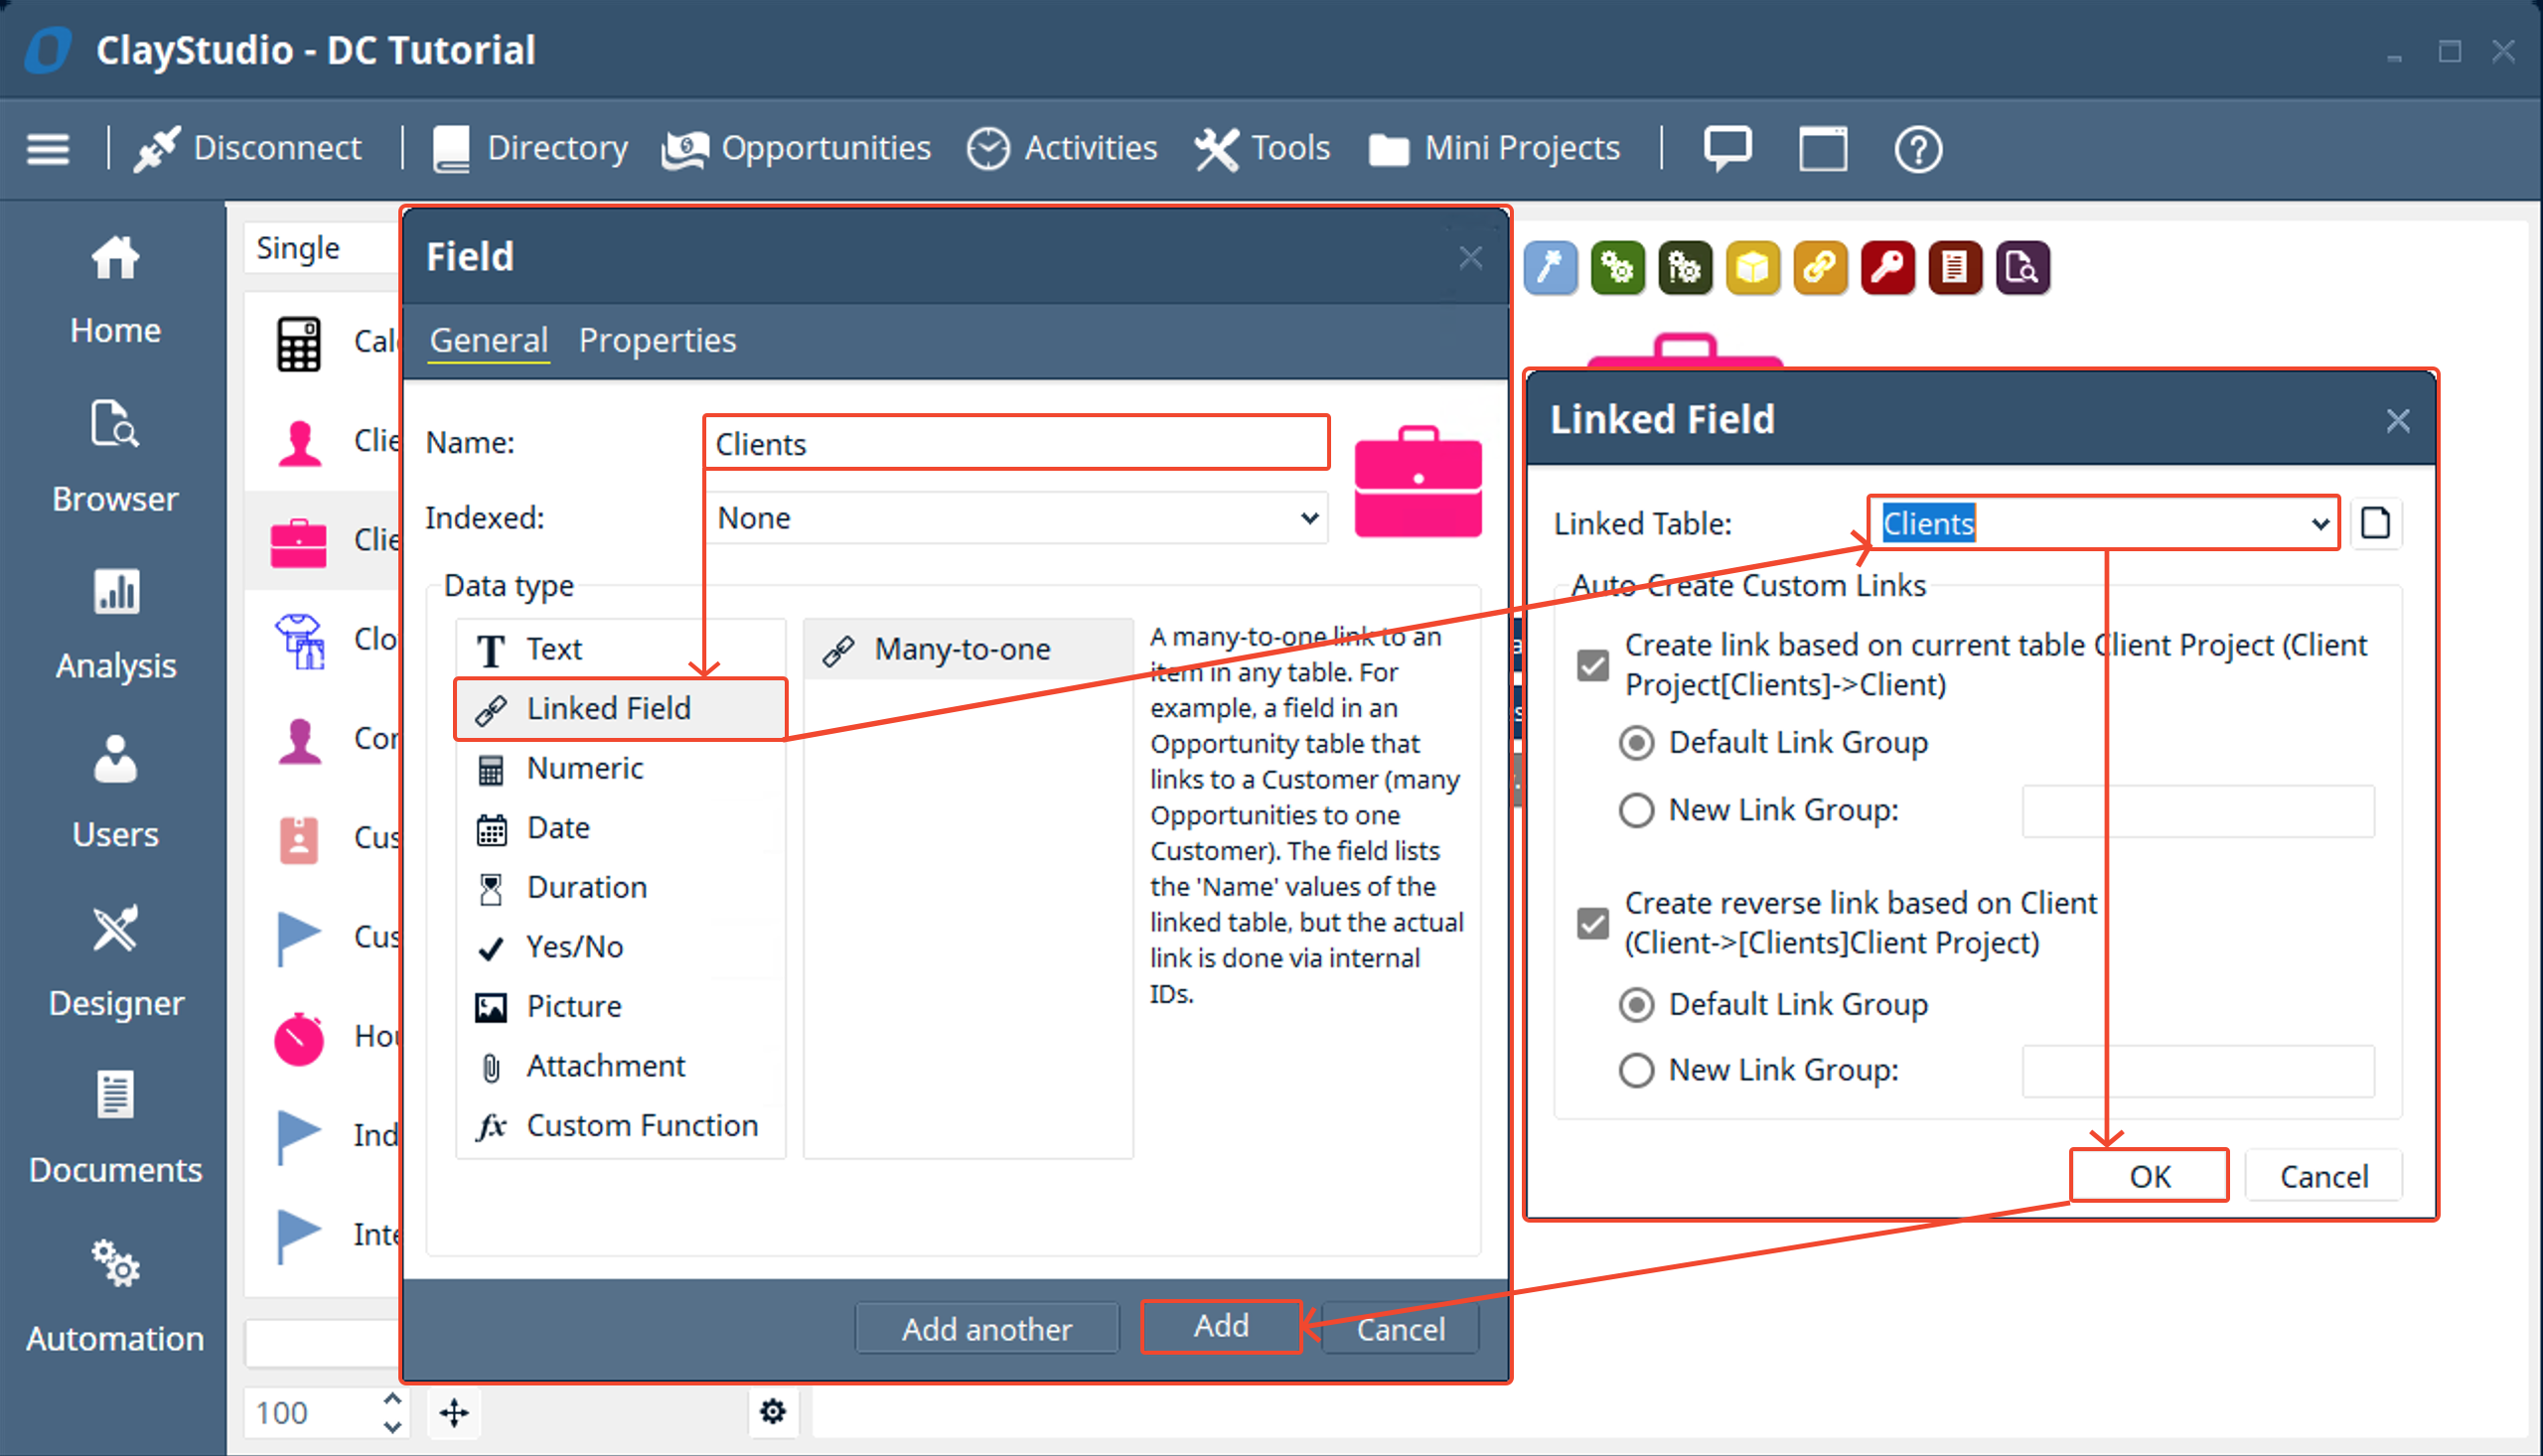
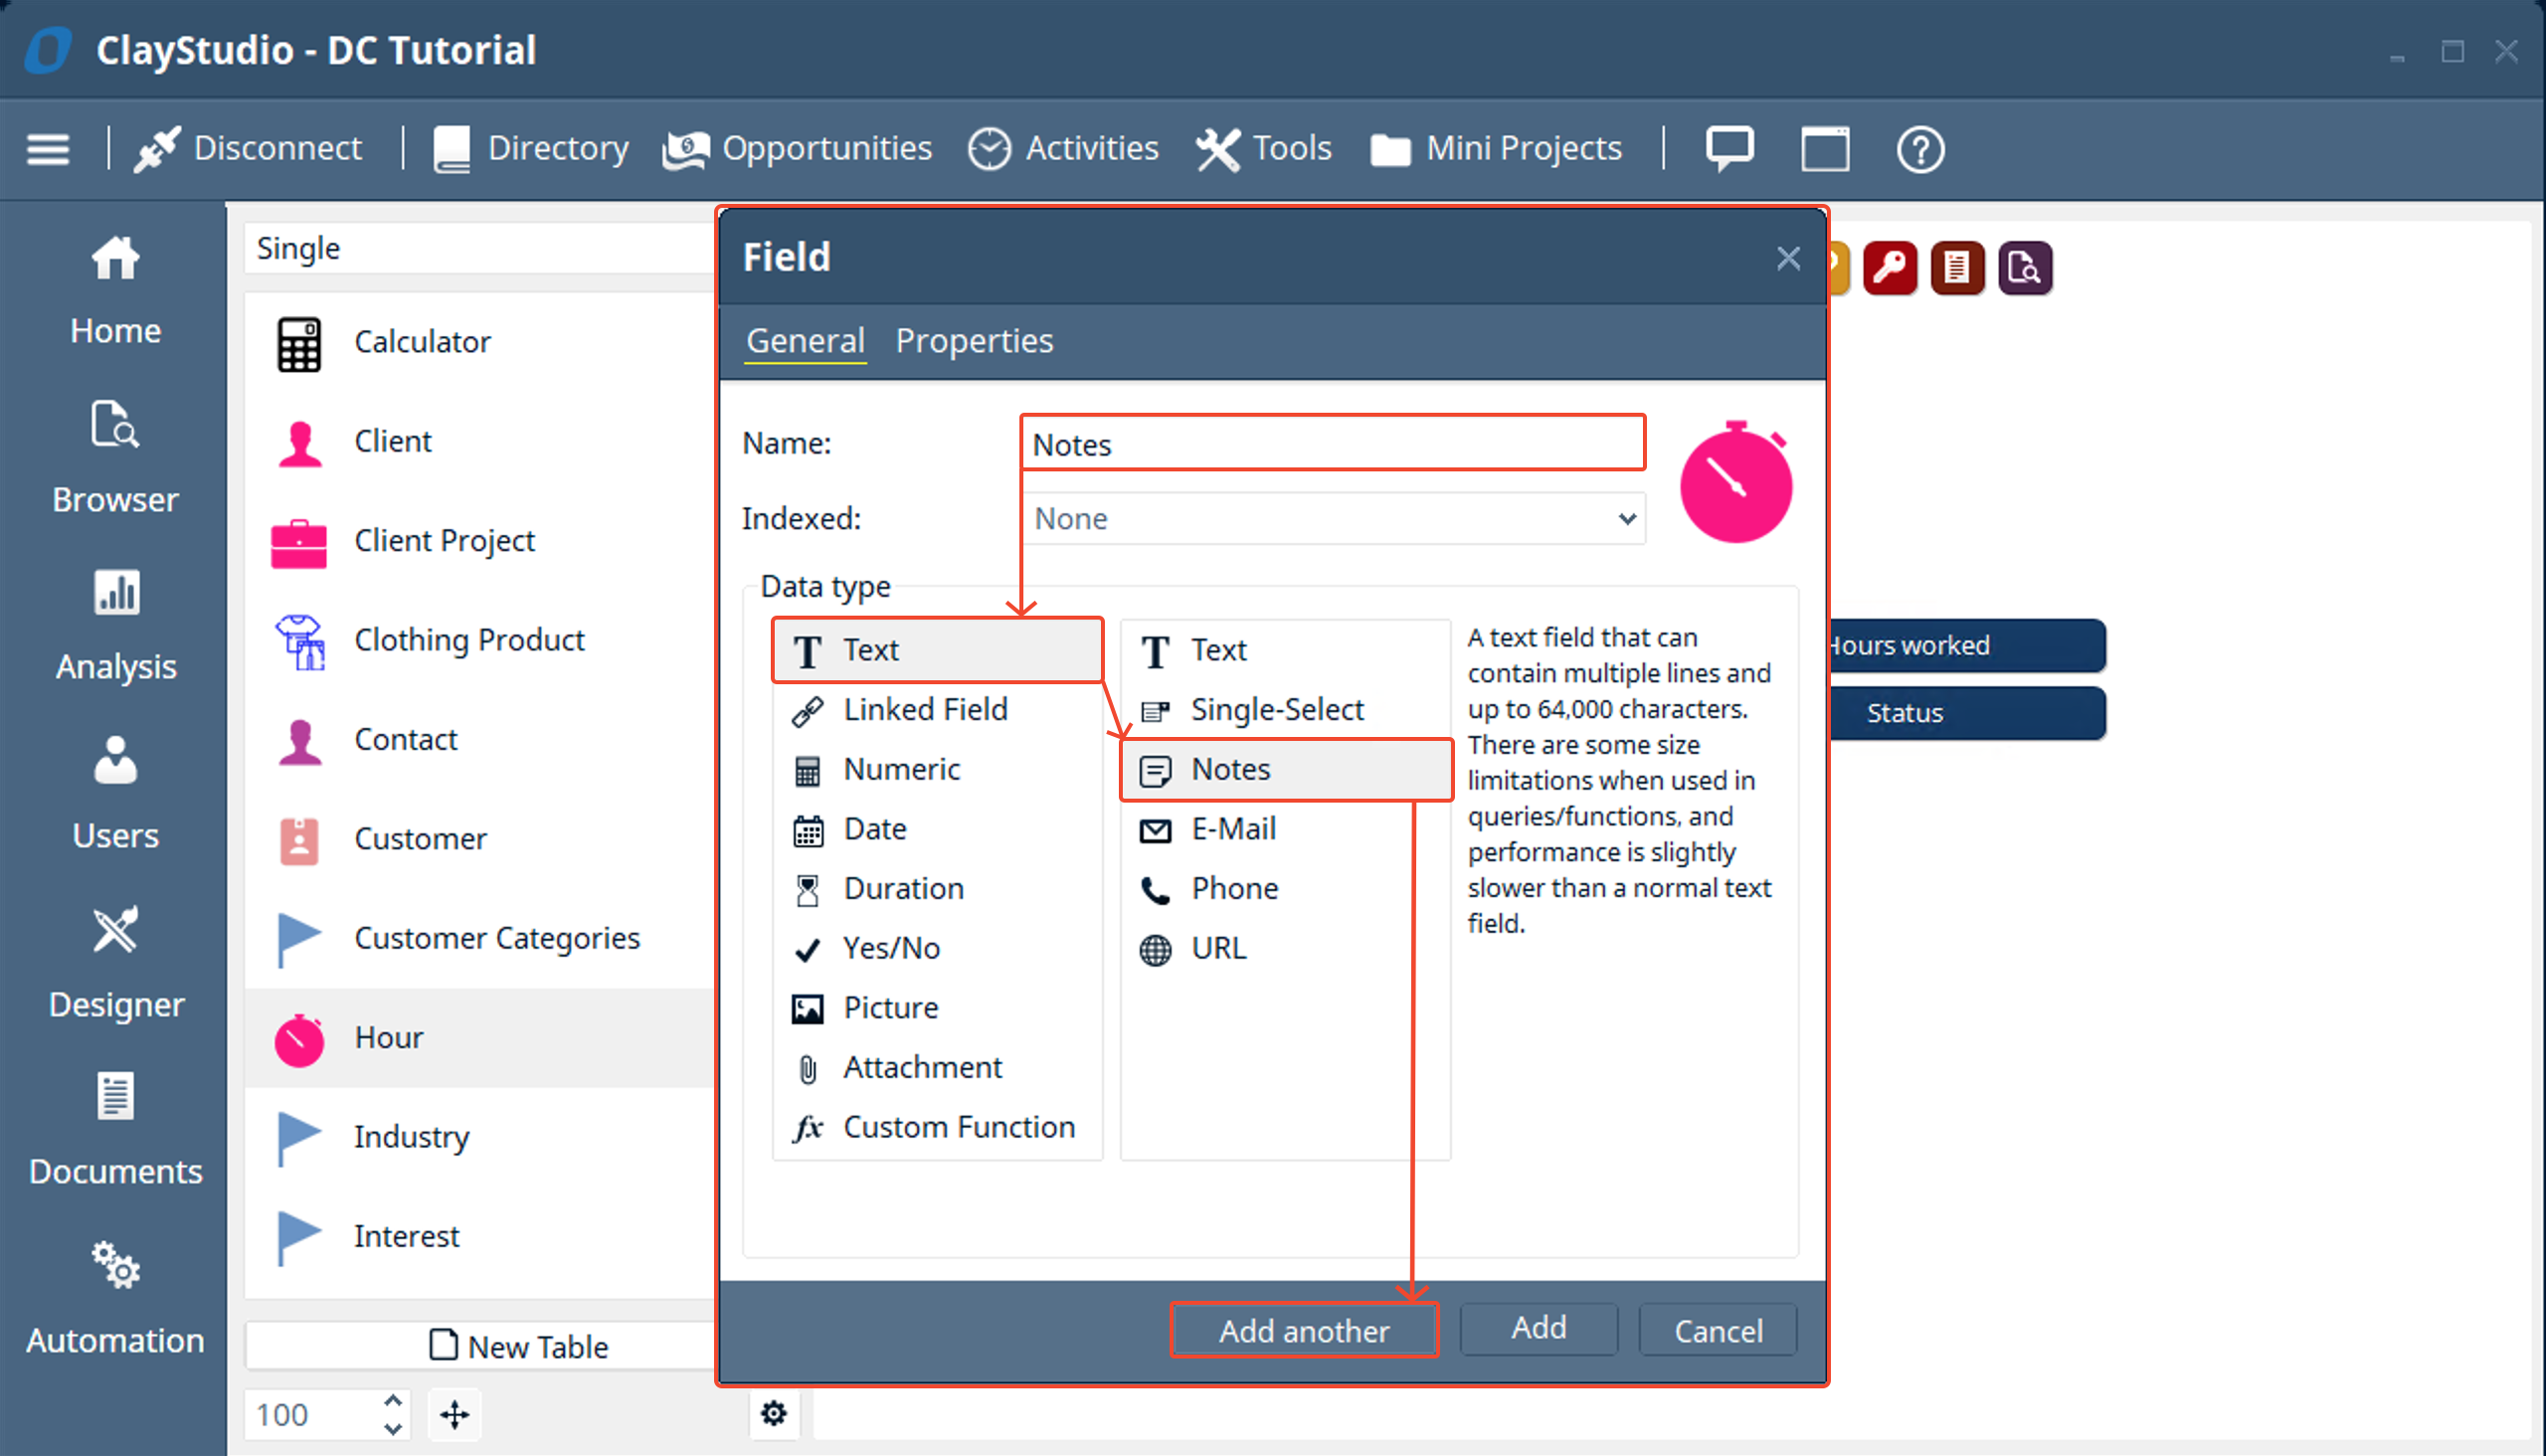
- In the “Hours” table lets add fields for: Hours worked, Date, Notes, and a many-to-one linked field to the “Client Project” table
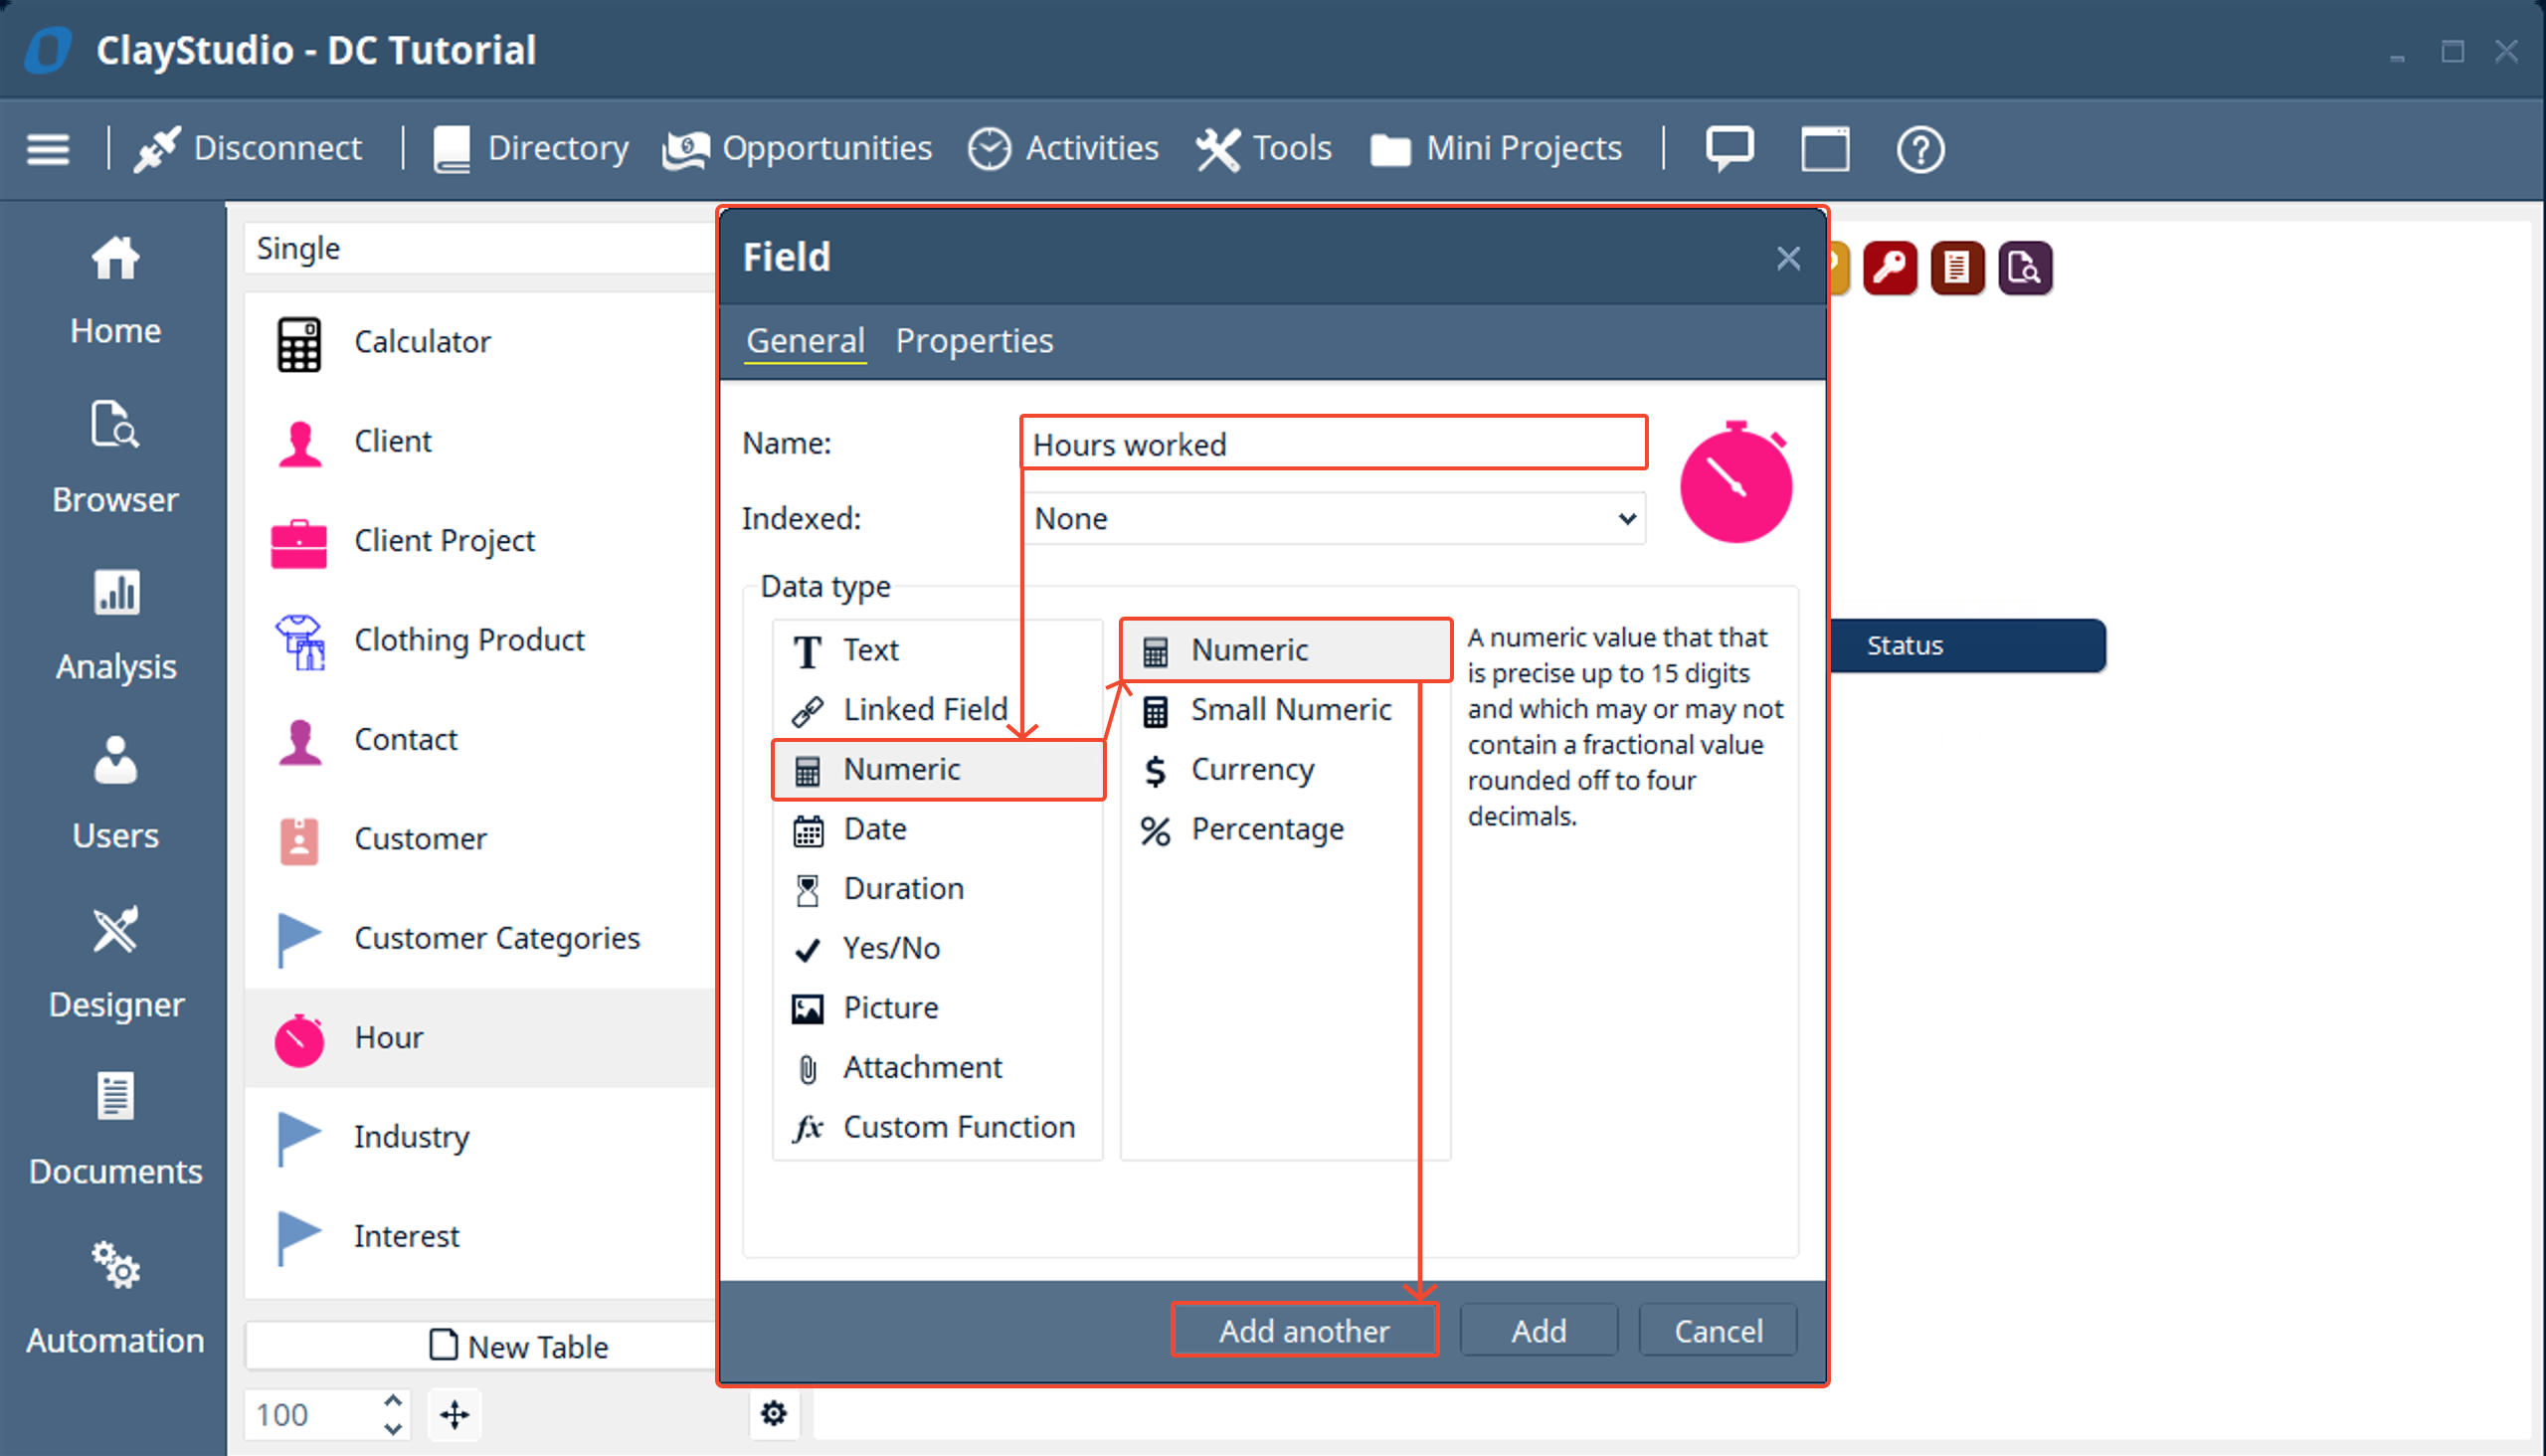
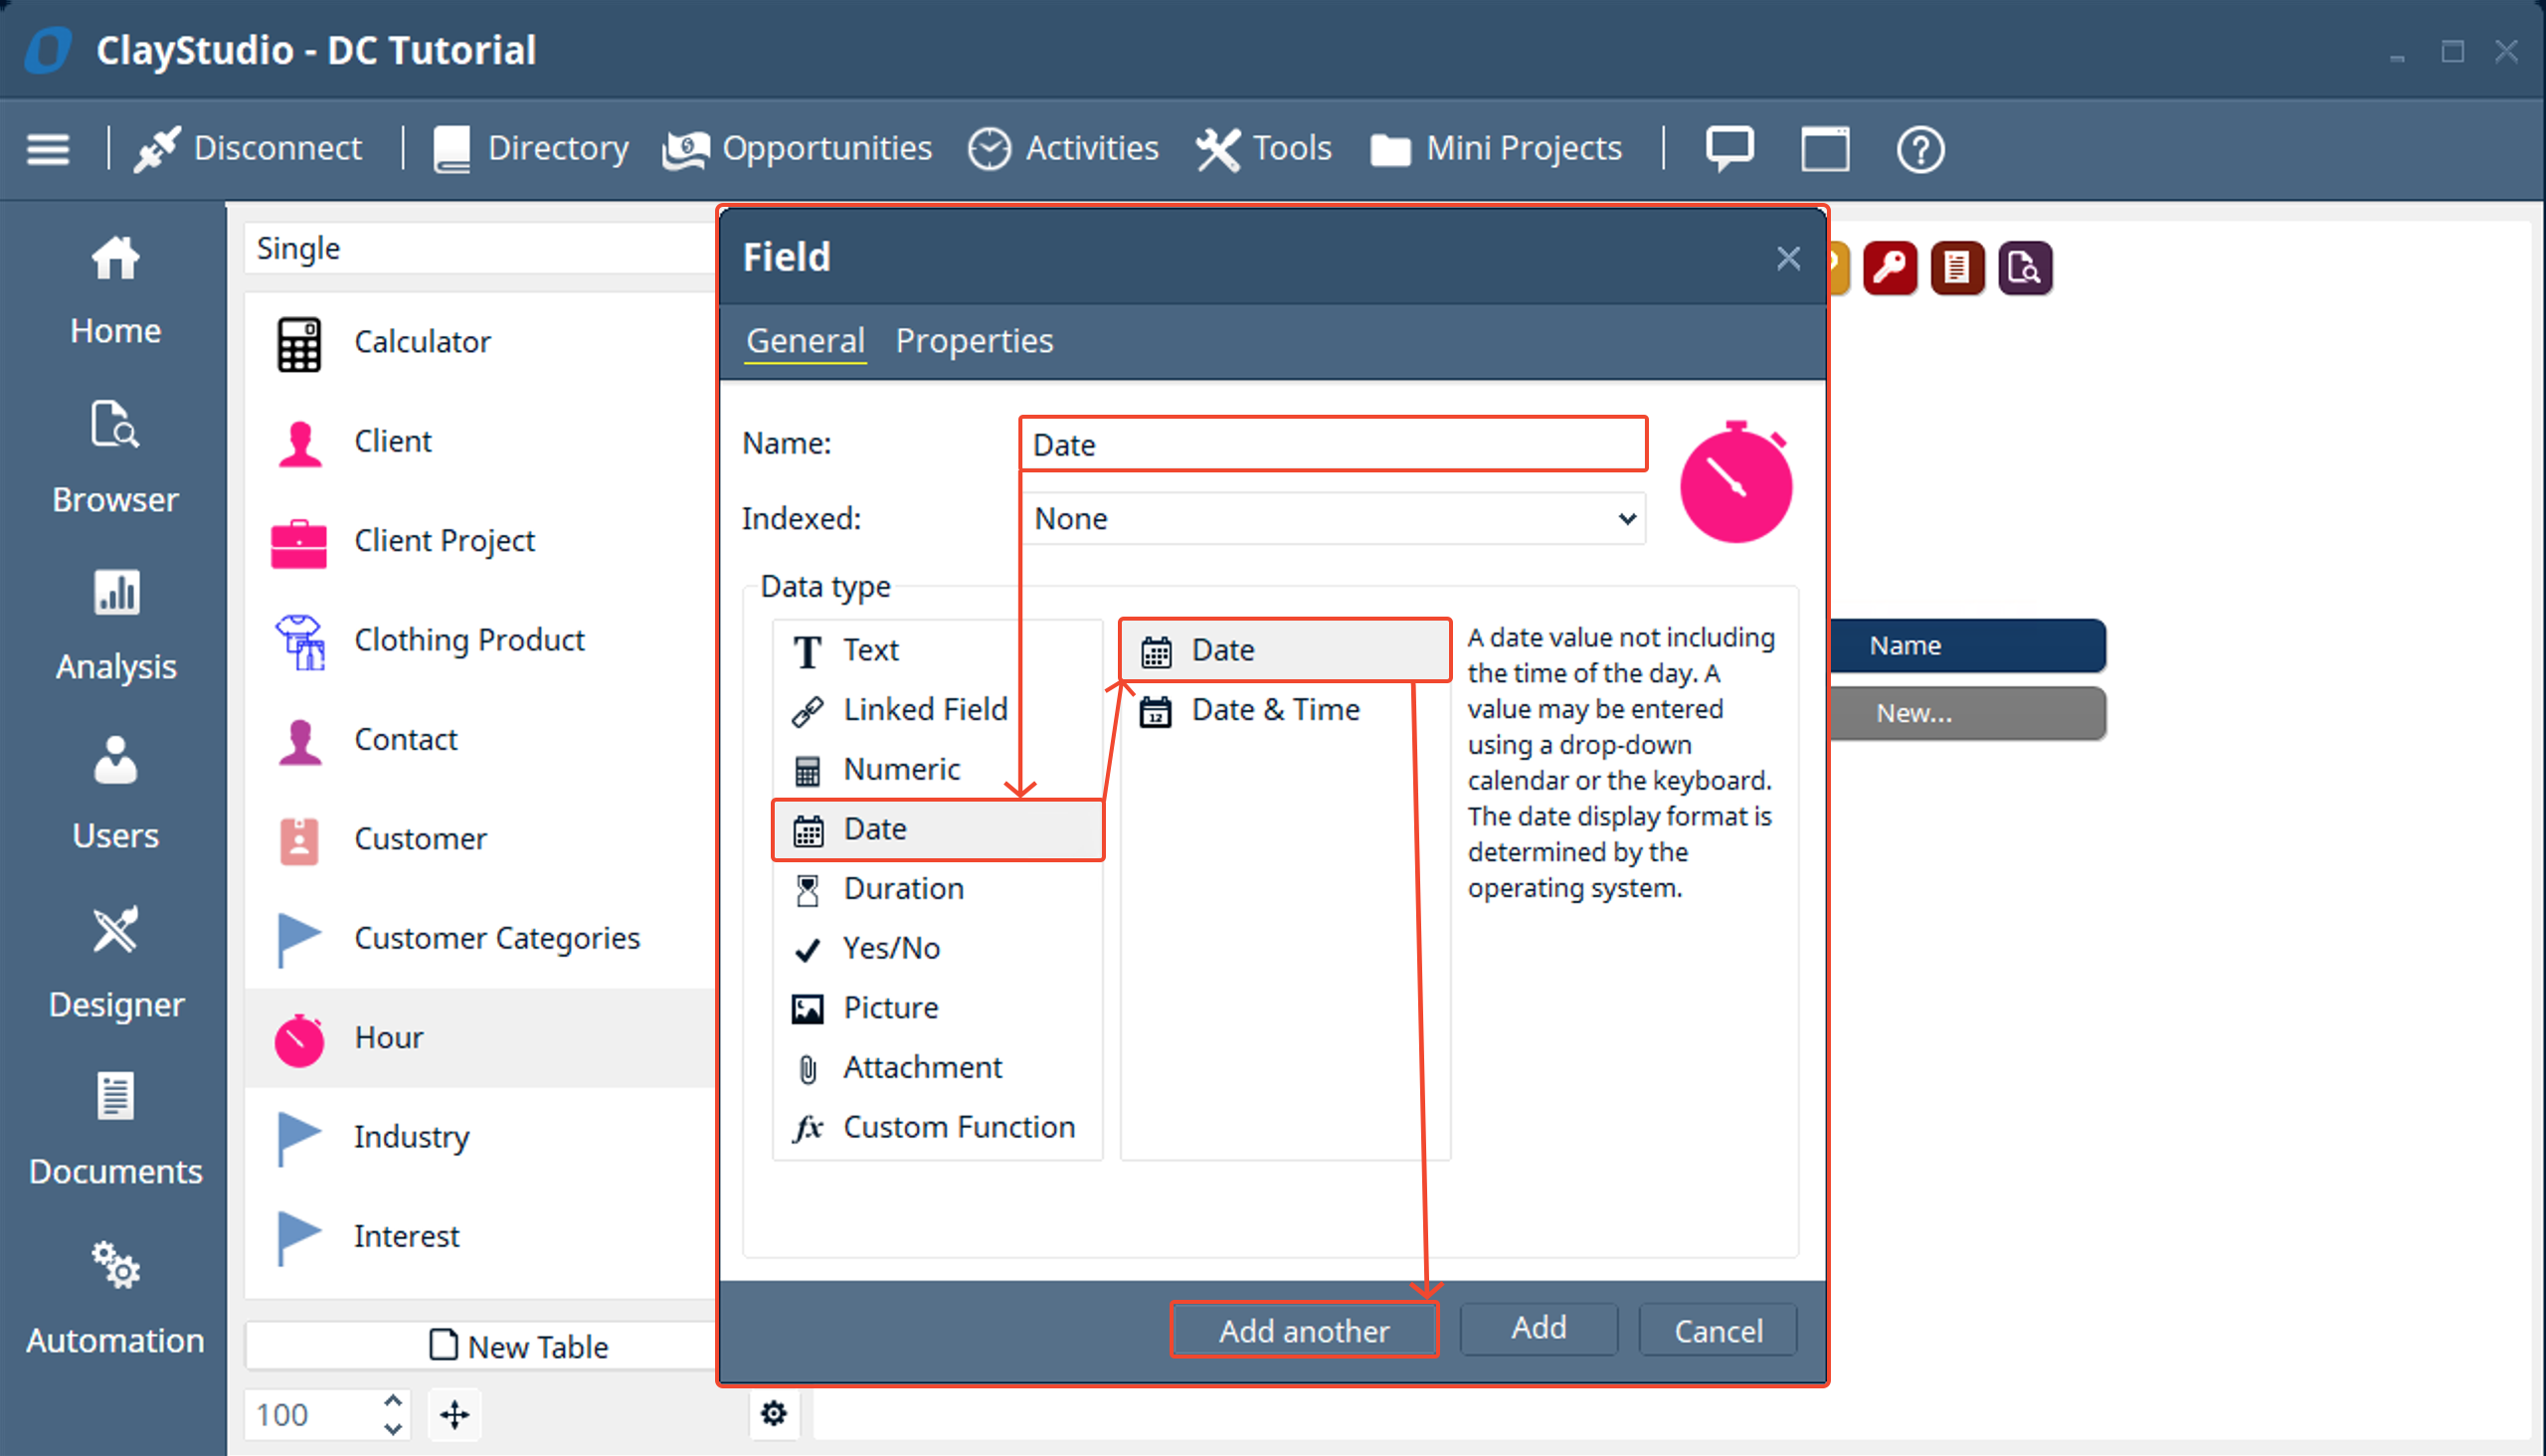
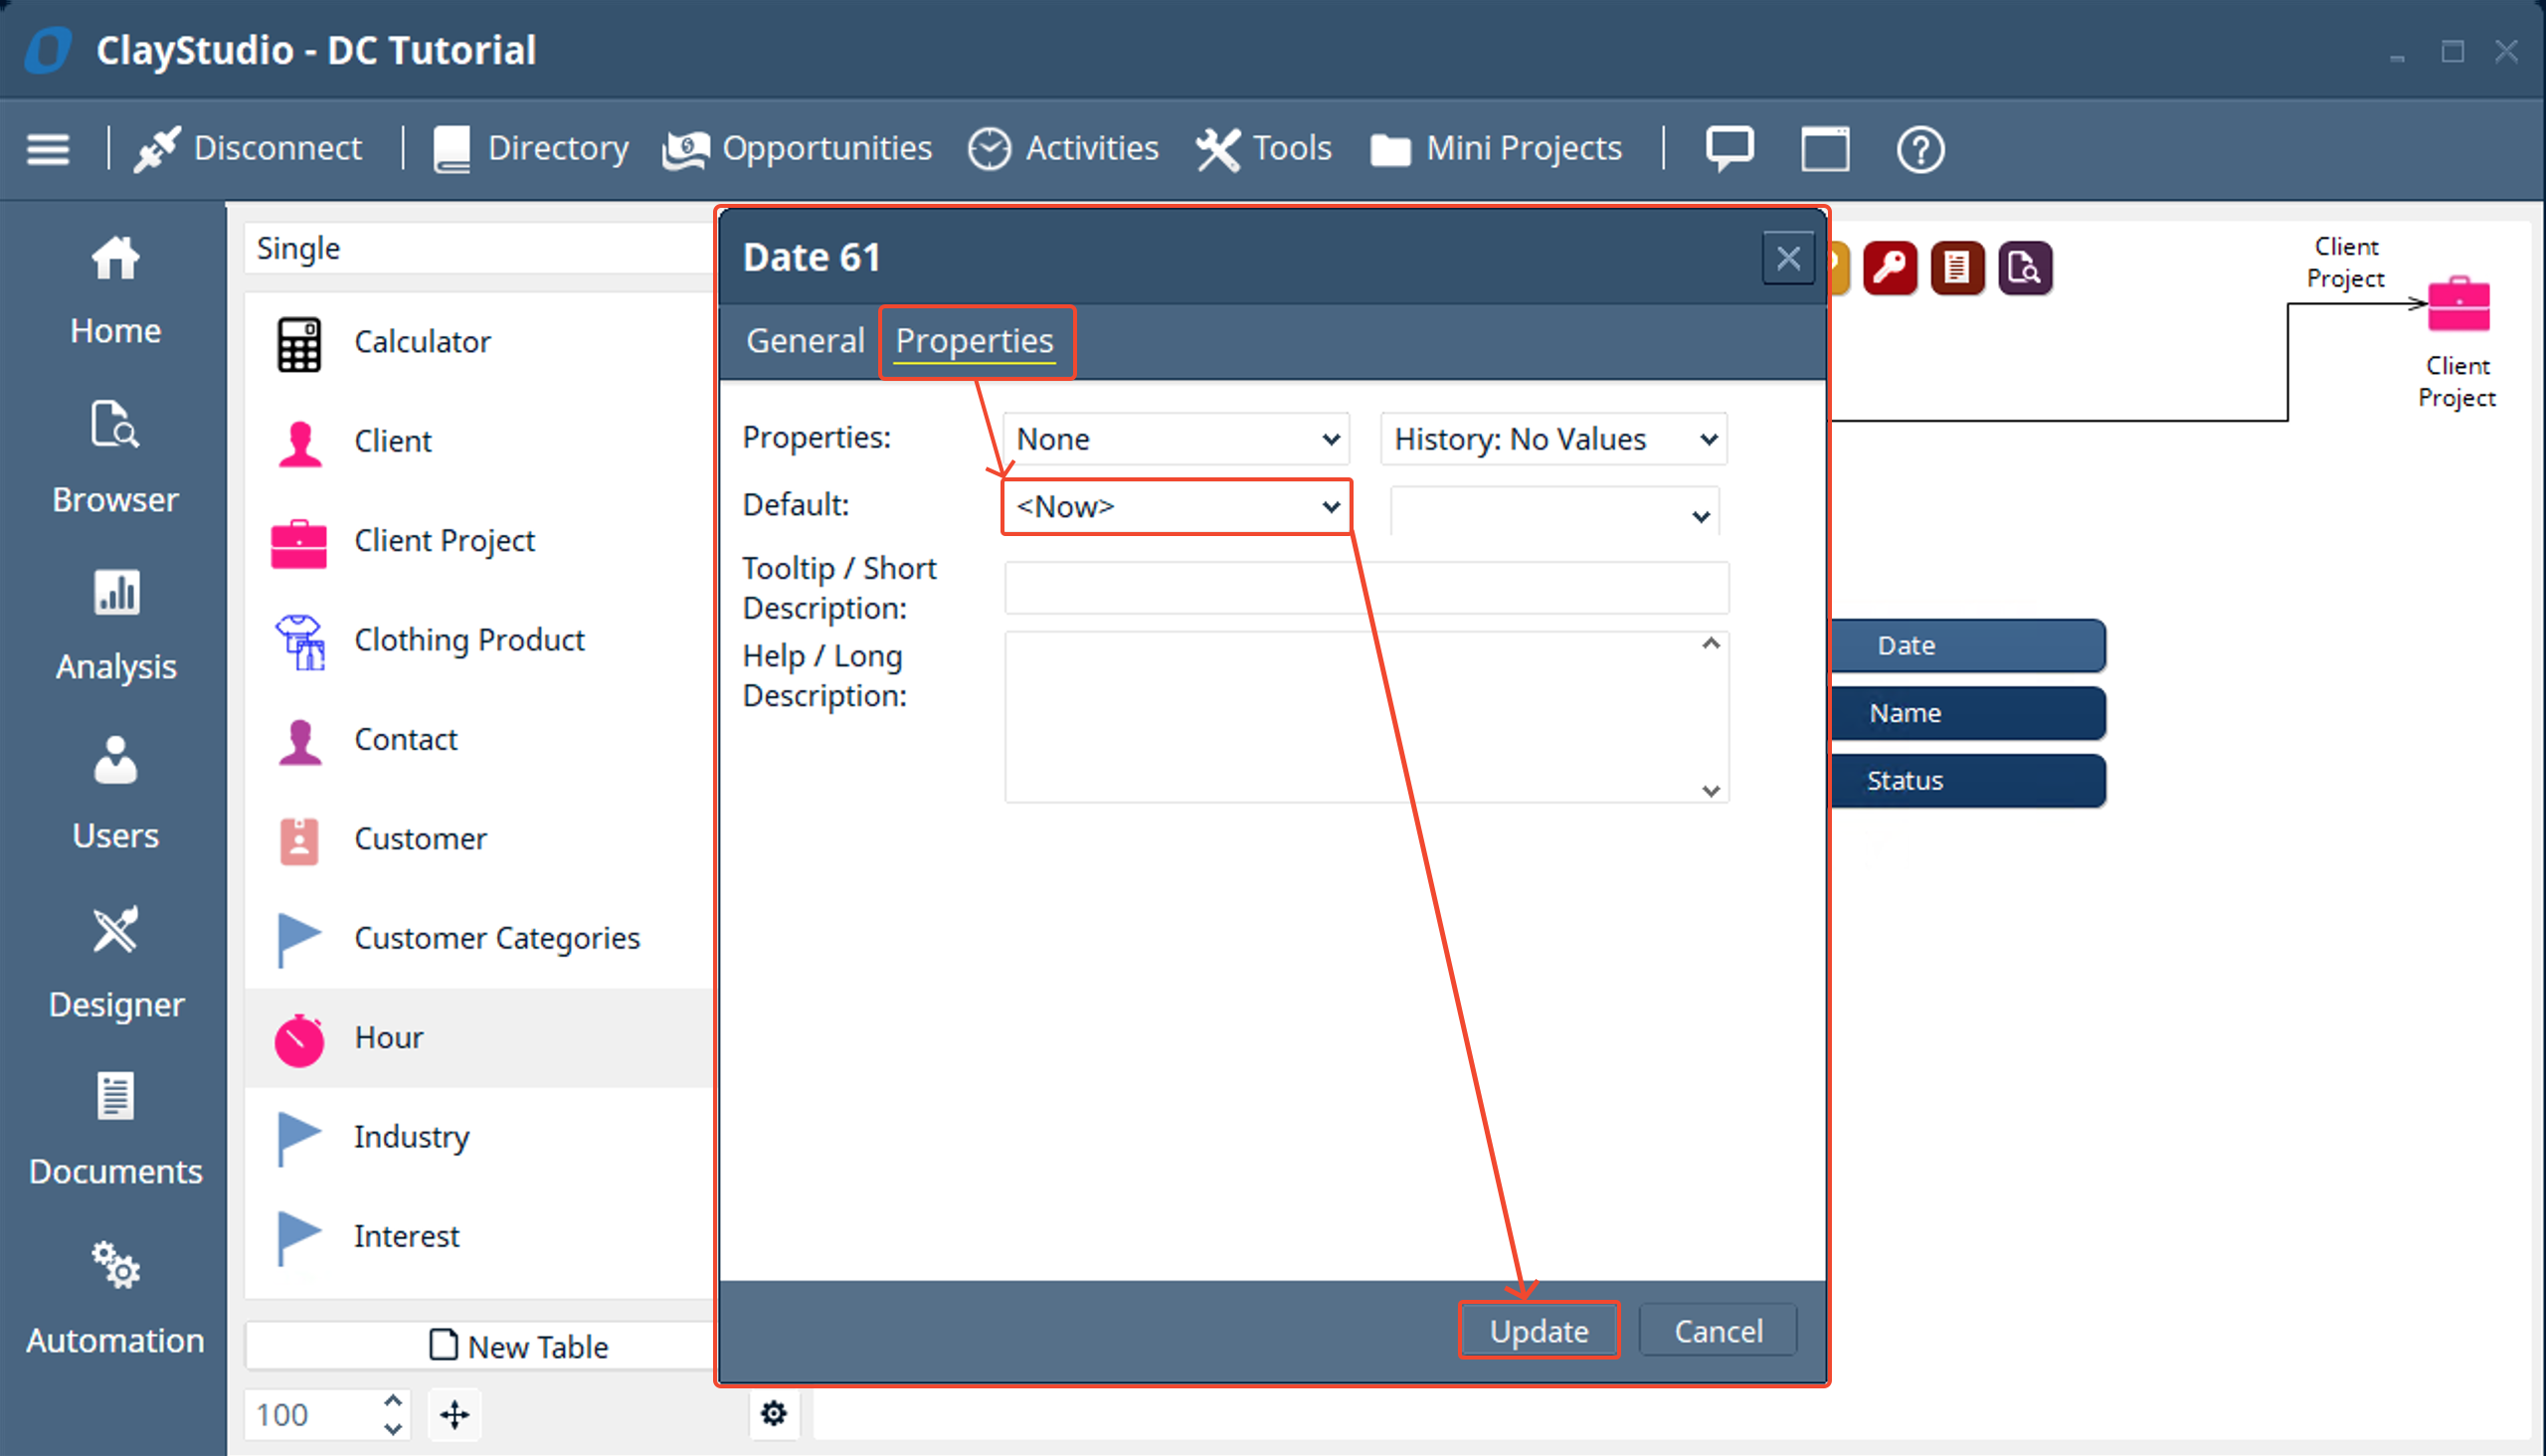
- Next, click on the “Date” field in the “Hours” table and set the default field properties to be “<Now>” so that by default a new “Hours” record has the current date
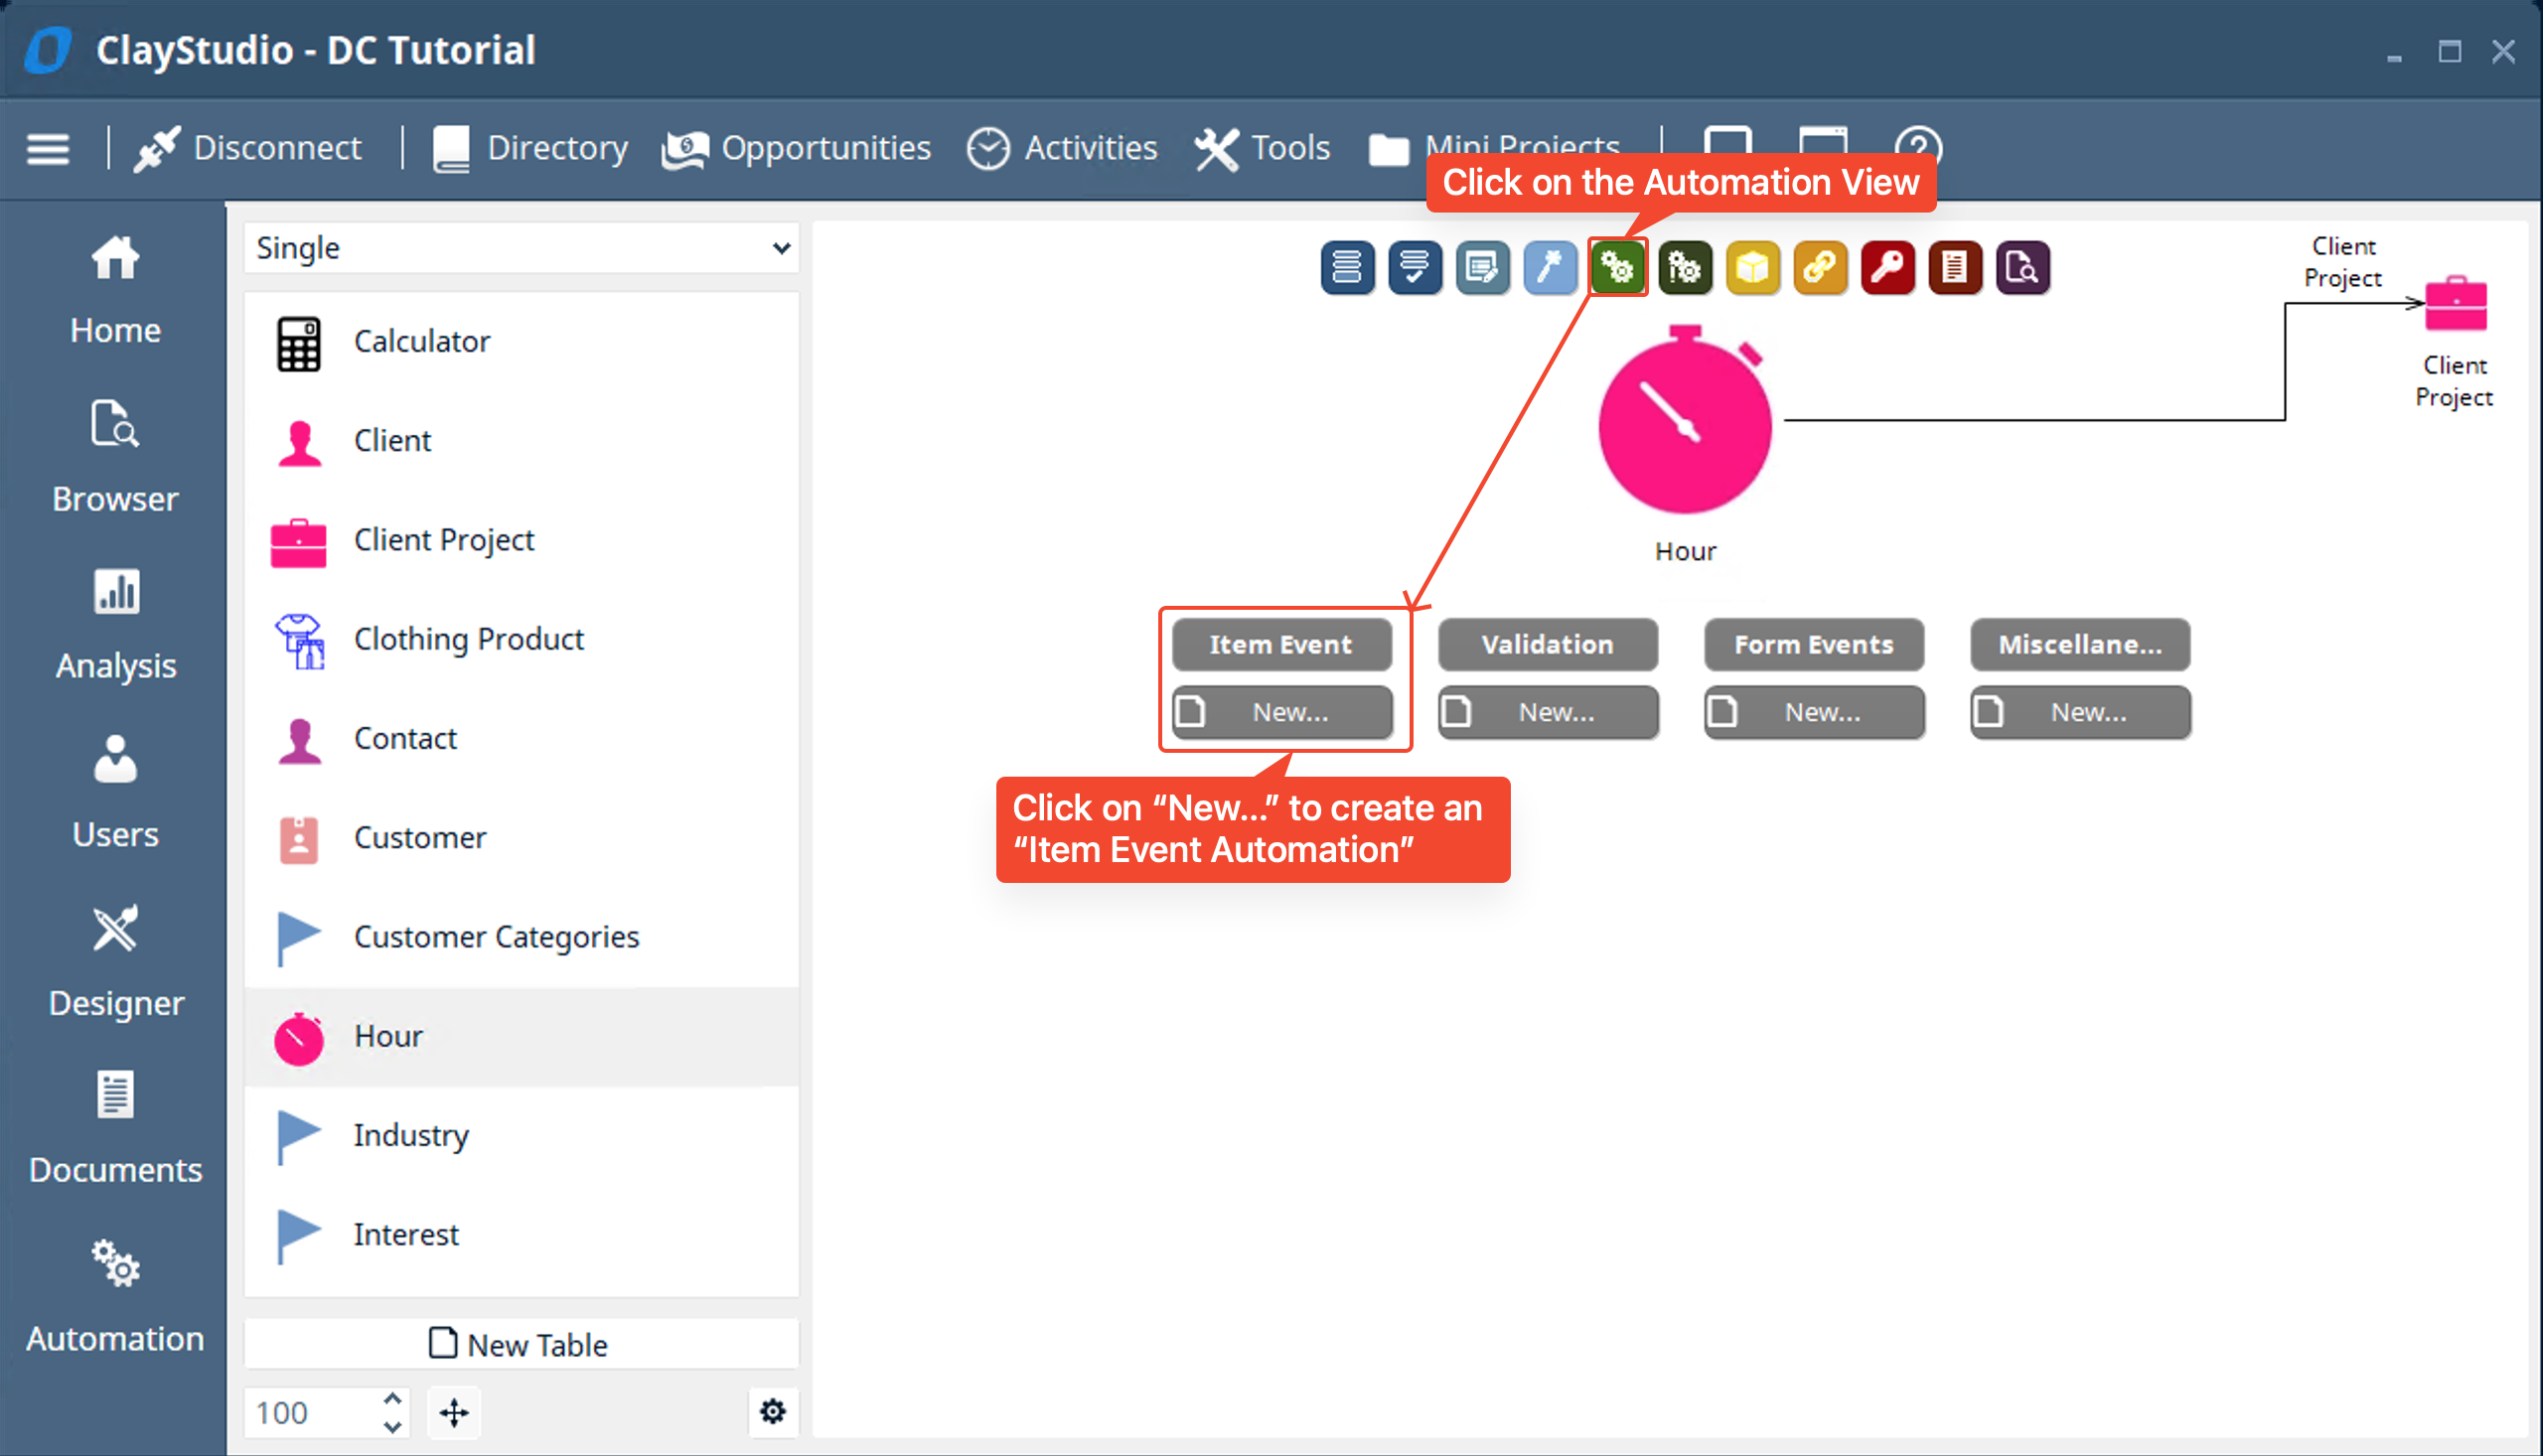
- Now, let’s set up a simple automation to automatically fill out the “Name” field based on the information you fill out in the “Hour” record. To do this we will go to the “Automation View” in the “Hour” table and click on the “New…” button under “Item Event”
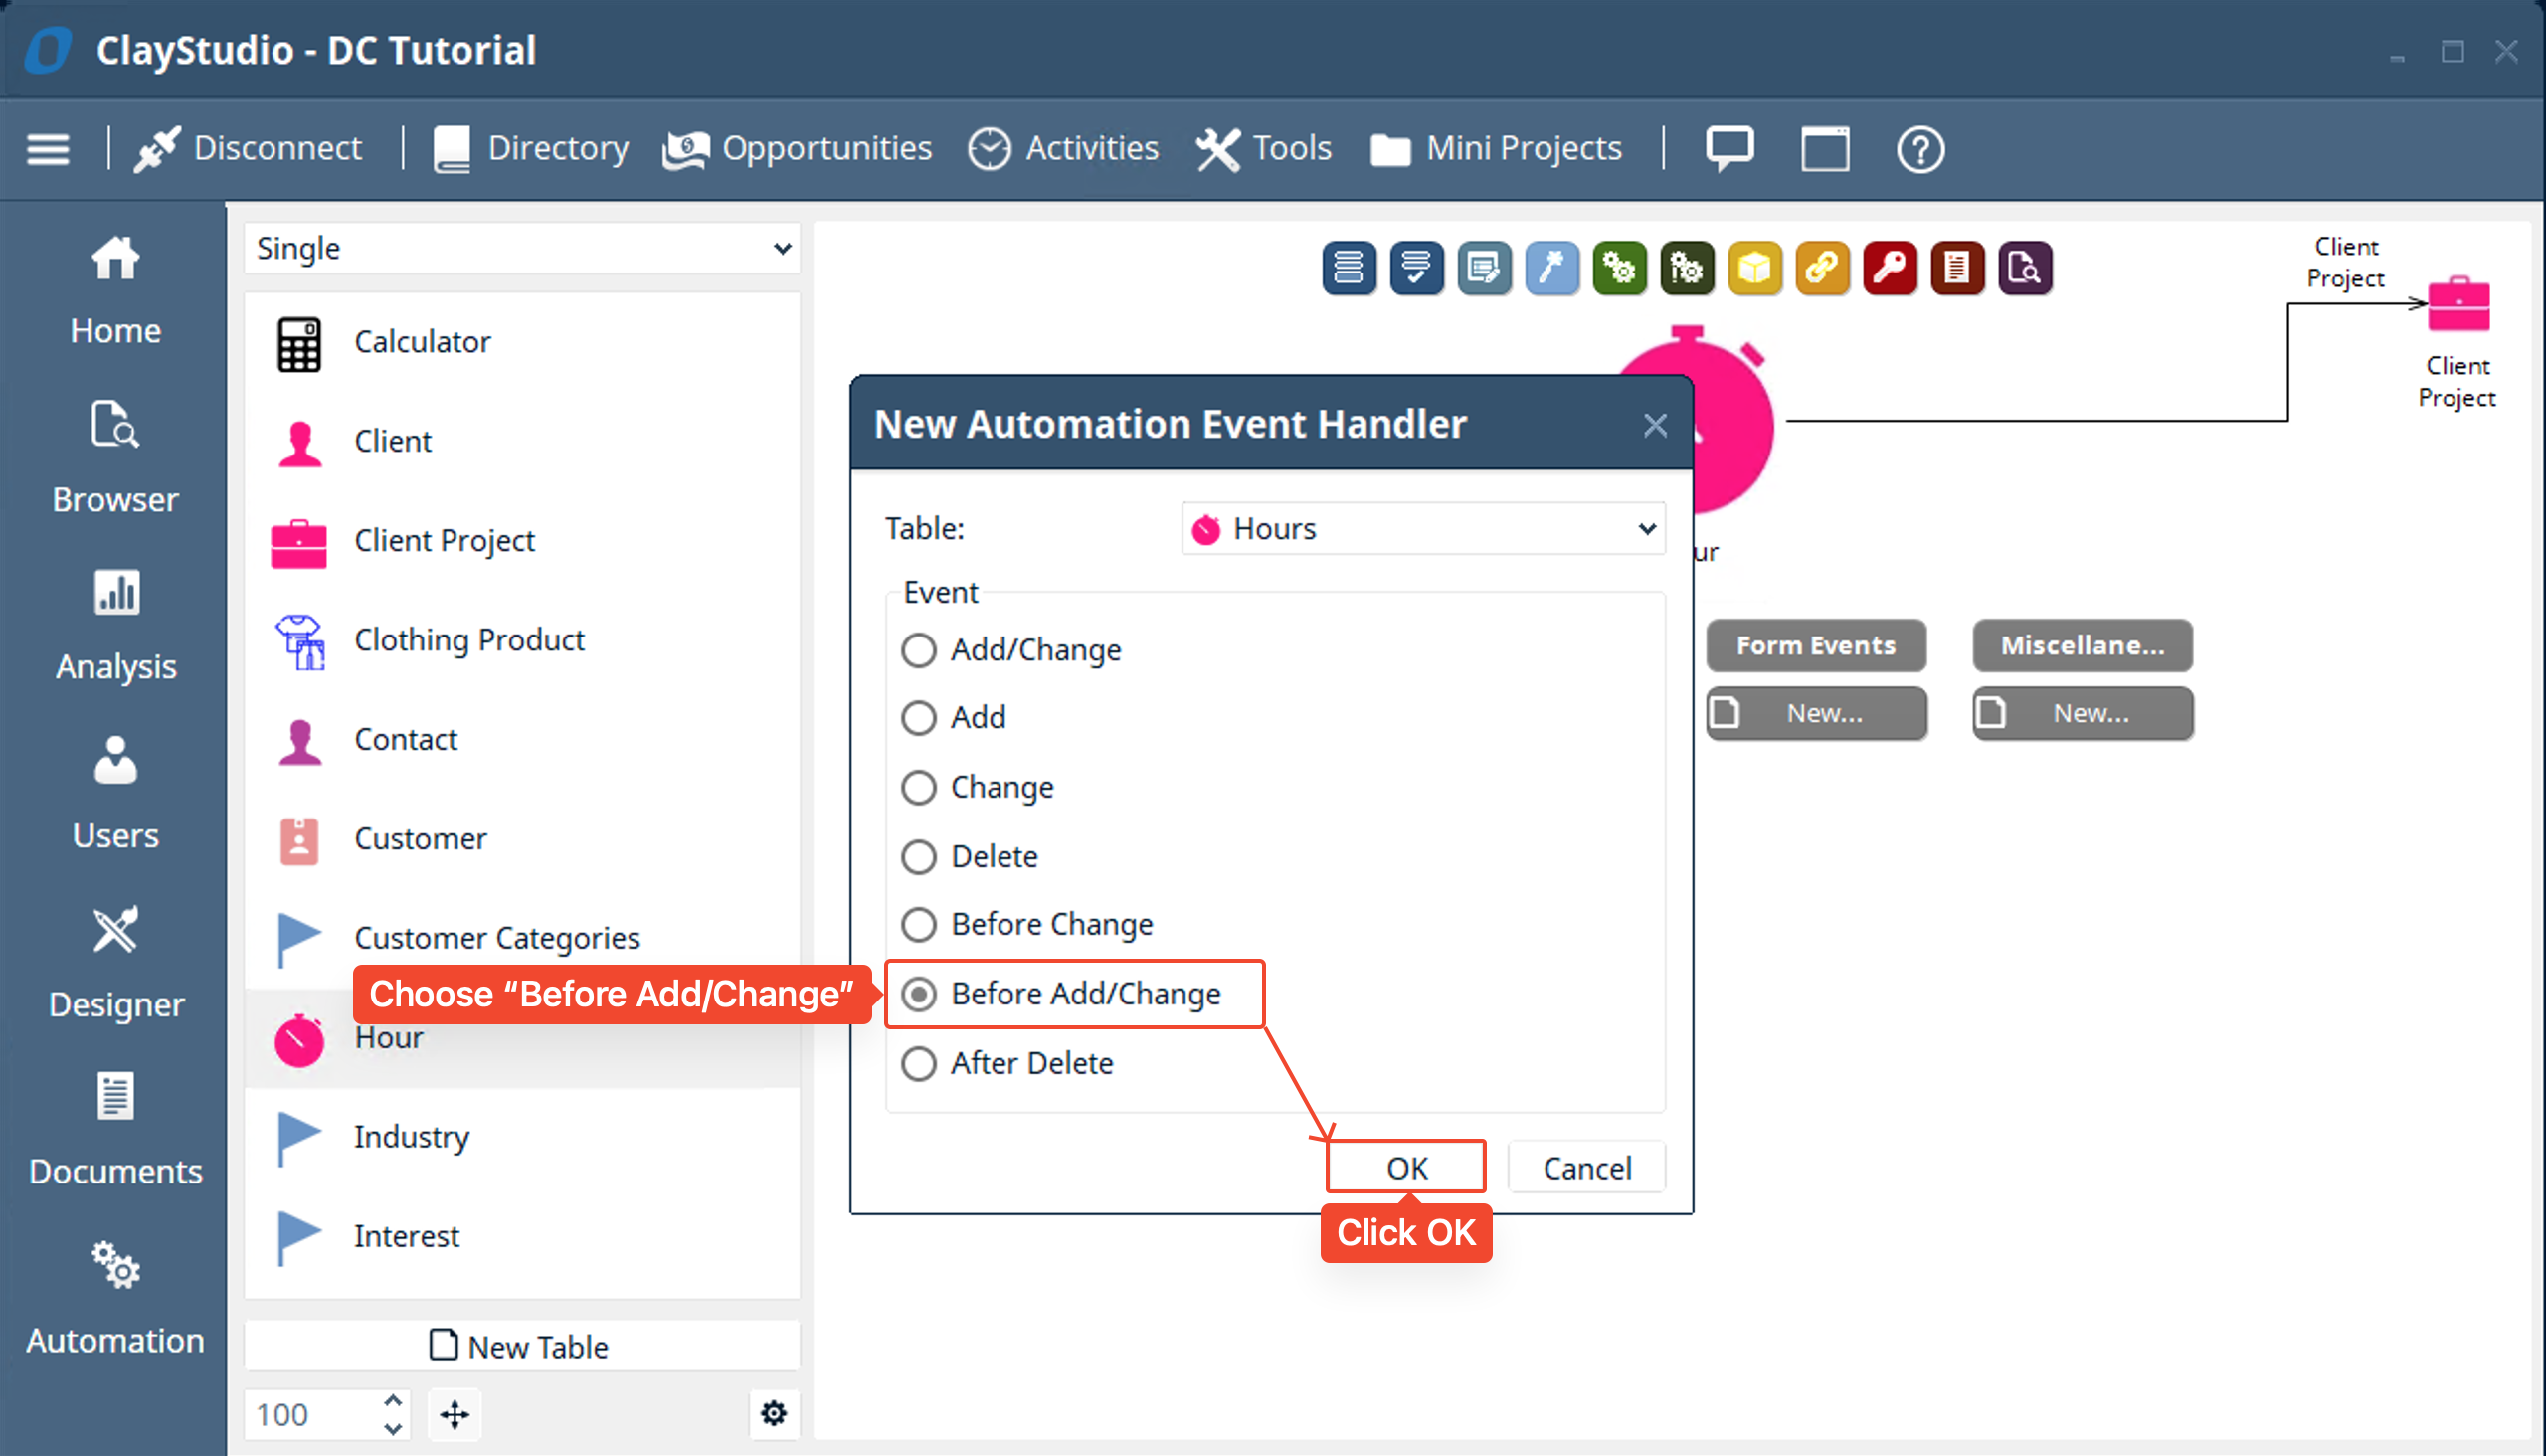
- In the “New Automation Event Handler” window select the “Before Add/Change” event then click OK
- Note: there are many different types of “Item Events” each type has a specific kind of use case. The reason I chose a “Before Add/Change” event to set the name field is because i want the name field to be filled before the record is saved when added or changed. What do I mean by this? When I save a record in digital-clay there is an order of operations in which the record is saved. In the order of operations of how a record is saved in digital-clay the “Before Add/Change” automation event handler happens after you click the “Save” button but before the record is actually saved. So the order would go: Click save button → run “Before Add/Change” automation on either the old or new values entered in the fields → save the record after the “Before Add/Change” automation is run. In the case of “Add/Change” this runs after the record was already saved so the order would go: Click Save button → save the record → run the “Add/Change” automation with the new saved values in the record.
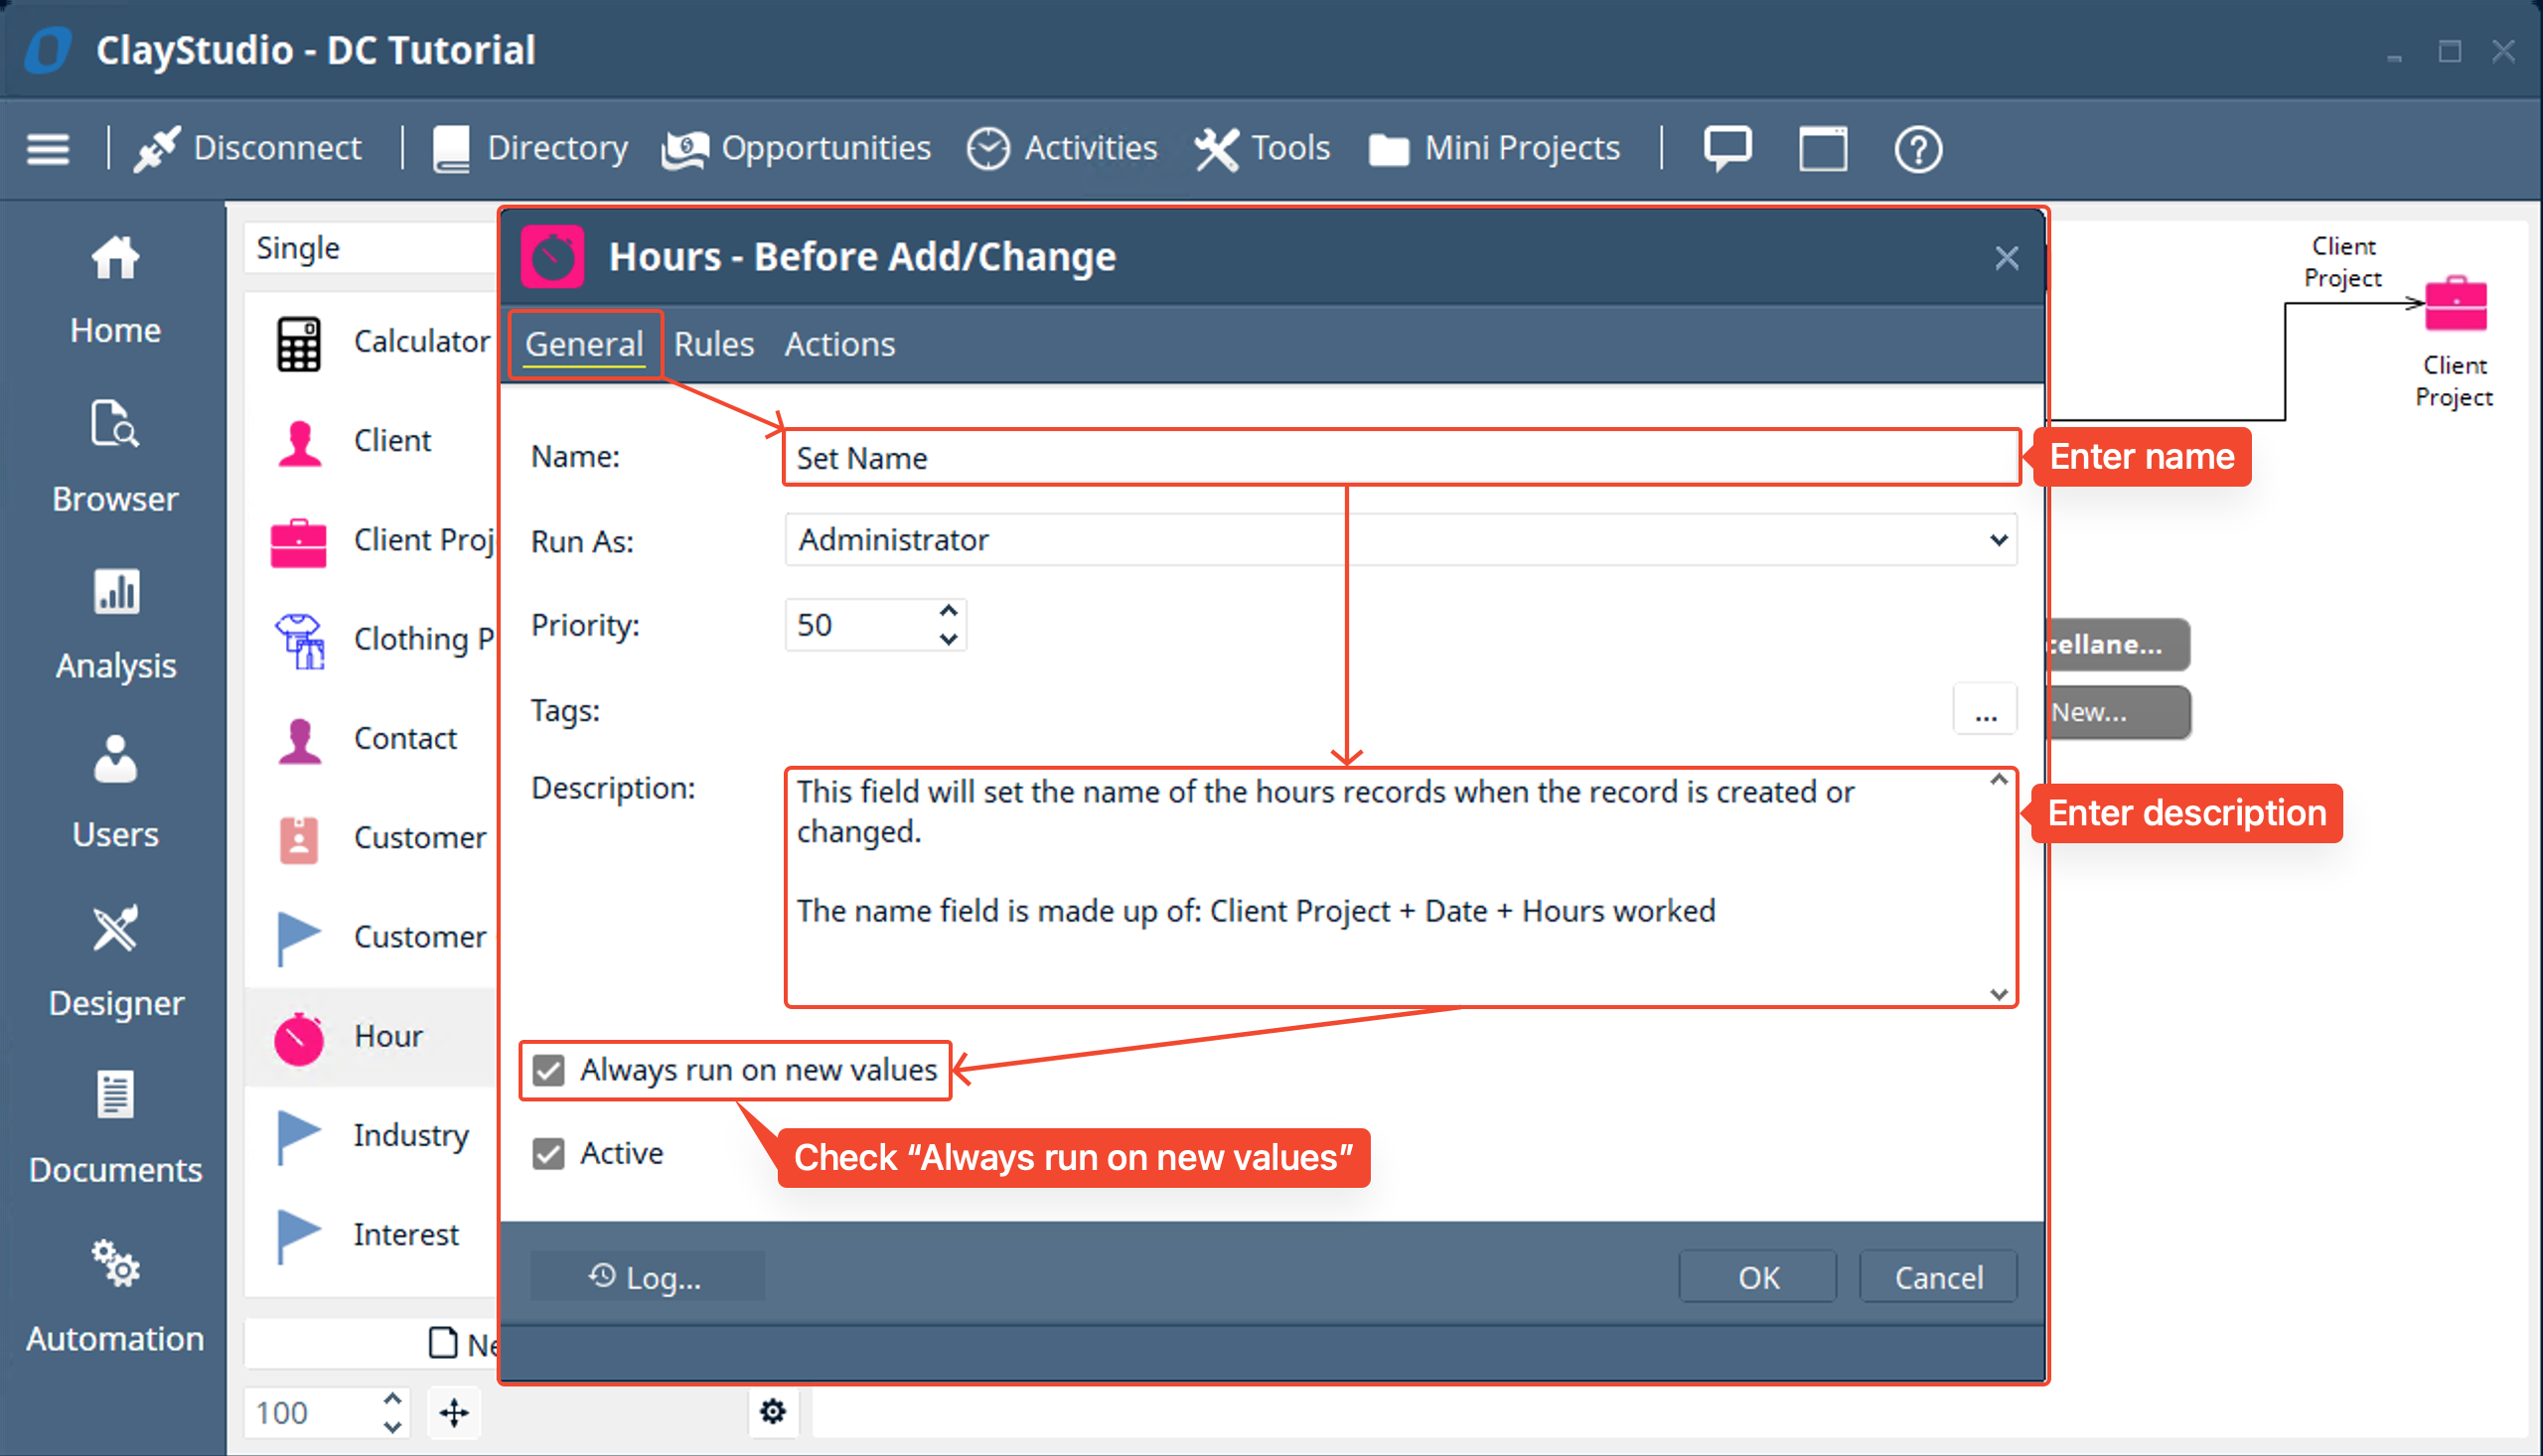
- A window is displayed with 3 tabs. In the “General” tab set: the “Name” → the “Description” → then make sure you check “Always run on new values”. Below ill note the other fields we didn’t fill out here:
- Run As: choose which user should the automation run as (by default it is administrator)
- Priority: The priority order in which automations should run in. This is important if you have multiple automations happening at the same time on the same information.
- Tags: allows you to add a custom tag to an automation to better organize them
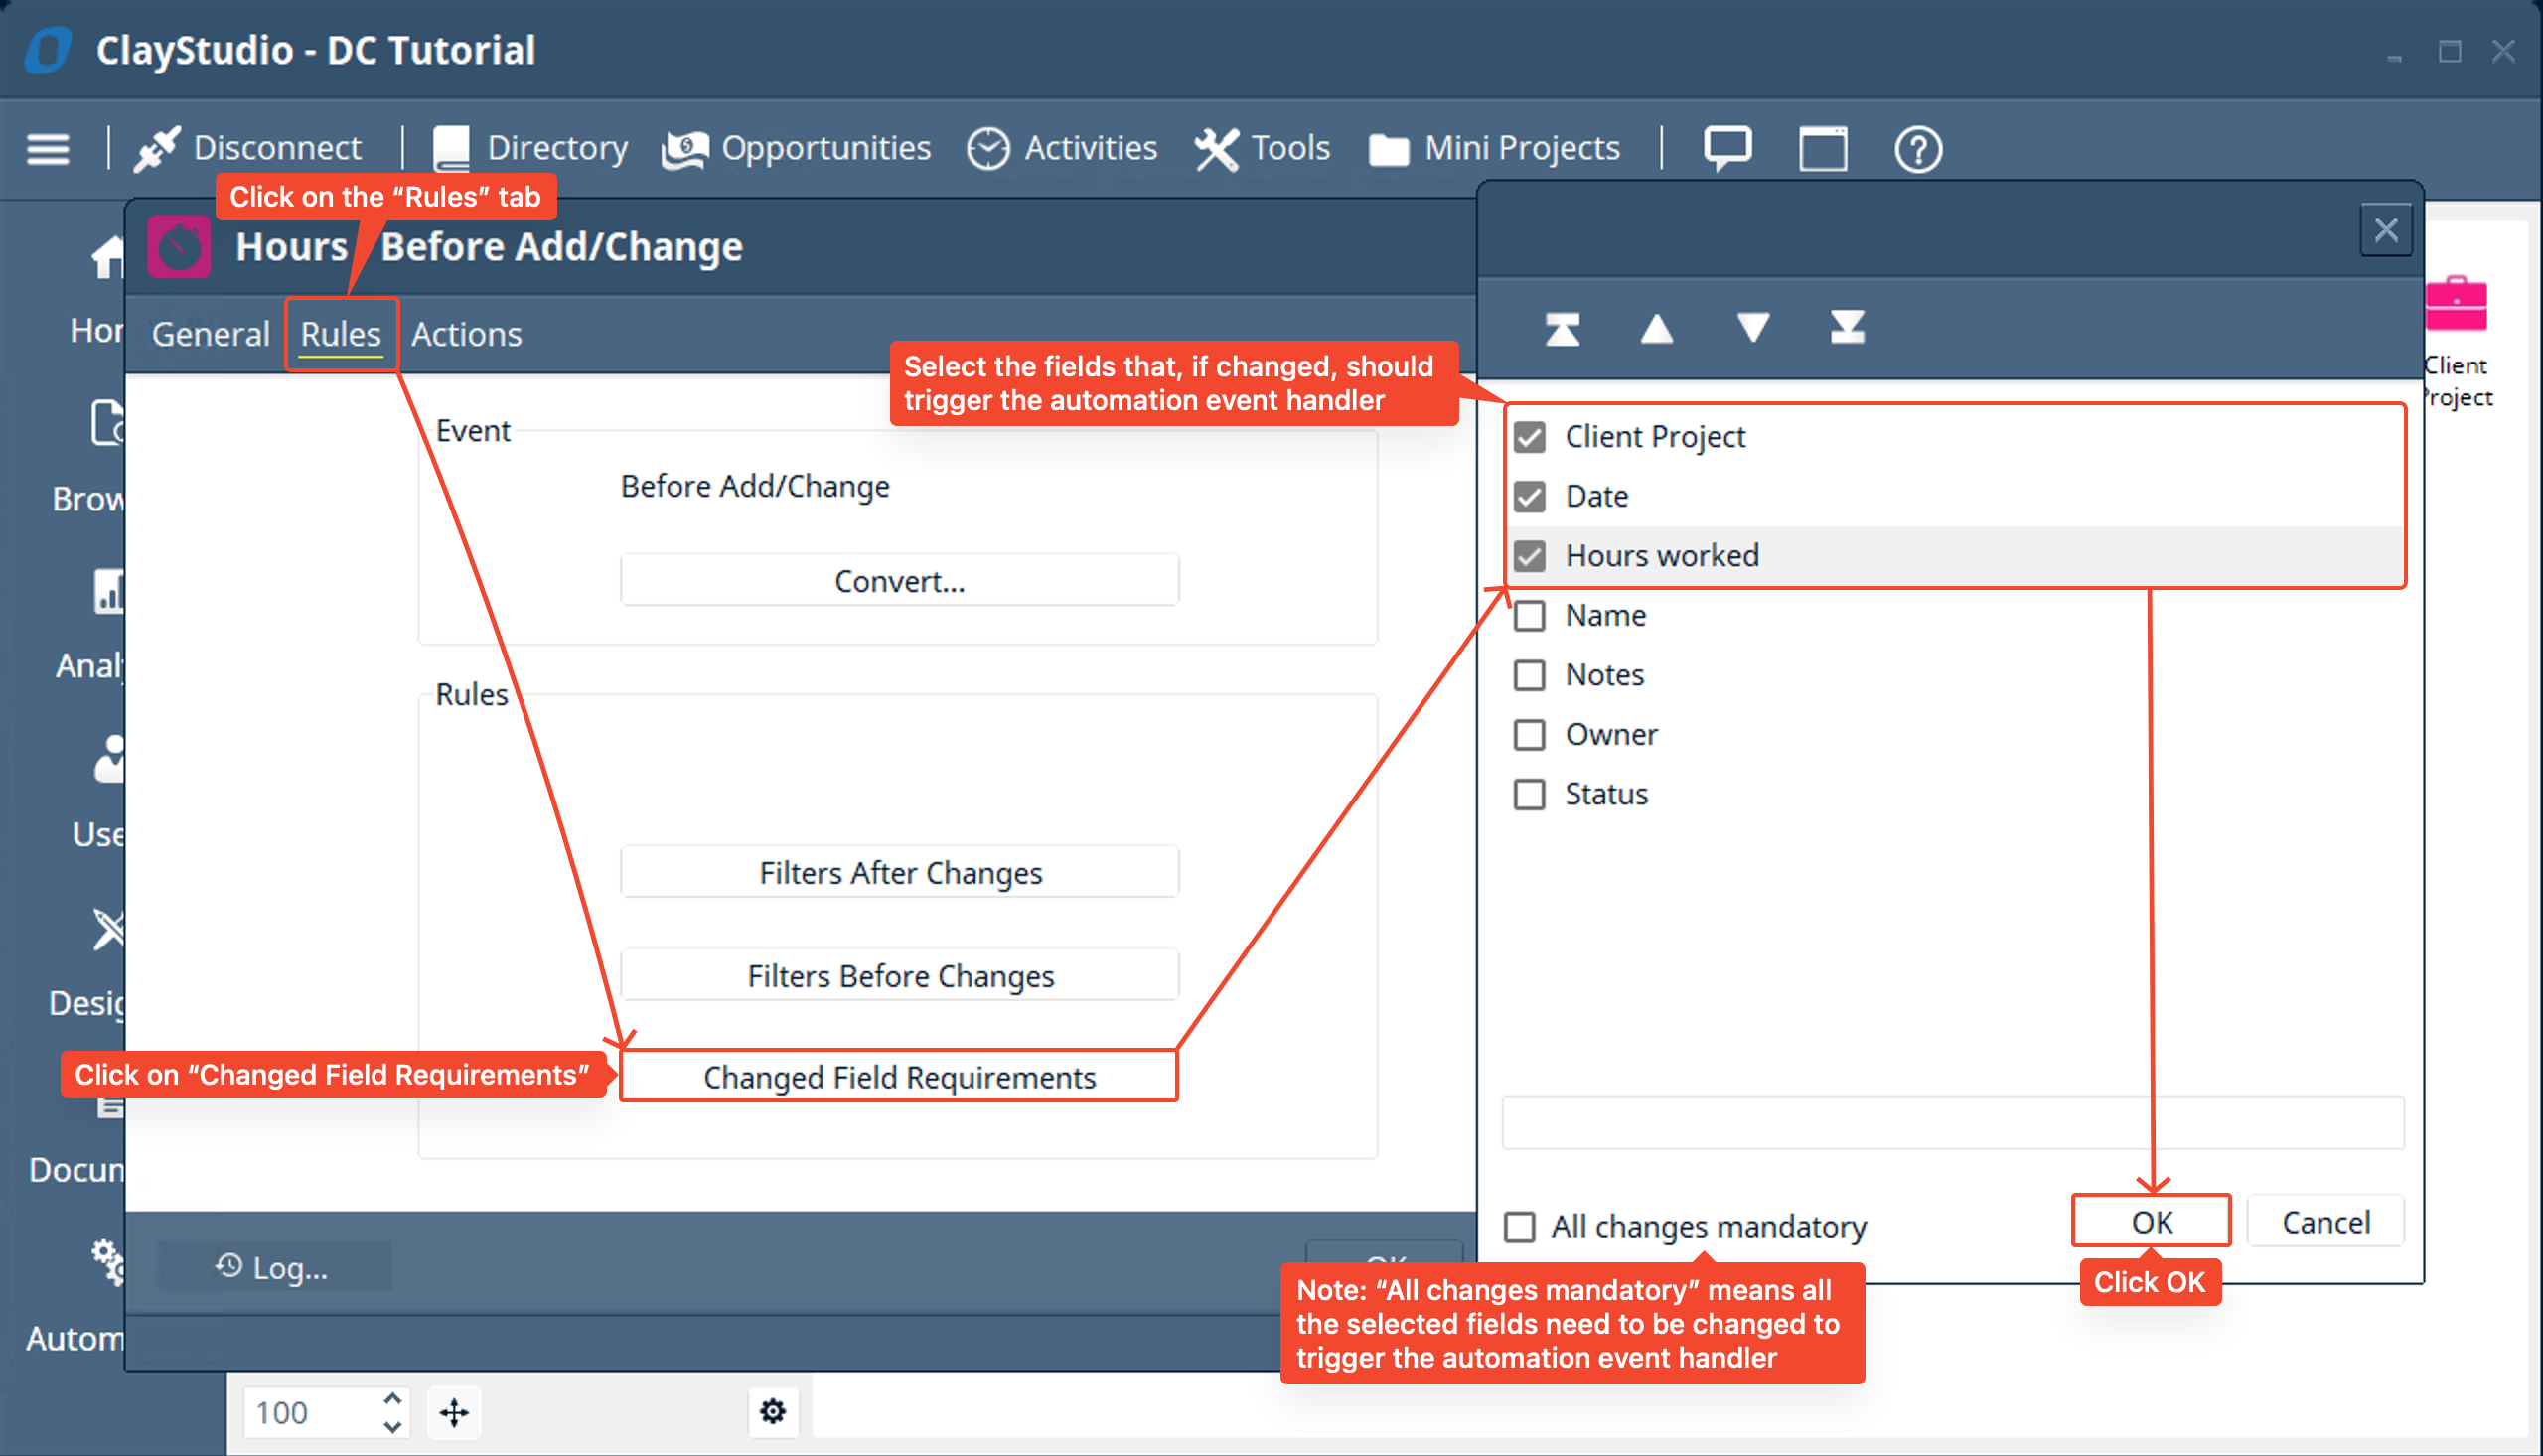
- Next, let’s add some rules to our automation by clicking on the “Rules” tab. We want that IF the “Client Project”, “Date”, or “Hours worked” field is changed then the automation will run. So to do that we click on the “Change Field Requirements” button → select the fields we want to check to see if they were changed → then click OK. This will link this automation to a change in any one of these fields.
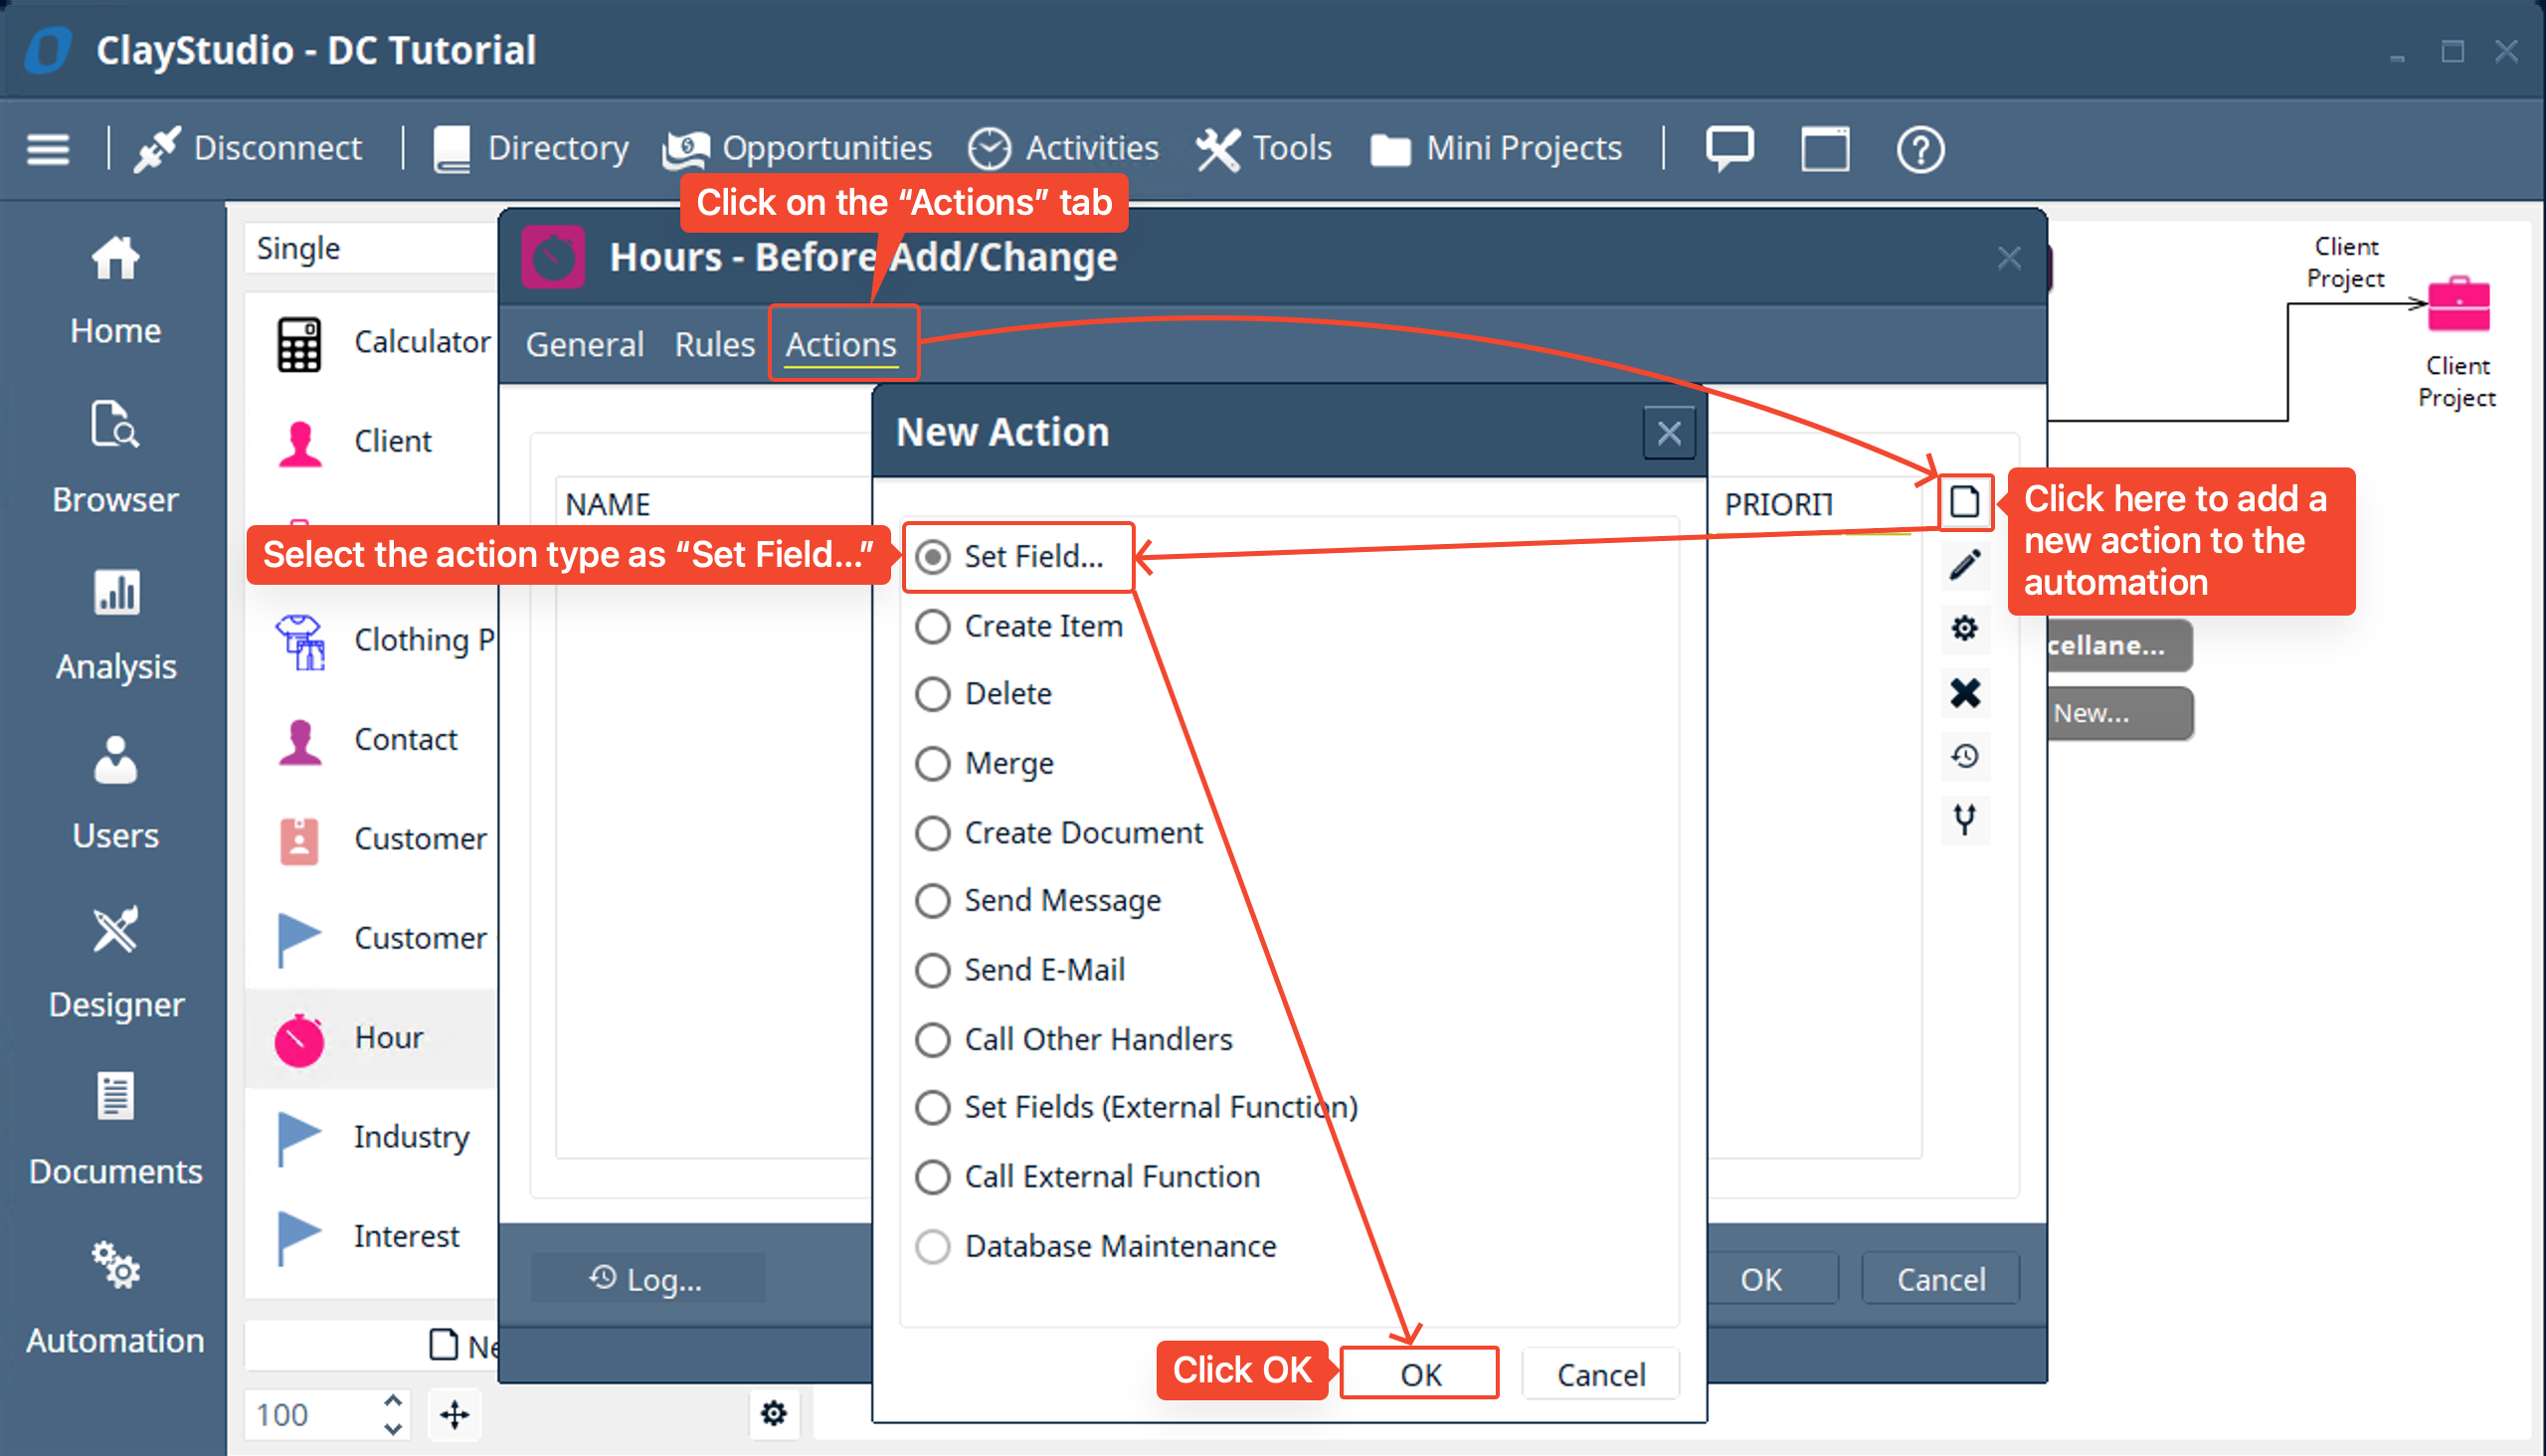
- Now let’s add an action to this automation by clicking on the “Actions” tab → then clicking on the “New Action” button on the right of the window. A “New Action” window will pop up and we will select “Set Field…” then click OK.
- What is a “Set Field” action?
- A set field action allows an automation to set a specific field to a specific value. This can be done in many ways which you will see in the next window
- What is a “Set Field” action?
- Now in the “Field” dropdown select the “Name” field and then select the “Set Field (Function)” then click ok.
- What does a “Set Field (Function)” do?
- A “Set Field (Function)” action allows an automation to set a specific field to a specific value through a custom function. So that the field can be built automatically based on what is entered into the custom function.
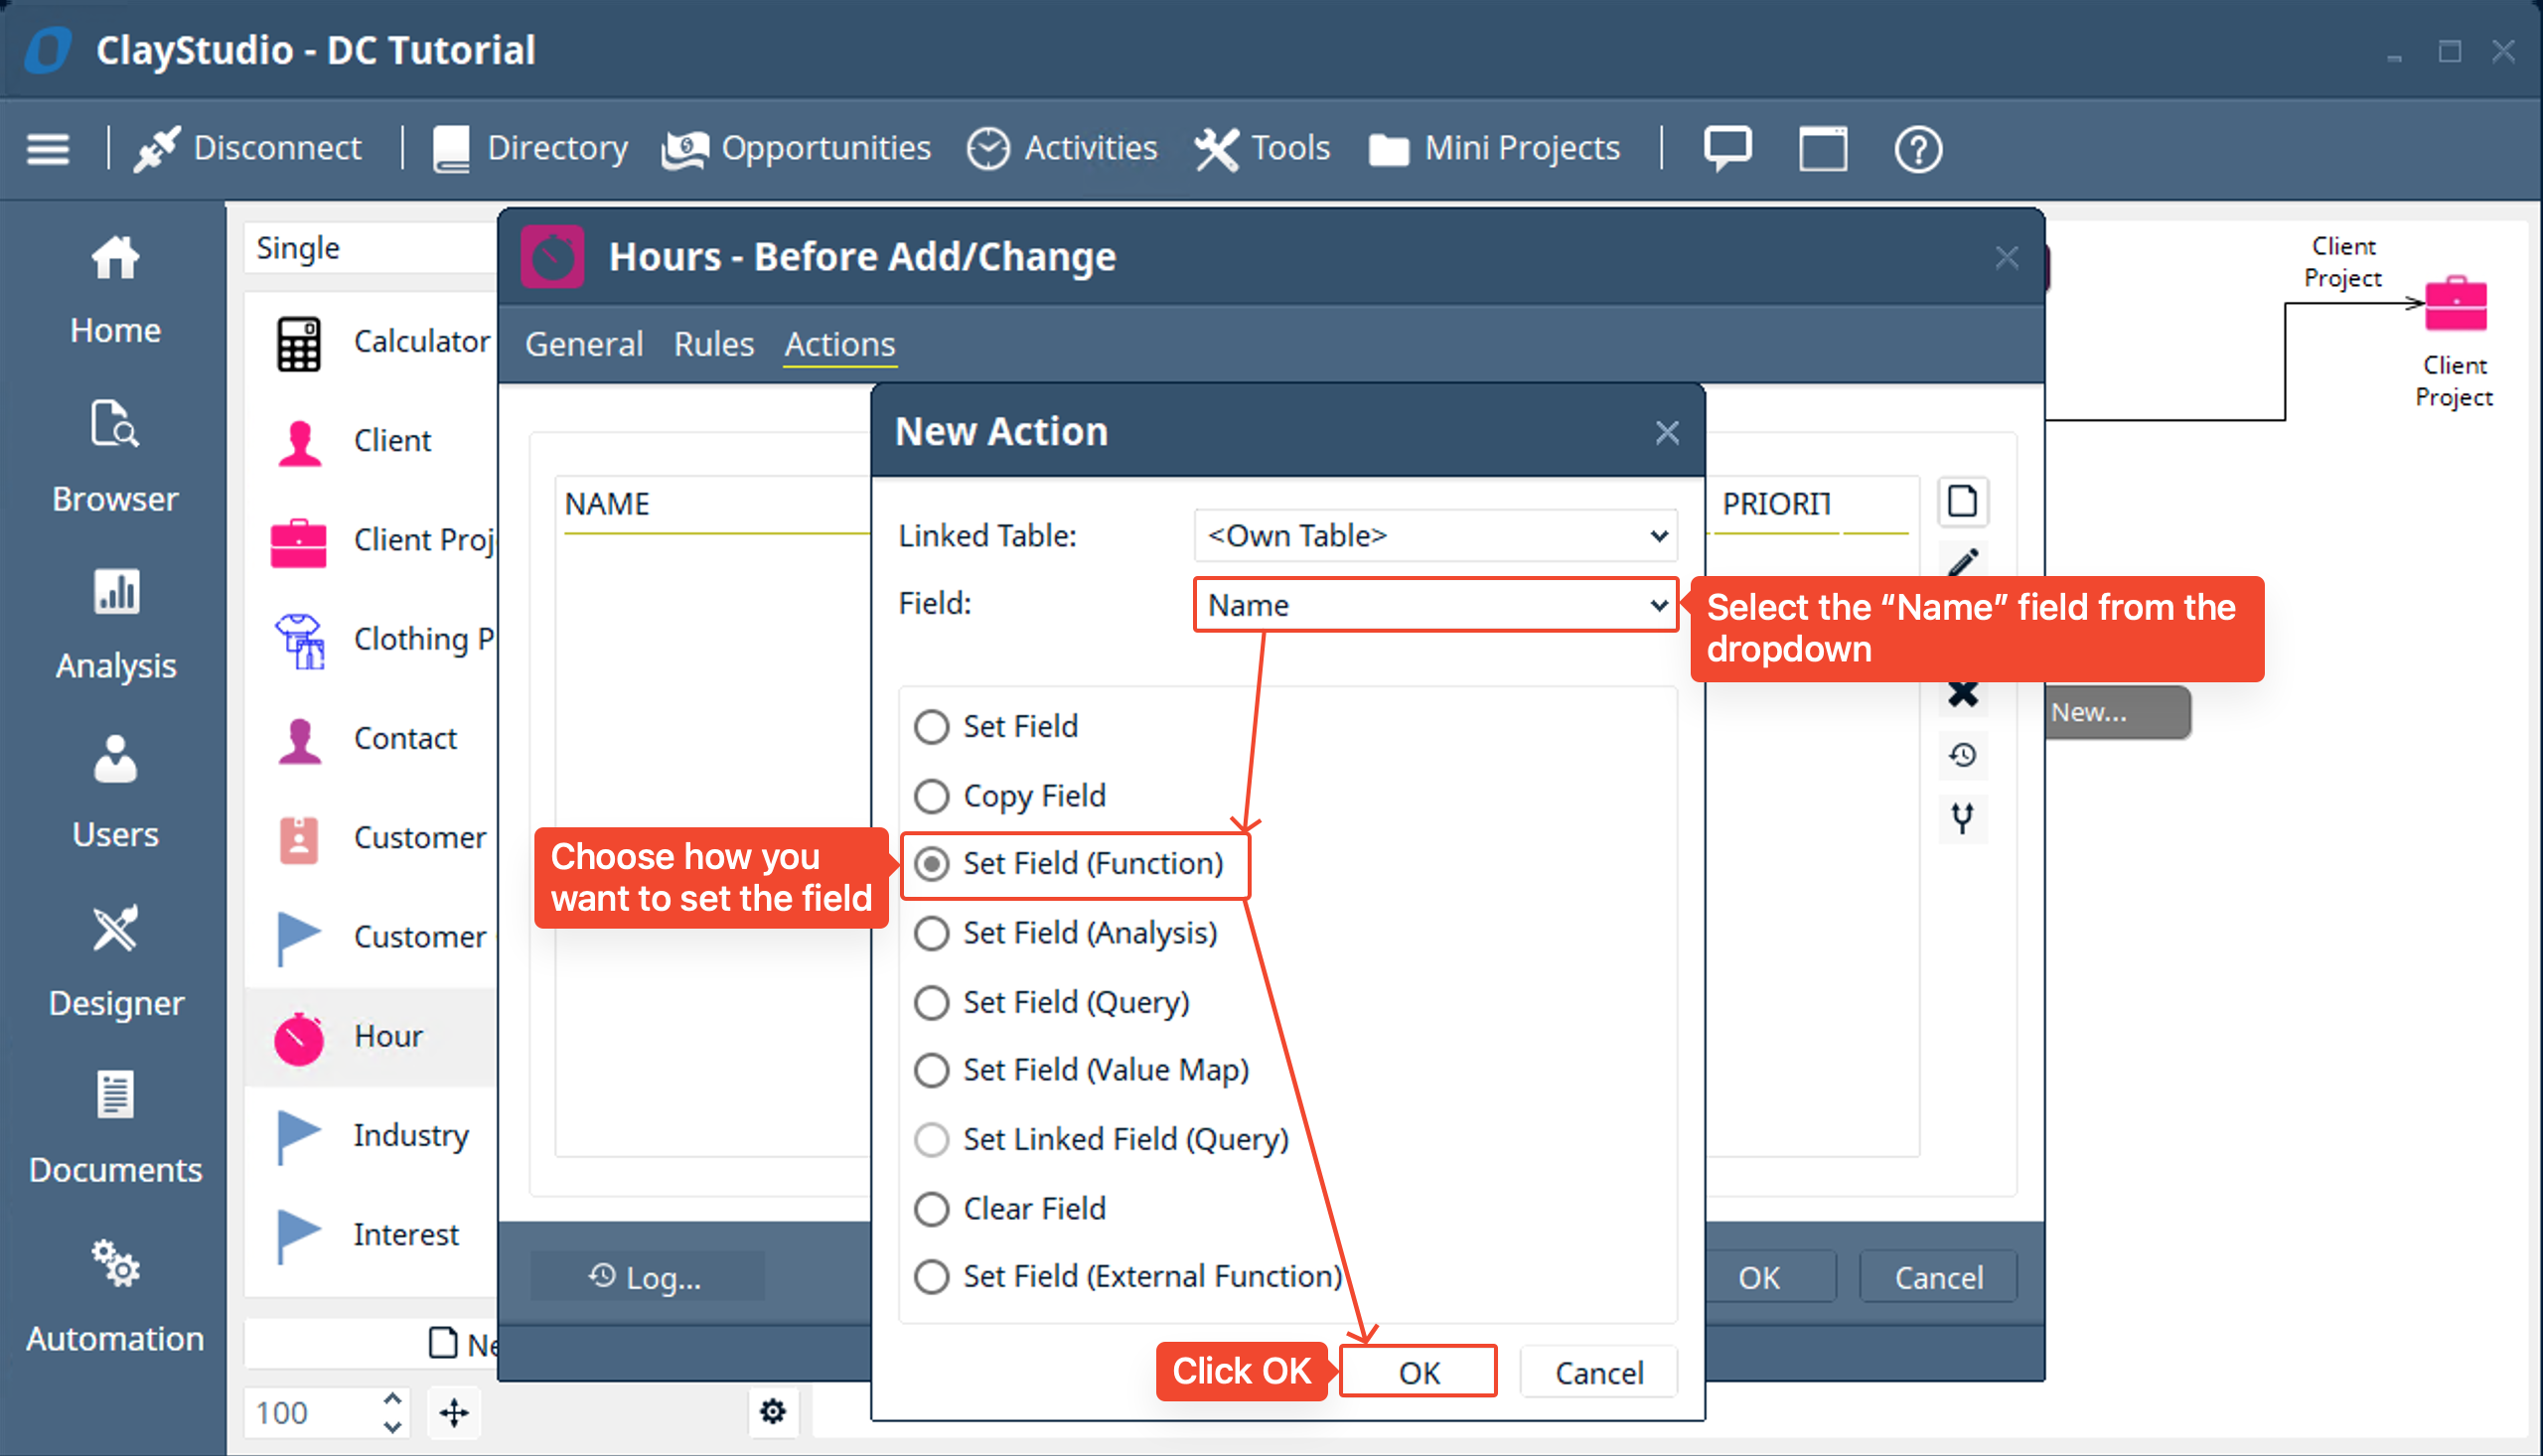
- What does a “Set Field (Function)” do?
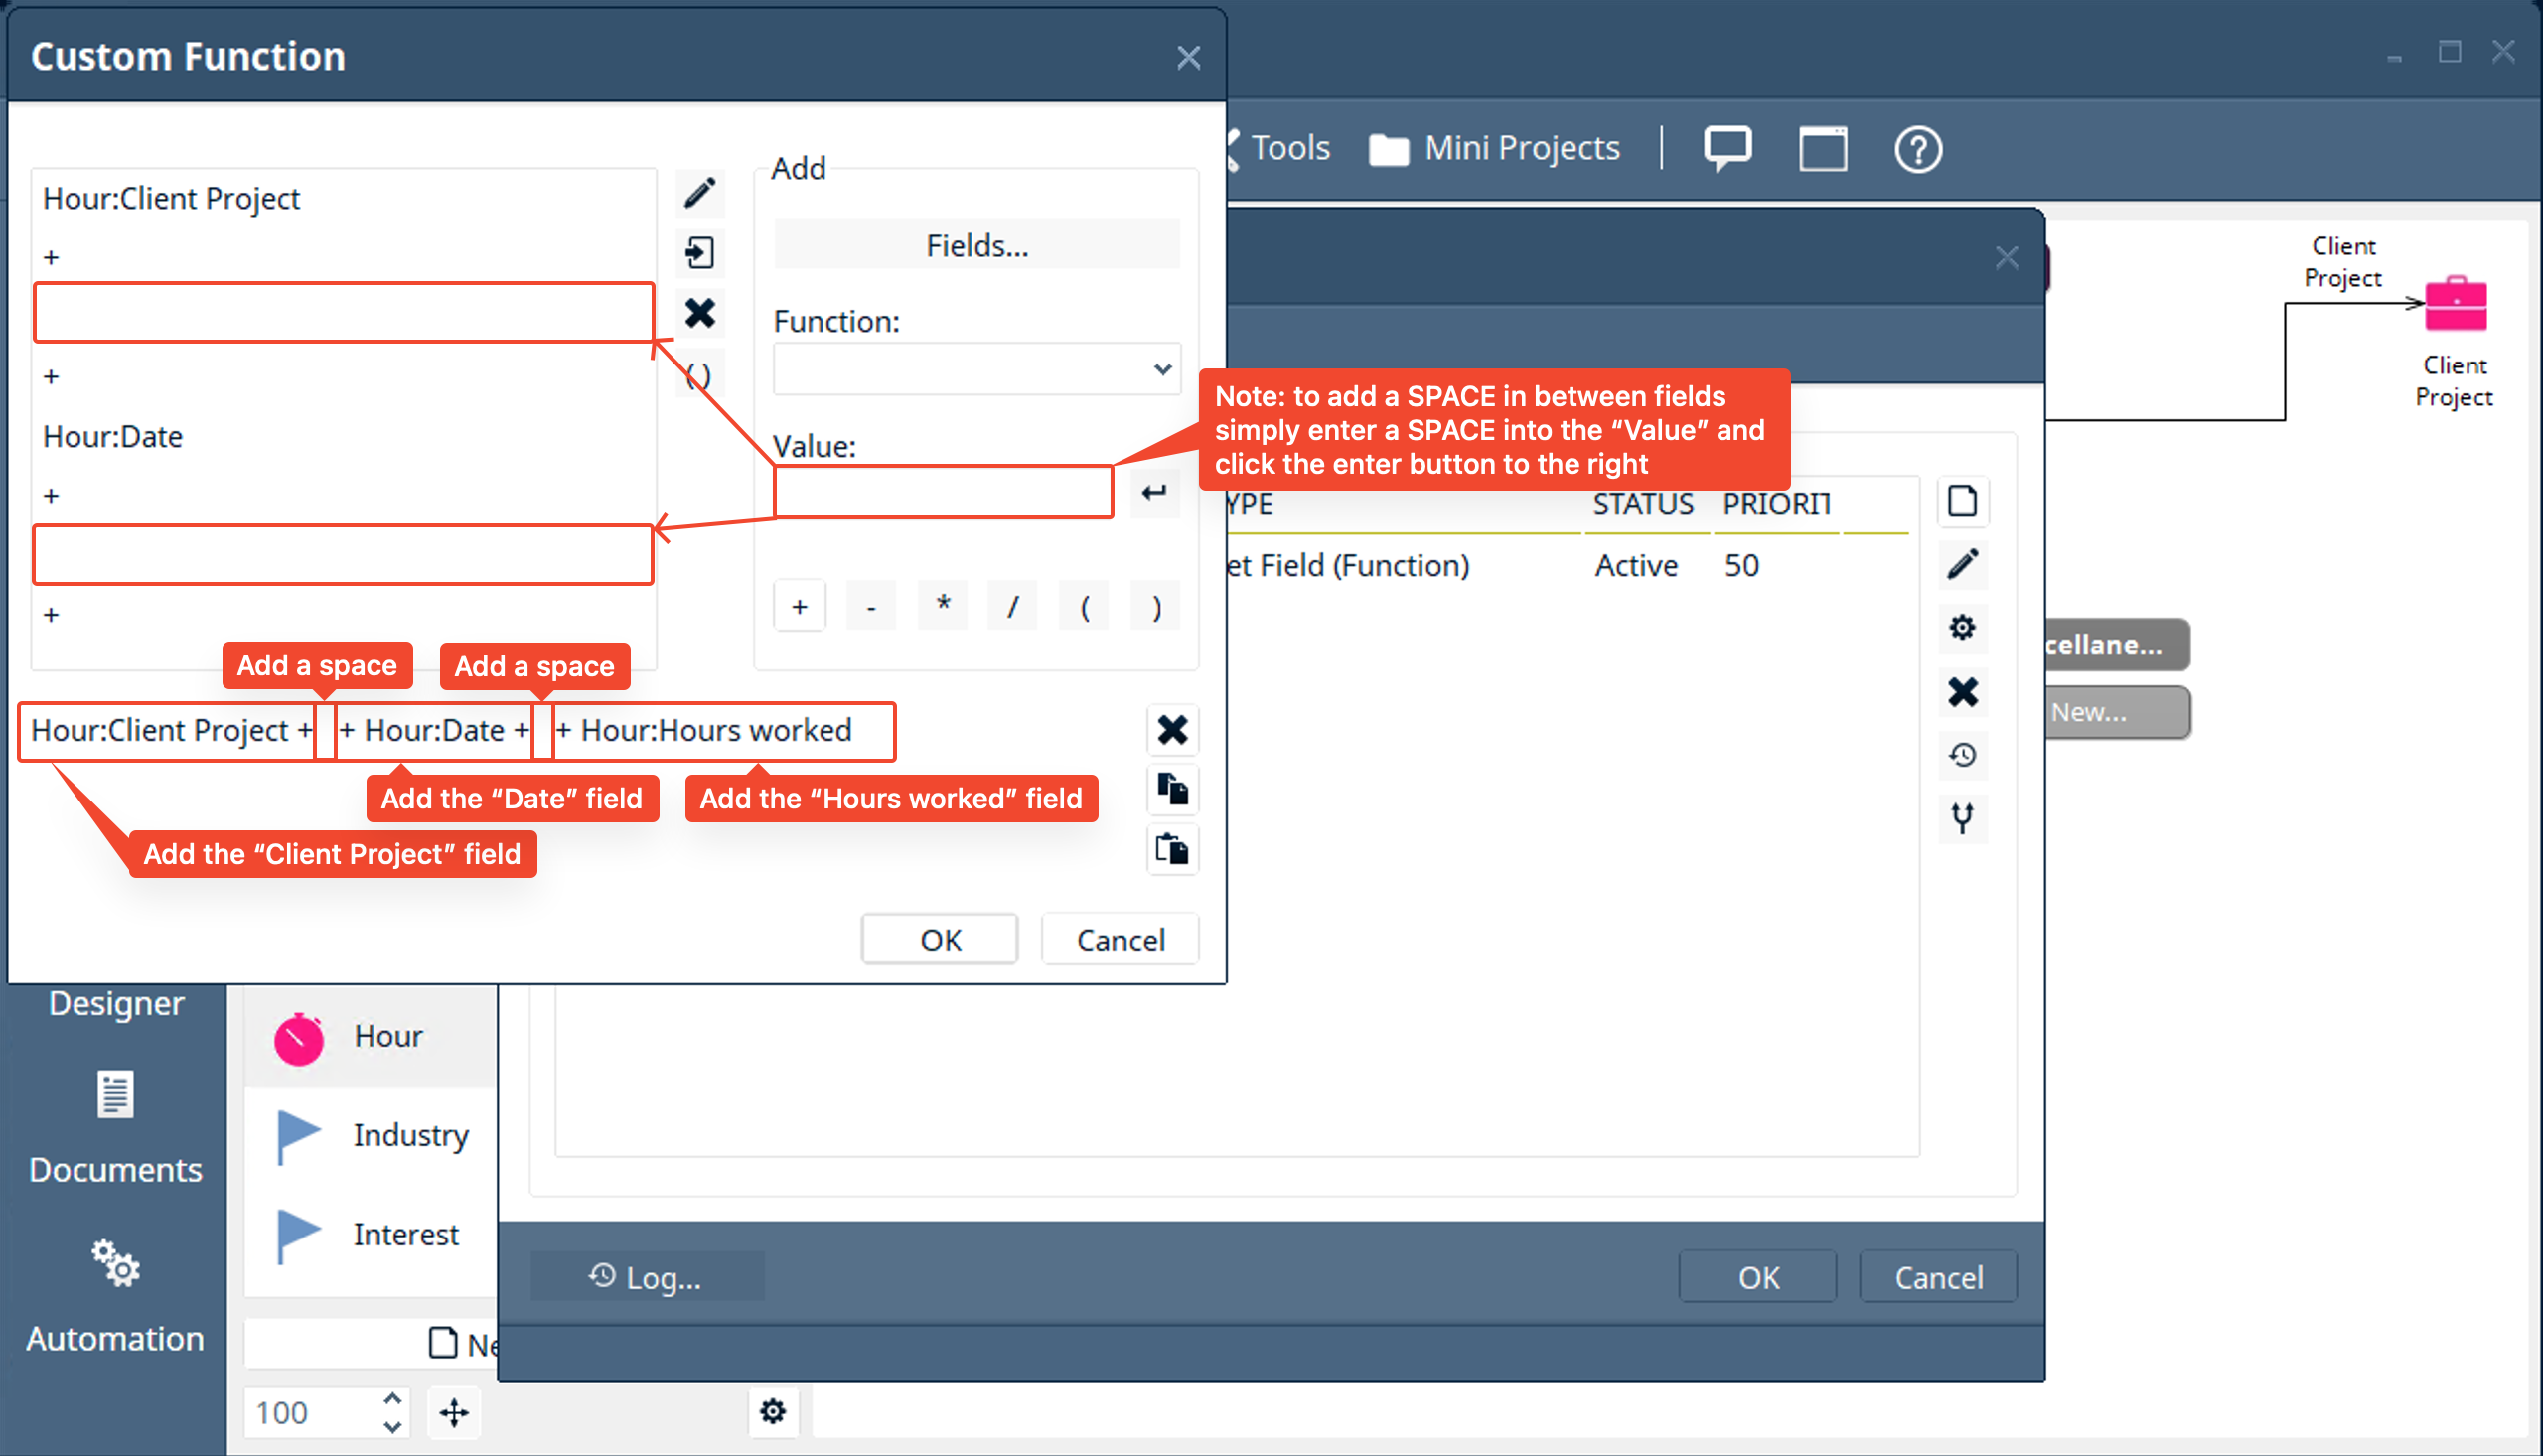
- In the custom function window add the field “Client Project” → click the “+” button → enter a SPACE (” “) into the “Value” field → click the “+” button and repeat for the “Date” field and “Hours worked” field. This will combine the Client Project, Date, and Hours worked field into the name field separated by spaces. (If you prefer to separate it with a dash then enter (“ - “) into the value field. When done click OK on the “Custom Function” window.
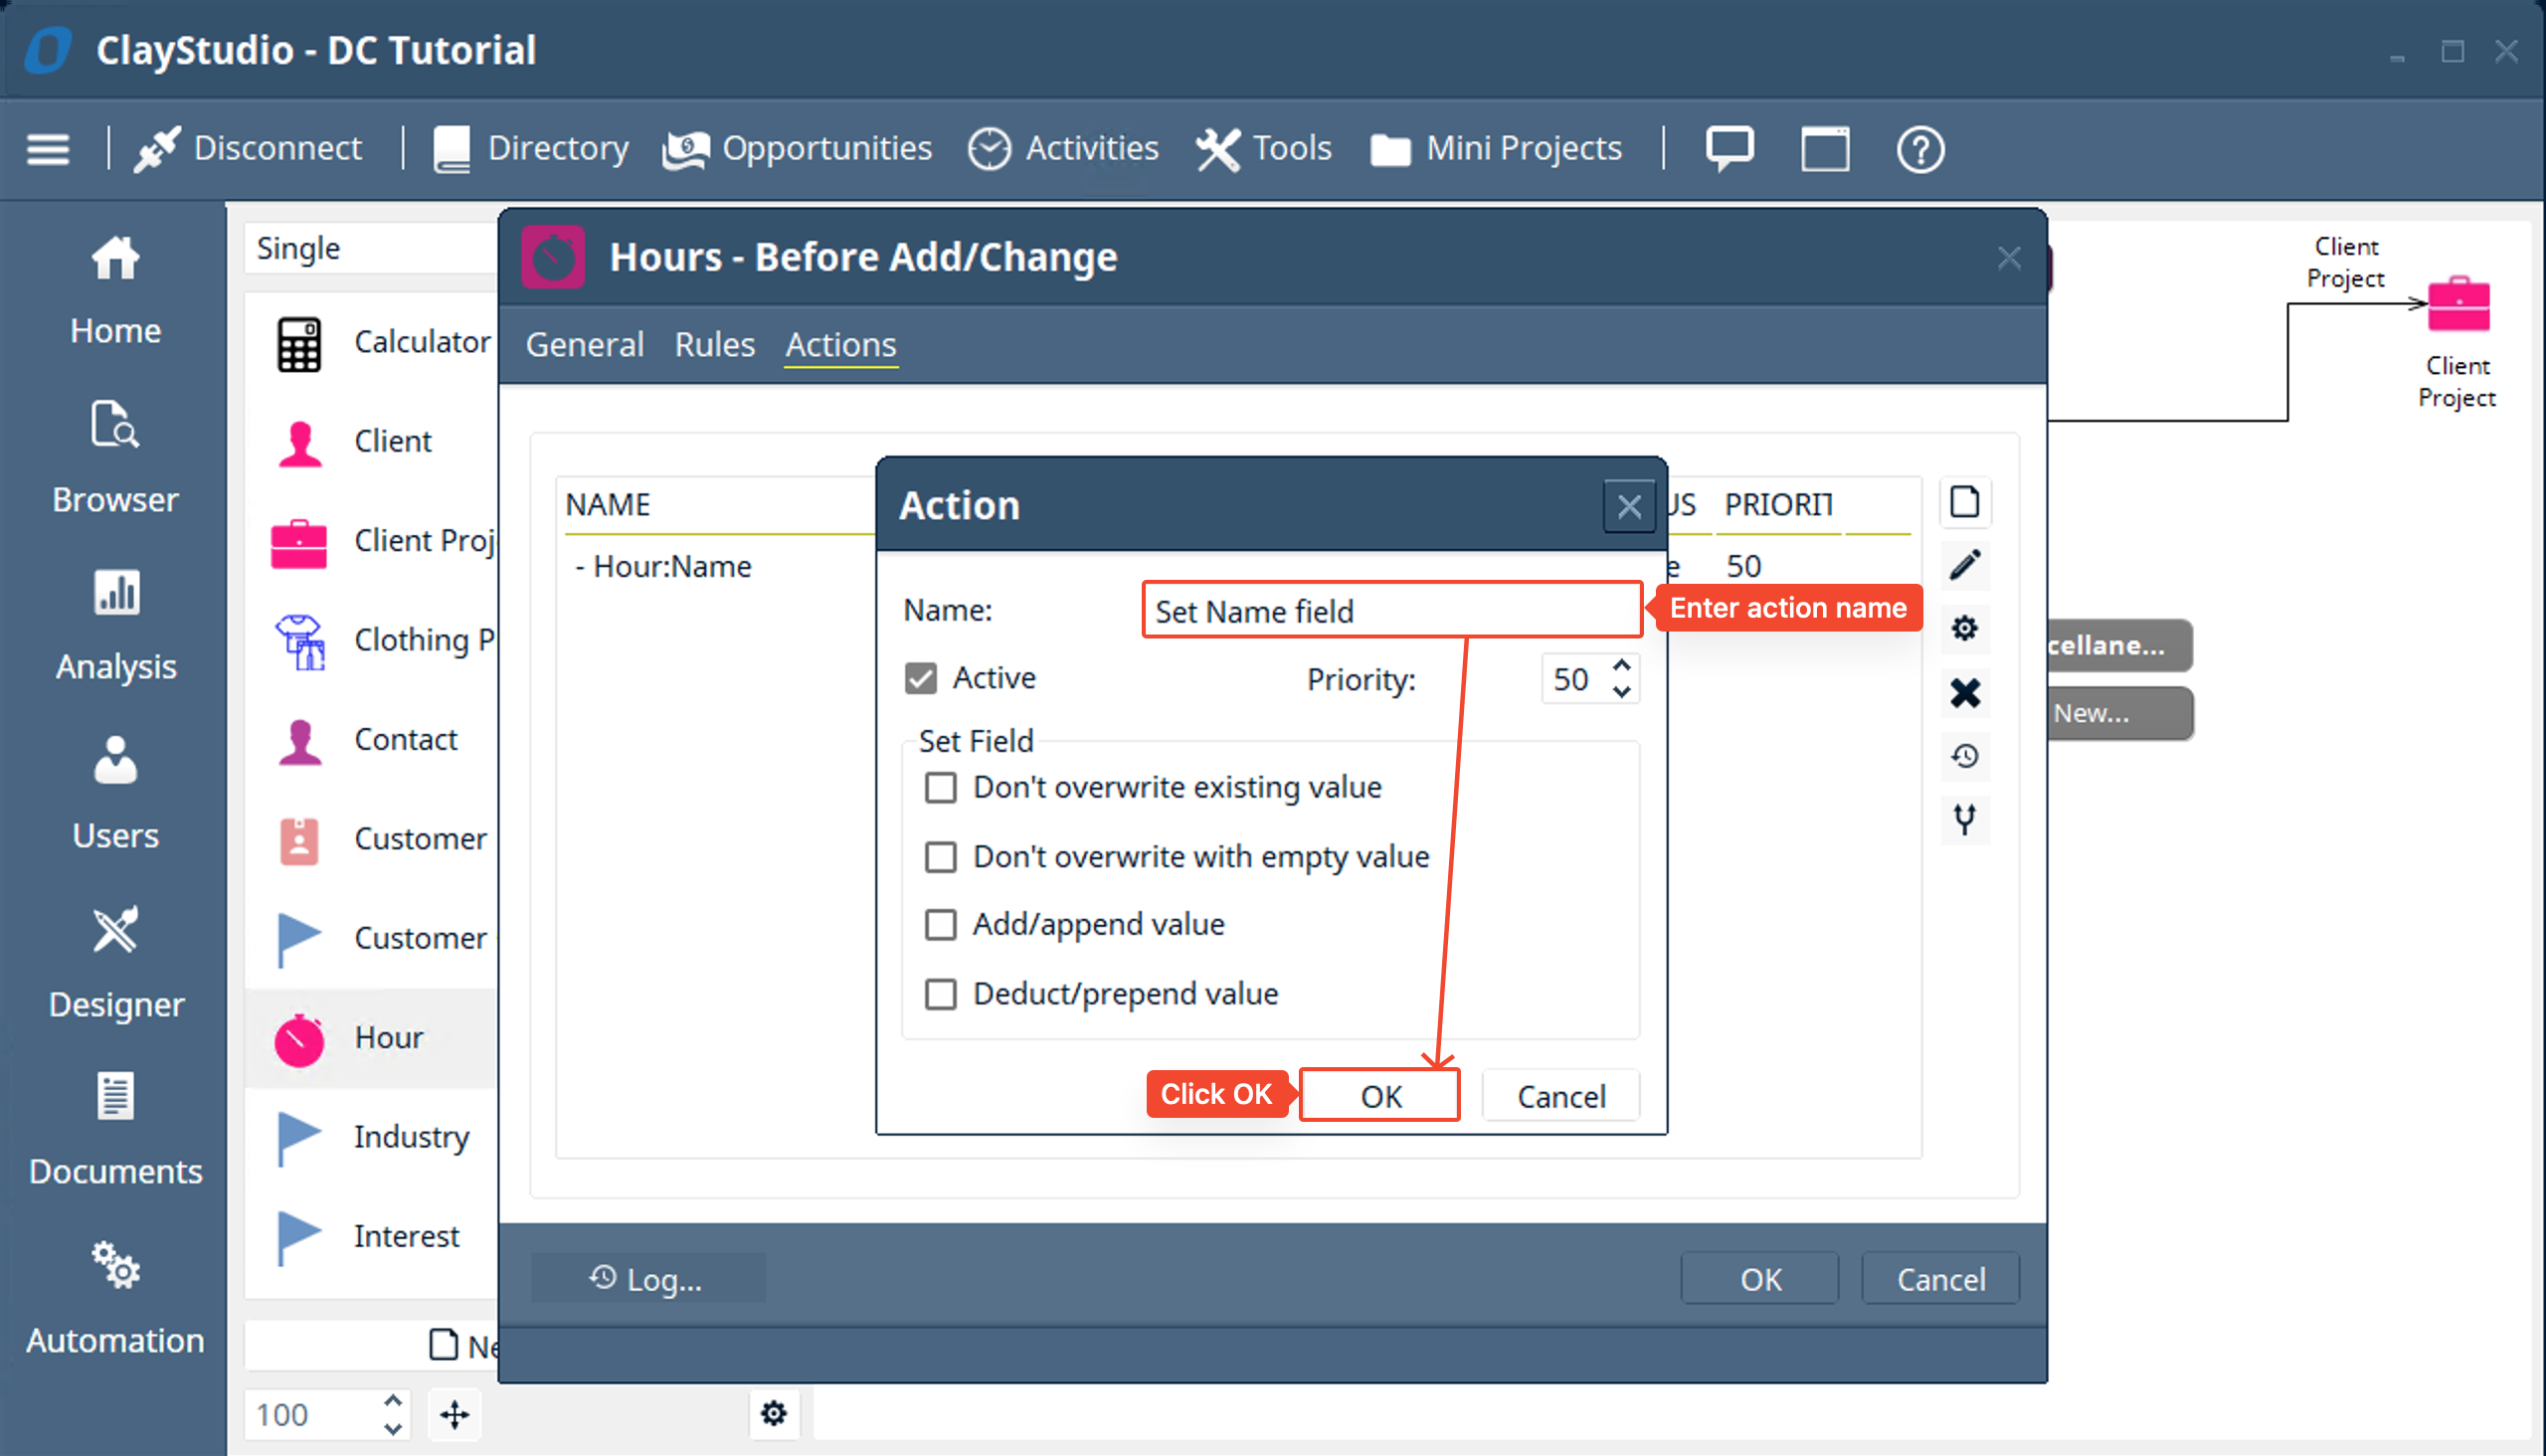
- Give the action a “Name” and click OK
- You have different ways to set a field and can choose options like not to overwrite an existing value, or only overwrite an empty value, or append/prepend a value. This is helpful if you have a specific requirement for a set field automation that you want to make.
- You will notice your action is added to the “Actions” list. You can see the “Name”, “Type”, and “Priority which is helpful to see at a glance. Click OK to create the automation.
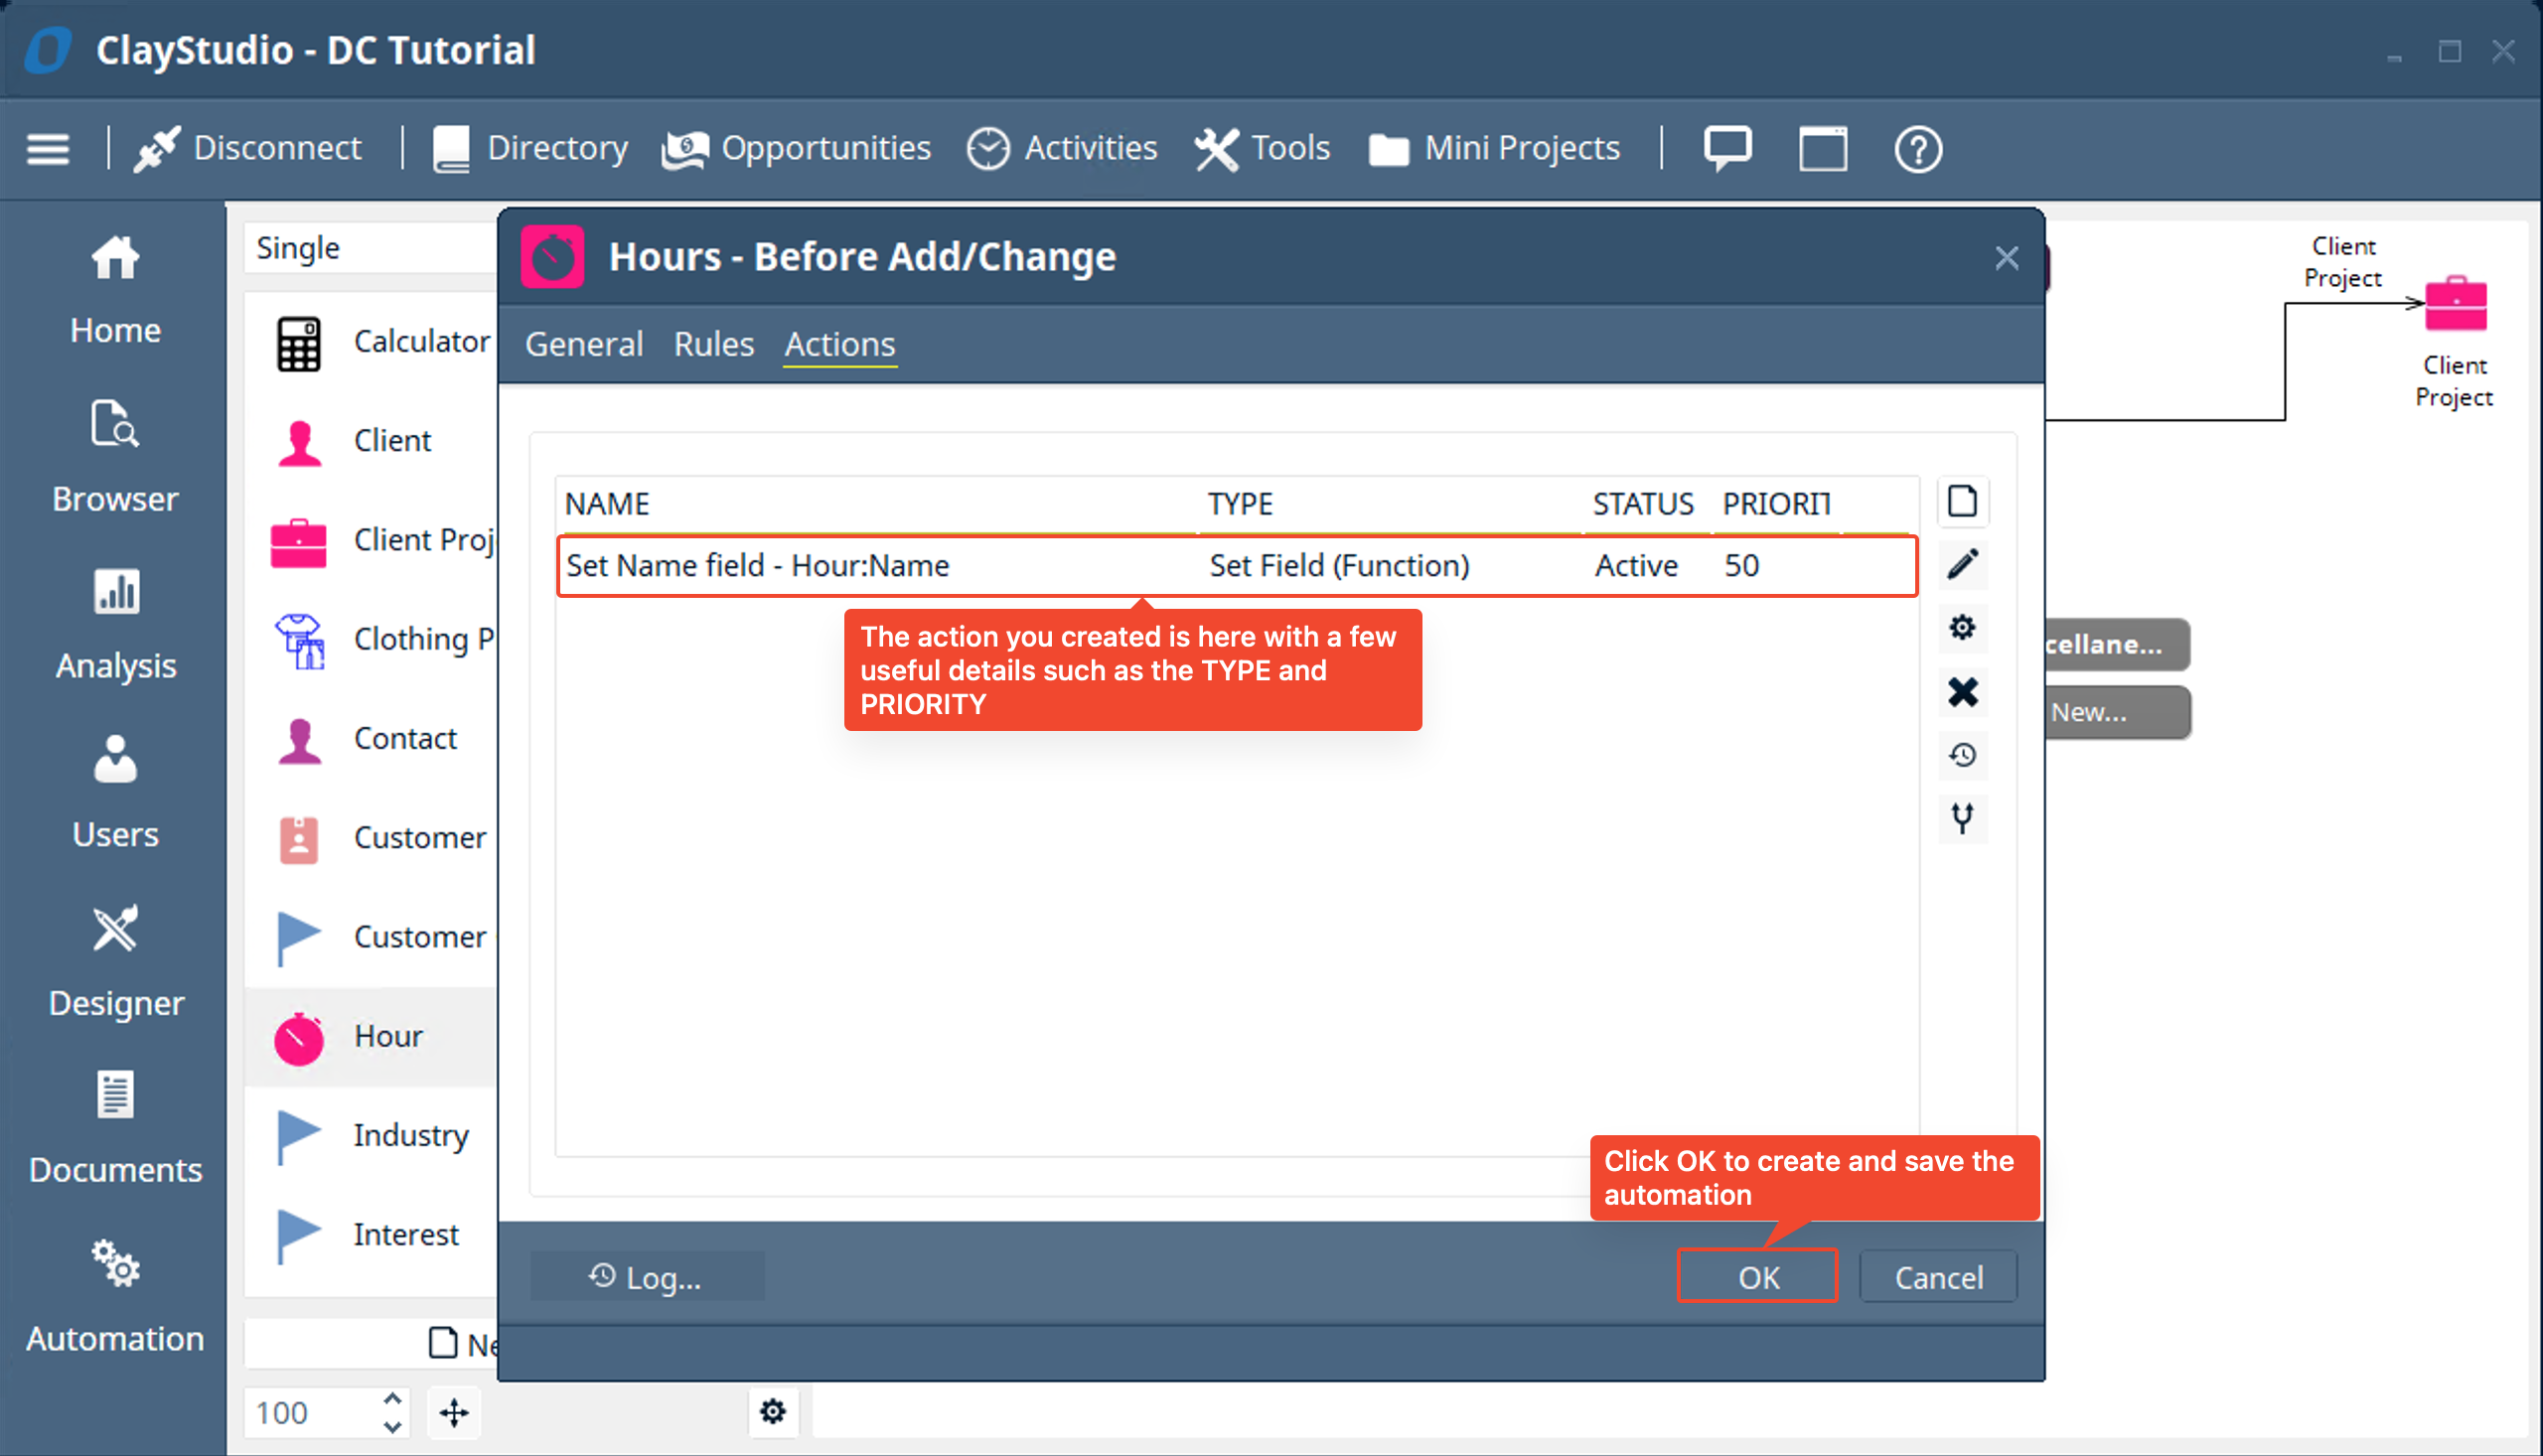
- Now you have successfully created an AUTOMATION that occurs on the event that an ITEM is added or changed. Now any time you add or change the an item/record AND change the “Client Project”, “Date”, and “Hours” the “Set Name” automation will run and set the name field in the hours table.
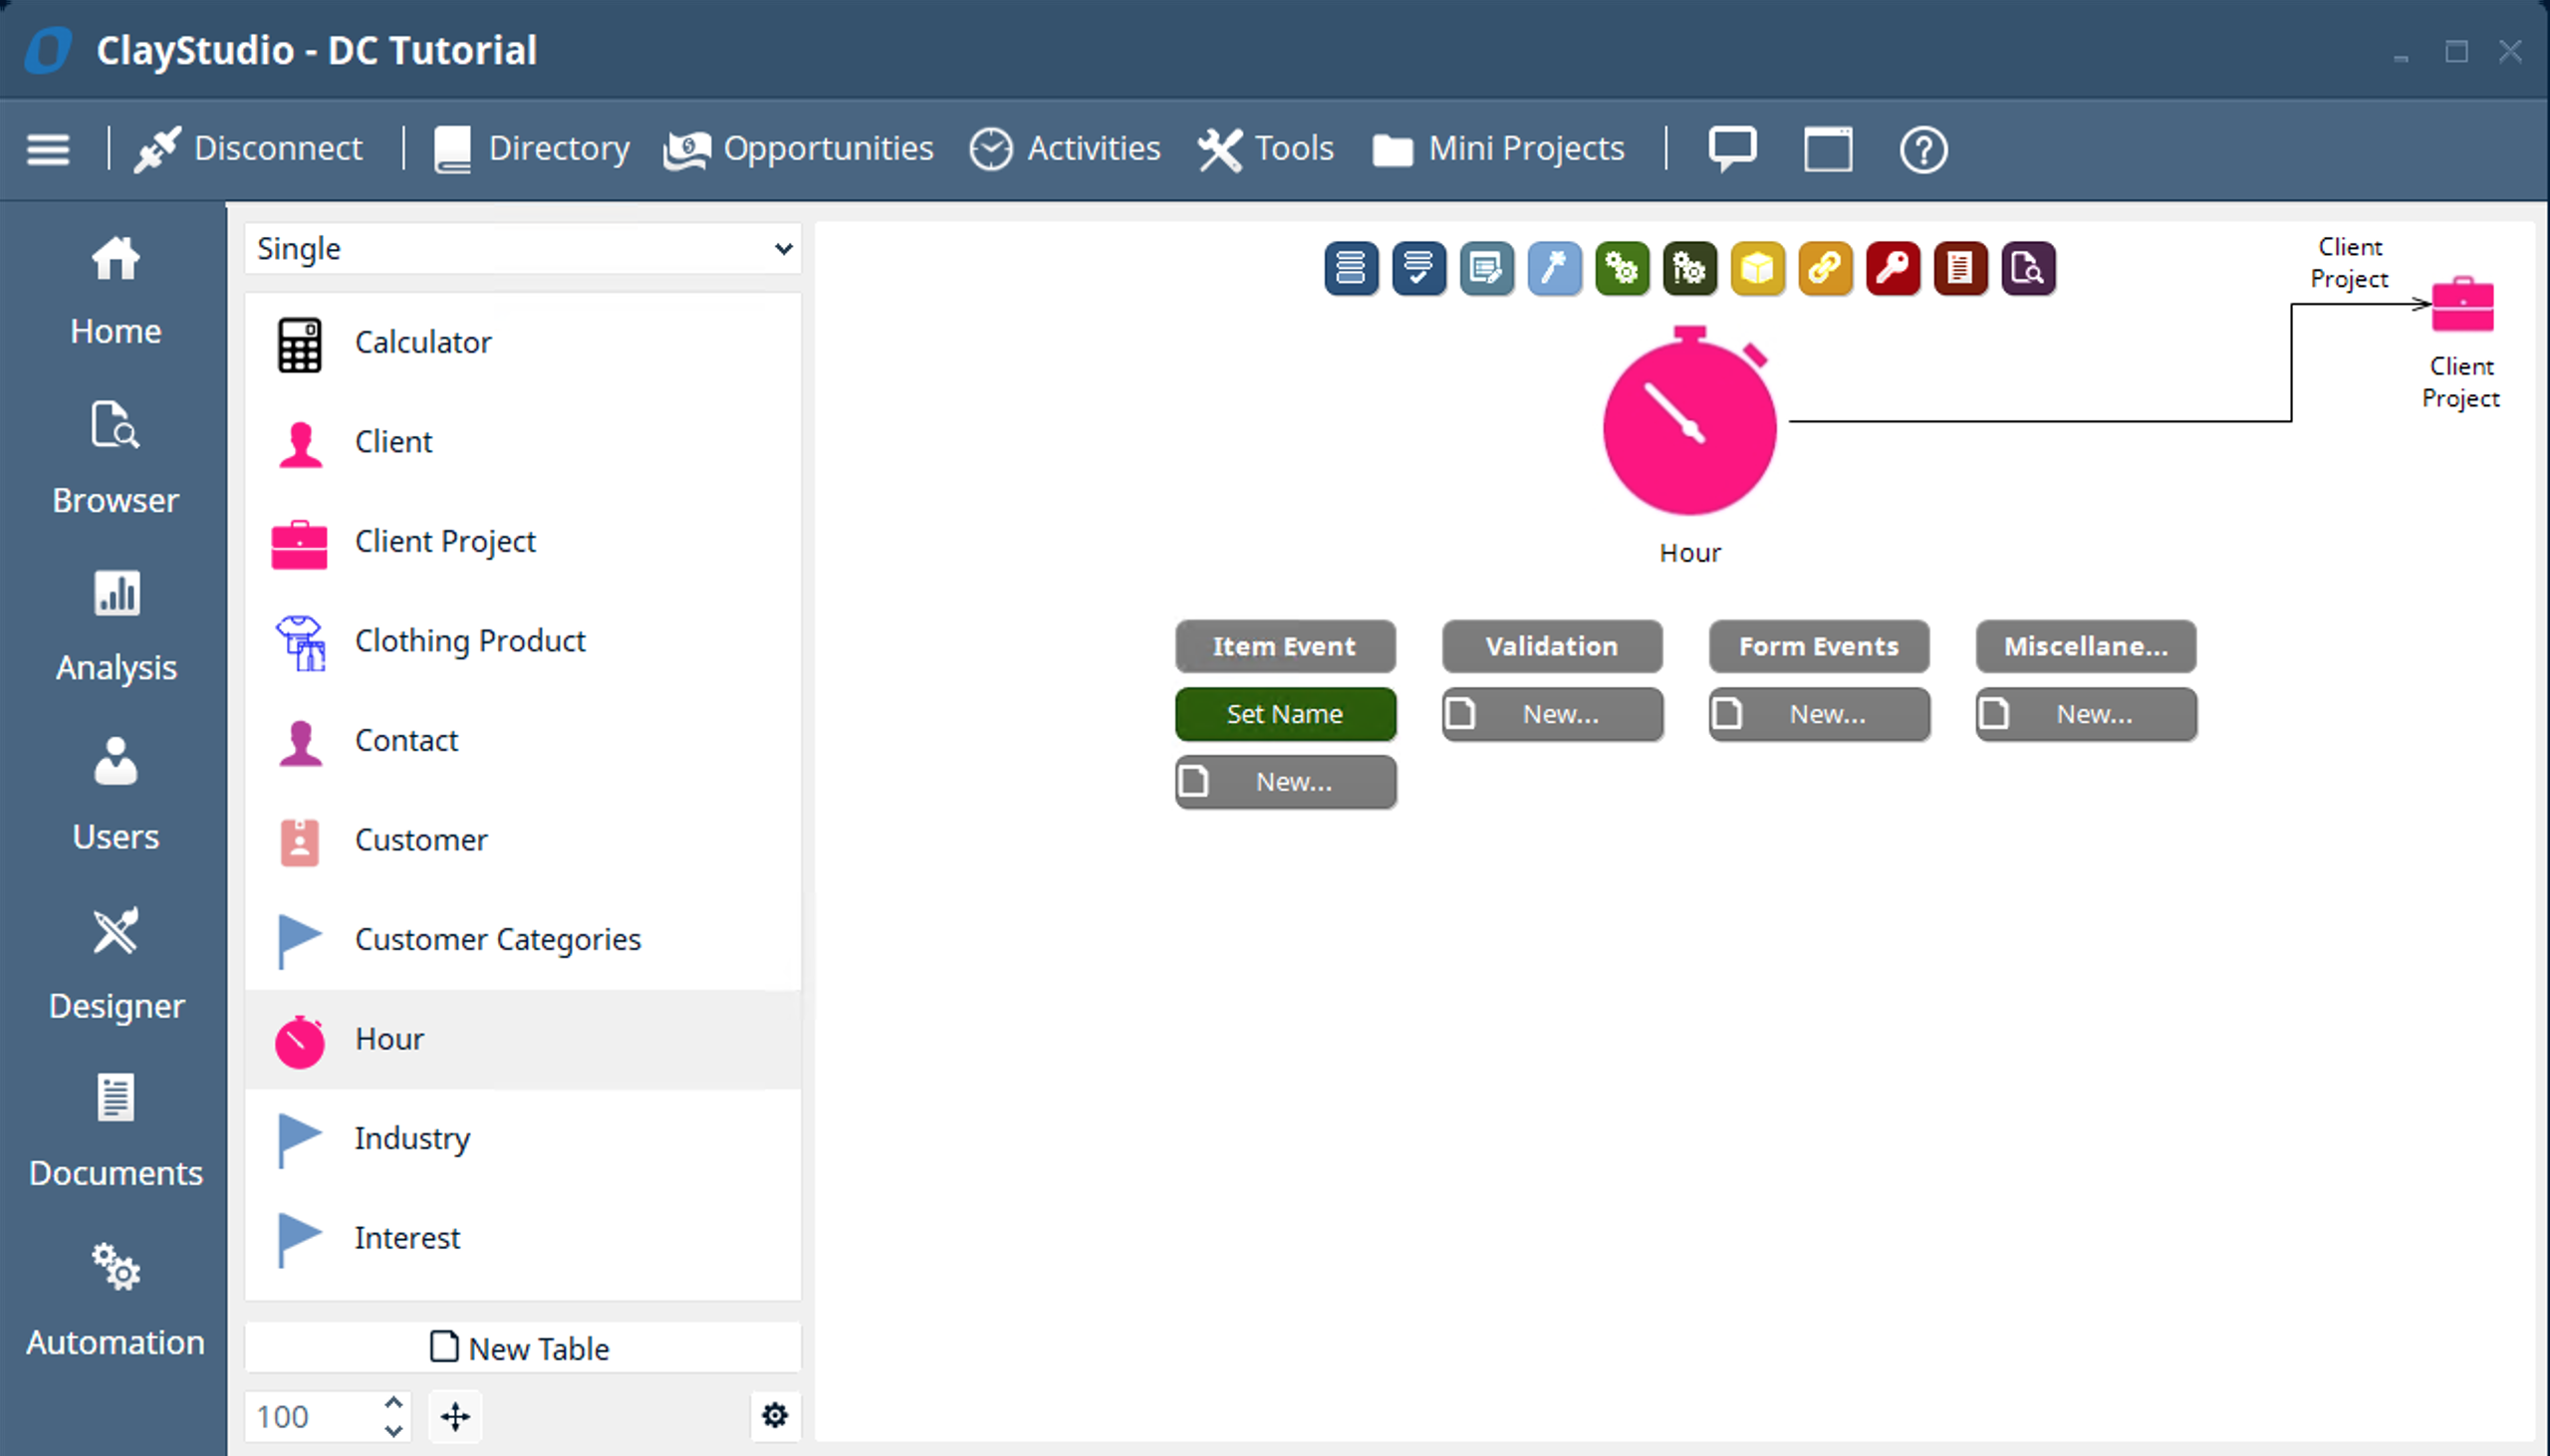
- Now let’s add some records to our tables so that we can implement more functionality and customization to our Hour Tracking solution. In previous mini projects we accessed the “Browser View” for a specific table by clicking the purple icon above each table in the “Designer Tool”, But there are many ways you can view lists of records in your tables in Digital-Clay.
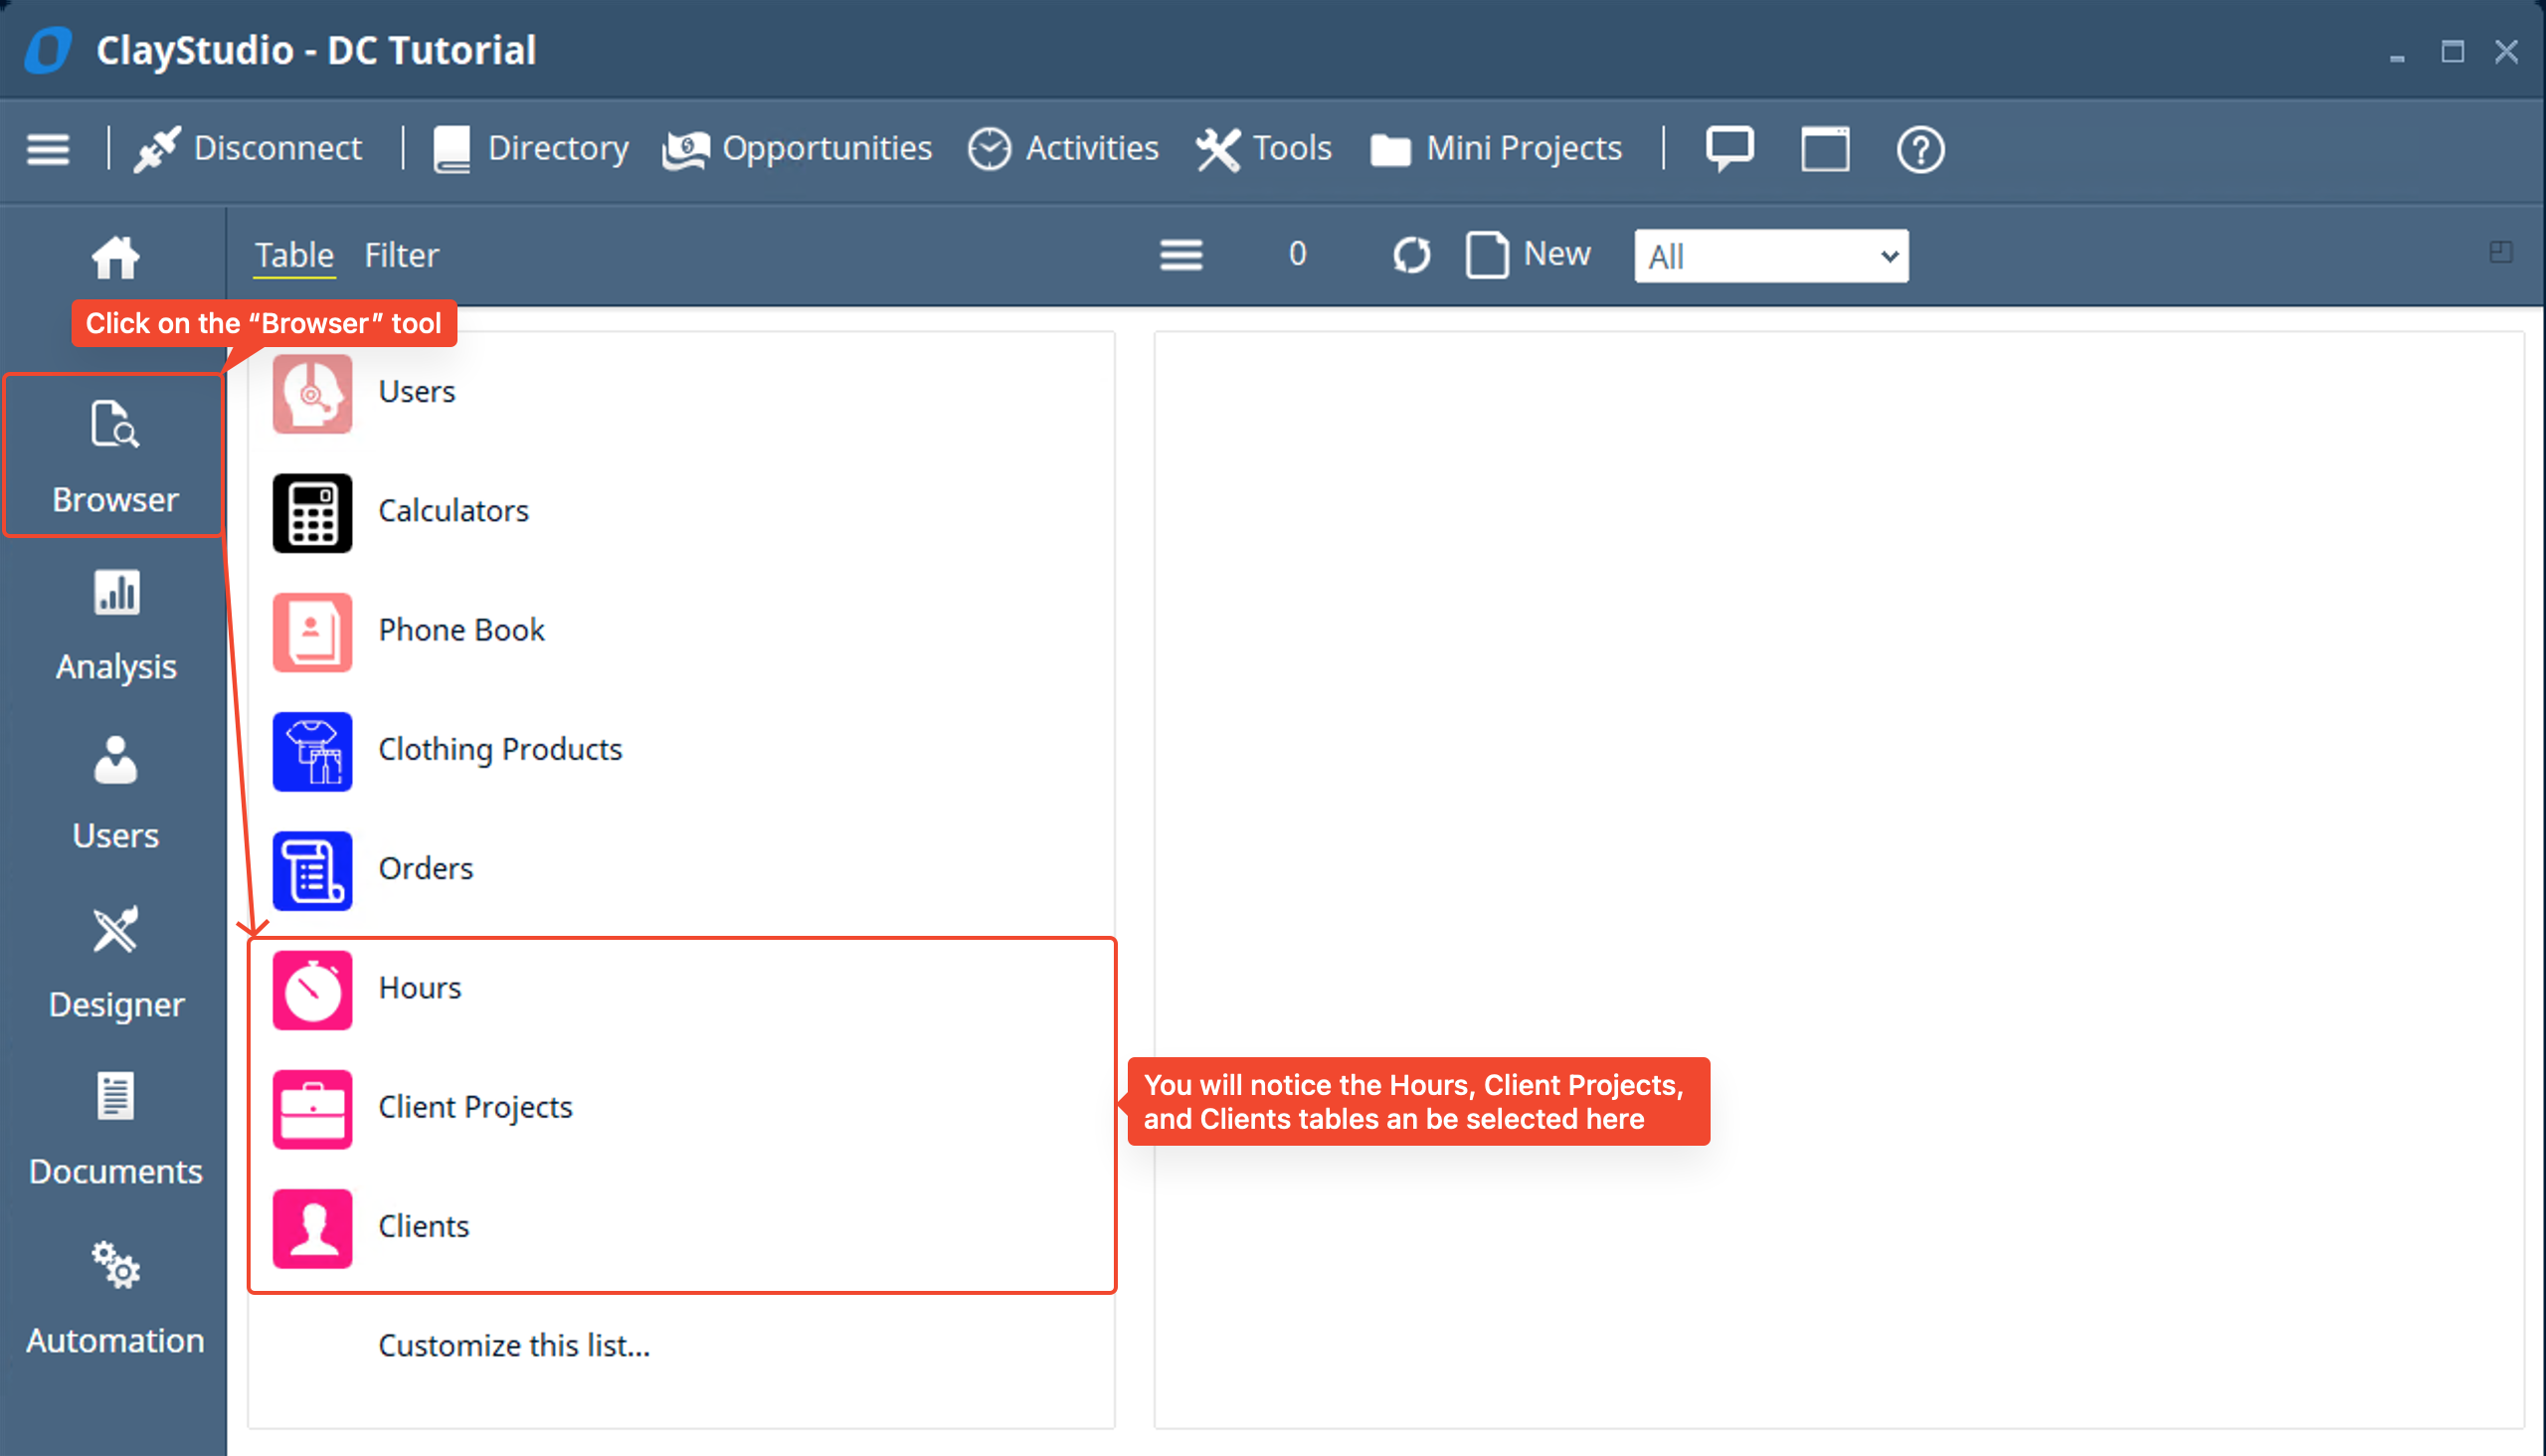
- Another way to view a list of records of a table is in the “Browser Tool” on the left of the page. Let’s click on the “Browser Tool” on the left toolbar. You will notice the “Hours”, “Client Projects”, and “Clients” tables are shown in the table list.
- if you do not see your tables in the list, scroll to the bottom and select the “Customize this list…” option and select the tables you want to view in the browser
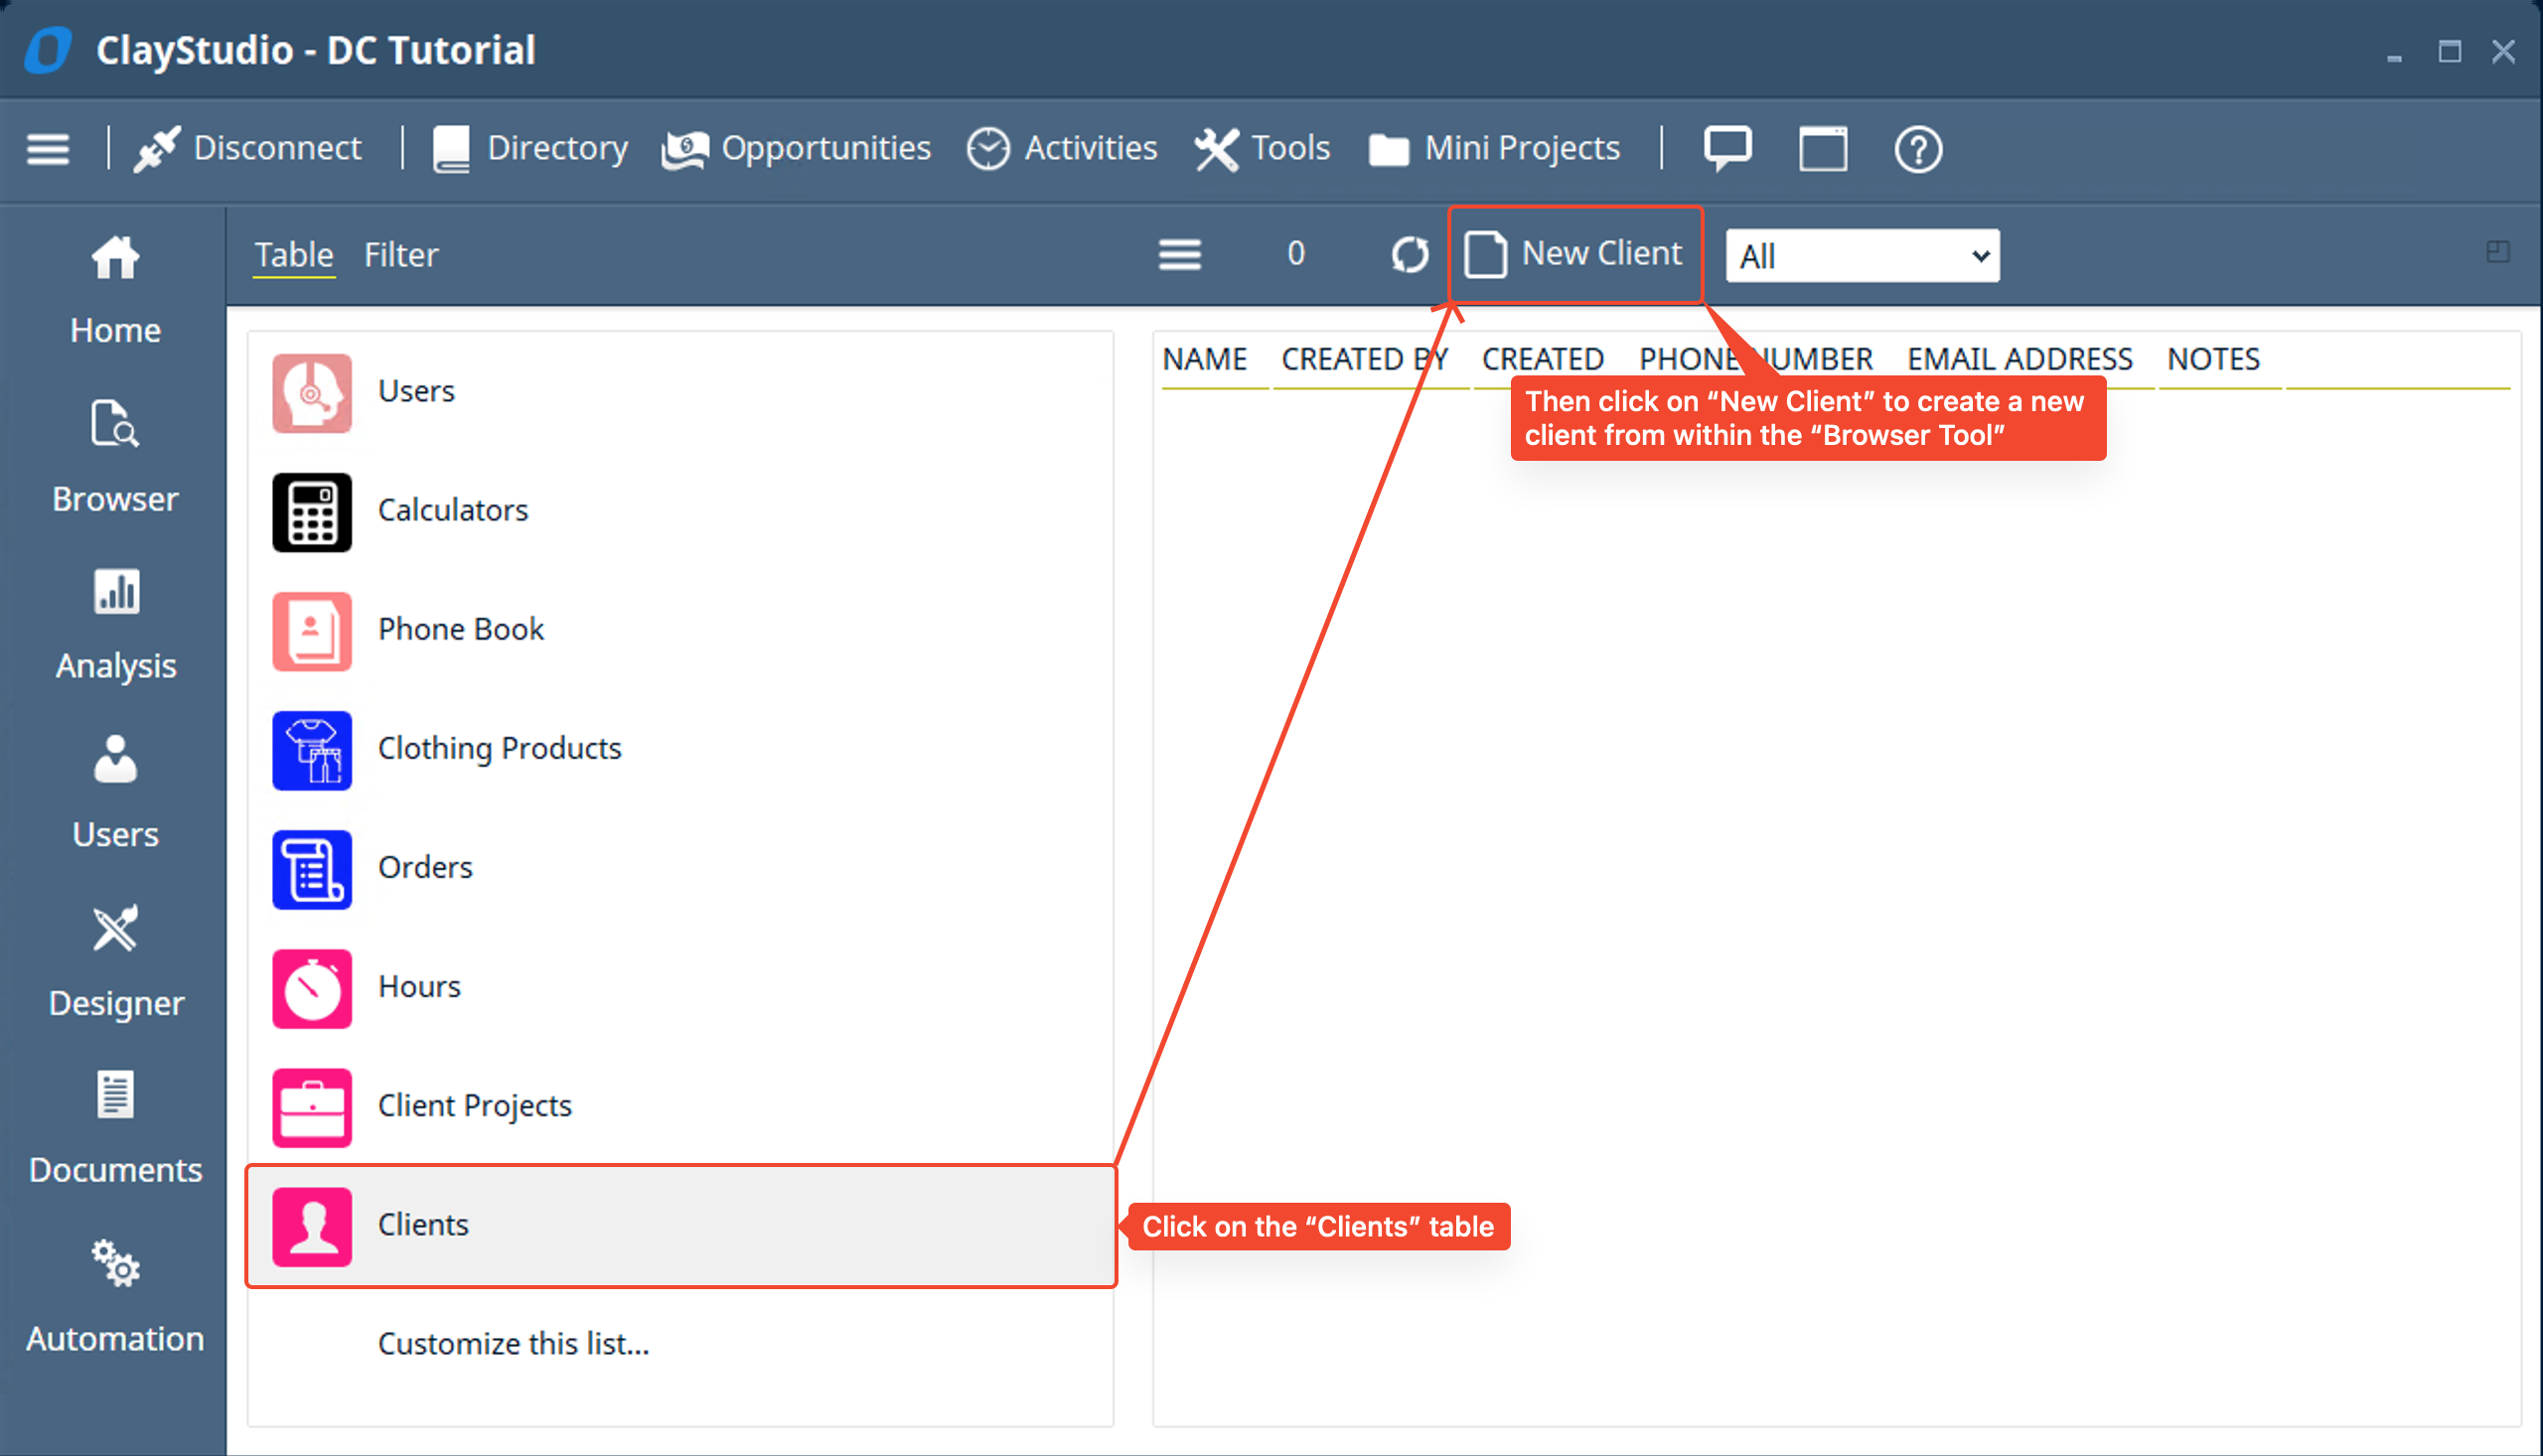
- Lets click on the “Clients” table and create a “New Client”
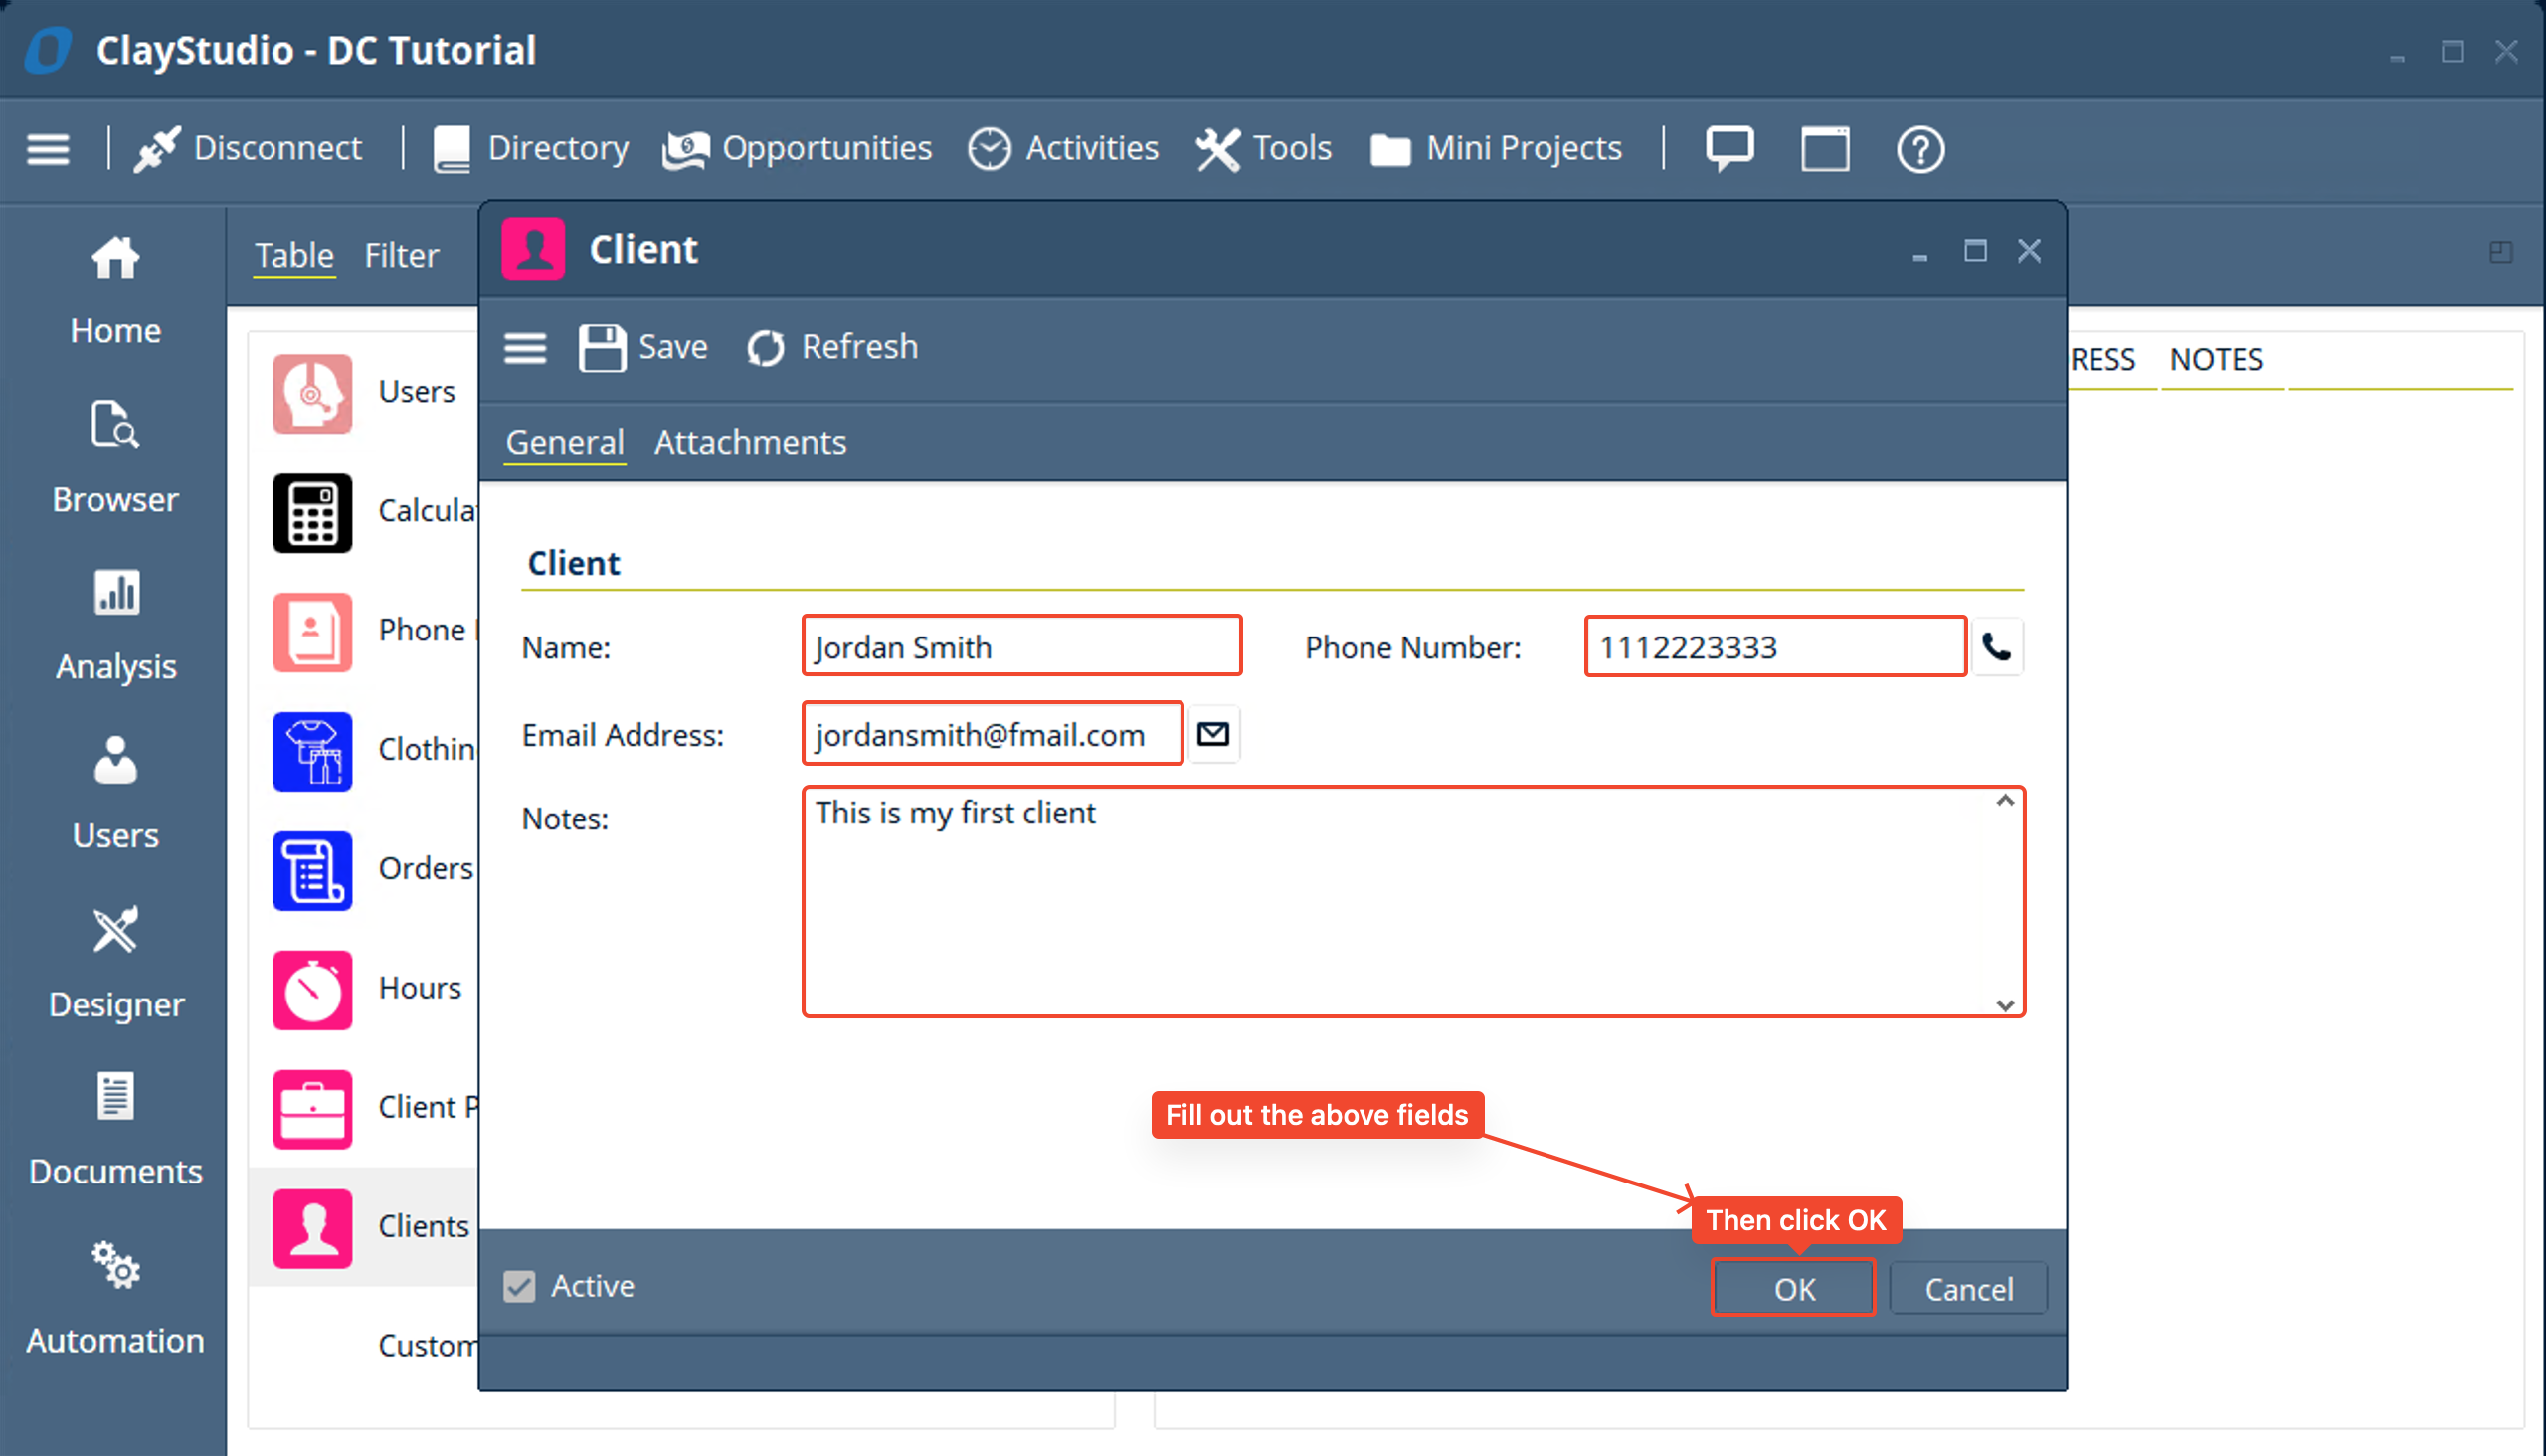
- Fill out the fields for the “New Client” and then click OK.
- Now we will do the same thing and create a record for the “Client Projects” and “Hours” table (use the screenshots below if you get stuck).
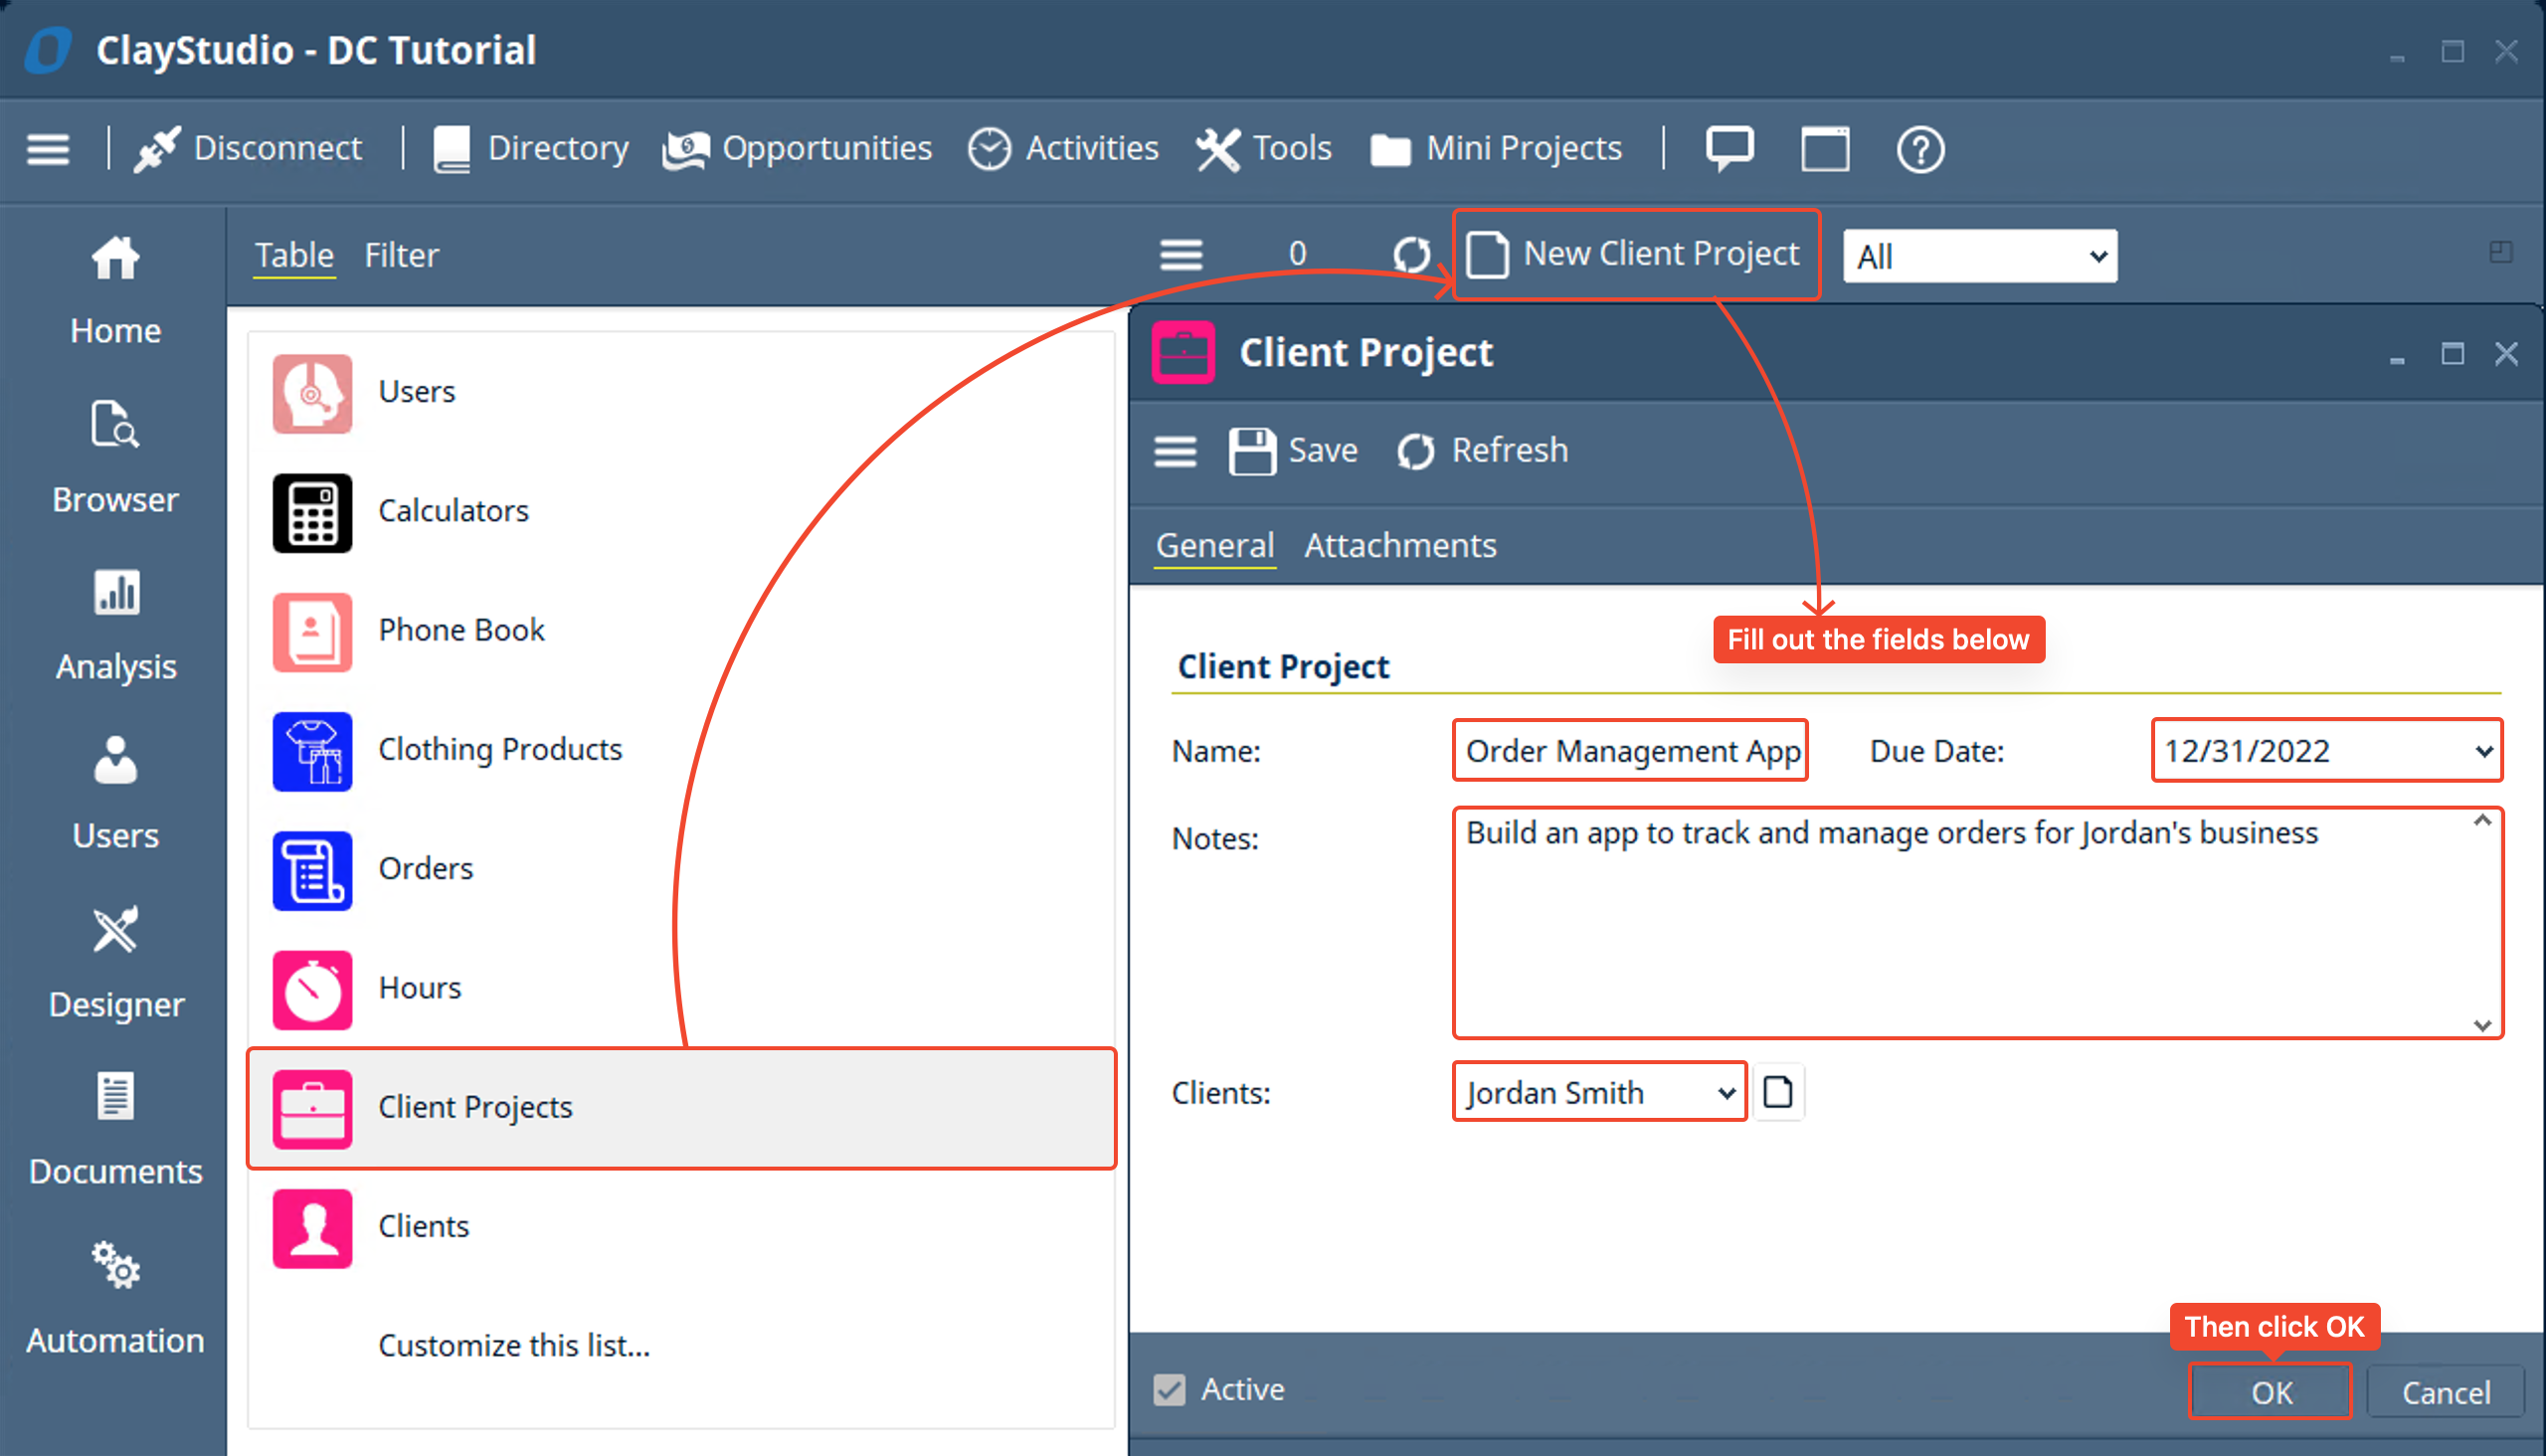
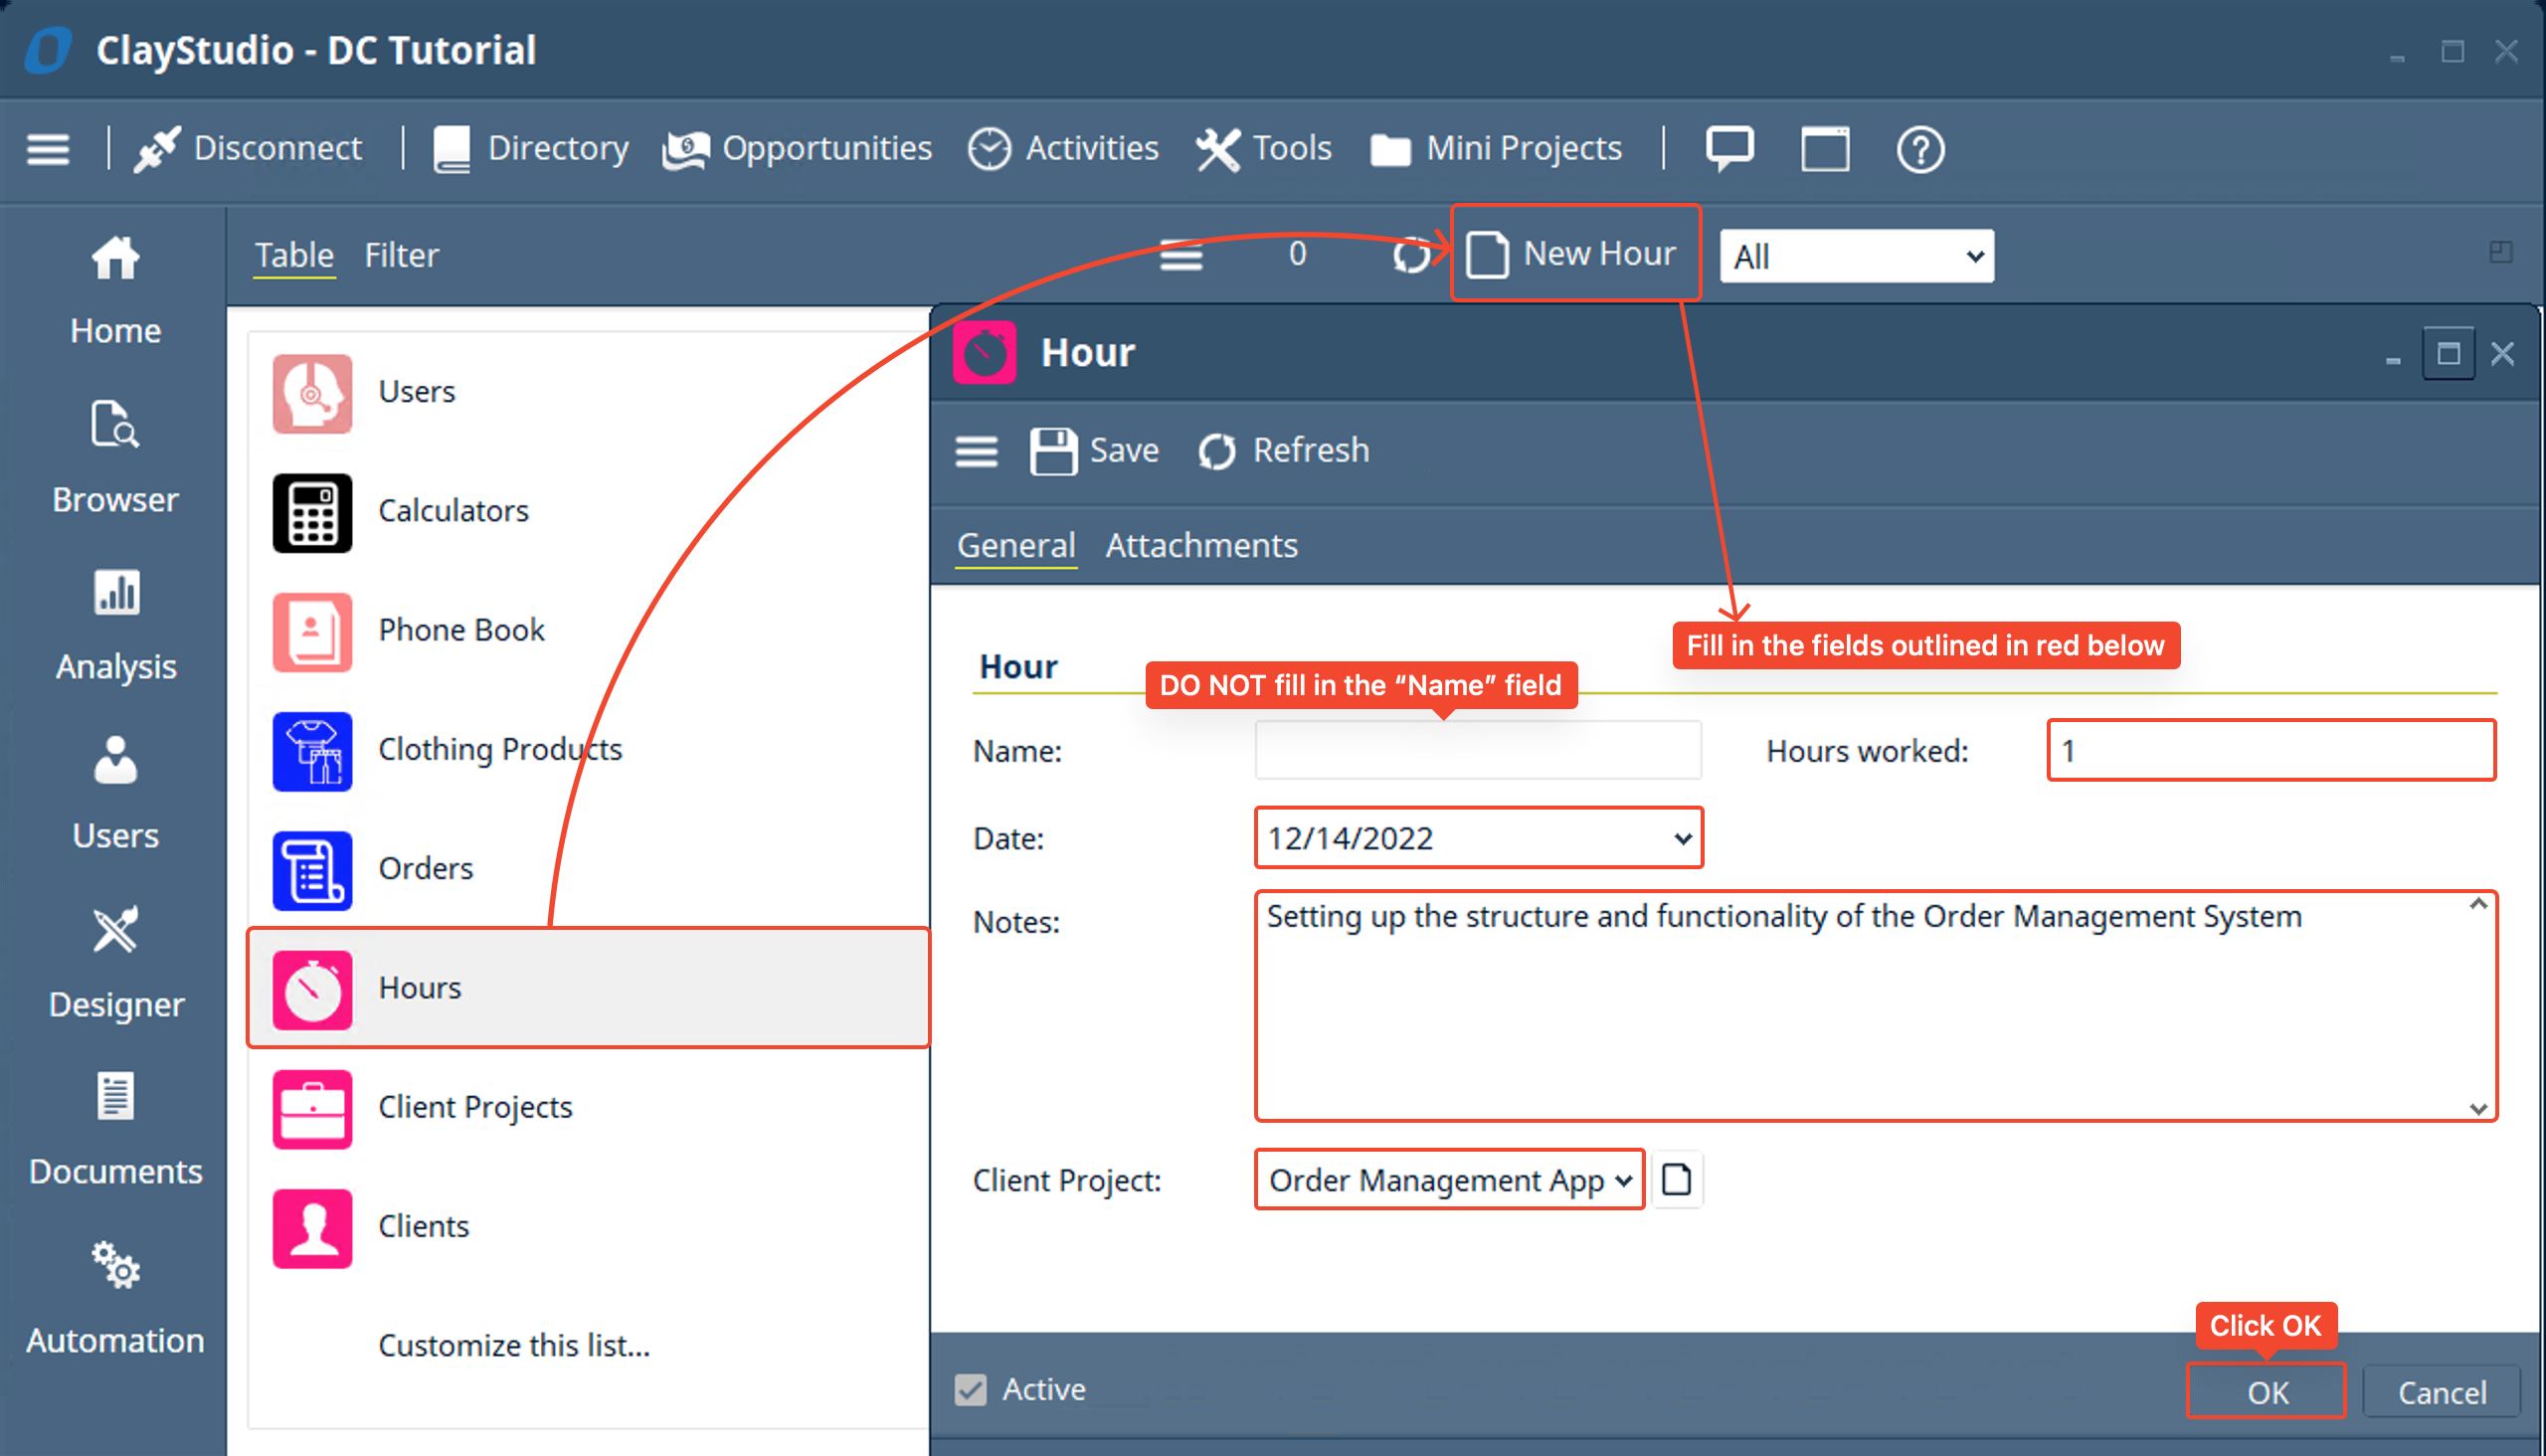
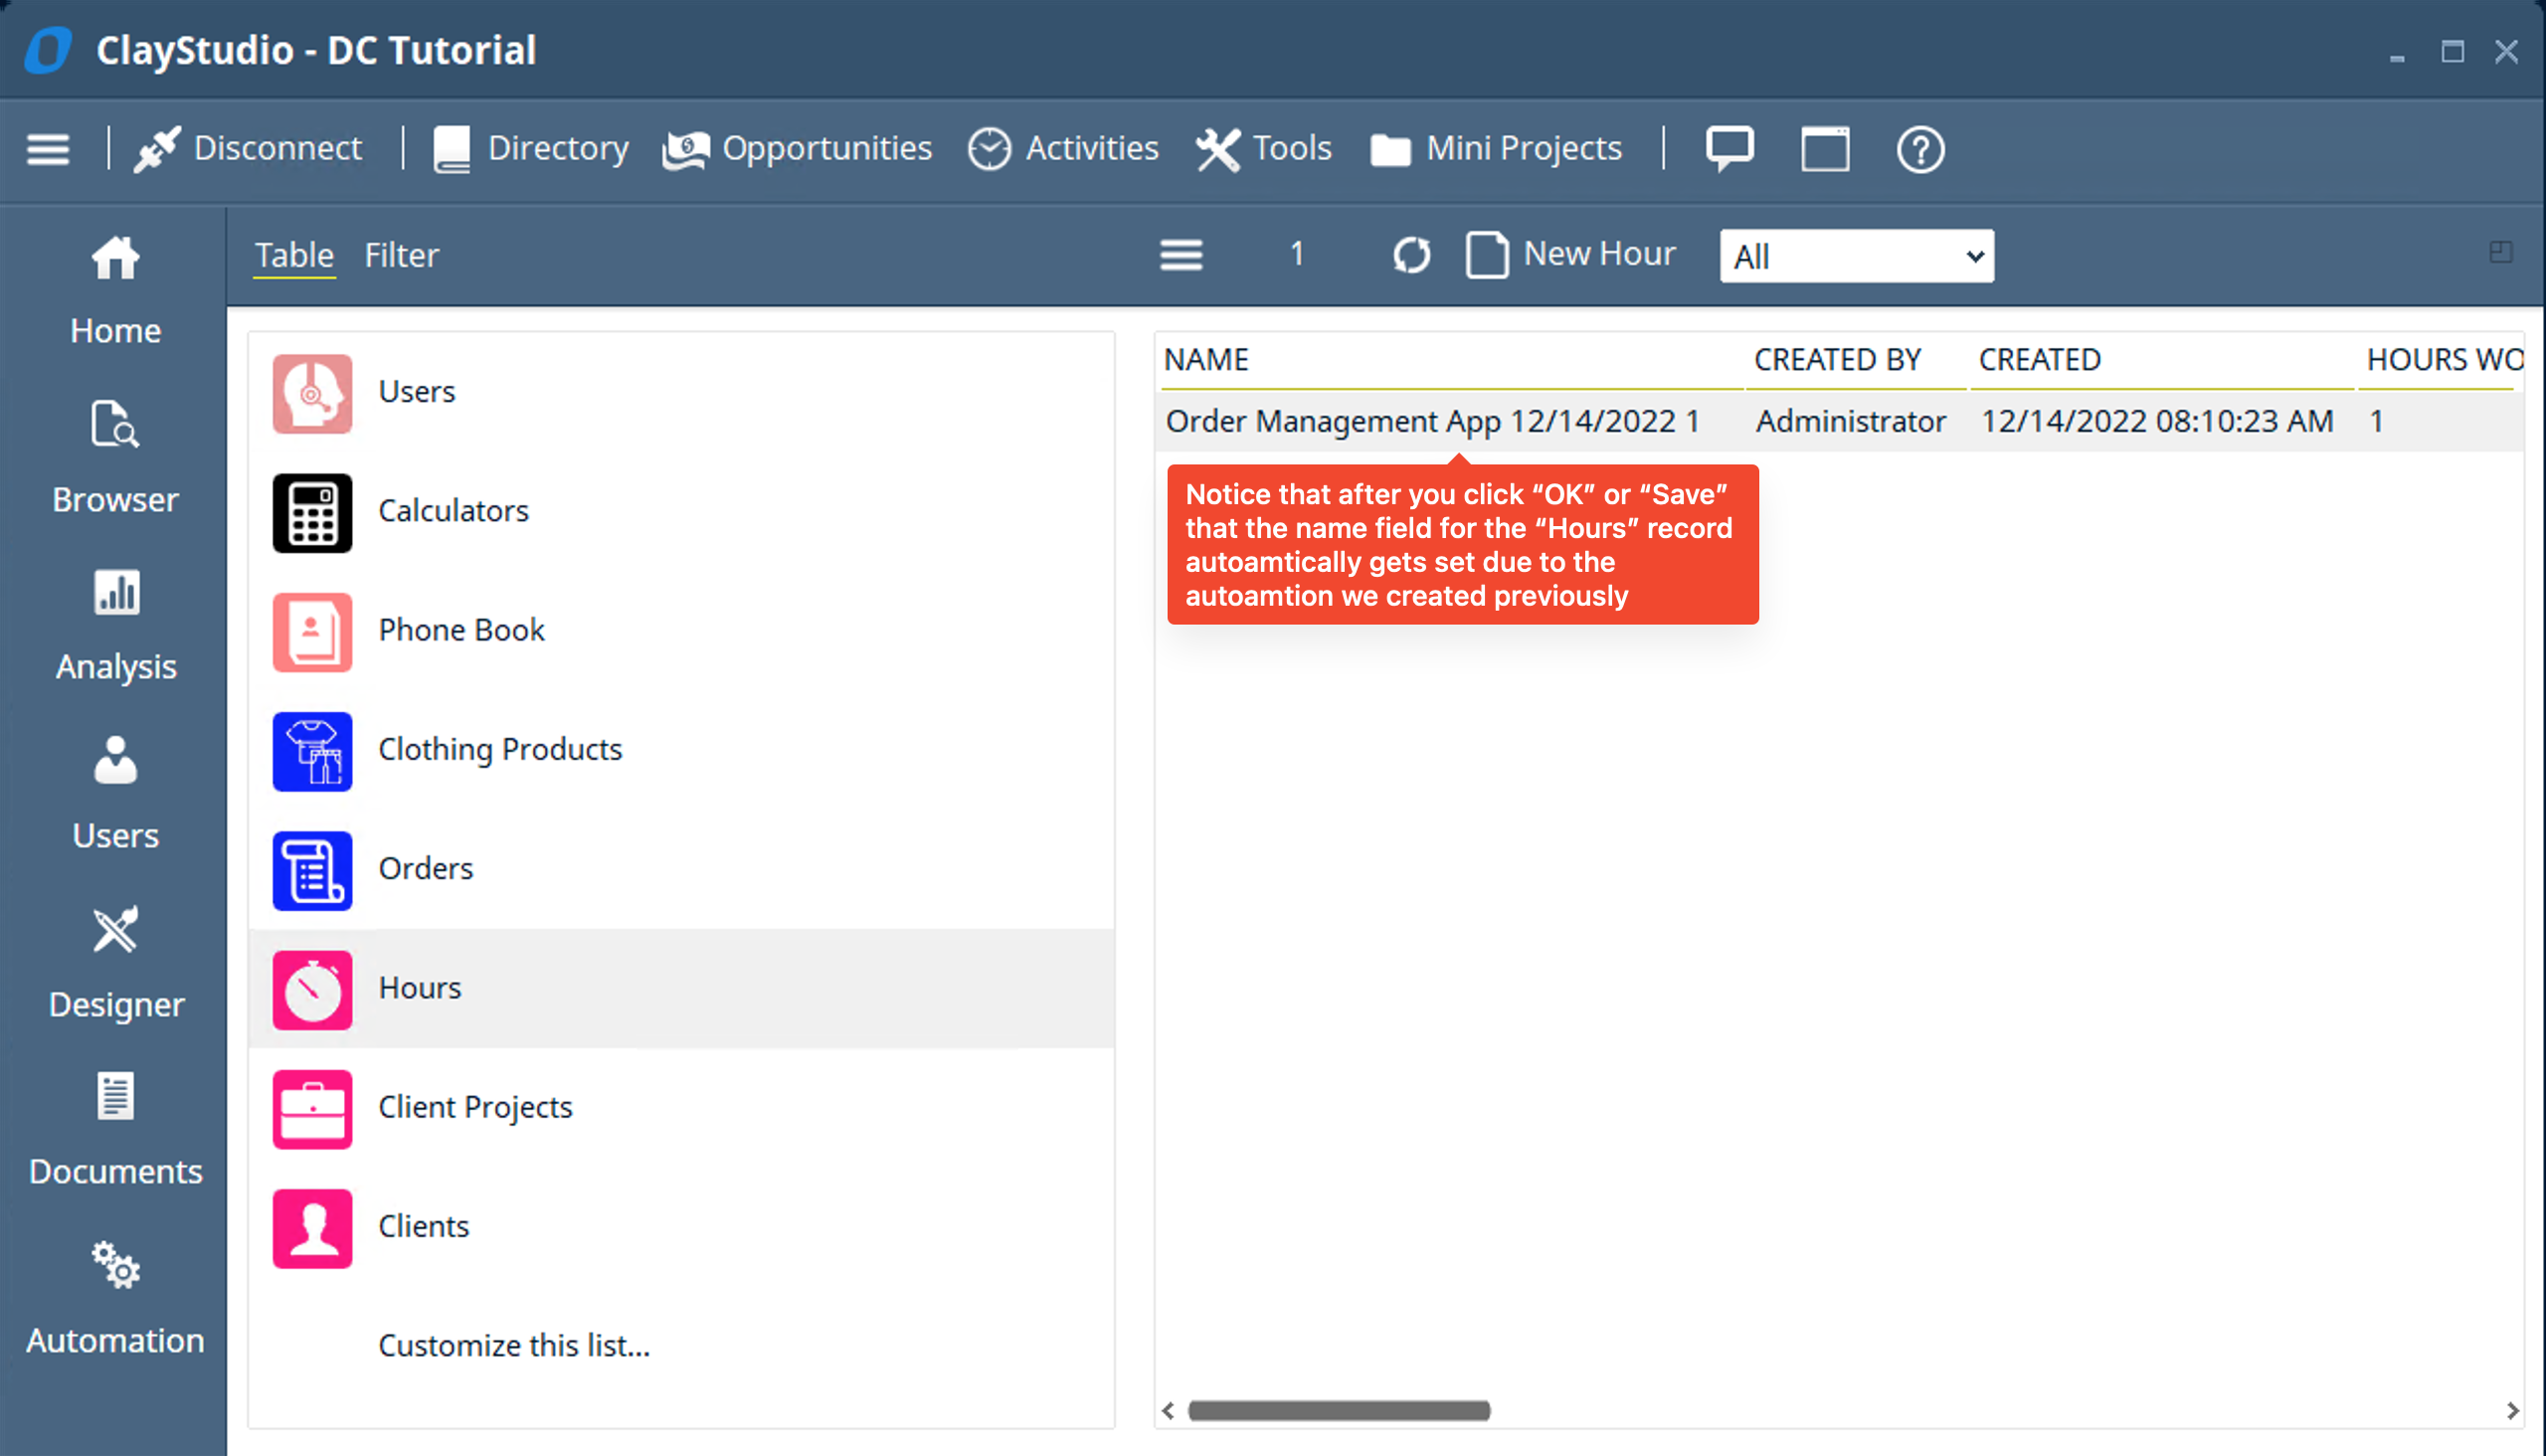
- Now let’s create a couple simple “Create User Actions”. We want to create two separate “Create User Actions”: one that will create a “Client Project” for a specific “Client”, and another one that will add “Hours” to a specific “Client Project”. In a previous mini project we learned how to do this within the “Designer Tool” using the “User Actions View” in a specific table. Another way to create user actions is to use the “User Action Tool”. This can be found in the toolbar menu → click on “Tables” in the dropdown → then click on “User Actions” in the sub dropdown.
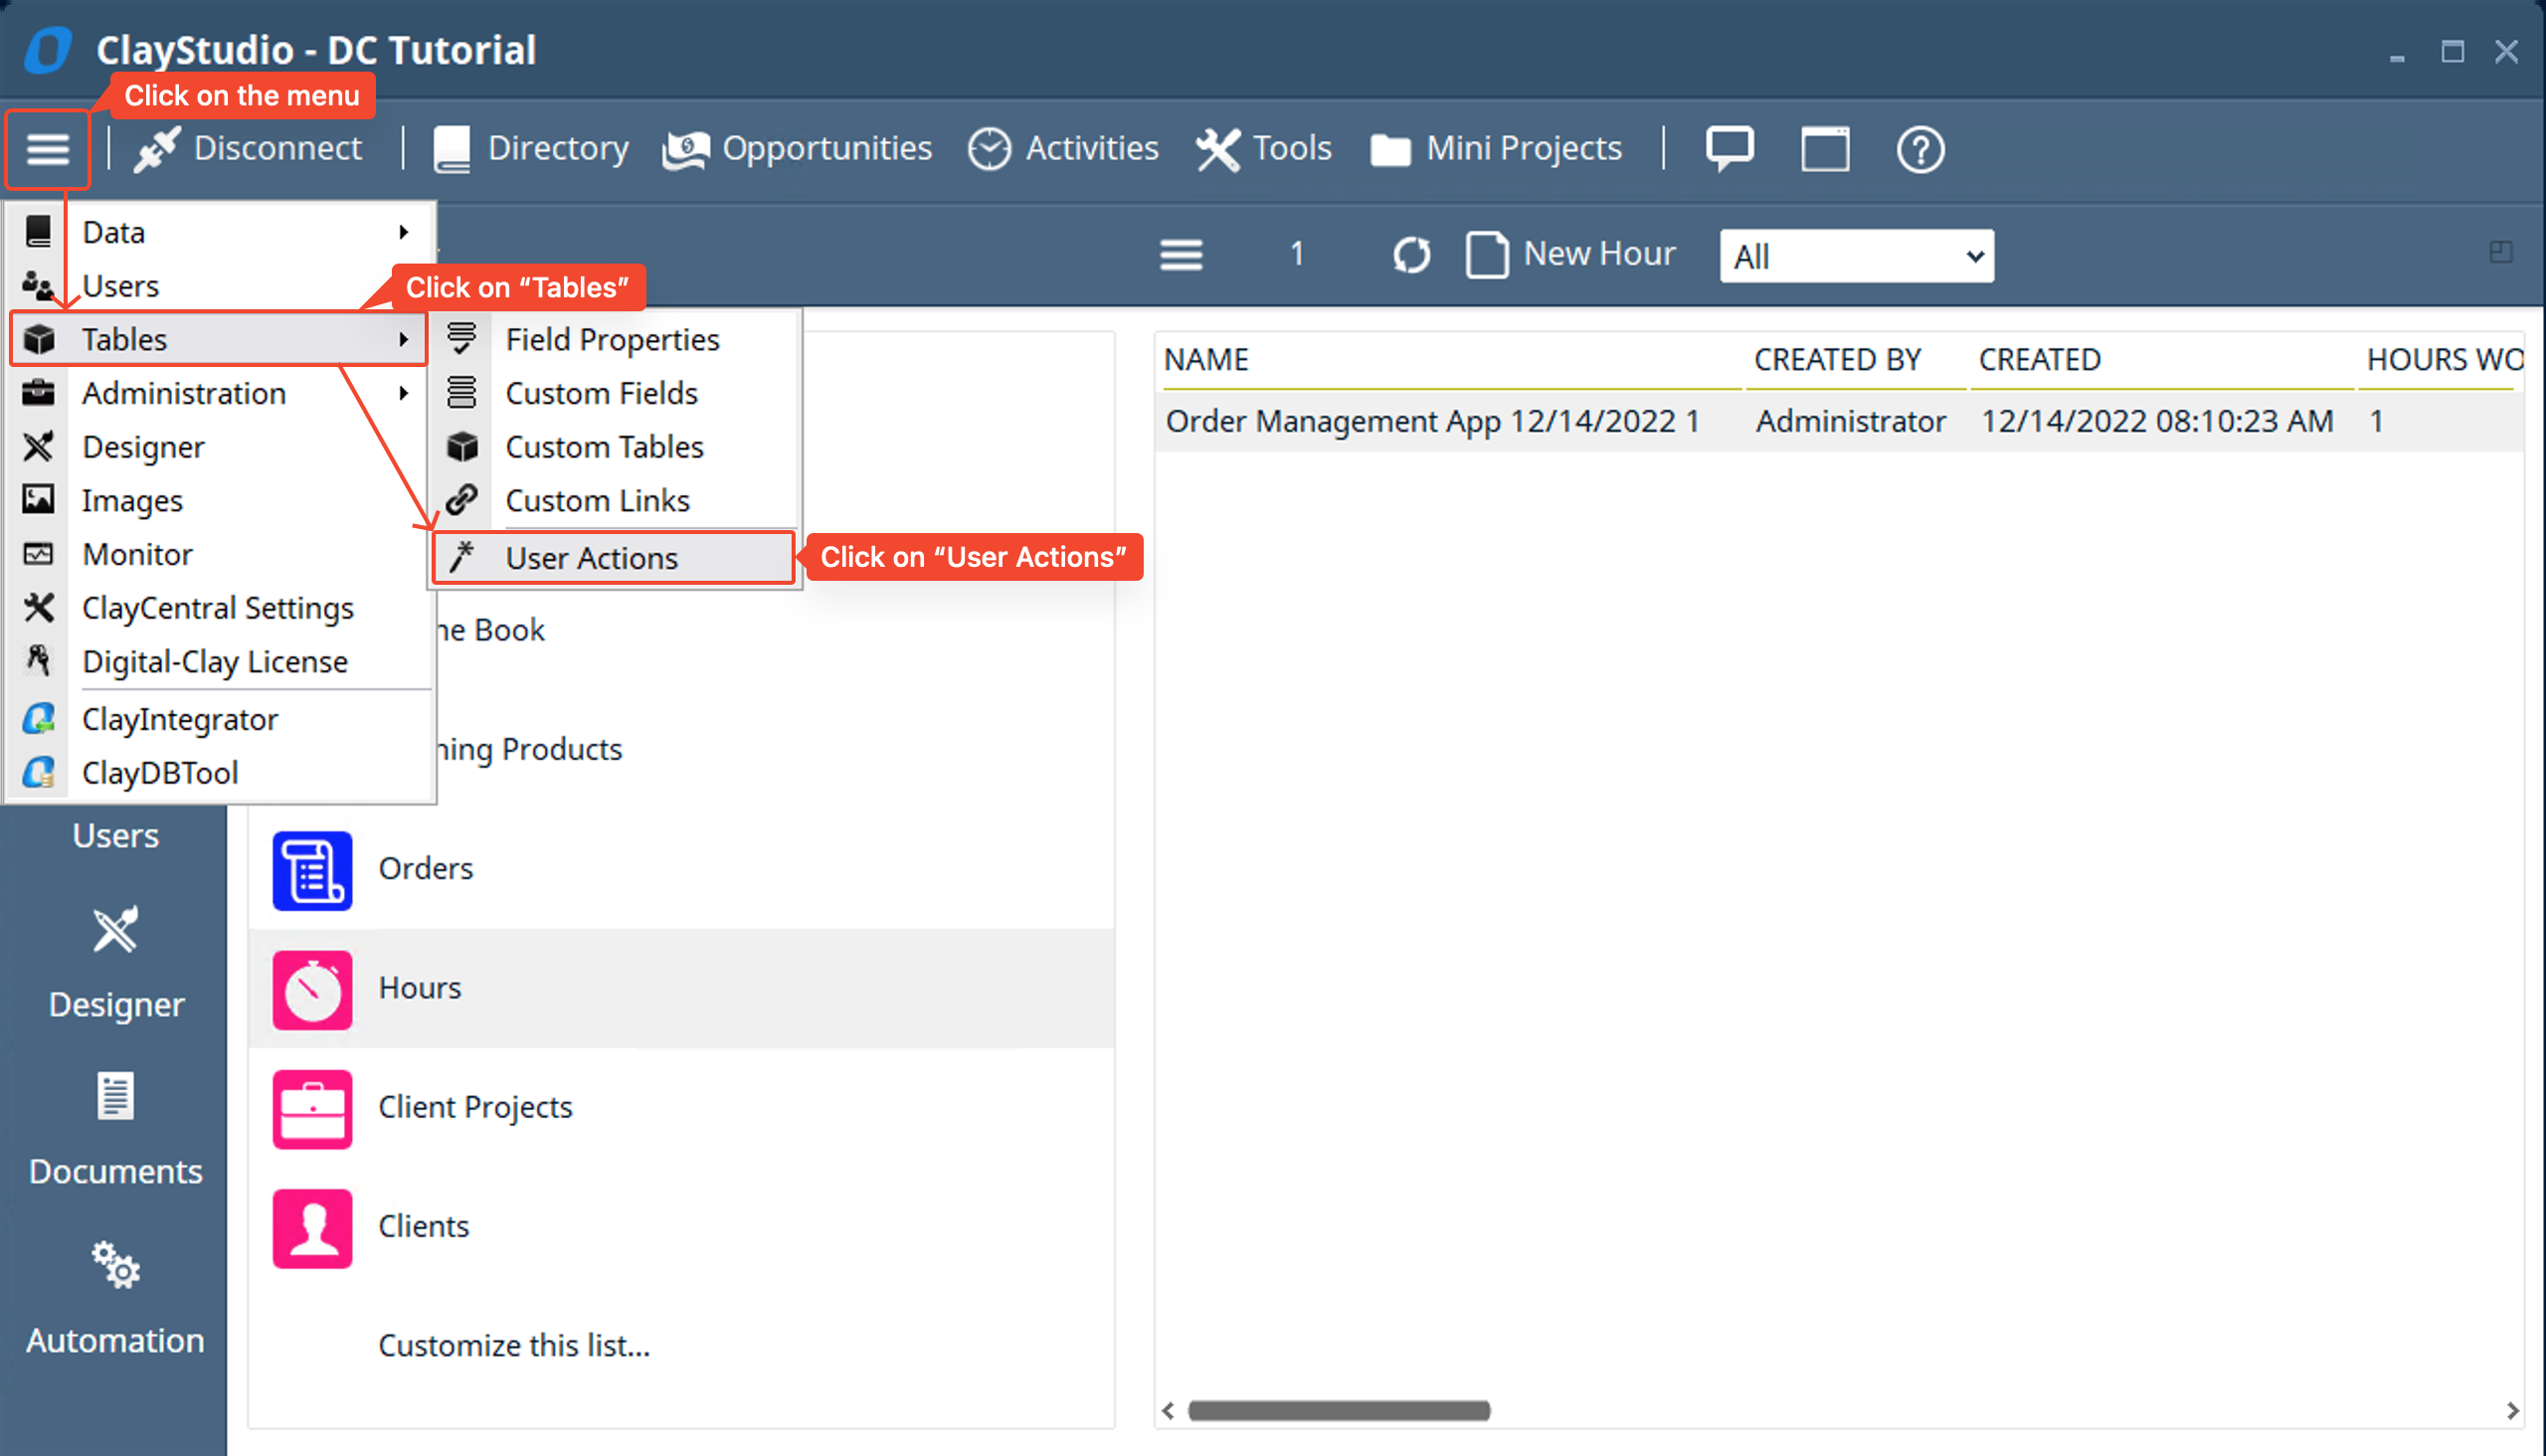
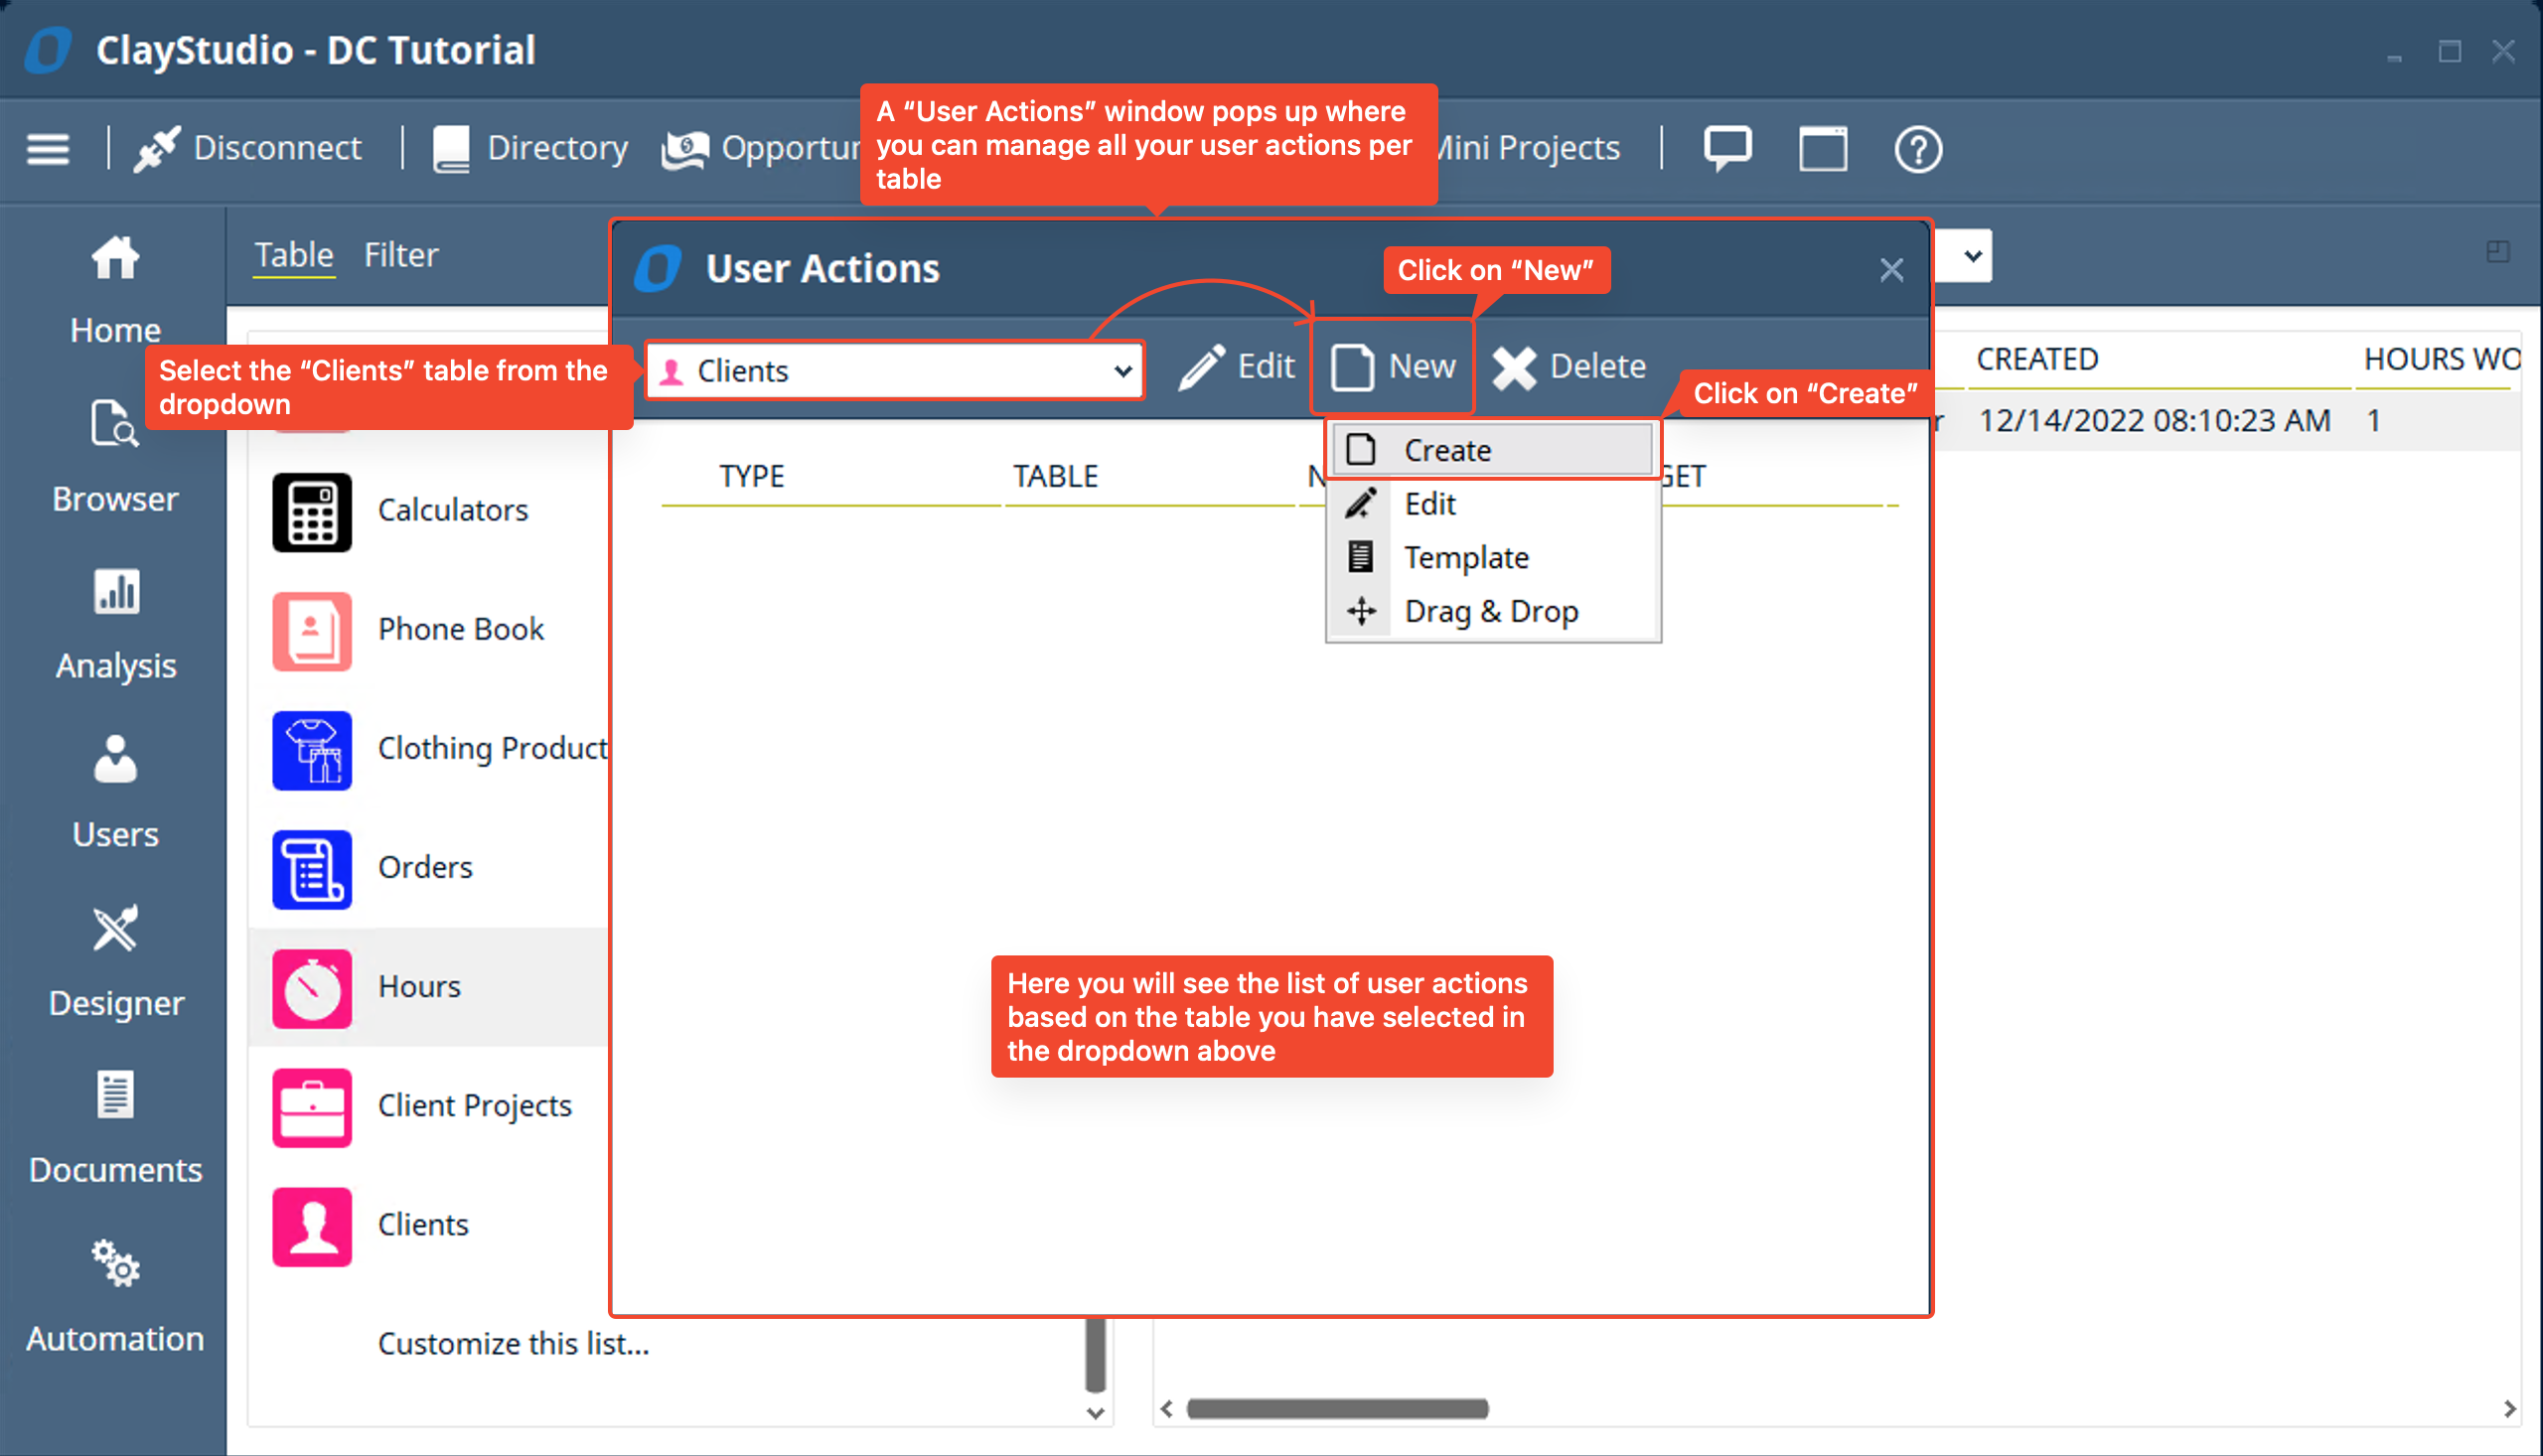
- A user action window will pop up. In here you can select the table you want to make a user action for. You can do things like create a “New” user action for a table, “Edit” and existing user action, or “Delete” a user action from a table. If we select the “Clients” table from the table dropdown and click on the “New” button → then select “Create”. We will be able to make a “Create Action” in the “Clients” table. This “Create Action” will allow you to create an item/record for a selected table.
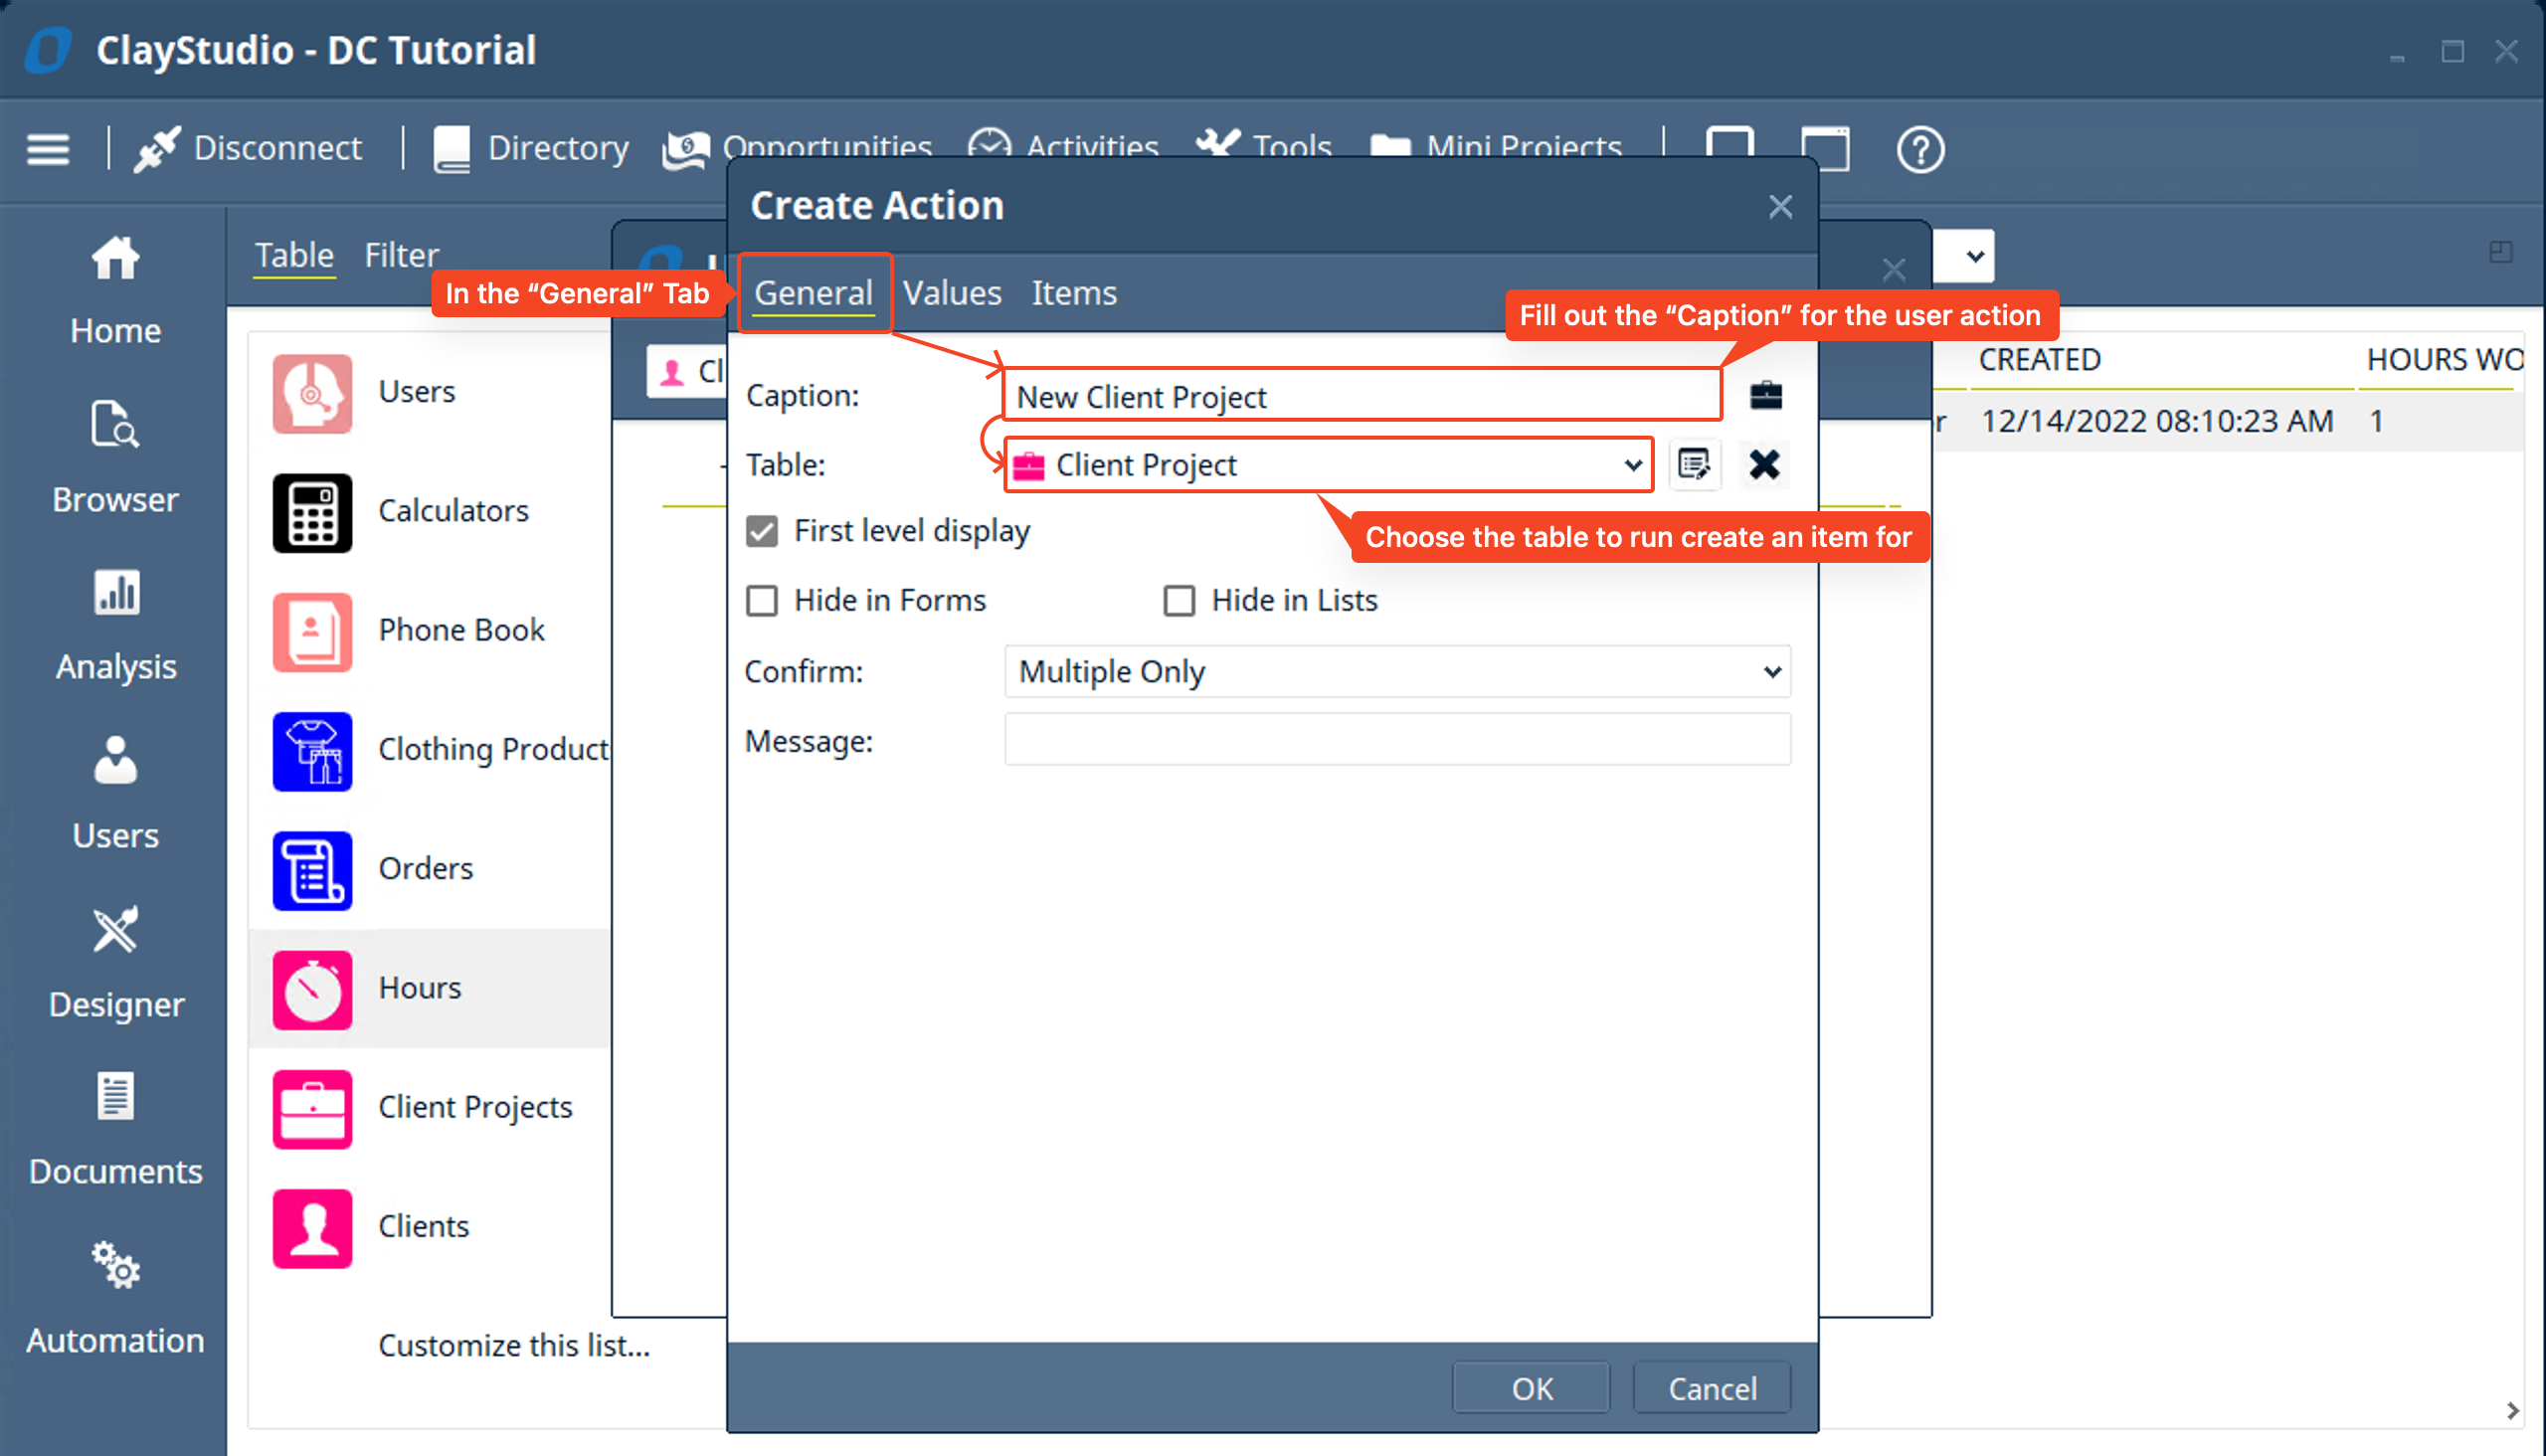
- The first “Create Action” we will make will allow us to easily add a “Client Project” to a “Client” directly from the “Client” item/record. So that when you are looking at a client you can click a button so simply add a “Client Project” to that “Client”. After clicking on the “Create” option… in the “General” Tab → fill out the caption field, this will be the name of the user action you are creating → then select the “Table” you want to create an item/record for.
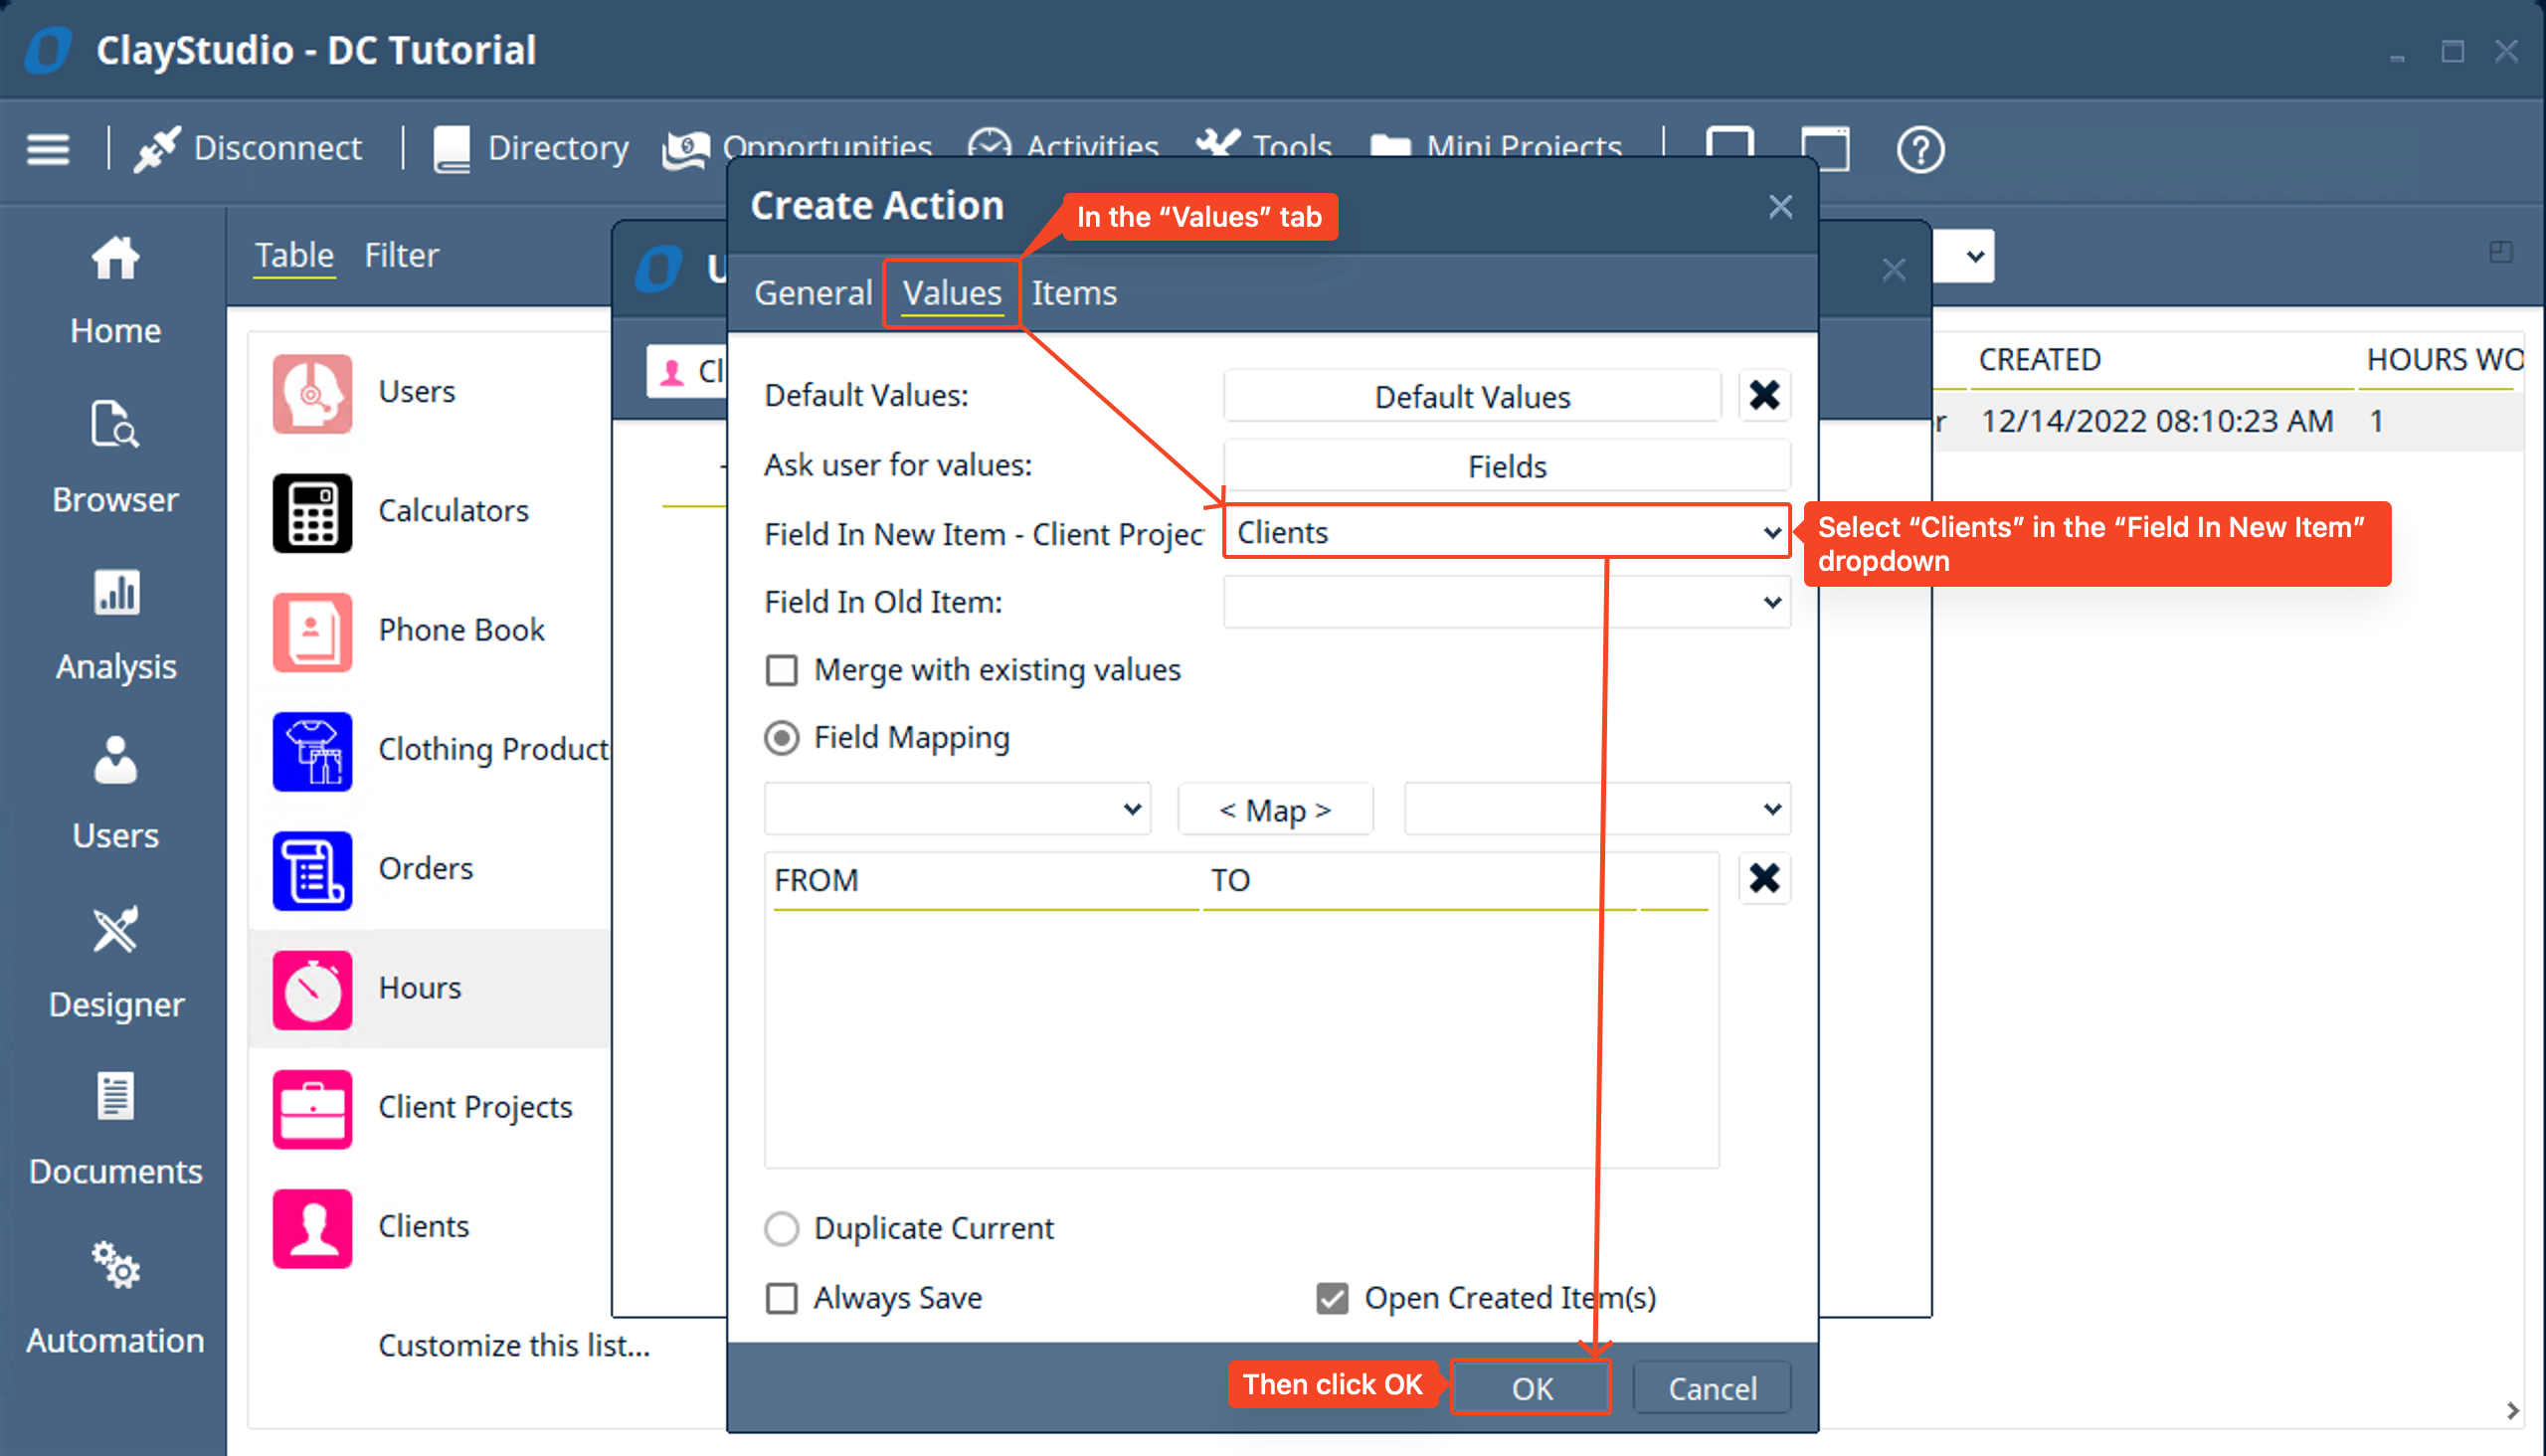
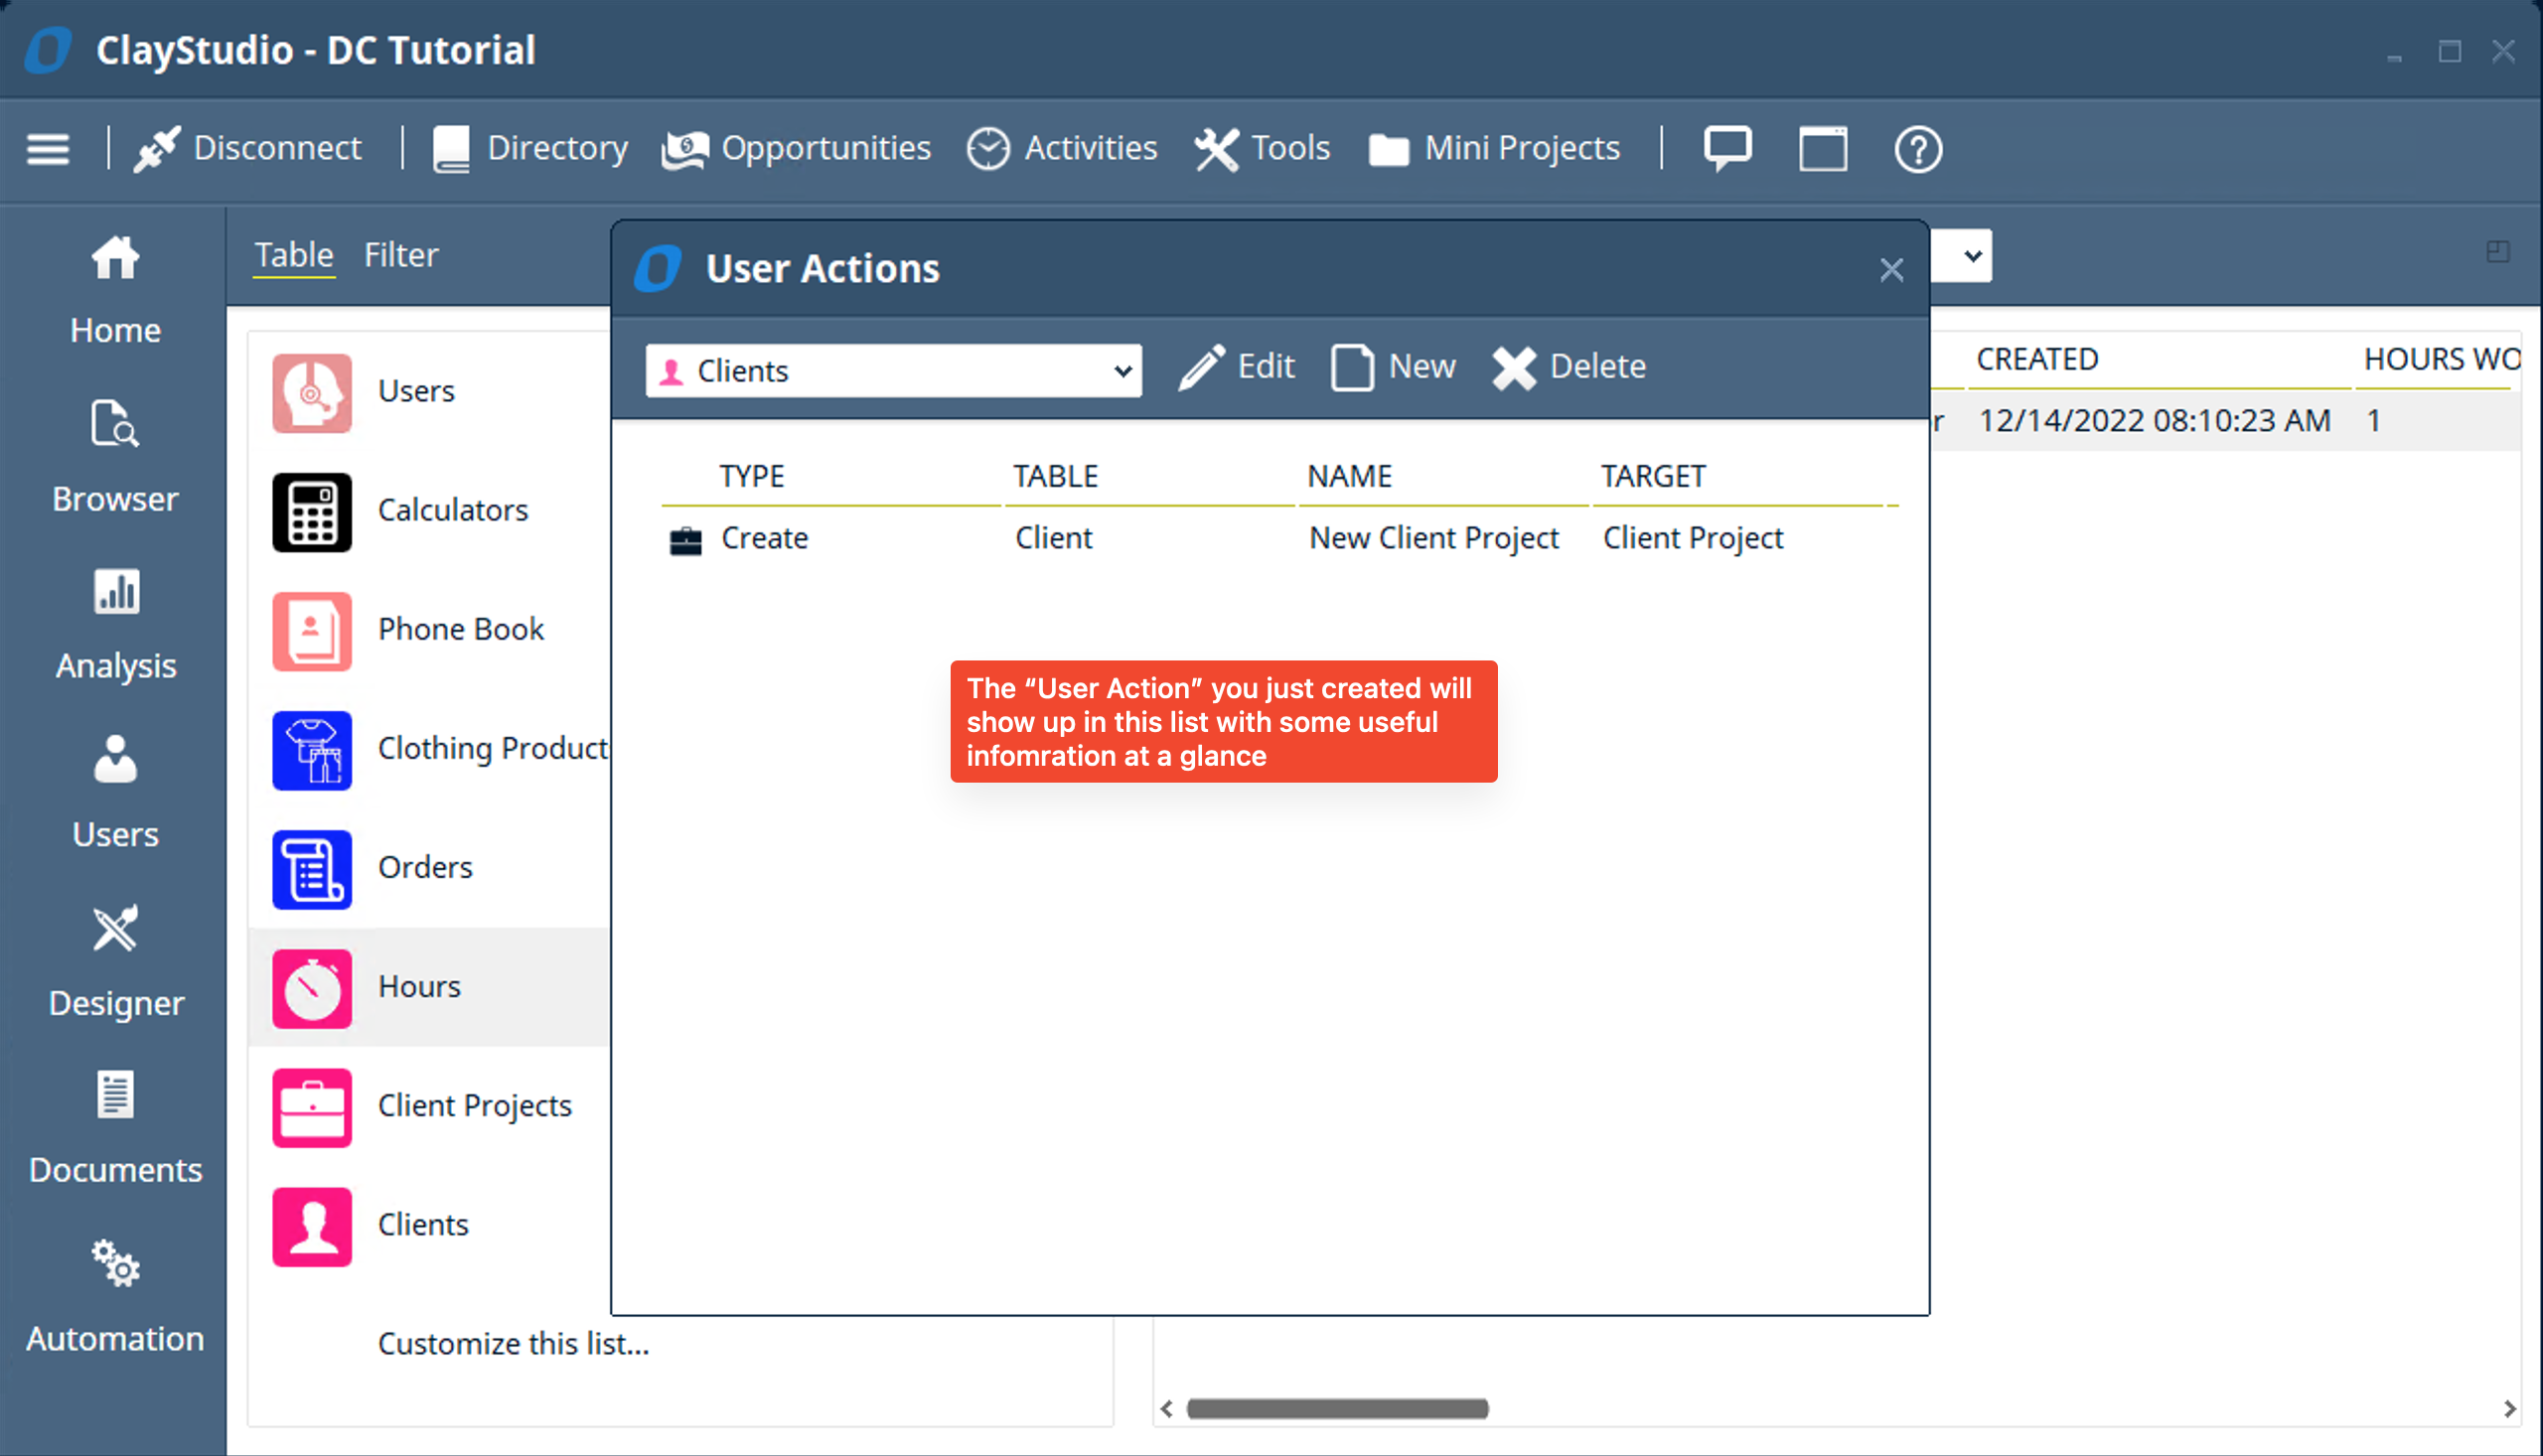
- Next, let’s click on the “Values” tab in the “Create Action” window and select the “Clients” option from the “Field In New Item” dropdown. Doing this will automatically link the newly created “Client Project” item to the “Client” you created the project from. Then click OK to save the save and create the user action. You will notice that the user action gets populated in the “User Actions” list where you can see useful information like the “Type” (which indicates what type of action the specific user action is), the “Table” (which indicates which table the user action is apart of), the “Name” which is the caption you filled out in the “General” tab of the create action), and a “Target” (which tells you what the action is running on, in this case since the type is “Create” it is a “Create” action that will create a “Client Project”)
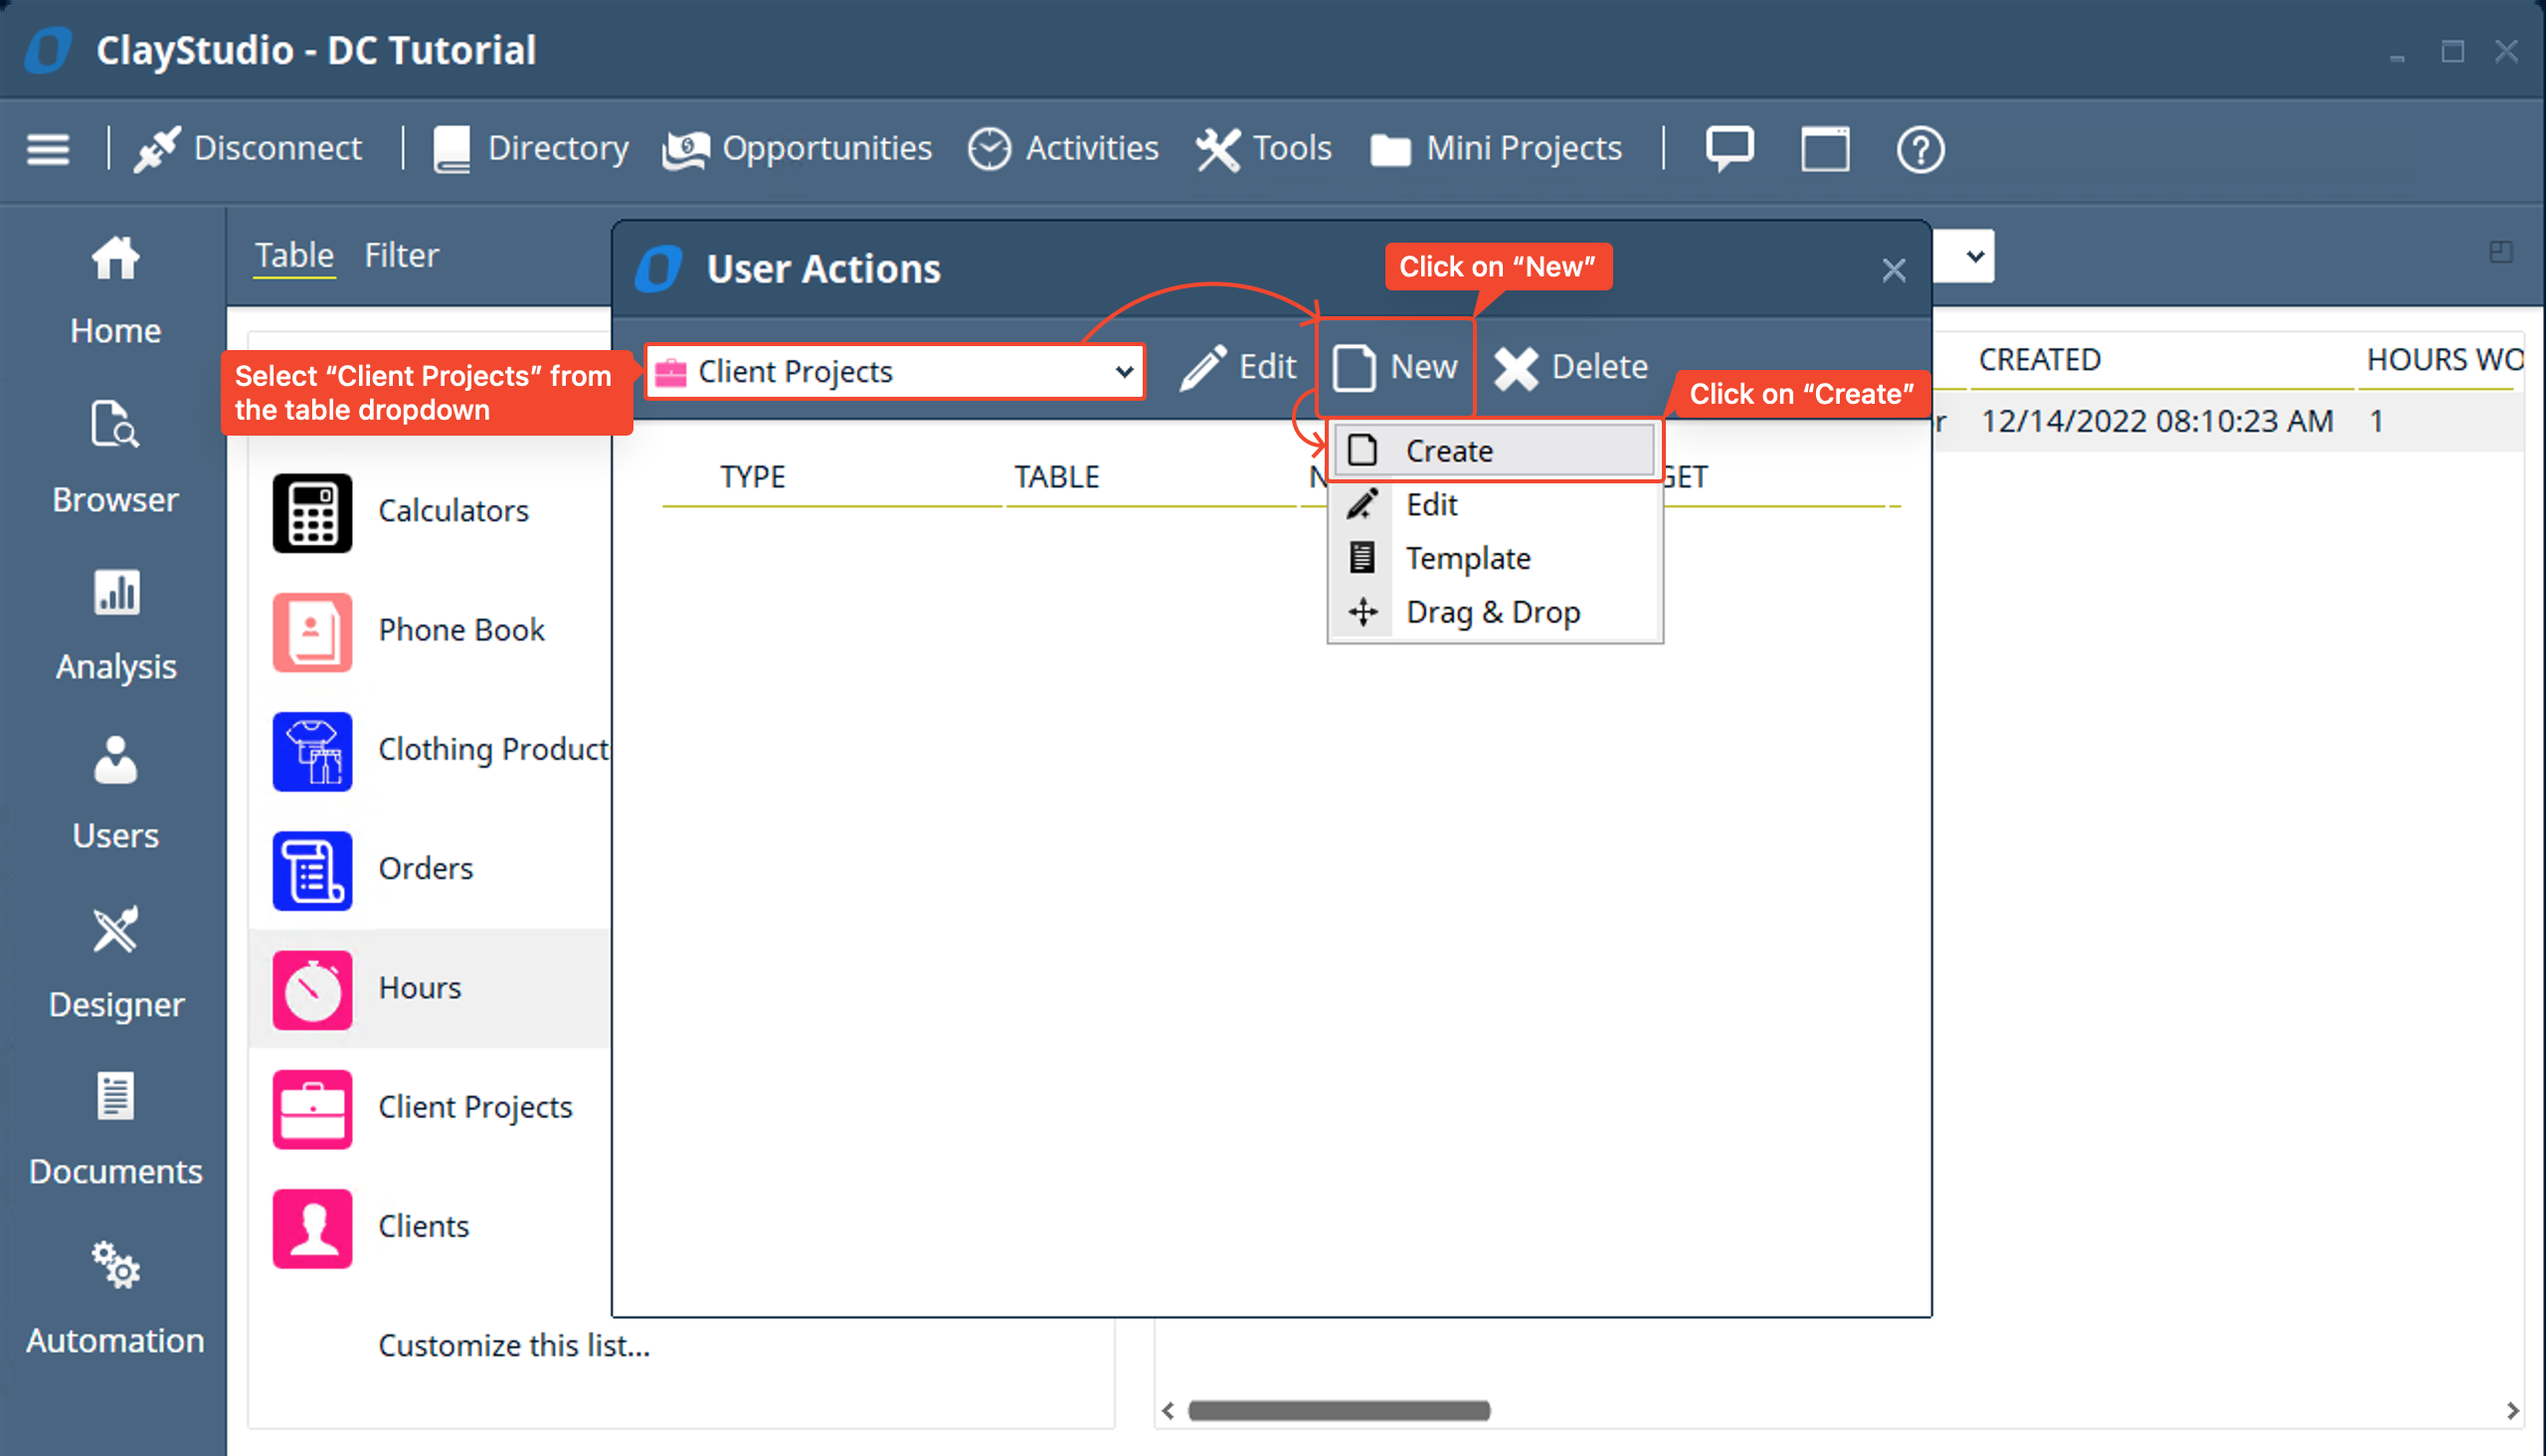
- Now, we will change the table in the dropdown to “Client Projects” and add a “Create Action” to easily add hours to a specific “Client Project”. After you select the “Client Projects” option from the dropdown → click on “New” → then click on “Create” since we want to create an “Hours” item/record for a specific “Client Project”
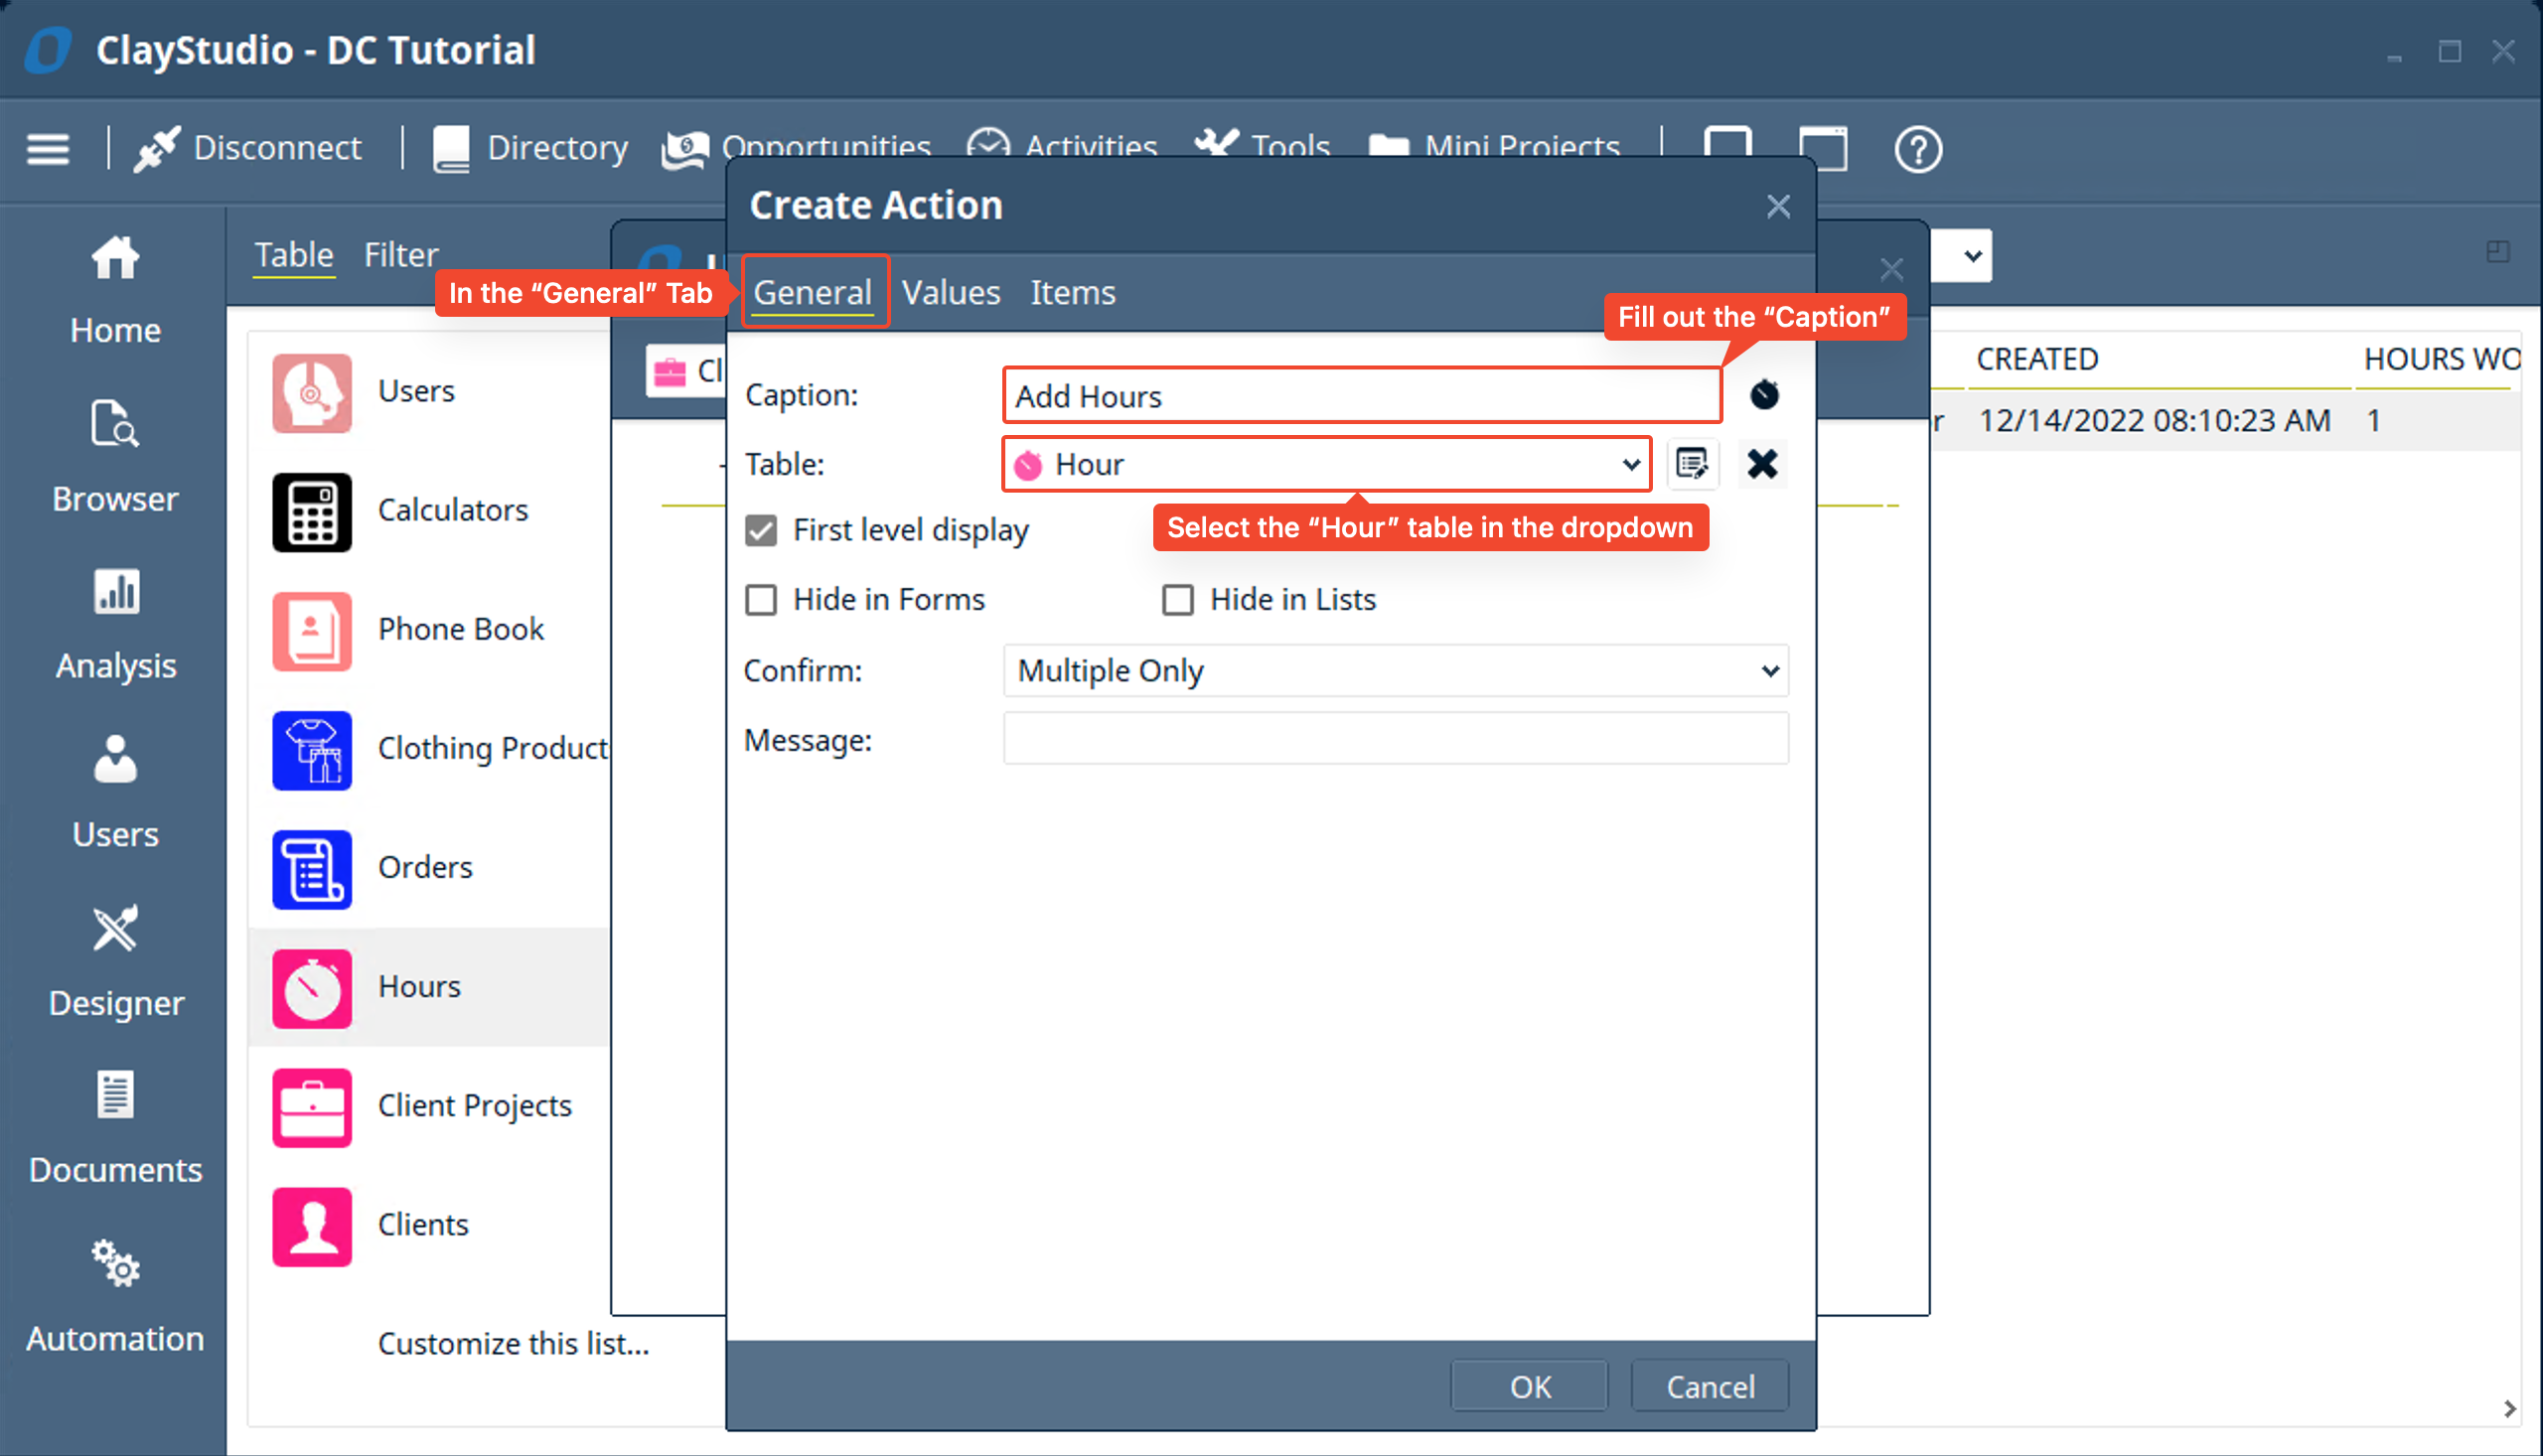
- In the “General” tab we will enter the caption “Add Hours”, and select the “Table” to be “Hour” since we want to create and link a “Hour” item/record to a “Client Project”
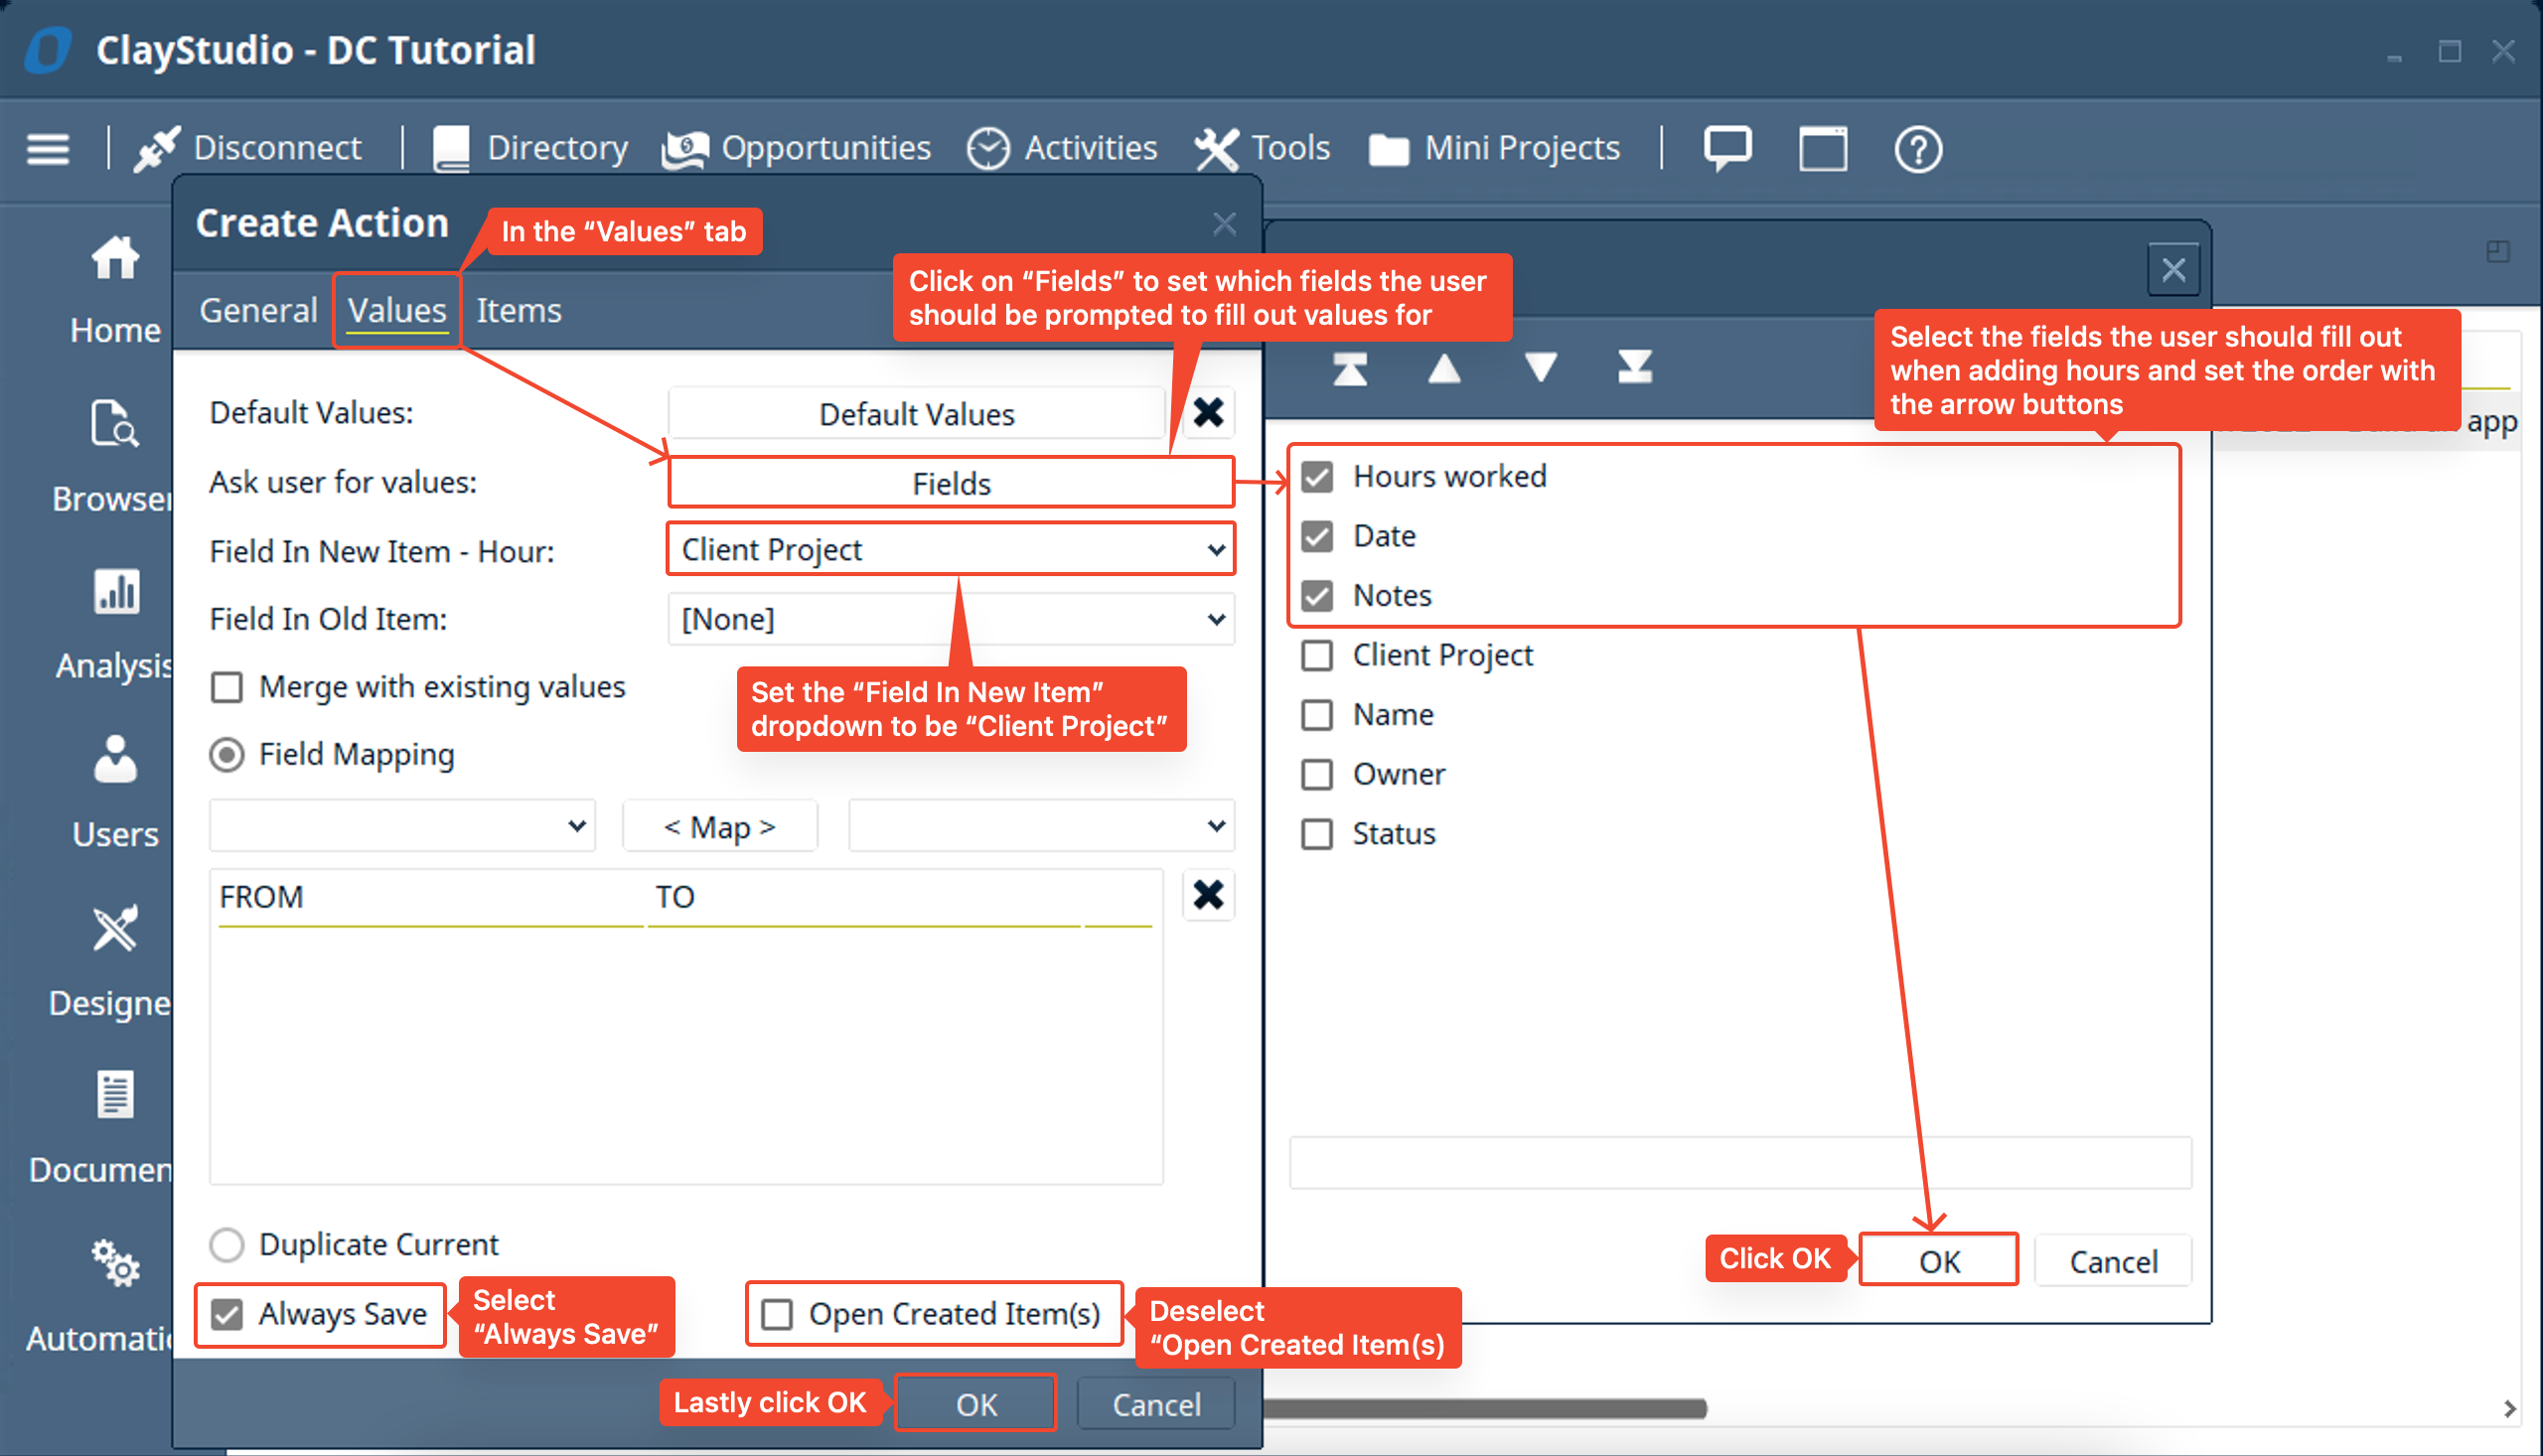
- Next, click on the “Values” tab. For this user action we want to select specific fields to ask the user to fill out when creating the item/record. Clicking on the “Fields” button next to “Ask users for values” → will show you a list of fields to select from to ask the user to fill out. Select the “Hours worked”, “Date”, and “Notes” and then click OK to save the selection (you can order the fields by selecting one and move them with the arrows in the toolbar of the window). Next select “Client Project” from the “Field In New Item” dropdown → Select “Always Save” (this will make sure if we fill out the fields and click OK that it will save the new “Hours” item/record → deselect “Open Created Item(s)” (this will stop the “Hours” item layout from opening up after you fill out the ask for user values fields) → then, lastly click OK to save the “Create Action”
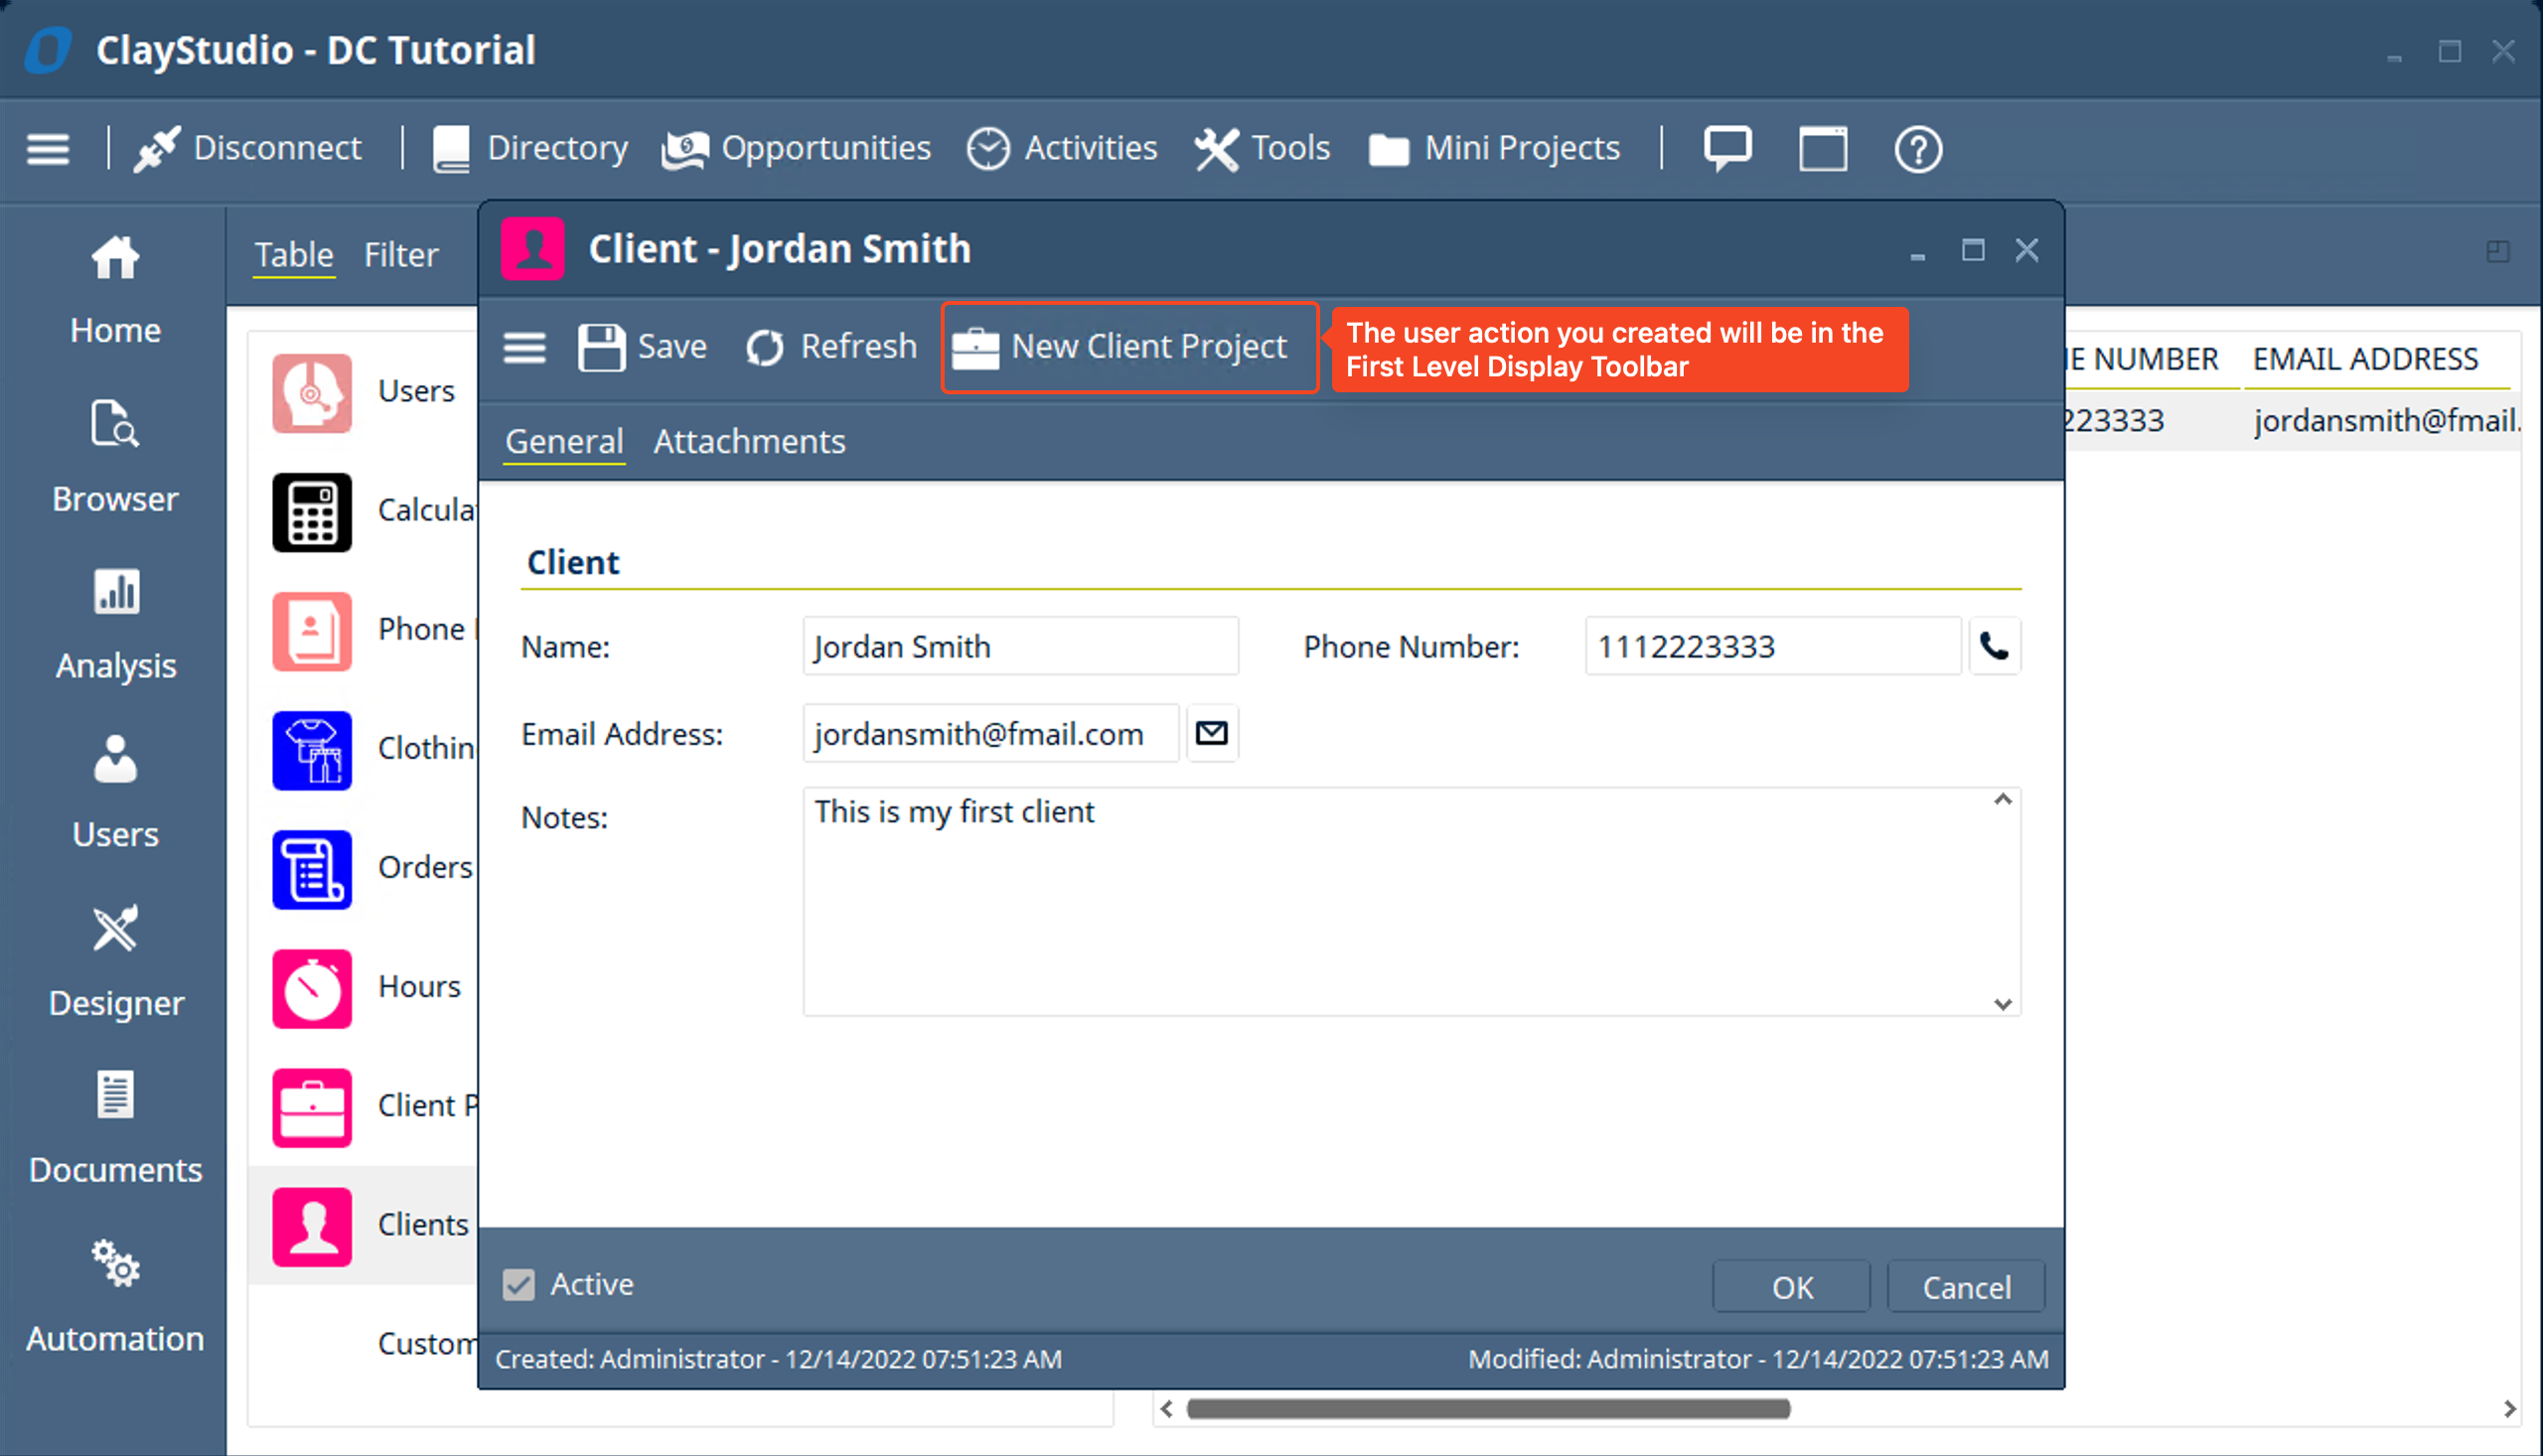
- Now, if we open a “Client” (I did this through the browser tool) we will see the “New Client Project” user action we just made displayed in the “First Level Display” of the toolbar. Similarly, if we open a “Client Project” we will see the “Add Hours” user action in the “First Level Display” of the toolbar. If you want you can click on them to see how they work and function, but it'll be easier to visualize how this user action will work once we customize the layout a little and add some lists to display the “Client Projects” and “Hours” records in the “Clients” and “Client Projects”
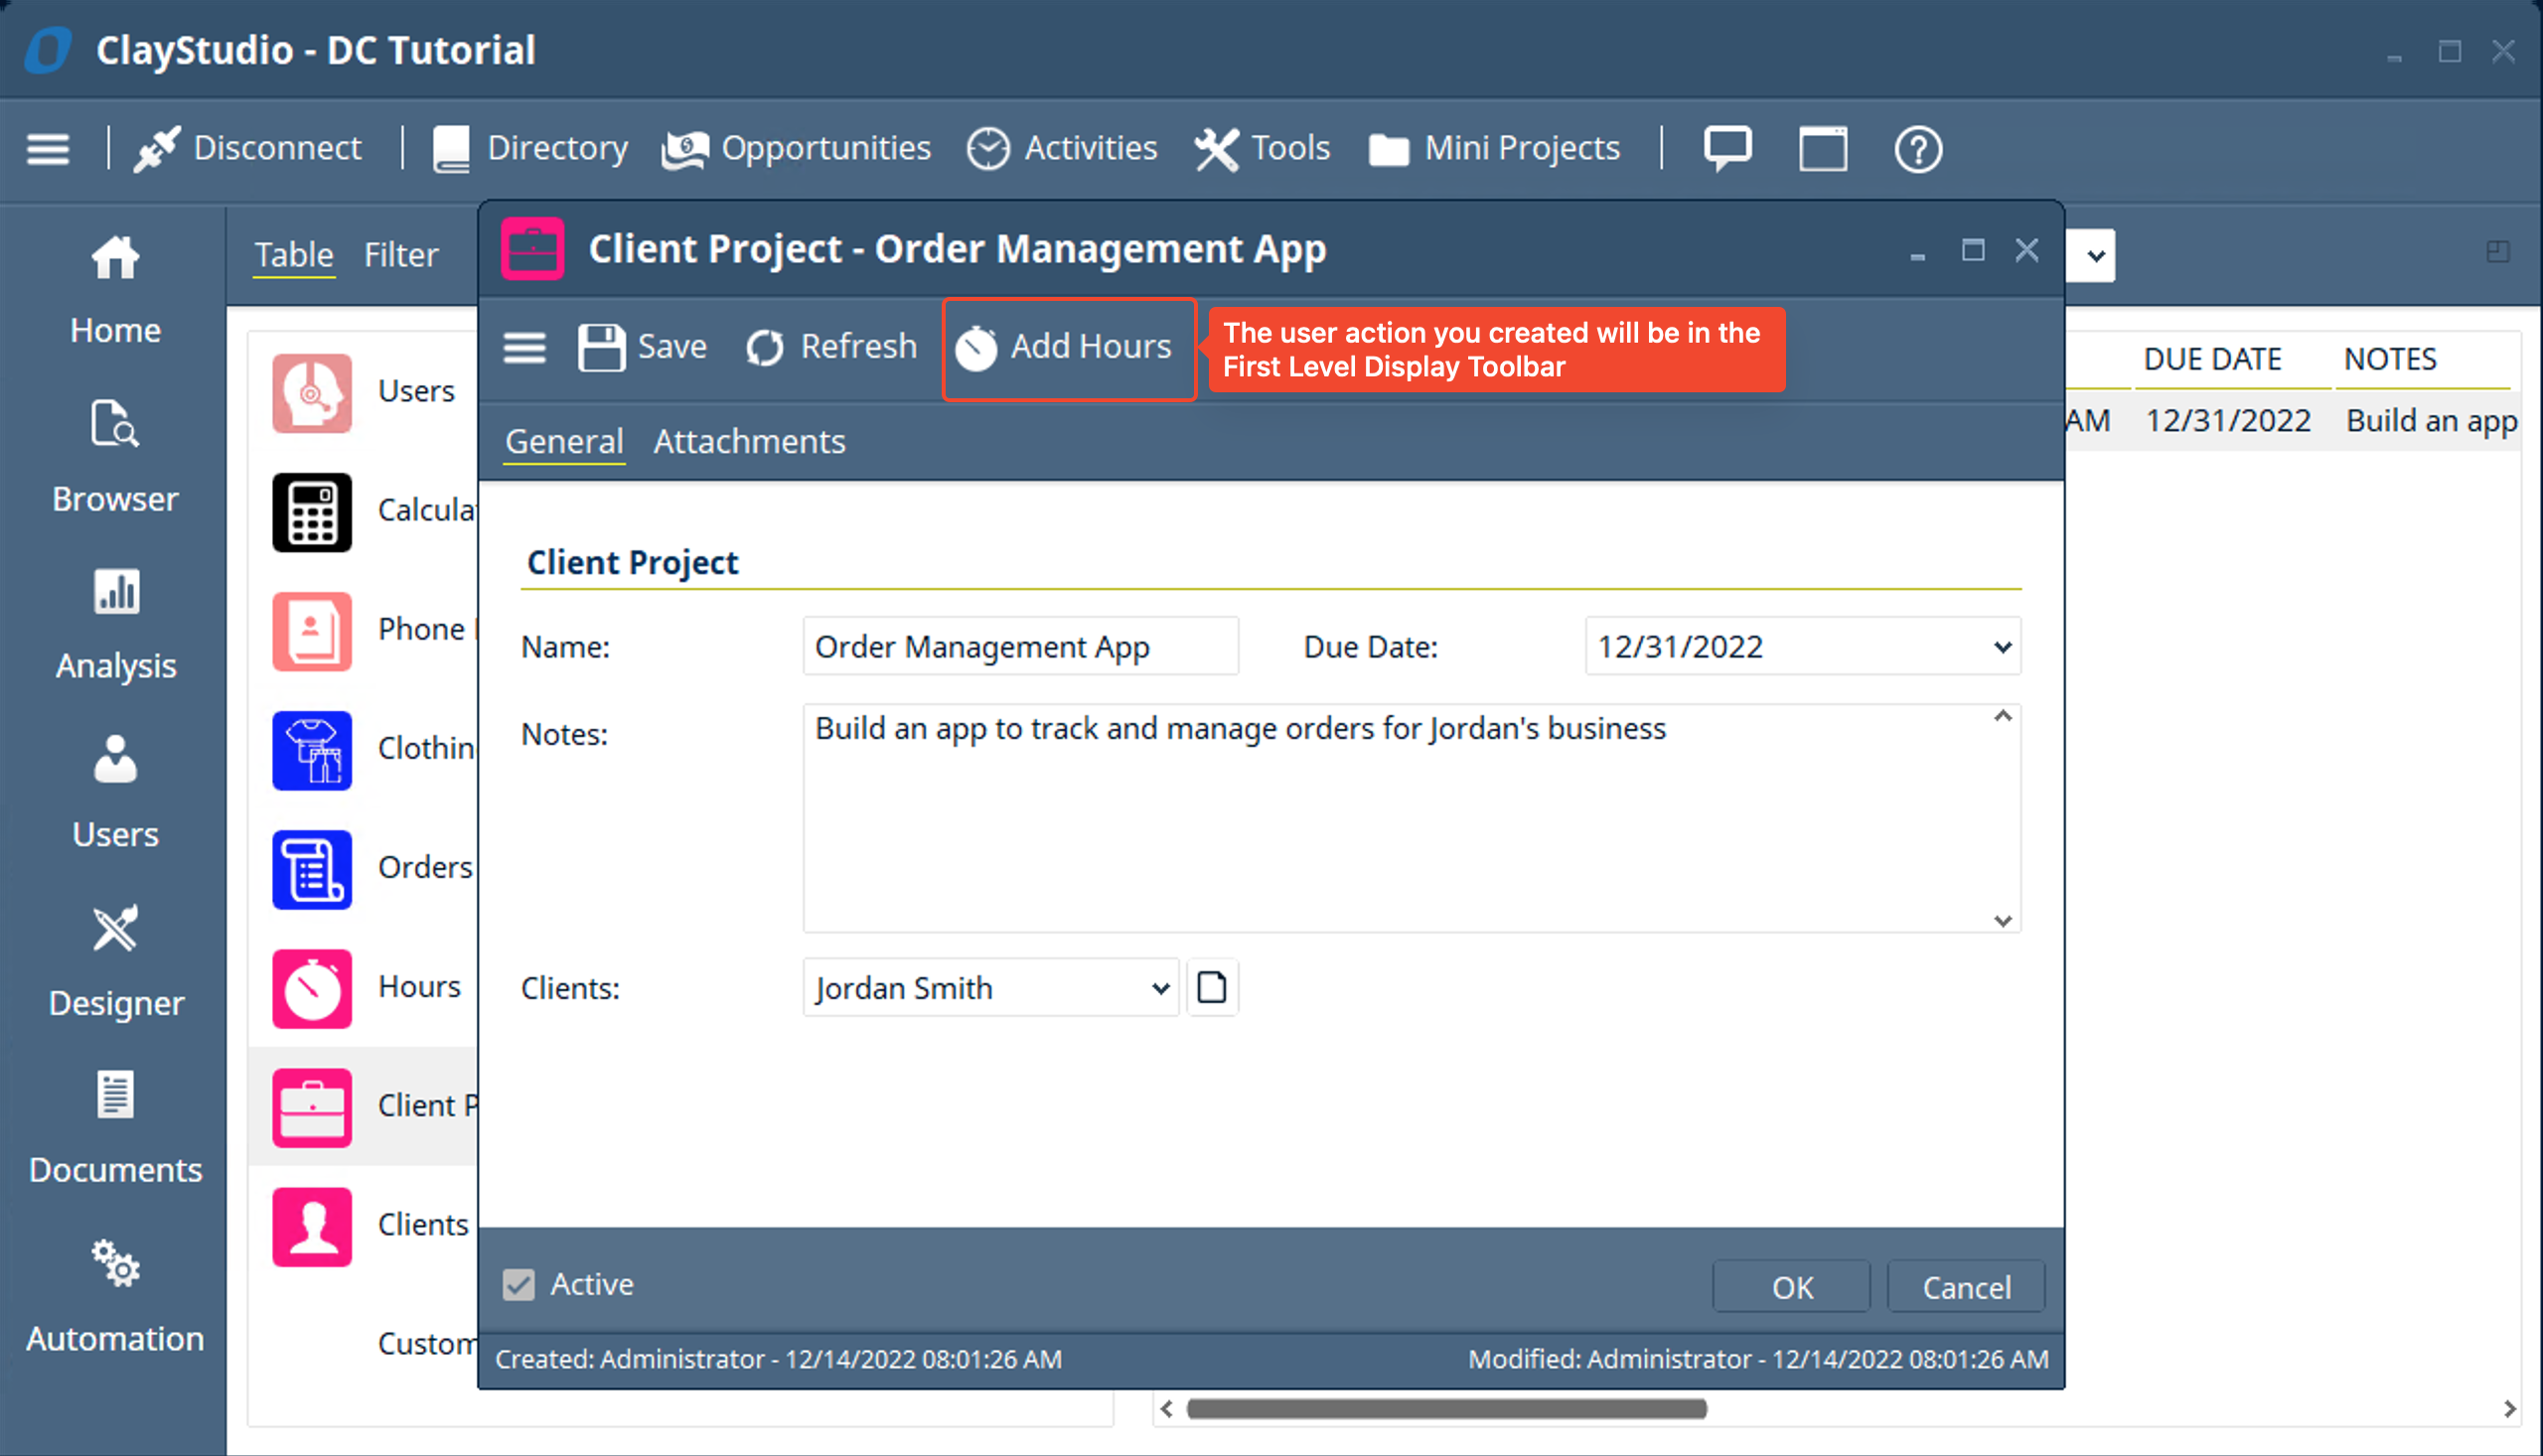
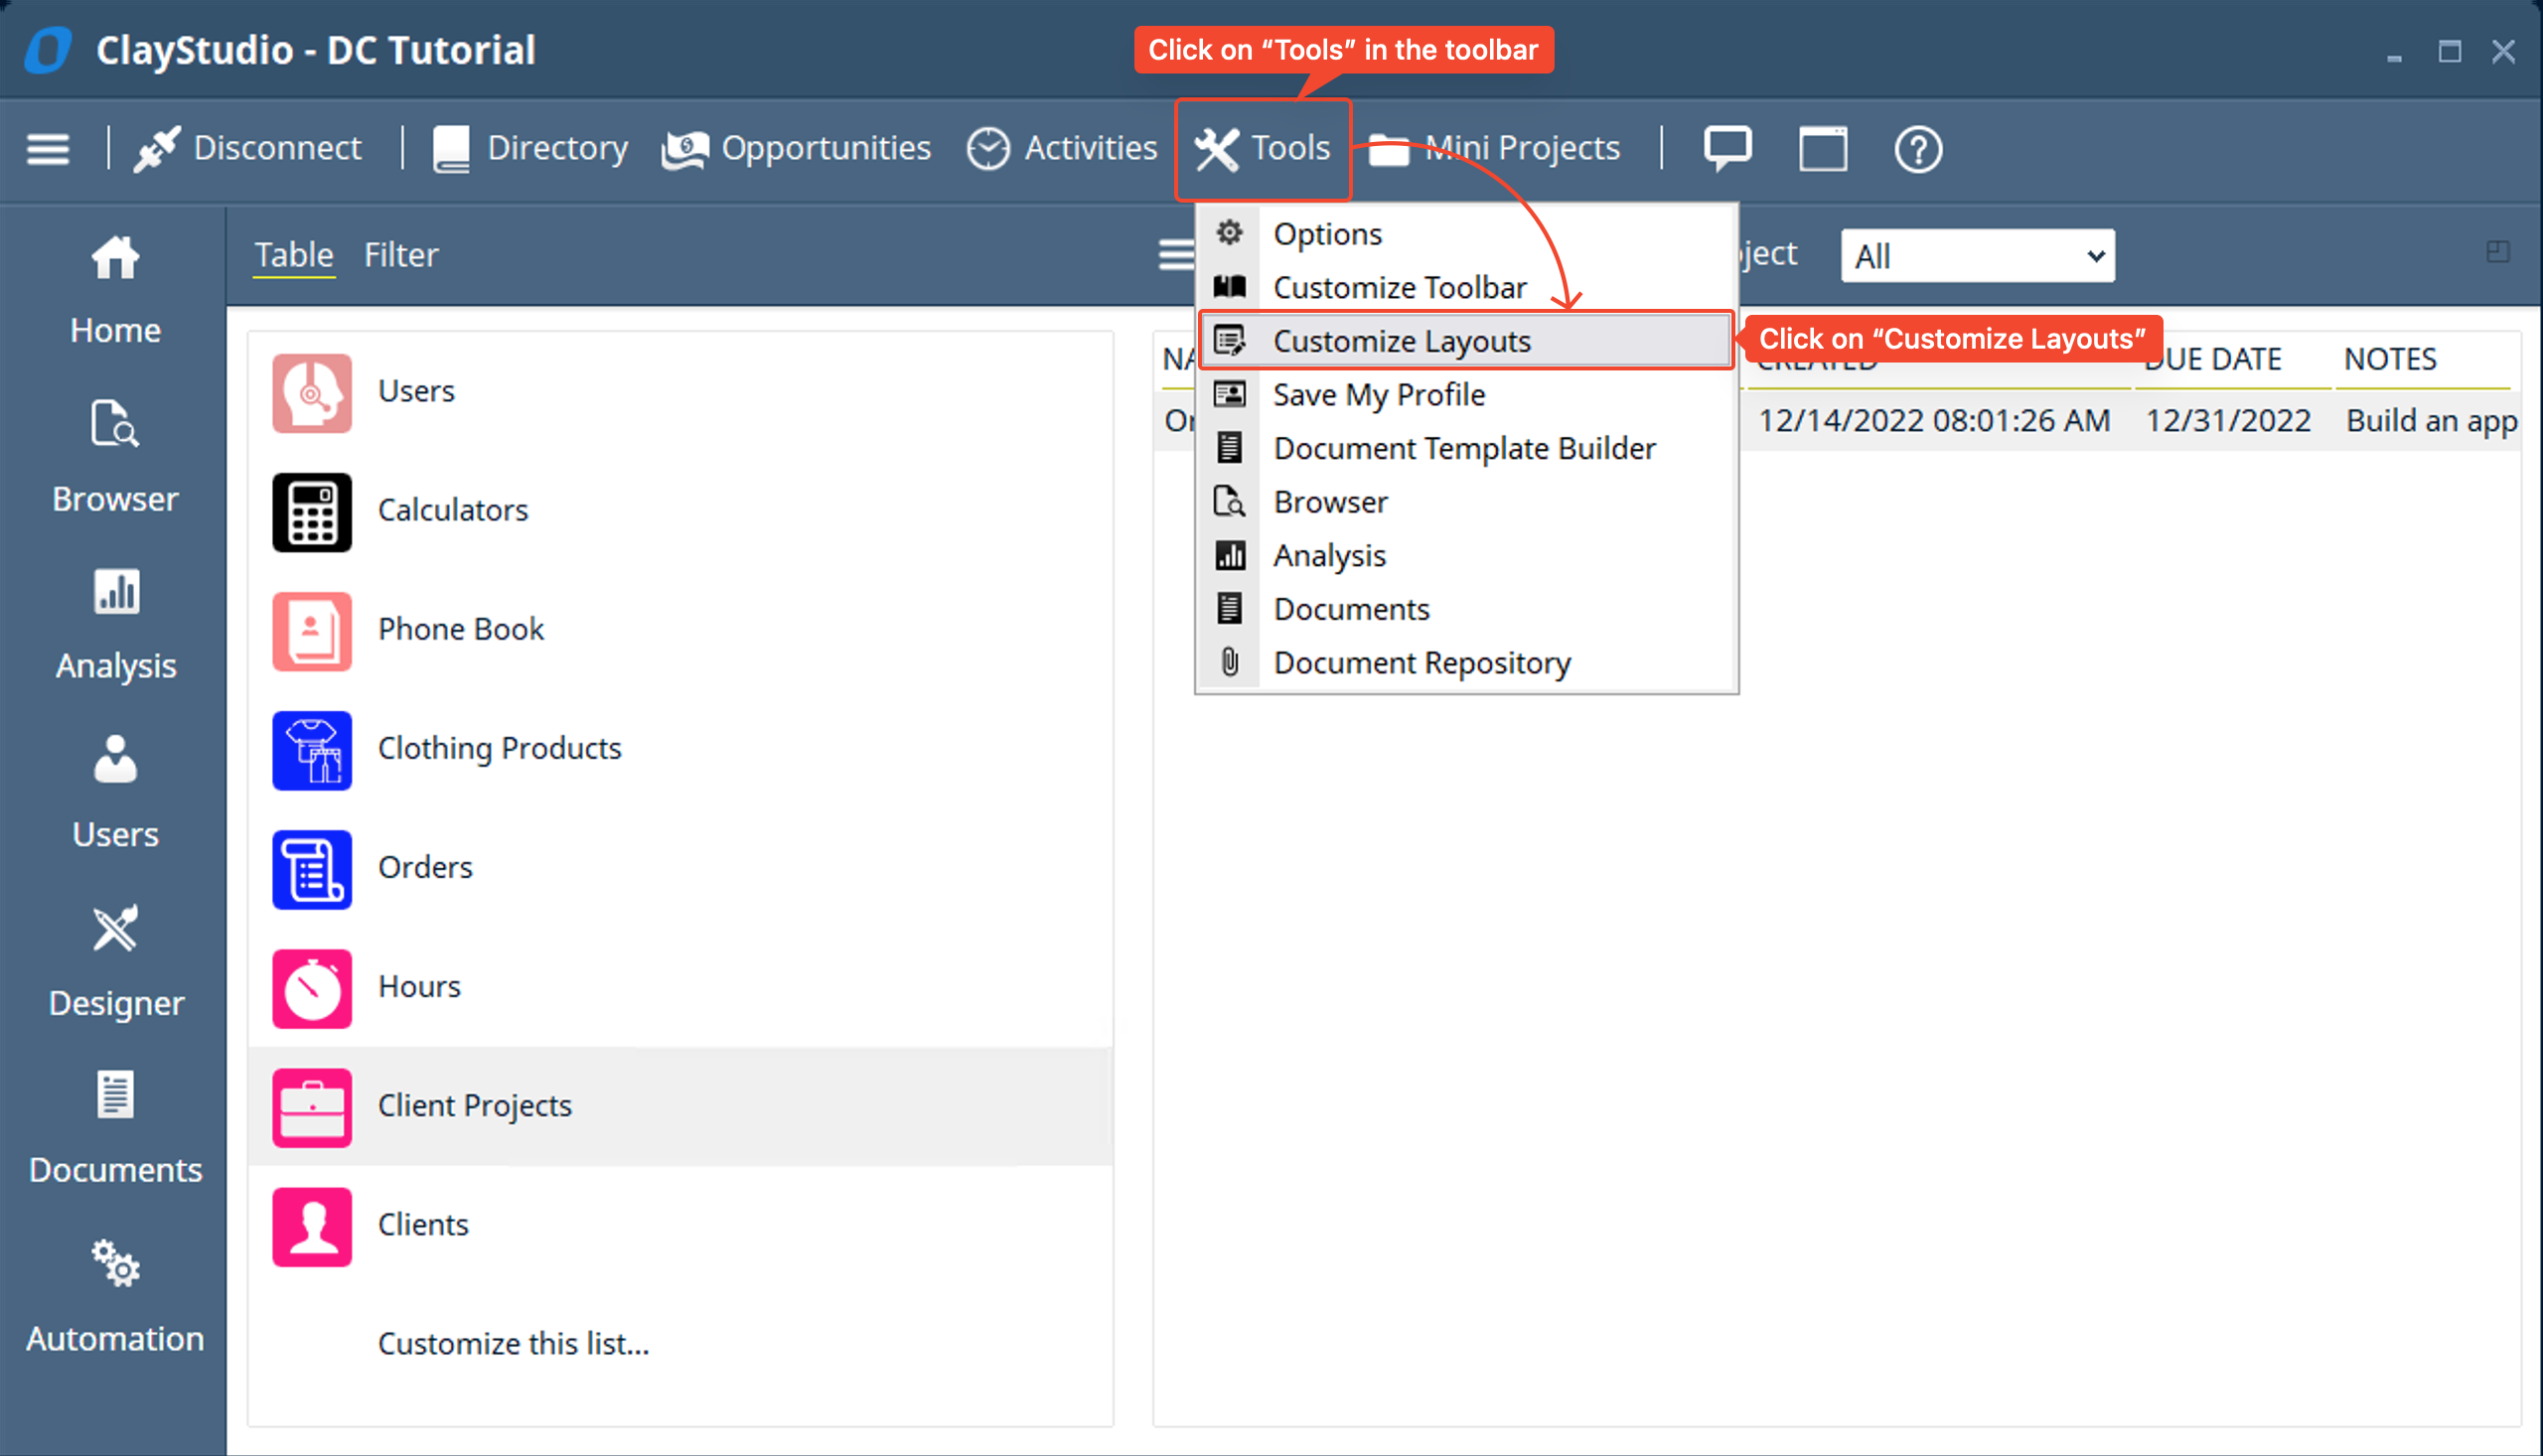
- Now lets work on customizing the layouts for our tables so that we can see more useful information when viewing a “Client” or “Client Project”. In previous mini projects we accessed the “Custom Layout” window from viewing the table in the “Designer Tool”. In this mini project we will access the “Custom Layout” window from the “Tools” category in the toolbar → and then selecting the “Customize Layouts” option.
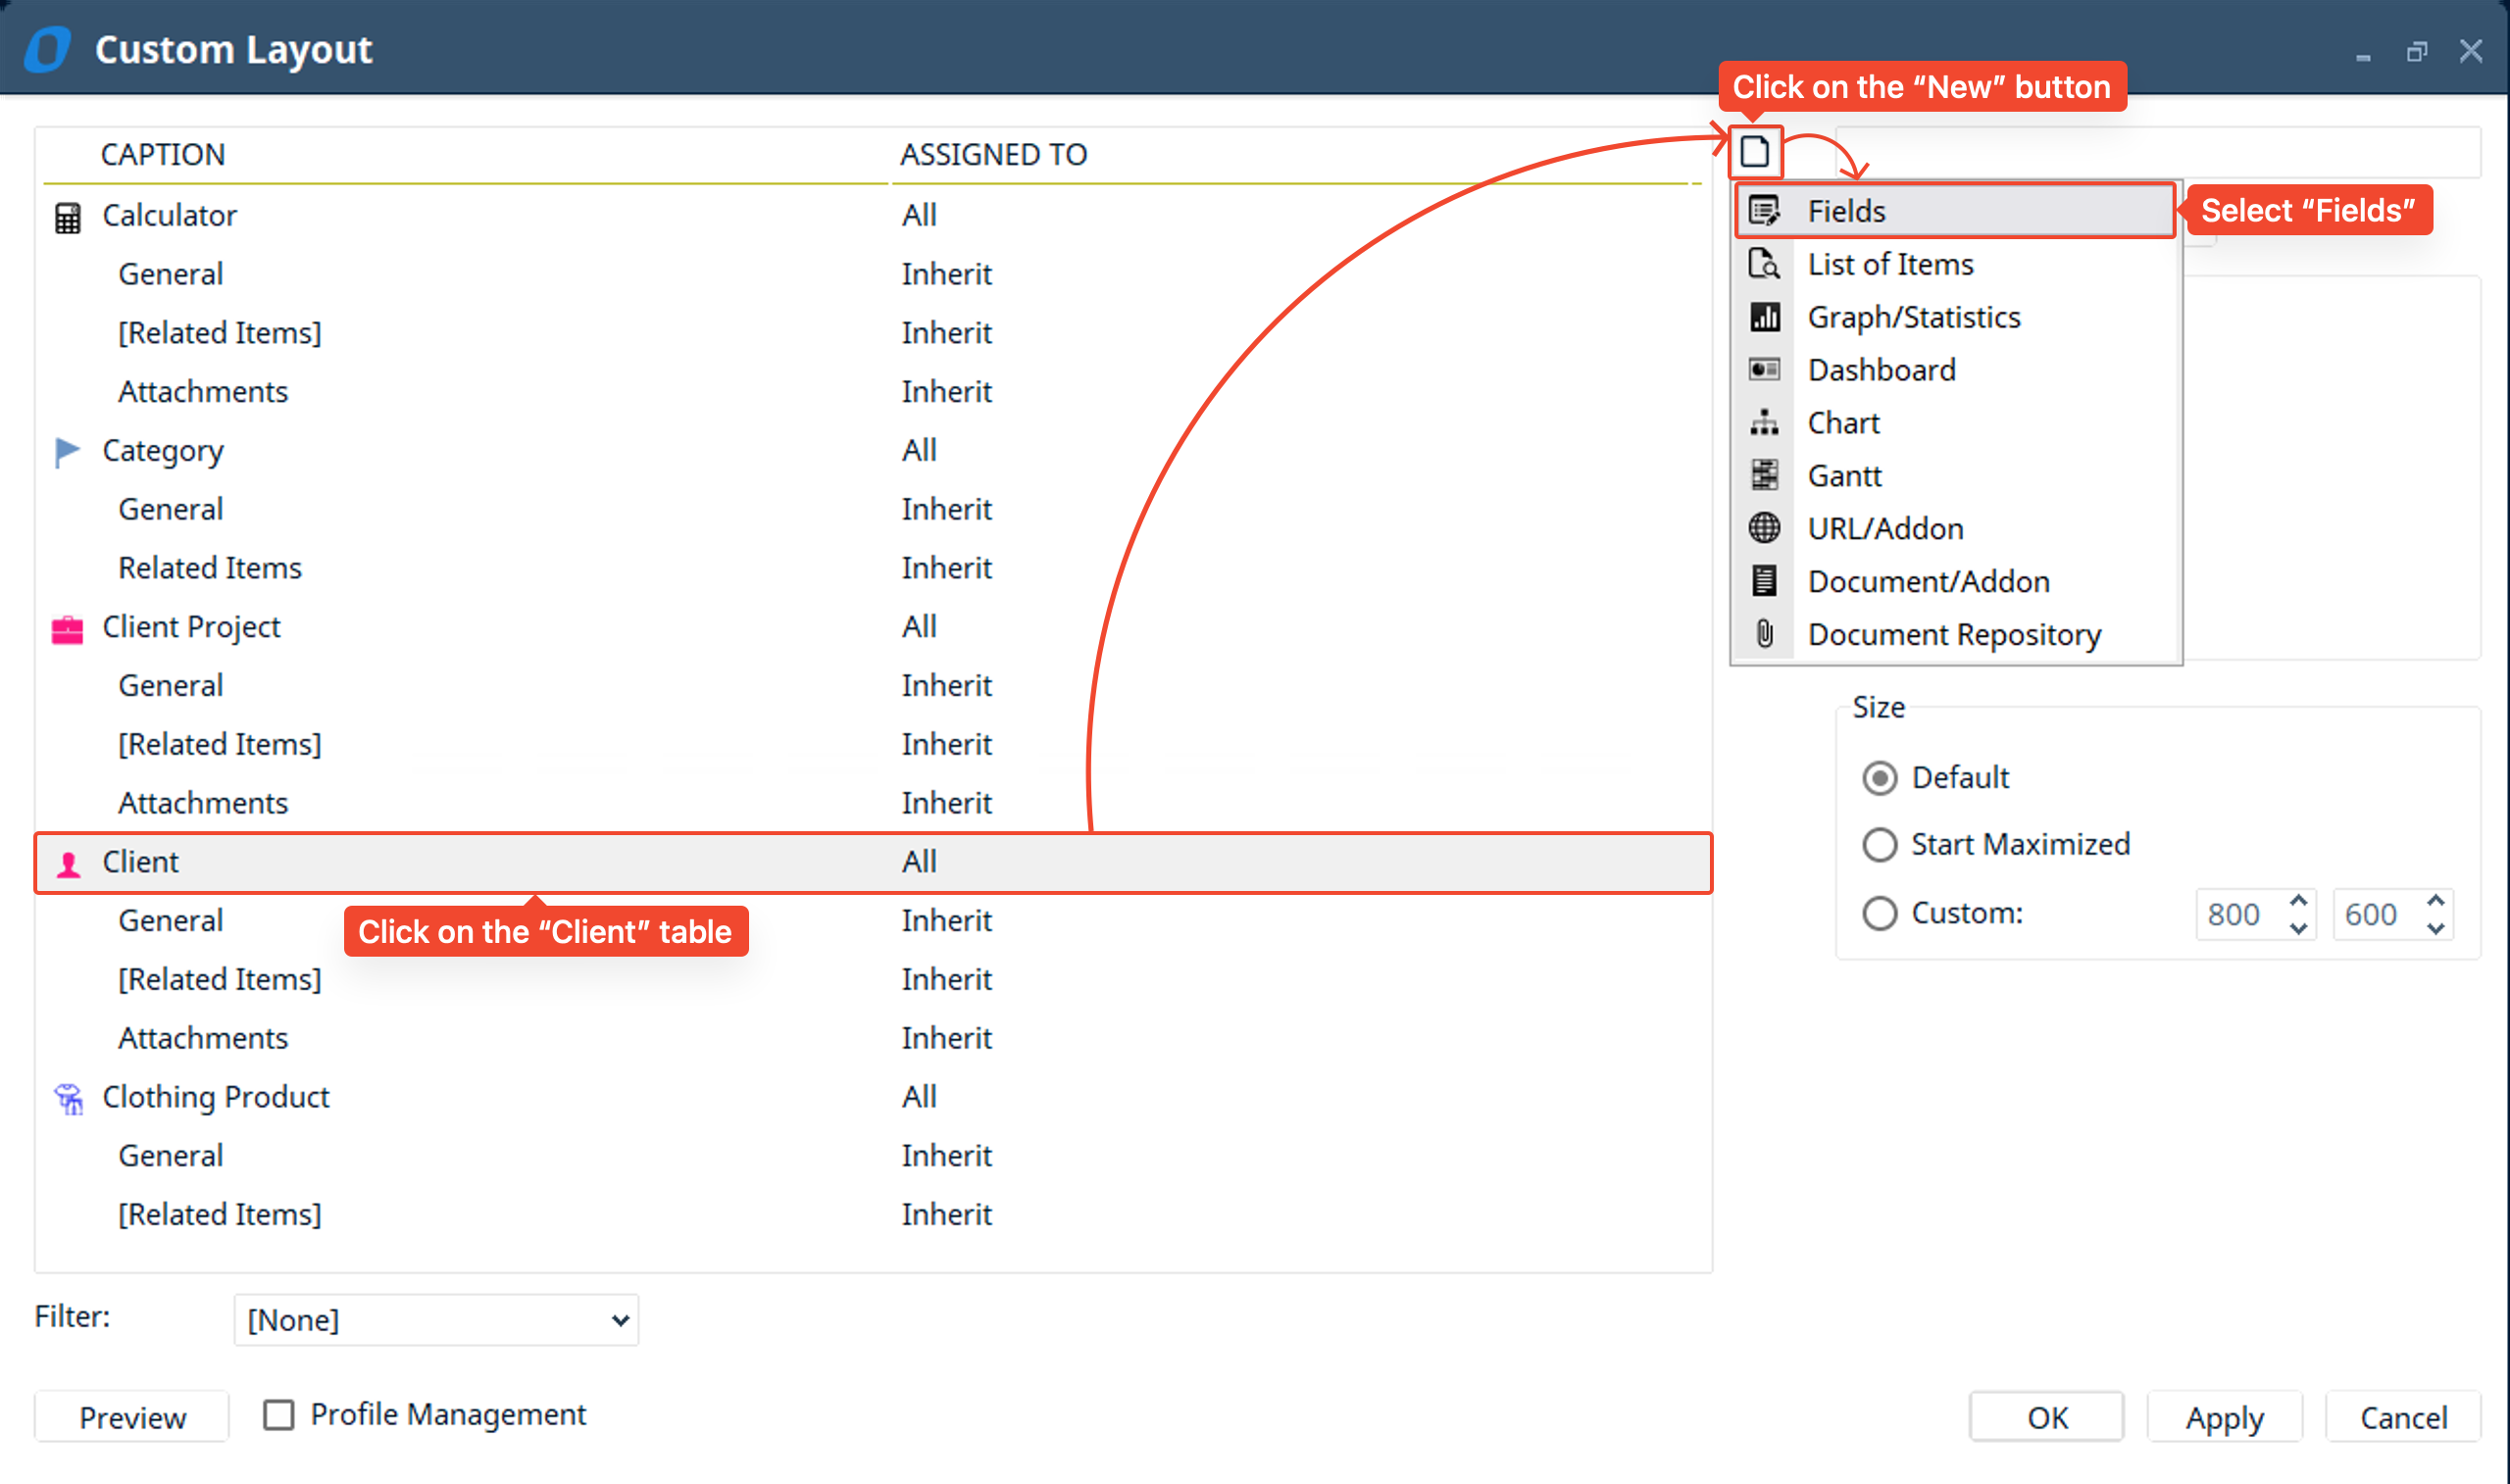
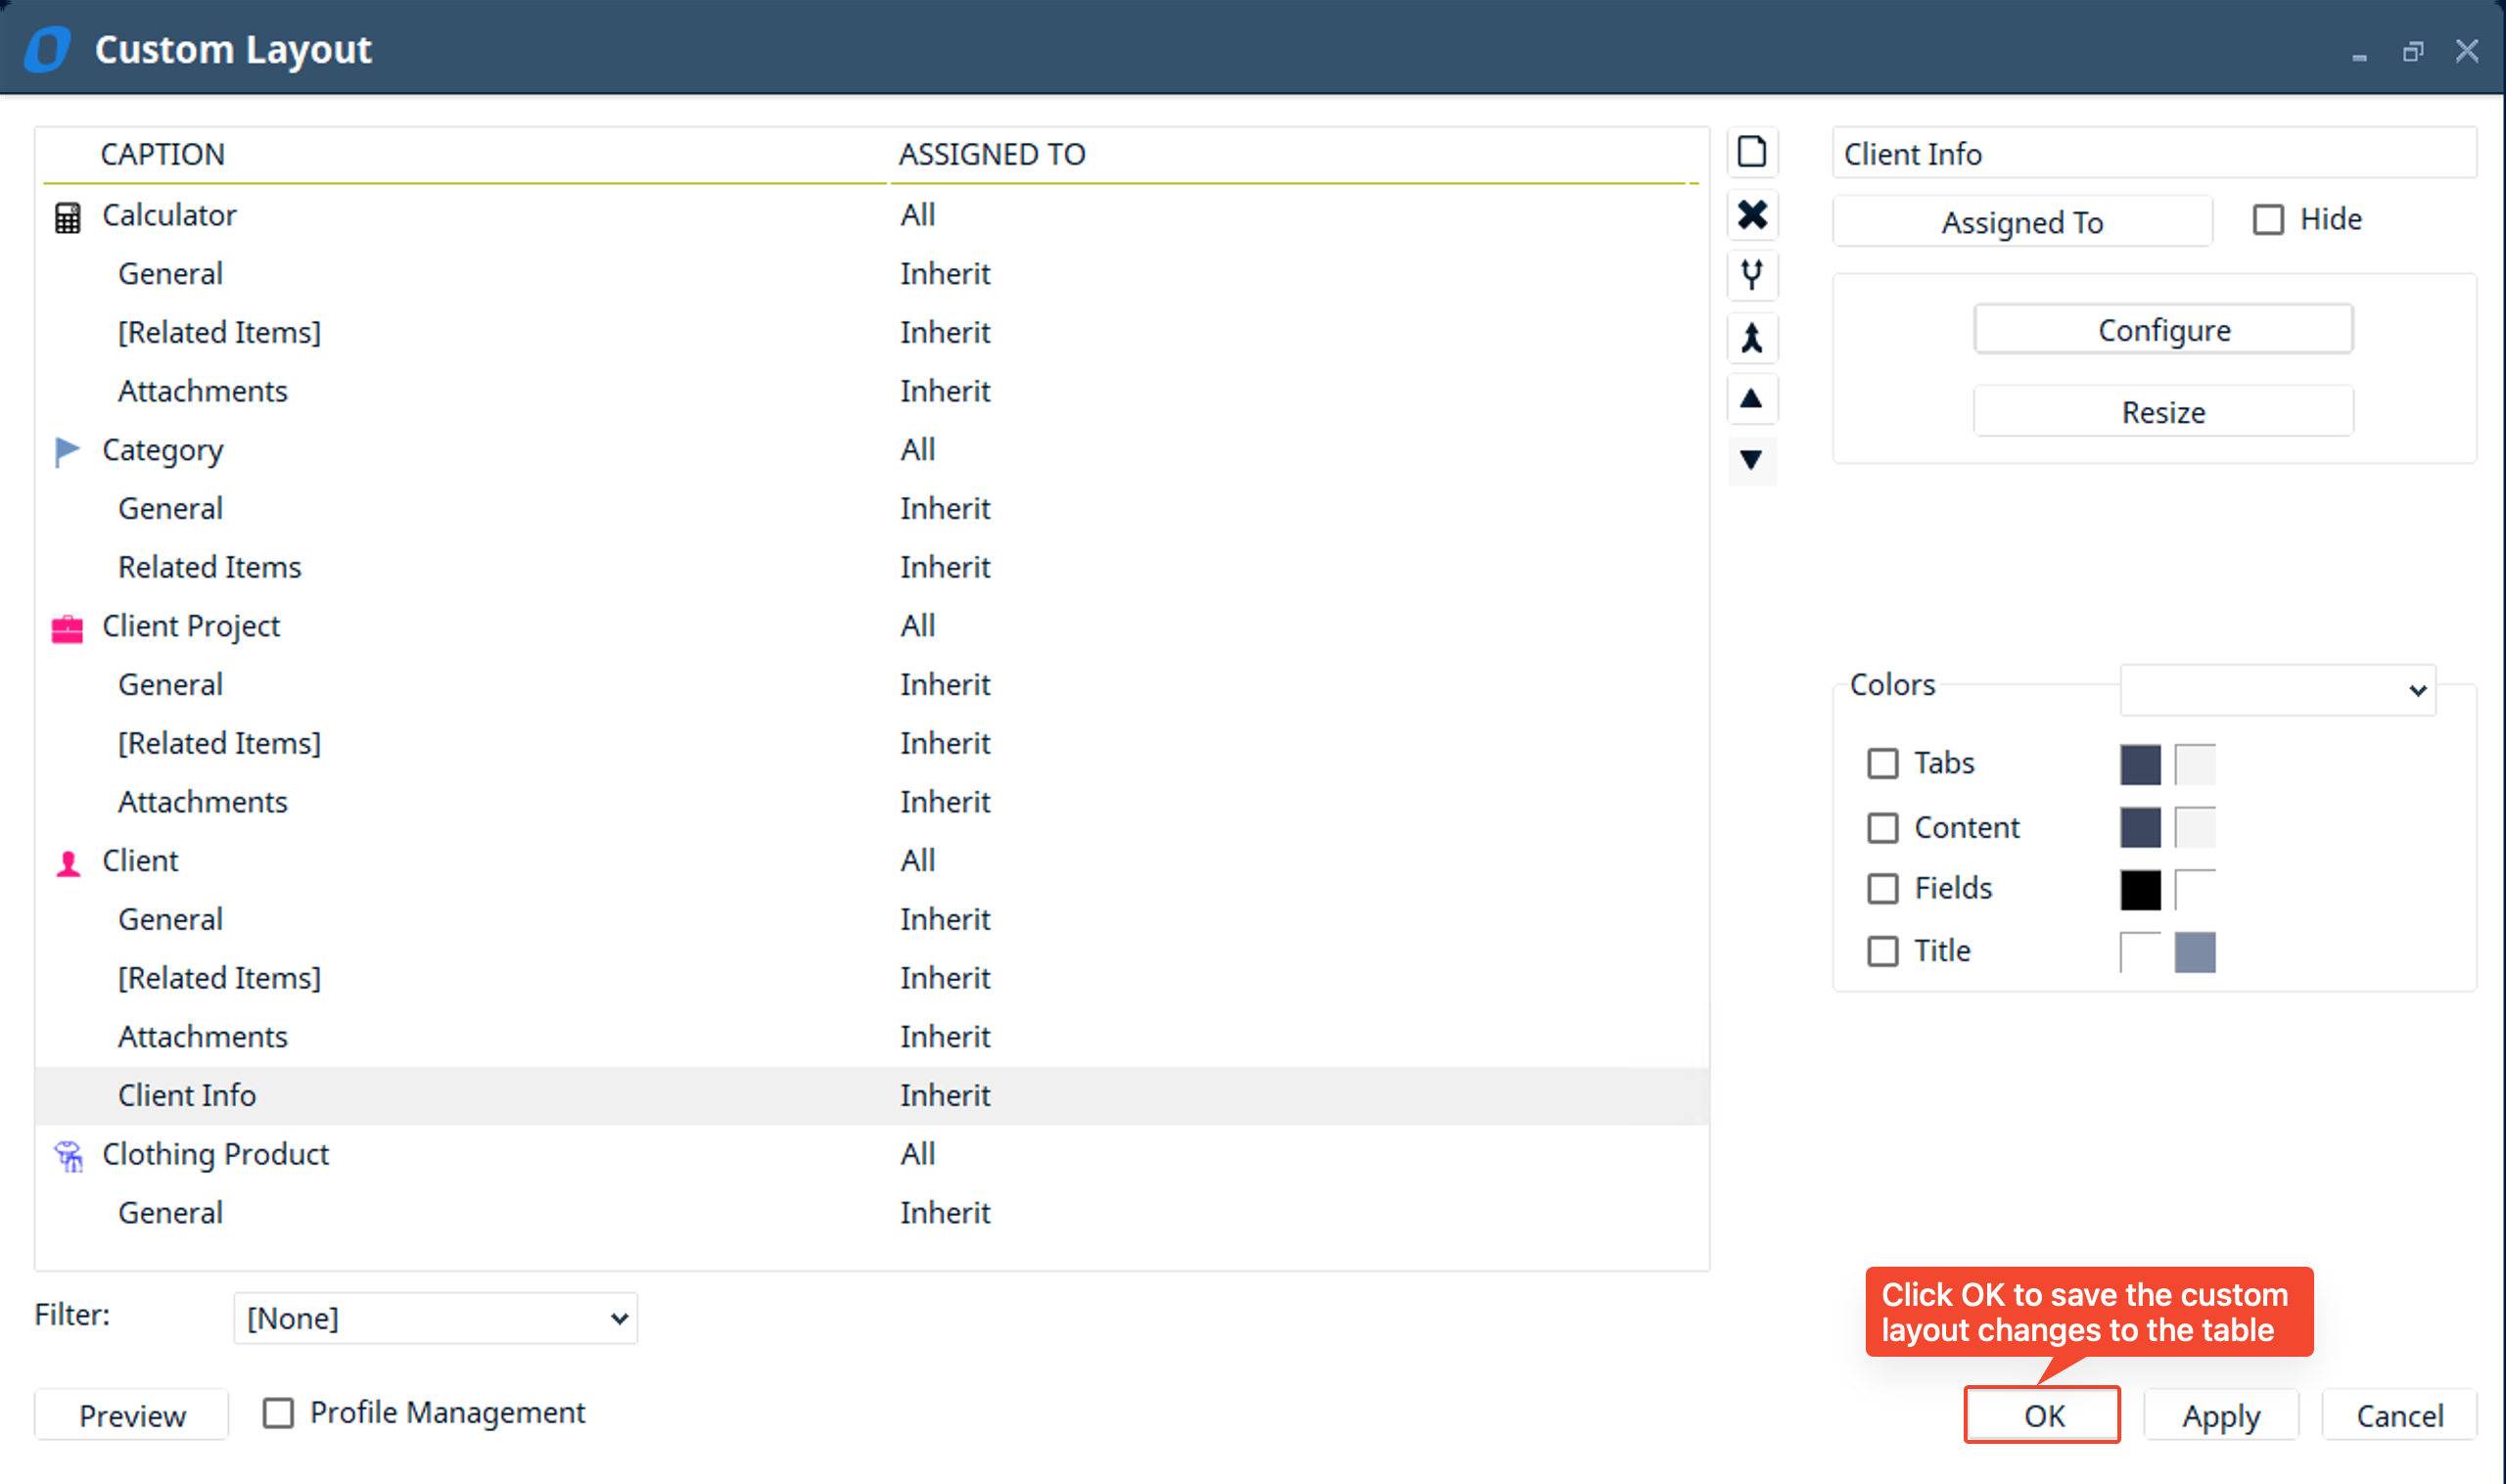
- The first layout we will create will be for the “Client” table. To start customizing a layout for a table, select the table you want to create a new custom layout for (in this case the “Client” table) → Click on the “New” icon → select “Fields”. This will create a new “Fields” layout for the “Client” table, a “Fields” layout allows you to customize a form that you can fill out, edit, and view information from.
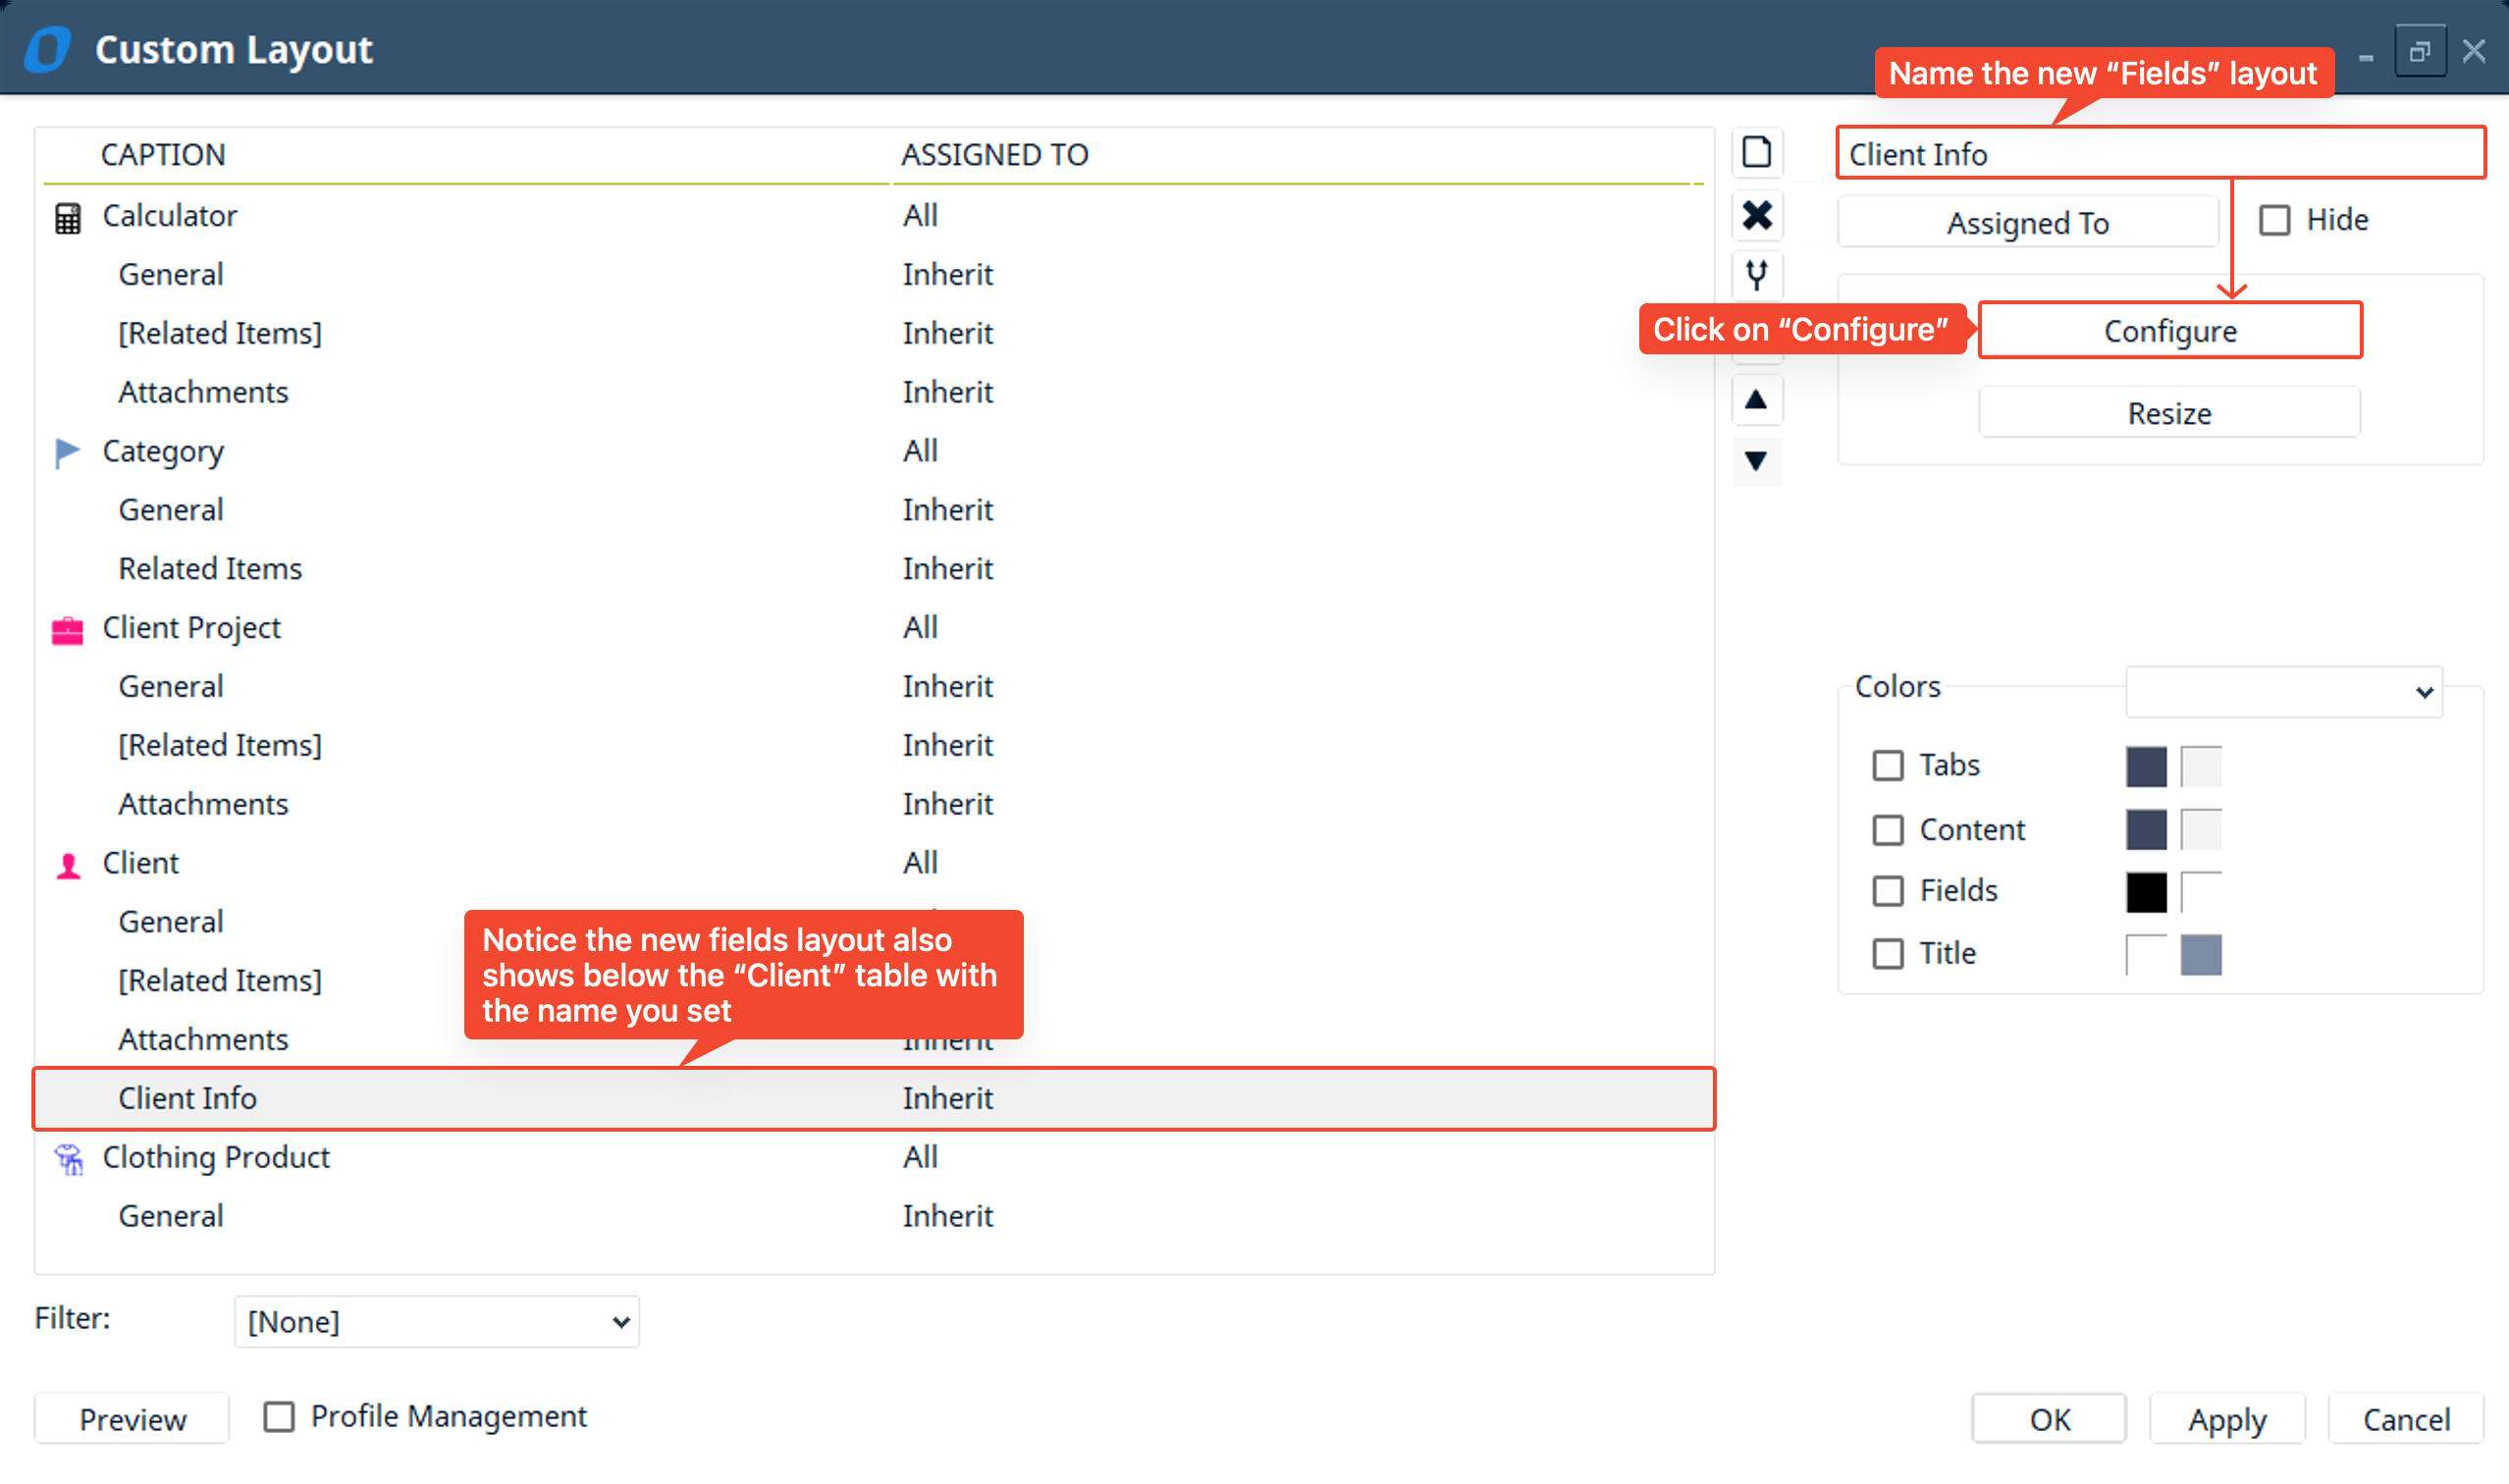
- The “Fields” custom layout will get added to the bottom of the “Client” table → next we will rename the “Fields” layout to “Client Info” → then click “Configure” to customize the layout you just created.
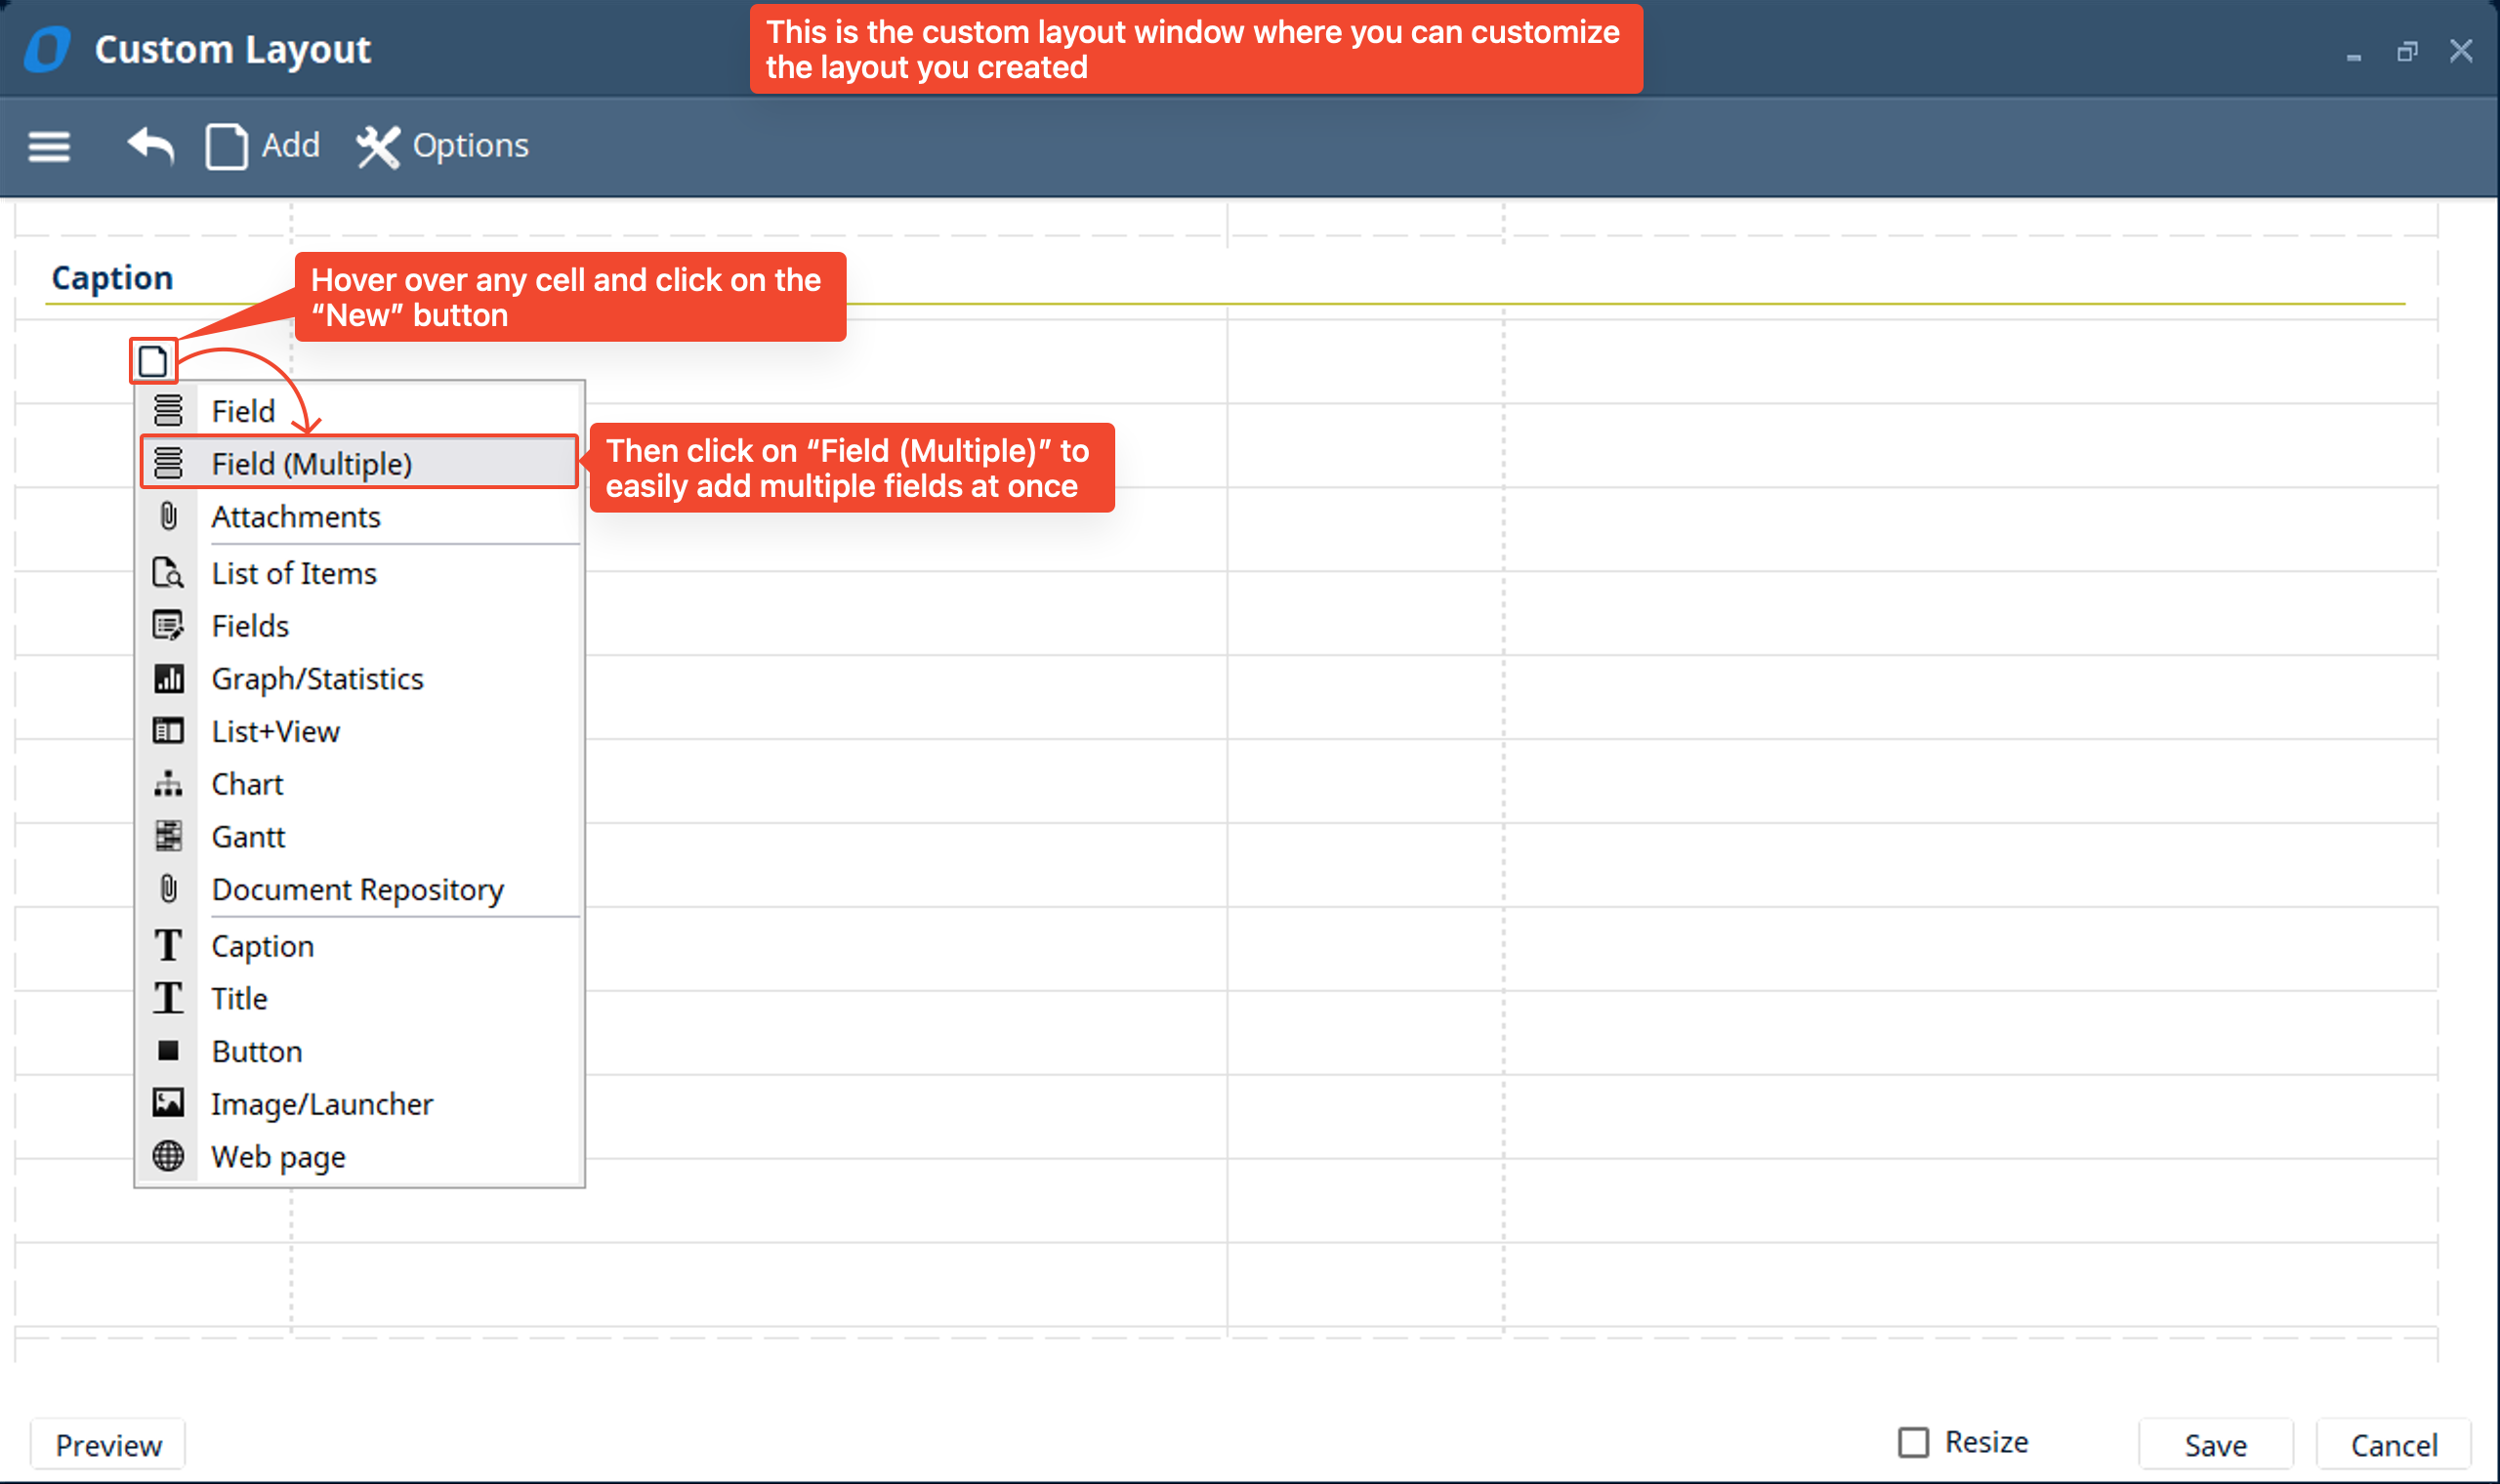
- A custom layout window shows up (if you completed the “Hello World” mini project you’ll notice many similarities in this window). You can easily add components to a layout by hovering over any cell and clicking on the “Add” button or by clicking on the “Add” button in the toolbar. Hover over a cell and click on the “NewAdd button that comes up and select the “Field (Multiple)” option. This will allow you to easily add multiple fields at once instead of individually adding each field (which is the “Field” option right above)
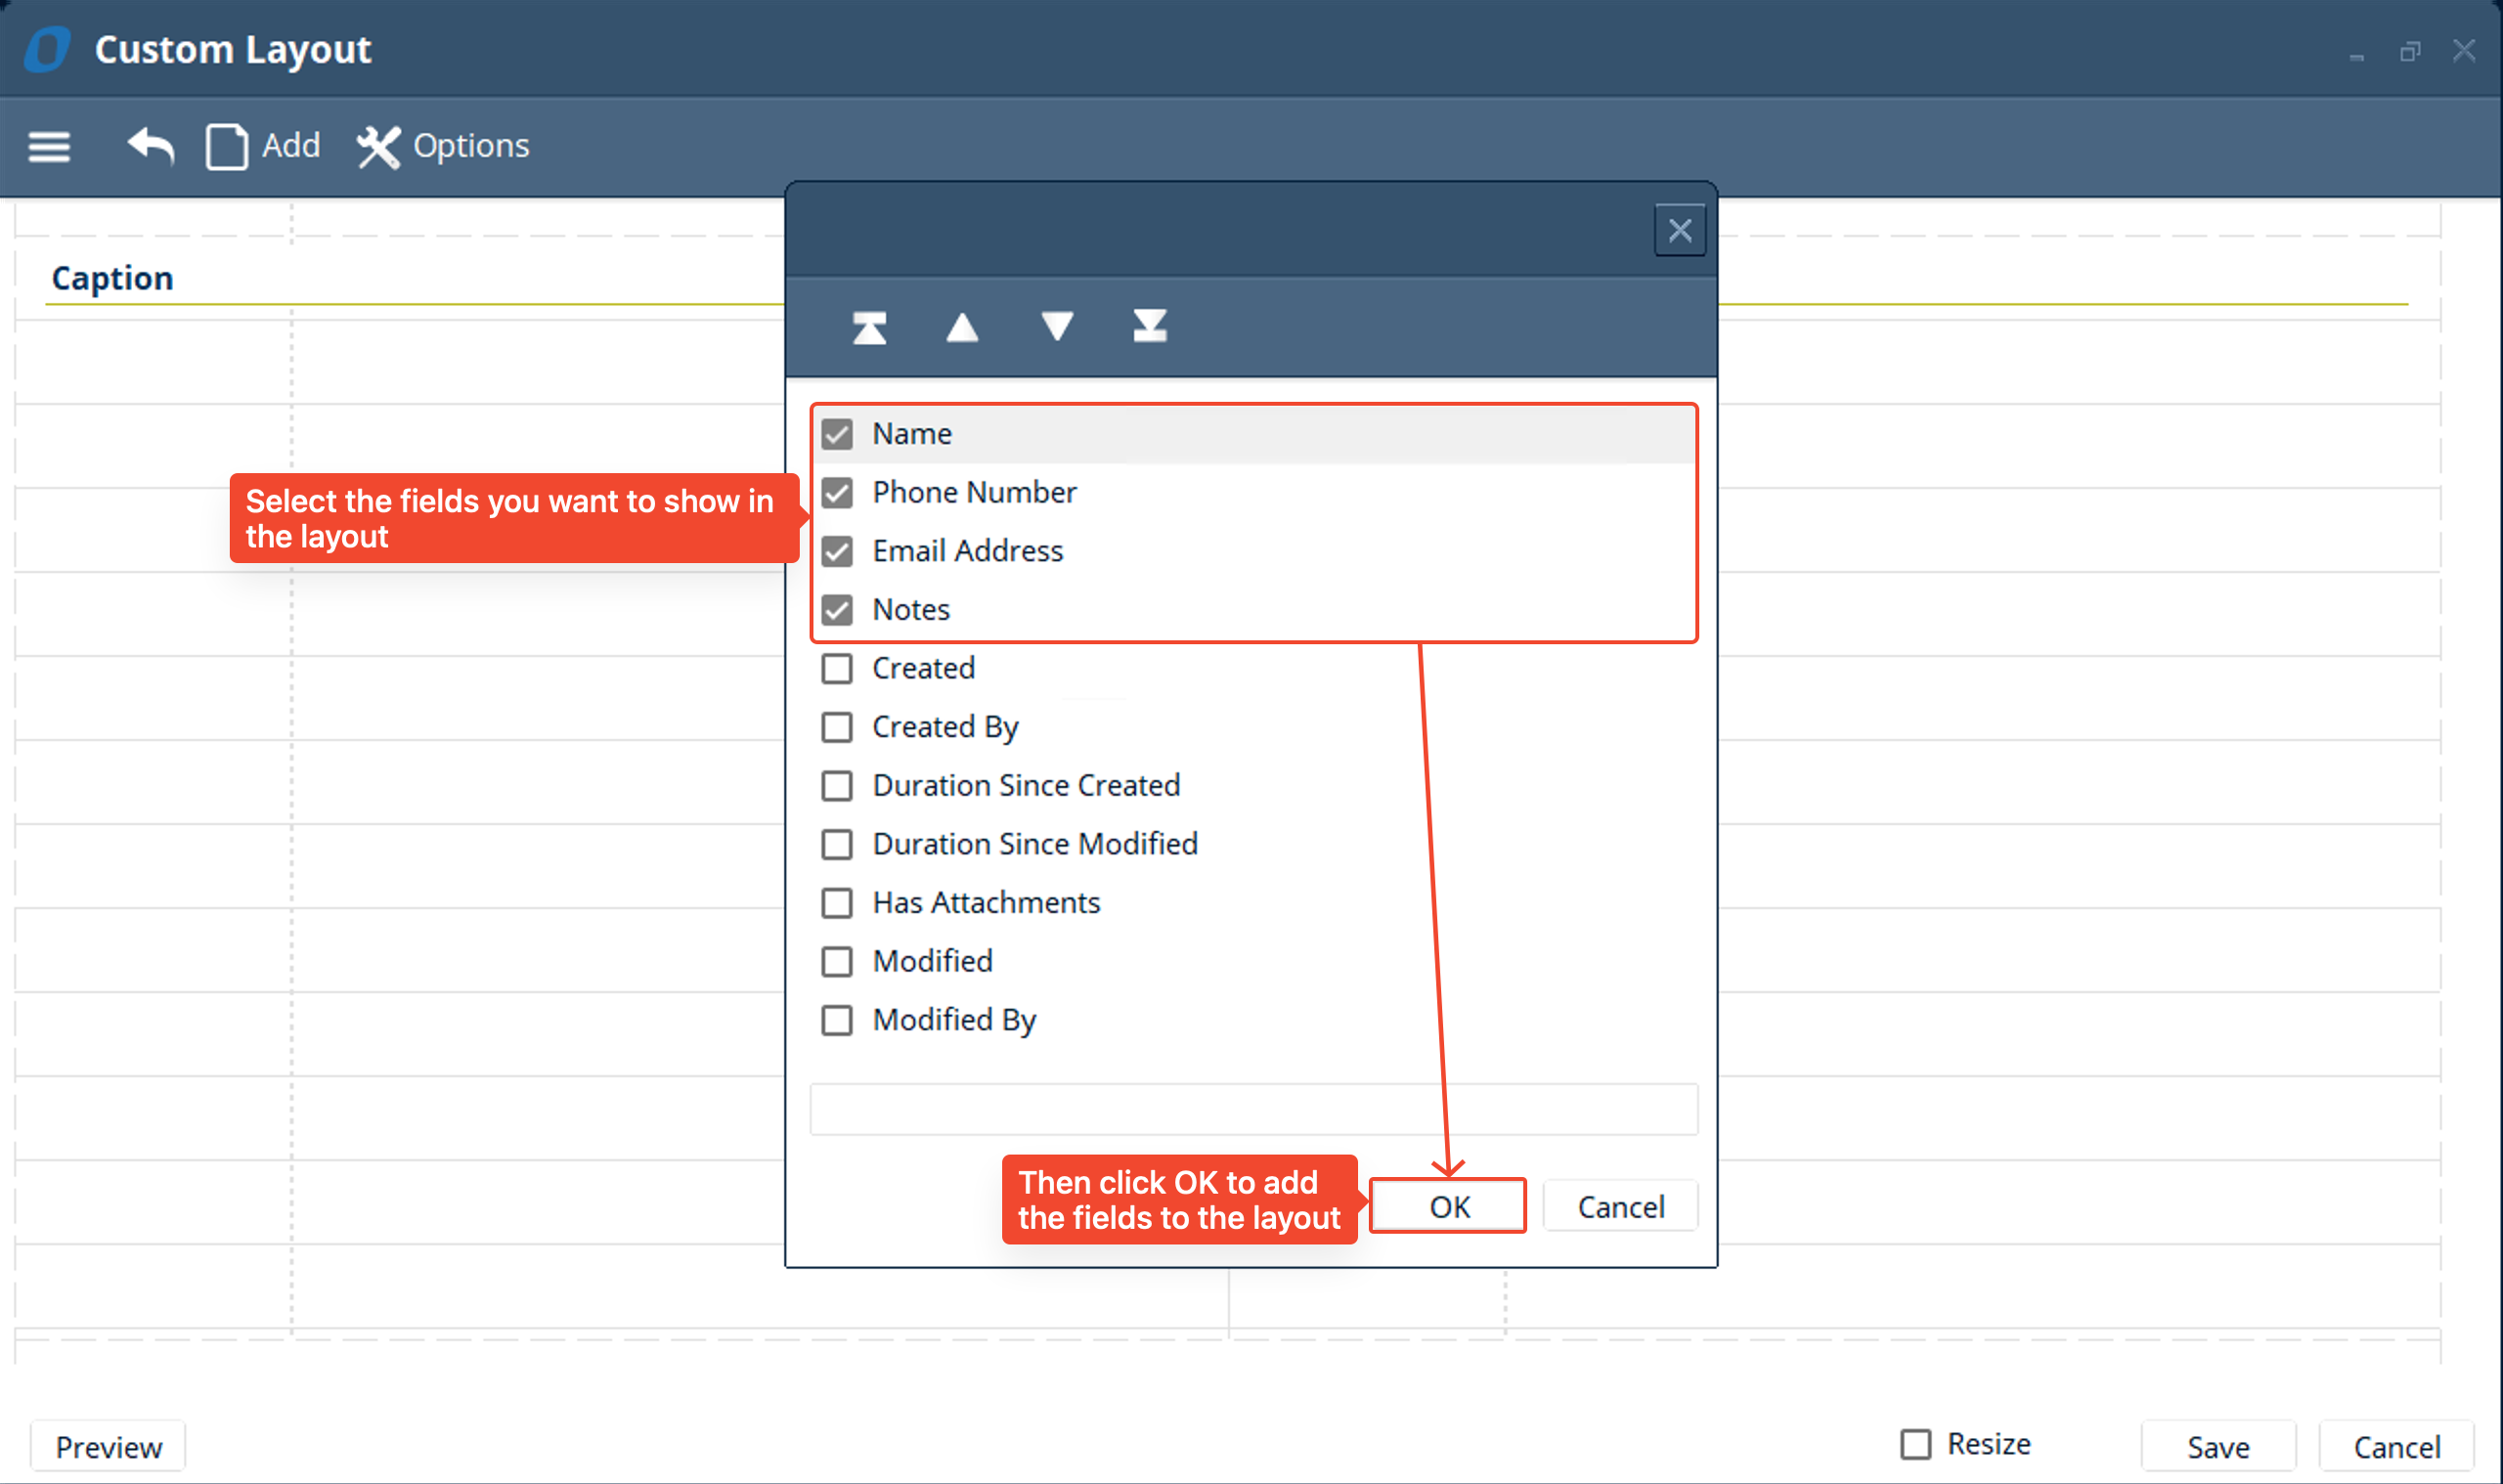
- A small window pops up allowing you to select which fields you want to add to the layout, Select the “Name”, “Phone Number”, “Email Address”, and “Notes” → then click OK
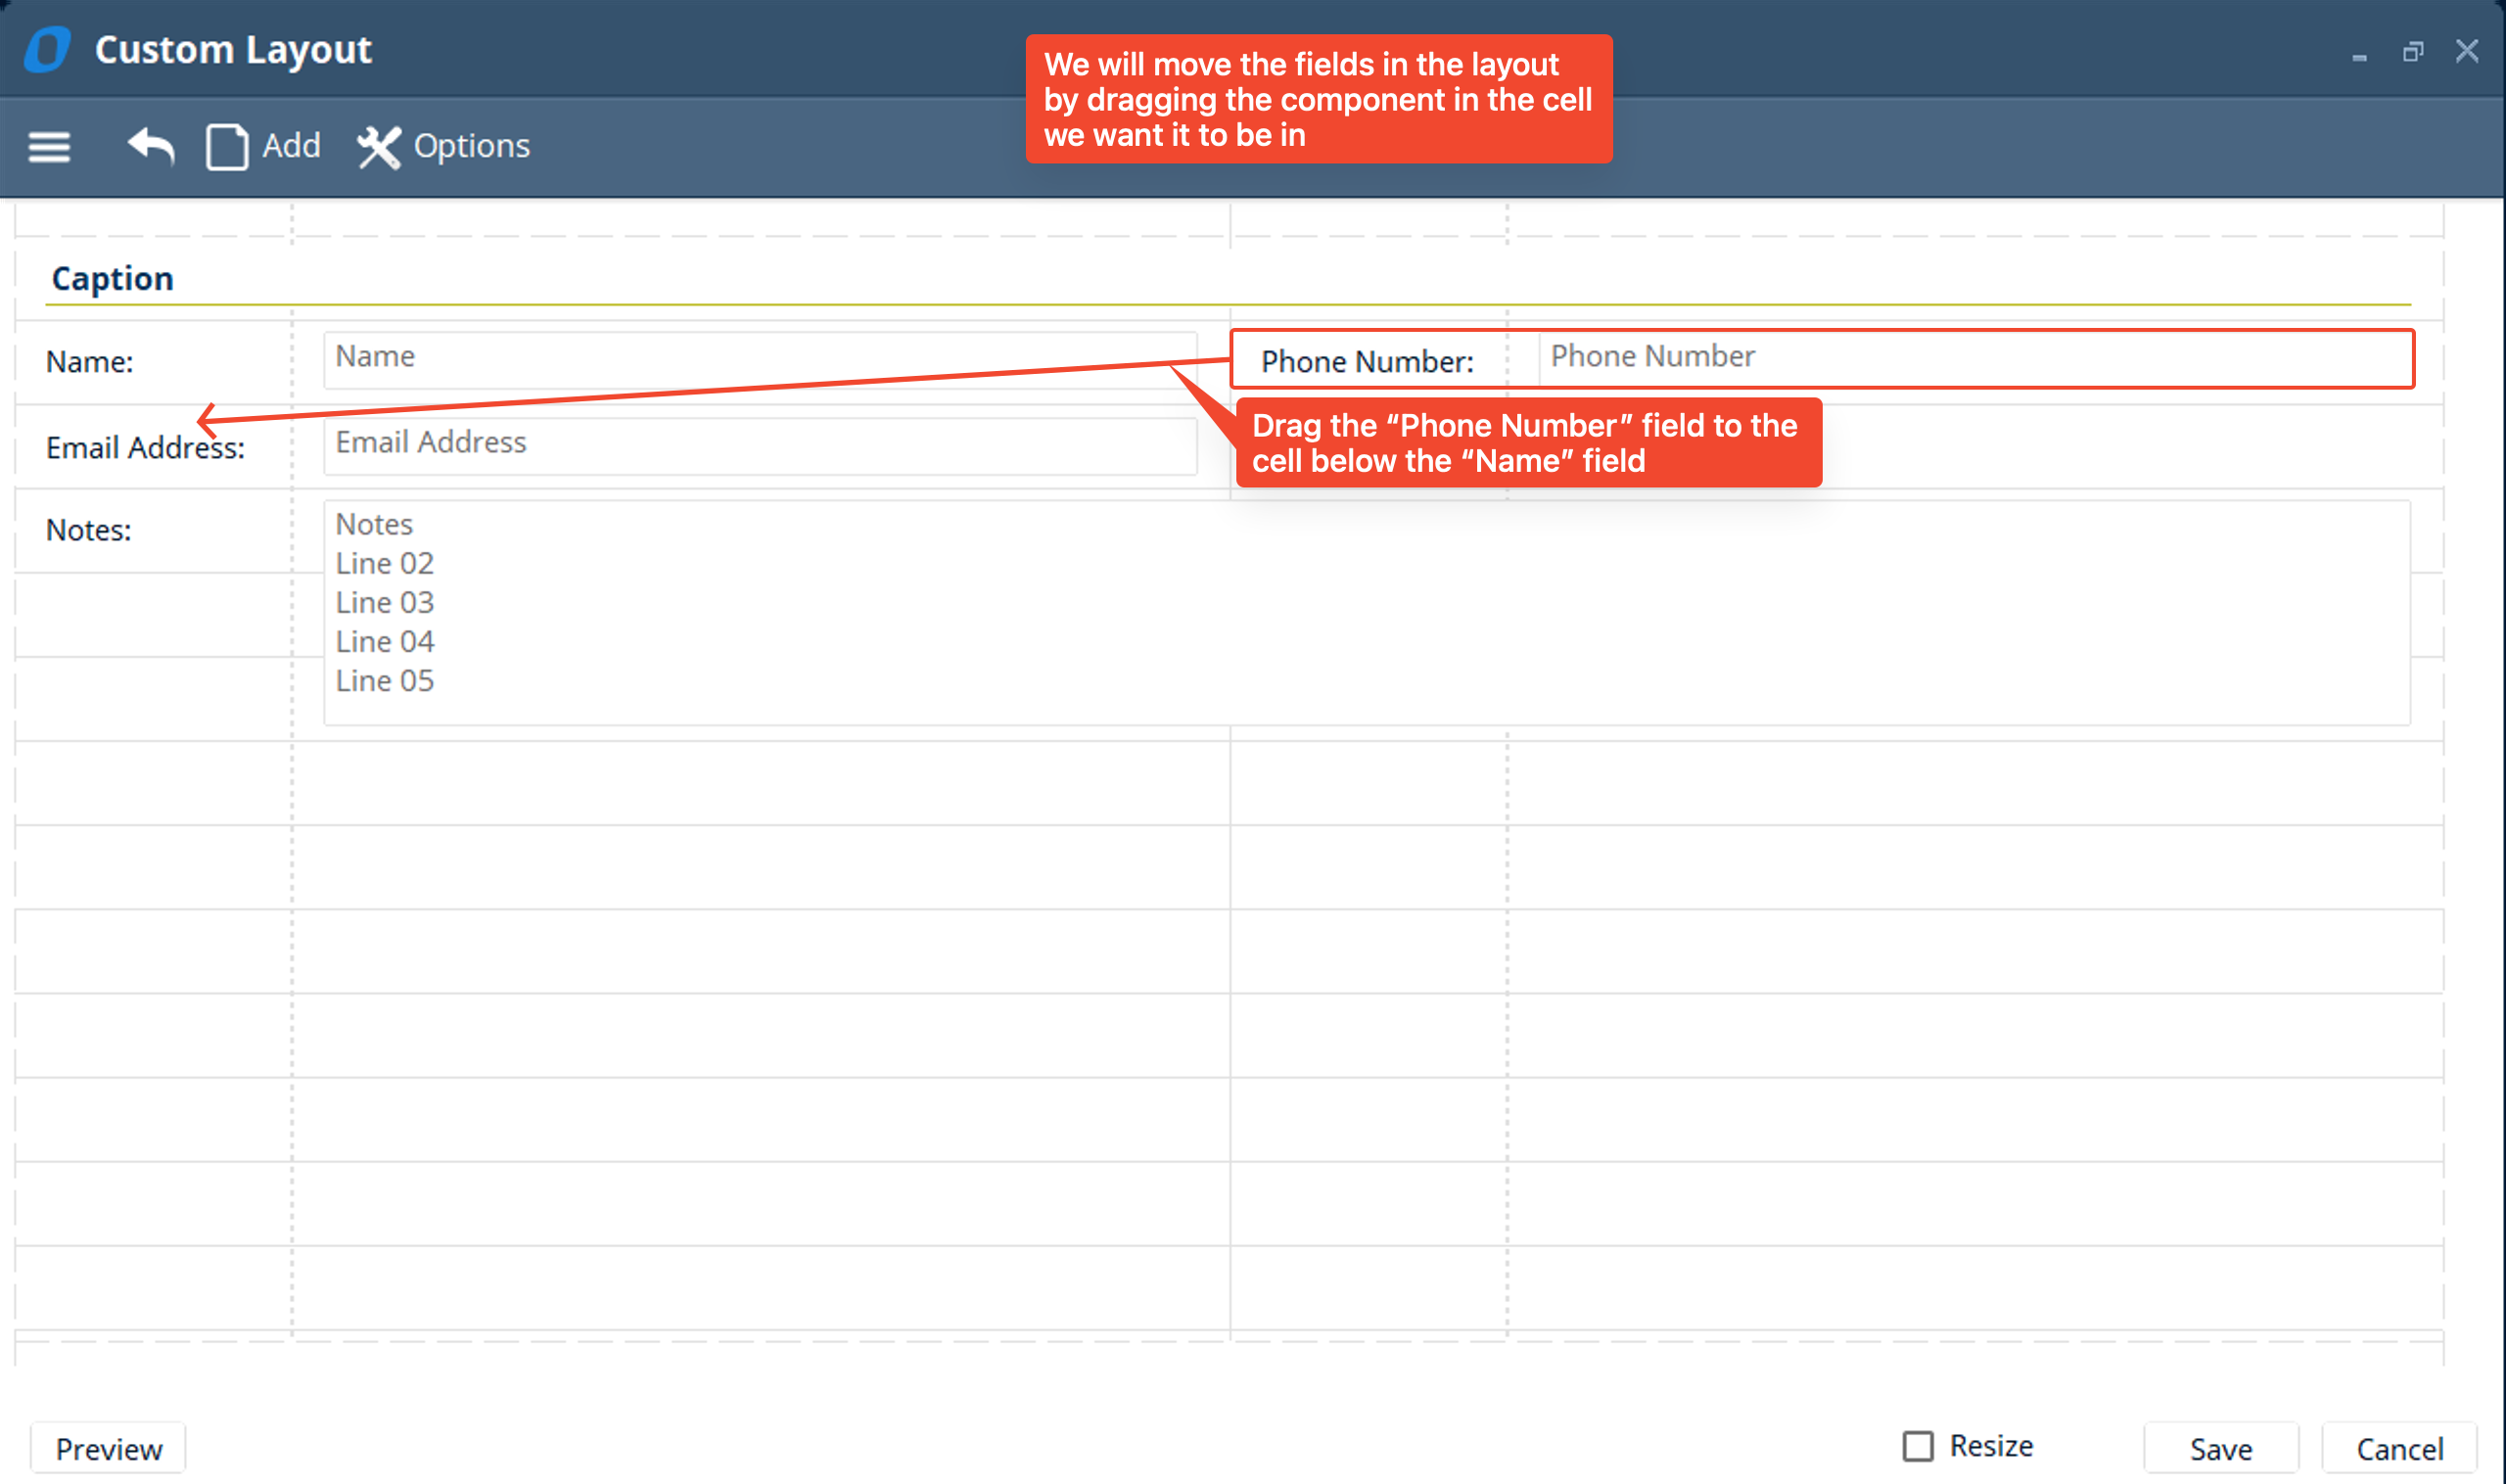
- You will see the fields you selected get added to the custom layout. To move the fields to the correct locations simply drag the field to the cell you want it to be in
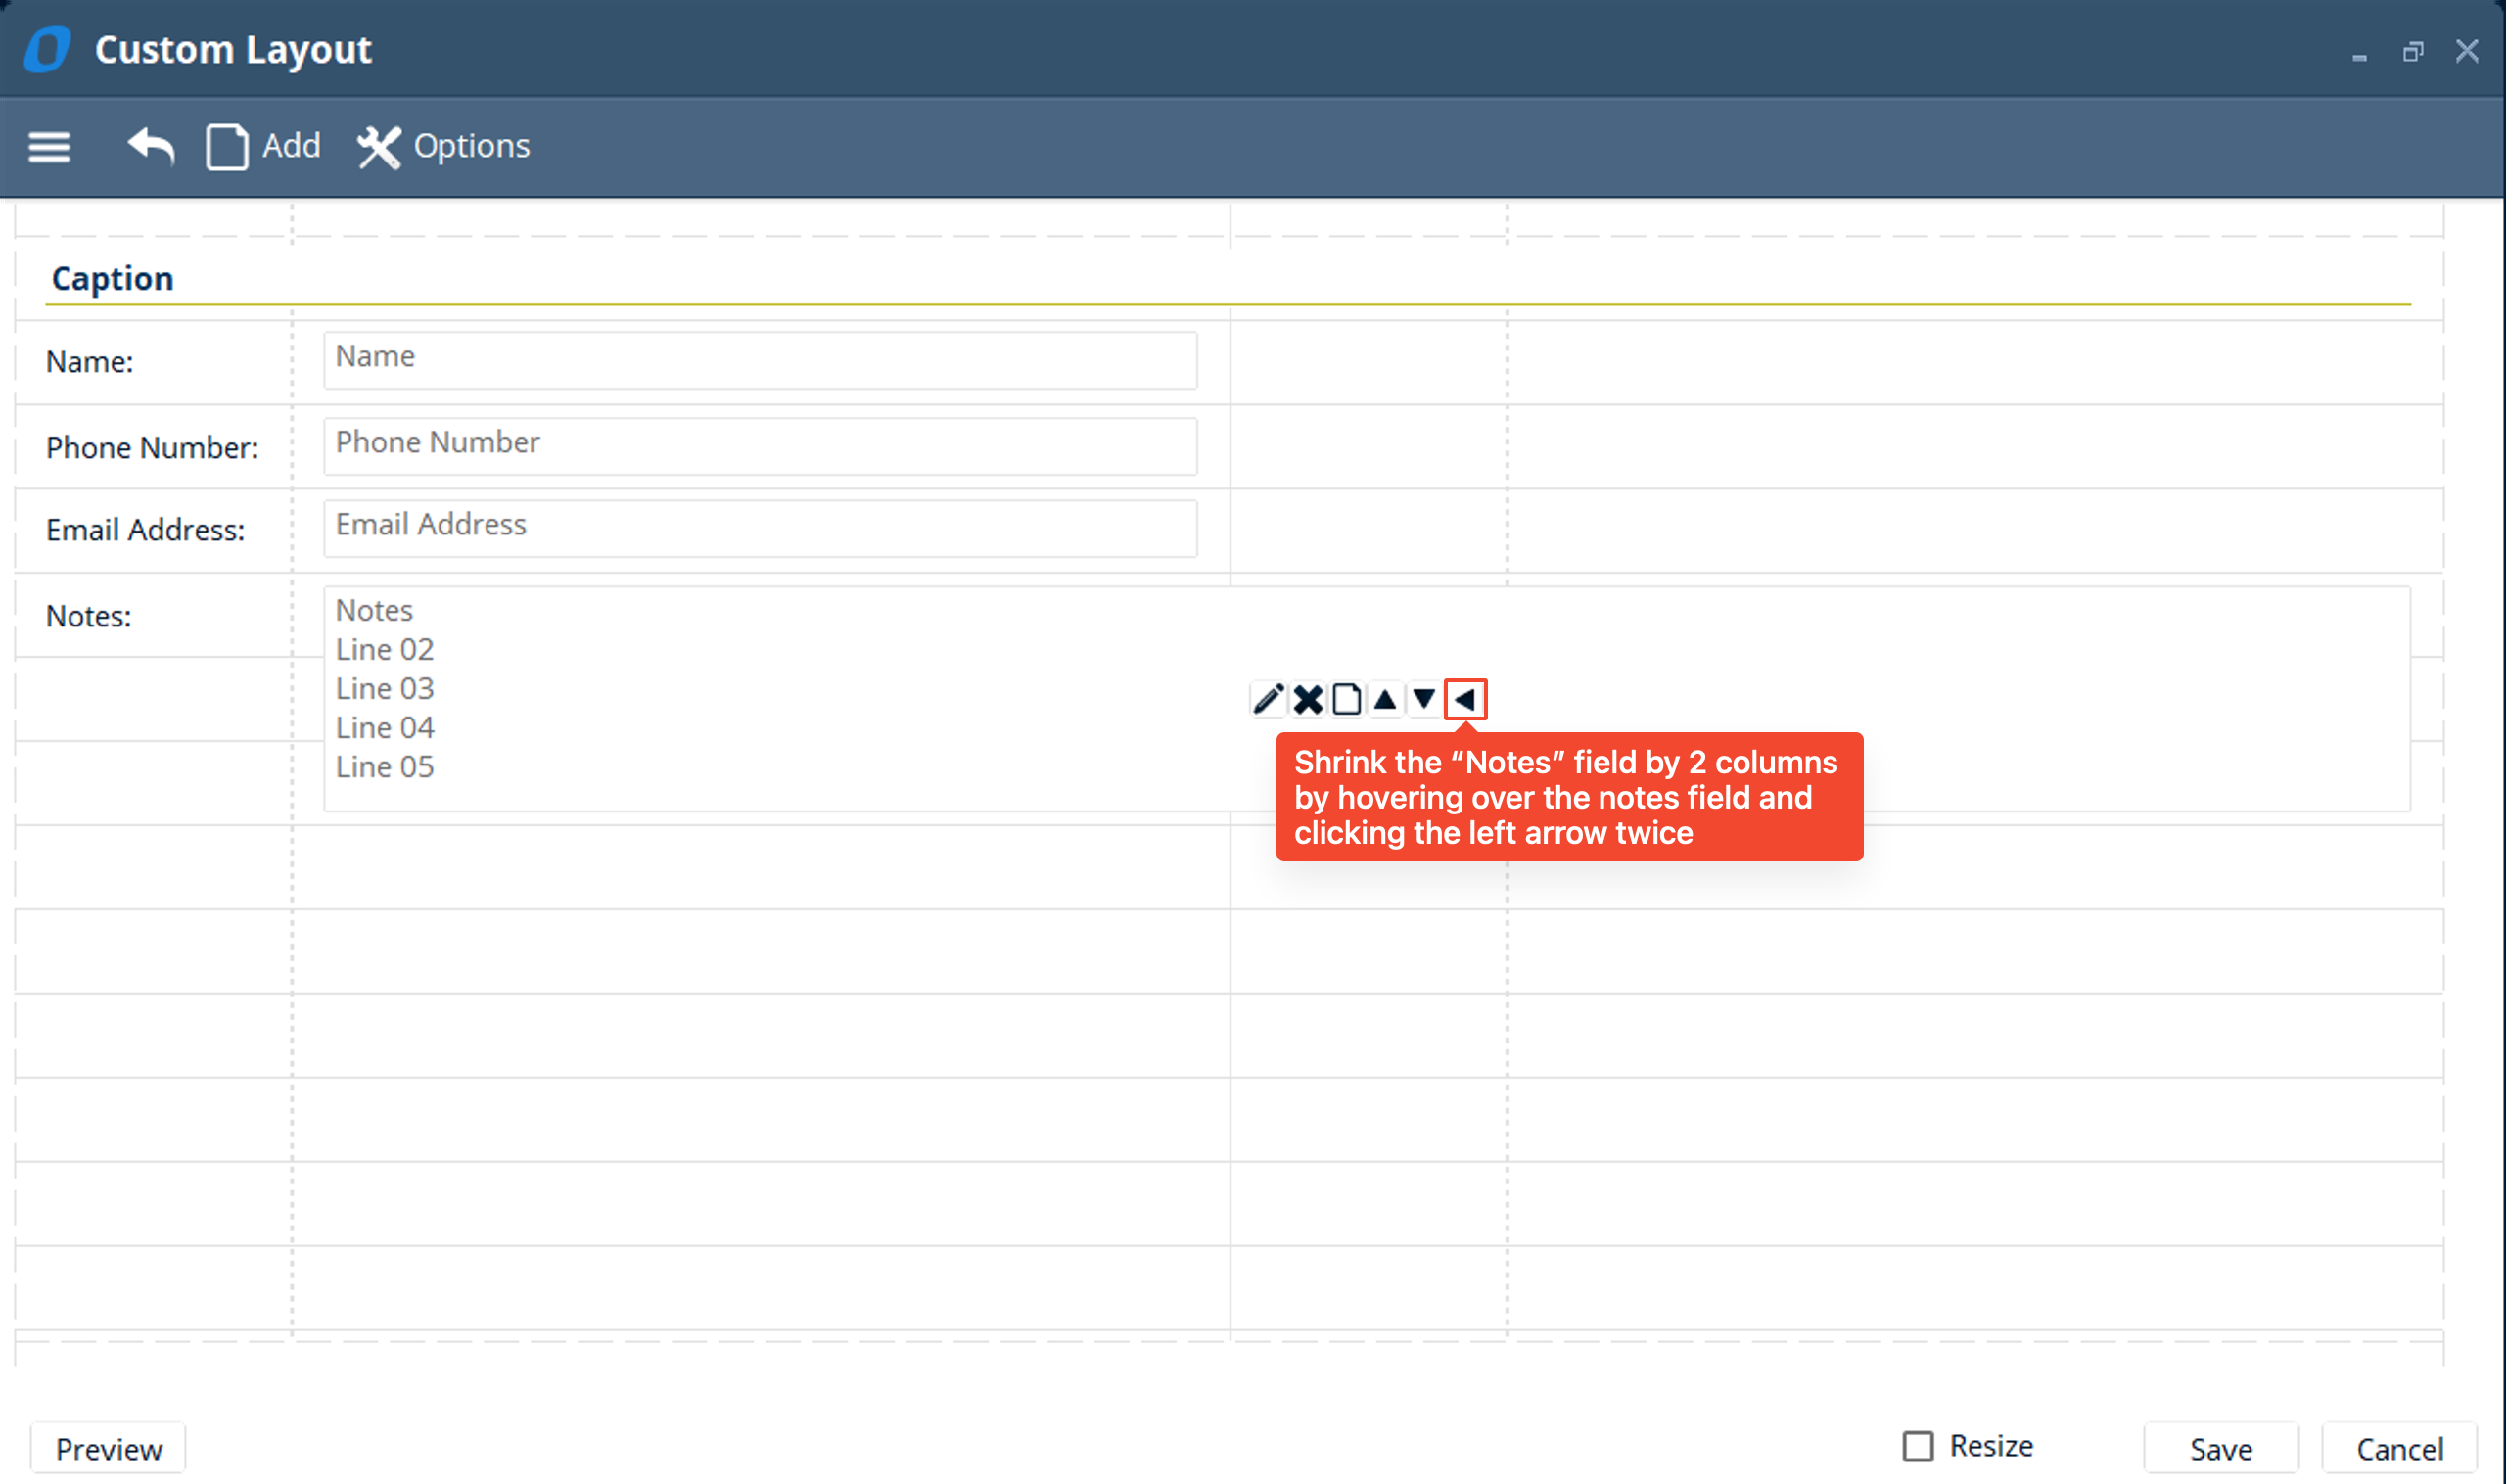
- If you want to resize a field simply hover over a field and click the arrow corresponding to the direction you want to shrink or grow the field. The custom layout works on a Column and Row system so components can only grow or shrink based on the Columns and Rows you have in the layout.
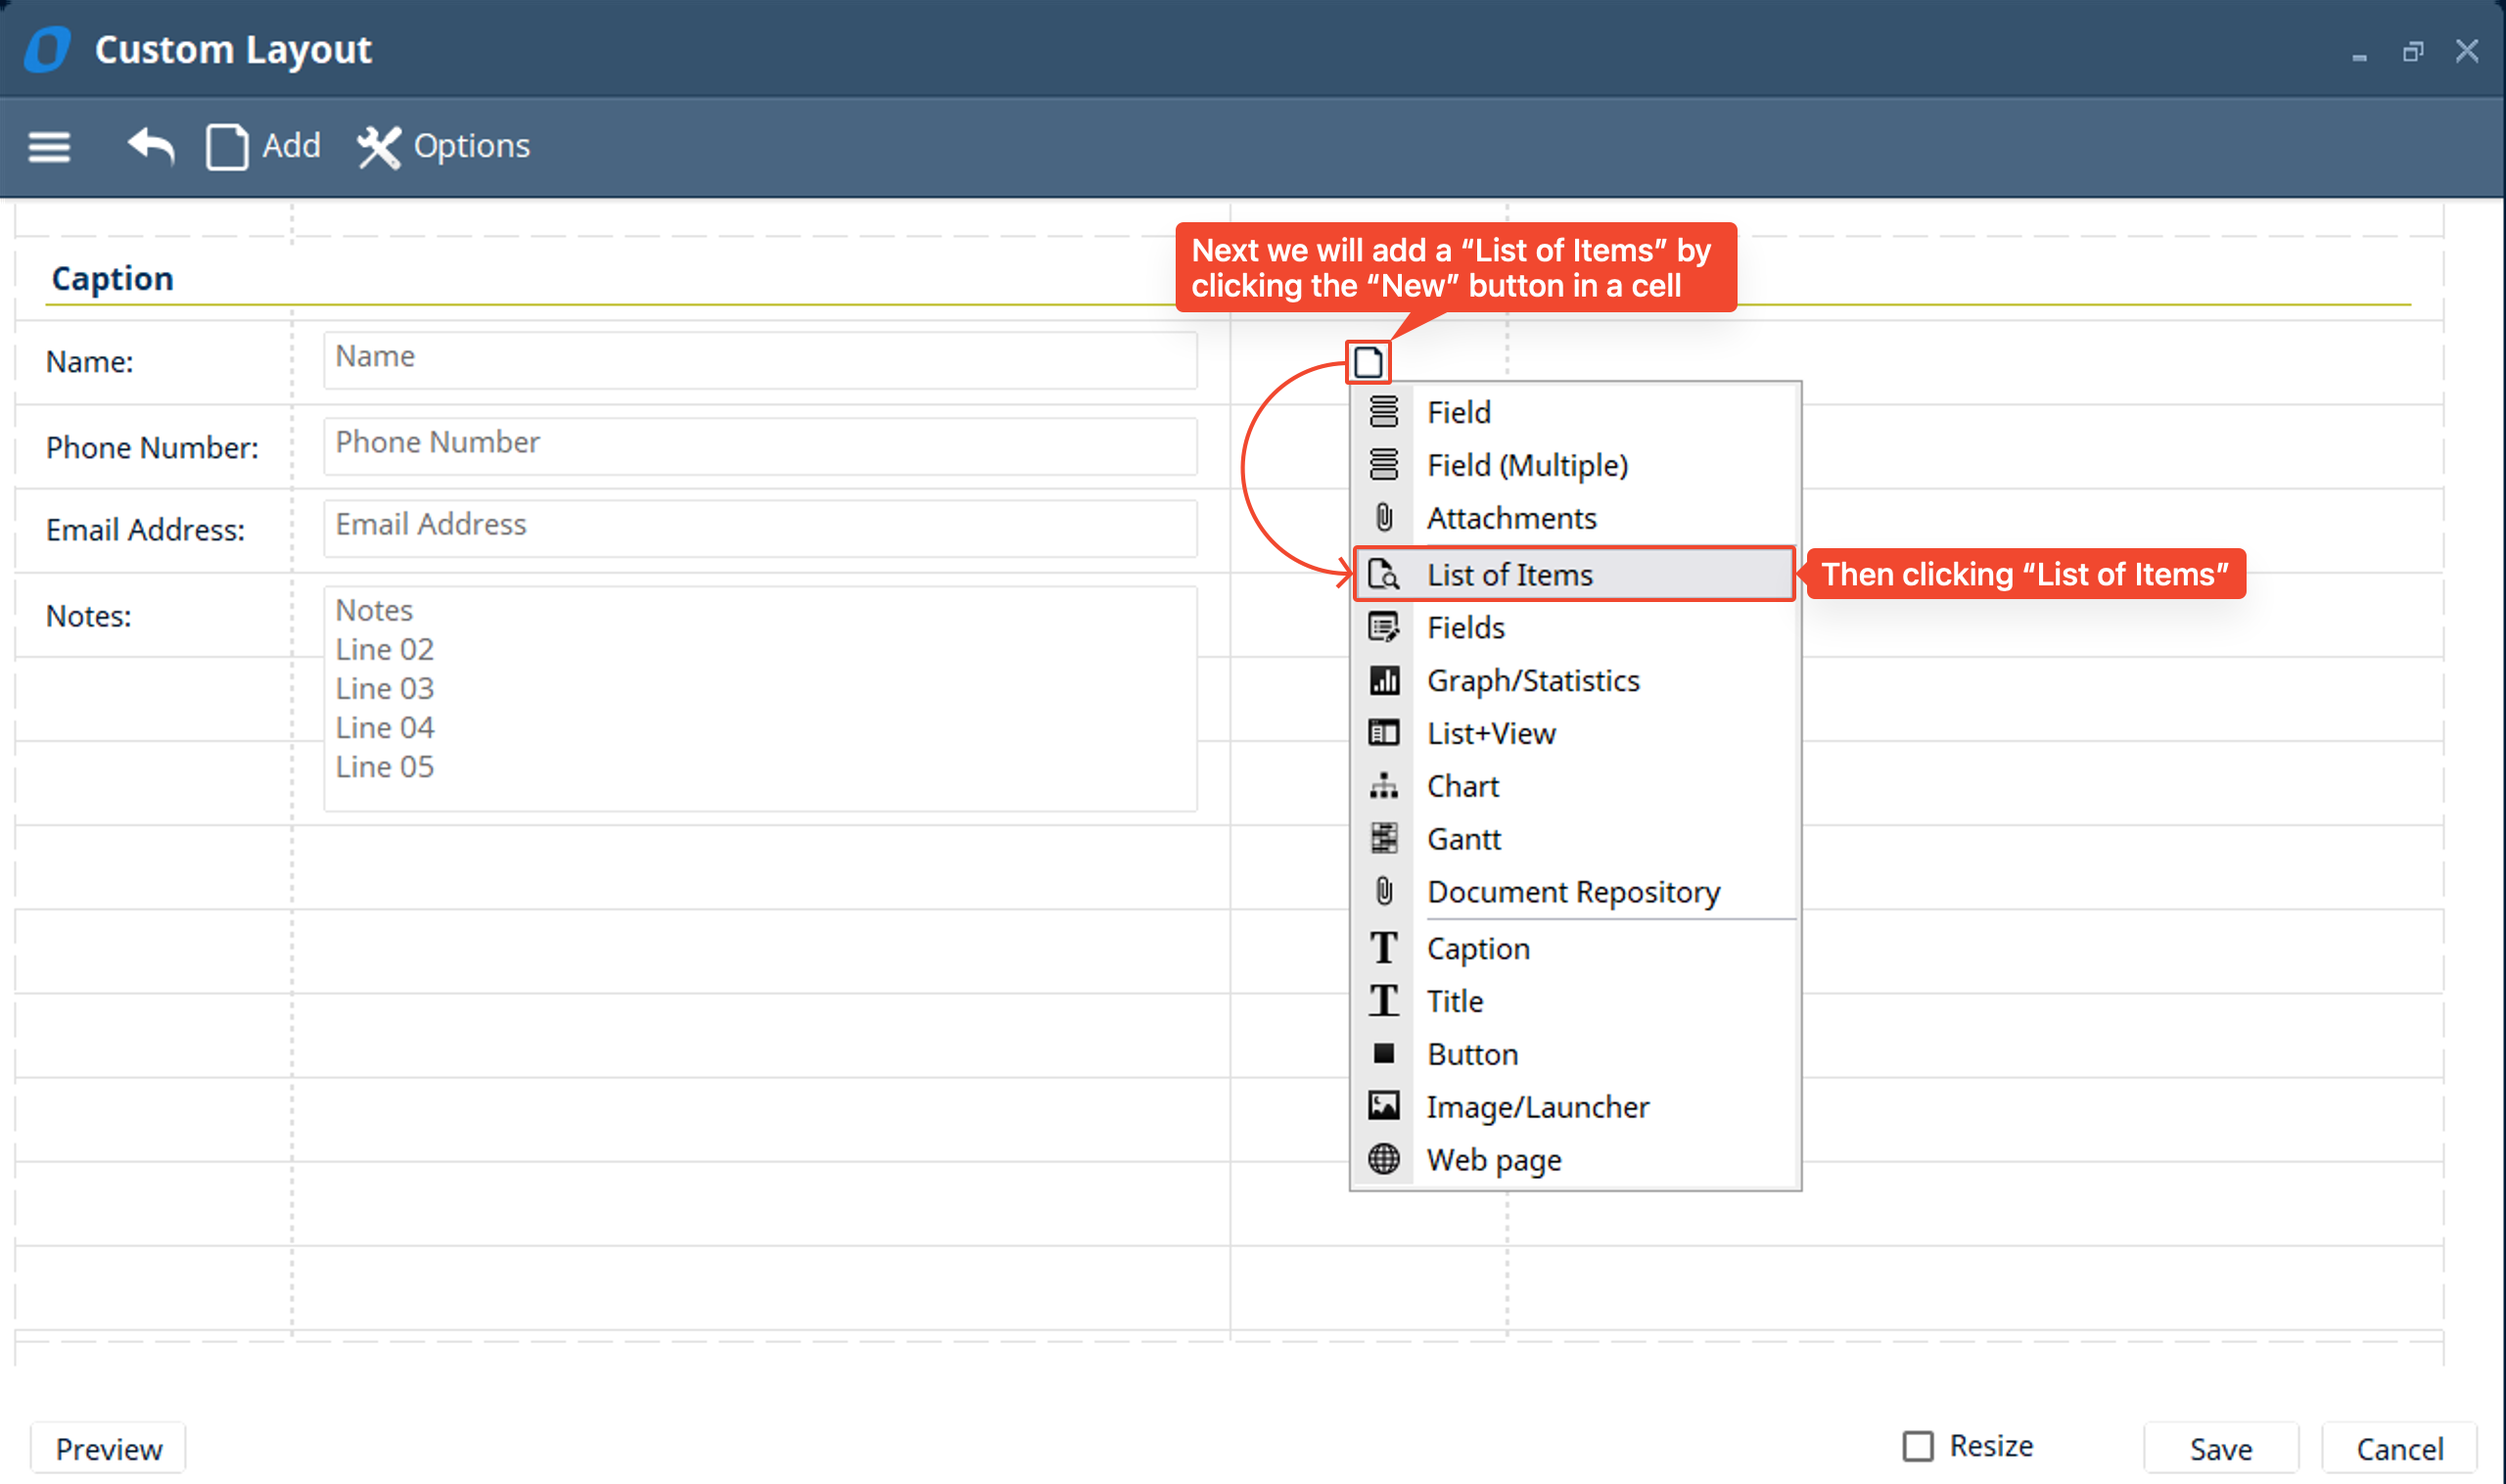
- After moving and sizing the fields, we will add a “List of Items”. A “List of Items” component allows you to display a list of items in a layout. This list of items can be related to the specific record you are viewing the list from. For example, we are going to create a list of “Client Projects” and then filter it so it only displays “Client Projects” attached to the “Client” I am viewing. To do this hover over a cell and click on the “Add” button → then select “List of Items”
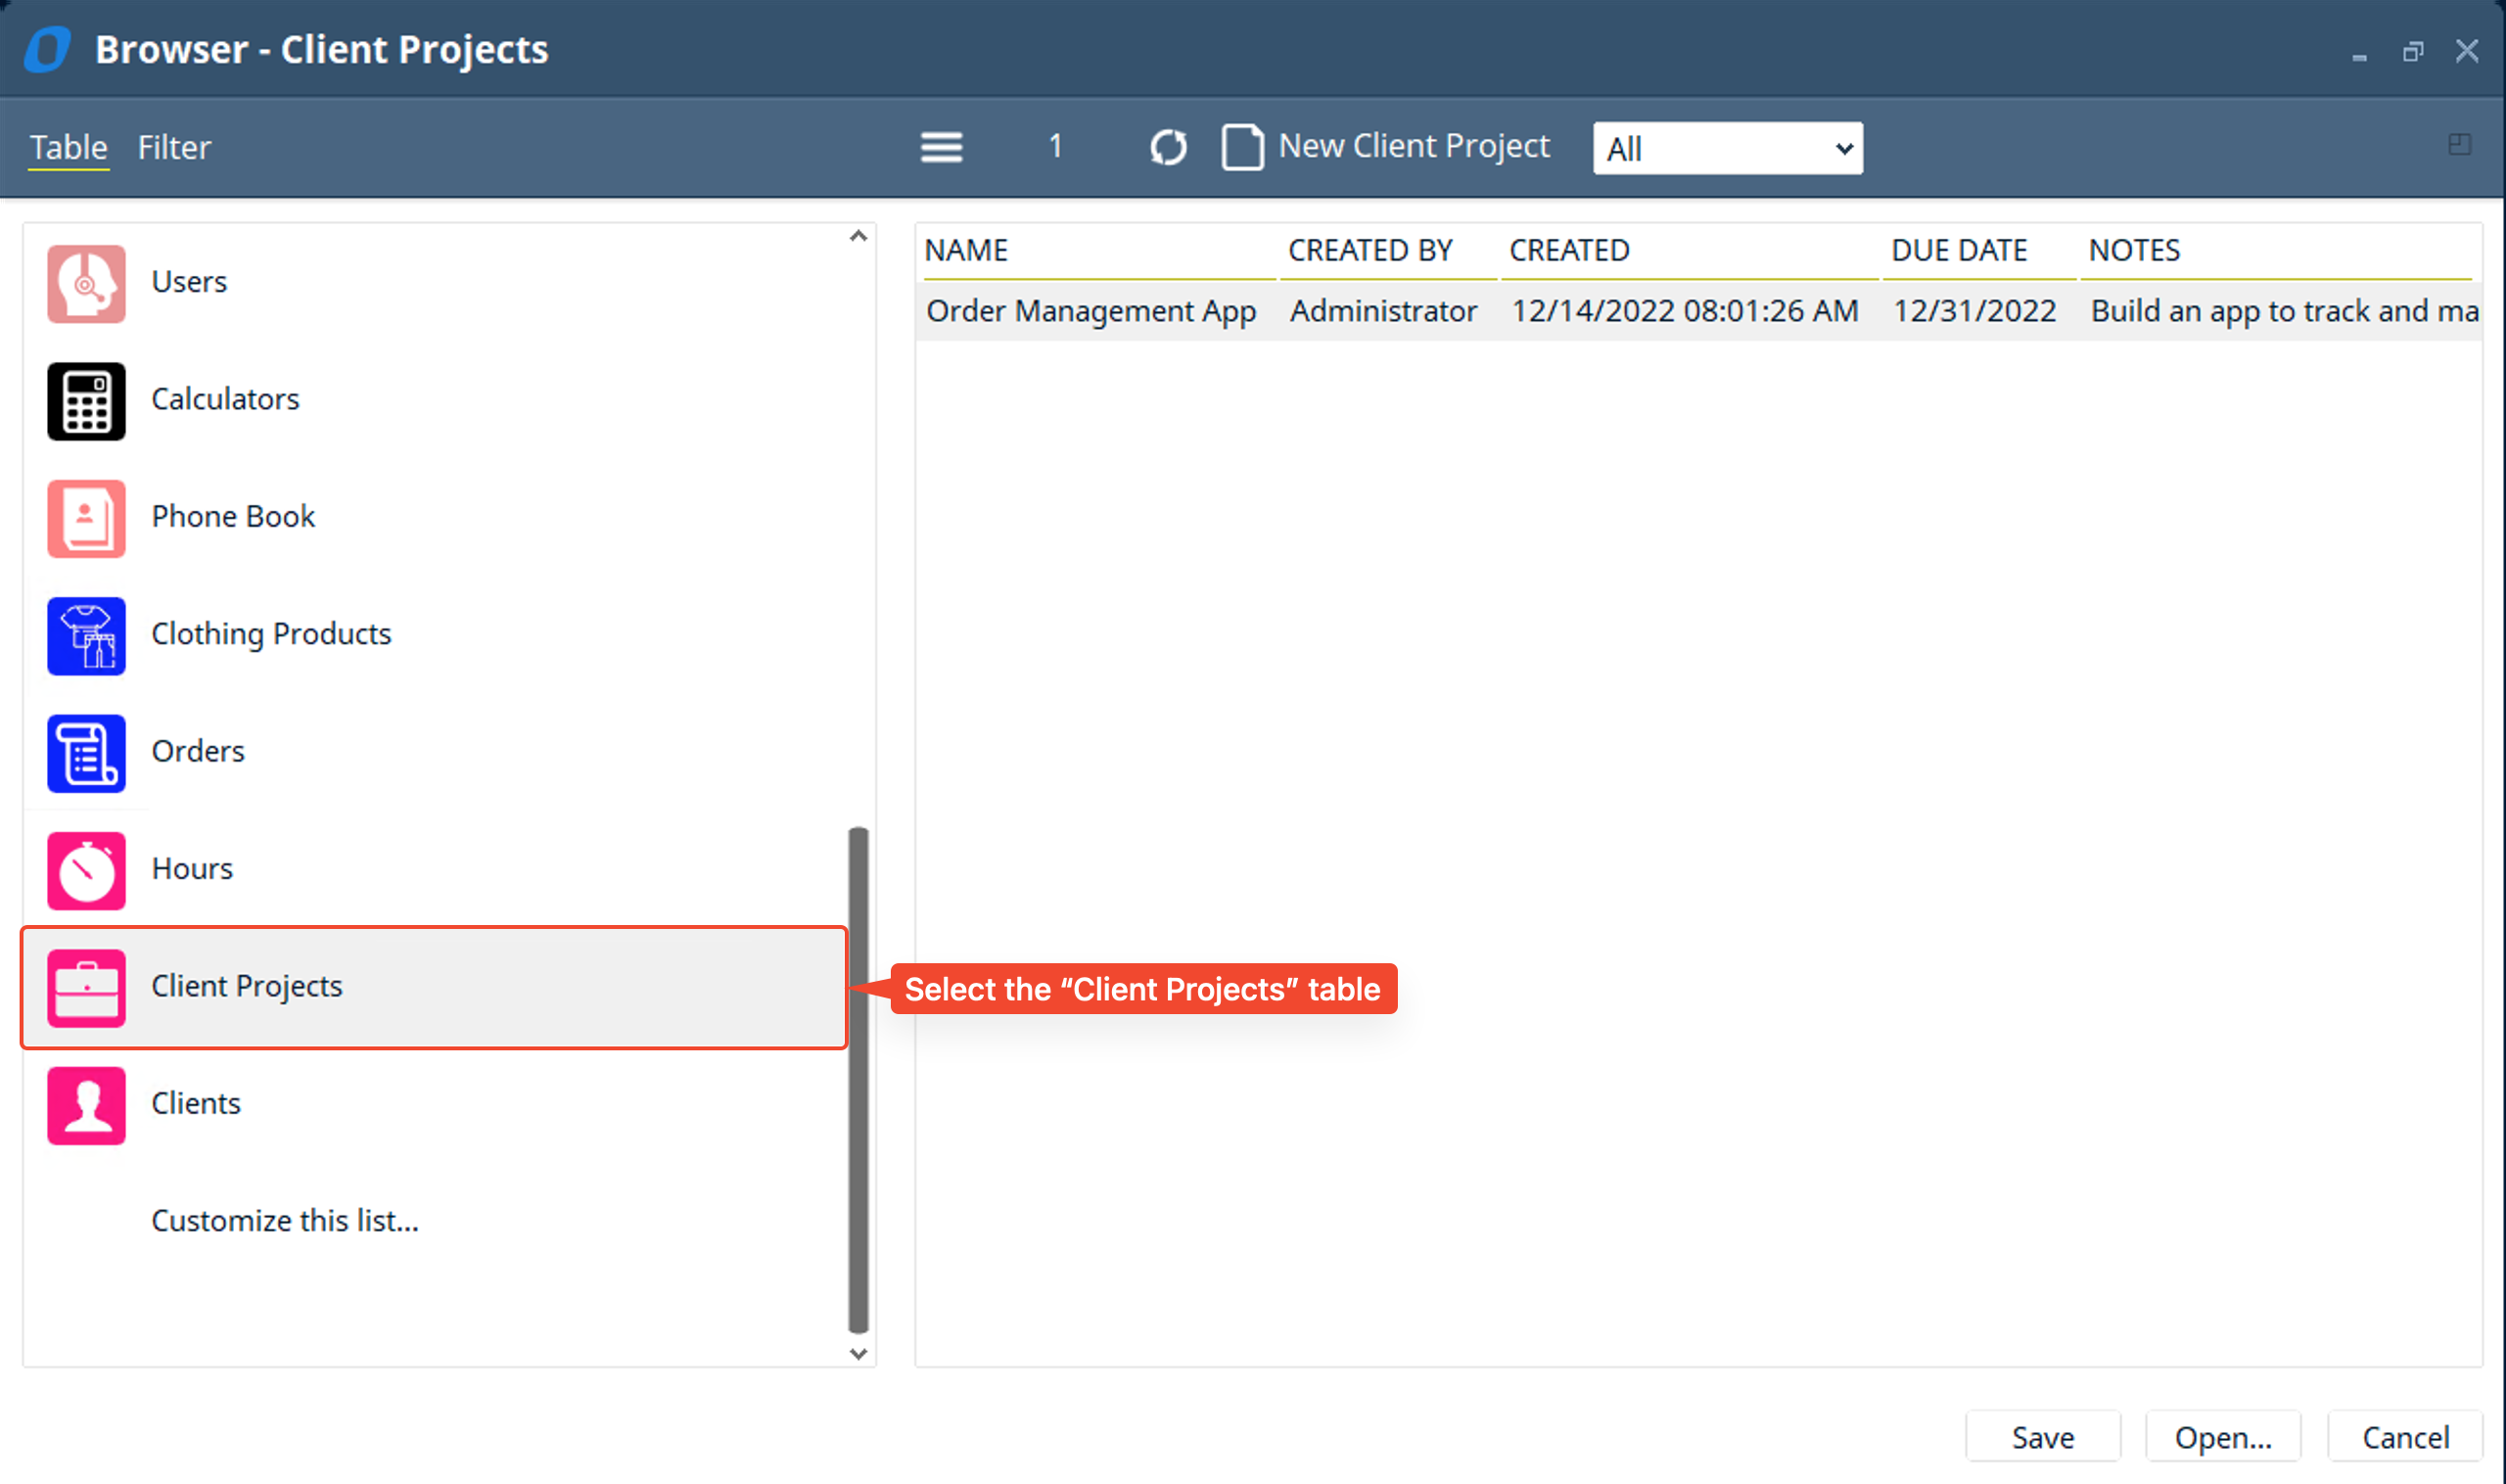
- We will select the “Client Projects” table
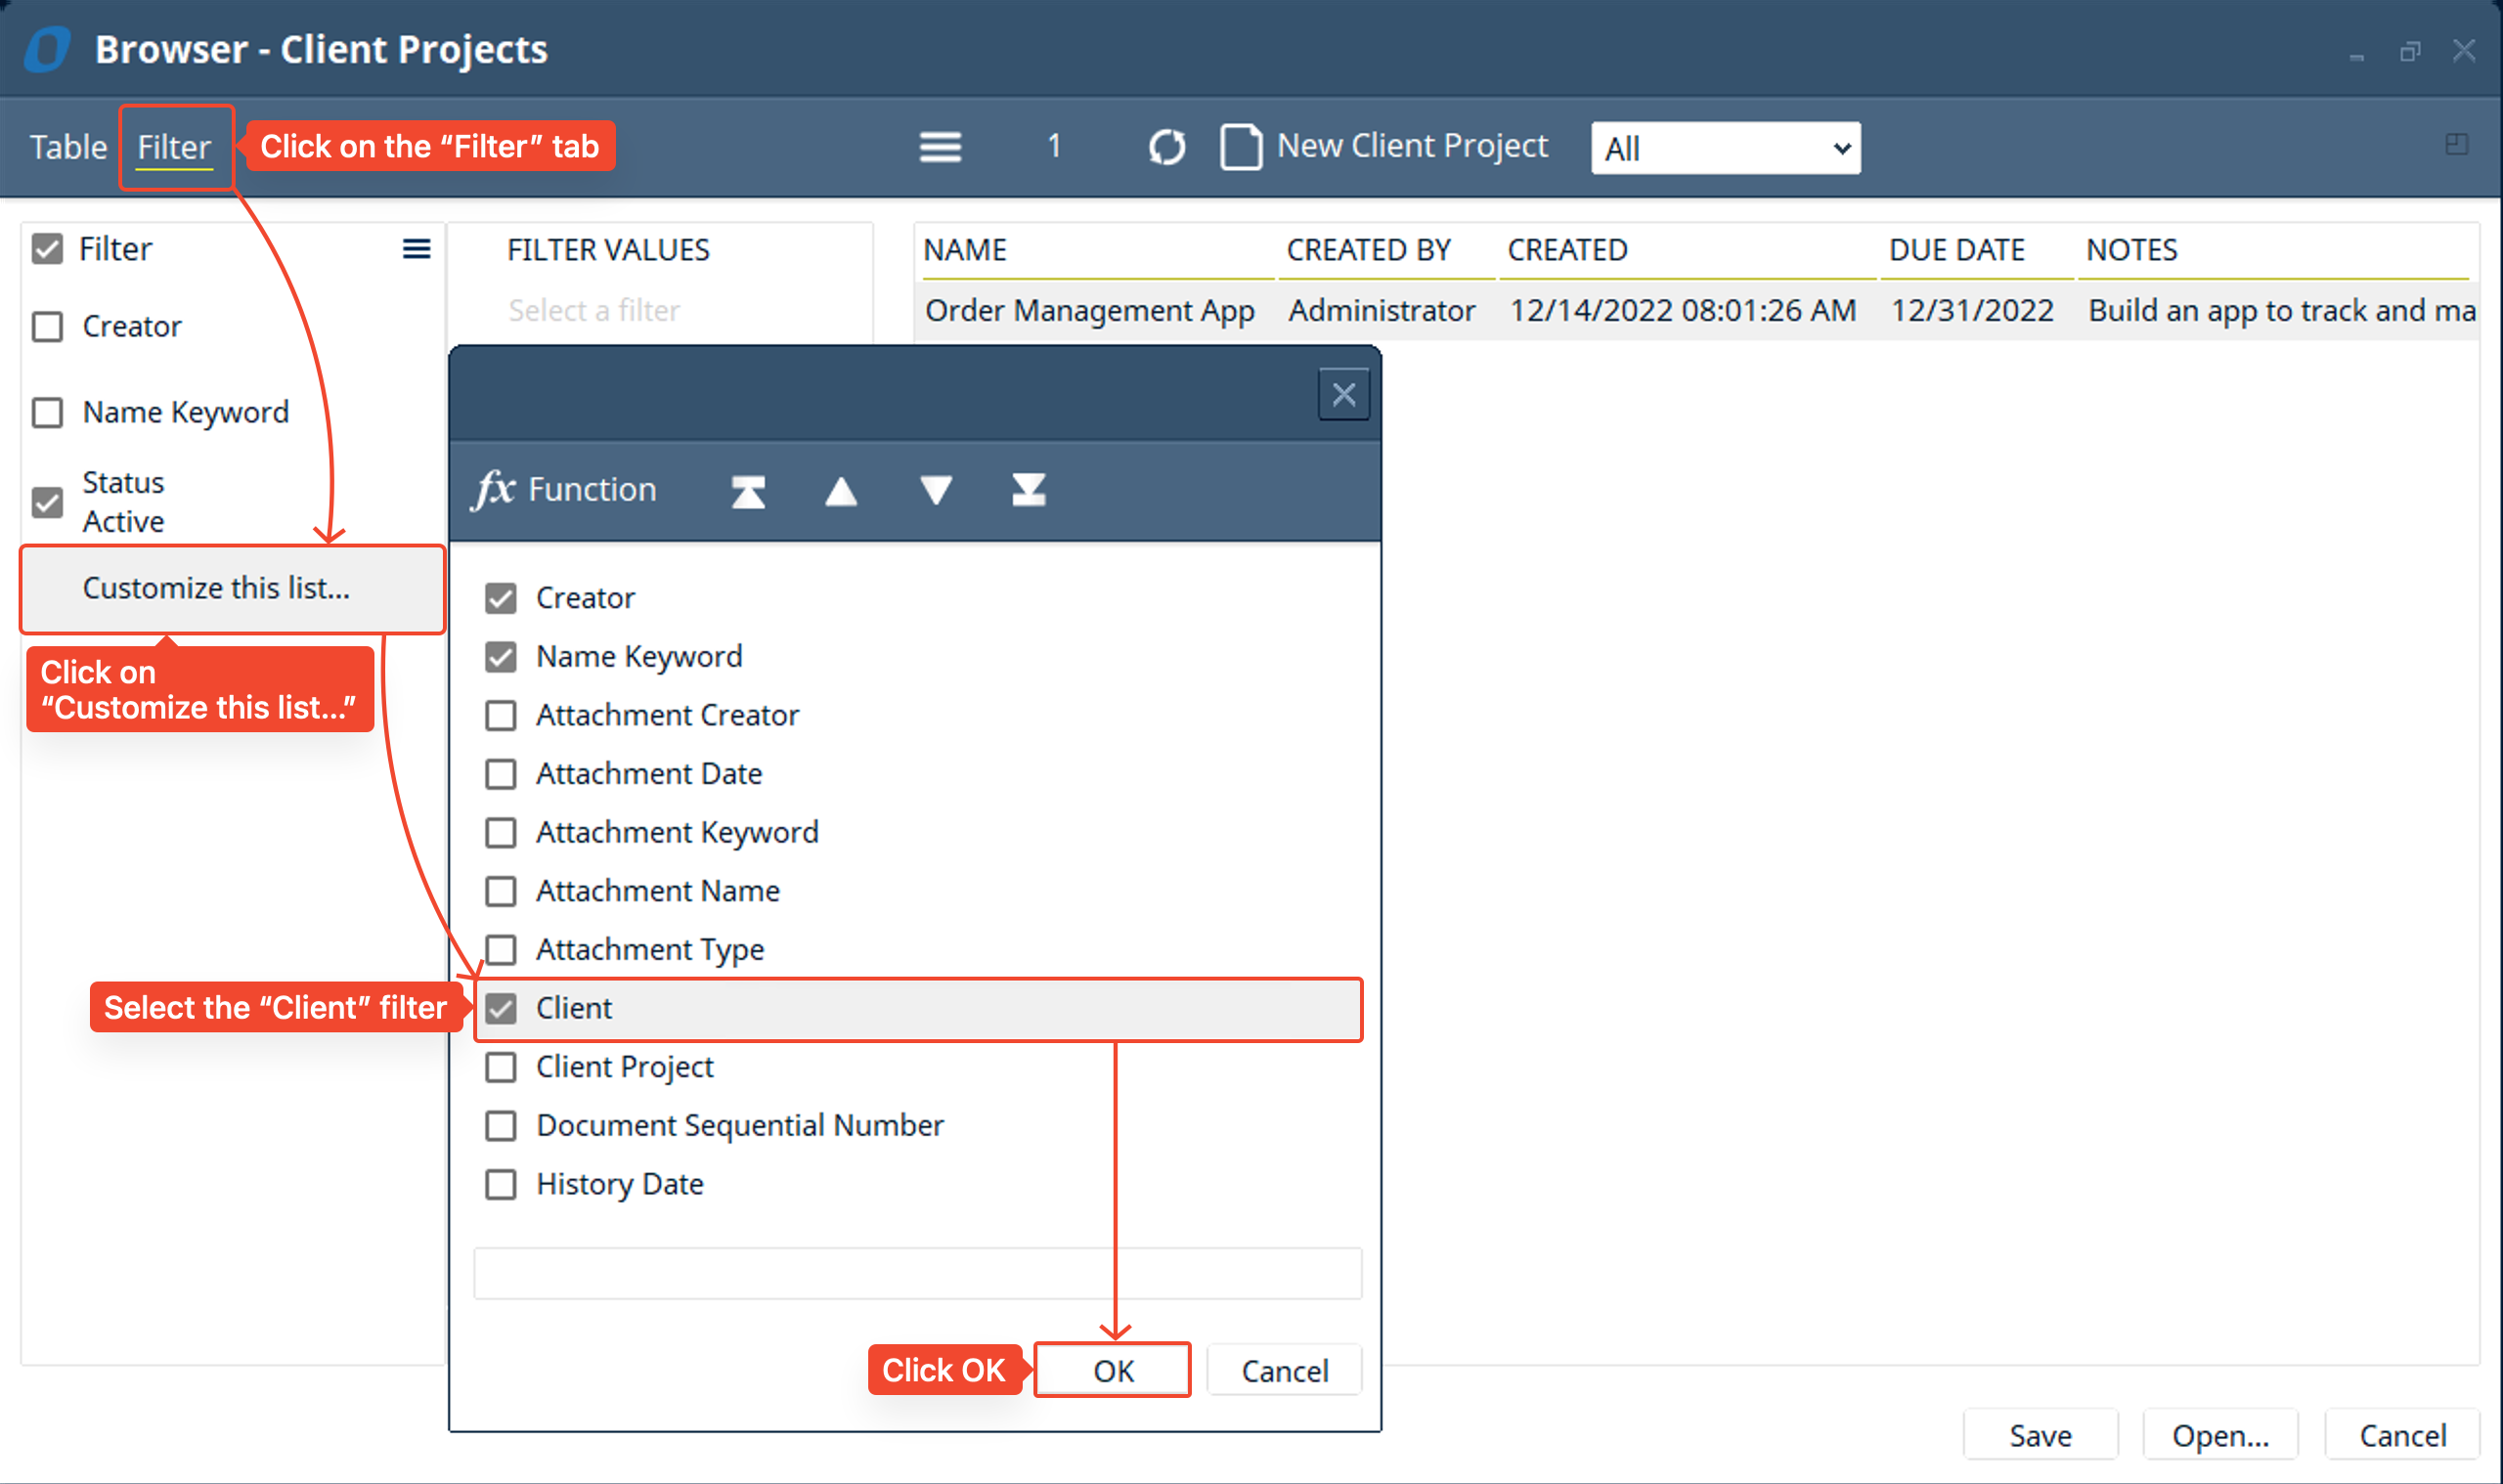
- Then select the “Filter” tab → go to “Customize this list…” → then select the “Client” filter and click OK to add the “Client” filter to your list of filters.
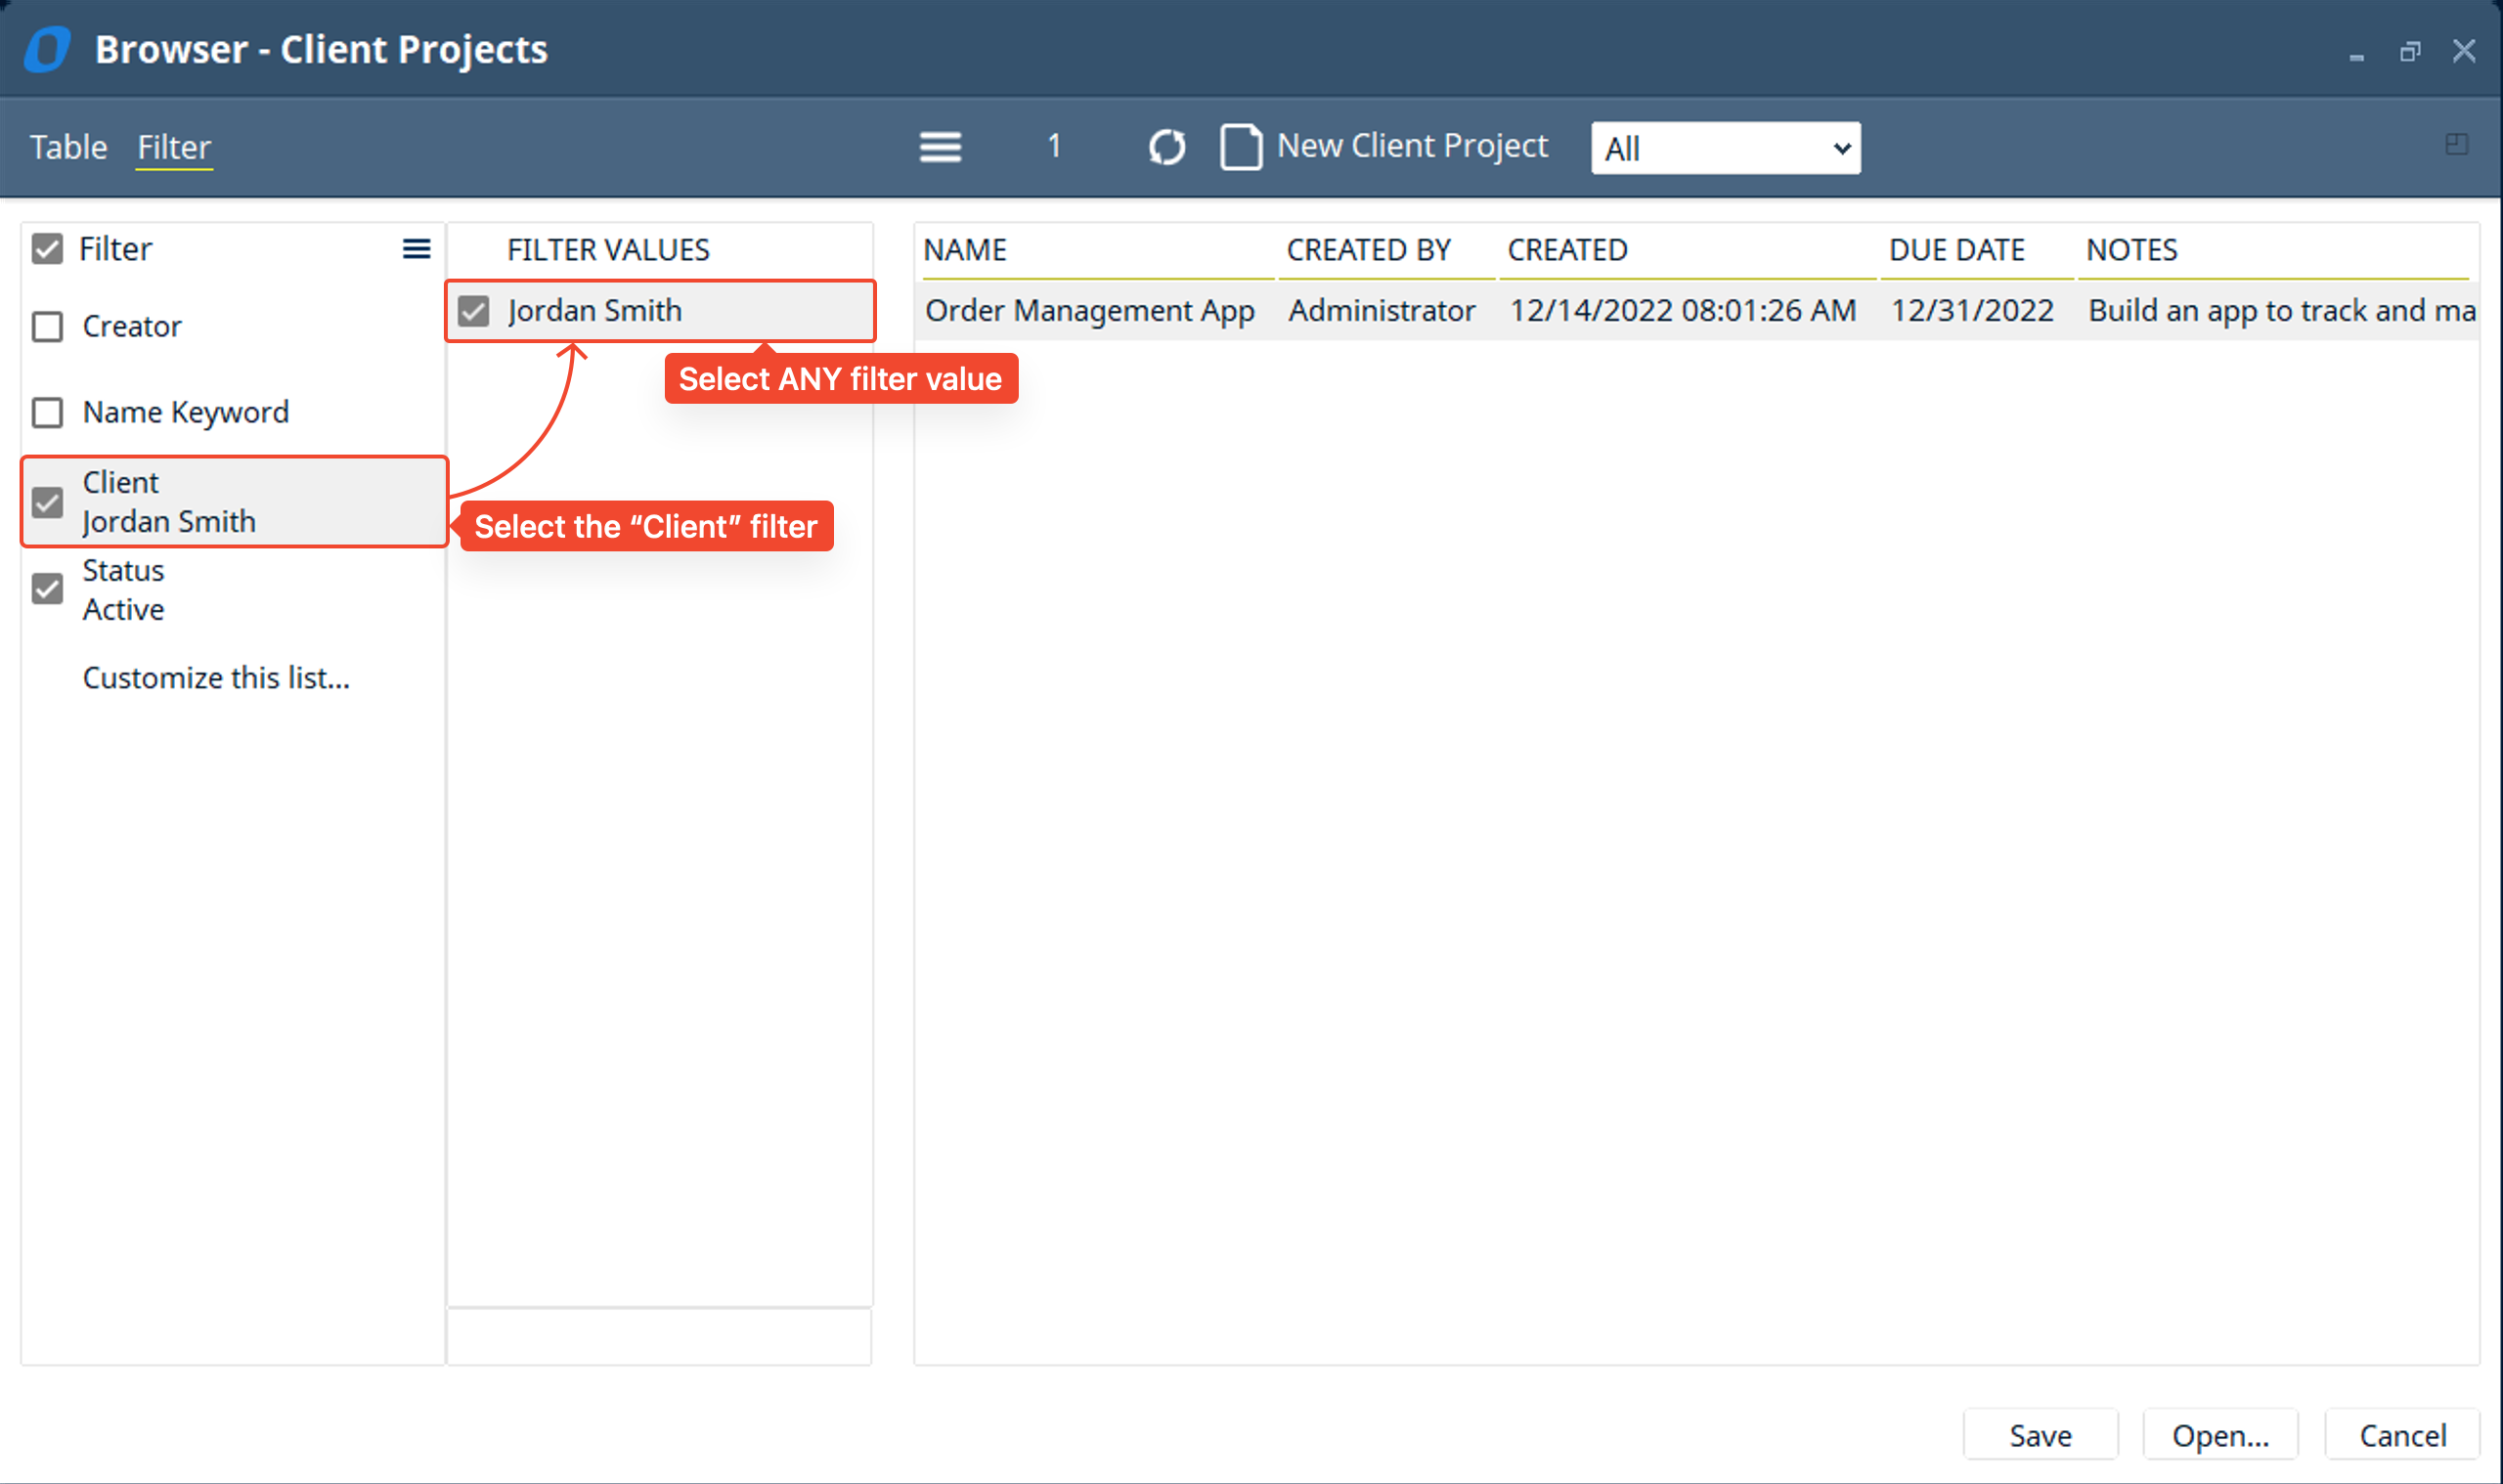
- Next, Select the “Client” filter and choose ANY filter value.
- If the filter you select, in this case the “Client” filter, is related with a custom link to the table you are adding the list of item to, then it will automatically filter the list by the related item. Otherwise it will keep the filter value static and not change depending on the record you are viewing.
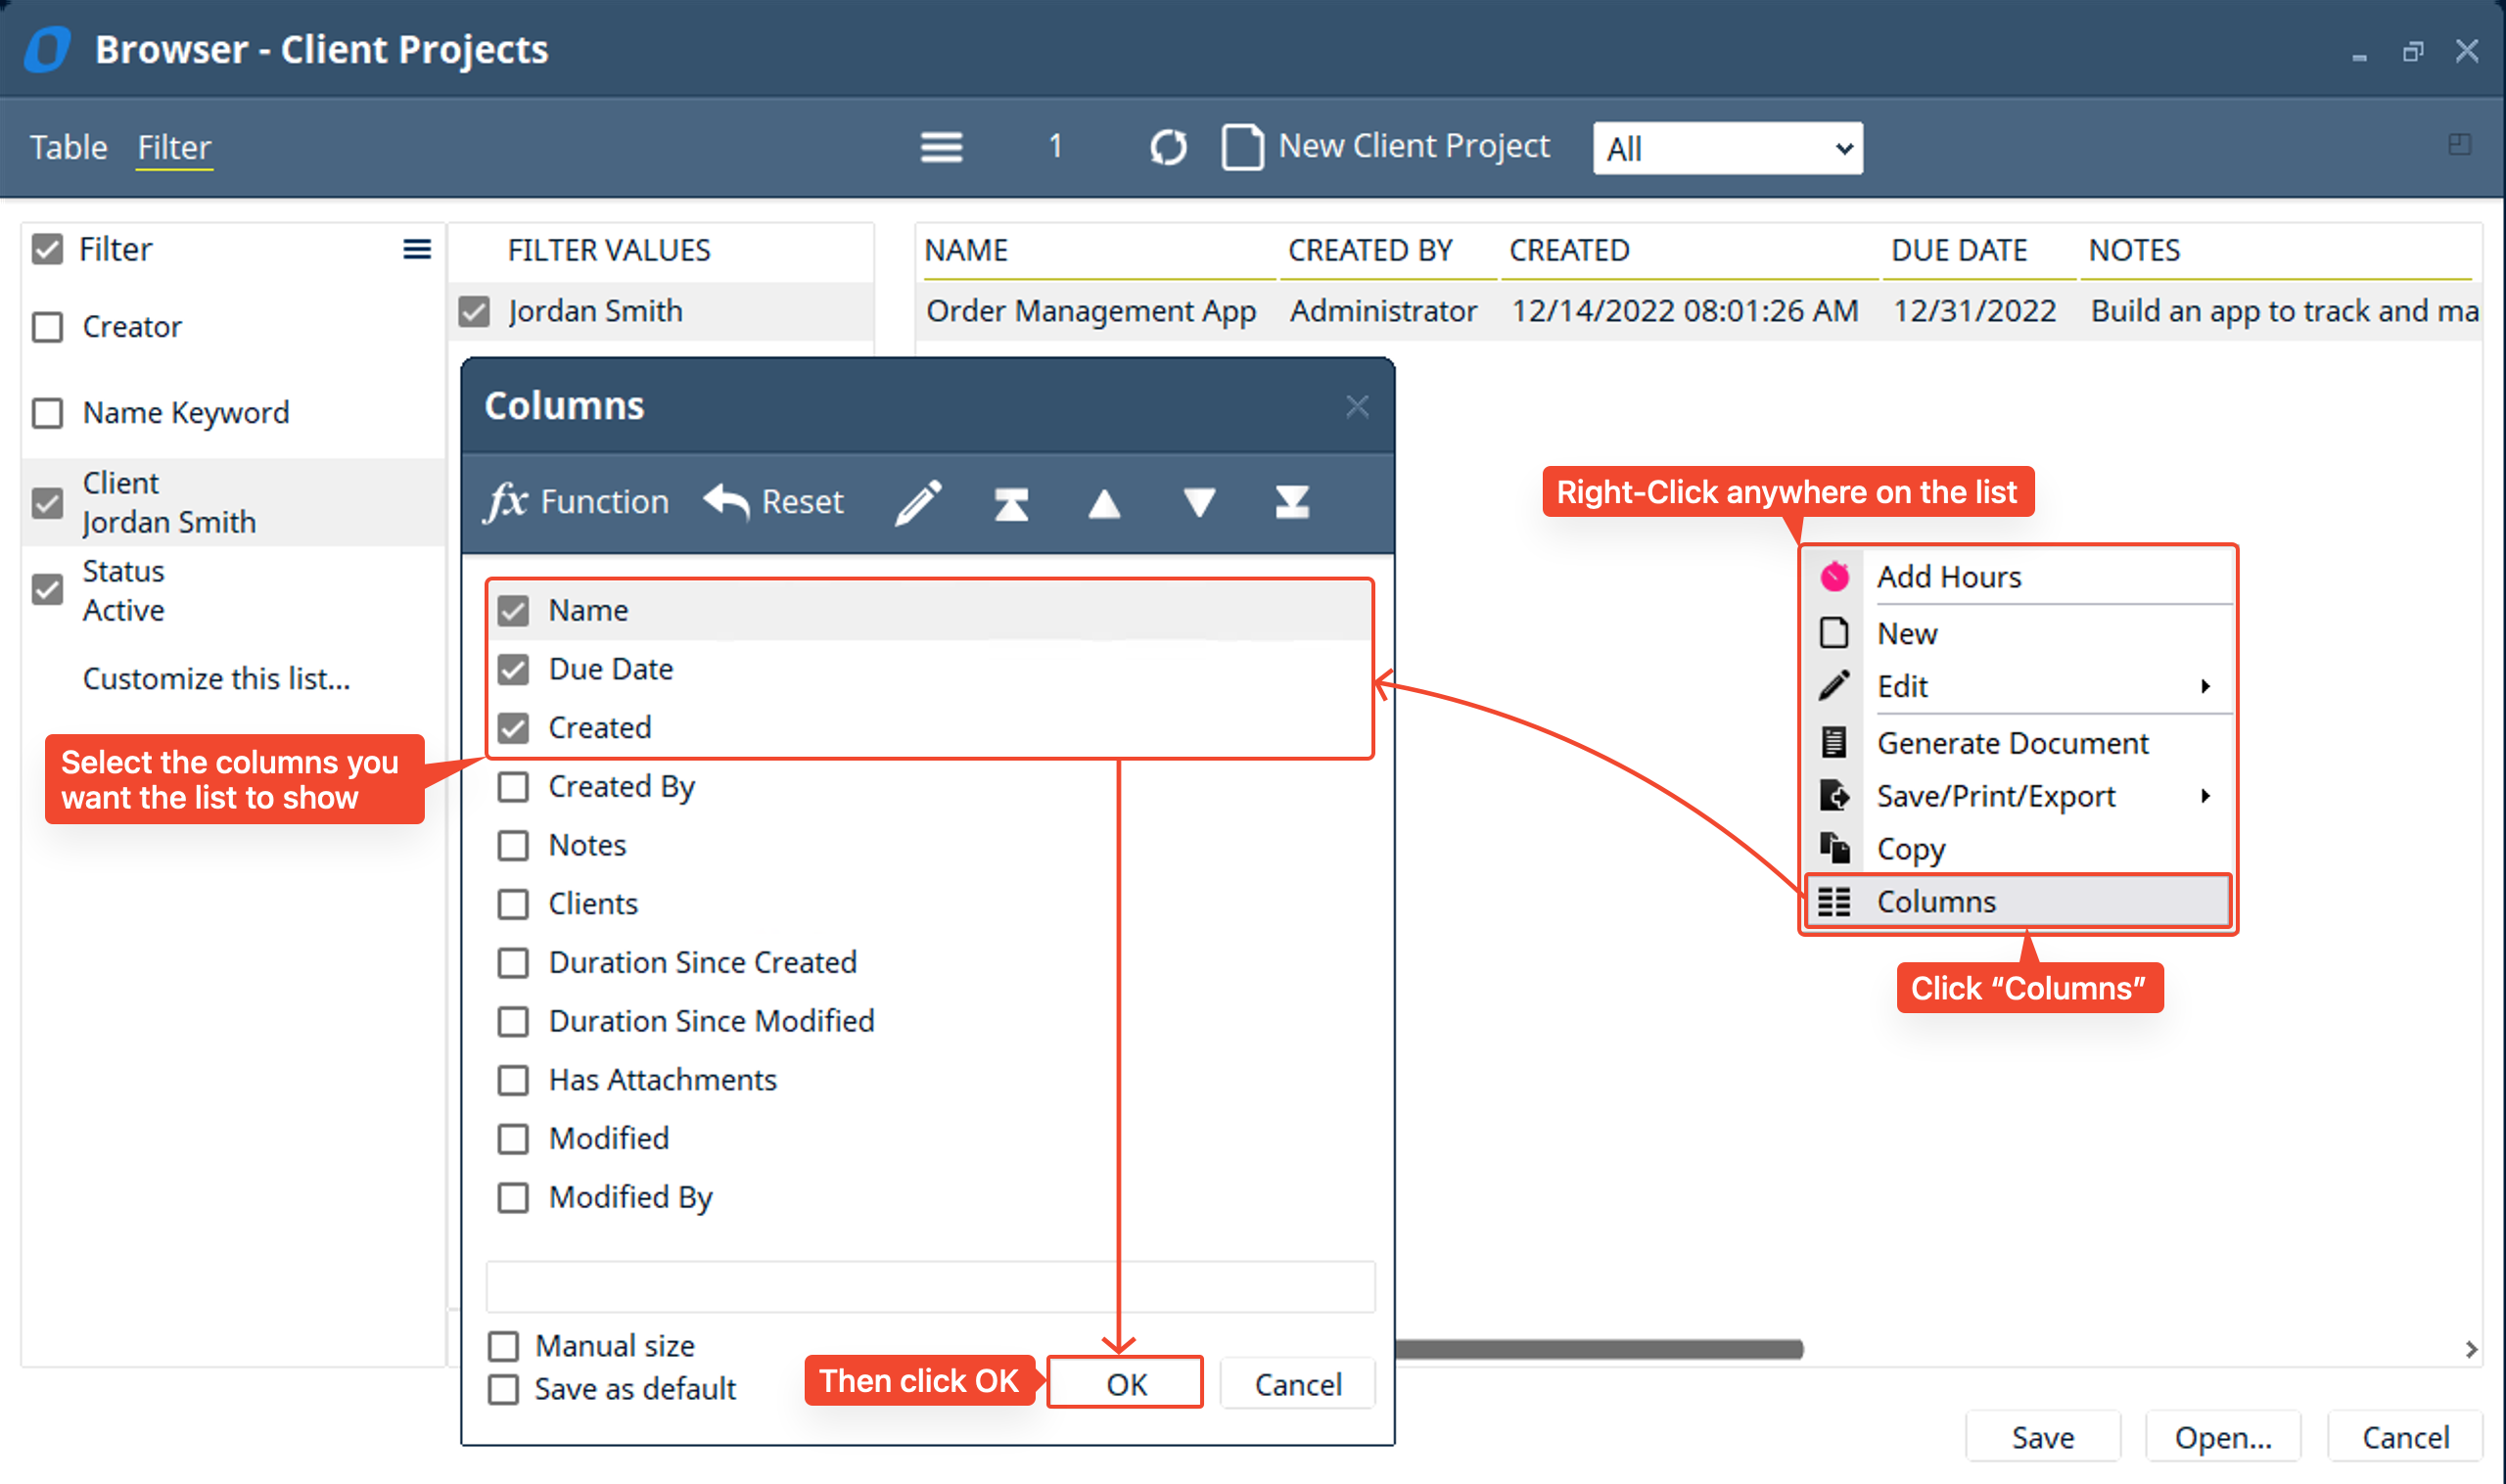
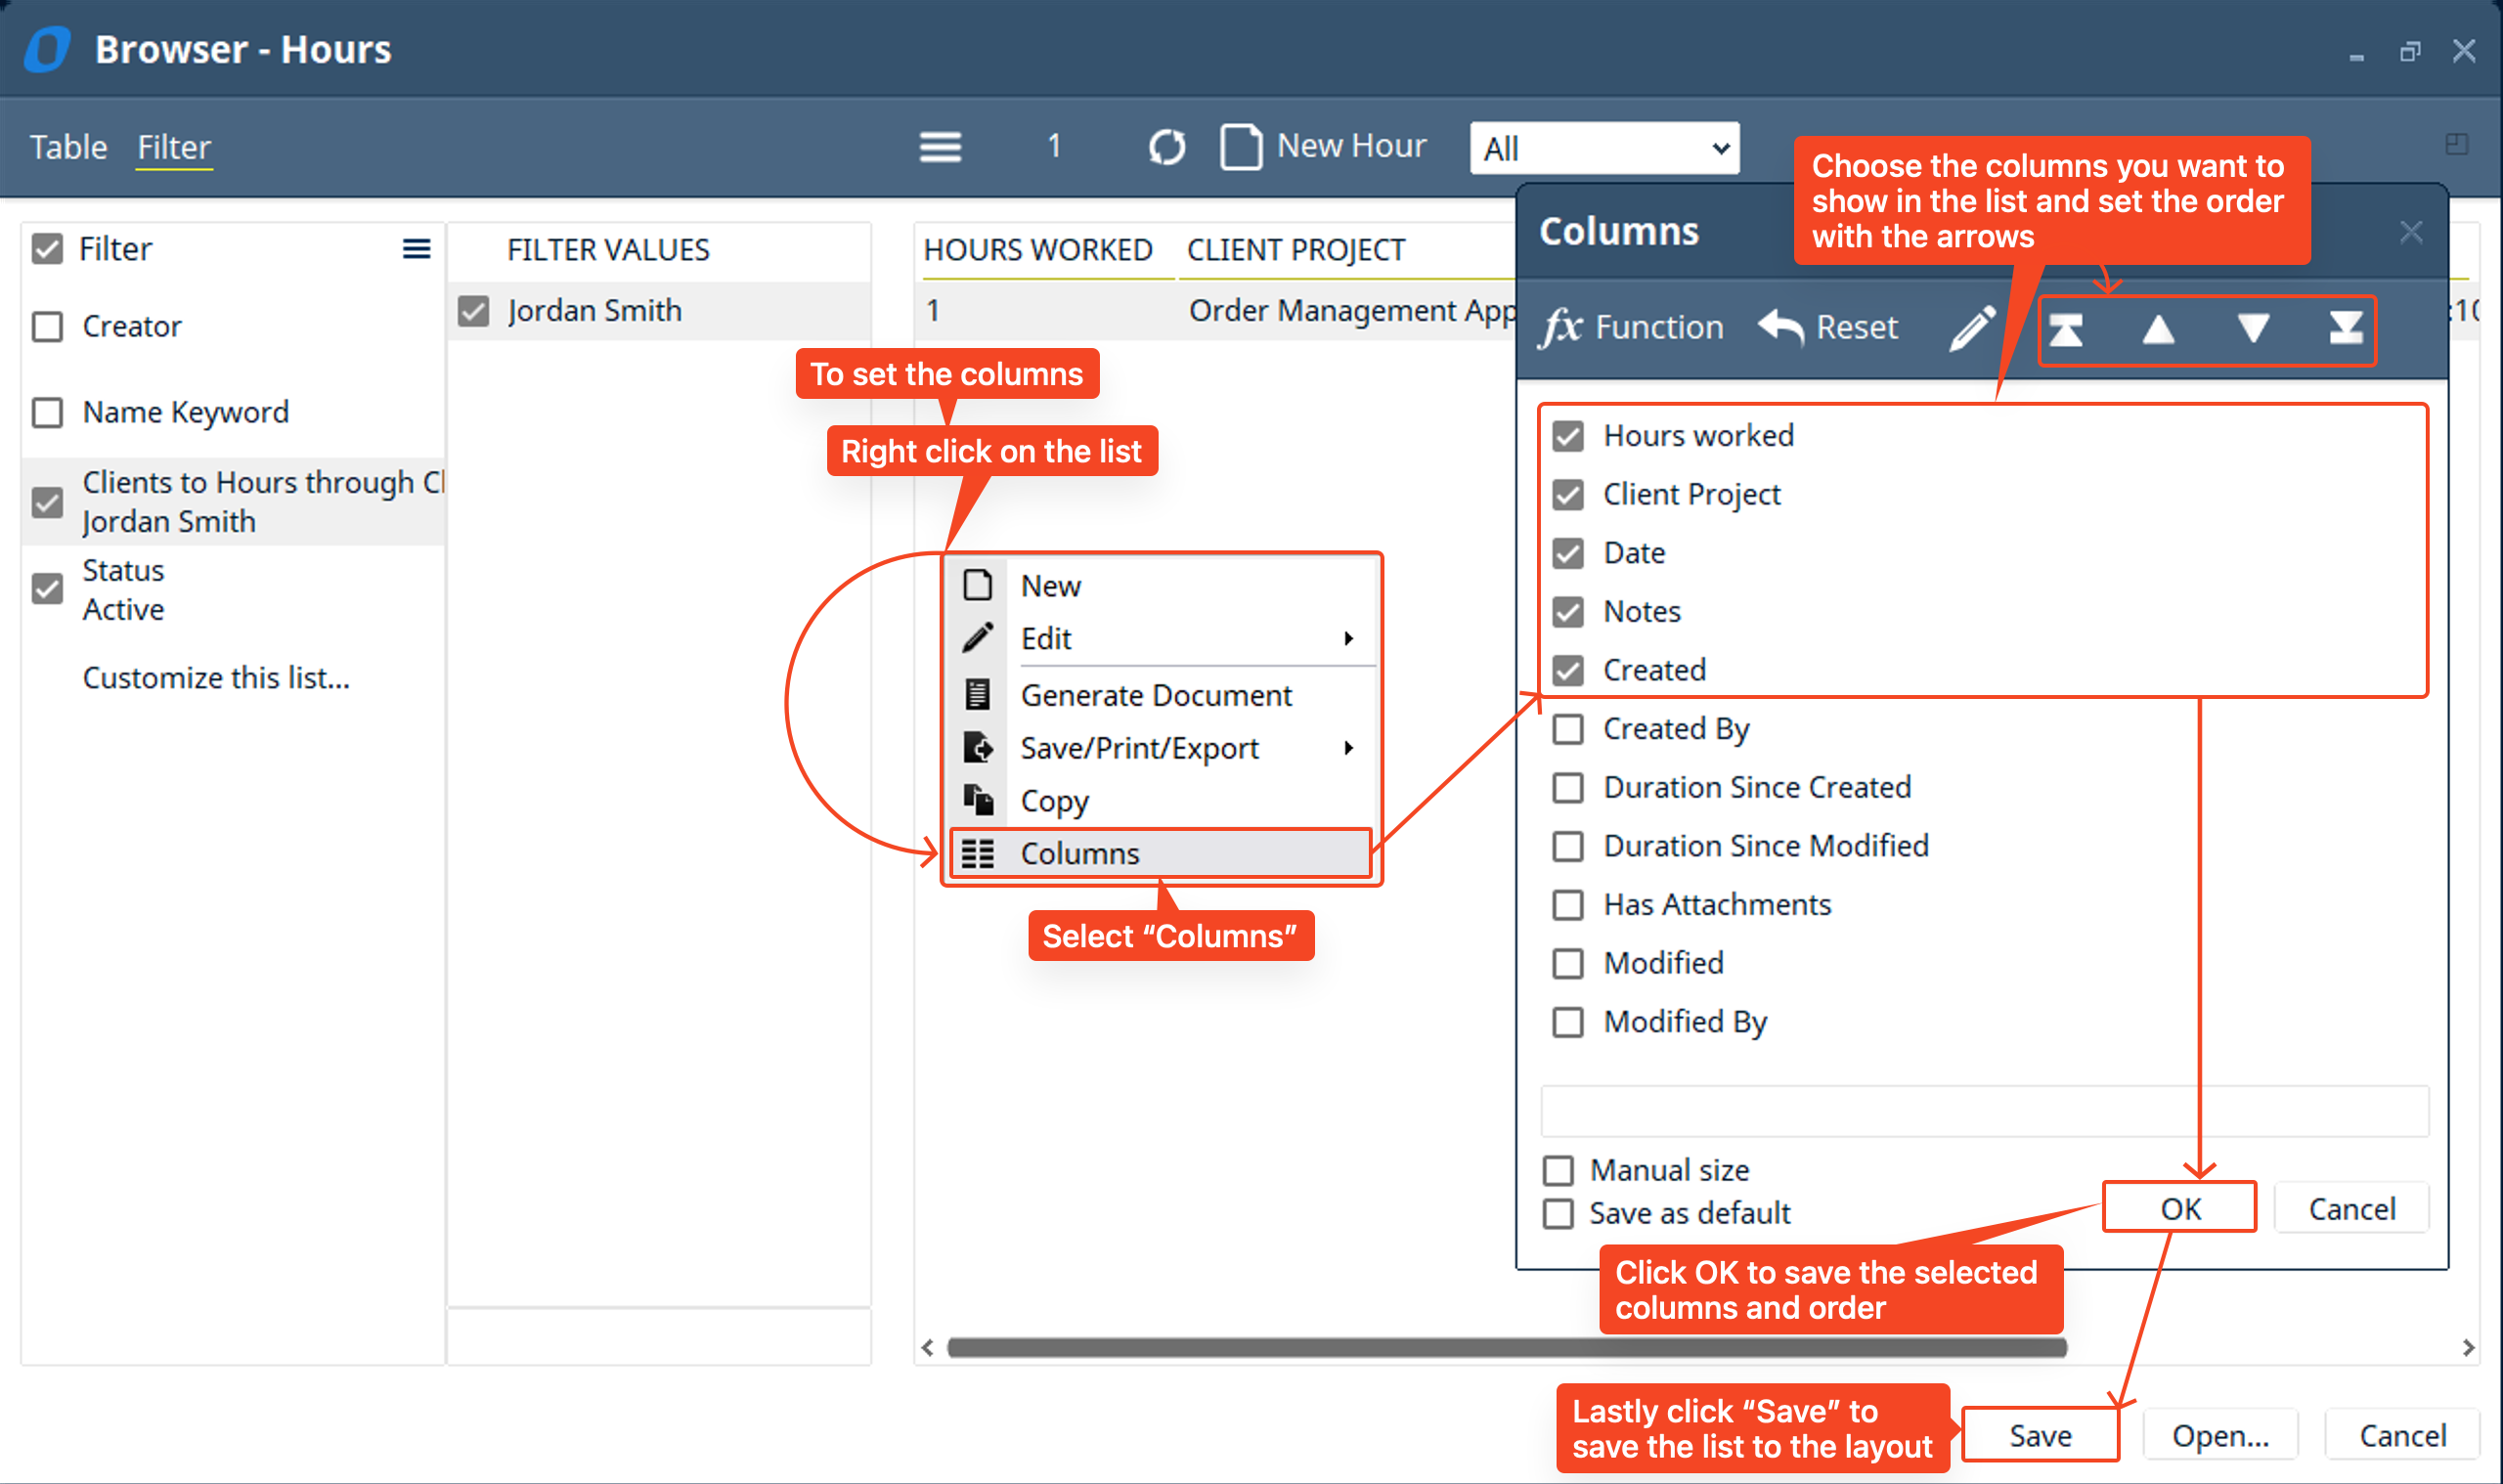
- Next we will customize the “Columns” of this list by right clicking on the list → selecting “Columns” → then choosing the columns I want to show and setting the order with the arrows in the toolbar of the “Columns” window. Once you have selected the columns you want to display click OK.
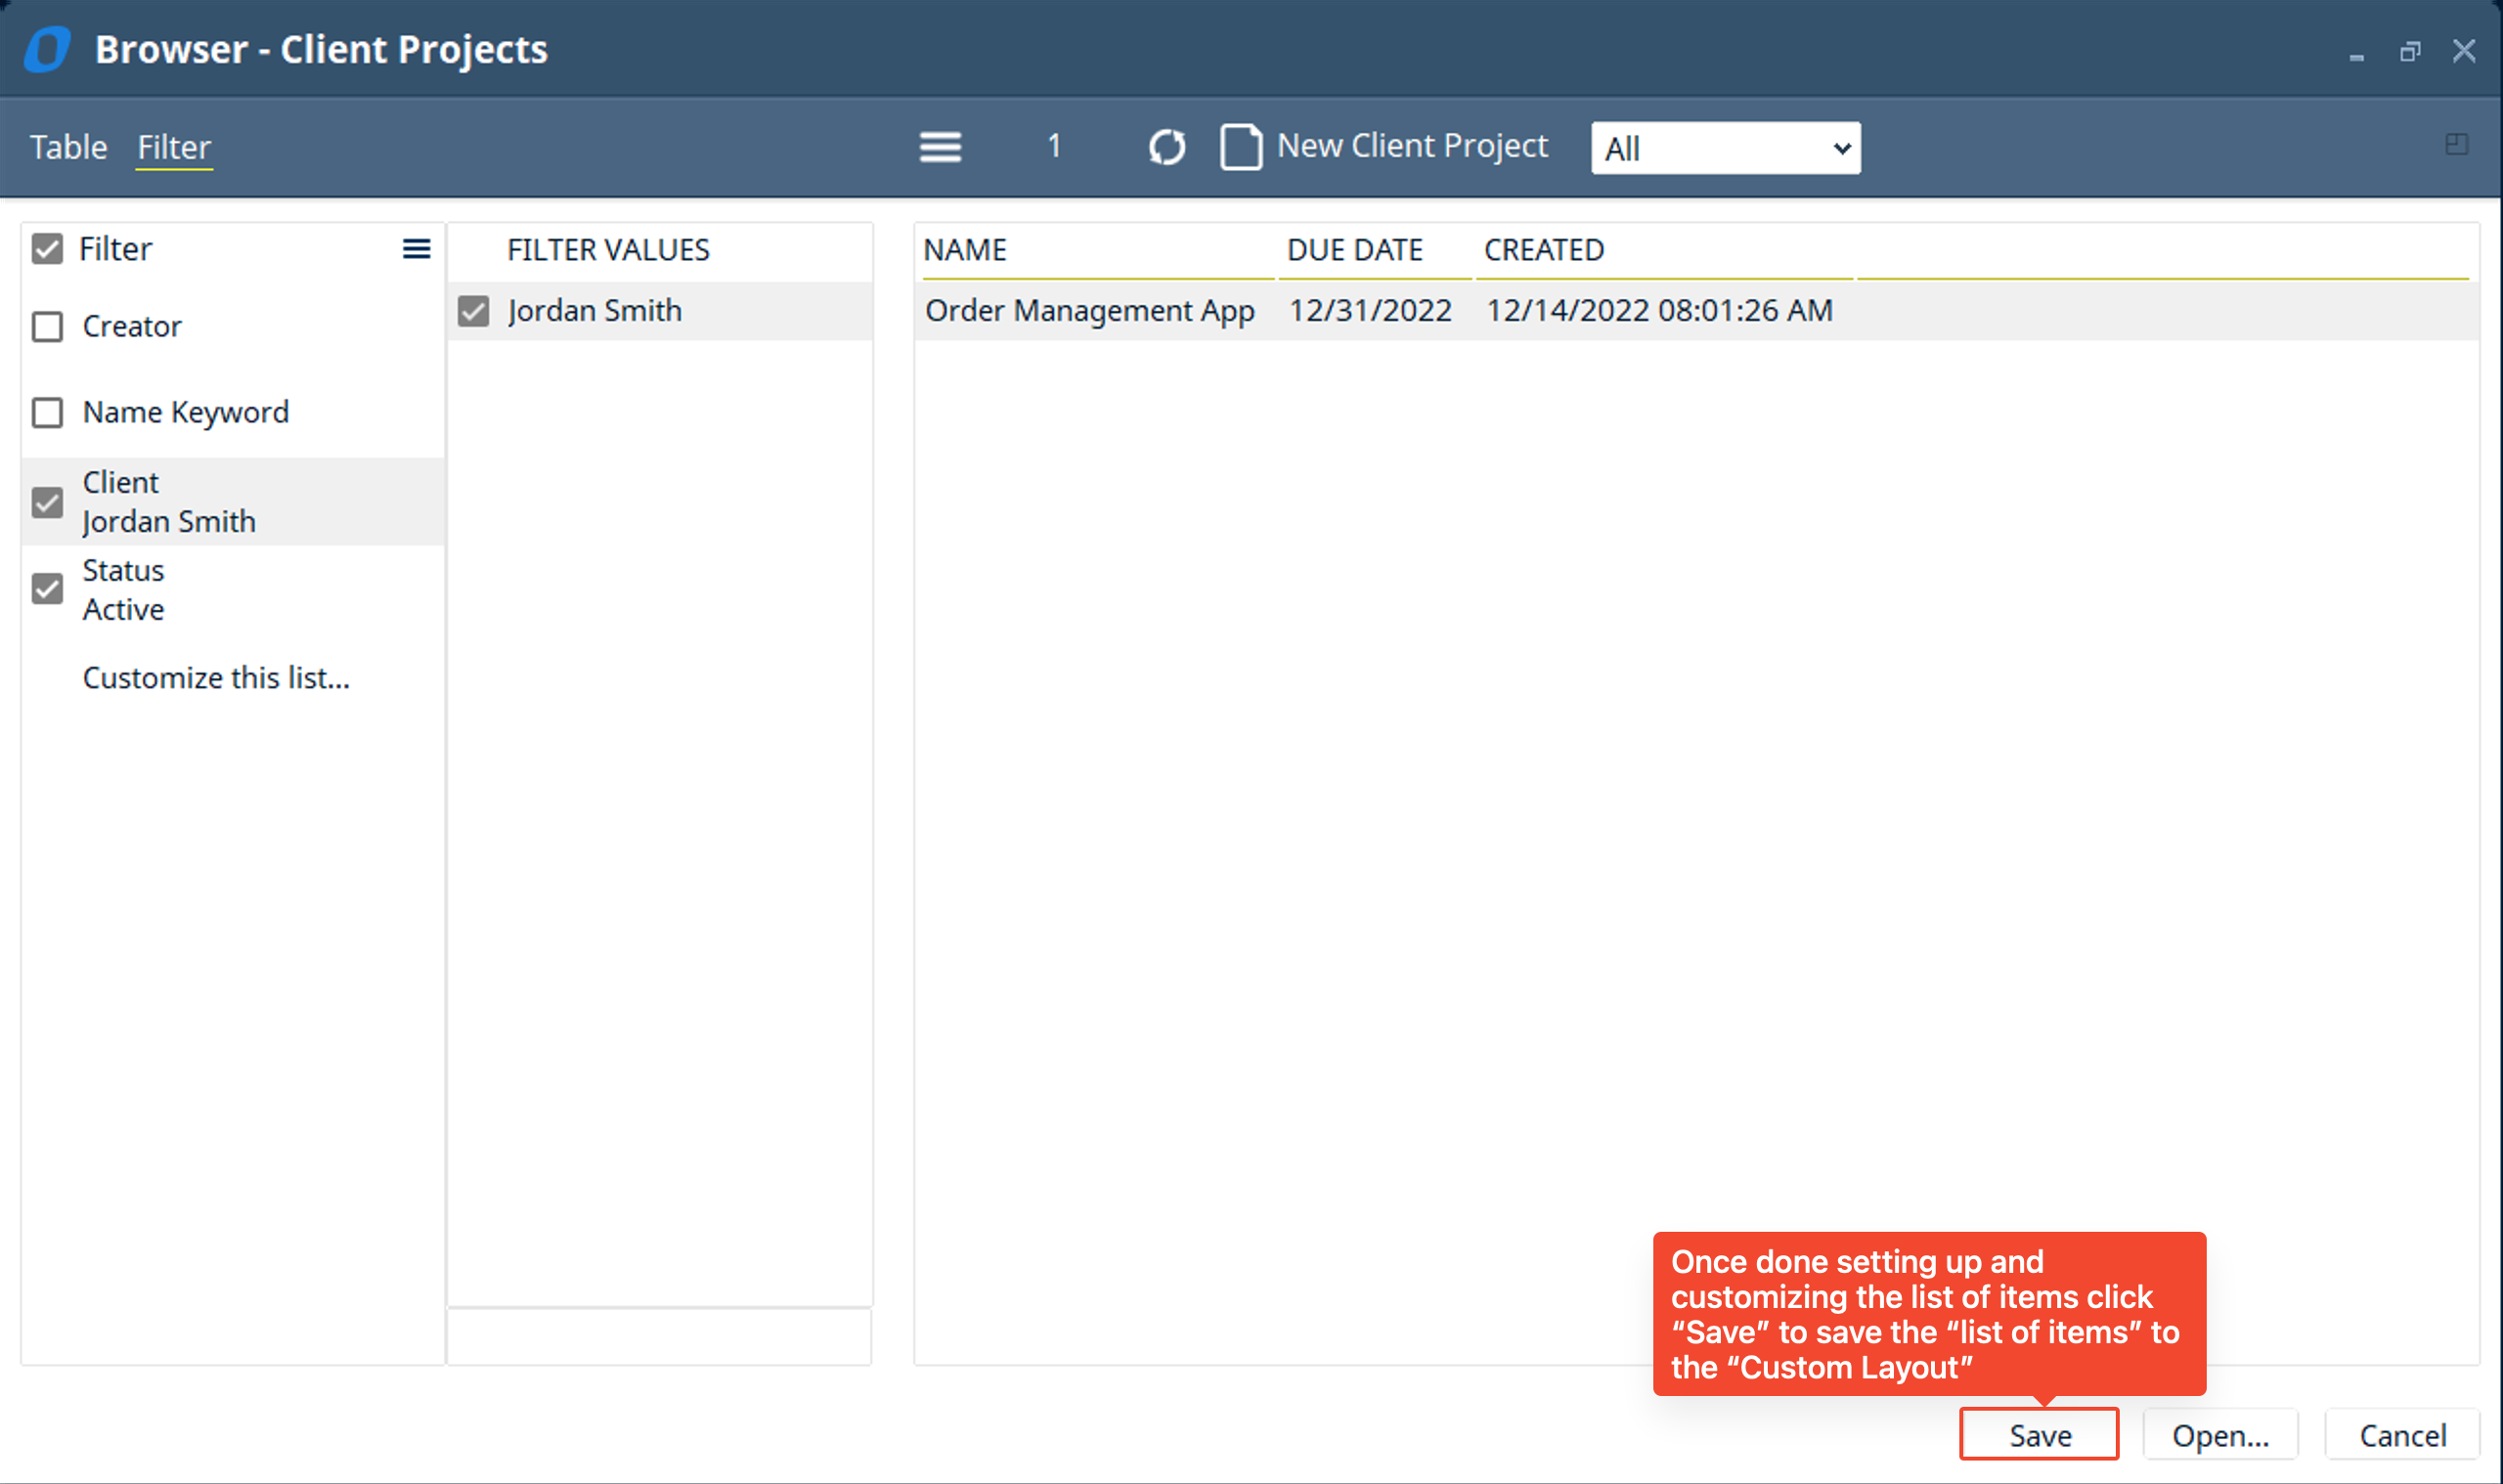
- Now that you completed setting up your list you can click “Save” to save the settings of the list and add it to the layout.
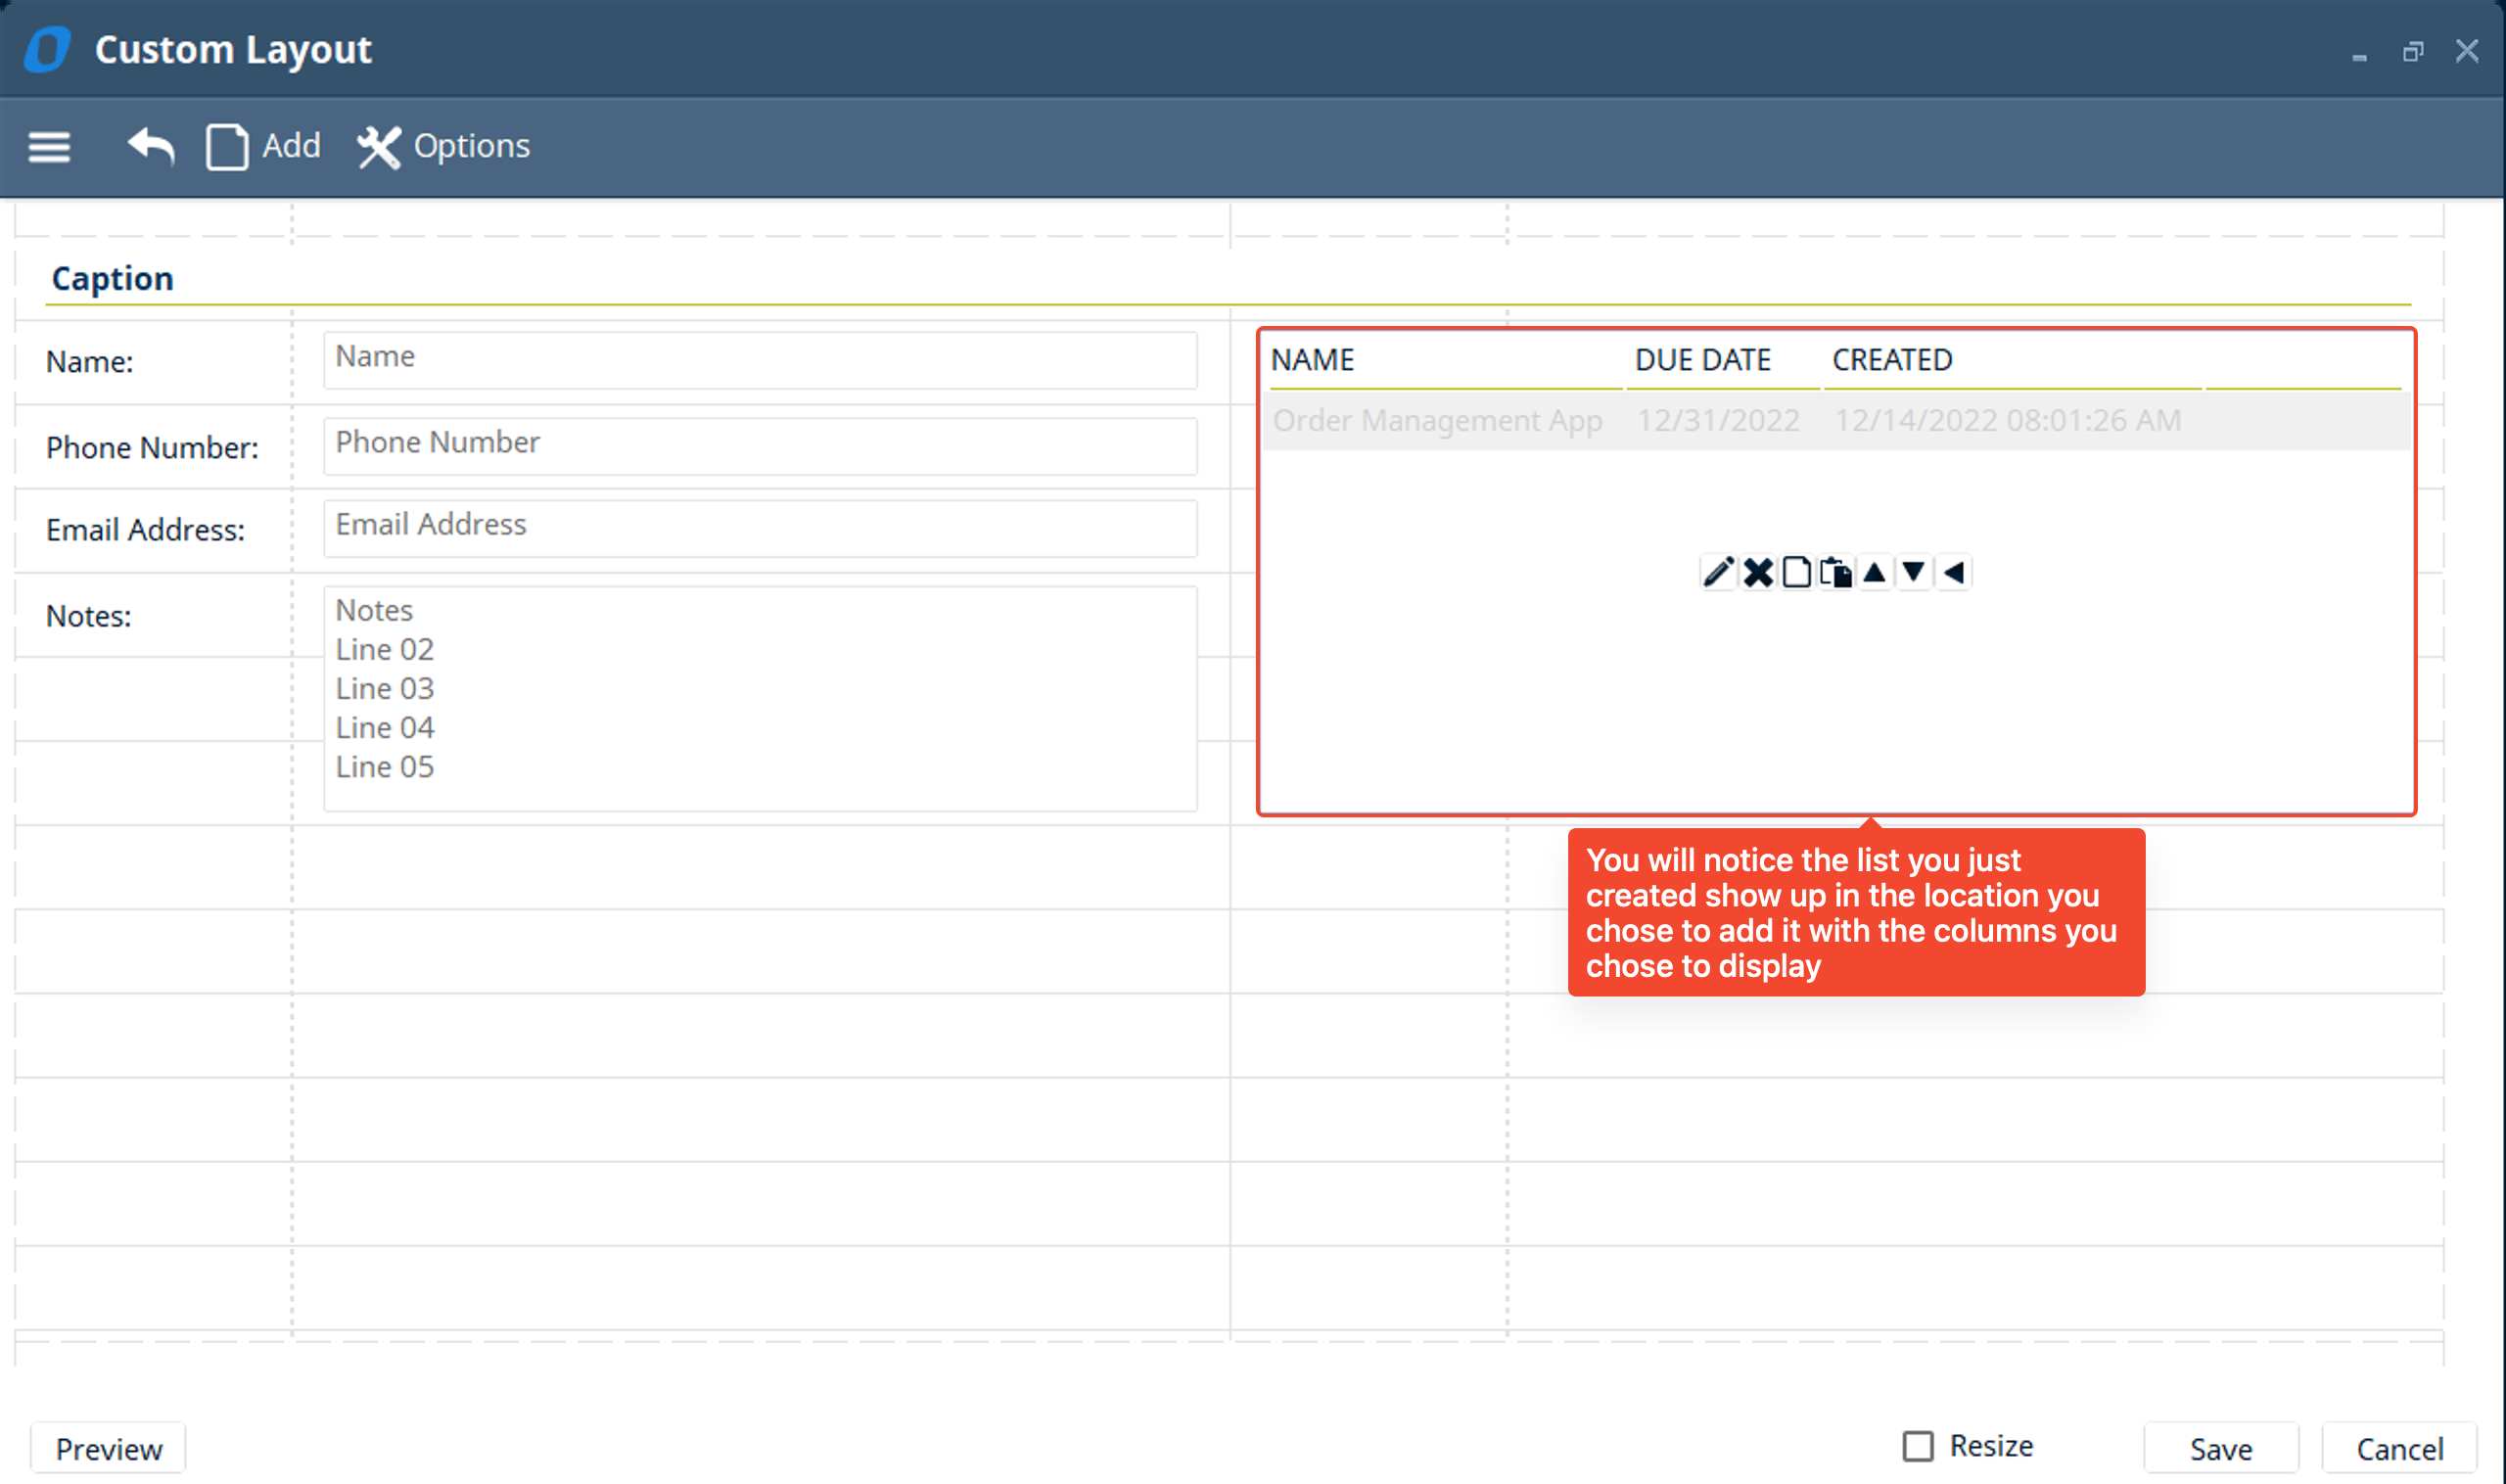
- Notice the list shows up starting in the cell you selected to add the list to.
- The next list of items we want to display is a list of “Hours worked” for a specific “Client”. So when clicking on a specific “Client” the freelancer can see all the “Hours worked” for that specific “Client”. Currently we only have custom links from the “Hours” table to the “Client Project” table (Hours → Client Project) AND another separate custom link from “Client Project” to “Client” (Client Project → Client).
- At the moment, because the links are separate, we cannot filter the ”Hours” table by “Clients”. To do this we need to create another custom link that will incorporate the 2 individual linked fields together by connecting the “Hours” → “Client Project” link and “Client Project” → “Client” link. Digital-Clay has a useful tool, called the “Custom Link Tool”, that will help us easily make this link without having to create a separate linked field from the “Hours” table to the “Client” table
- The reason we don’t want to directly link the “Hours” table to the “Client” table through a linked field is because we want to get retrieve the client information FROM the “Client Project” table. If we added a linked field we could get a similar functionality but we will have redundant data in the system that can be retrieved through powerful no-code tools that clay has to offer.
- To start we will “Save” the custom layout so we don’t lose our progress
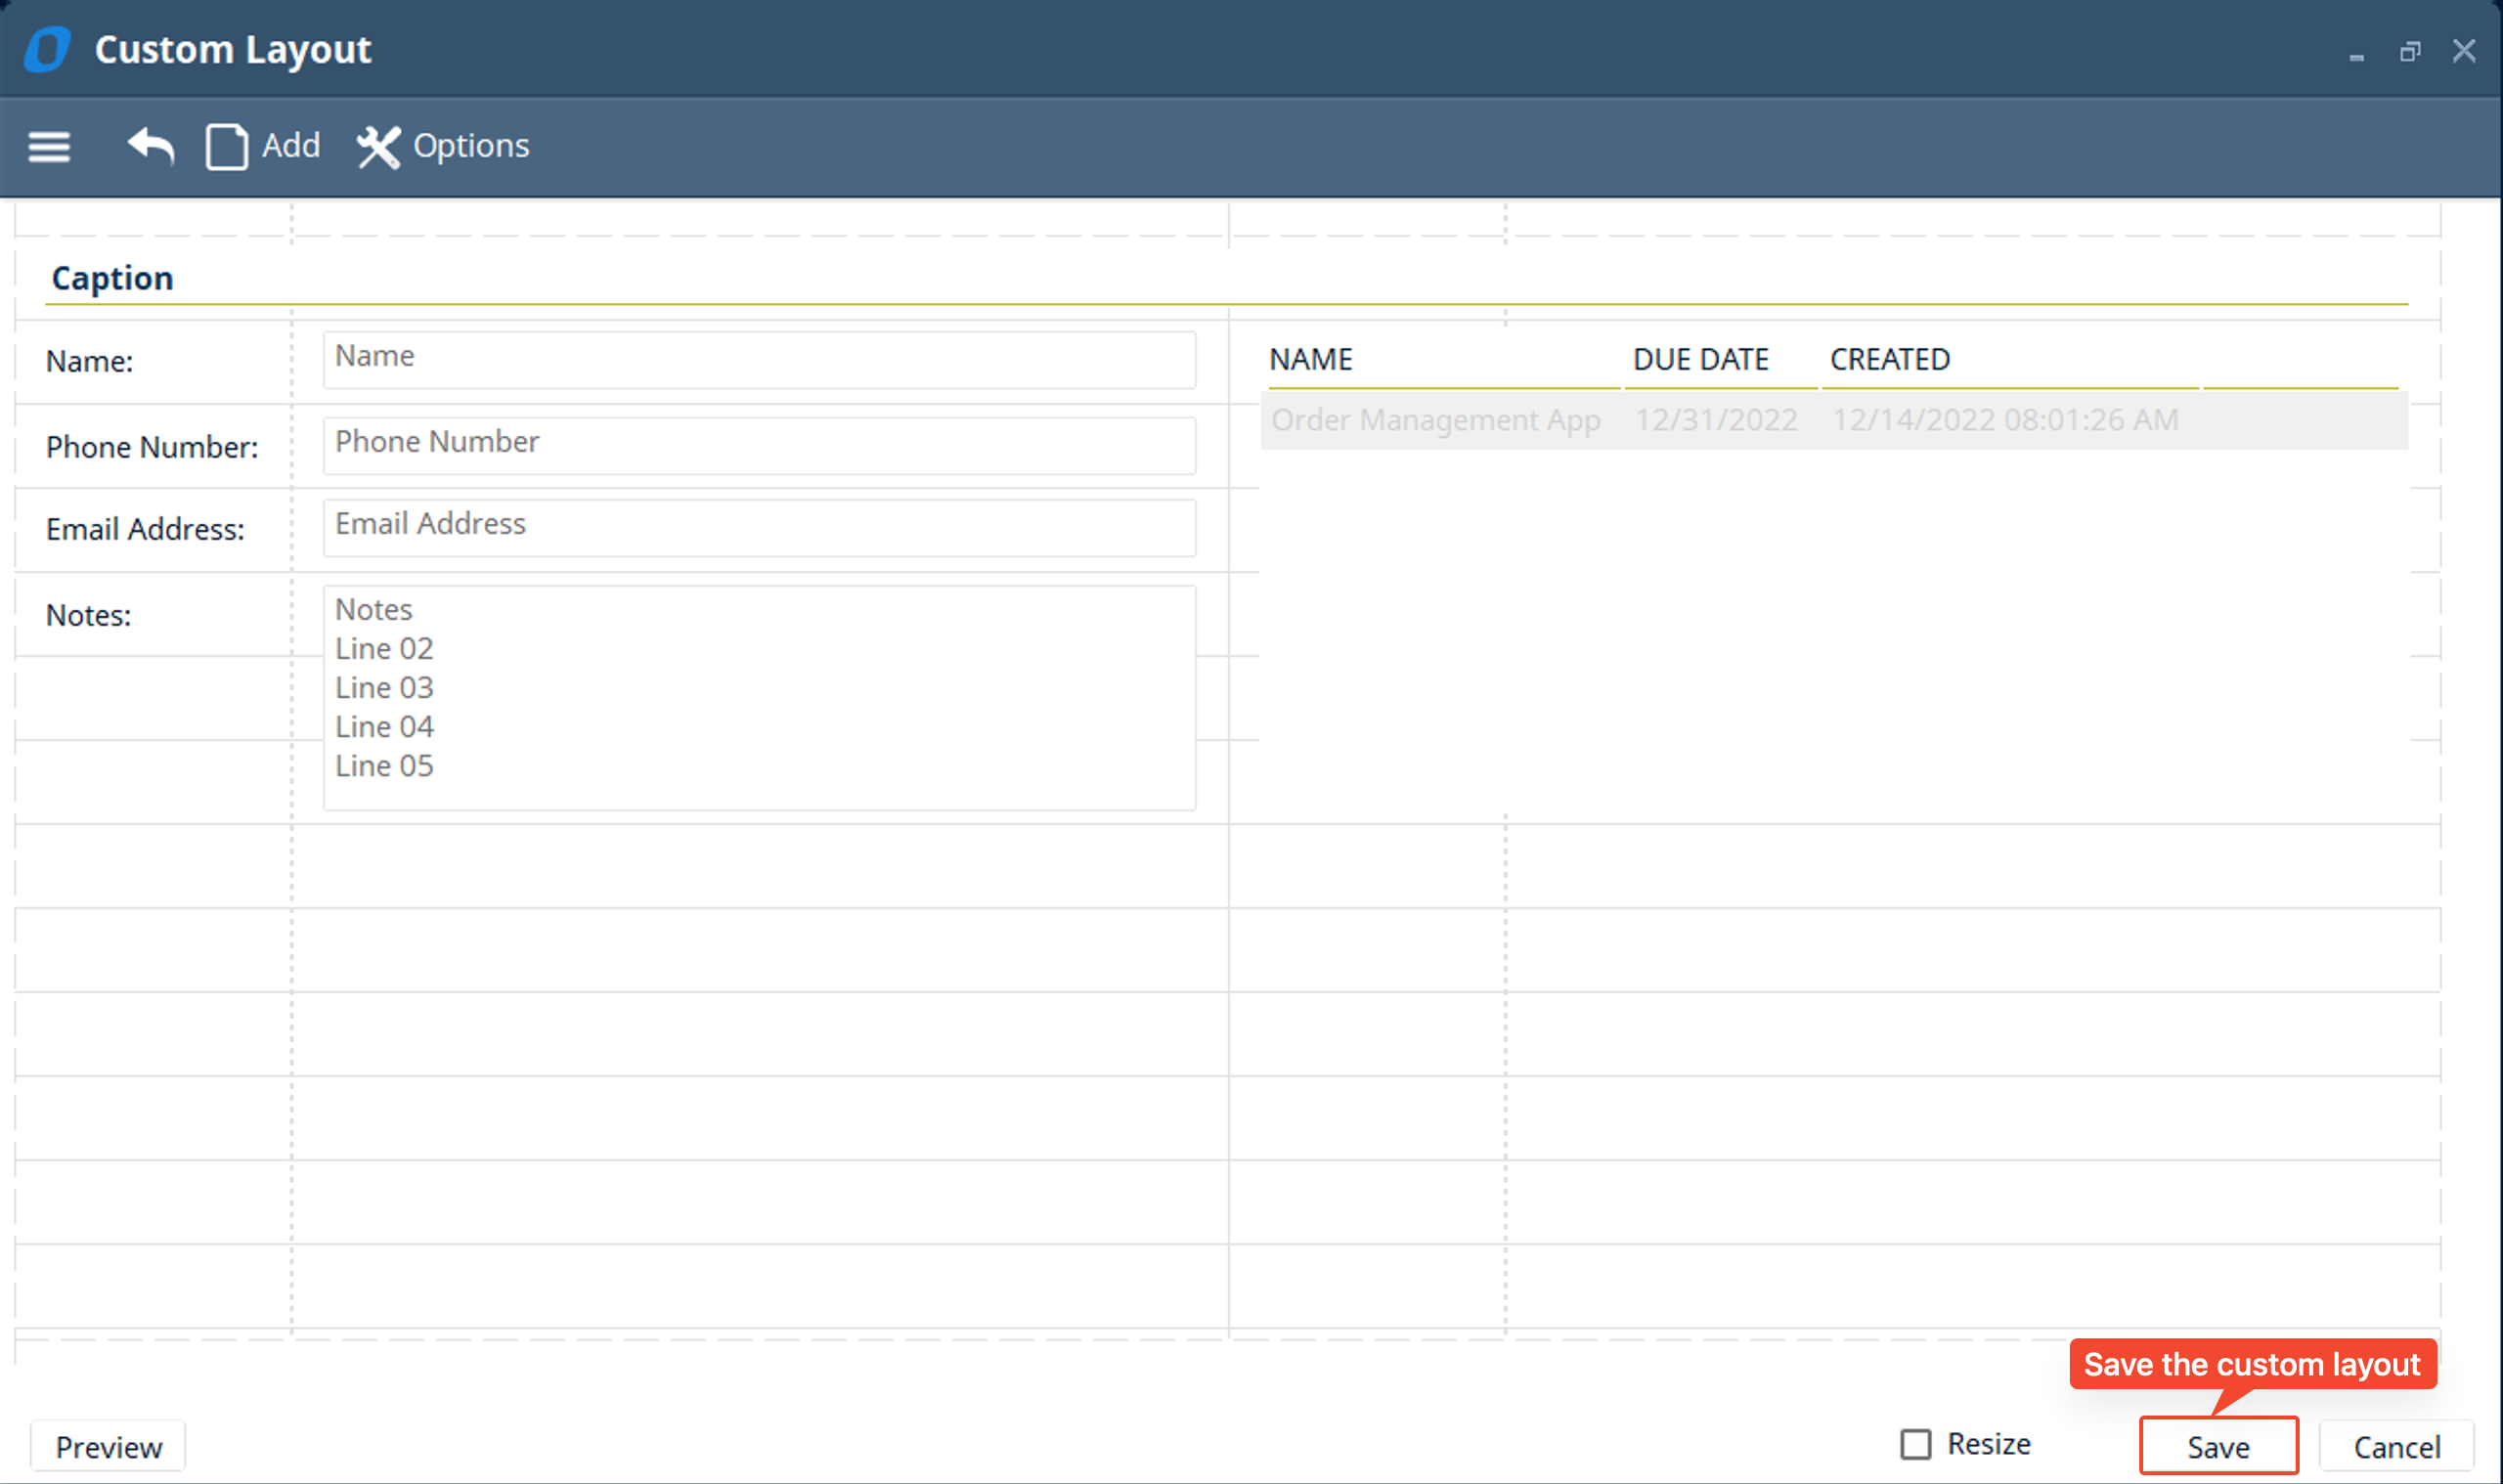
- Then we will click OK to save the changes to the custom layouts to the tables
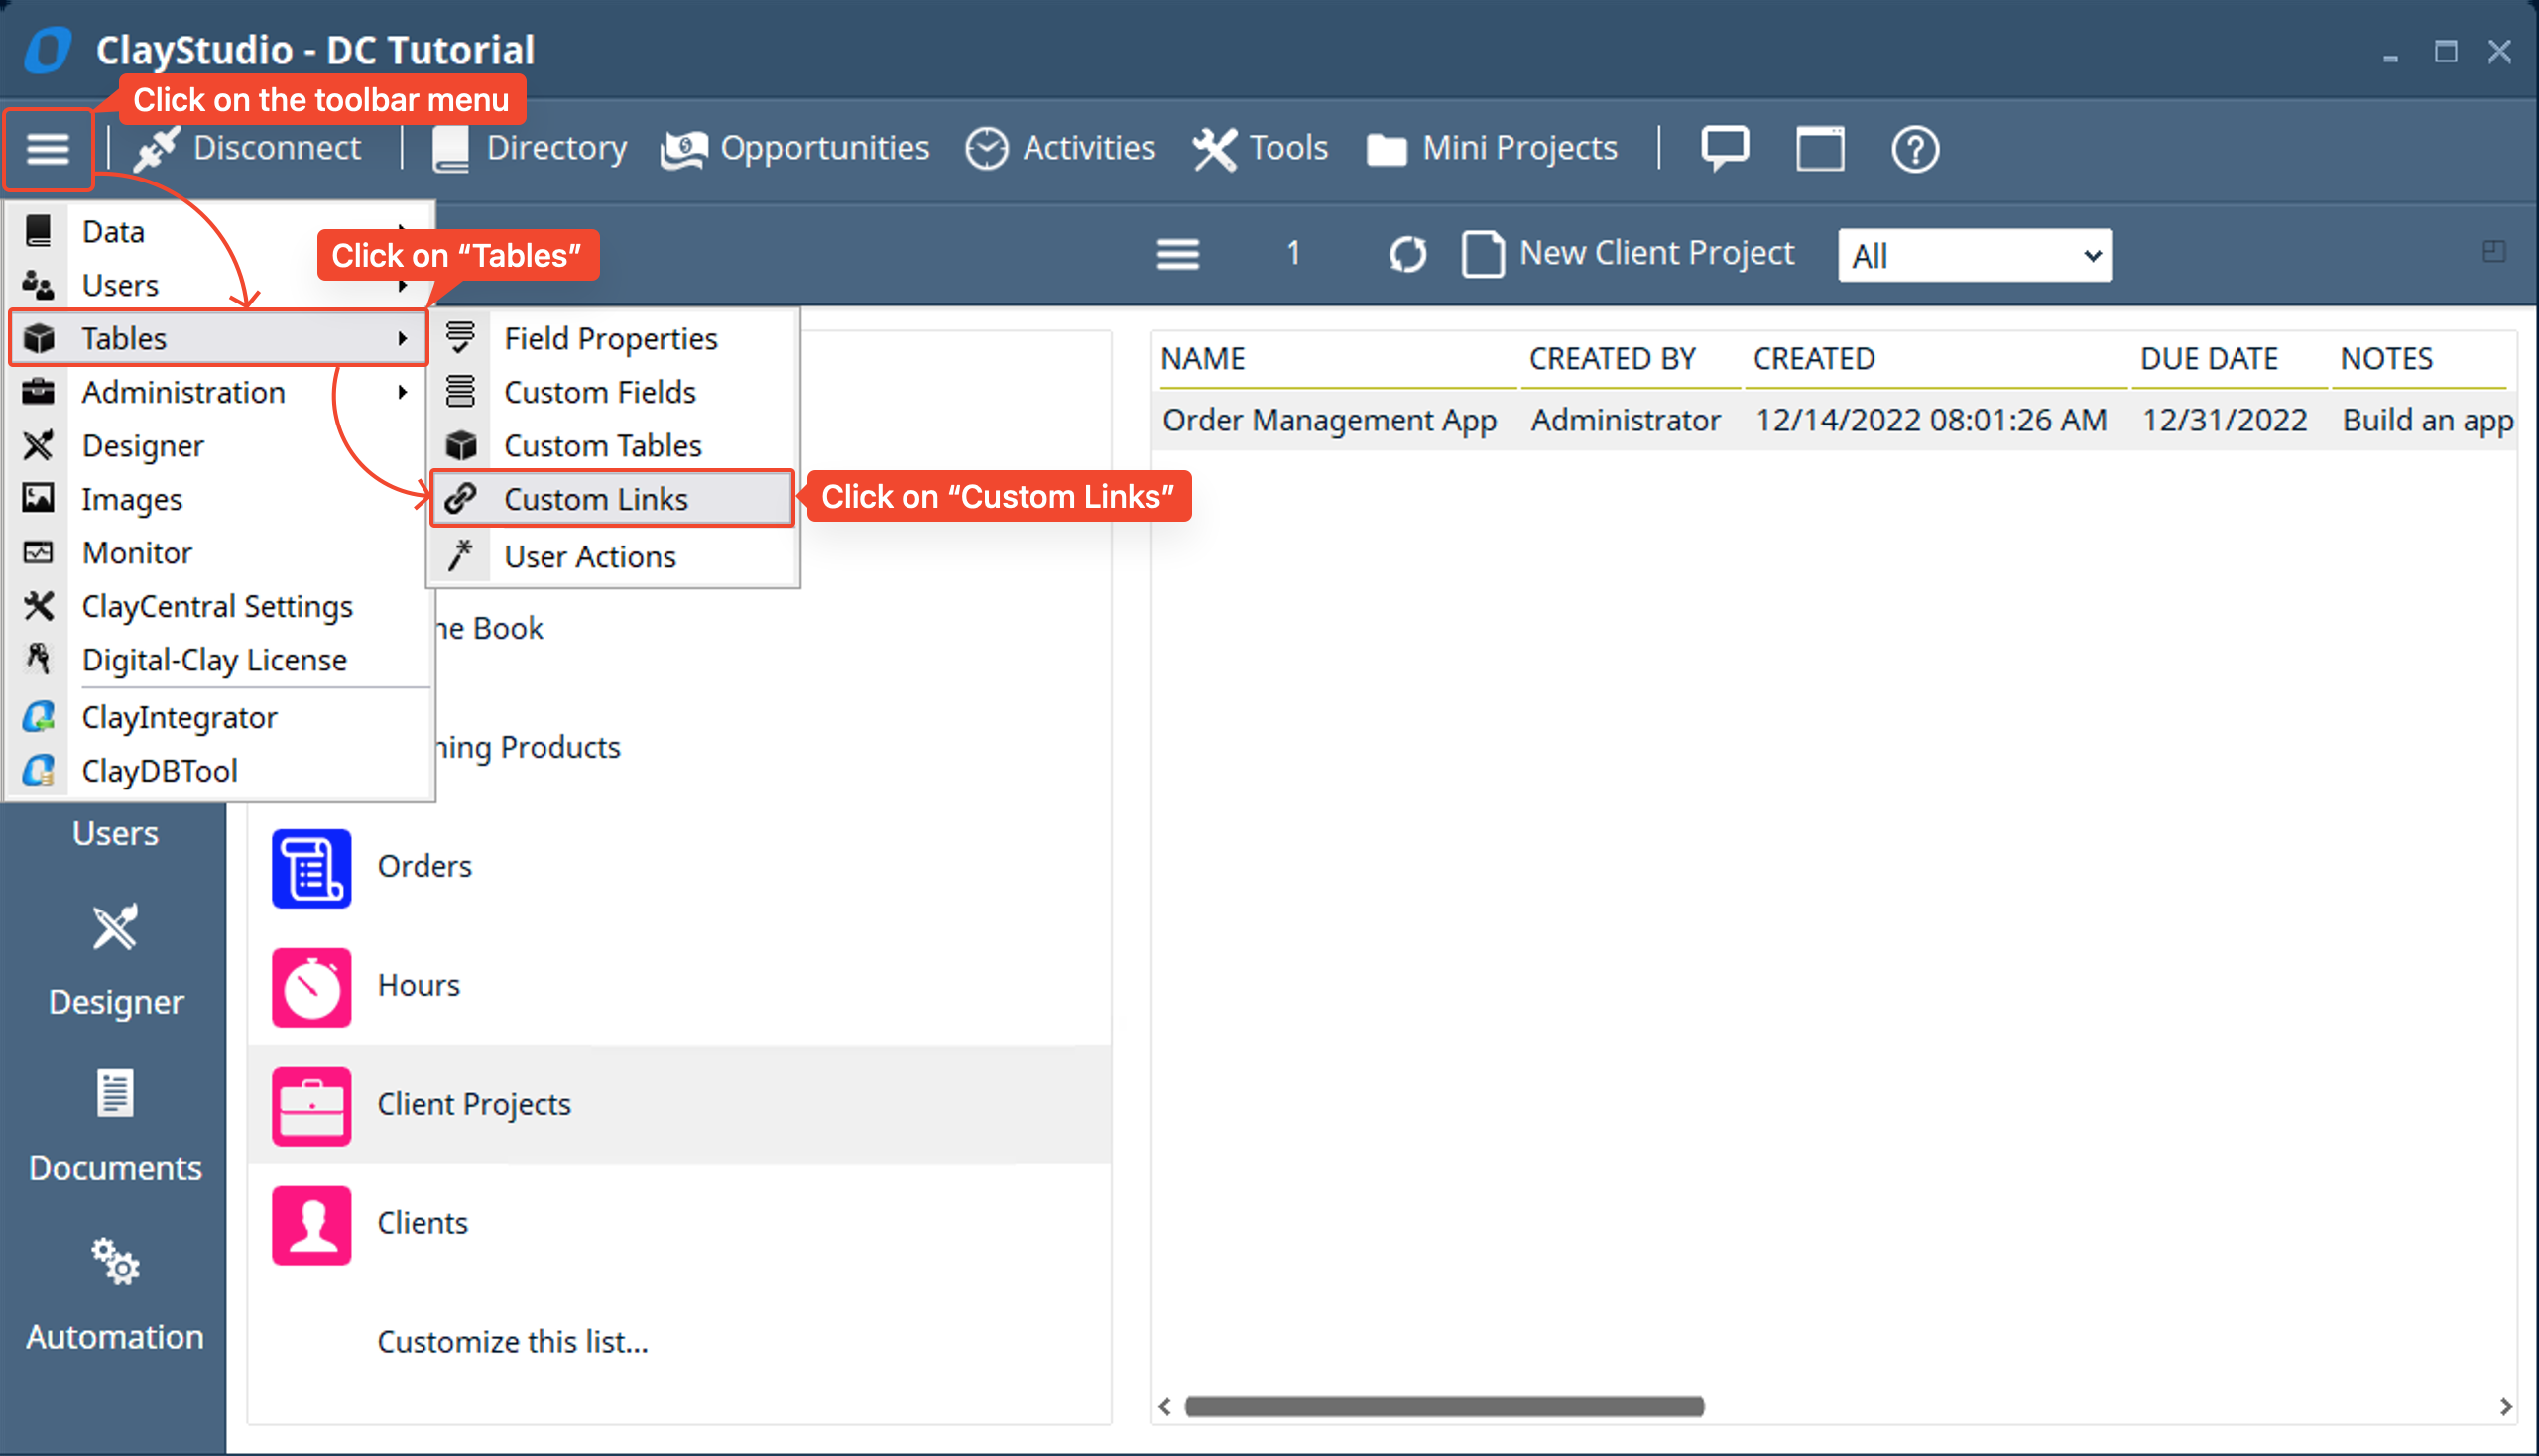
- To access the “Custom Links” tool we will click on the toolbar menu → click on “Tables” → then click on “Custom Links”
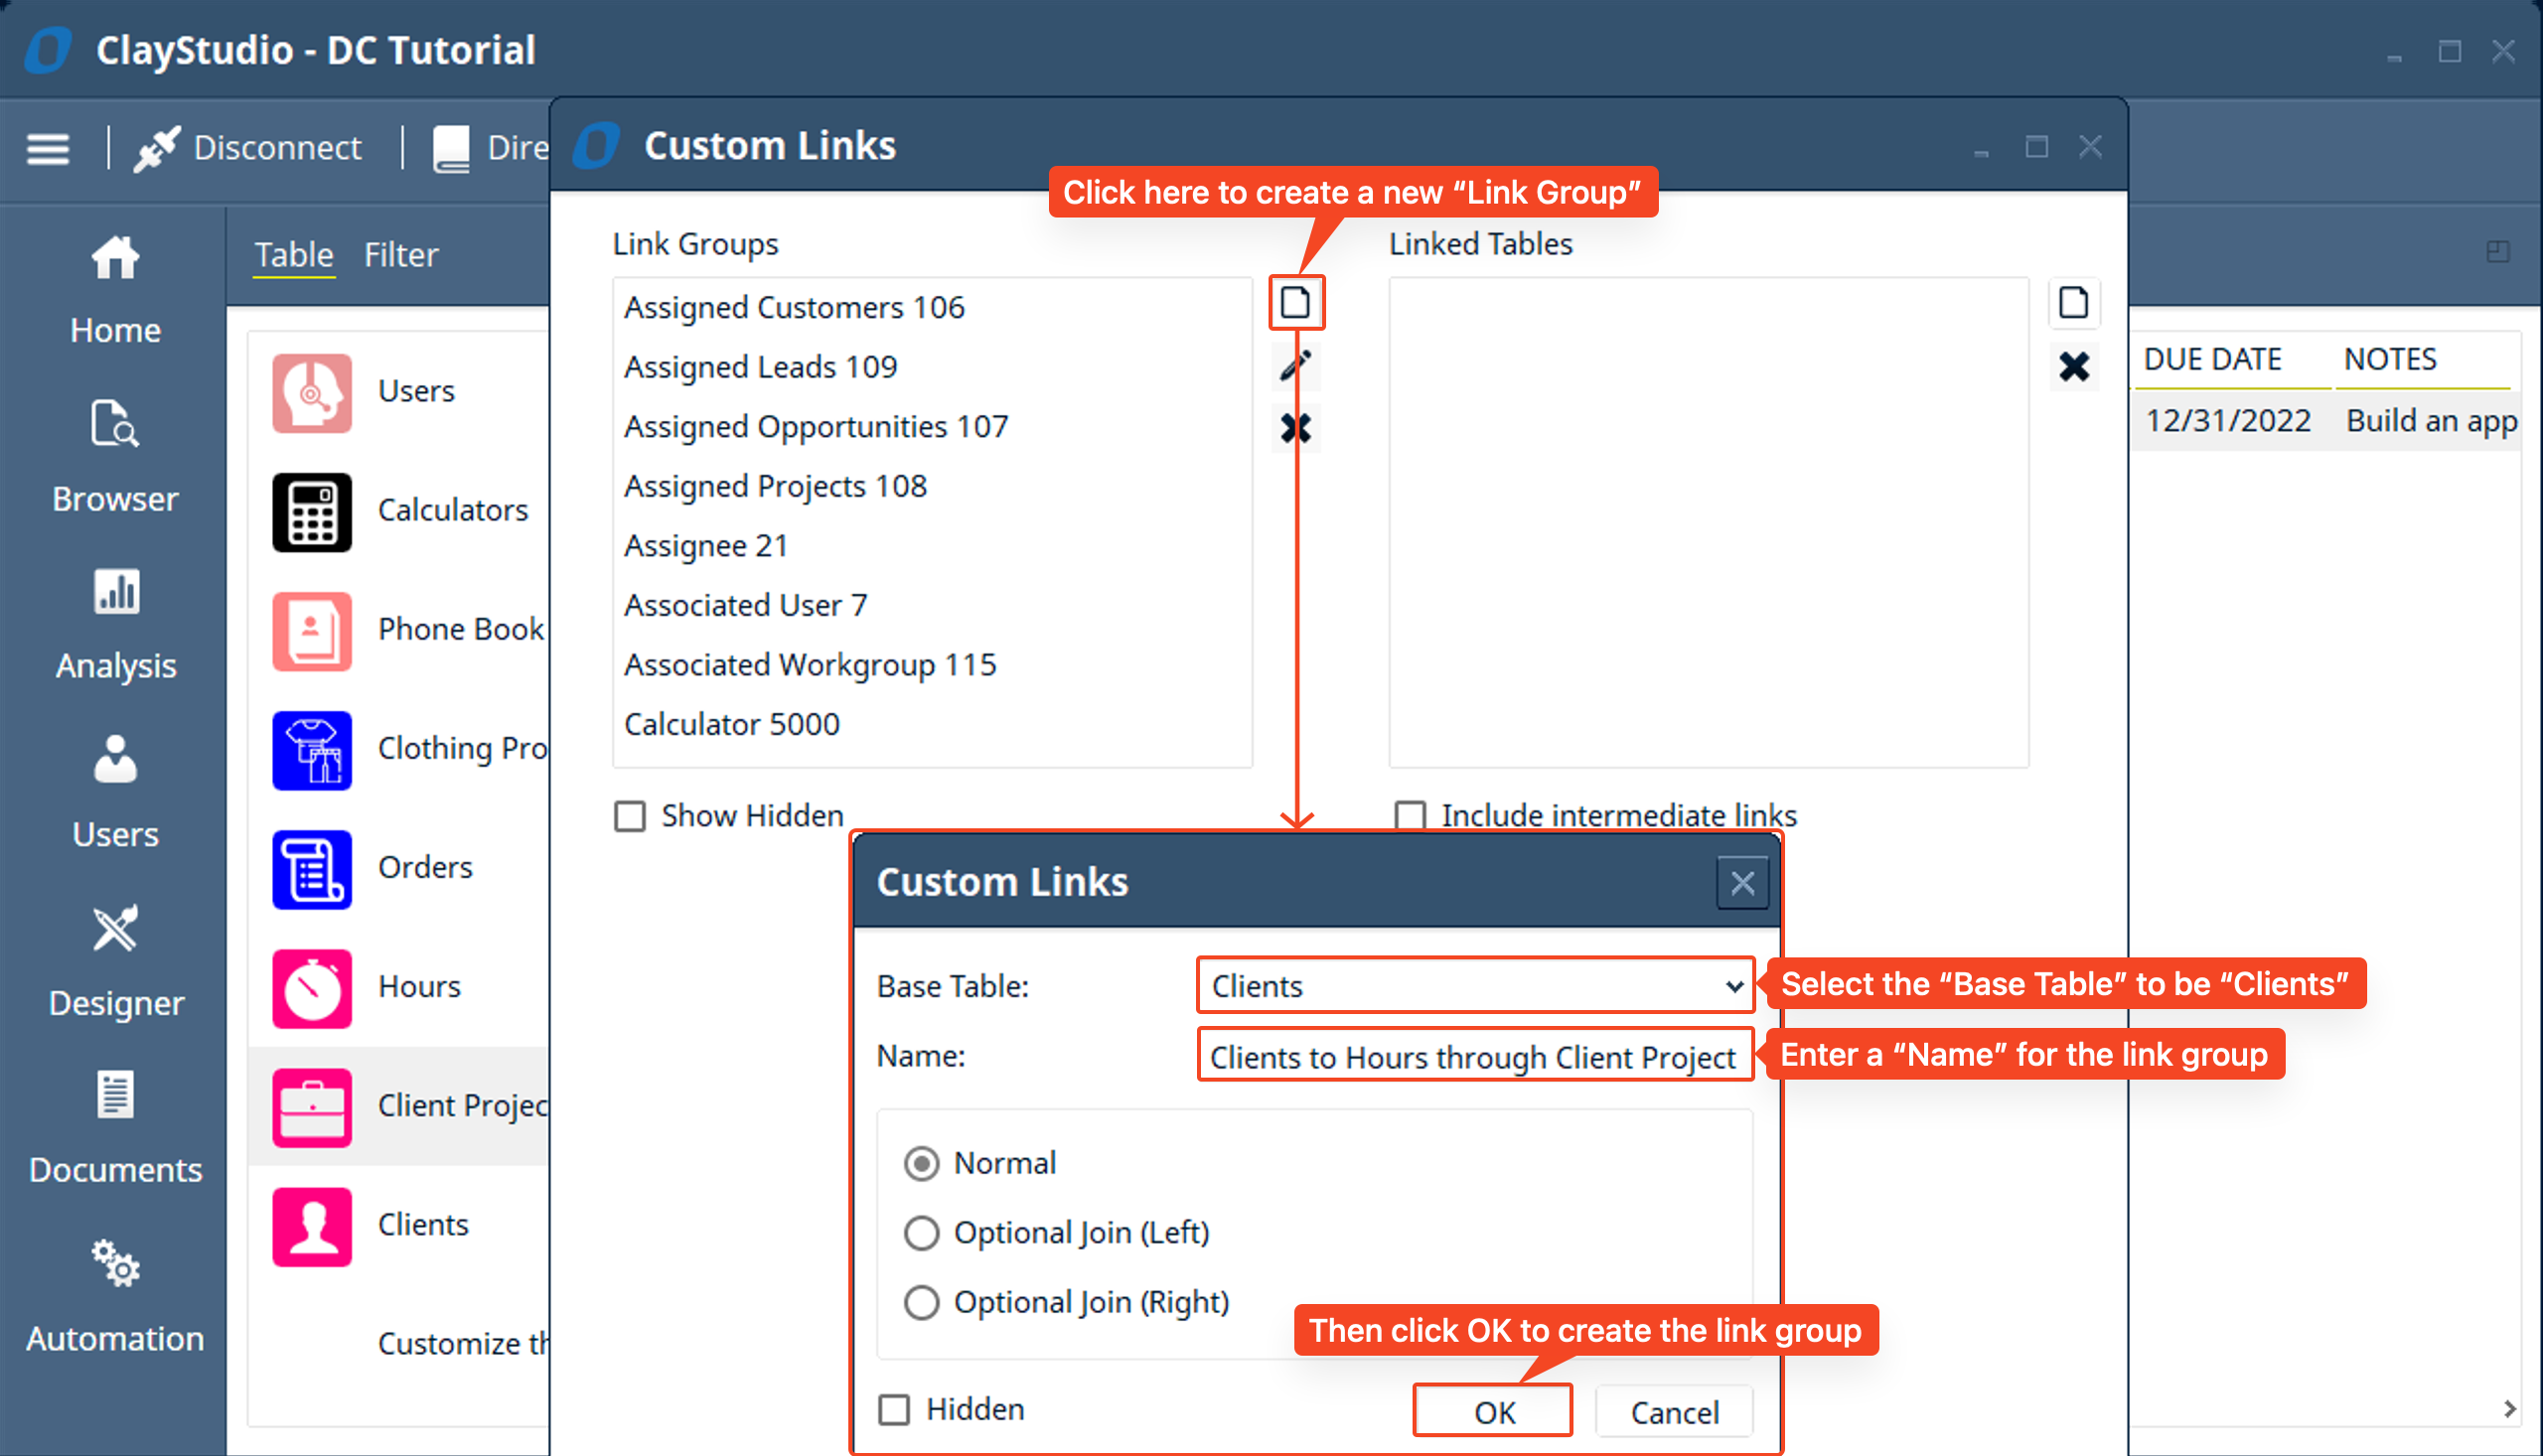
- A “Custom Links” window will pop up where you can see all the custom links in your database solution. This includes all the links that are created when you make add a “Linked Field” to a table and link it to another table. We are going to use this tool to create a new “Link Group” that will combine the two existing links we have: one from “Hours” → “Client Project” and one from “Client Project” → “Client”. The custom link we will create will start from (meaning the base table of the link group) the “Clients” table so that we can further link it to the “Client Project” and “Hours” respectively. To create a new link group simply click the “New” button then select the “Base Table” to be “Clients” and name the link group to be “Clients to Hours through Client Project” (this can be any name, I chose this for simplicity and clarity)
- The reason we choose the “Clients” table to be the base table is because we want to have the list of “Hours” shown in the “Client” layout
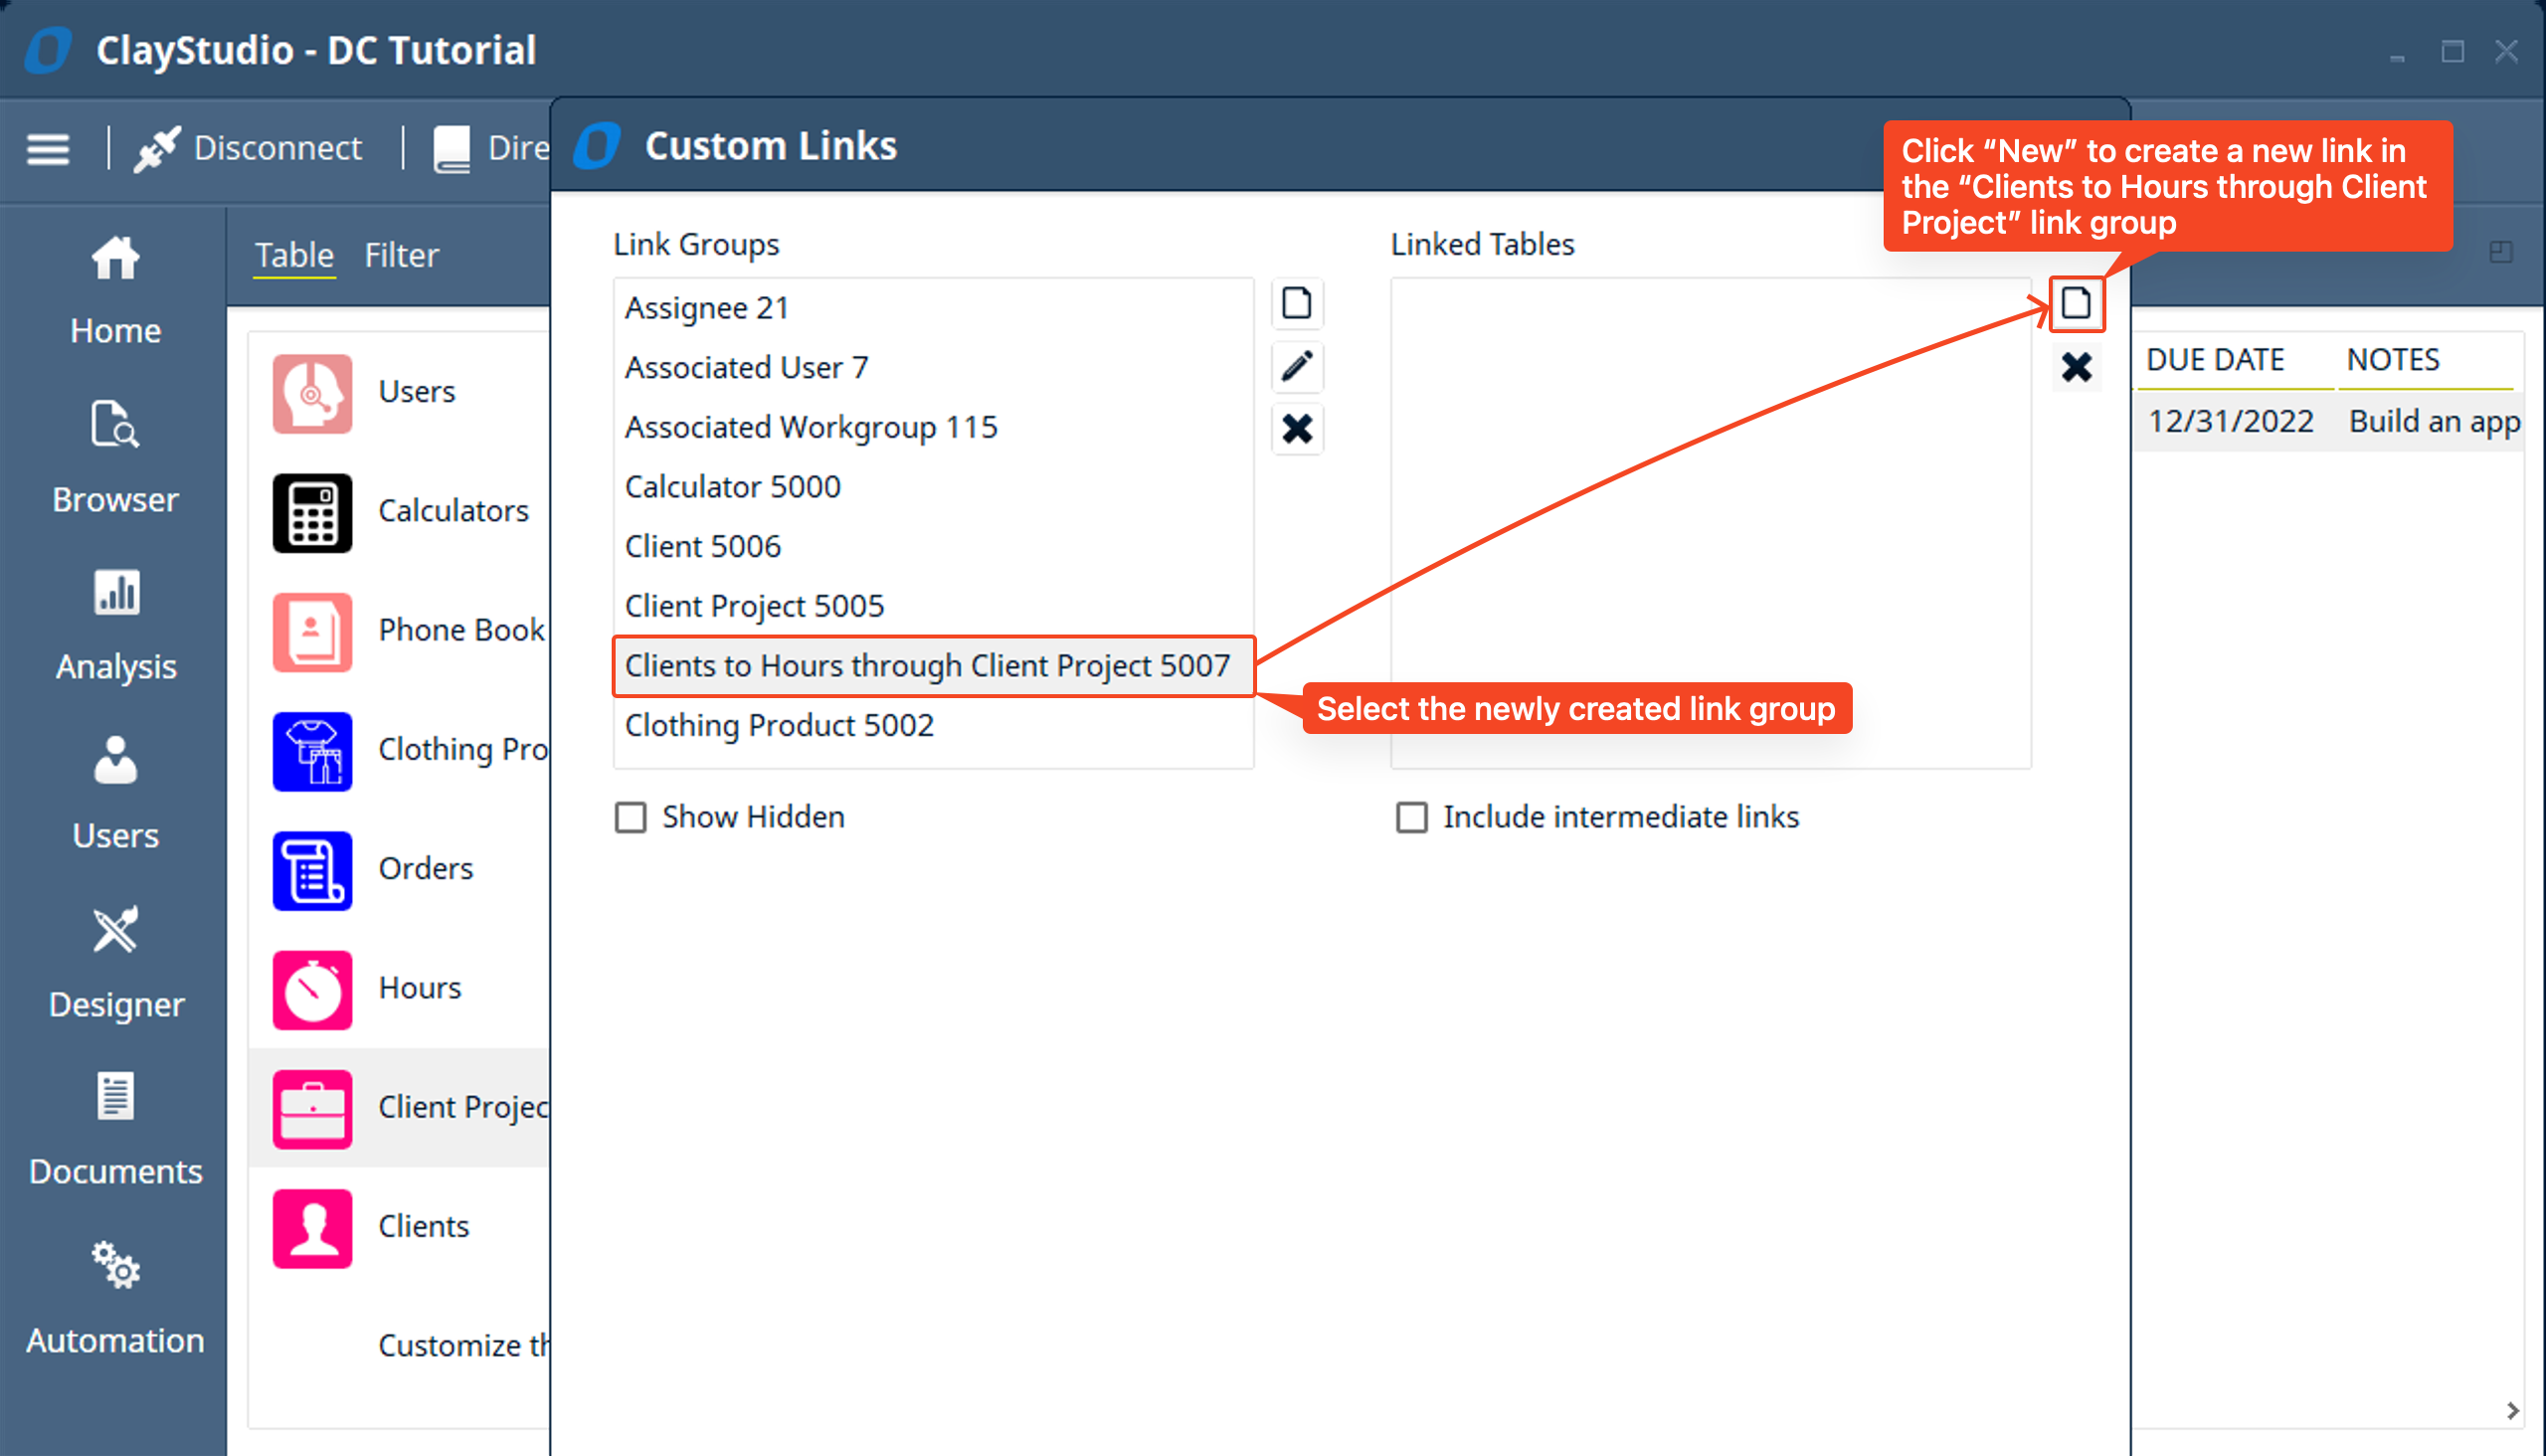
- Next, select the new link group you created and click the ”New” button to add a new “Linked Table” to your “Link Group”
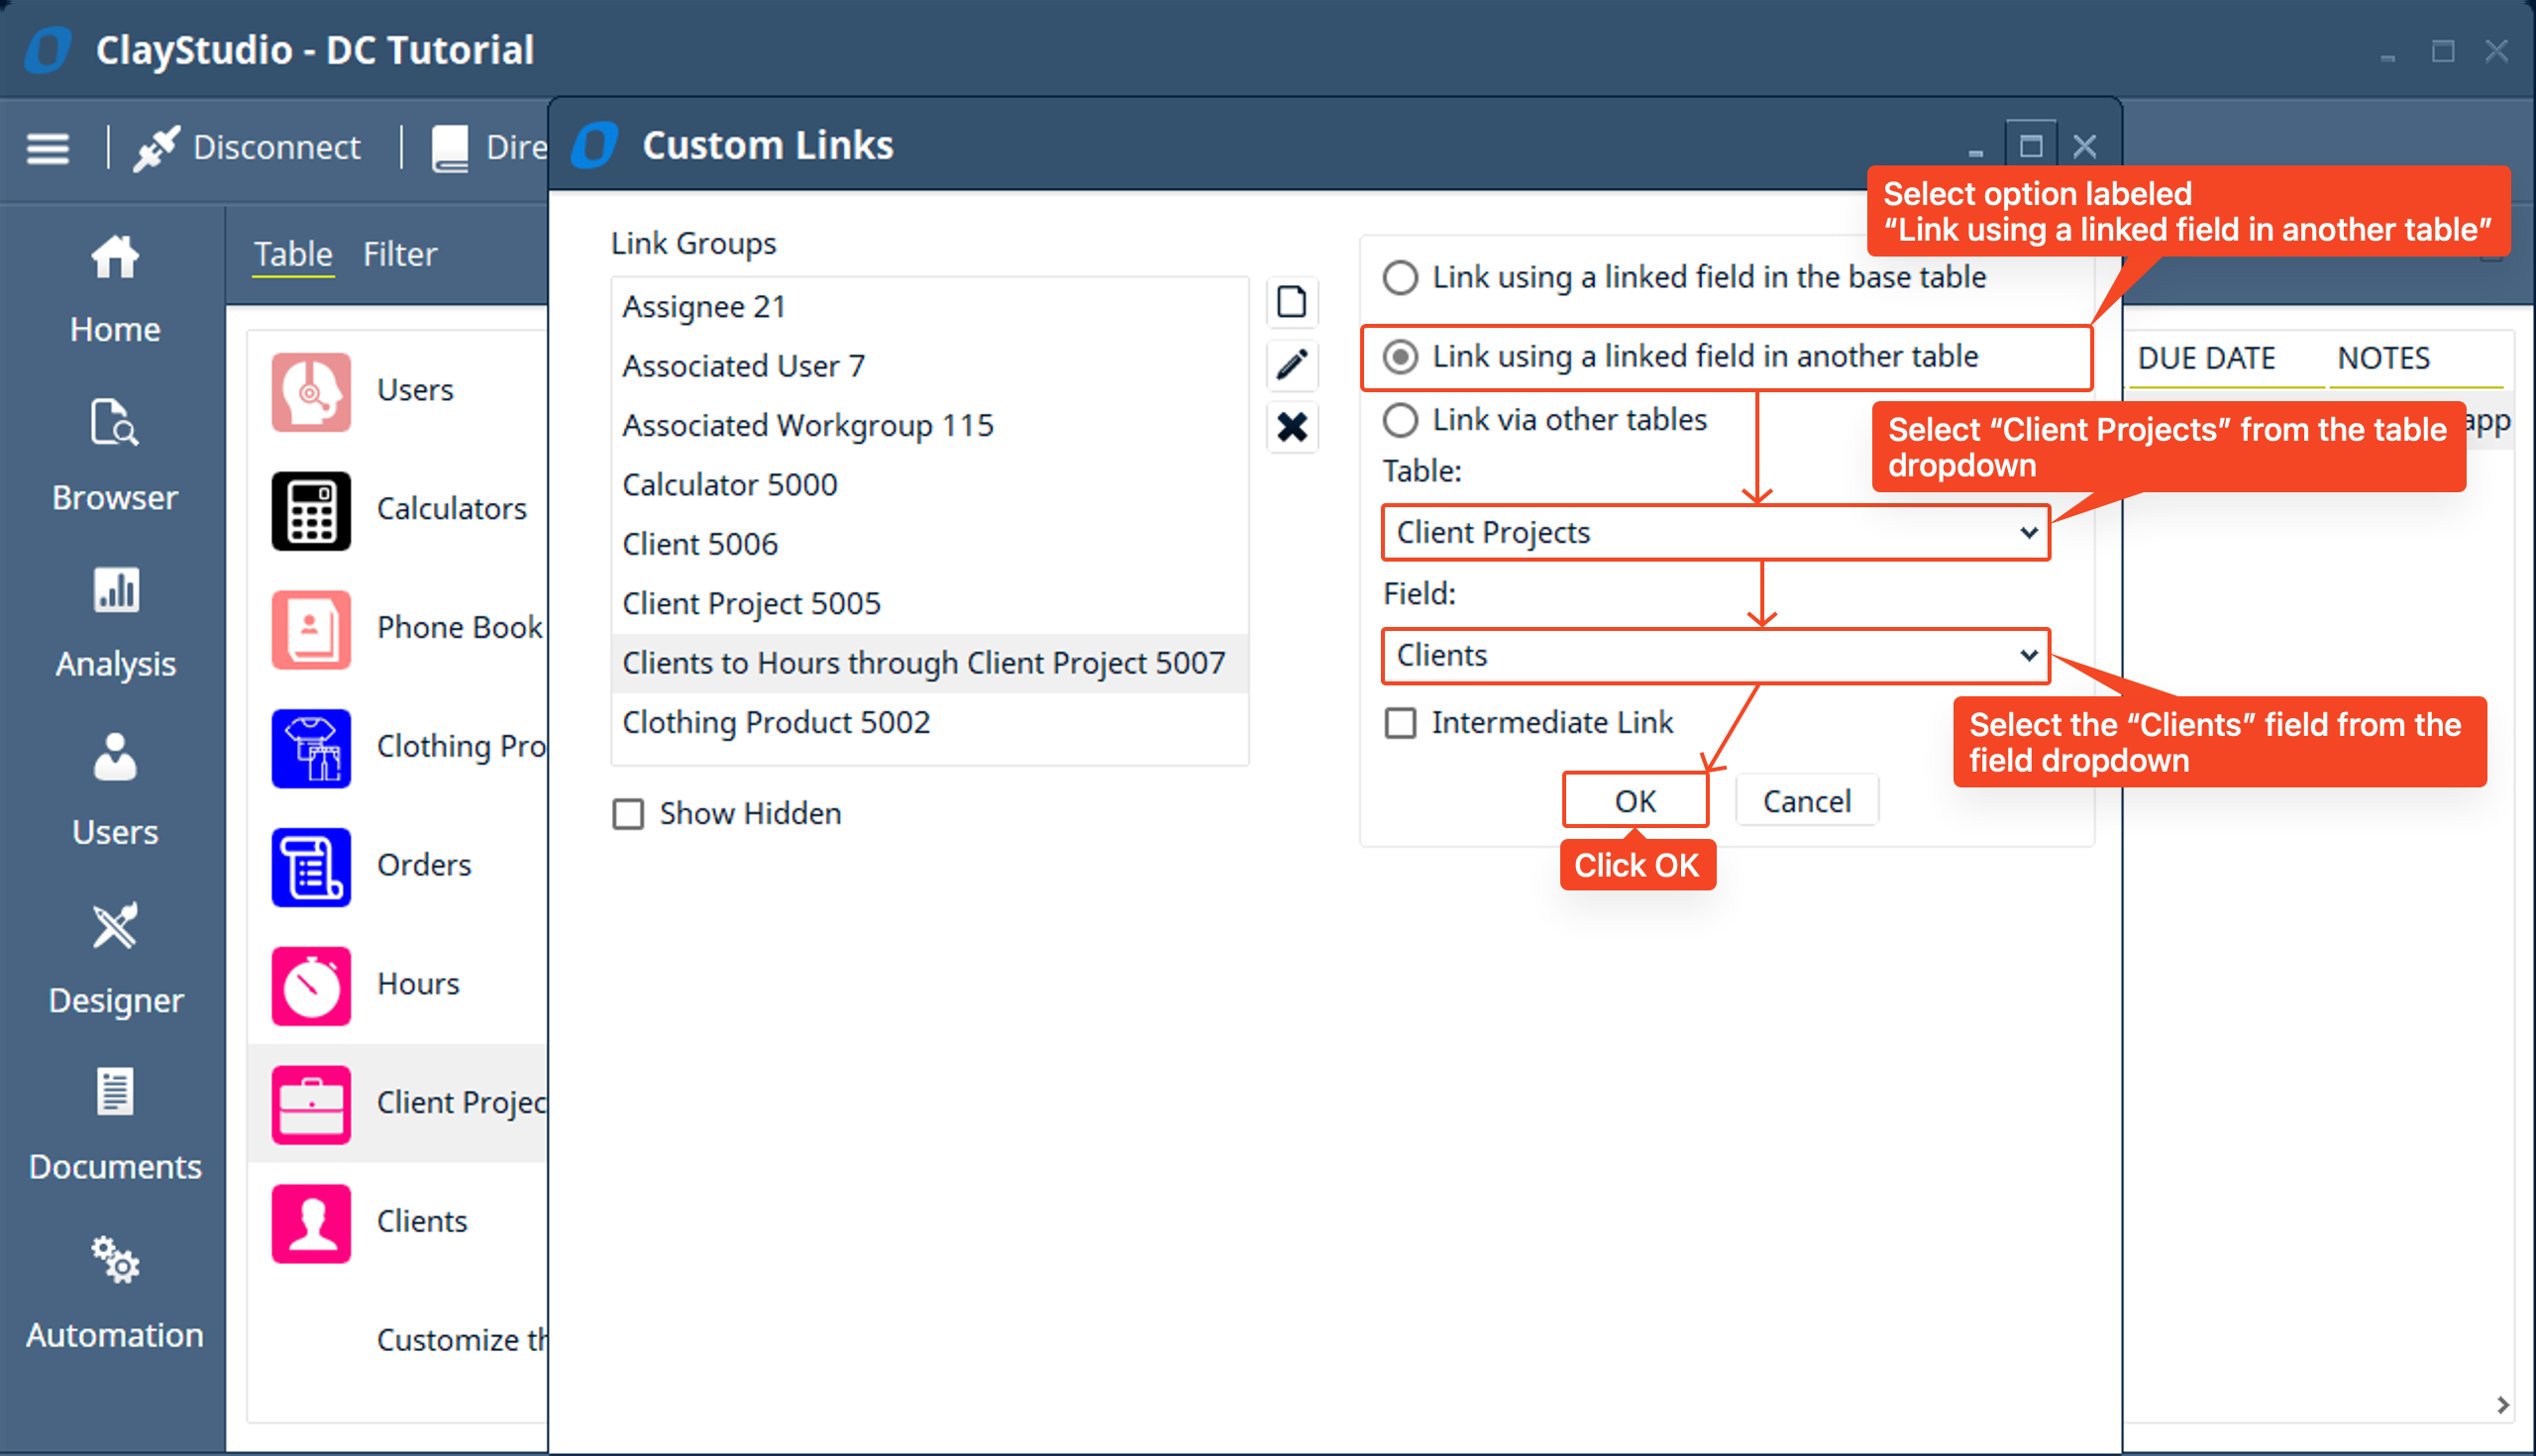
- Here we have 3 options to select from. For the first “Linked Table” we will use the “Link using a linked field in another table” because the linked field we have is in the “Client Project” and is linked to the “Client” through a linked field. Since “Client Project” is not the base table of this link group we need to use this option to access the link that the linked field provides clay. So select “Link using a linked field in another table” → in the table dropdown select “Client Projects” → in the “Field” select the “Clients” field → then click OK.
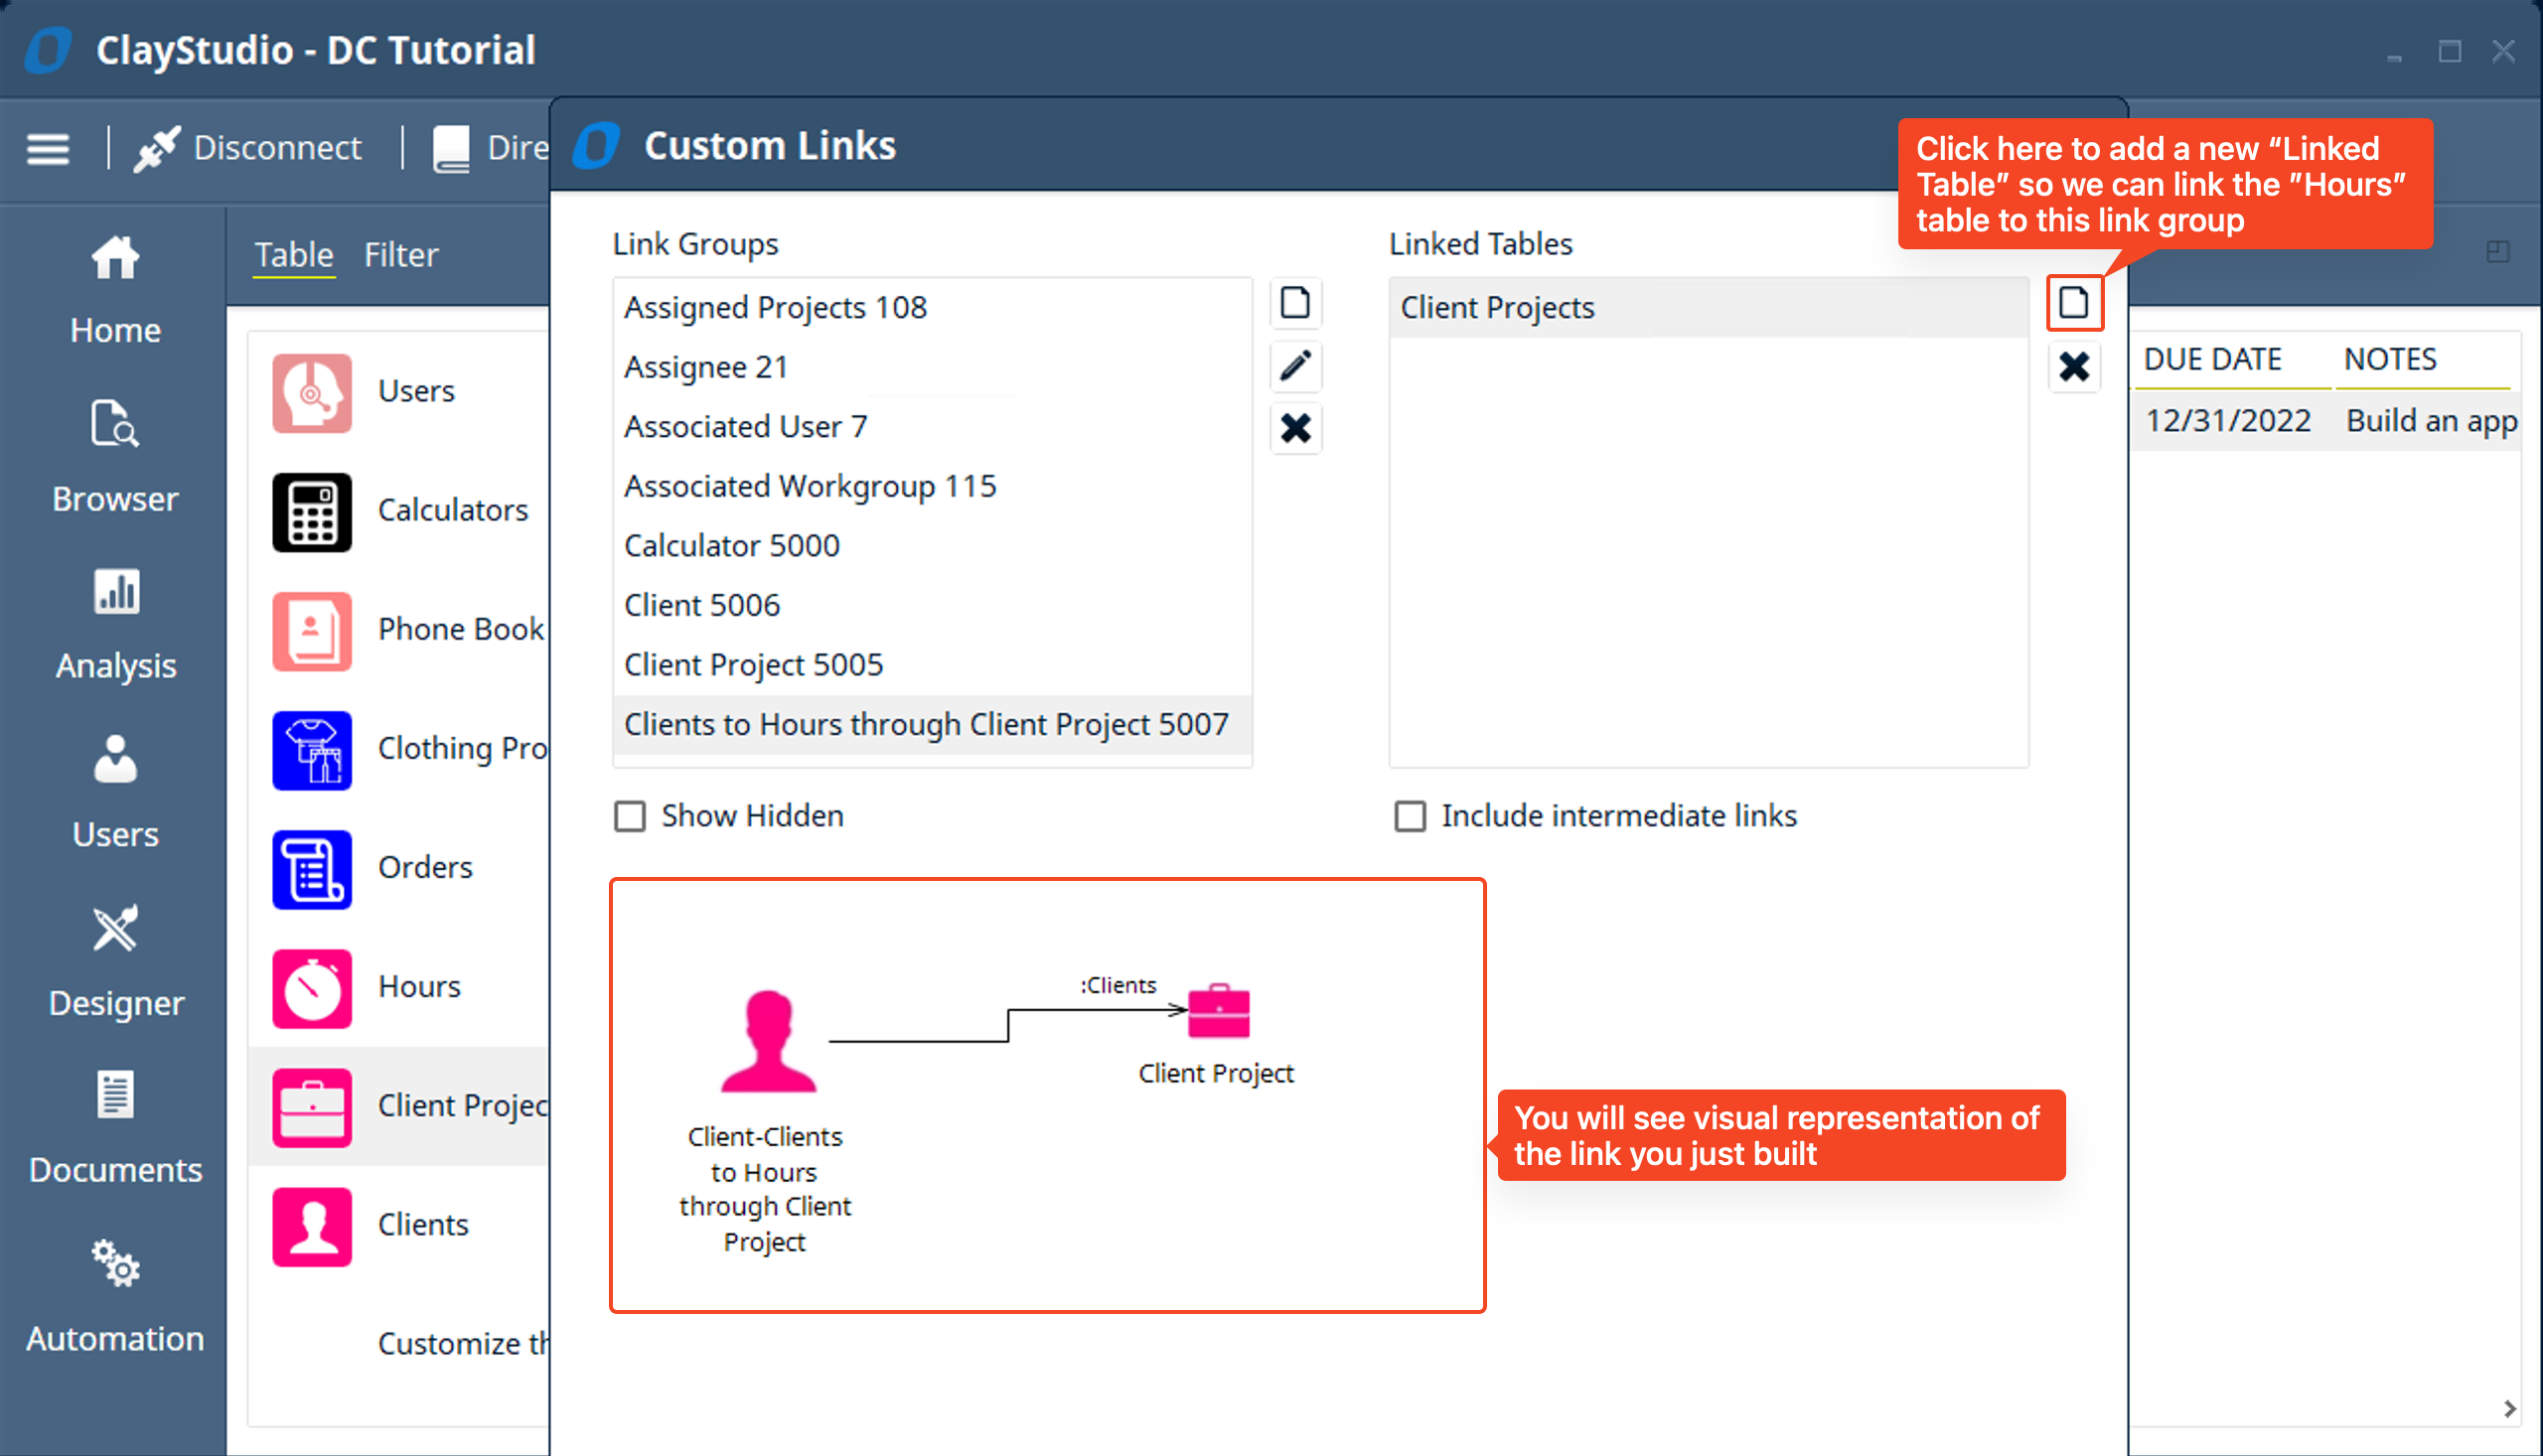
- Now you successfully linked the “Clients” table to the “Client Projects” table through the linked field in the “Client Projects” that is linked to the “Clients” table you will see that link visually below. Now click on the “New” button again to add a new “Linked Table” and link the “Hours” table to this link group
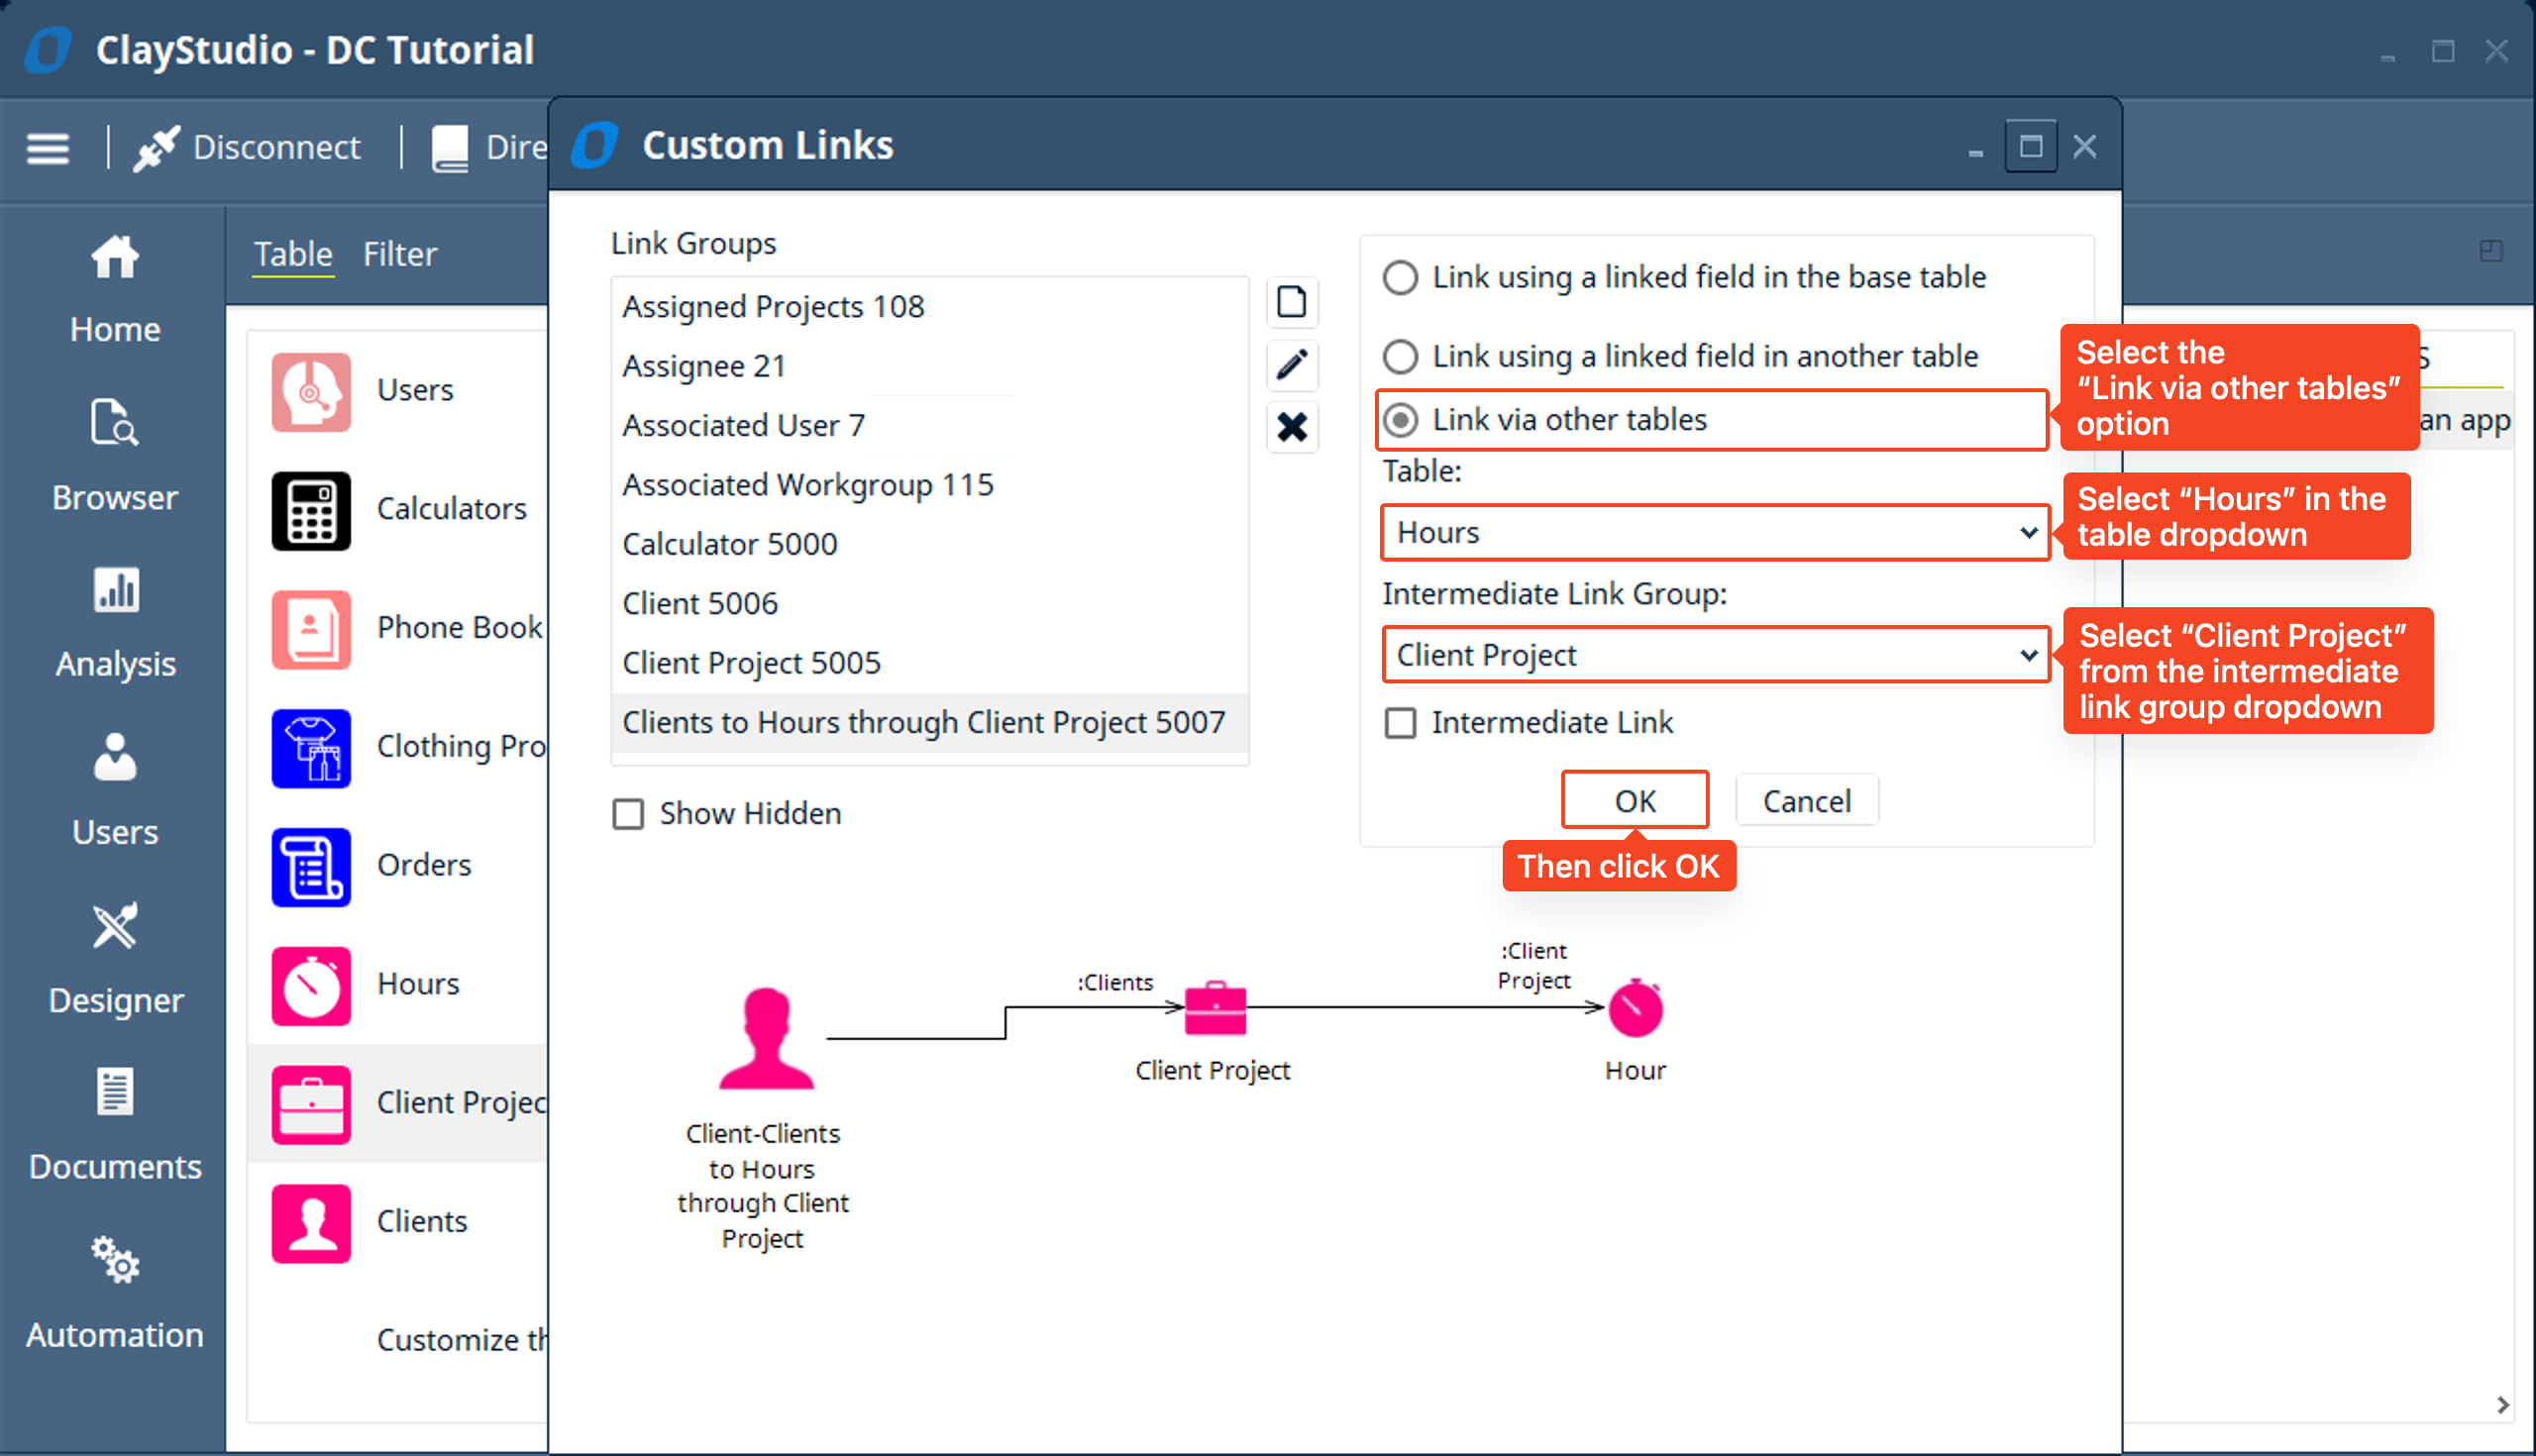
- This time we will select “Link via other tables” because we need to use a link that is in another table that isn’t directly linked to the base table (ie the “Clients” table). We will select “Link via other tables” → select “Hours” from the “Table” dropdown → select “Client Project” from the “Intermediate Link Group” dropdown → then click OK.
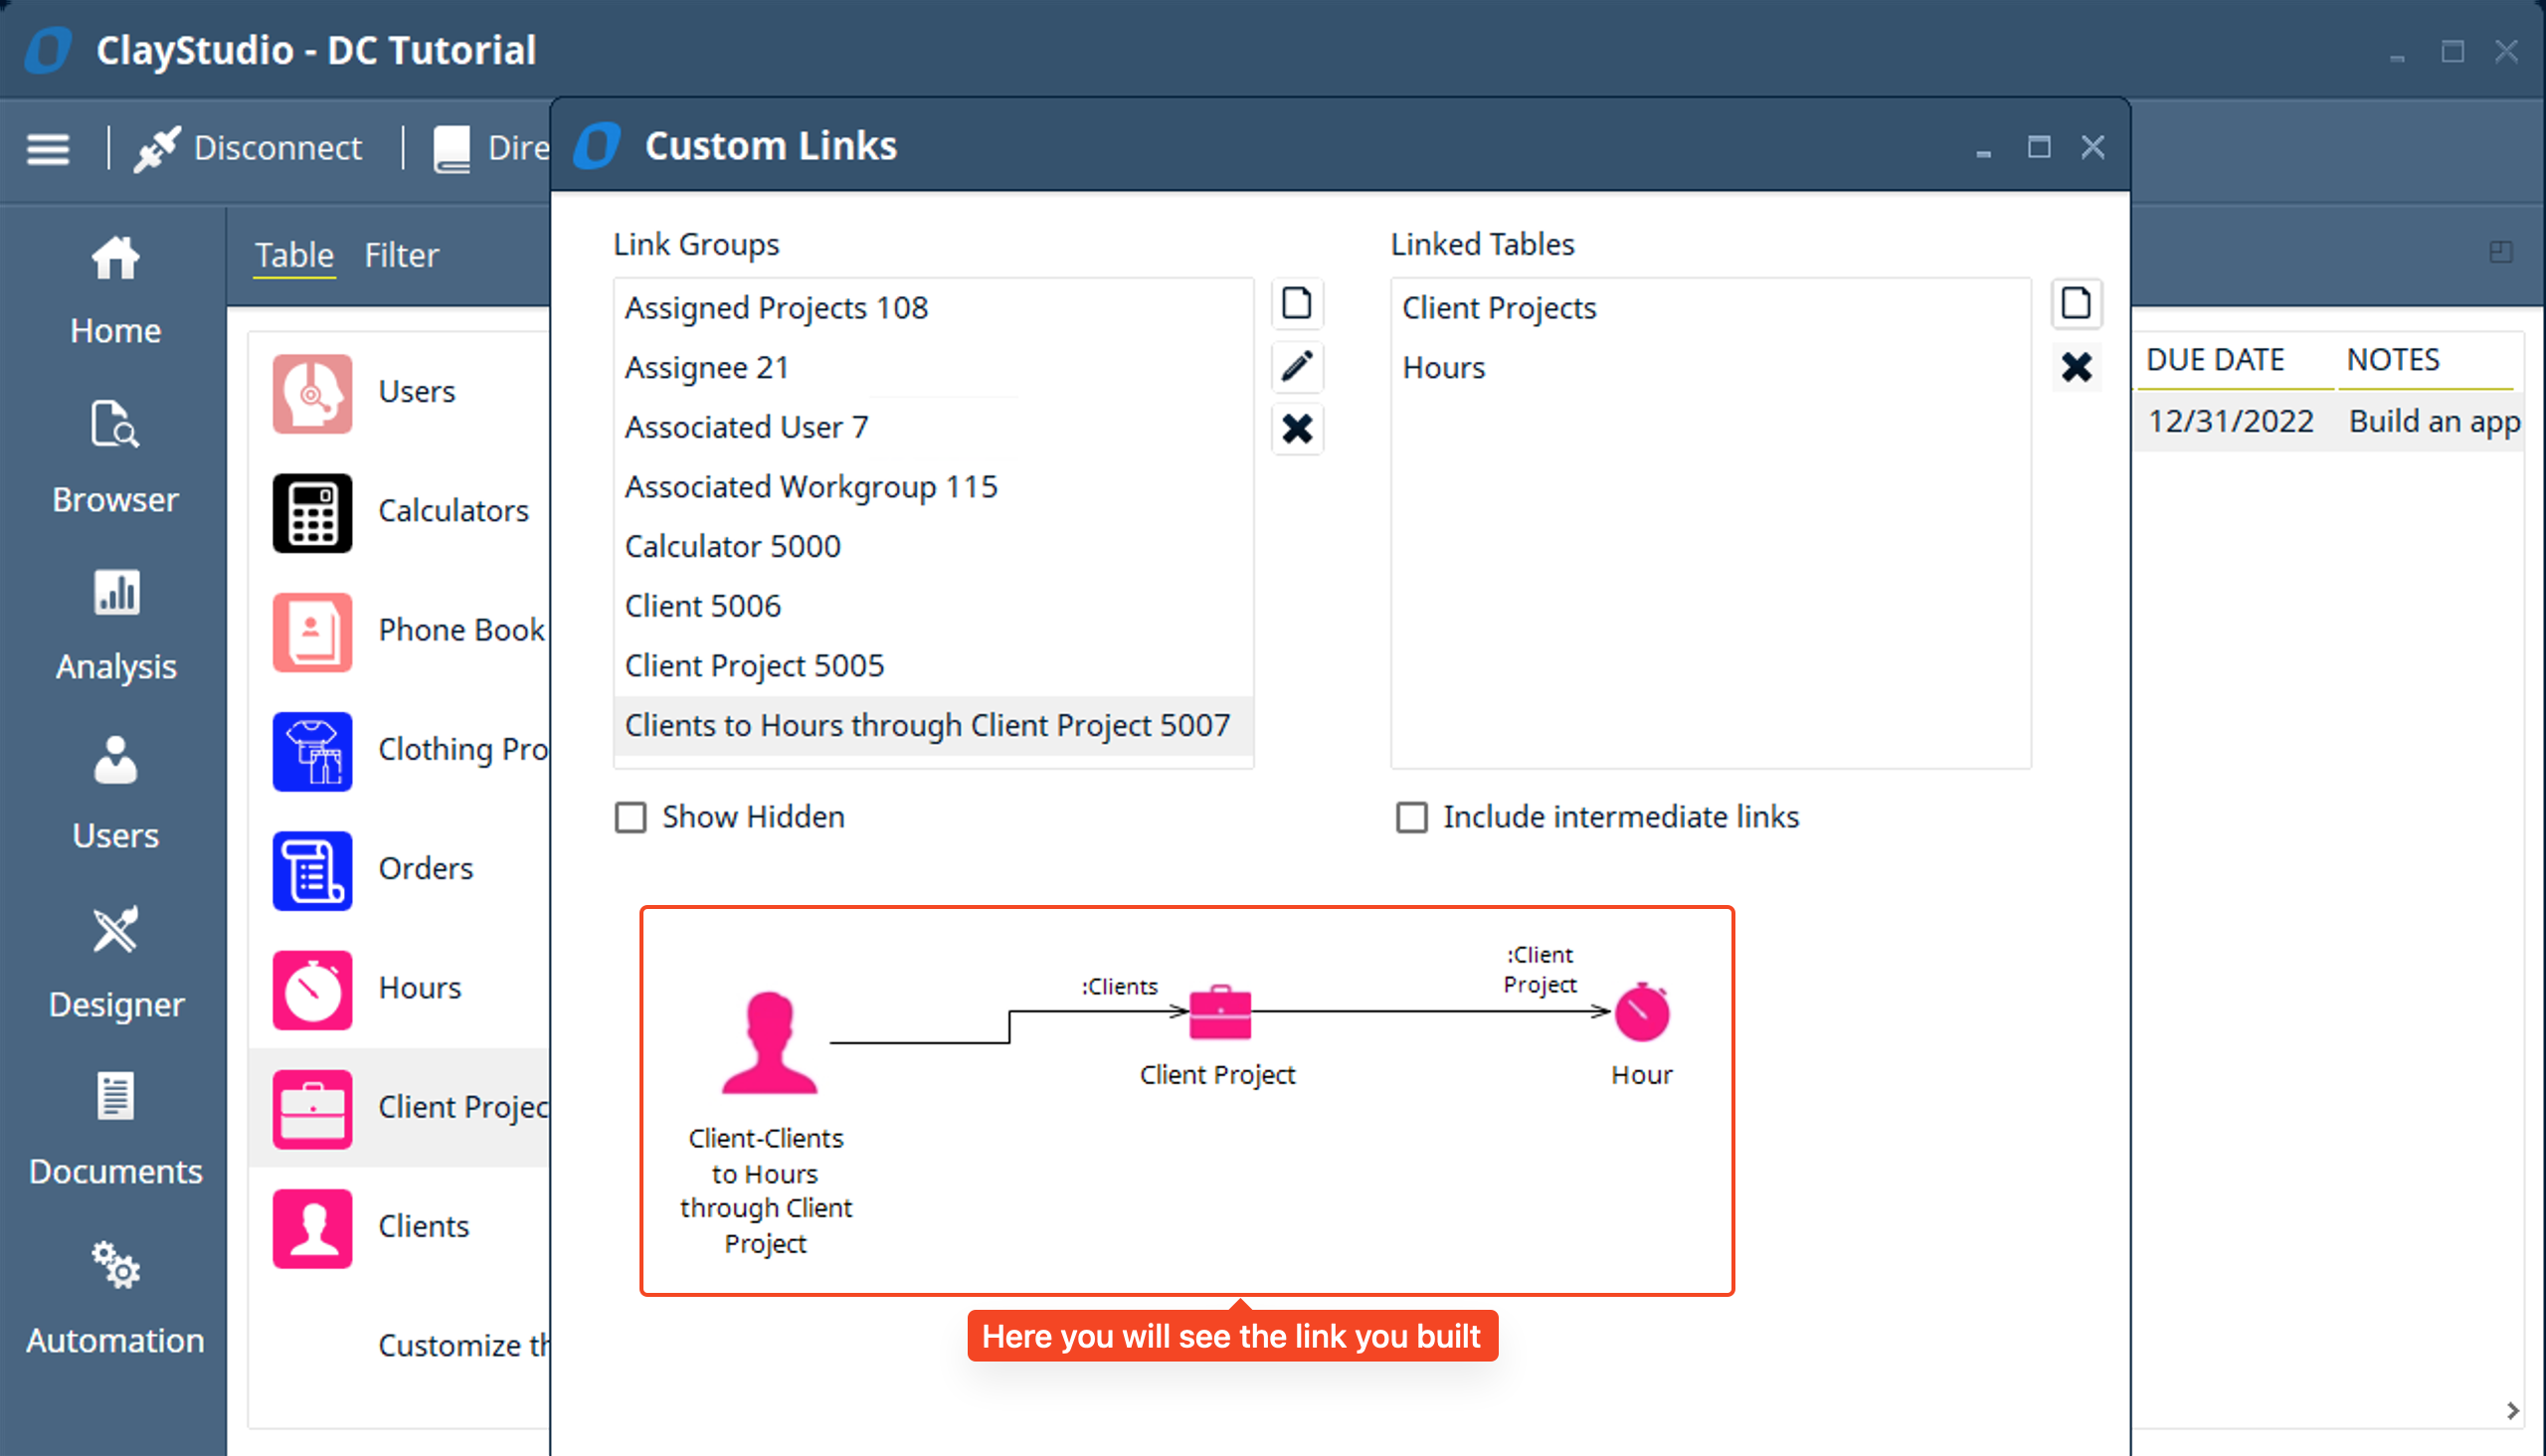
- Now you can see that you successfully linked the “Clients” table to the “Hours” through the “Client Projects” table and can visually see the full link from the “Client” → “Client Project” → “Hour”
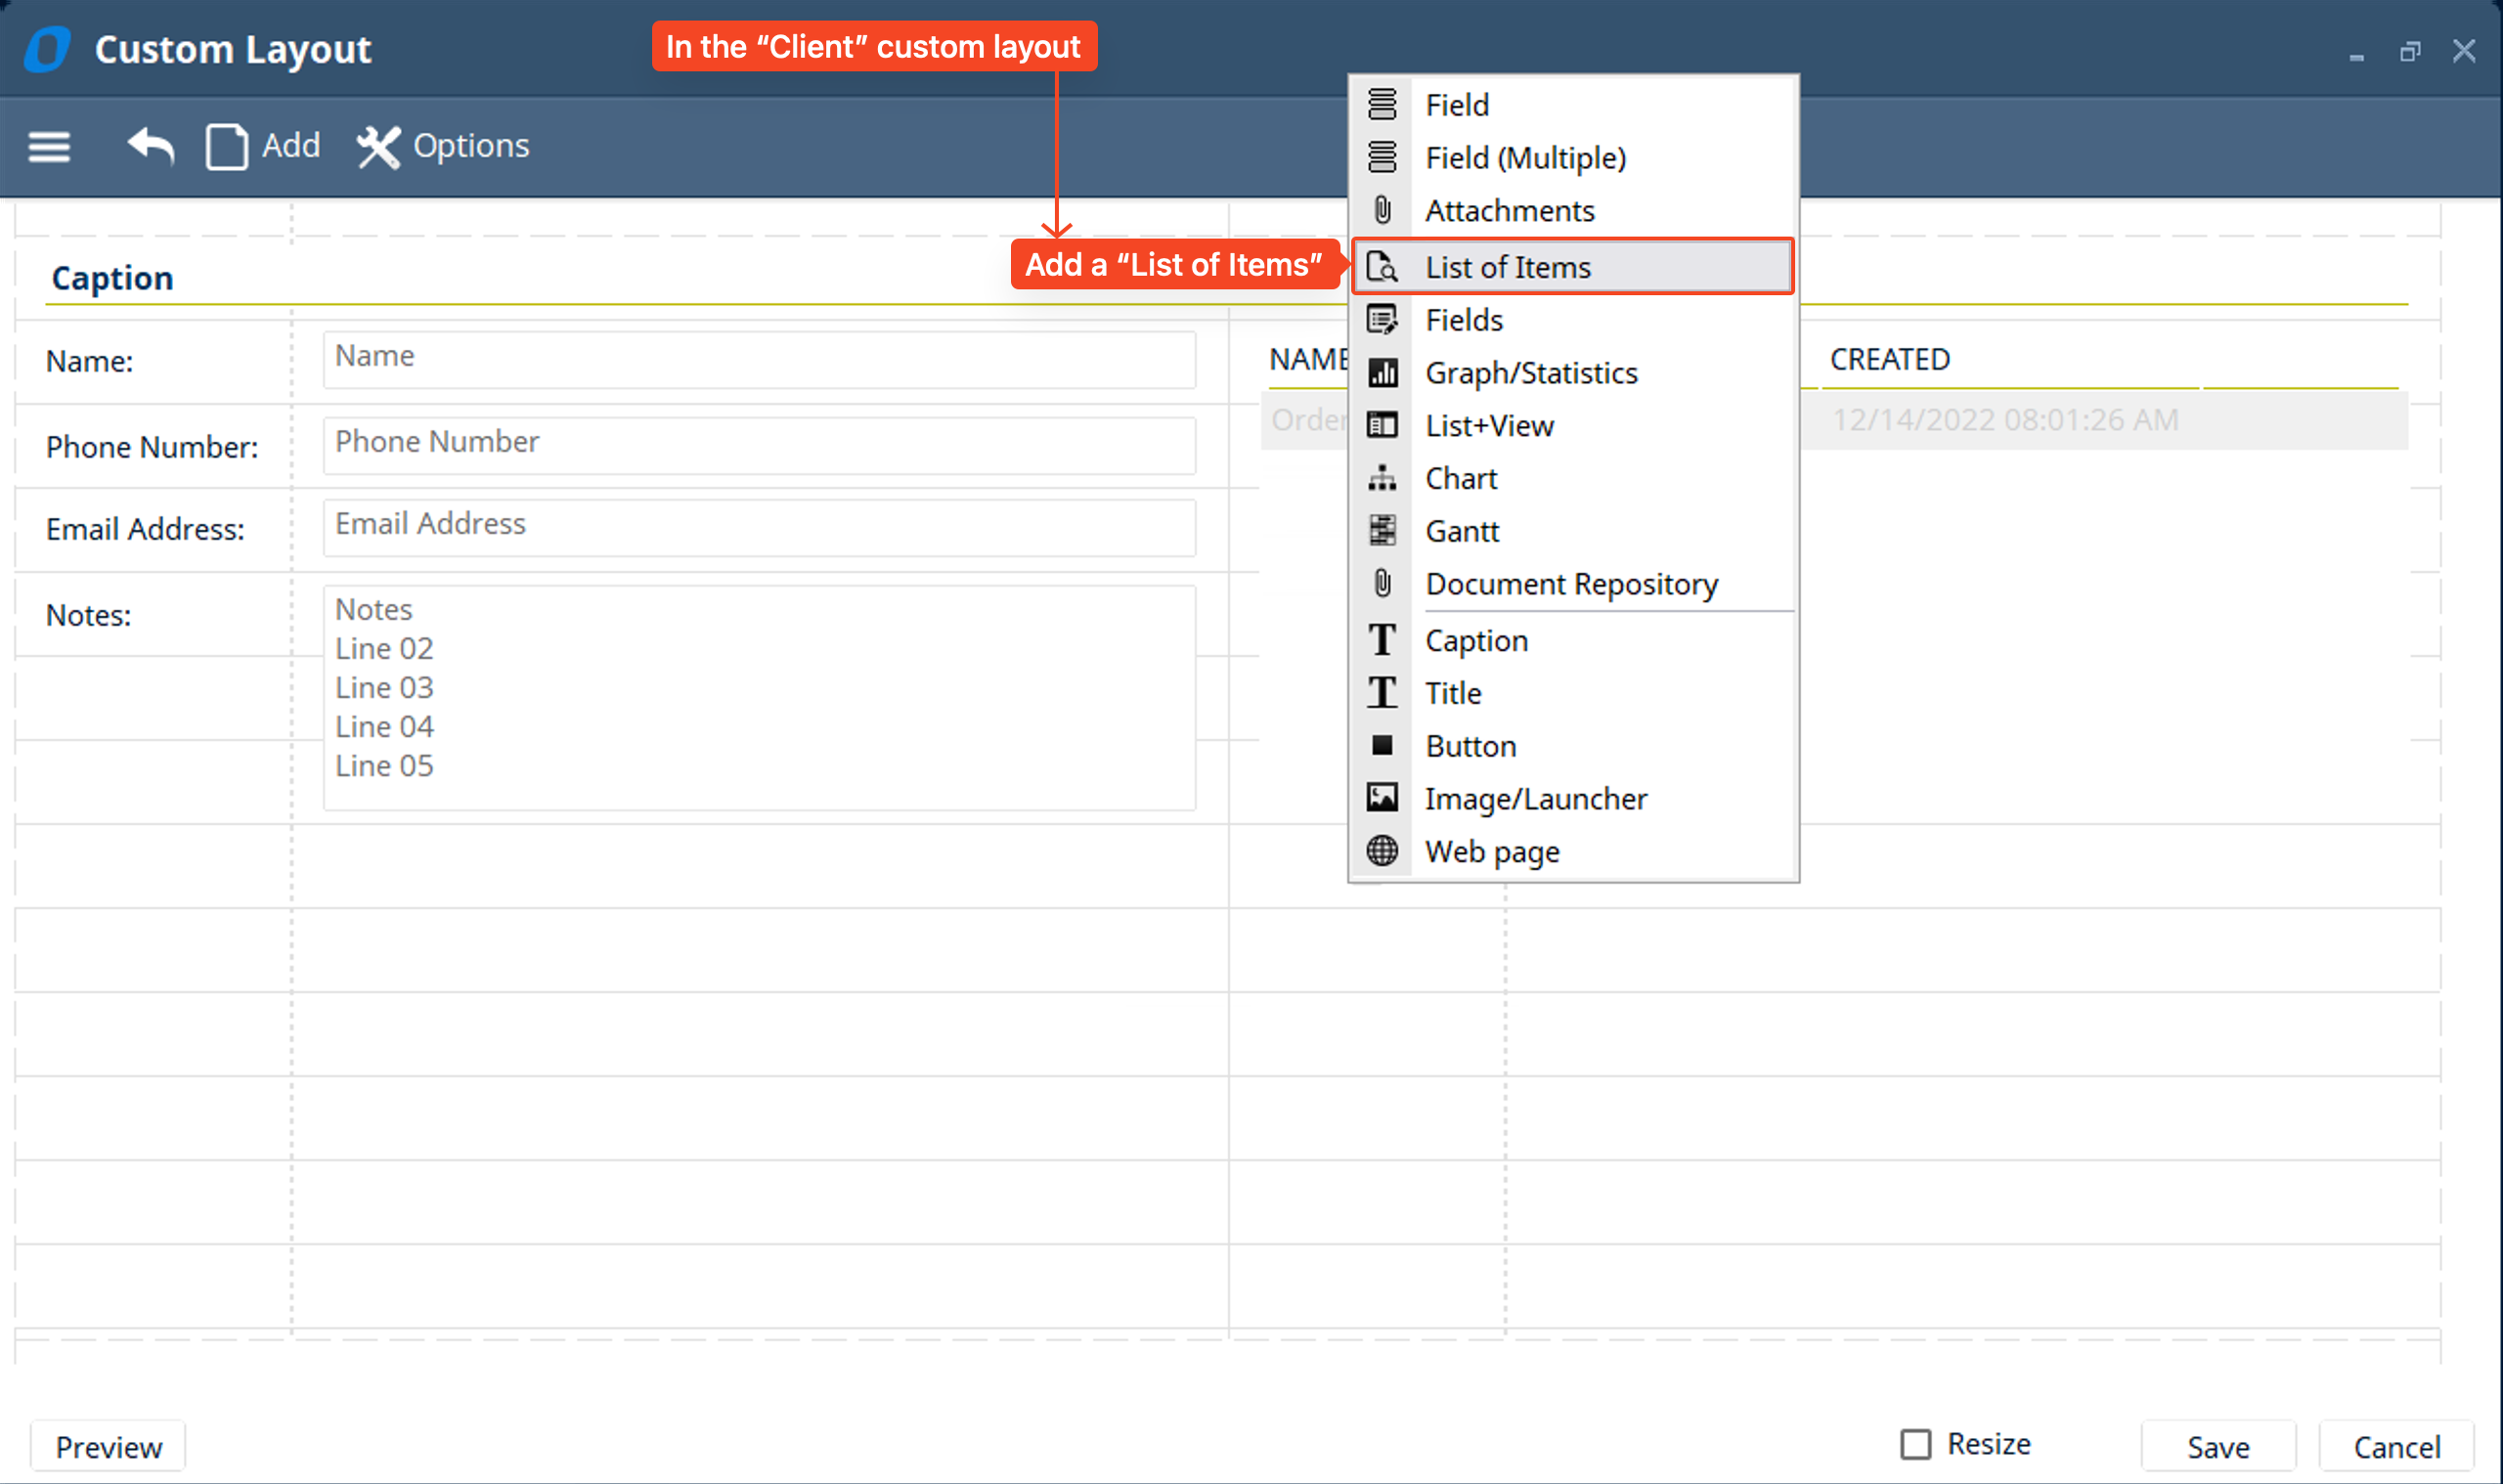
- Let’s go back to the “Client info” custom layout we previously created and customize the layout like we did in step 32. Click on the “Add” button in any cell in the layout and select “List of Items” to add a list of hours to the layout
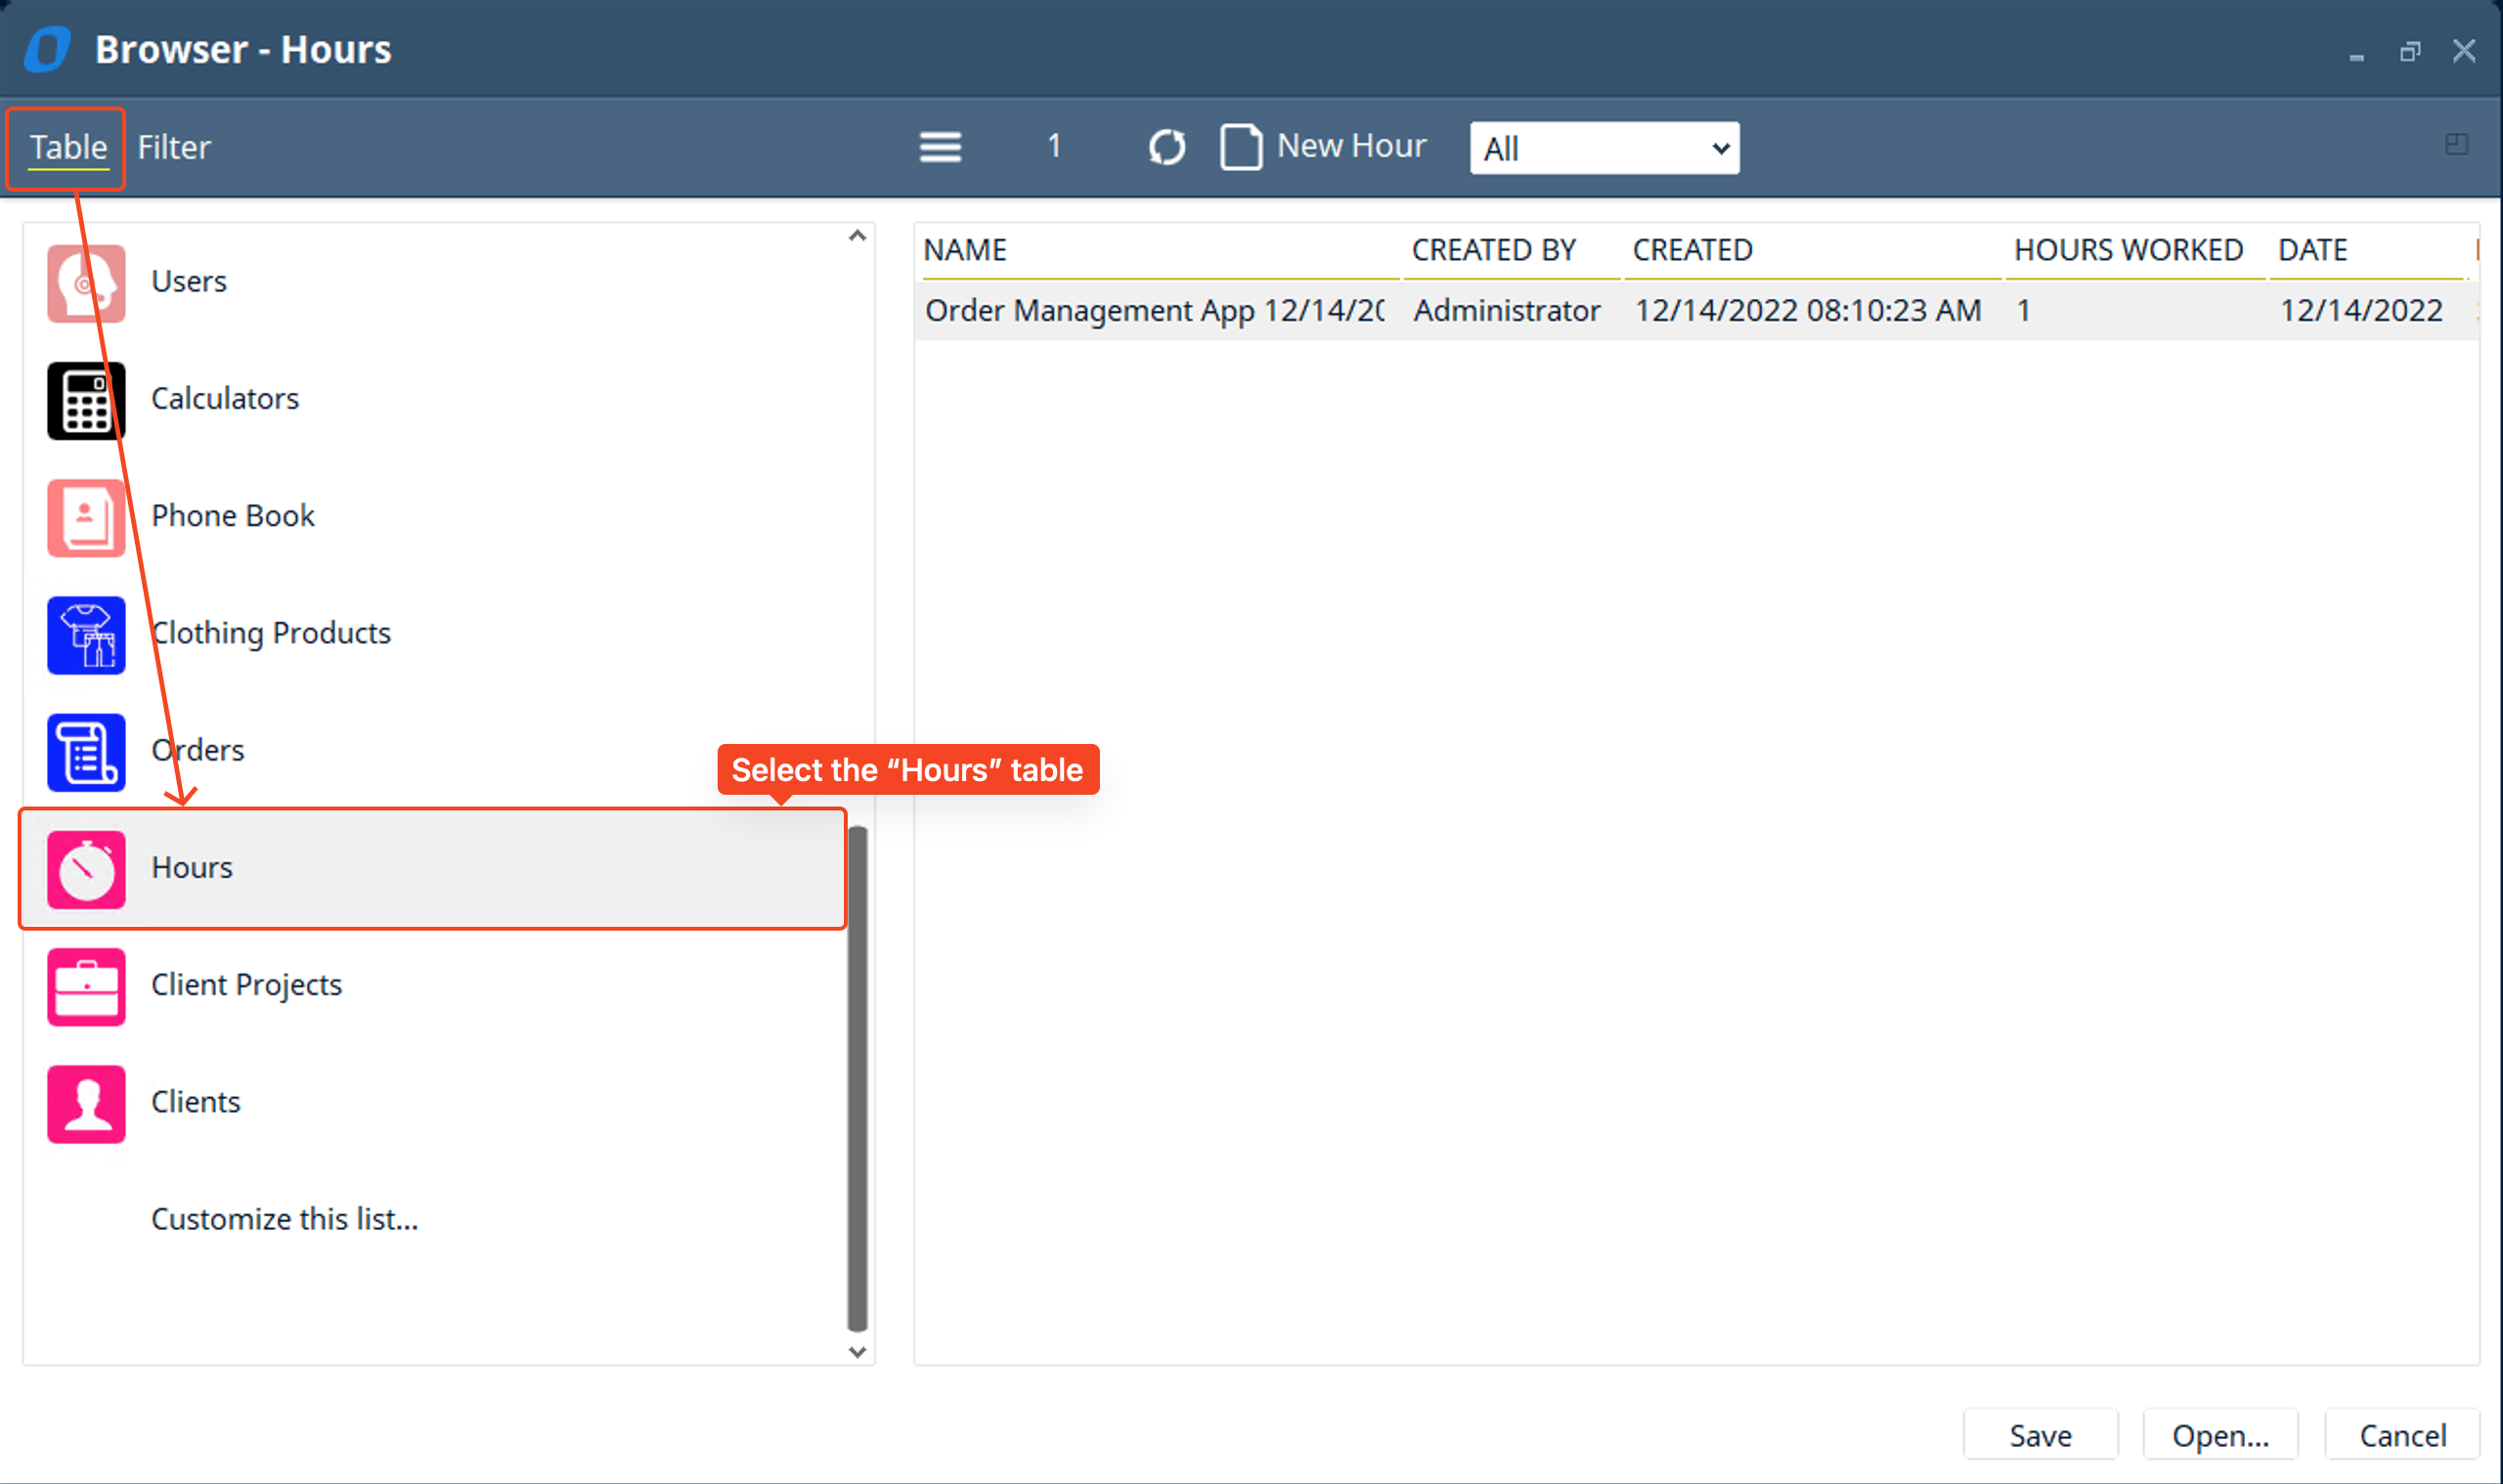
- Next, click on the “Hours” table
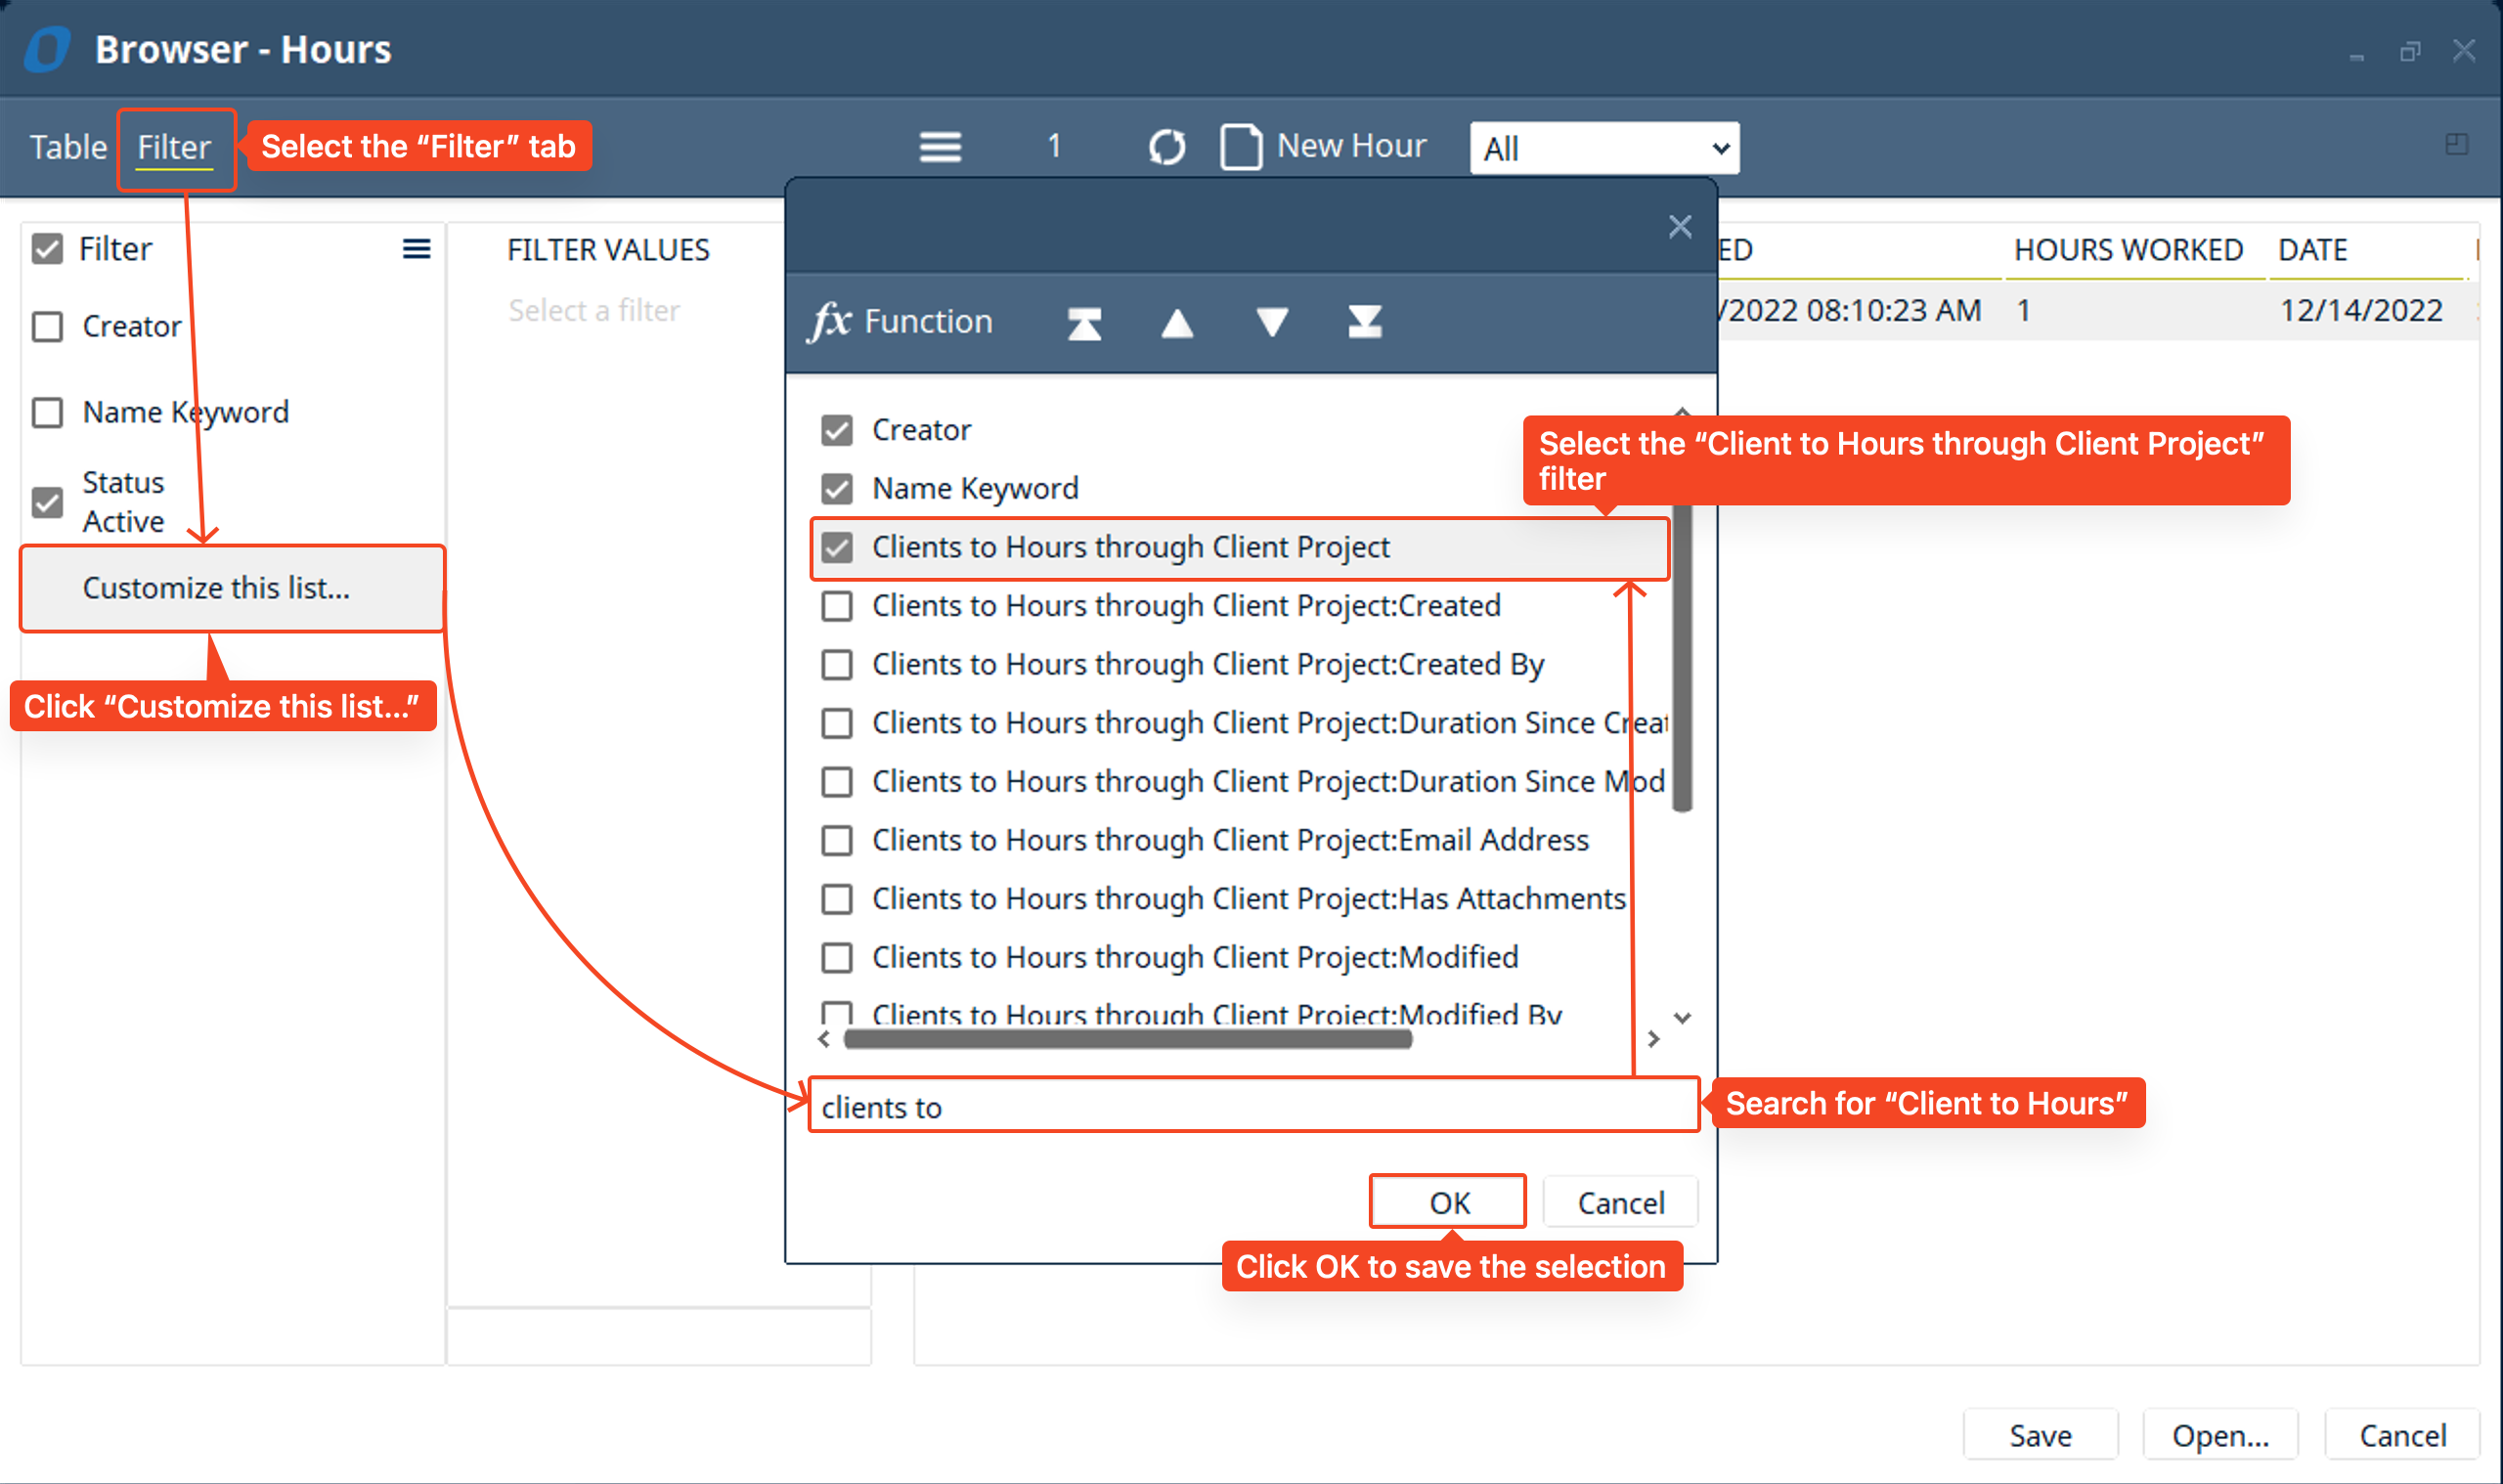
- Then, click on the “Filter” tab and select “Customize this list…” and search for the “Client to Hours through Client Project” custom link we just created. This is the custom link that connects the “Hours” table through the “Client Project” directly to the “Client”
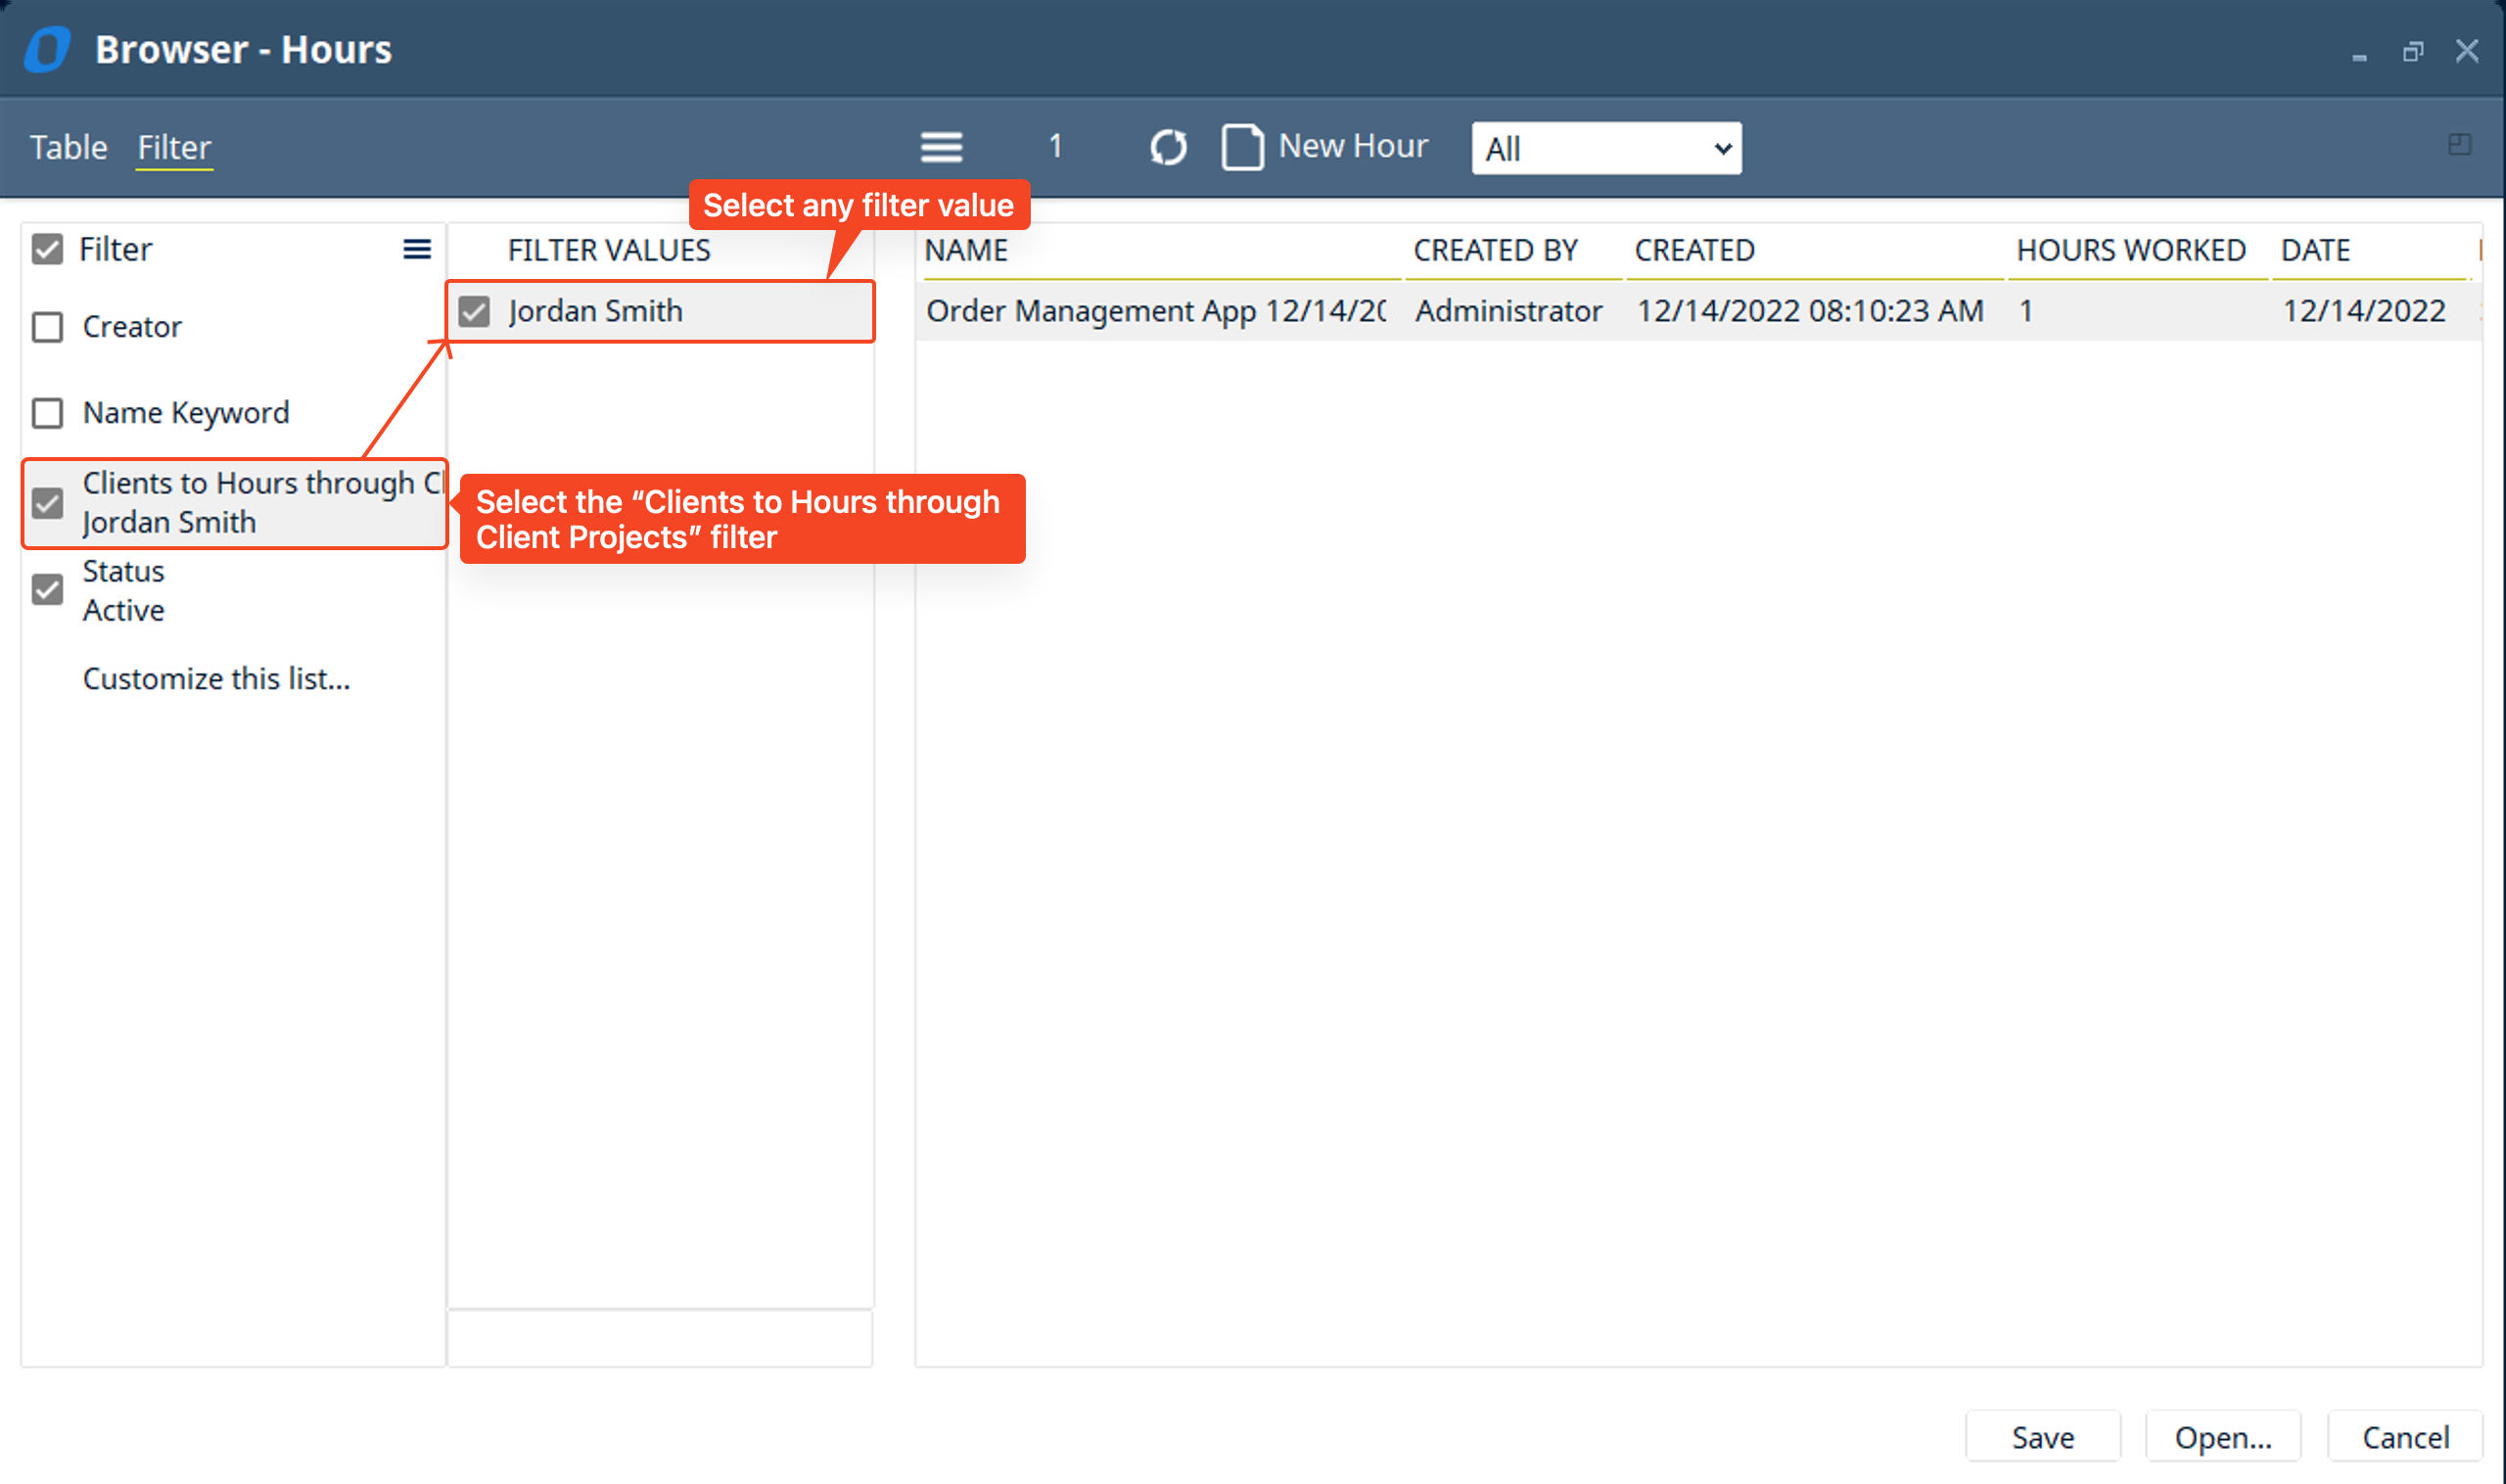
- Next, Select that filter and then choose any filter value to have the list automatically show the “Hours” based on the “Client” you are viewing in your database.
- Next, we will change the columns to show only the relevant information we want to see pertaining to the “Hours” records. Lastly, click “Save” to save the list to the custom layout
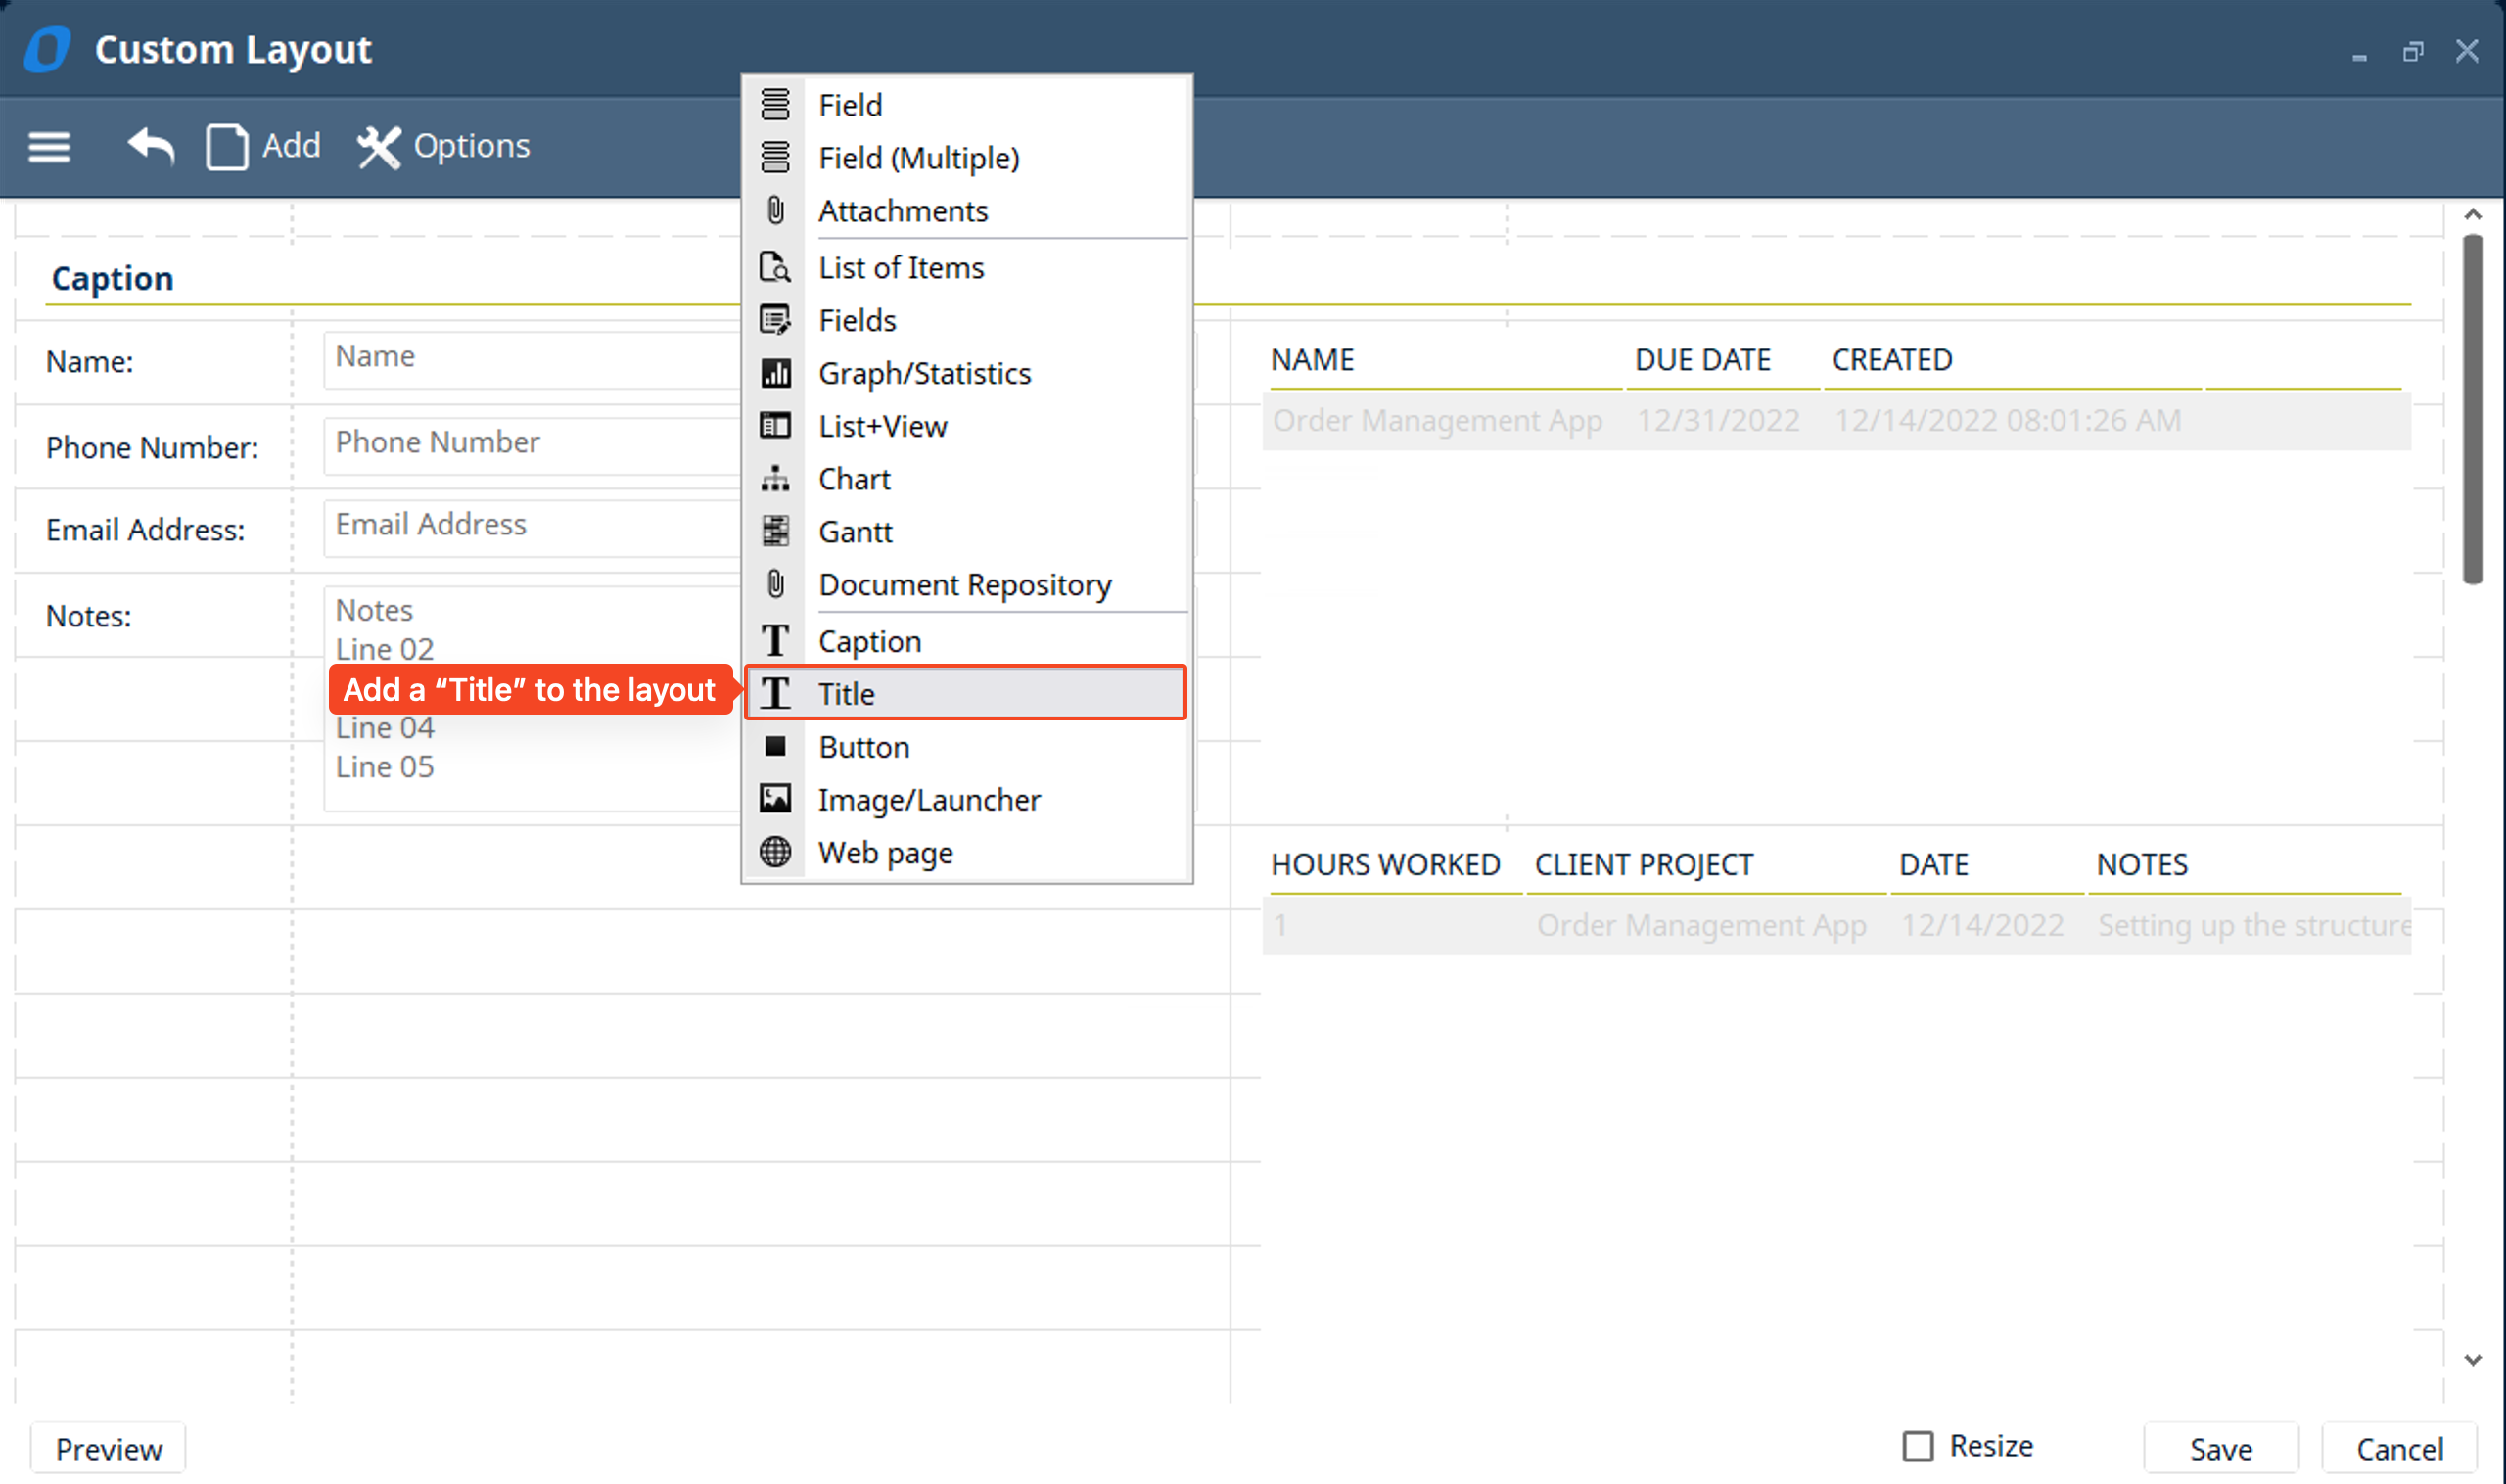
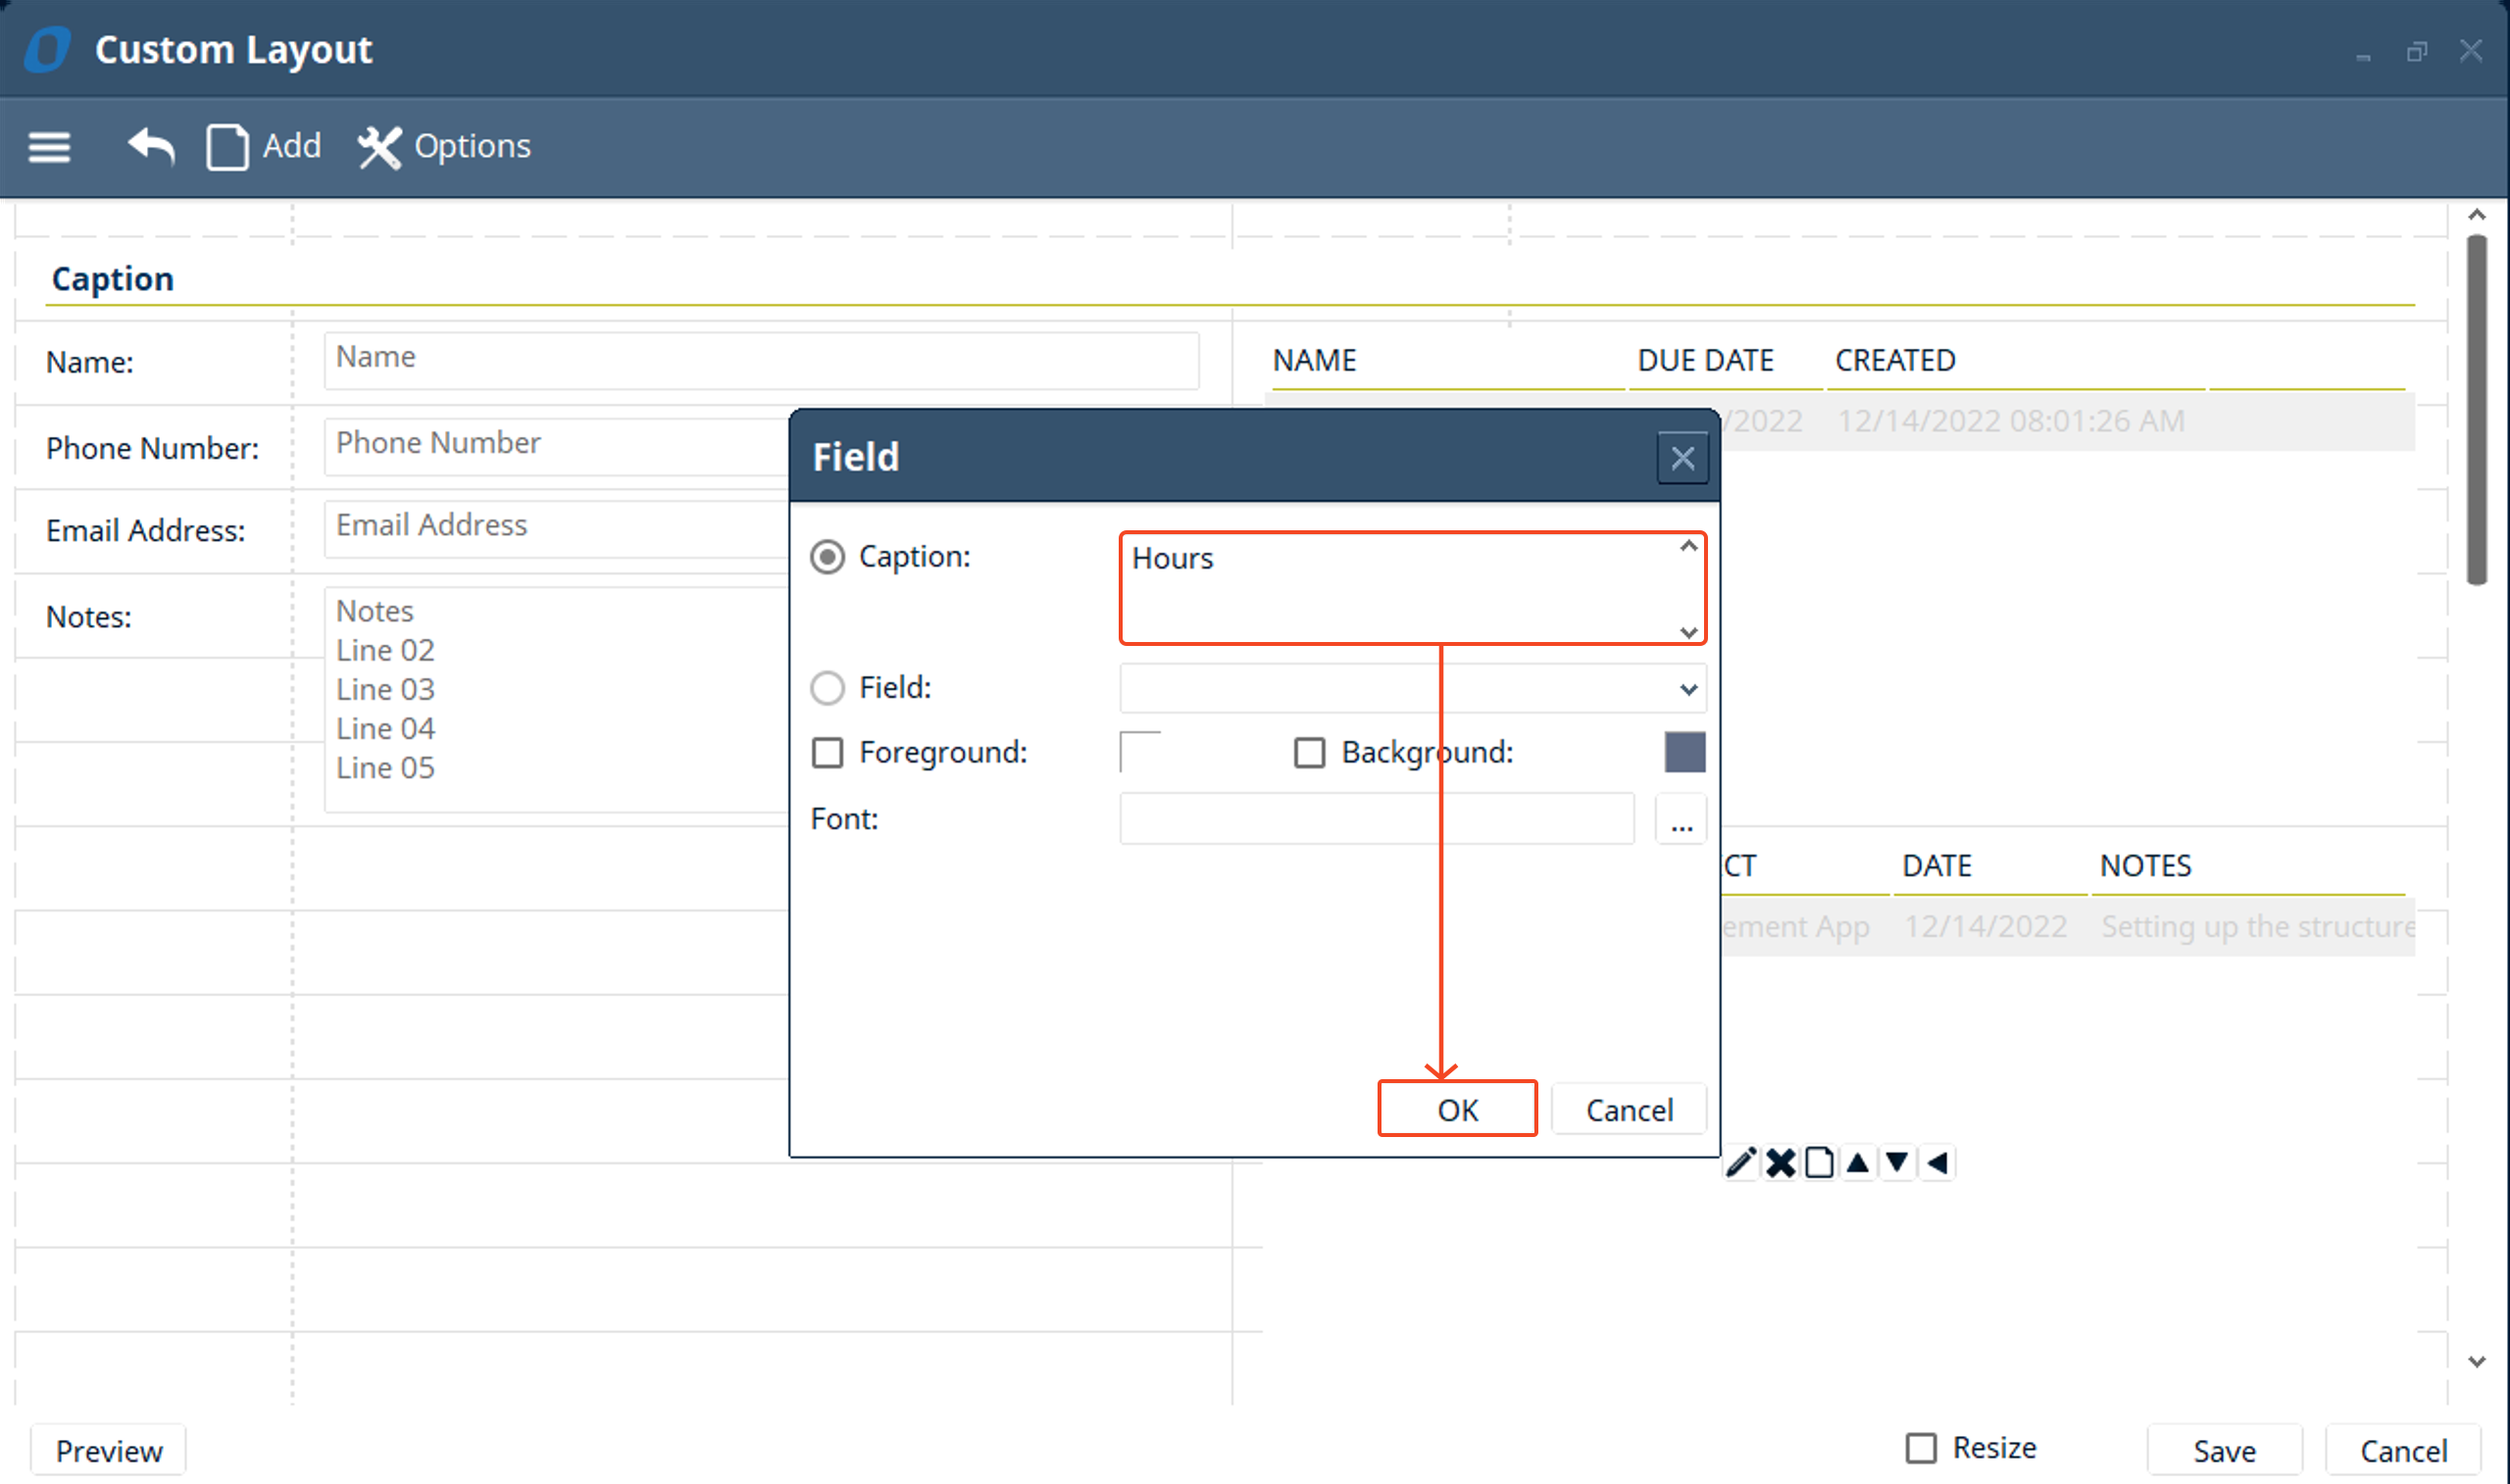
- Now, let’s add a couple “Title” components and name them: “Hours” and “Projects” for each respective list of items.
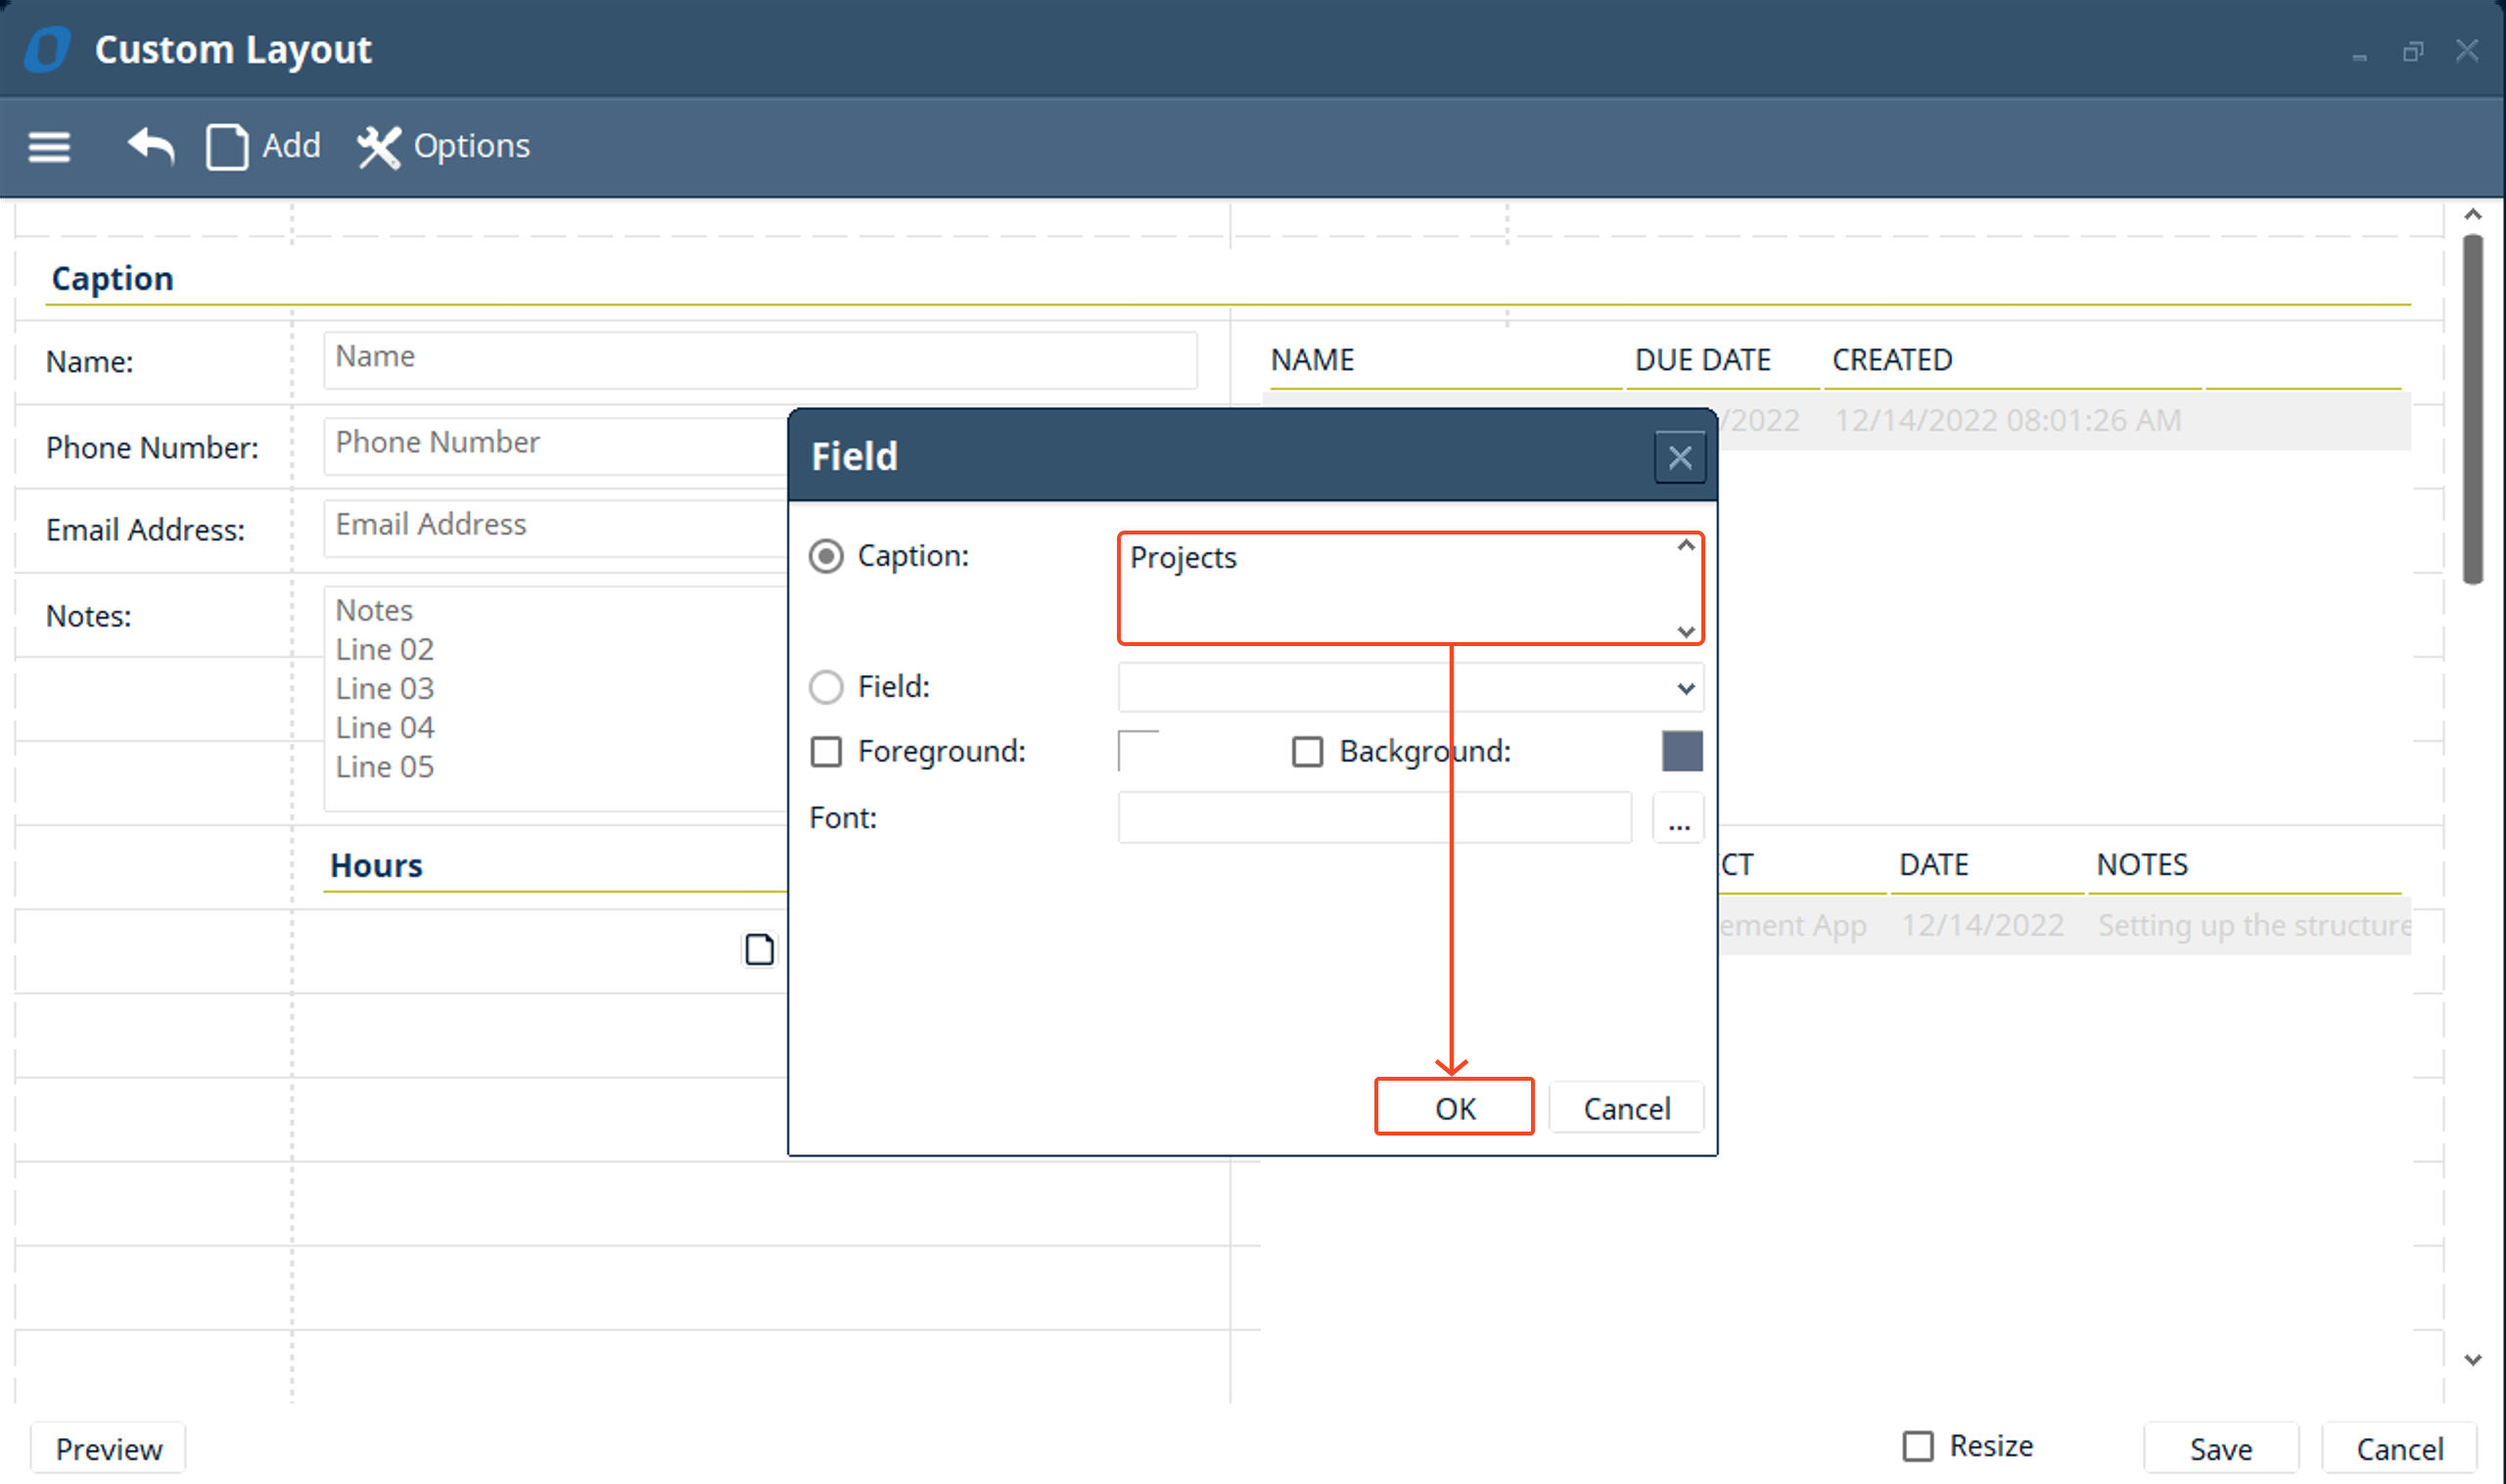
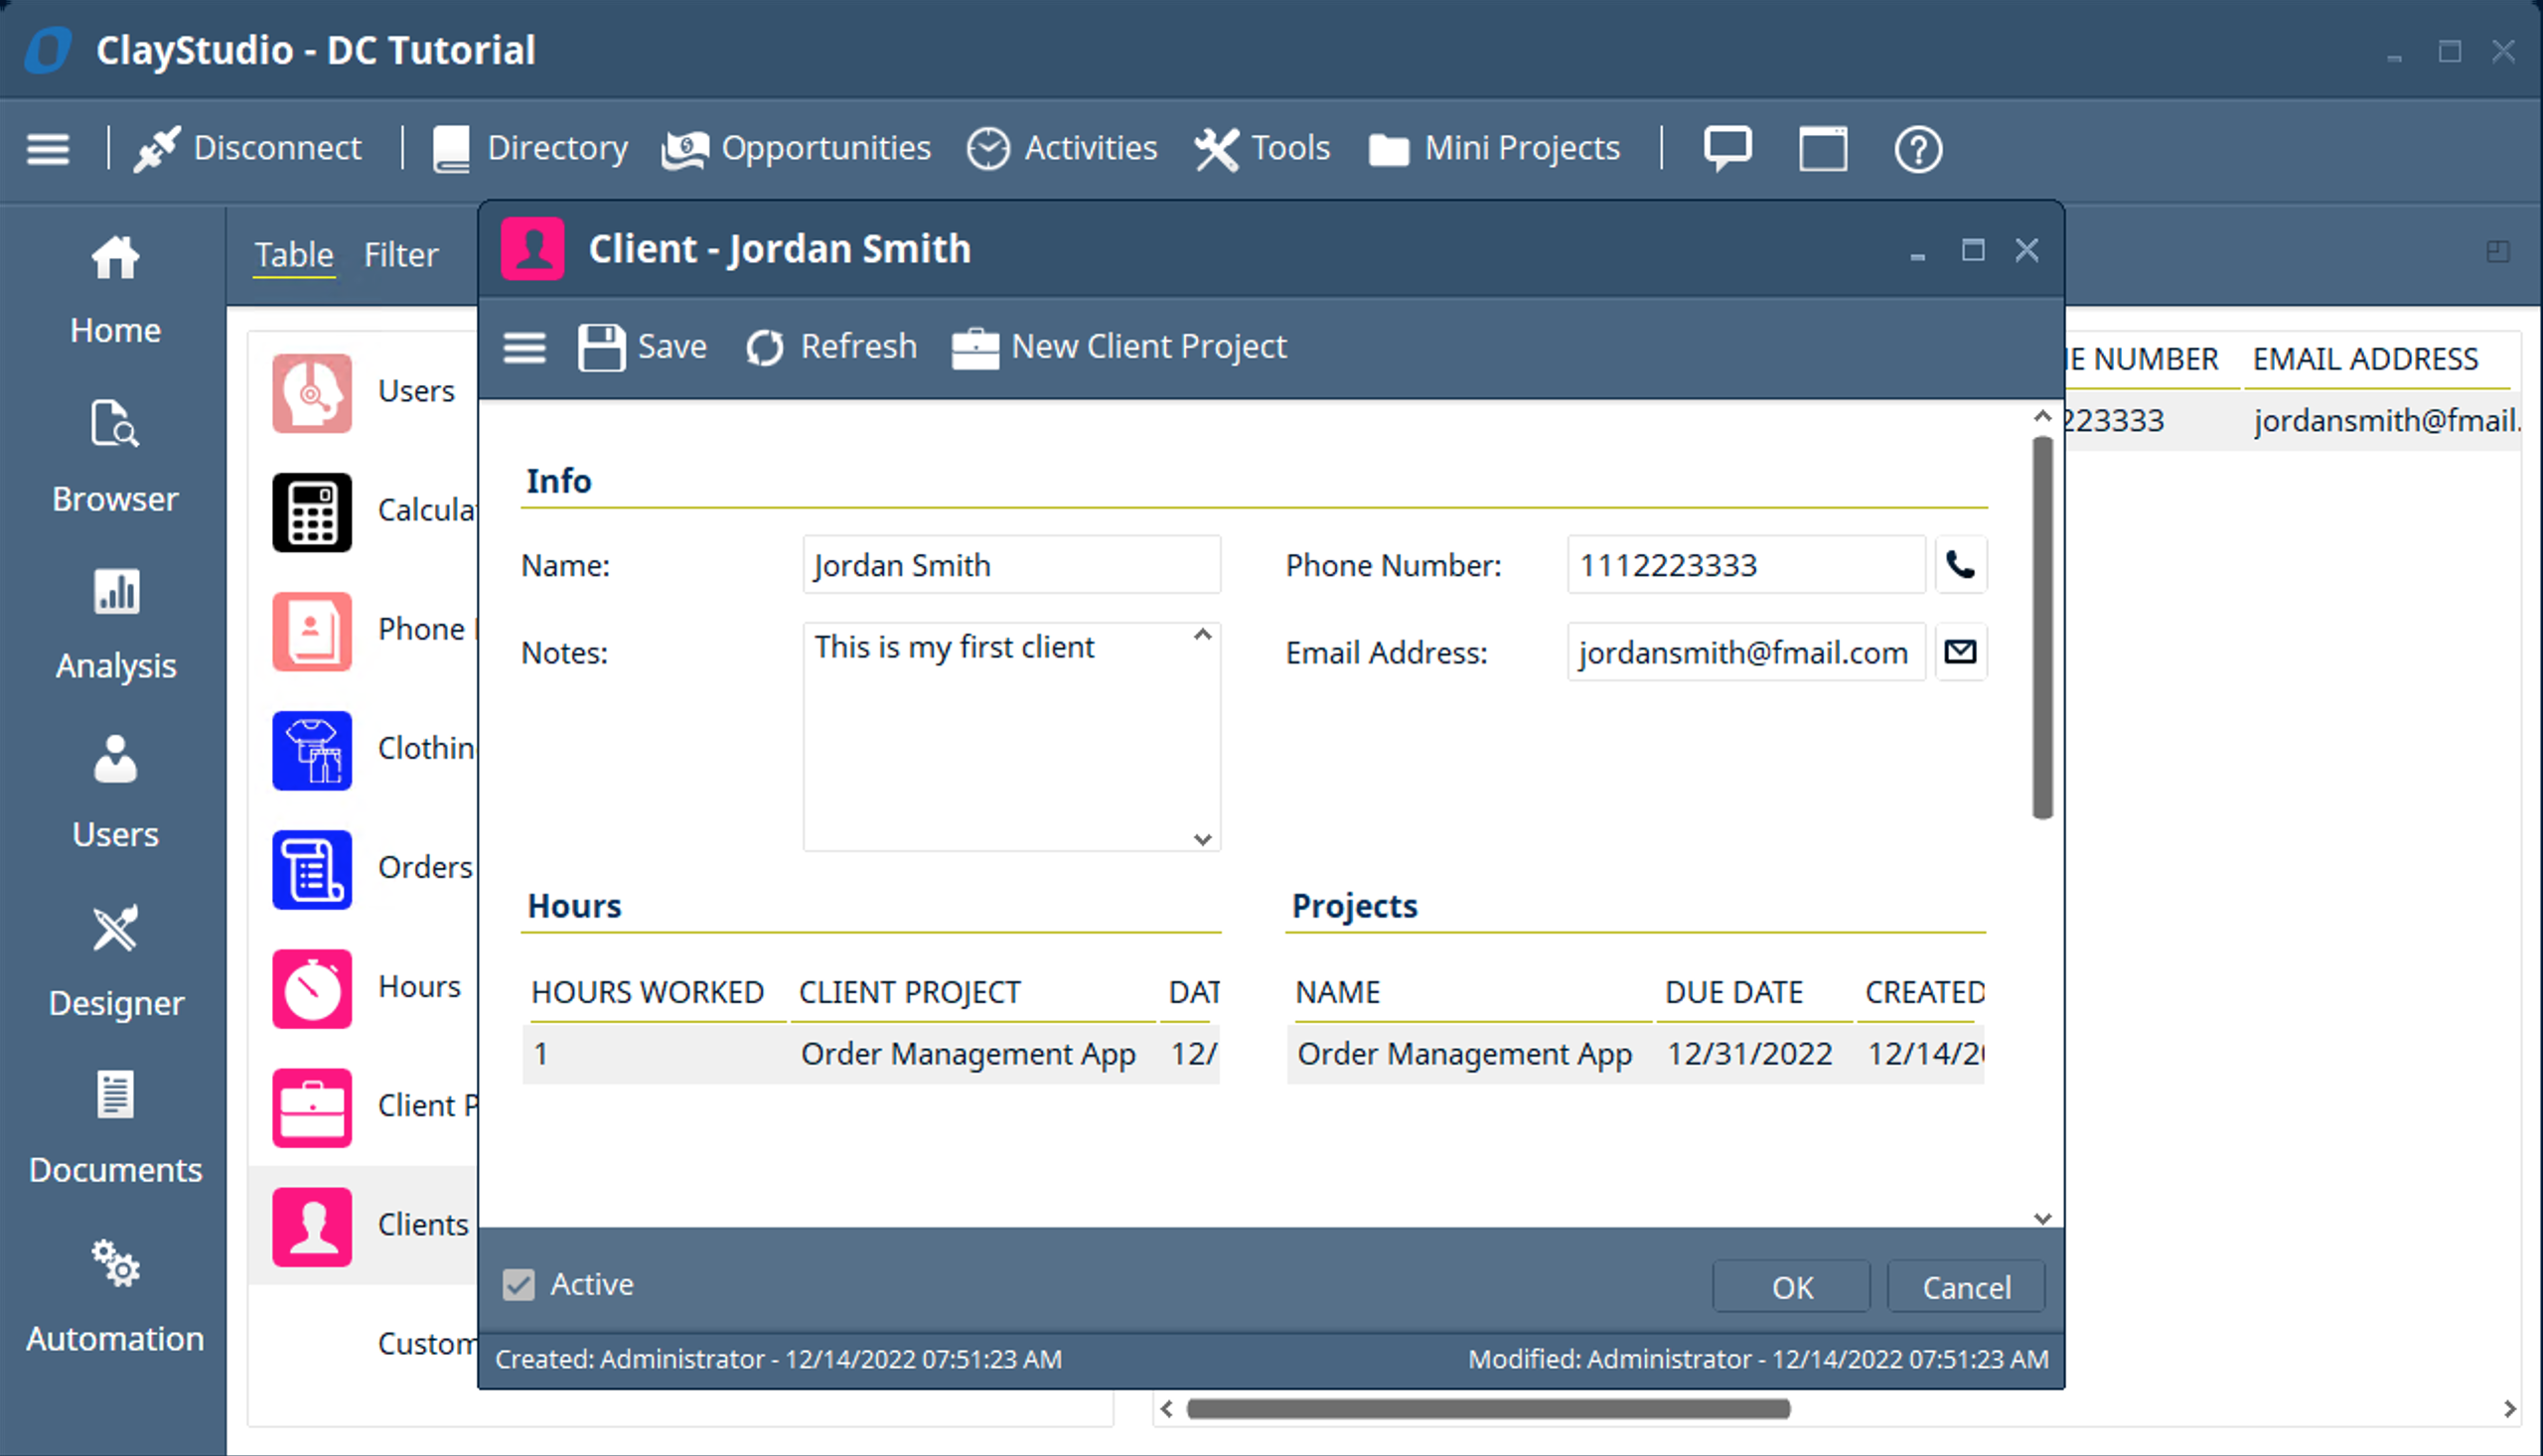
- Next, move the respective list under the respective title as shown in the screenshot below so you can clearly see what each list of items is for. At the same time, move the “Phone Number” and “Email Address” field so that can both be clearly seen on the right of the layout.
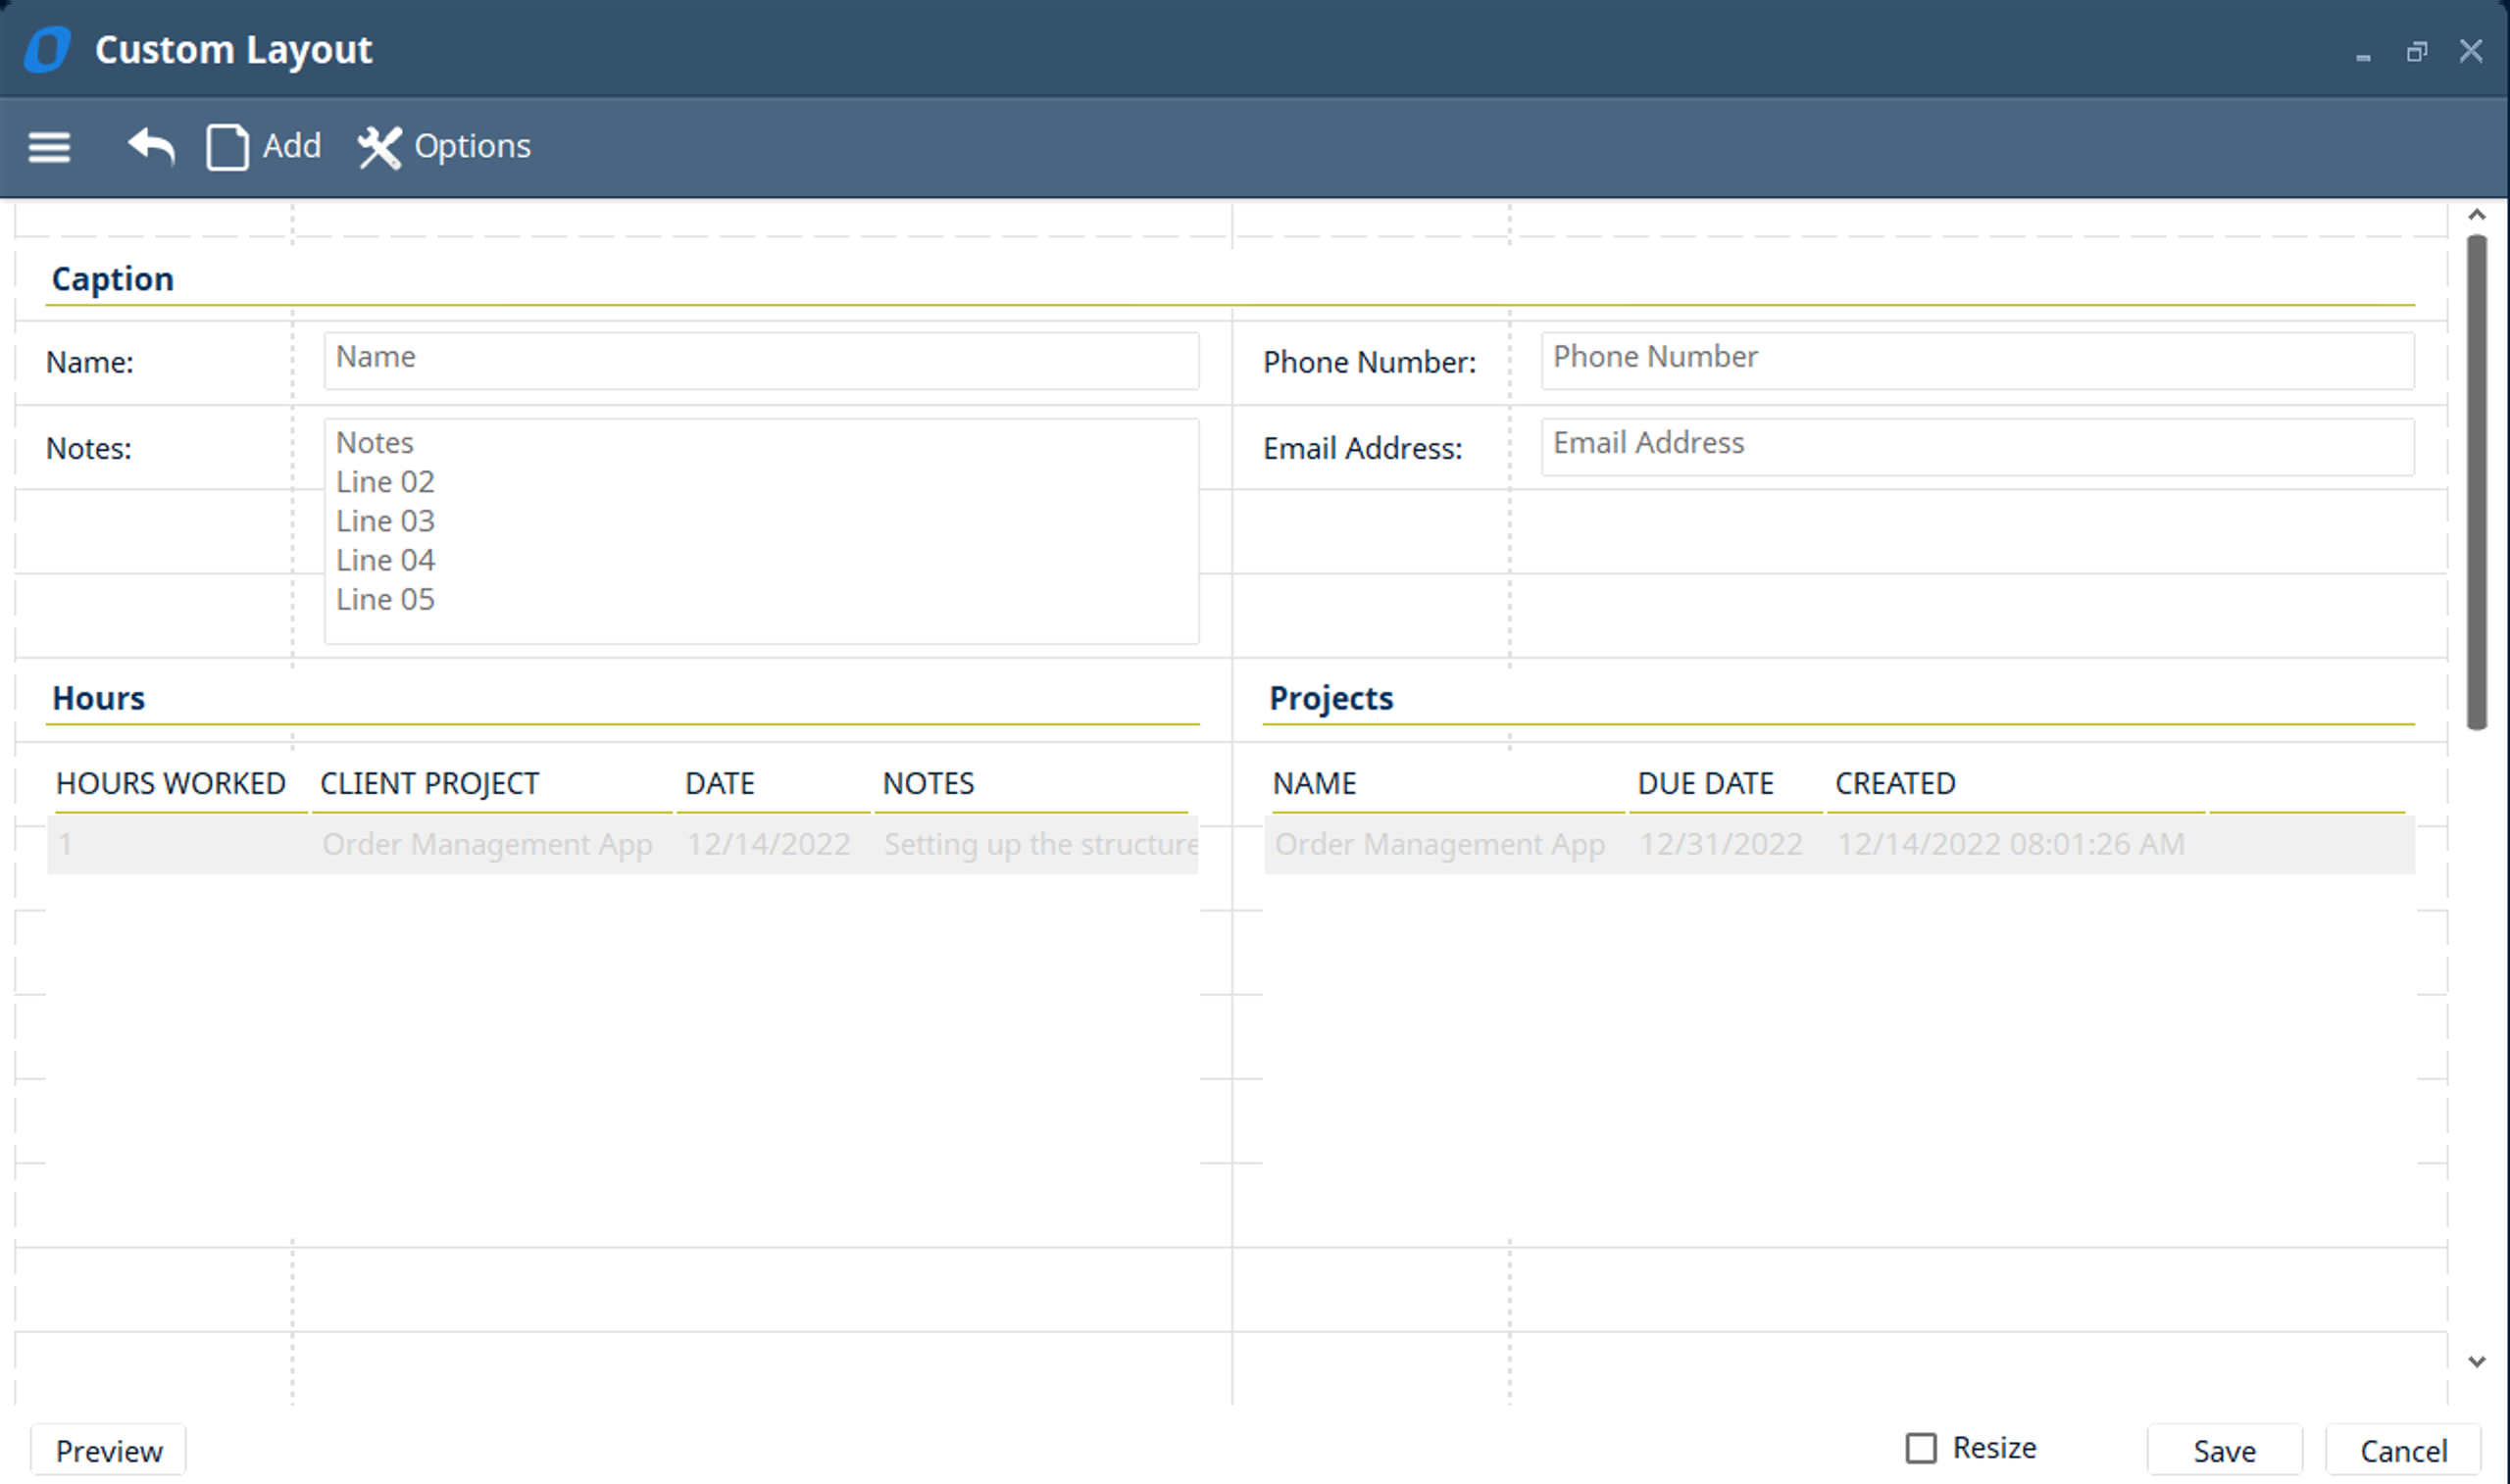
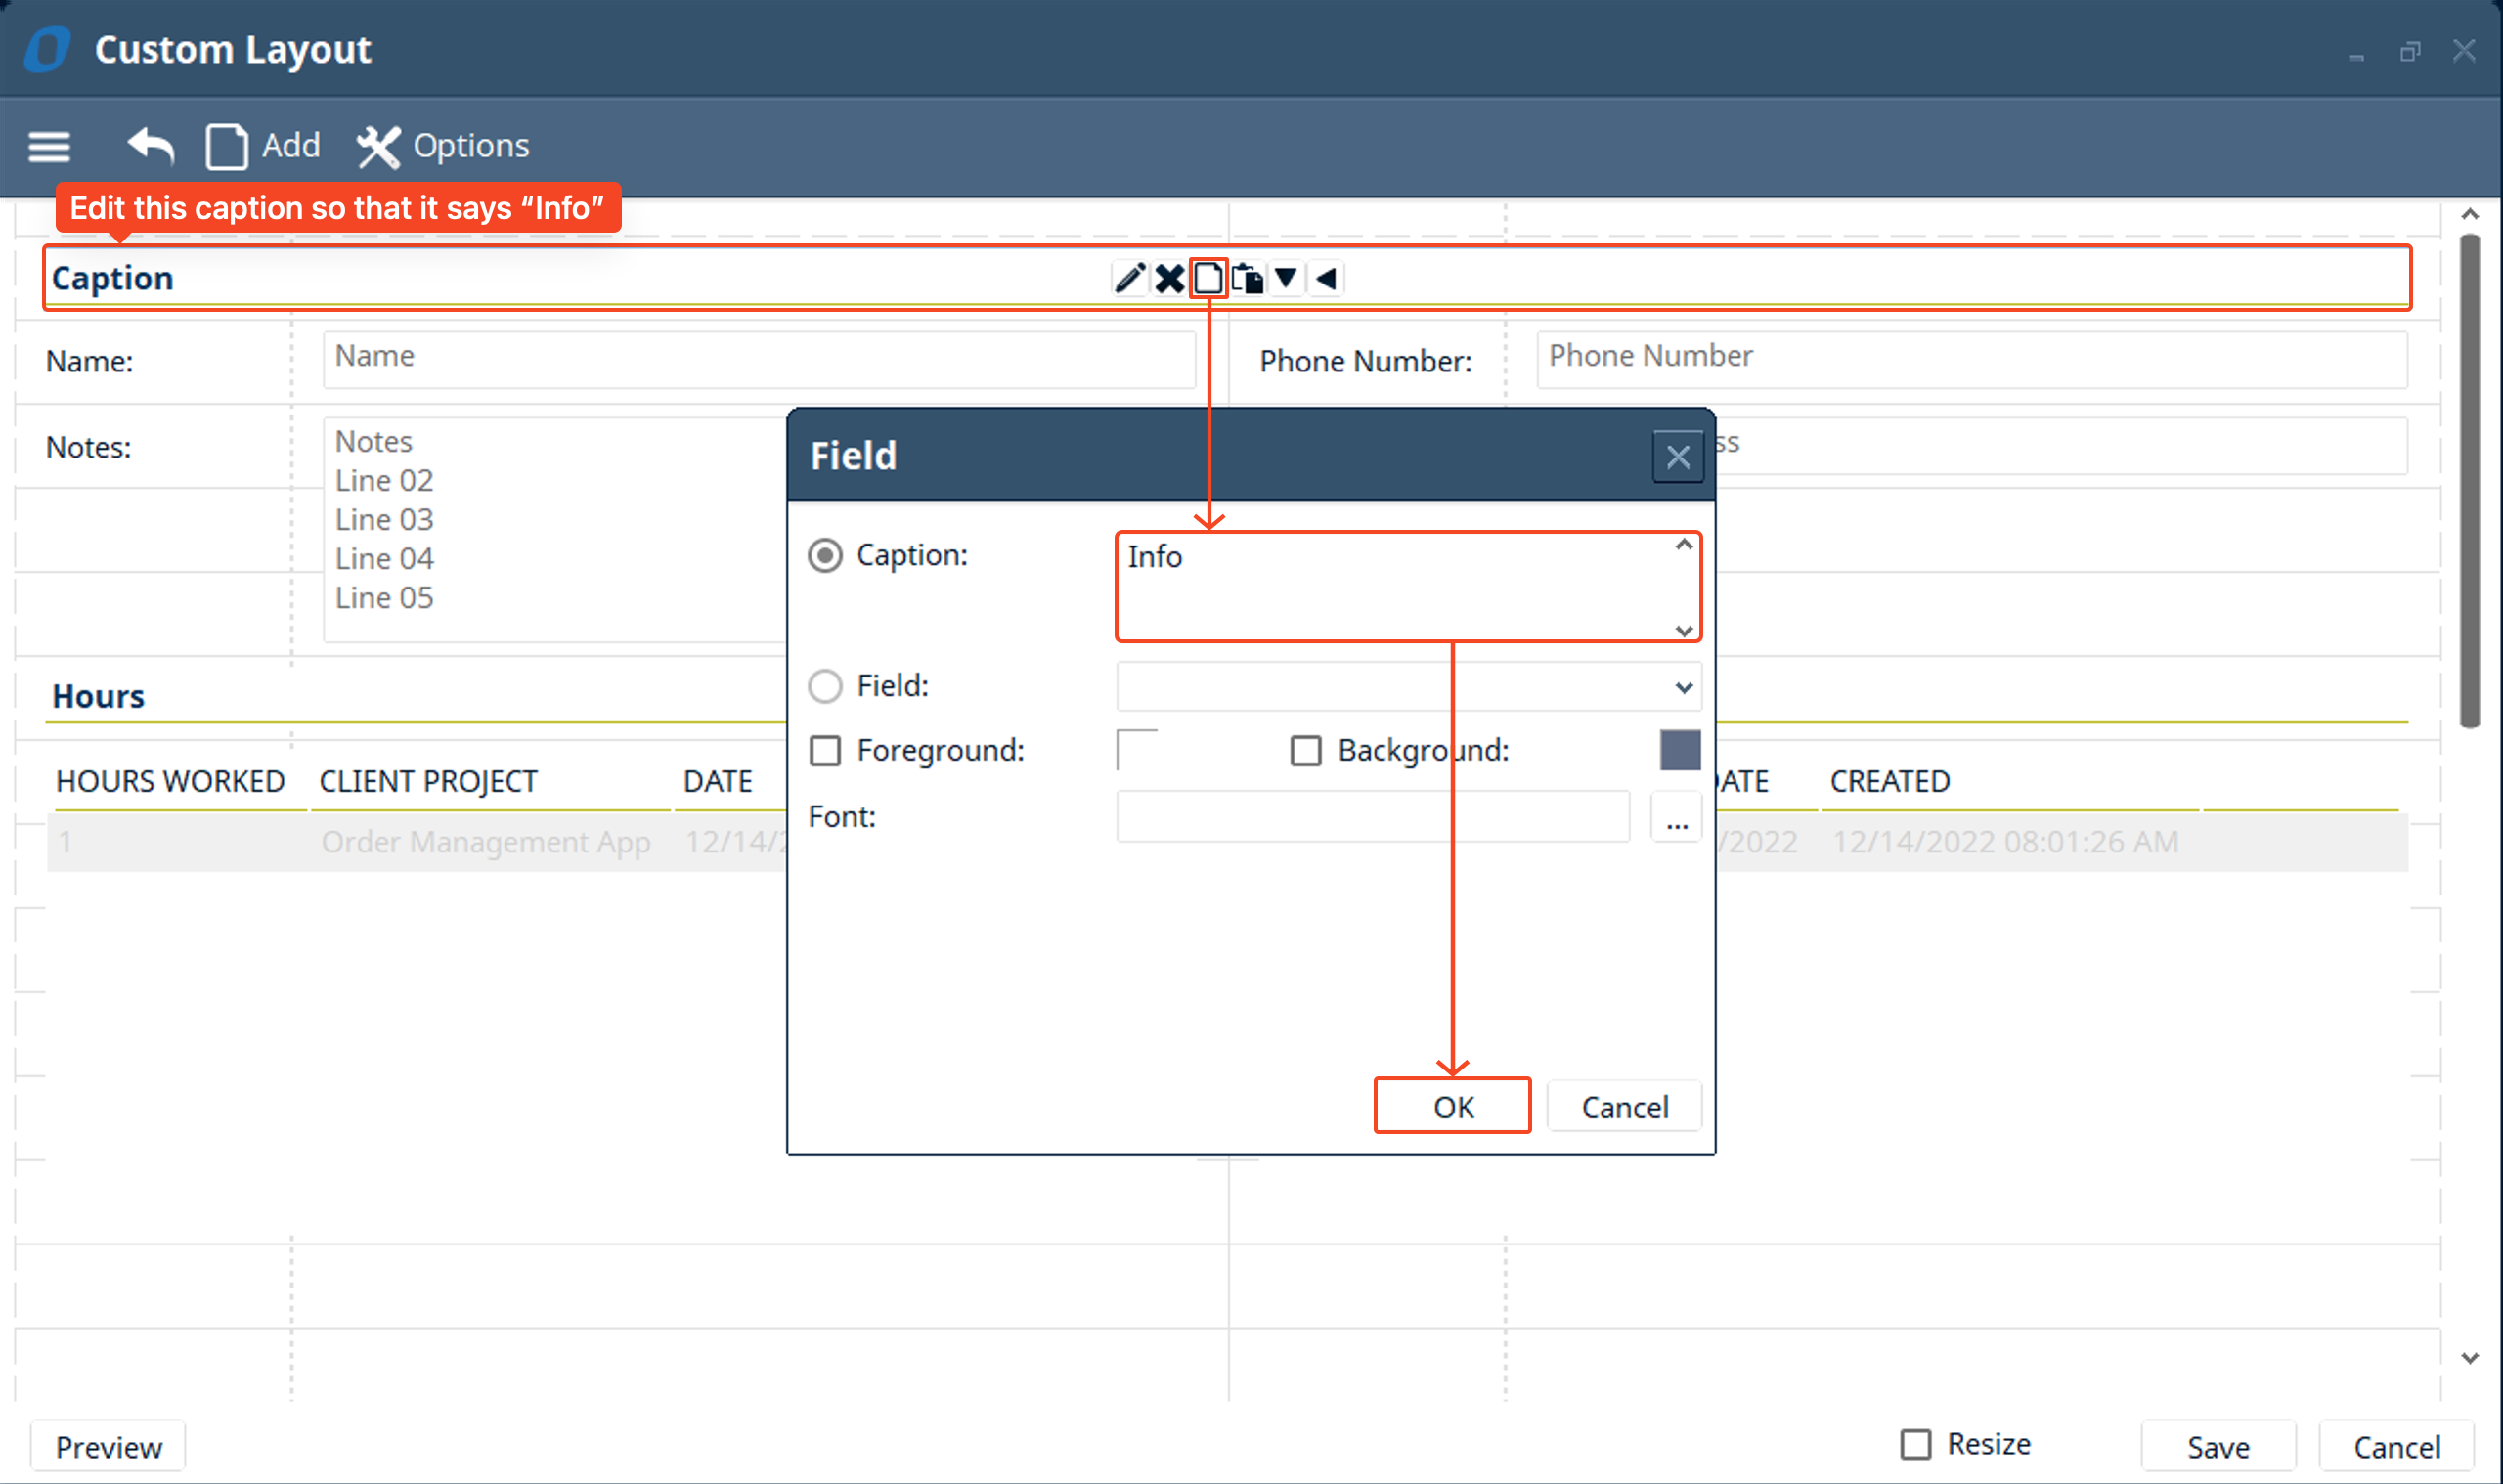
- Lastly, hover over the “Caption” in the first row and click the pencil icon to “edit” the caption to say “Info”
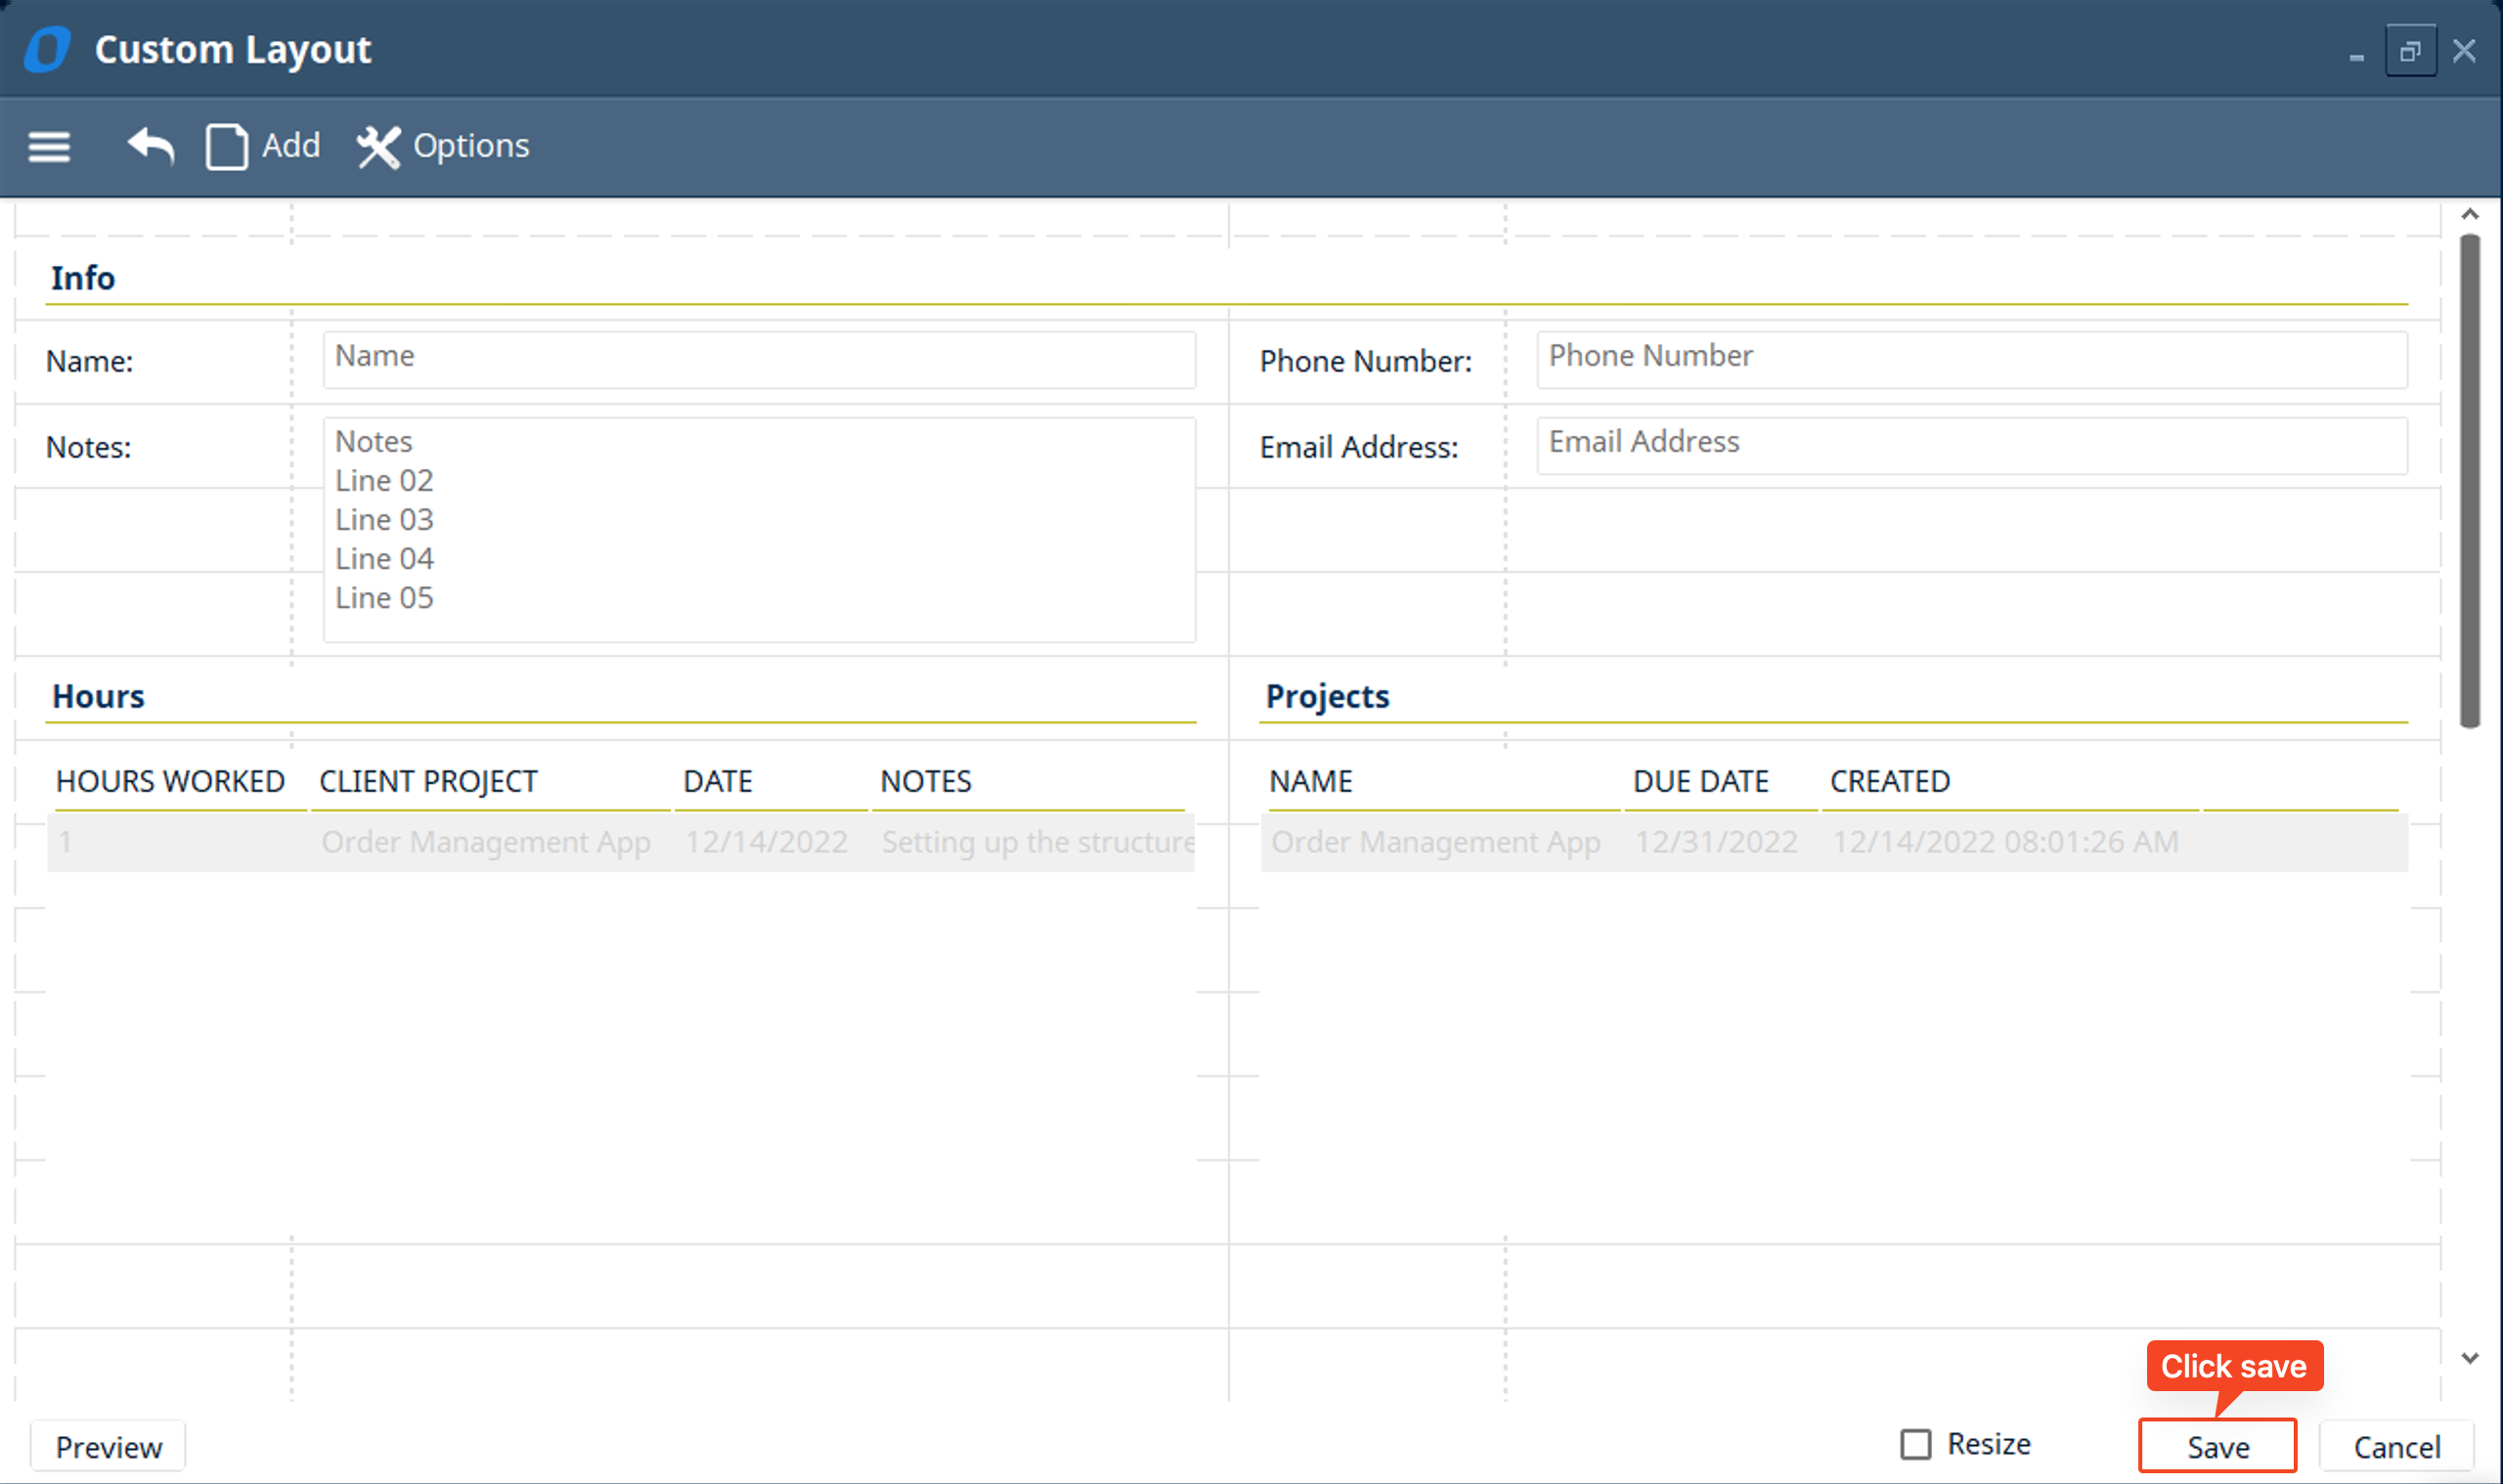
- The layout should look similar to the screenshot below. Click “save” when done
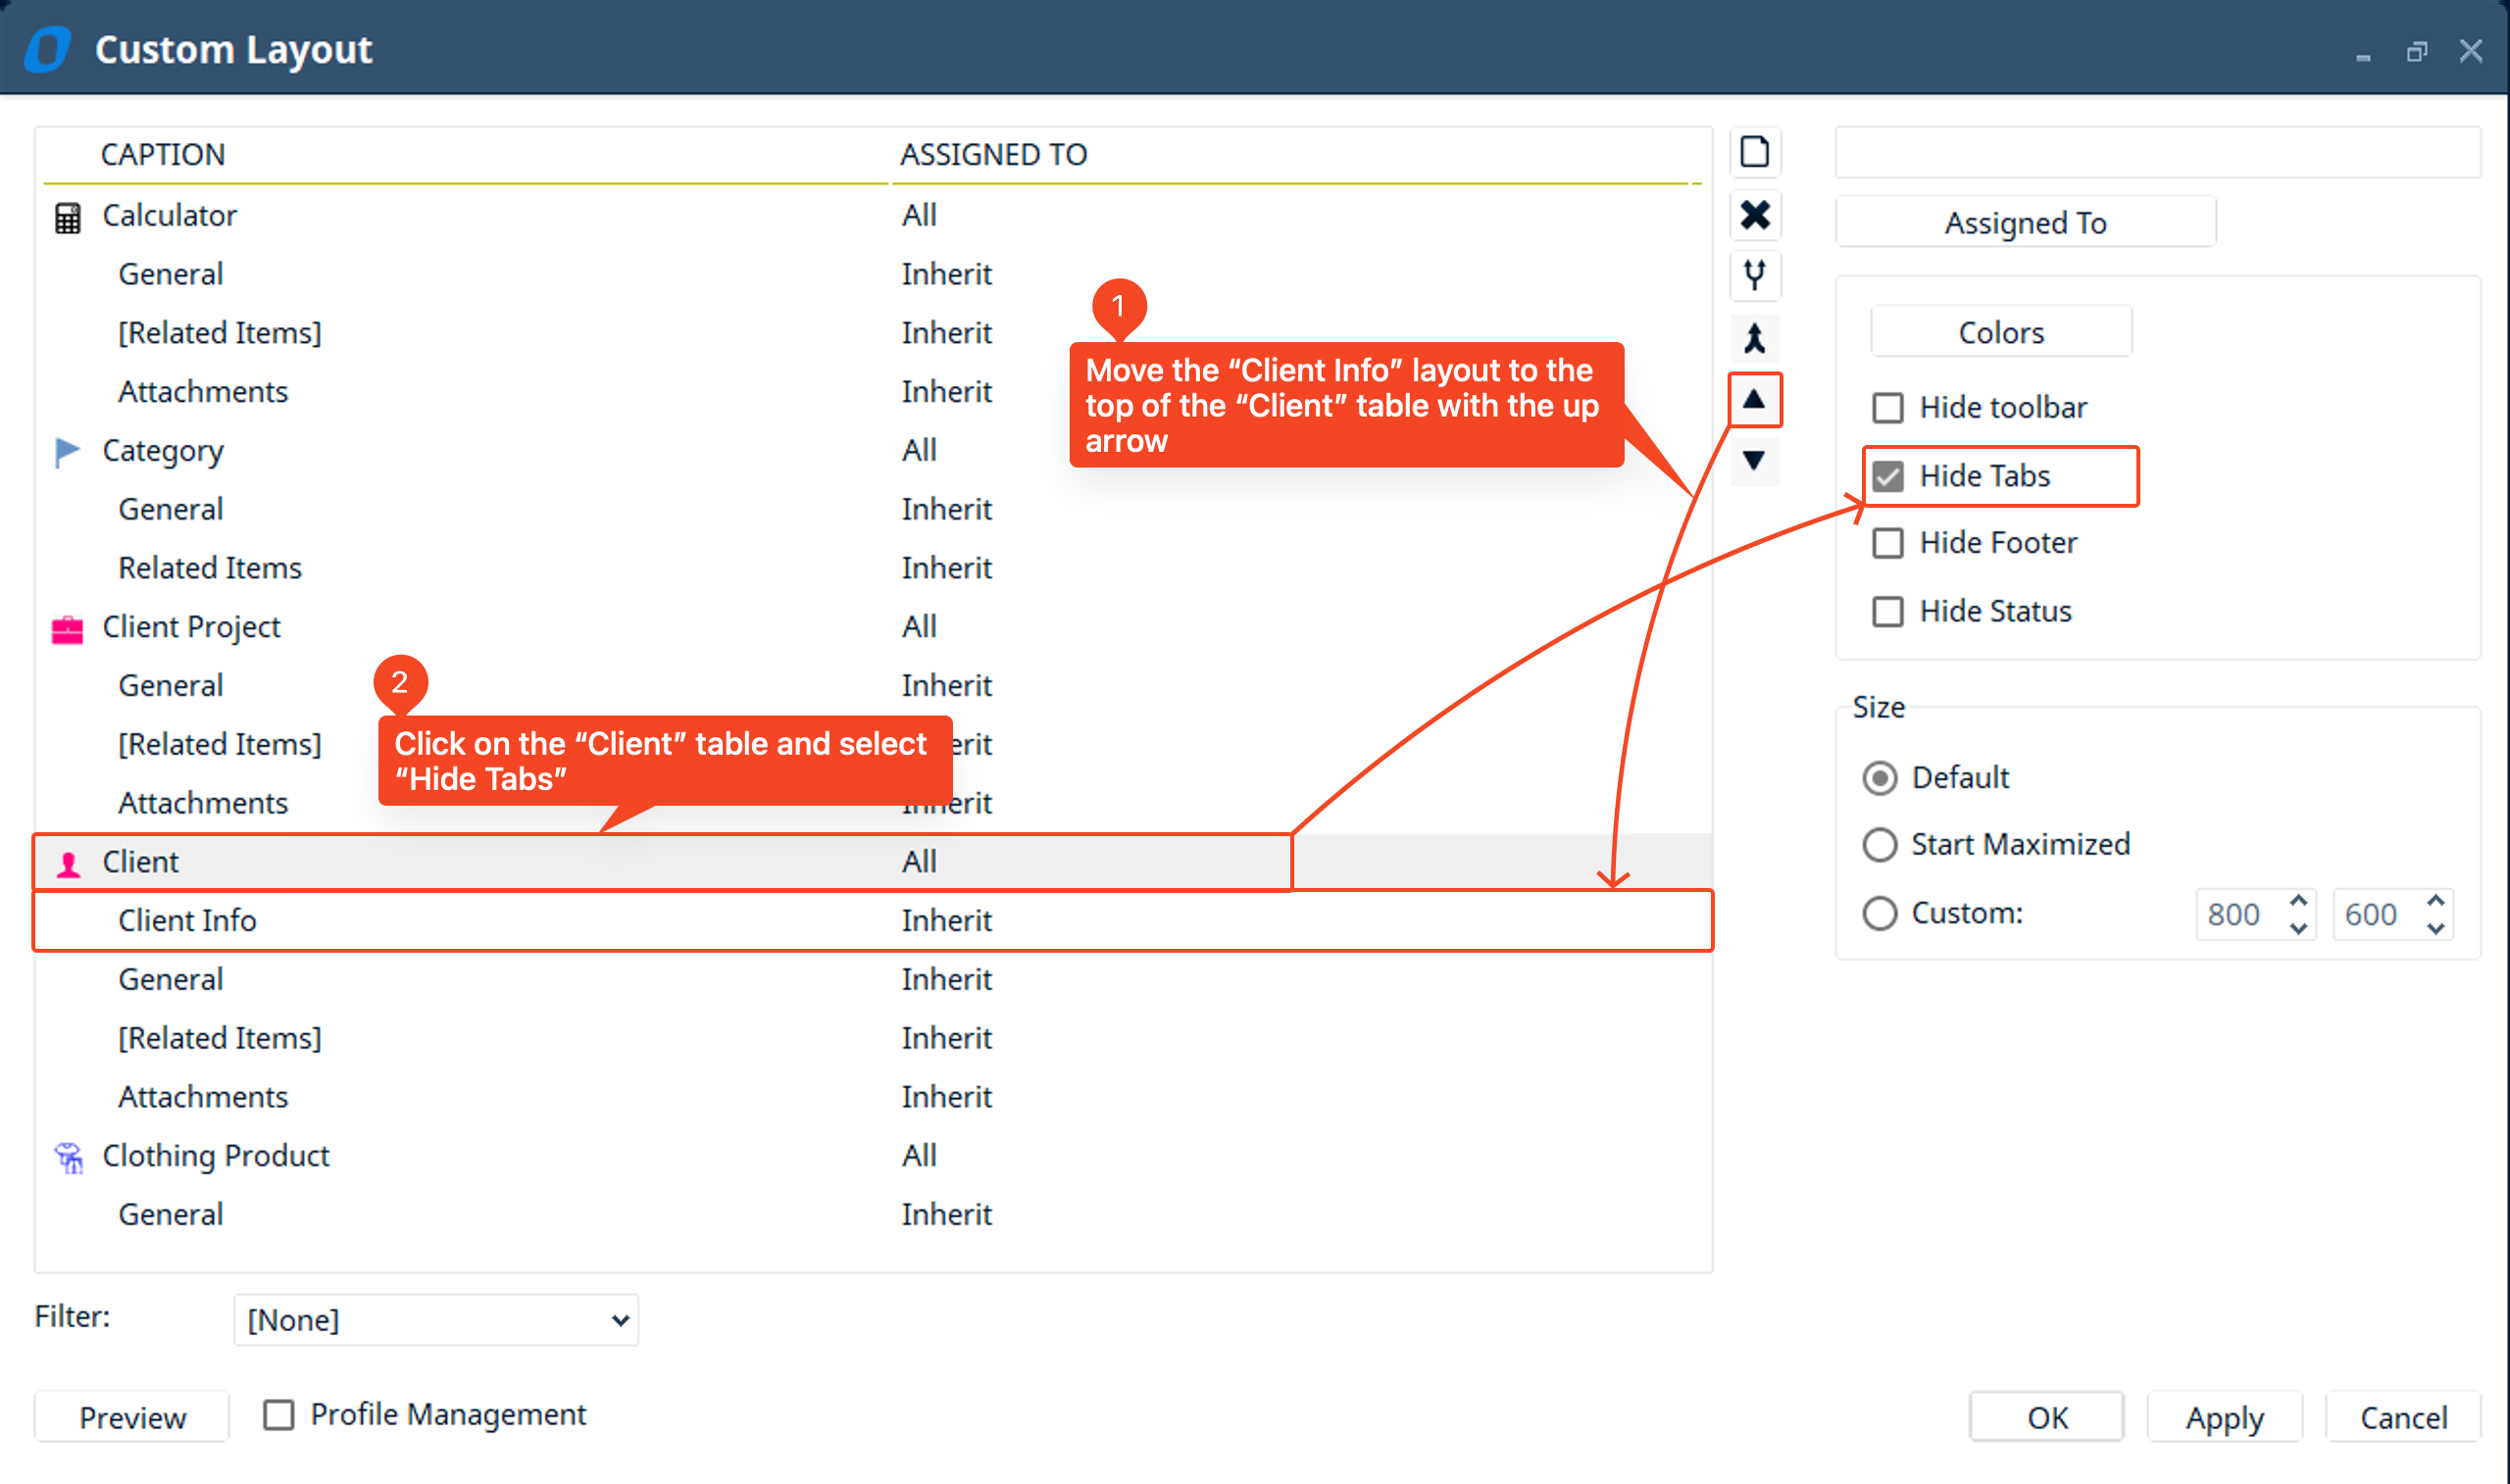
- Move the “Client Info” custom layout you just created to the top of the list of “Client” custom layouts. You can do this by clicking on “Client Info” then clicking the “Up” arrow on the right of the screen → Then click on the “Client” table and select the option to “Hide Tabs” to have less clutter in the “Client” layouts. → When done click “OK” to save the custom layout and the order of the custom layouts.
- Next, go back into the “Browser” tool and open a “Client” to see the new custom layout you created.
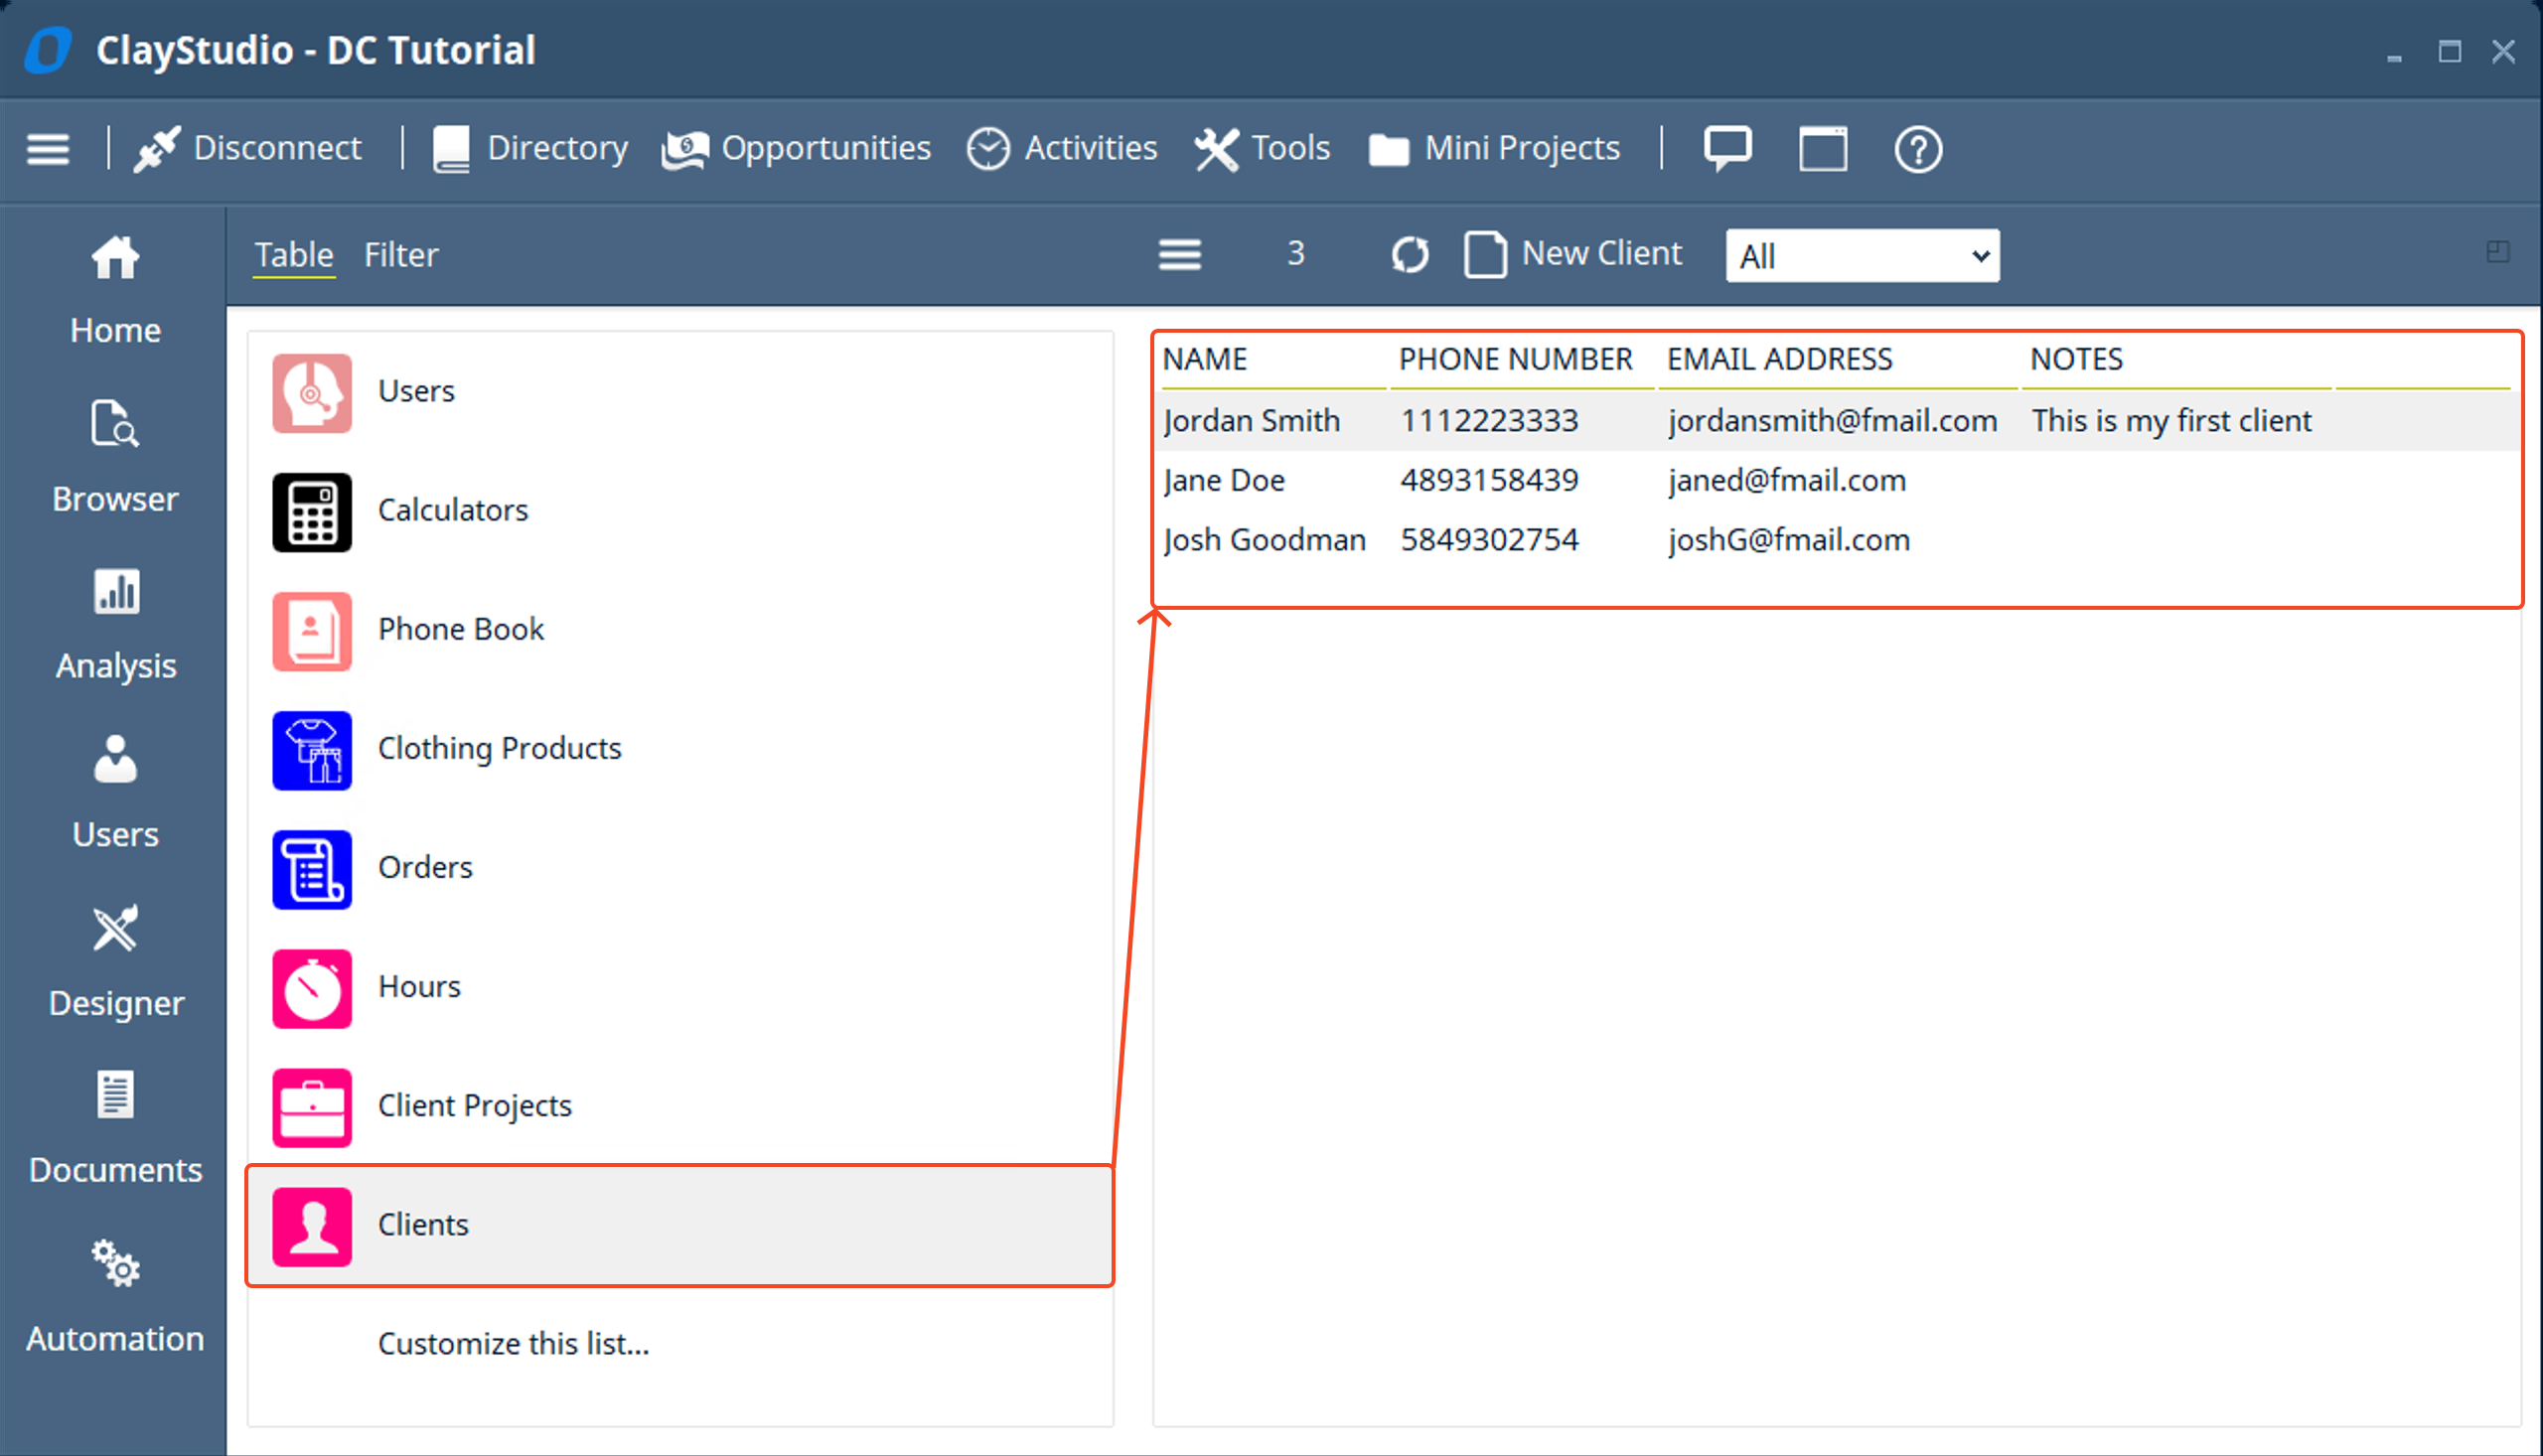
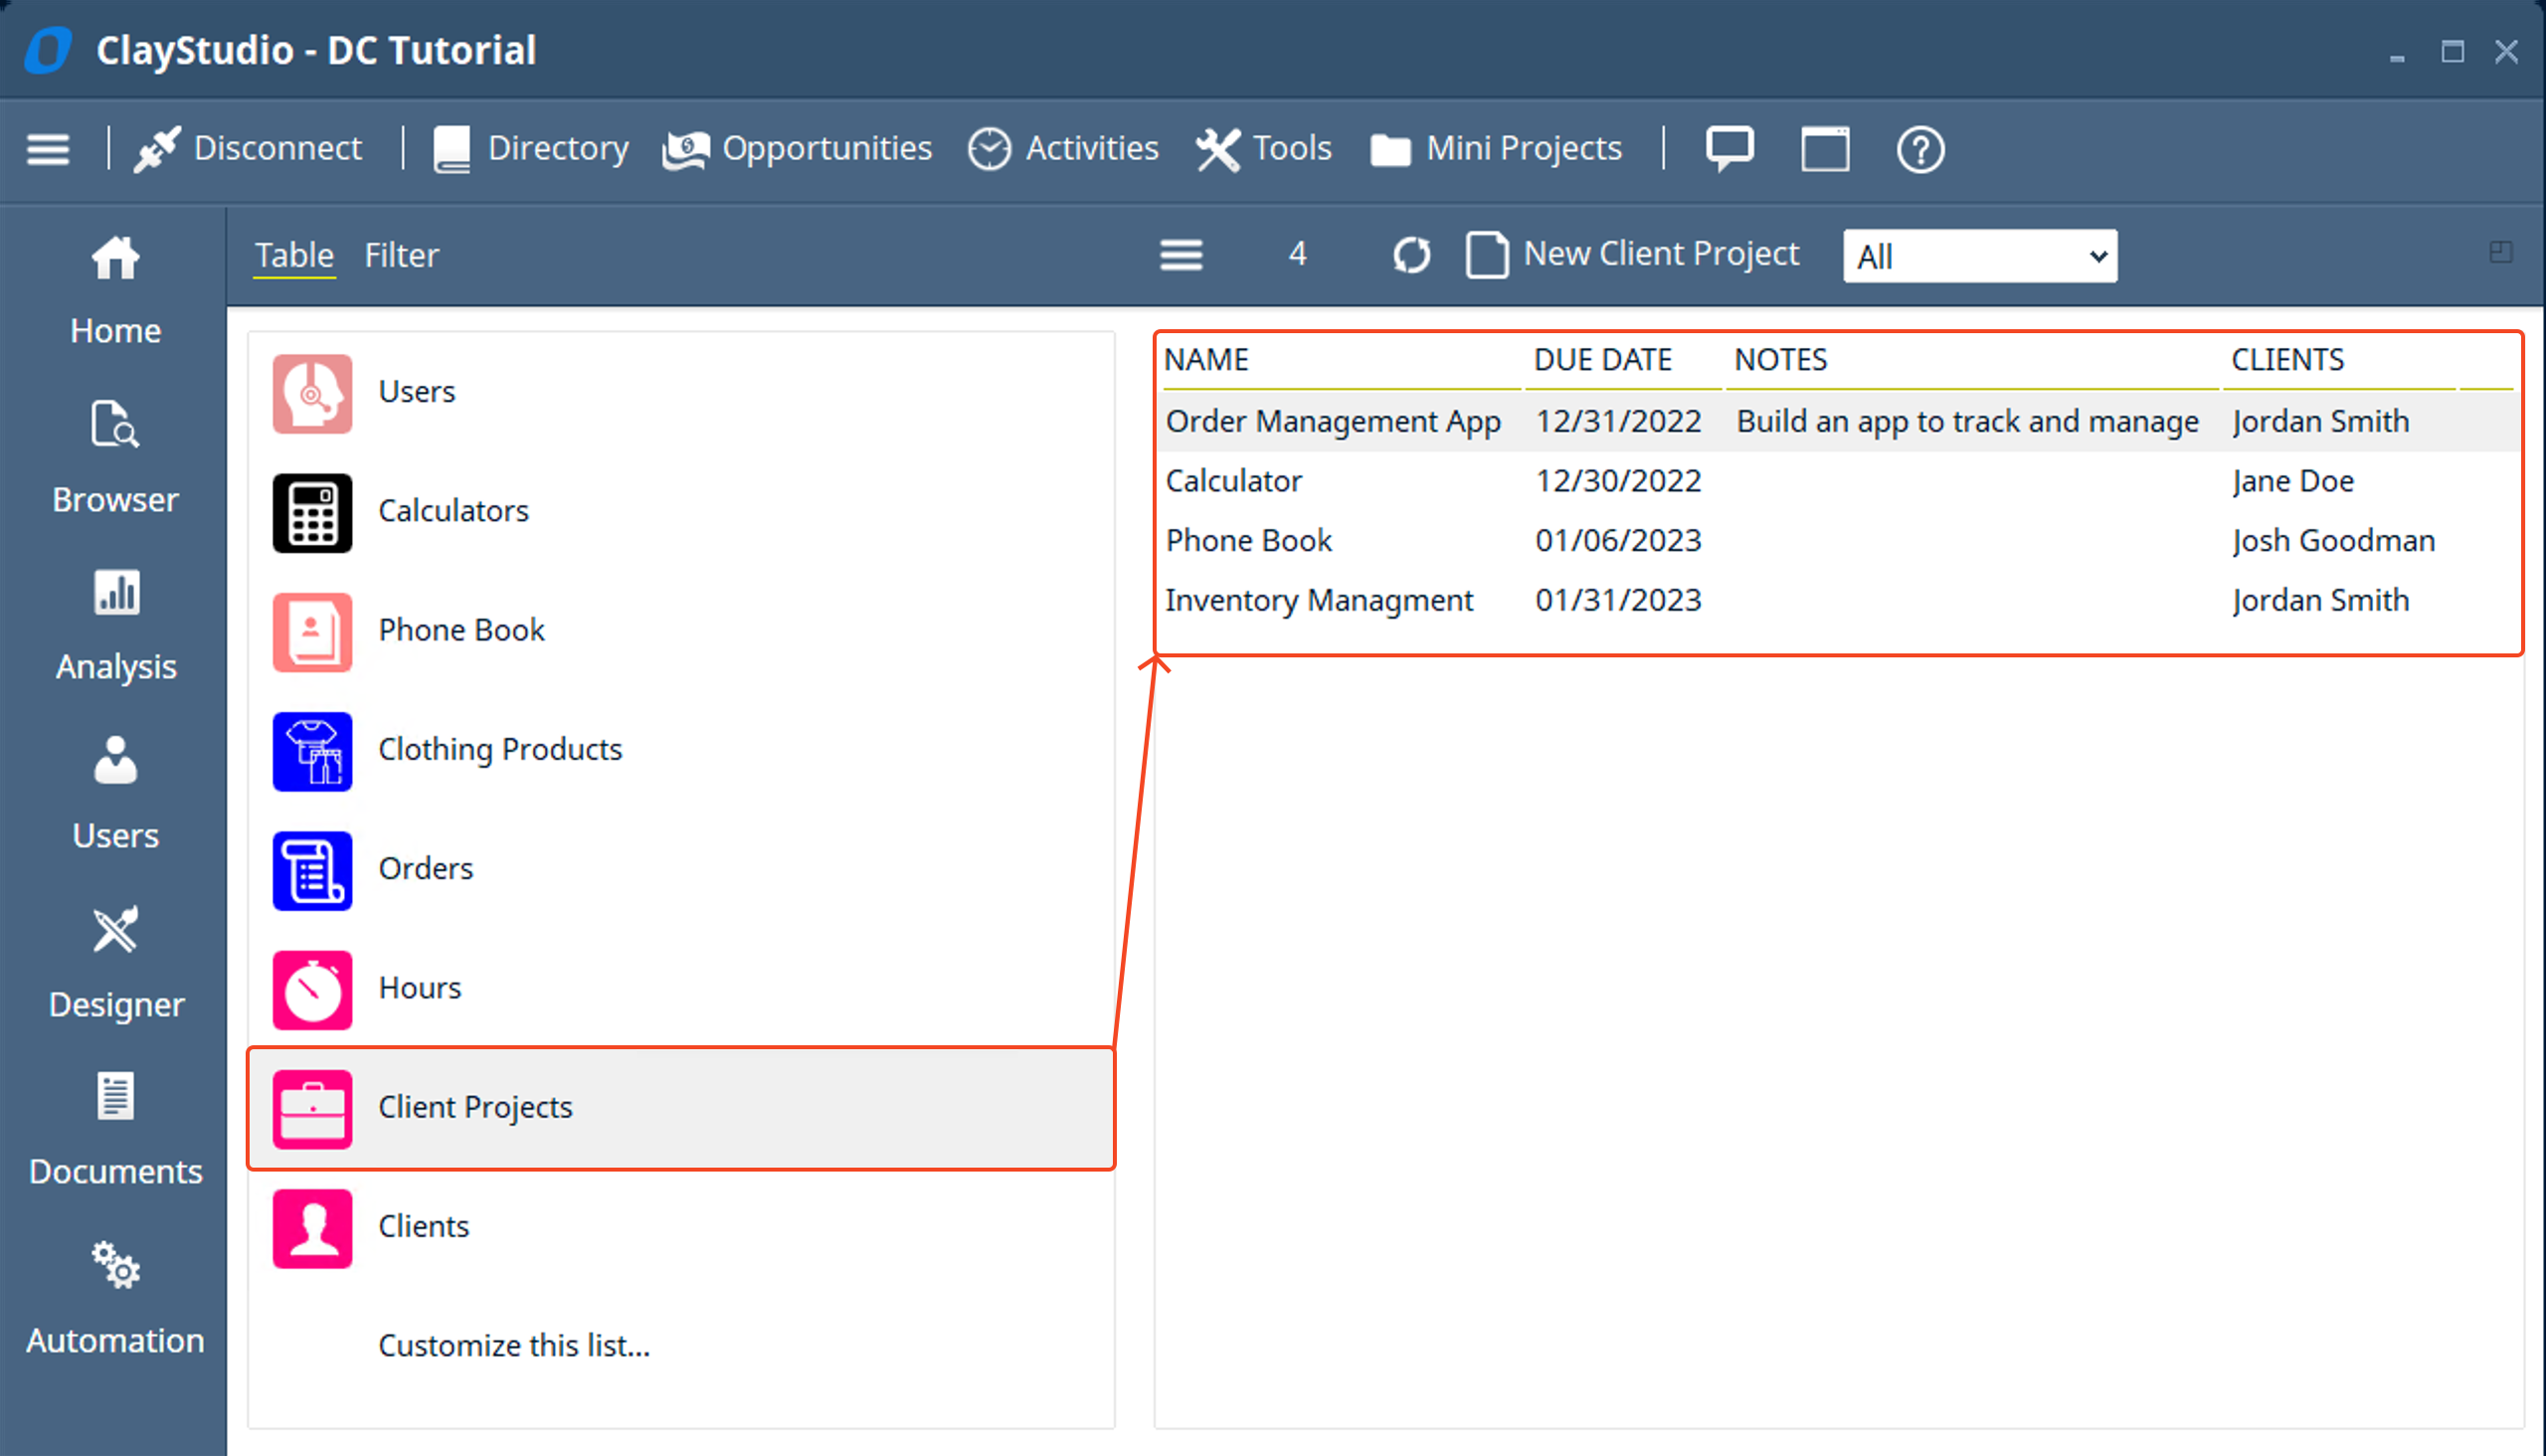
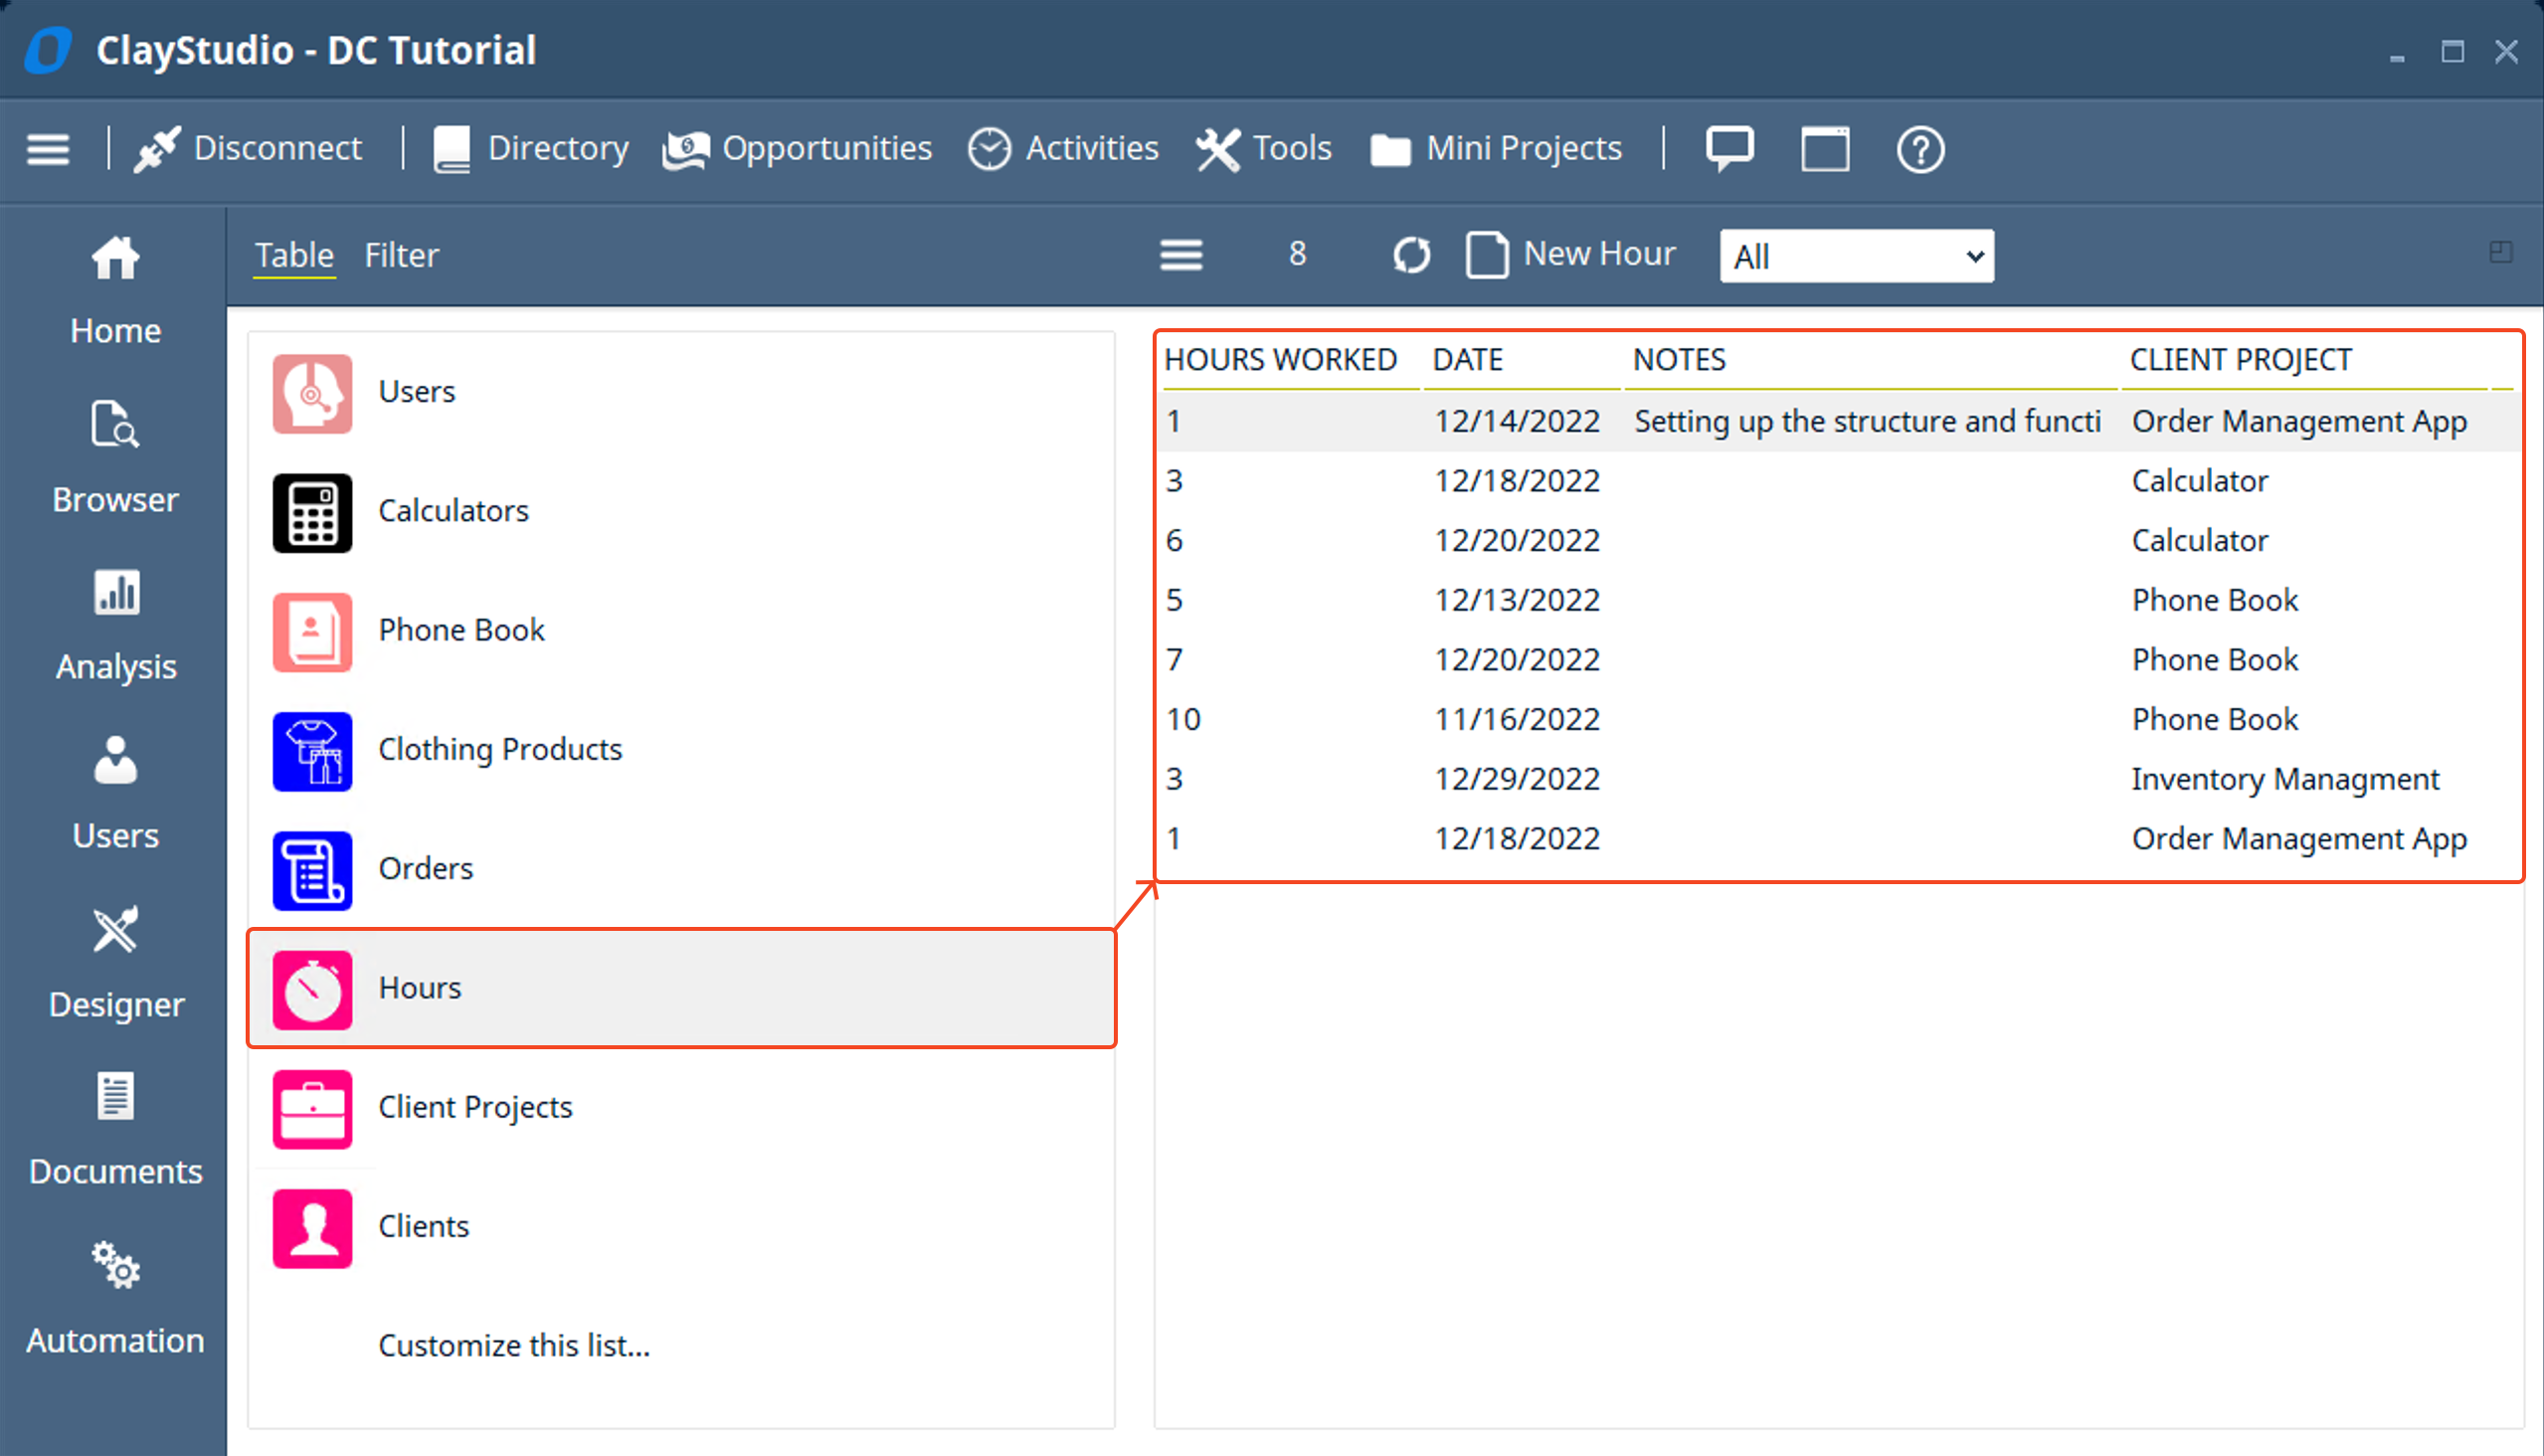
- Now let’s create a dashboard to help us see useful information about our Hour Tracking solution. We will add some lists and statistics about the hours worked to a dashboard in our toolbar. Let’s first add some data to our: Clients, Client Project, and Hours tables so that we have some information in our system to work with. (look at the screenshots below for the new data)
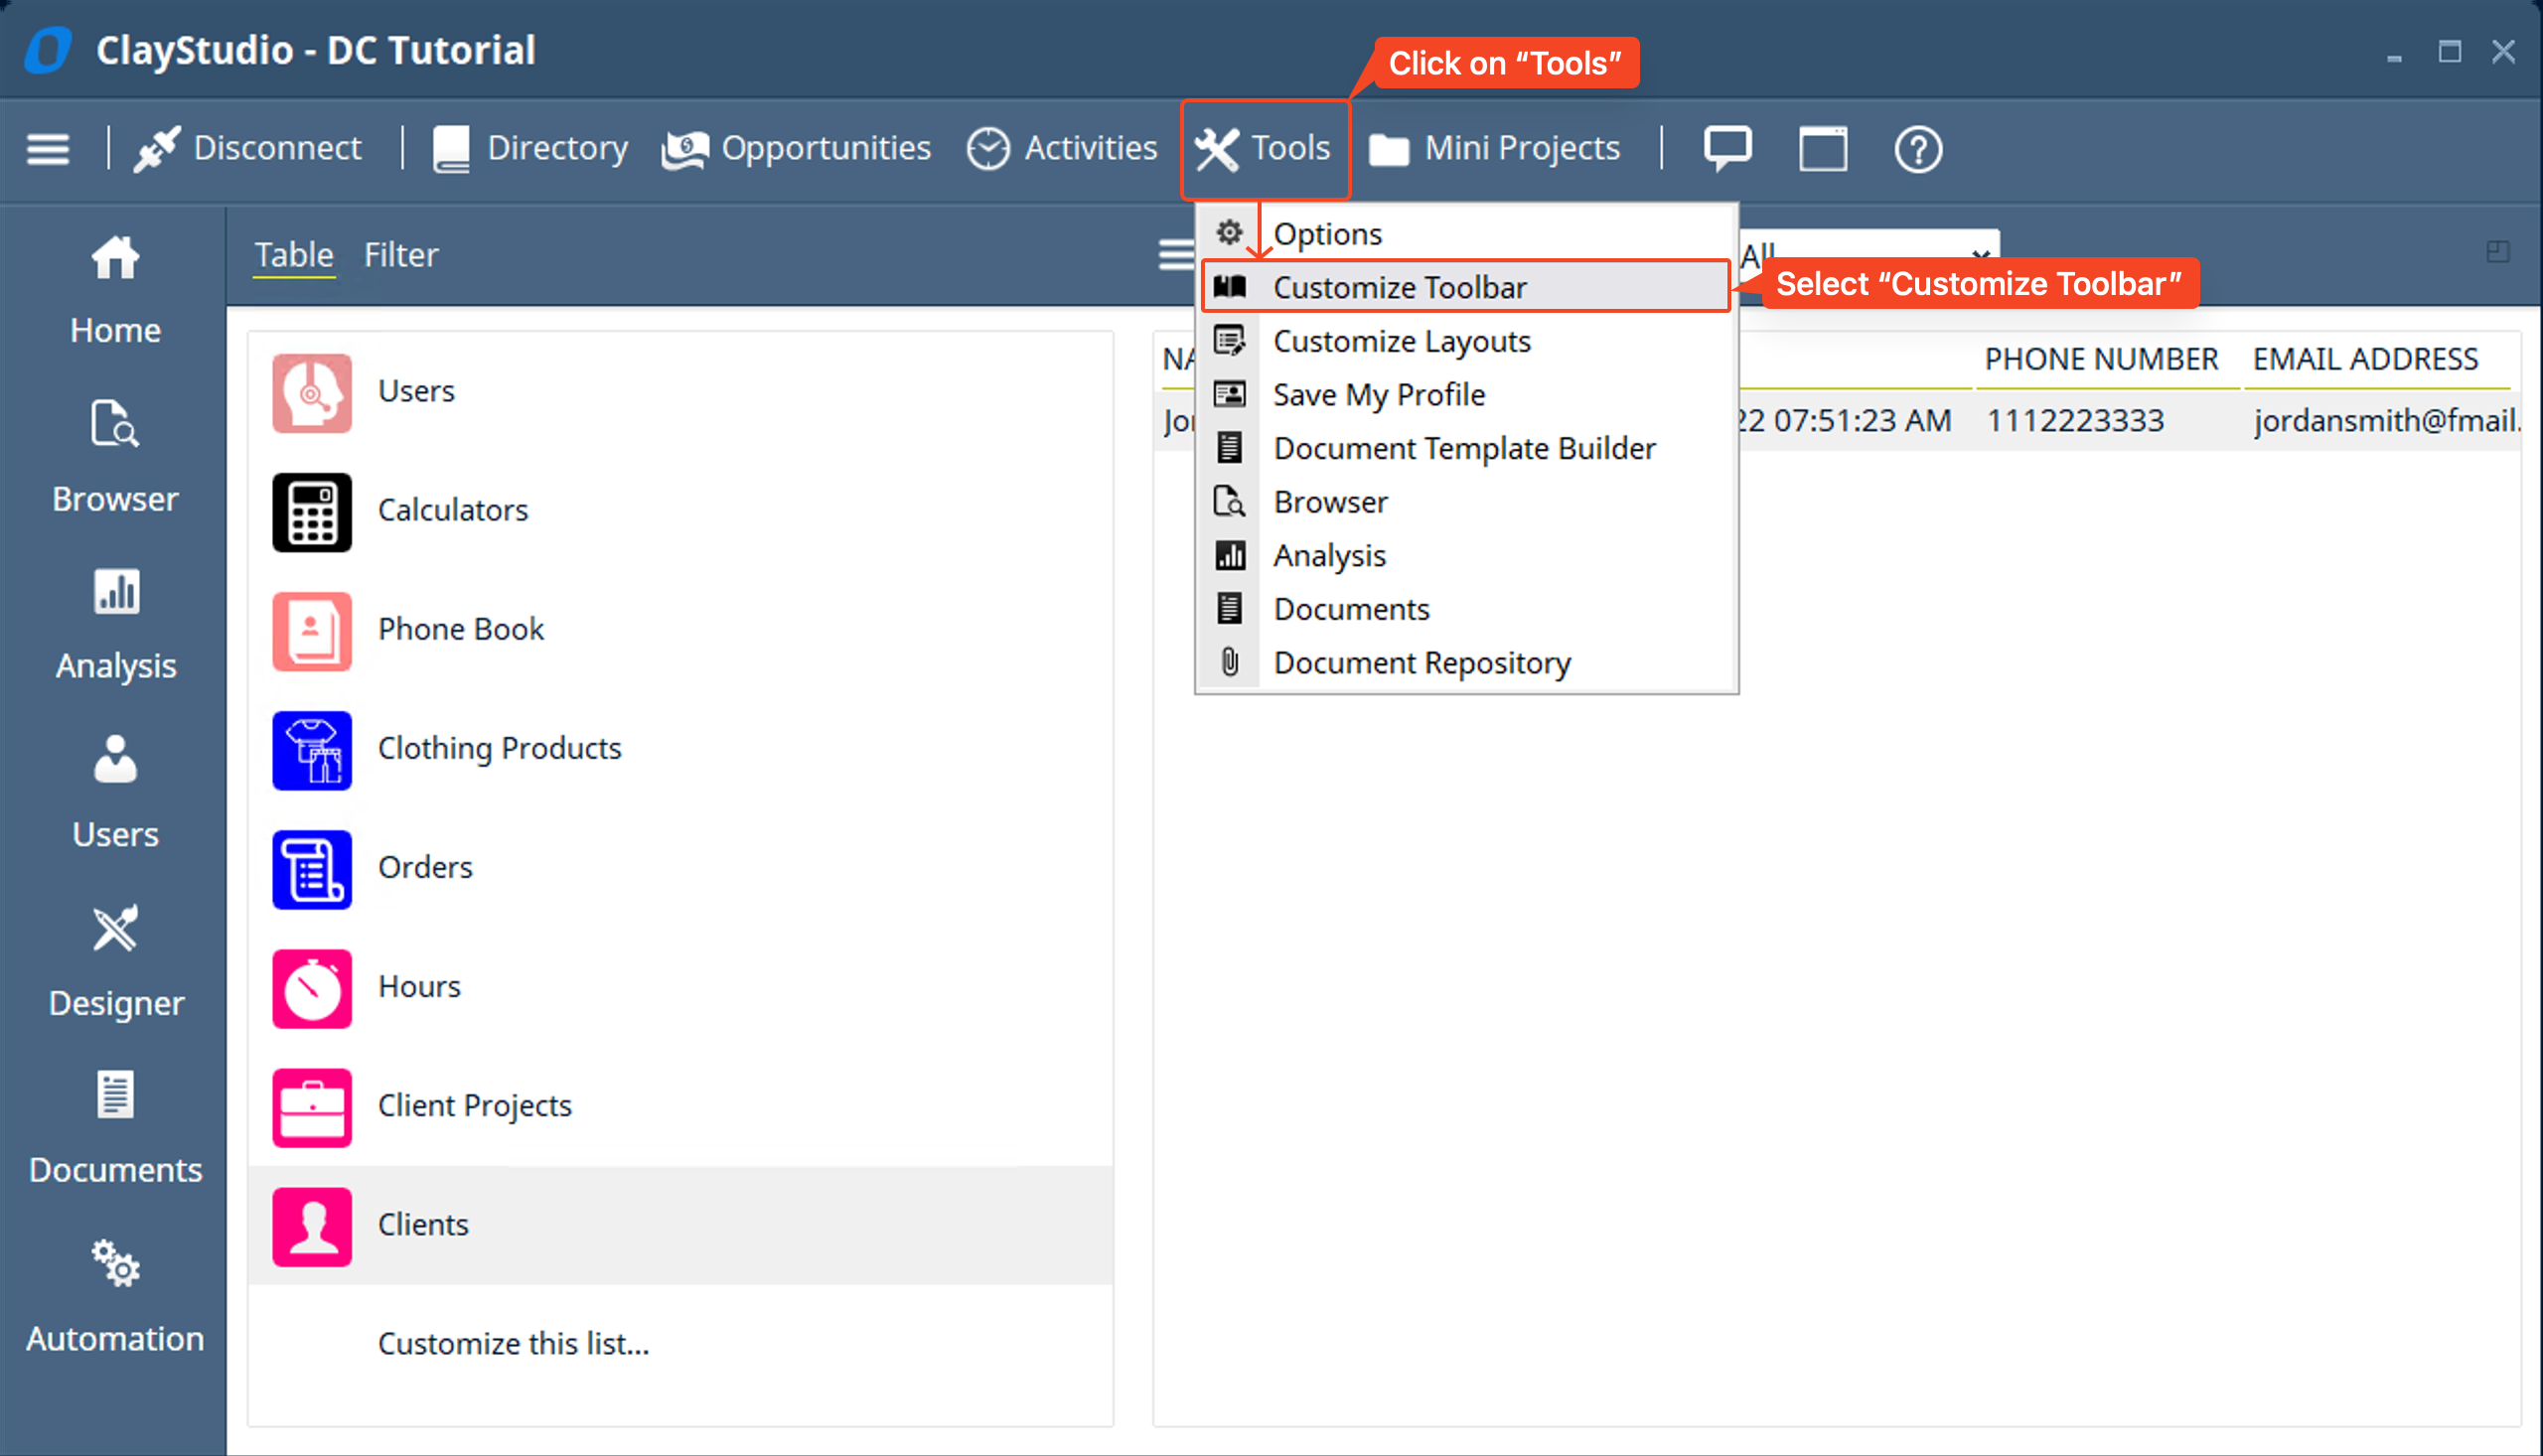
- Let’s click on the “Tools” option in the toolbar and click on “Customize Toolbar”.
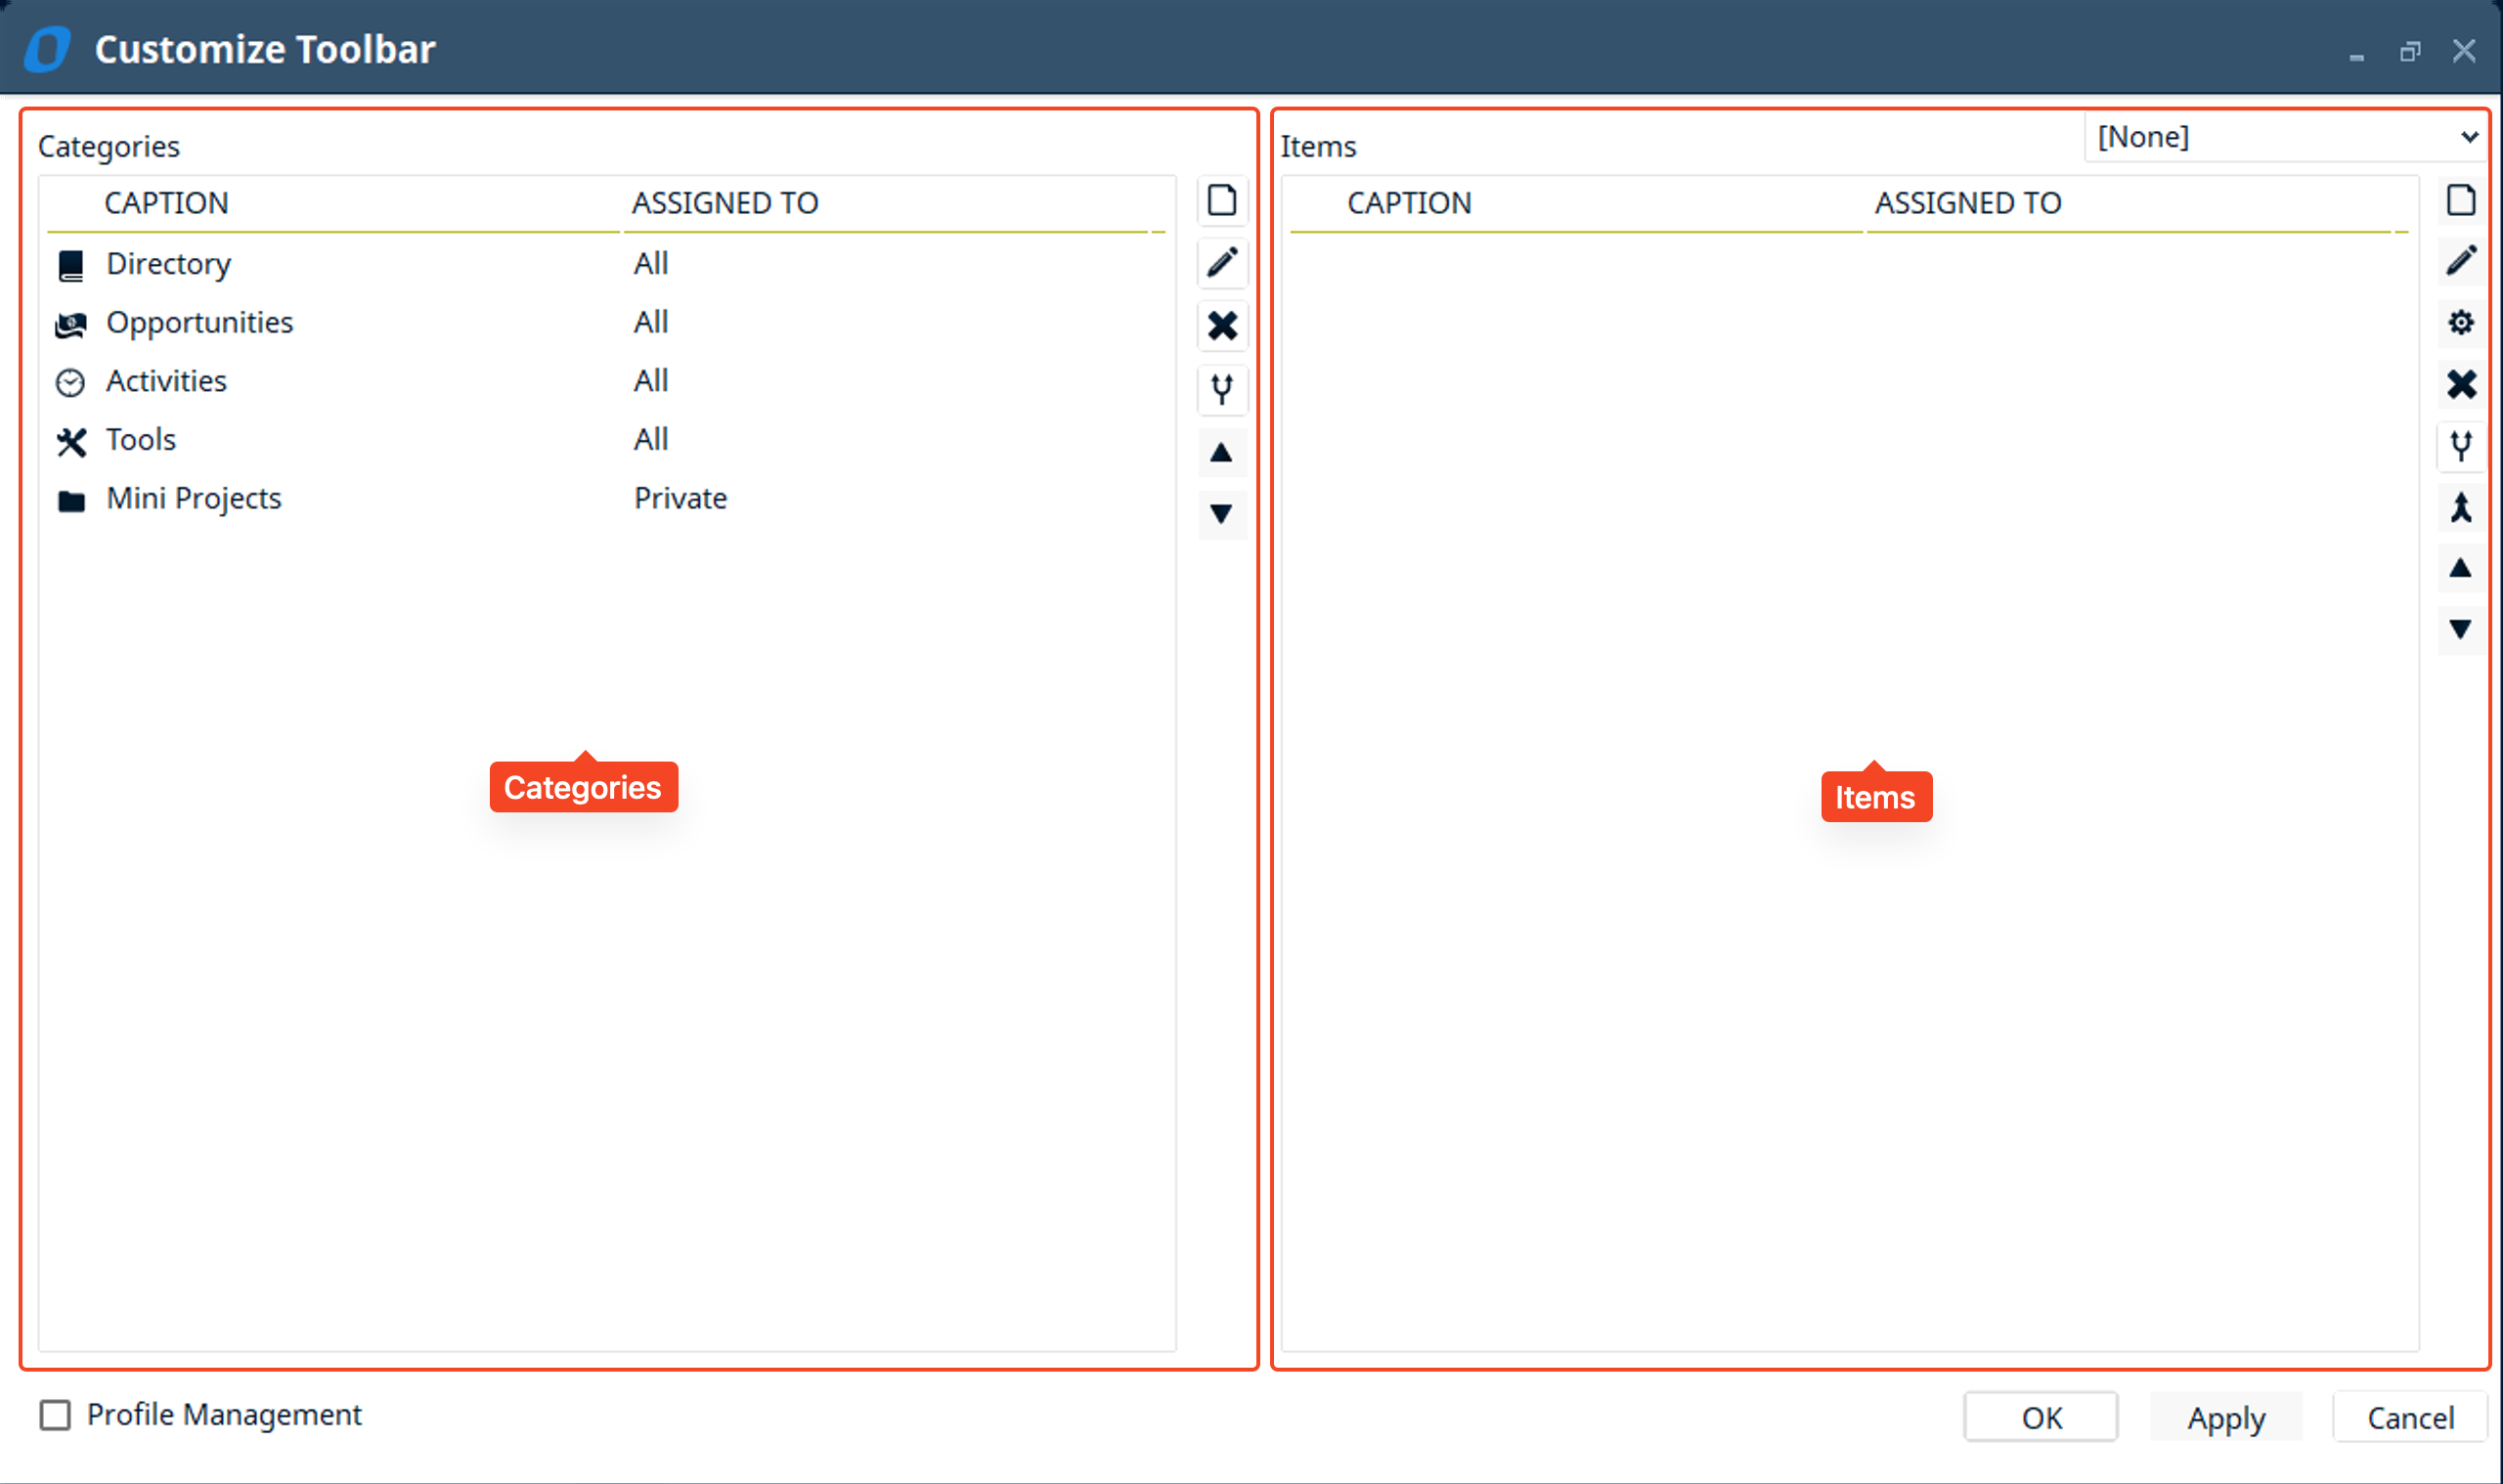
- The “Customize Toolbar” window pops up → here you have two sides of the window: Categories and “Items”. “Categories” are essentially folders that contain “Items”
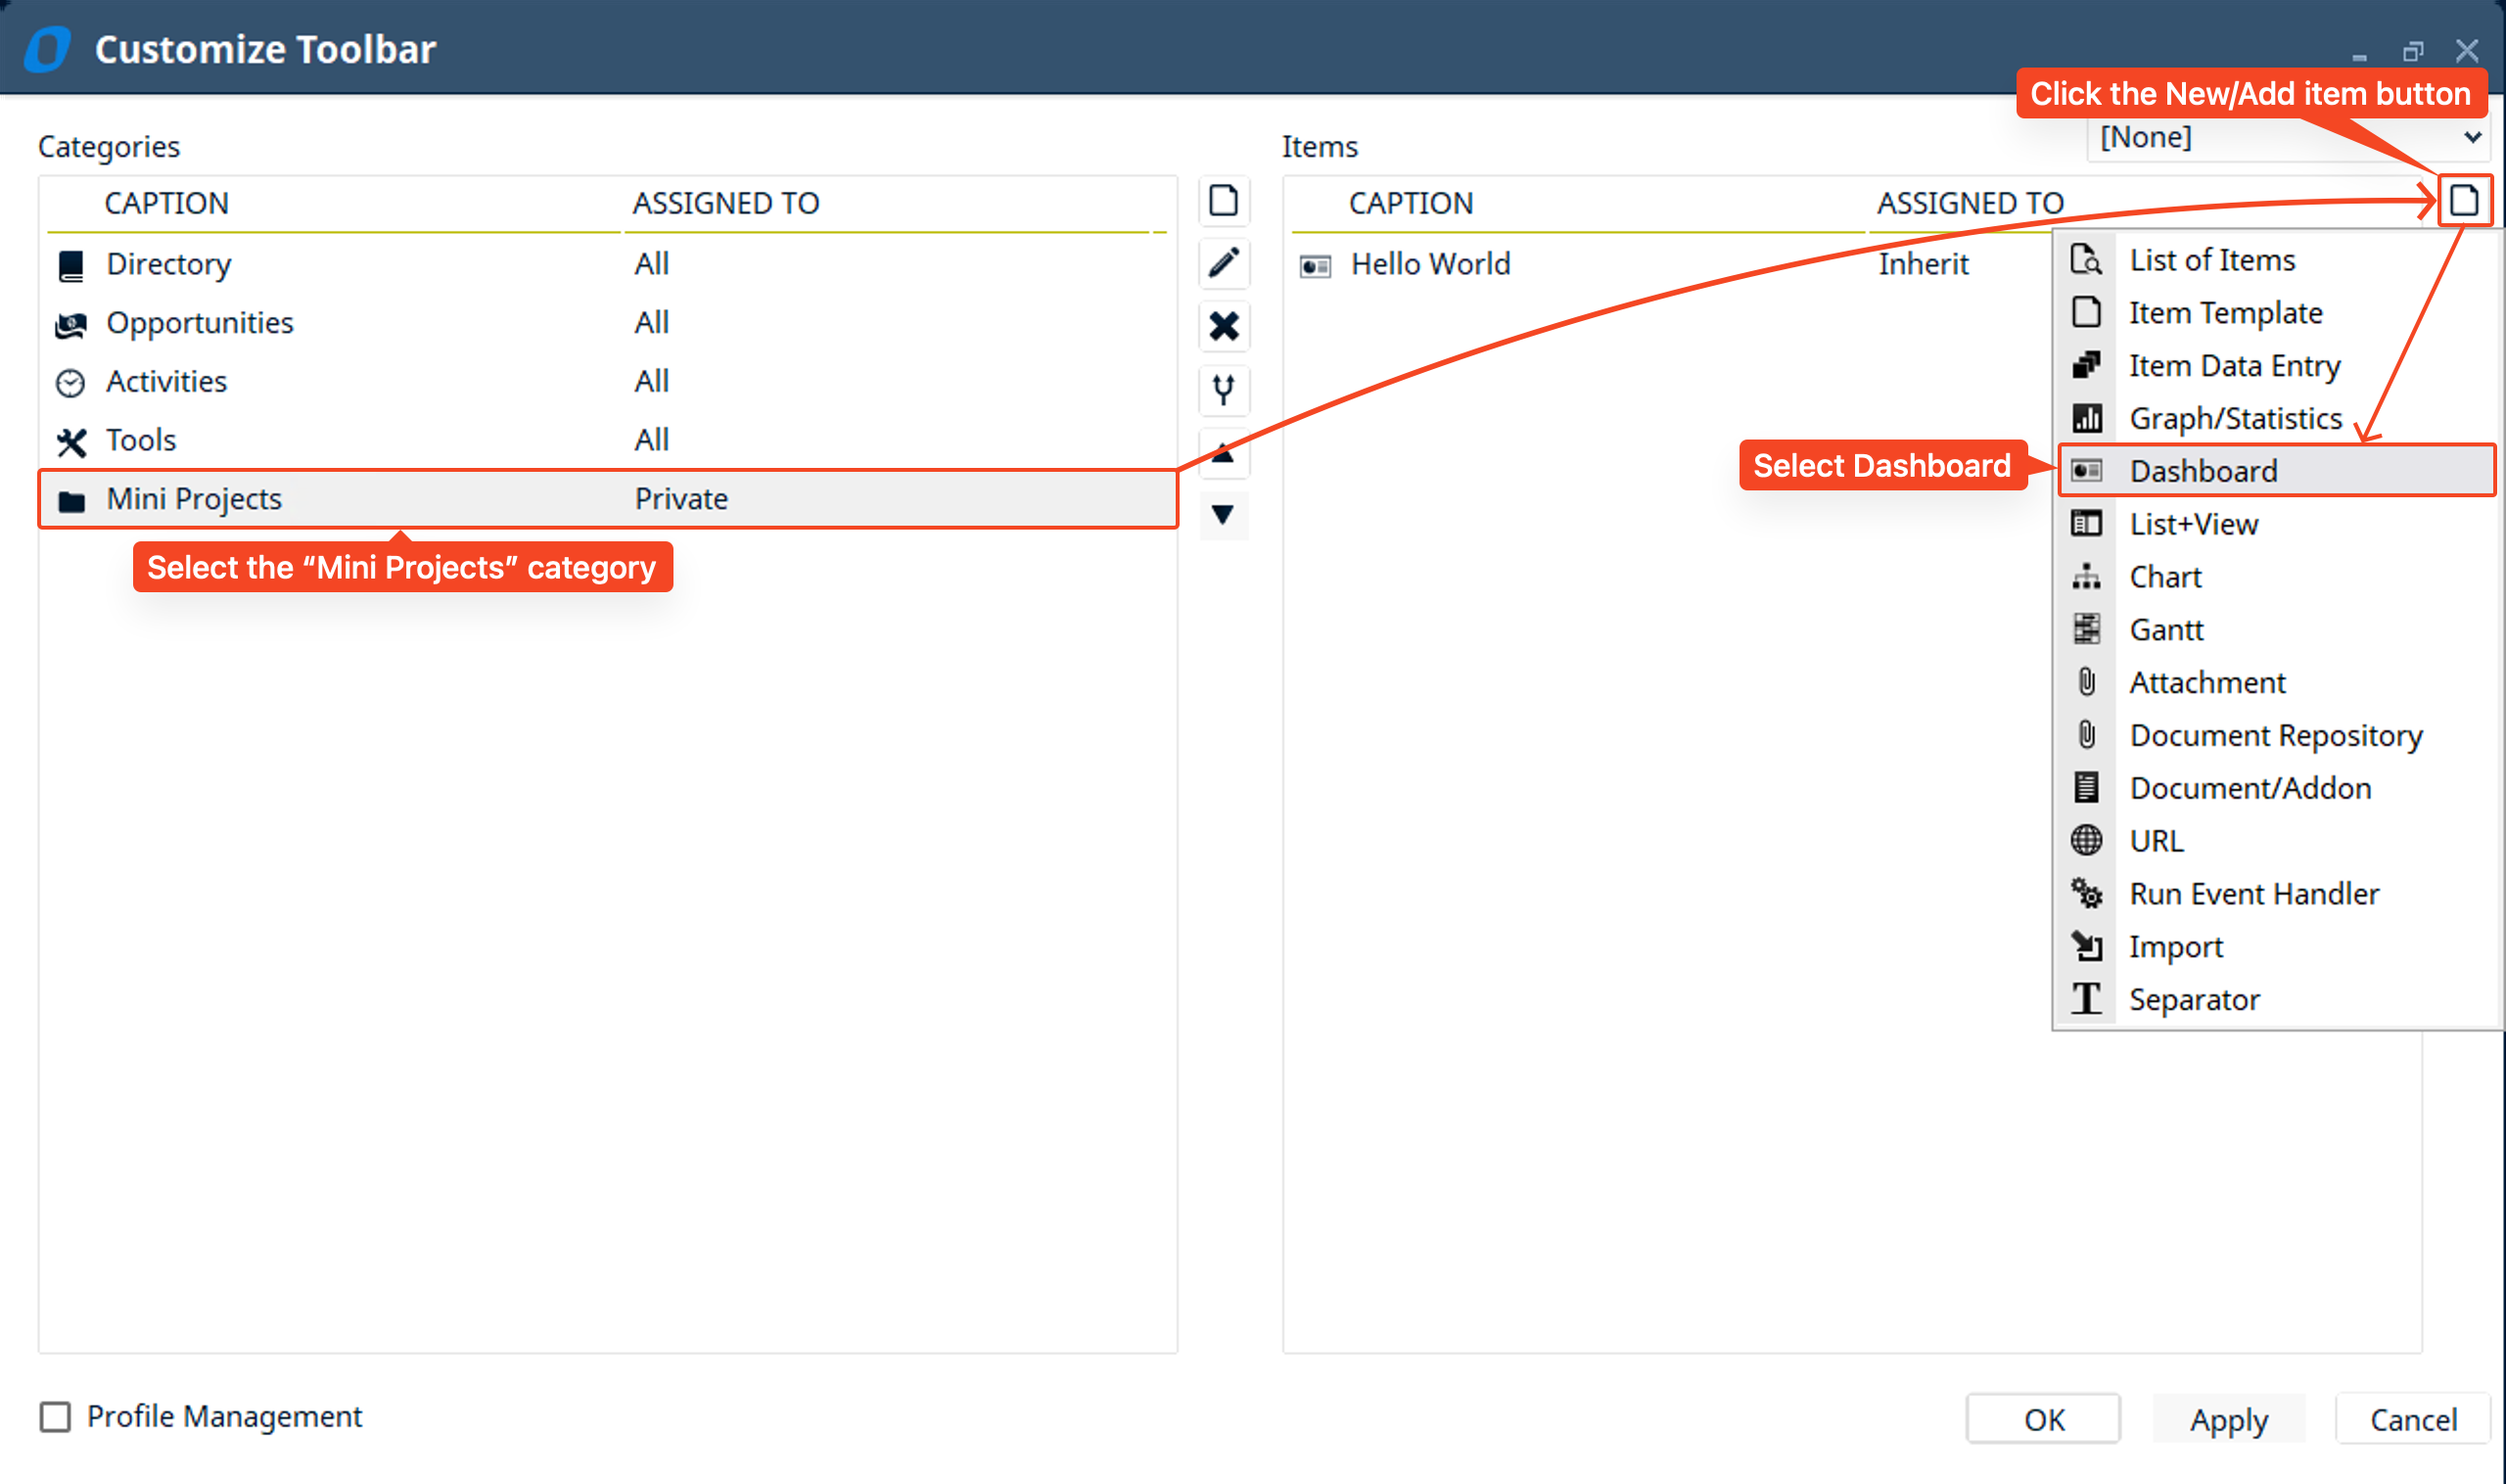
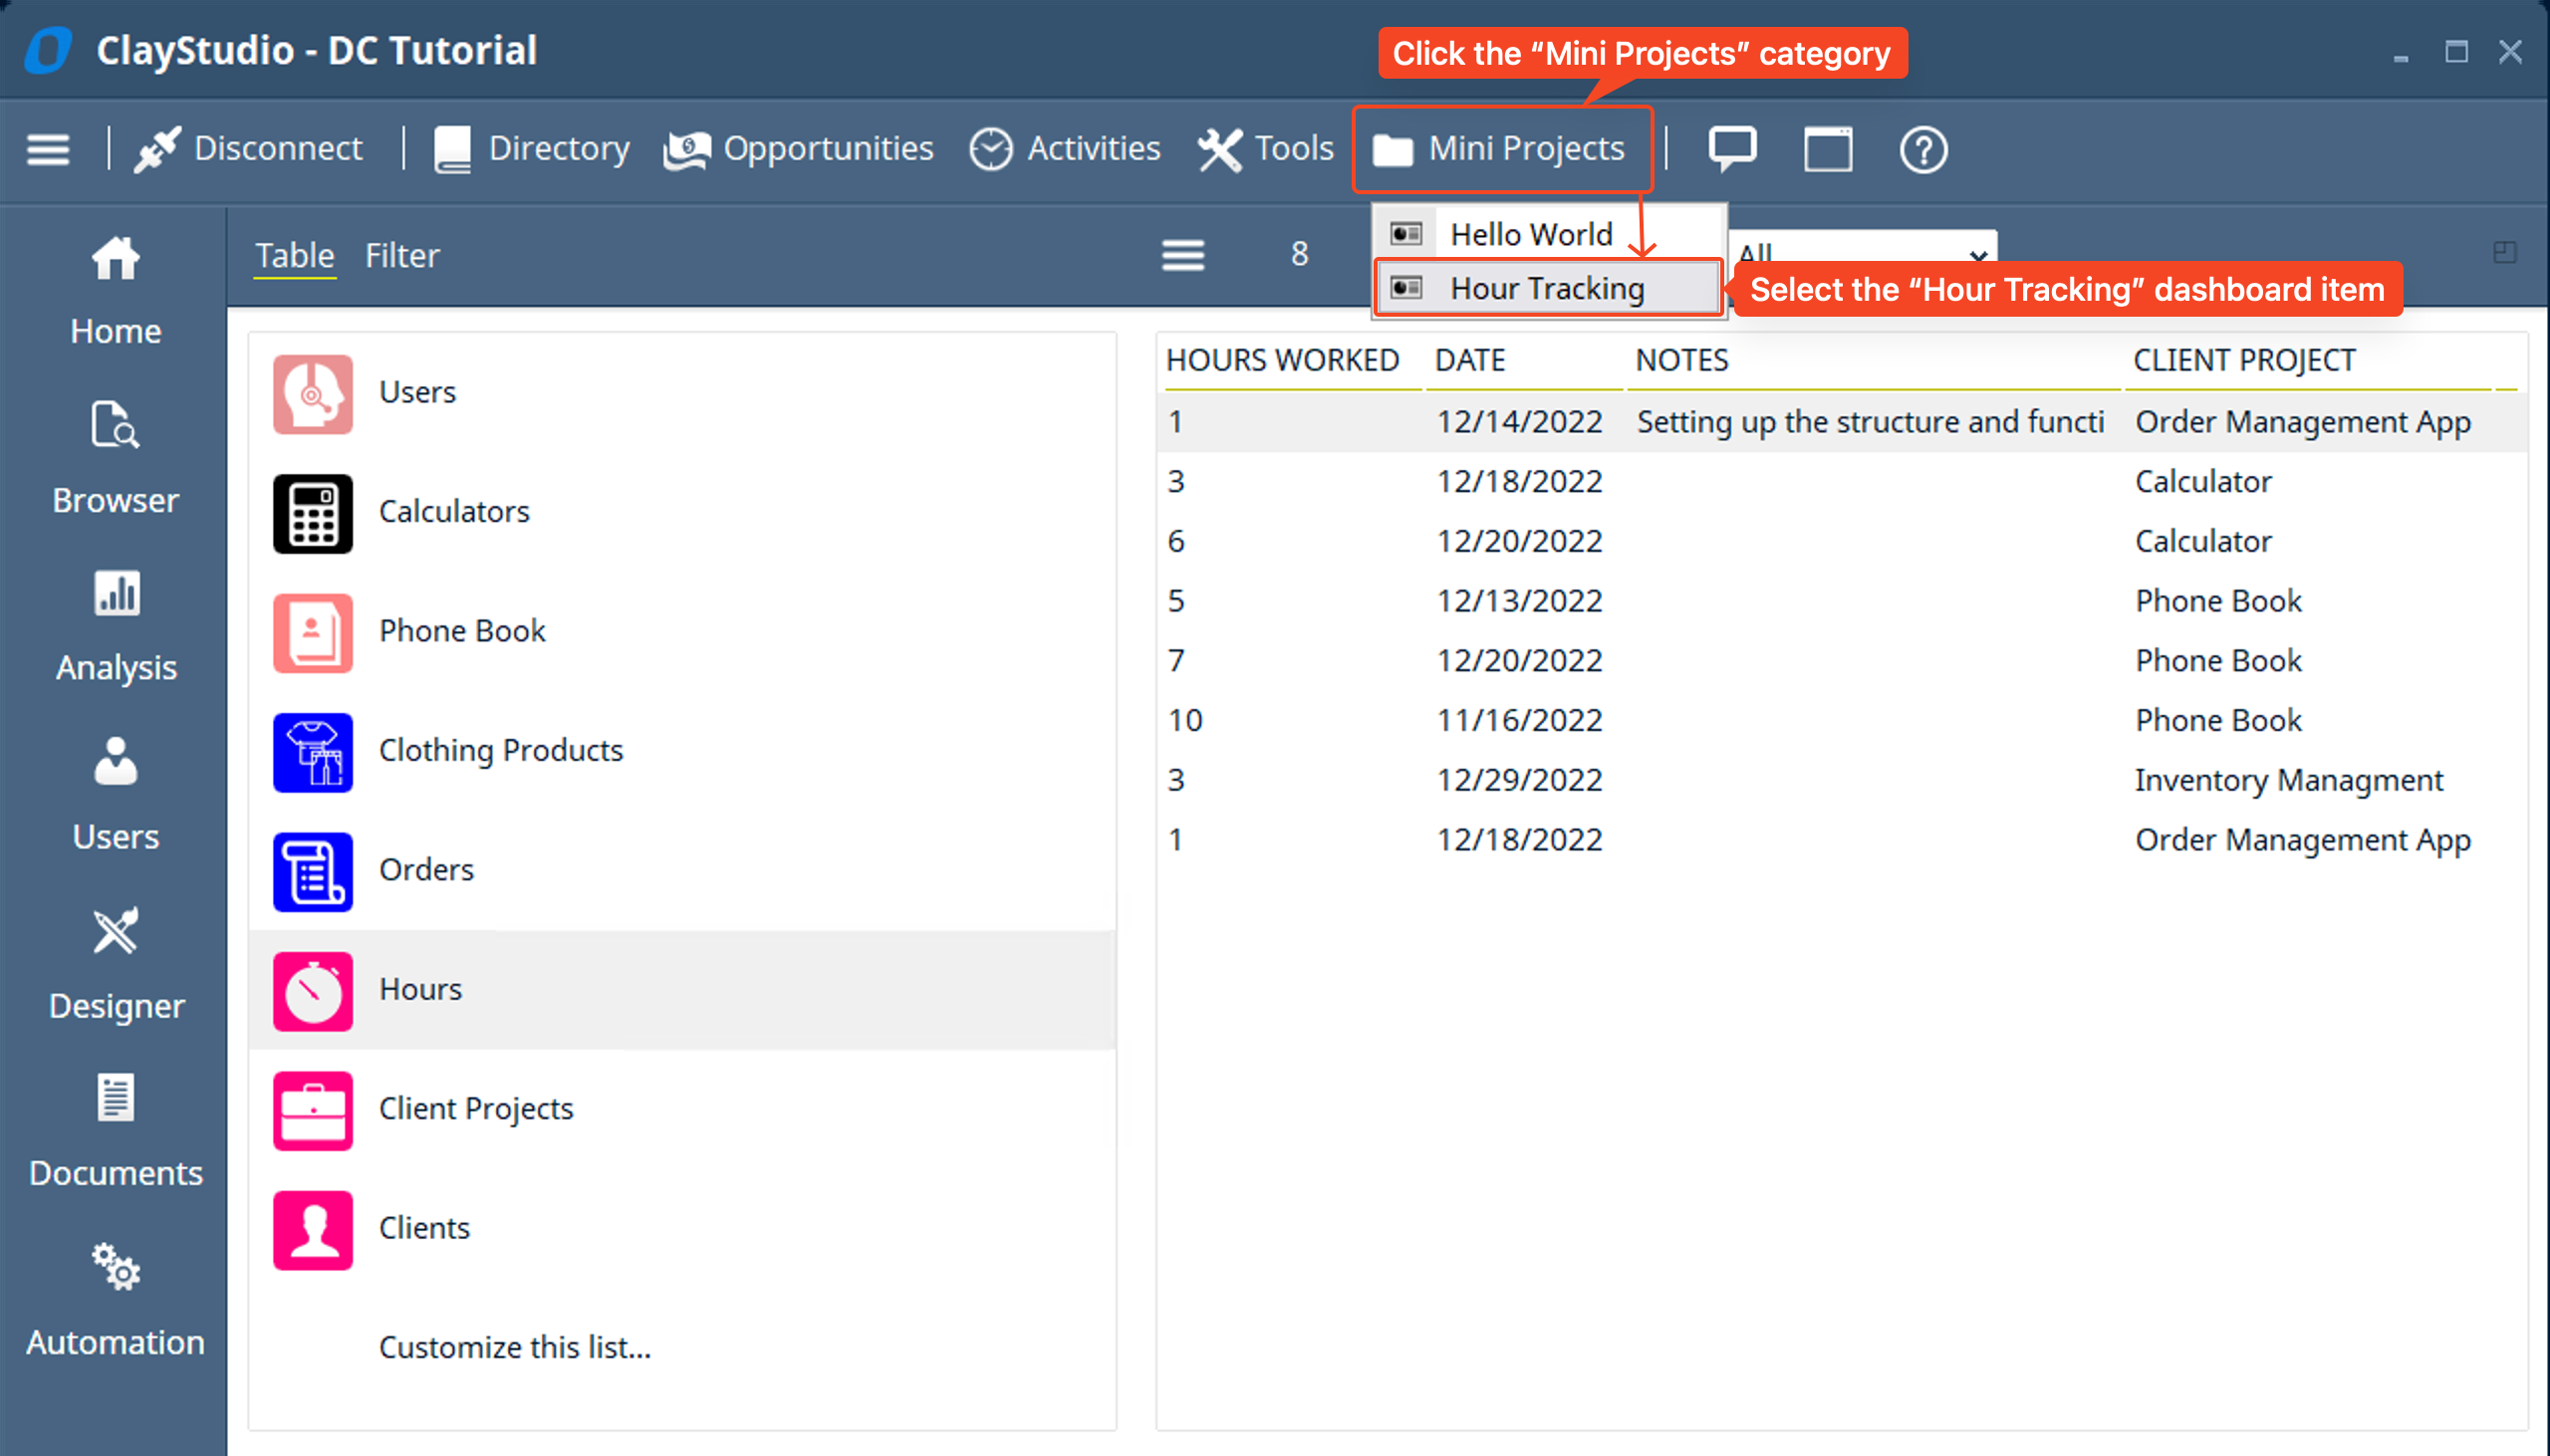
- Now select the “Mini Project” category → click the “Add” button on the “Items” side of the window → then select “Dashboard”
- The “Mini Project” category was created in the Hello World Mini Project. View the second screenshot below on how to create a new category
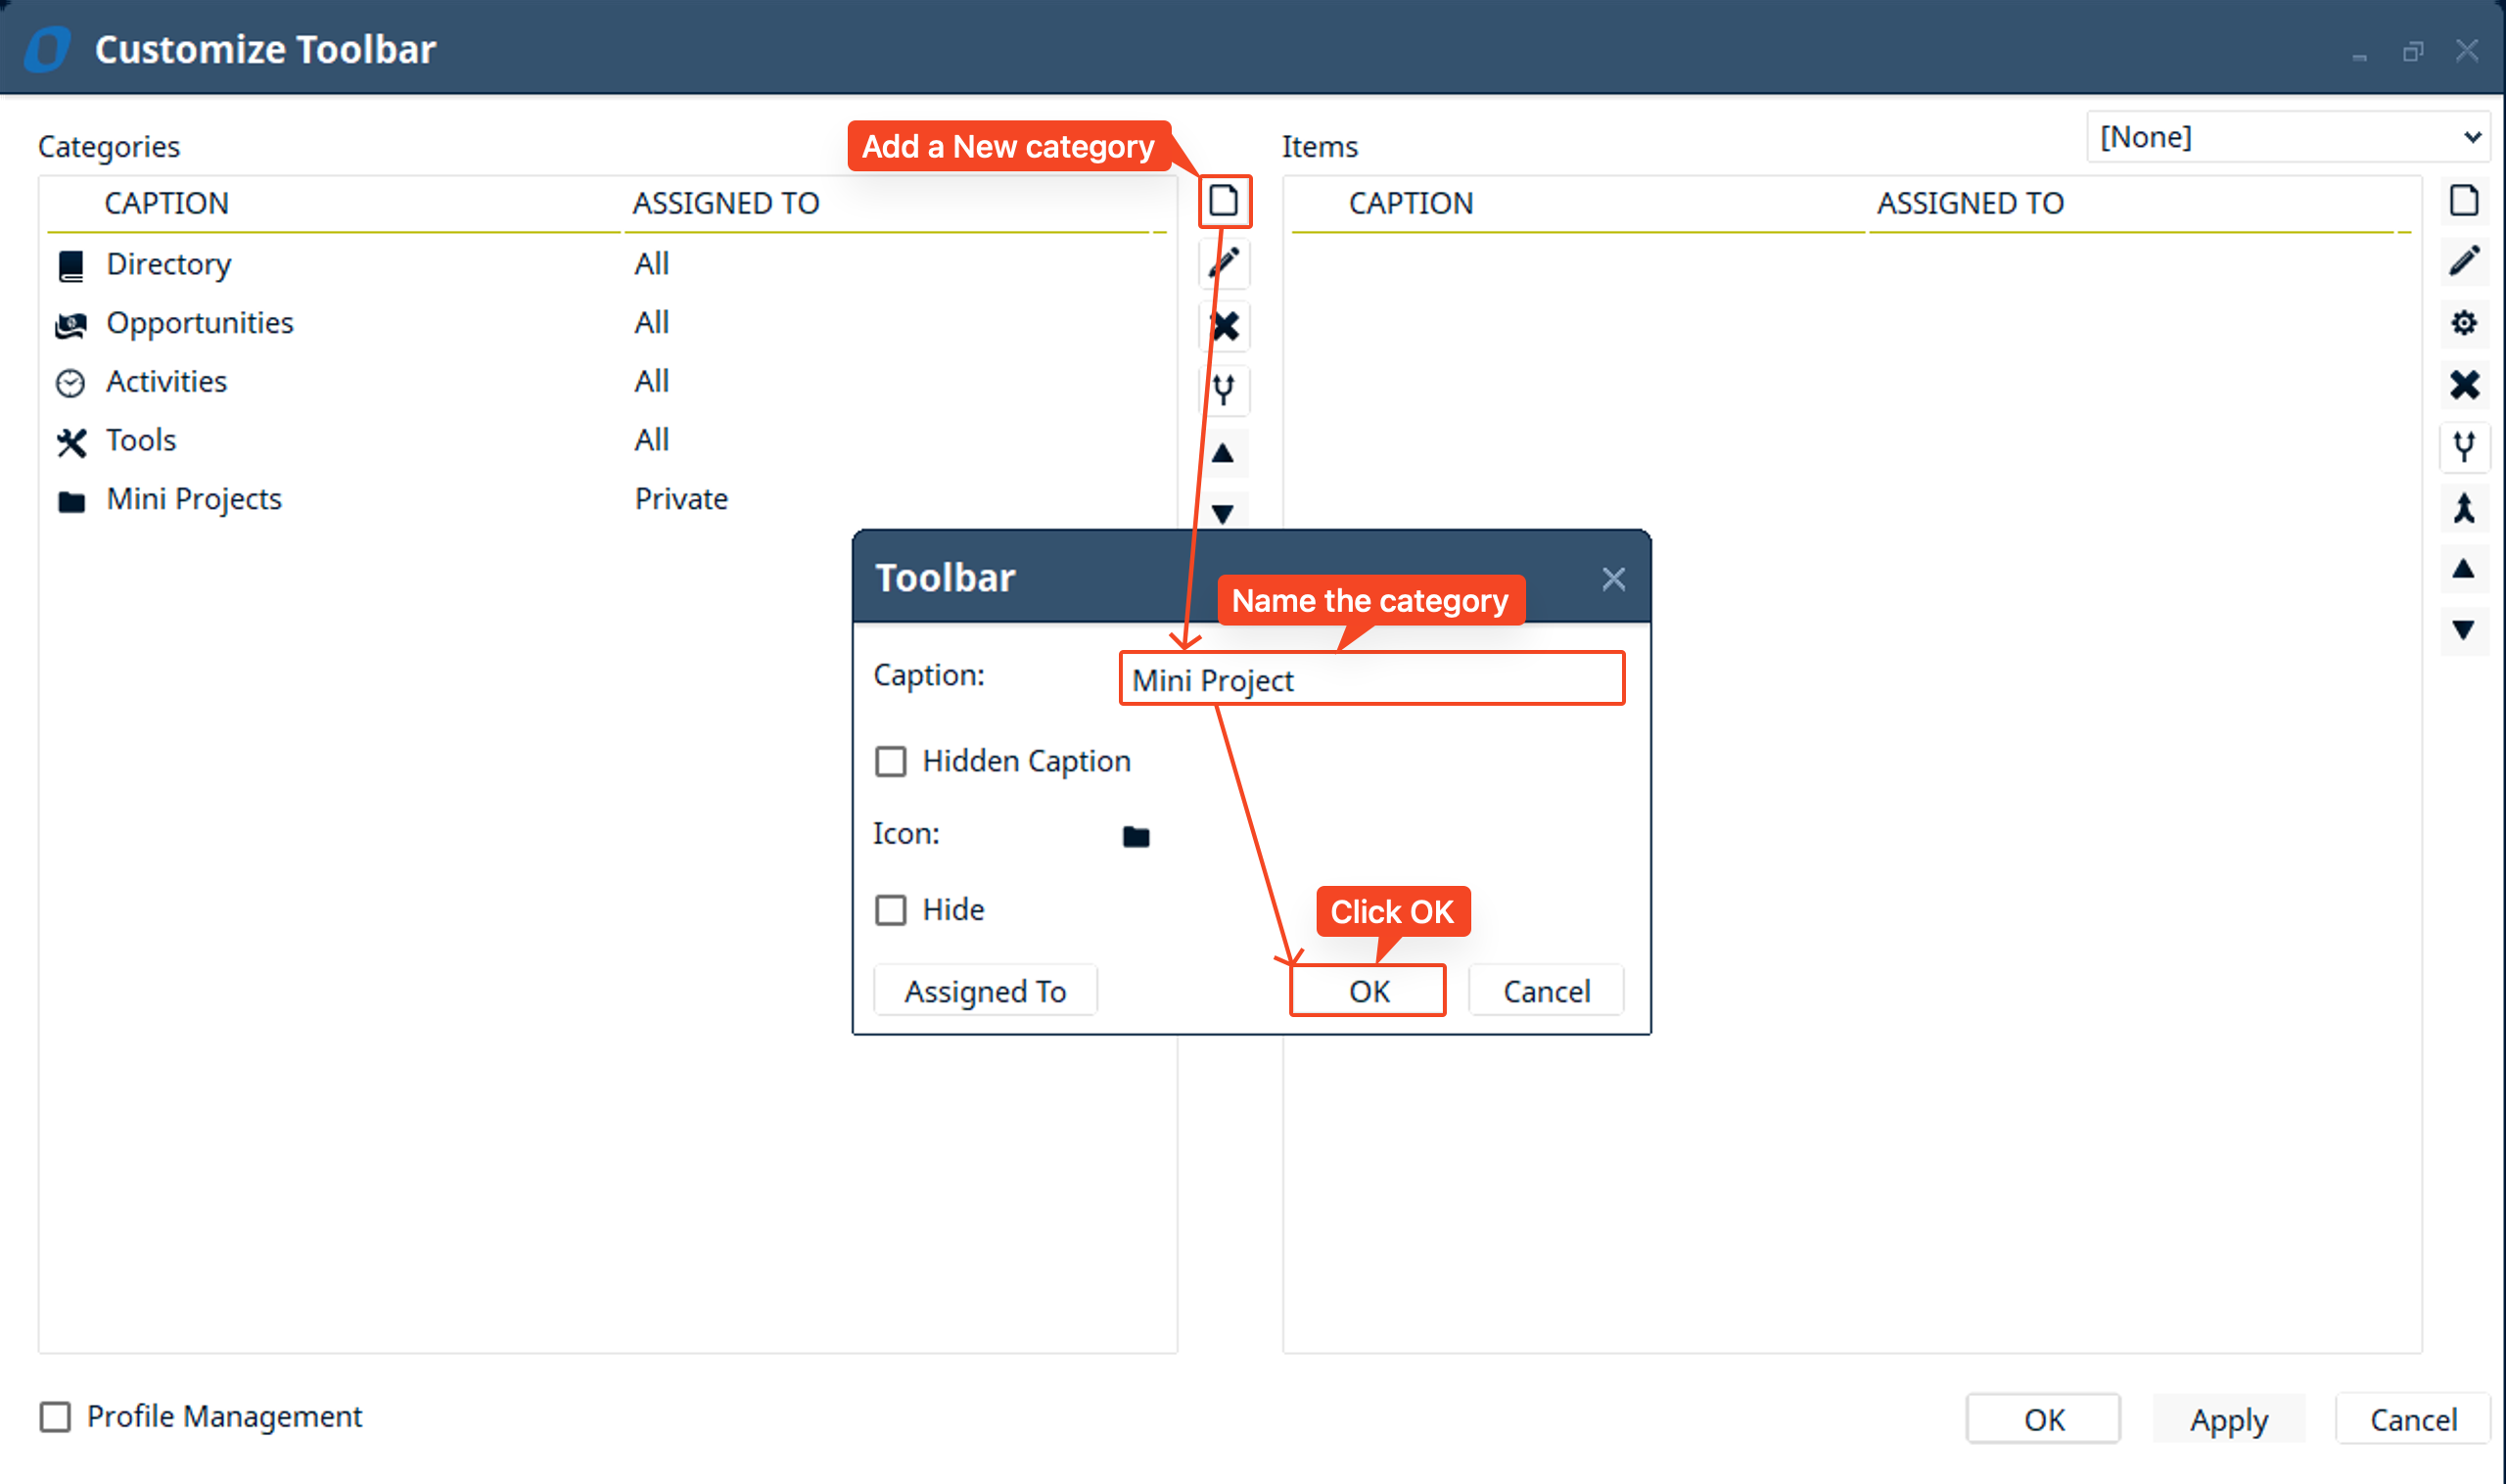
To create a new category follow the screenshot above
- The “Mini Project” category was created in the Hello World Mini Project. View the second screenshot below on how to create a new category
- A “Dashboard” window is shown. You’ll notice its almost identical to the “Custom Fields Layout” screen we saw previously in this project. While a “Custom Fields Layout” is used to place fields and fill out forms, “Dashboards” are used to view and interact with the information so that you can easily view the information you want to see in a variety of ways.
- “Dashboards” and “Layouts” are powerful no code tools while they look similar and can technically do some of the same things they do have their own benefit. Such as, a “Dashboard” doesn’t have to be made for a specific table. Meaning the data displayed on the “Dashboard” (lists, graphs, charts, gantt) can be all from separate tables in your solution to be able to help you visualize and design your entire system with ease.
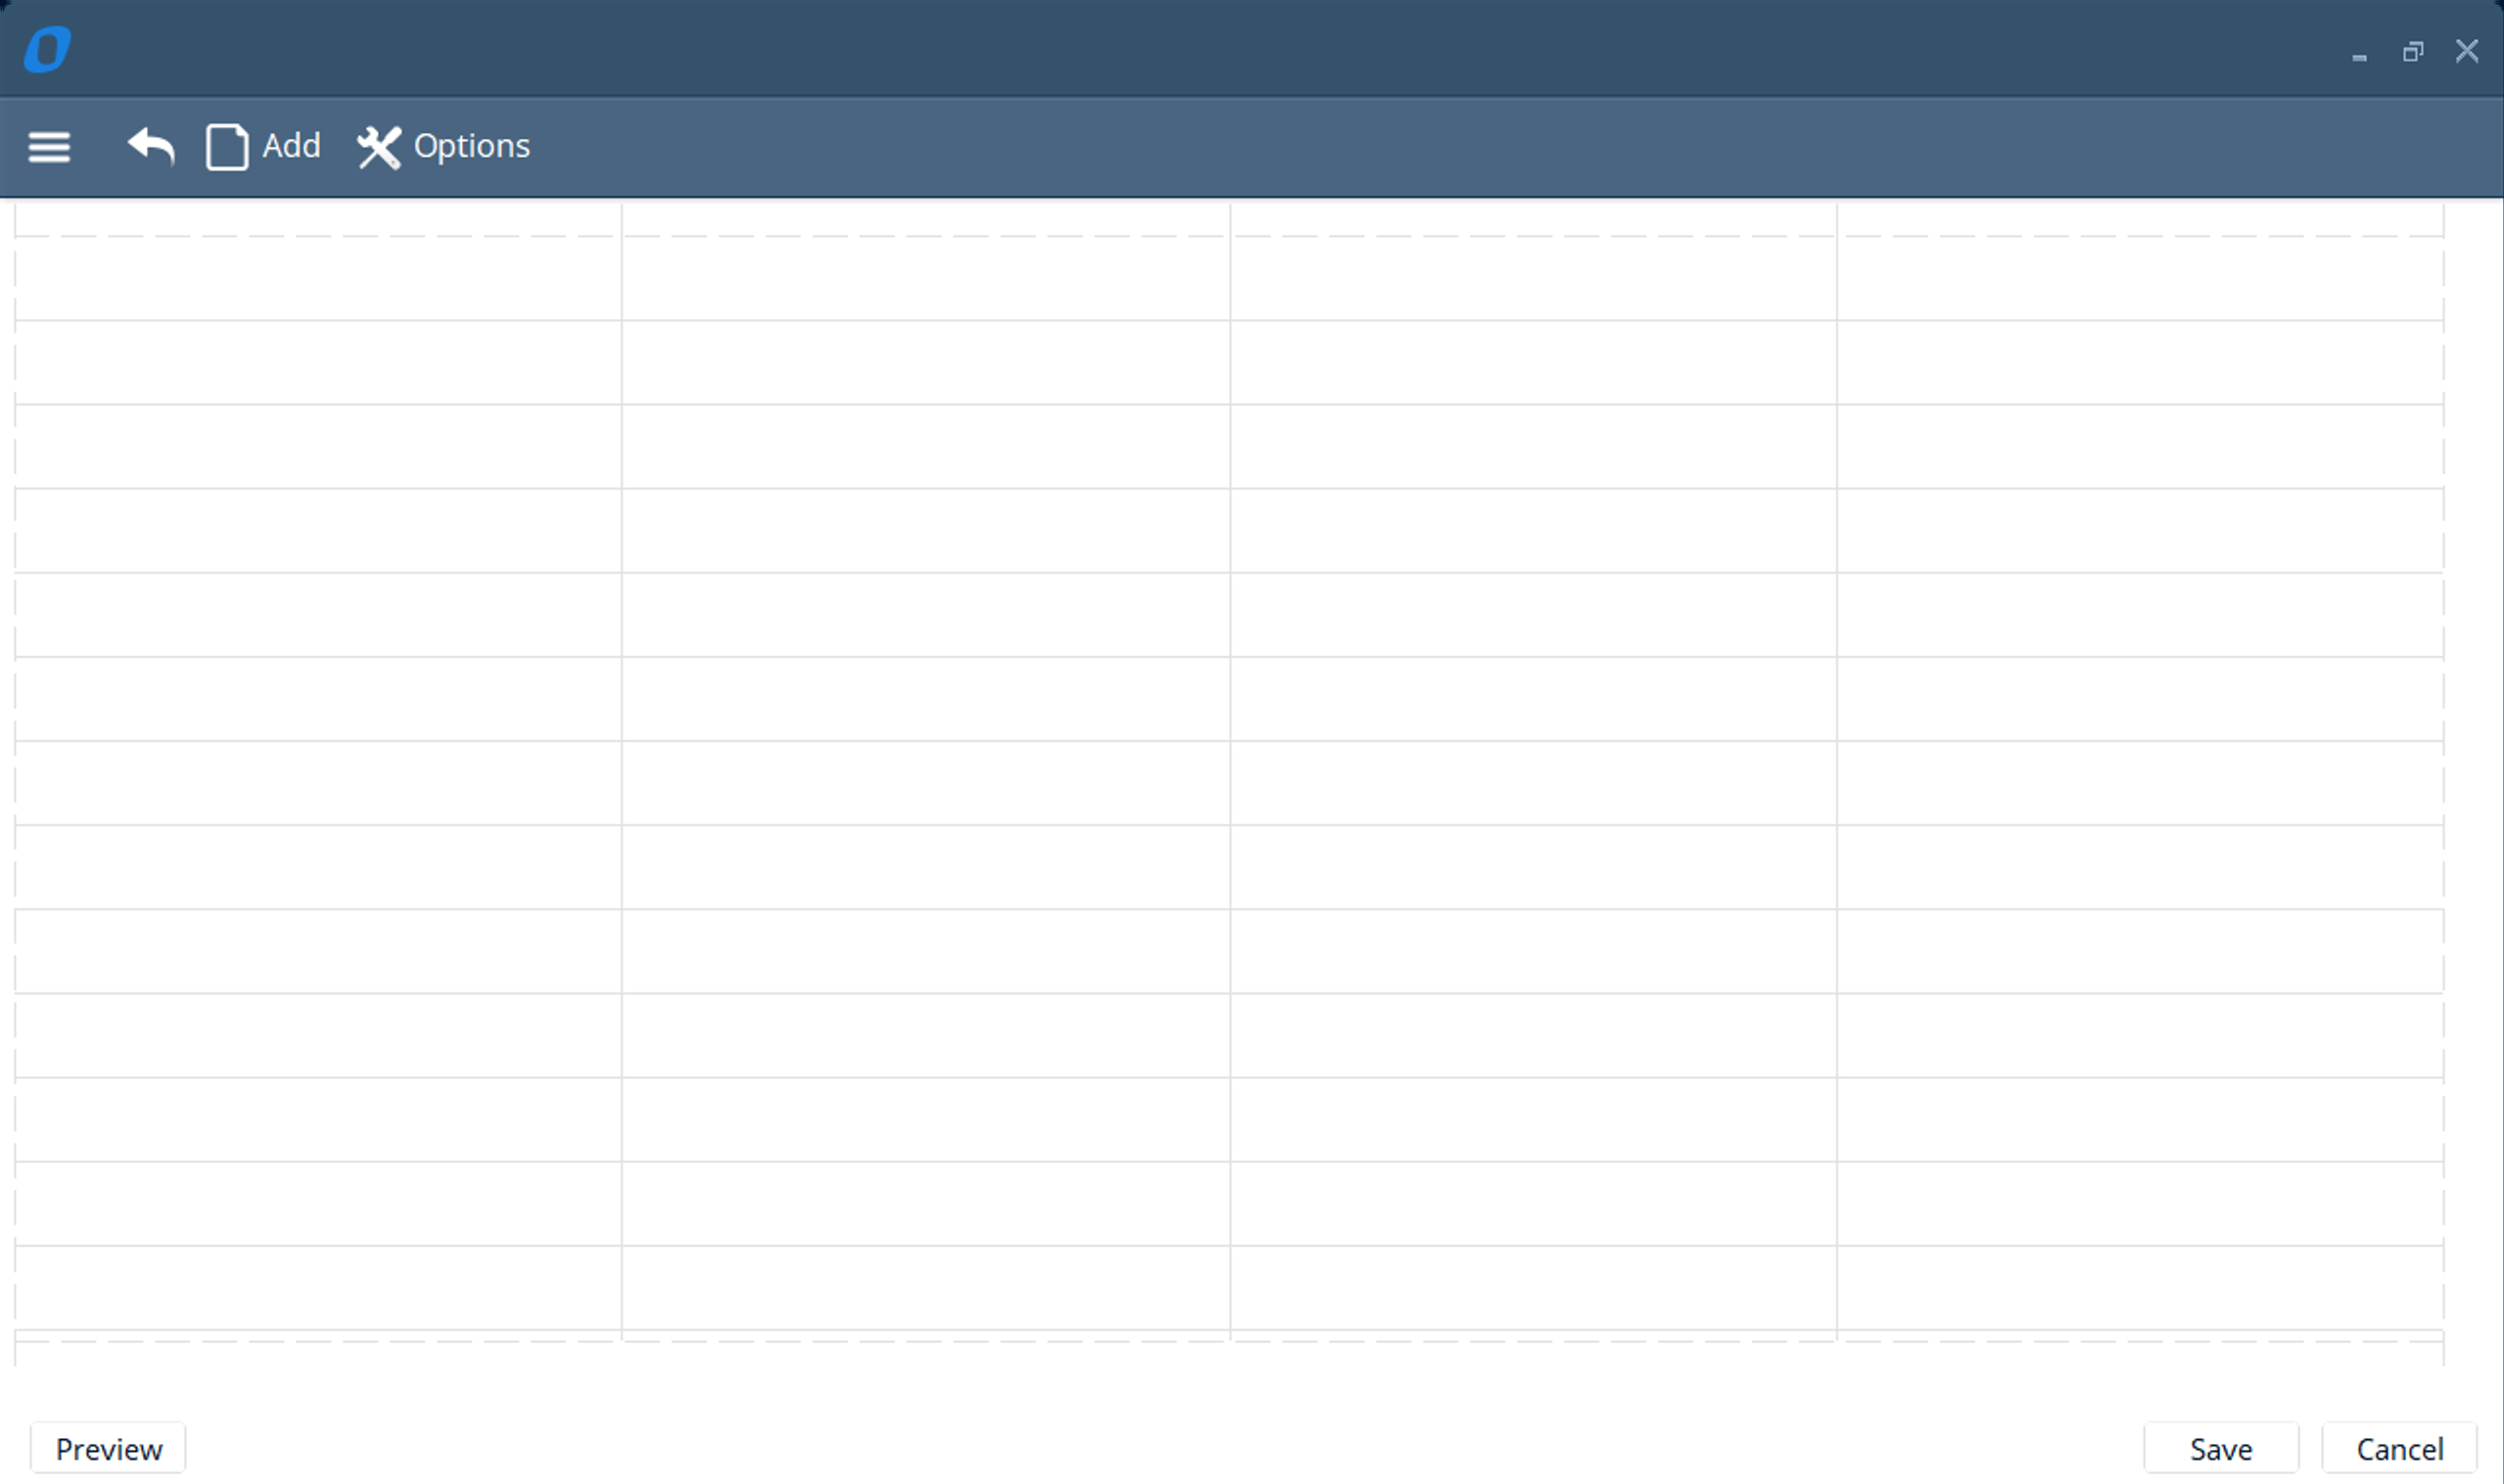
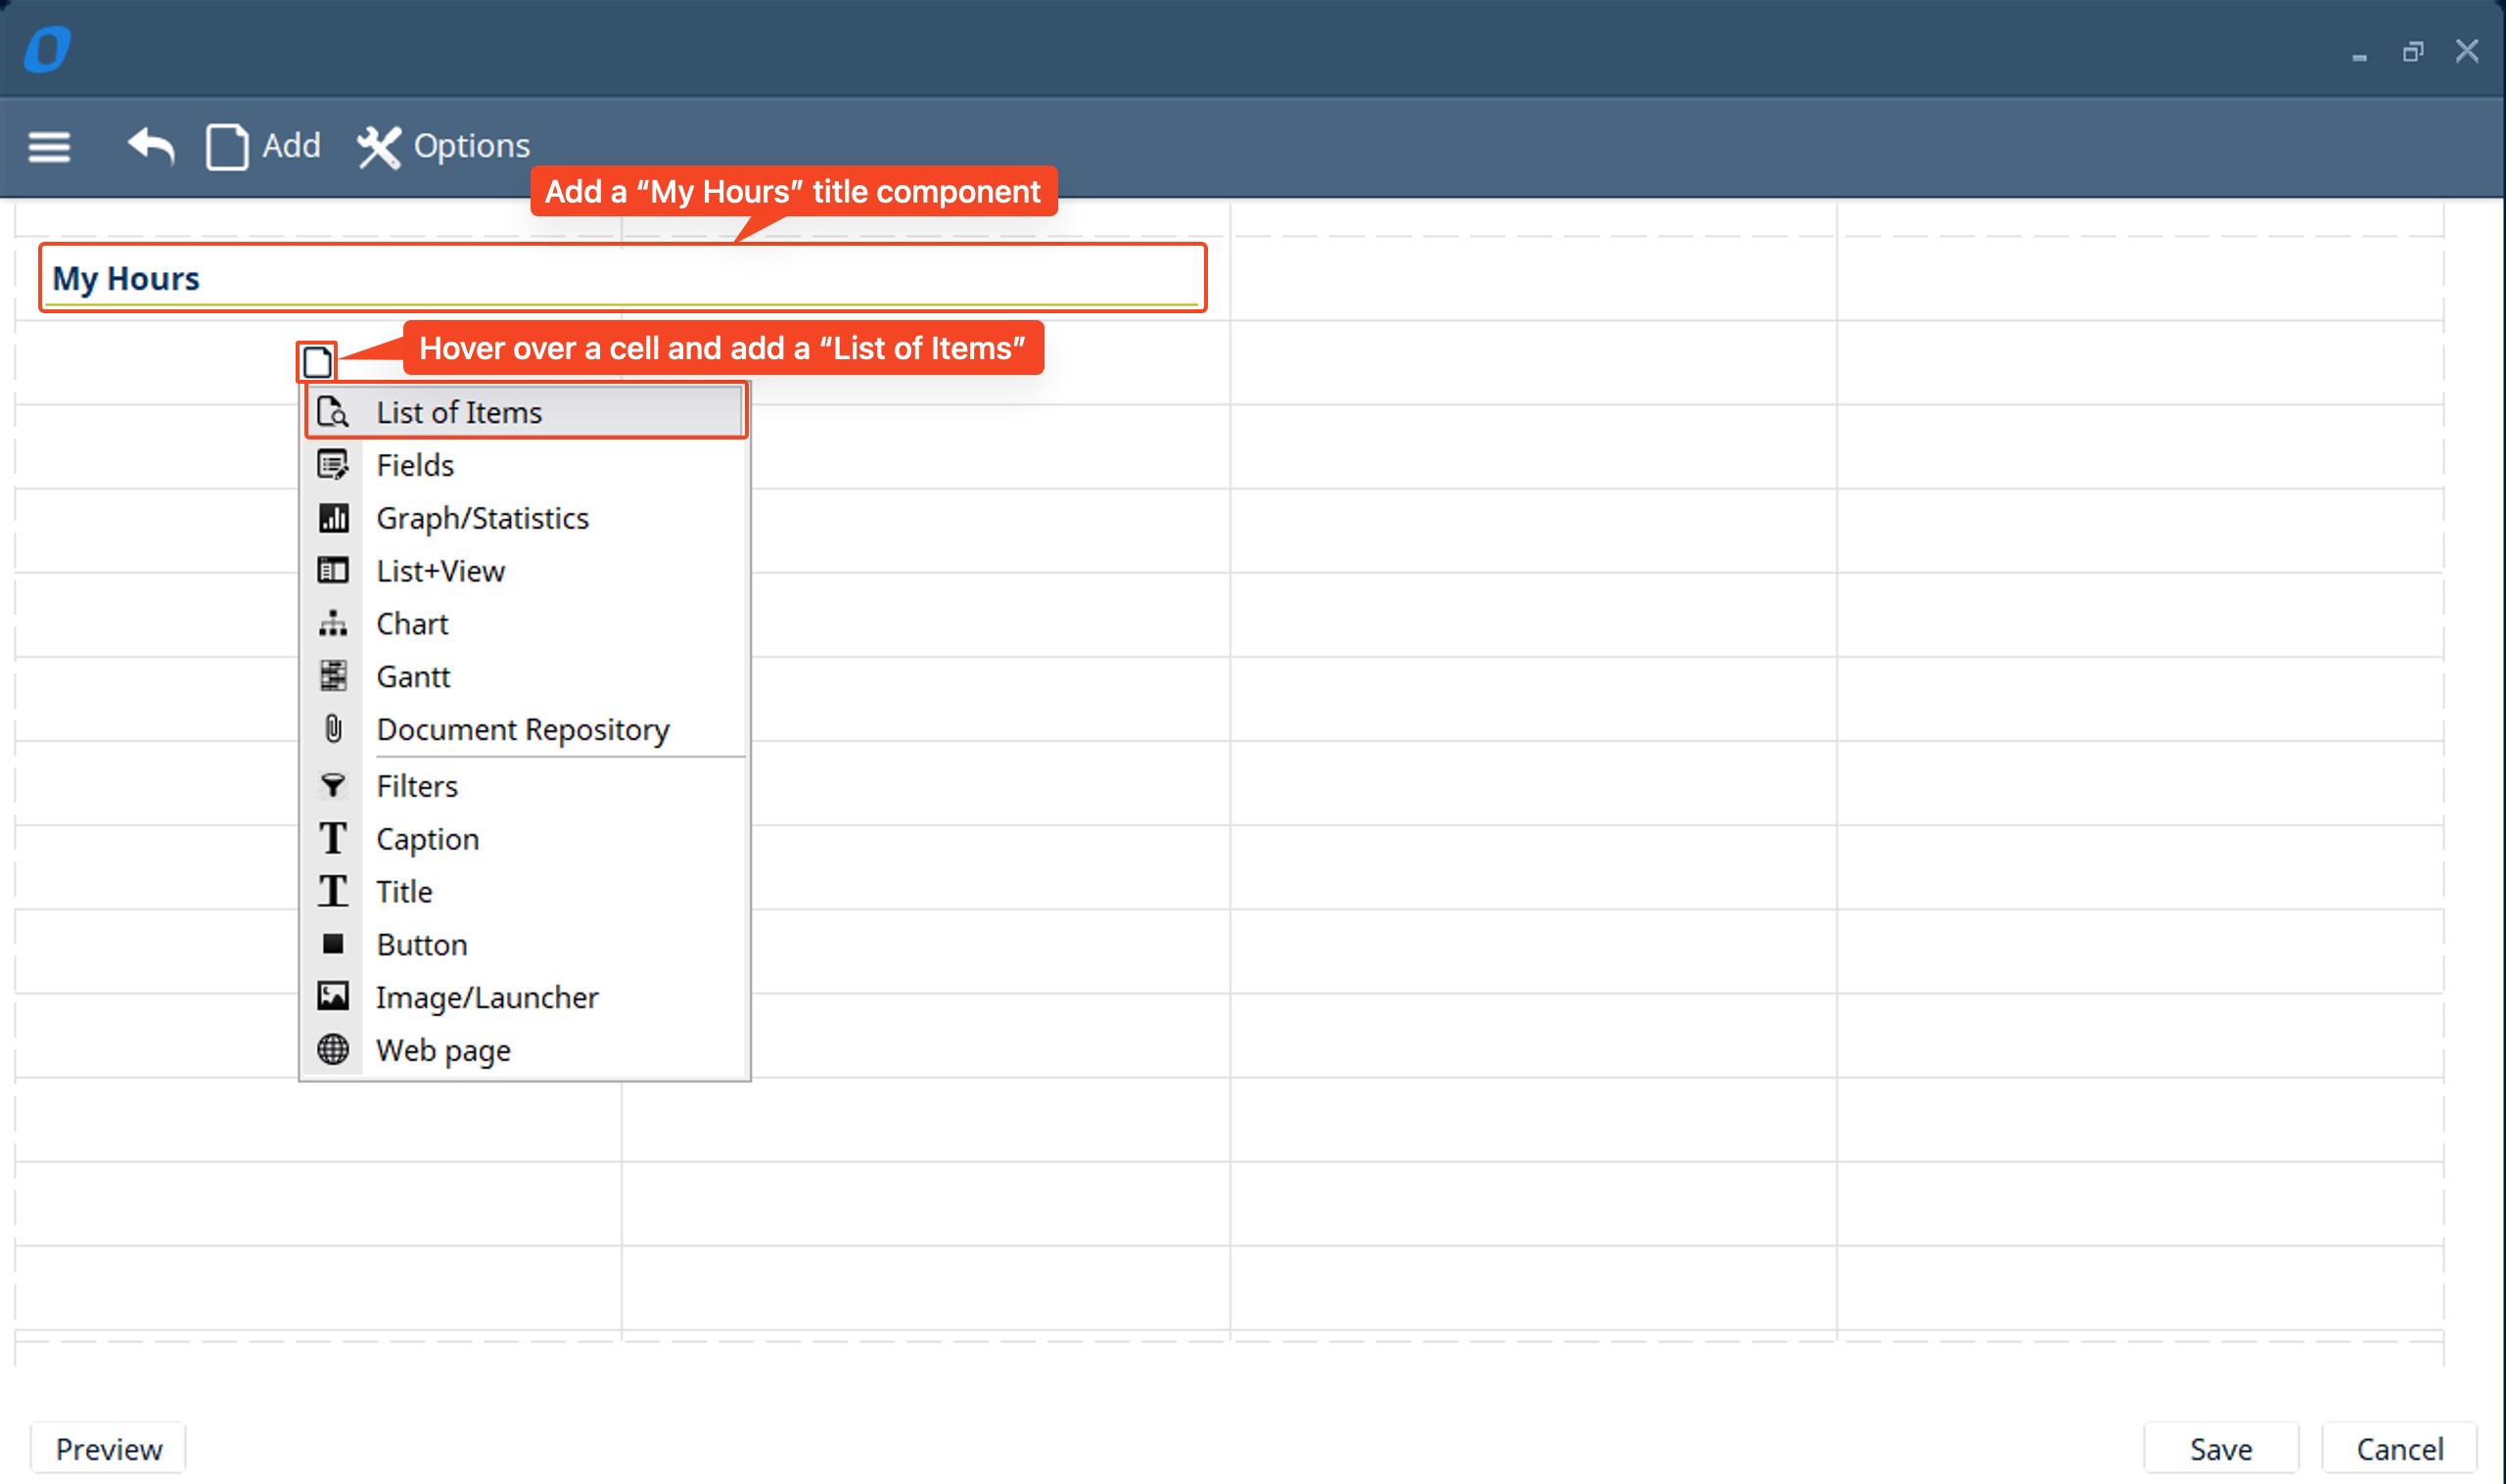
- To start, let’s add a “Title” to the dashboard just like we did previously in the “custom layout” section of this mini project by clicking “Add” on a cell or in the top toolbar and selecting “Title” → then name it “My Hours”.
- Next we will add a “List of Items” so that we can see a list of all the “Hours” in my system sorted by the “Hour:Date” field
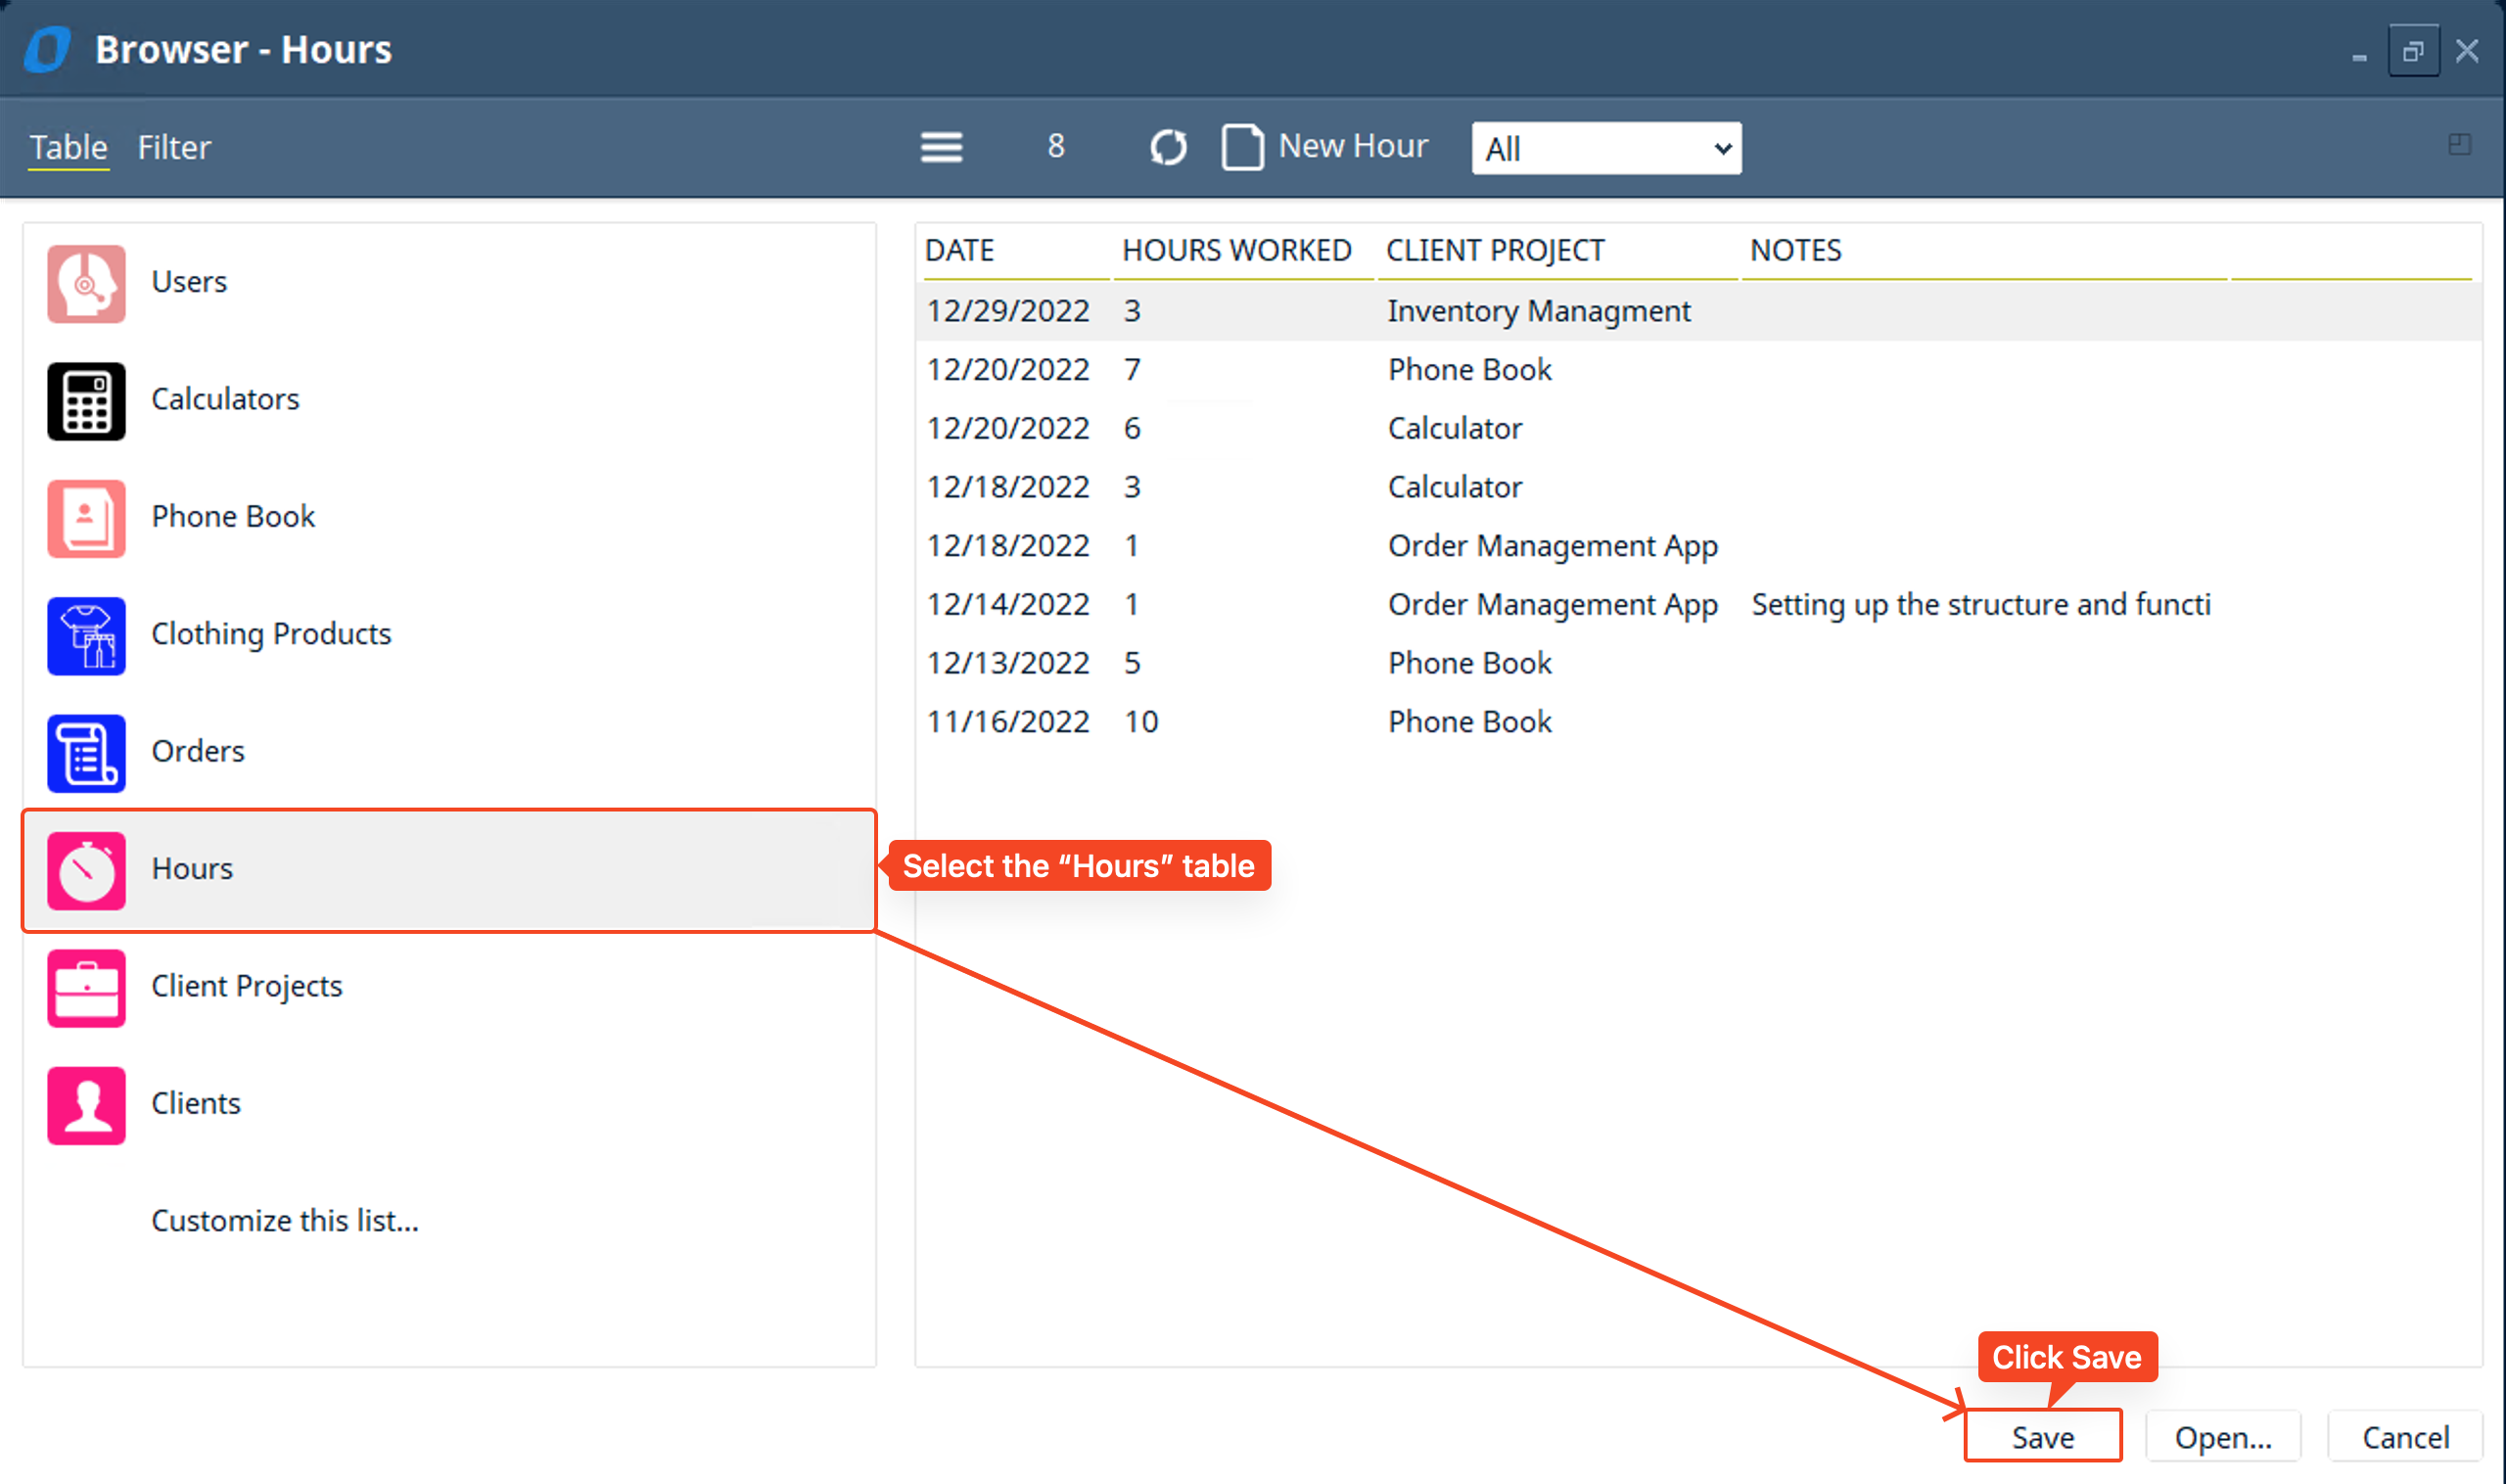
- Select the “Hours” table → set the “Columns” to show only what you want to see → click on the “Date” column to quickly sort by most recent “Date” → then click “Save”
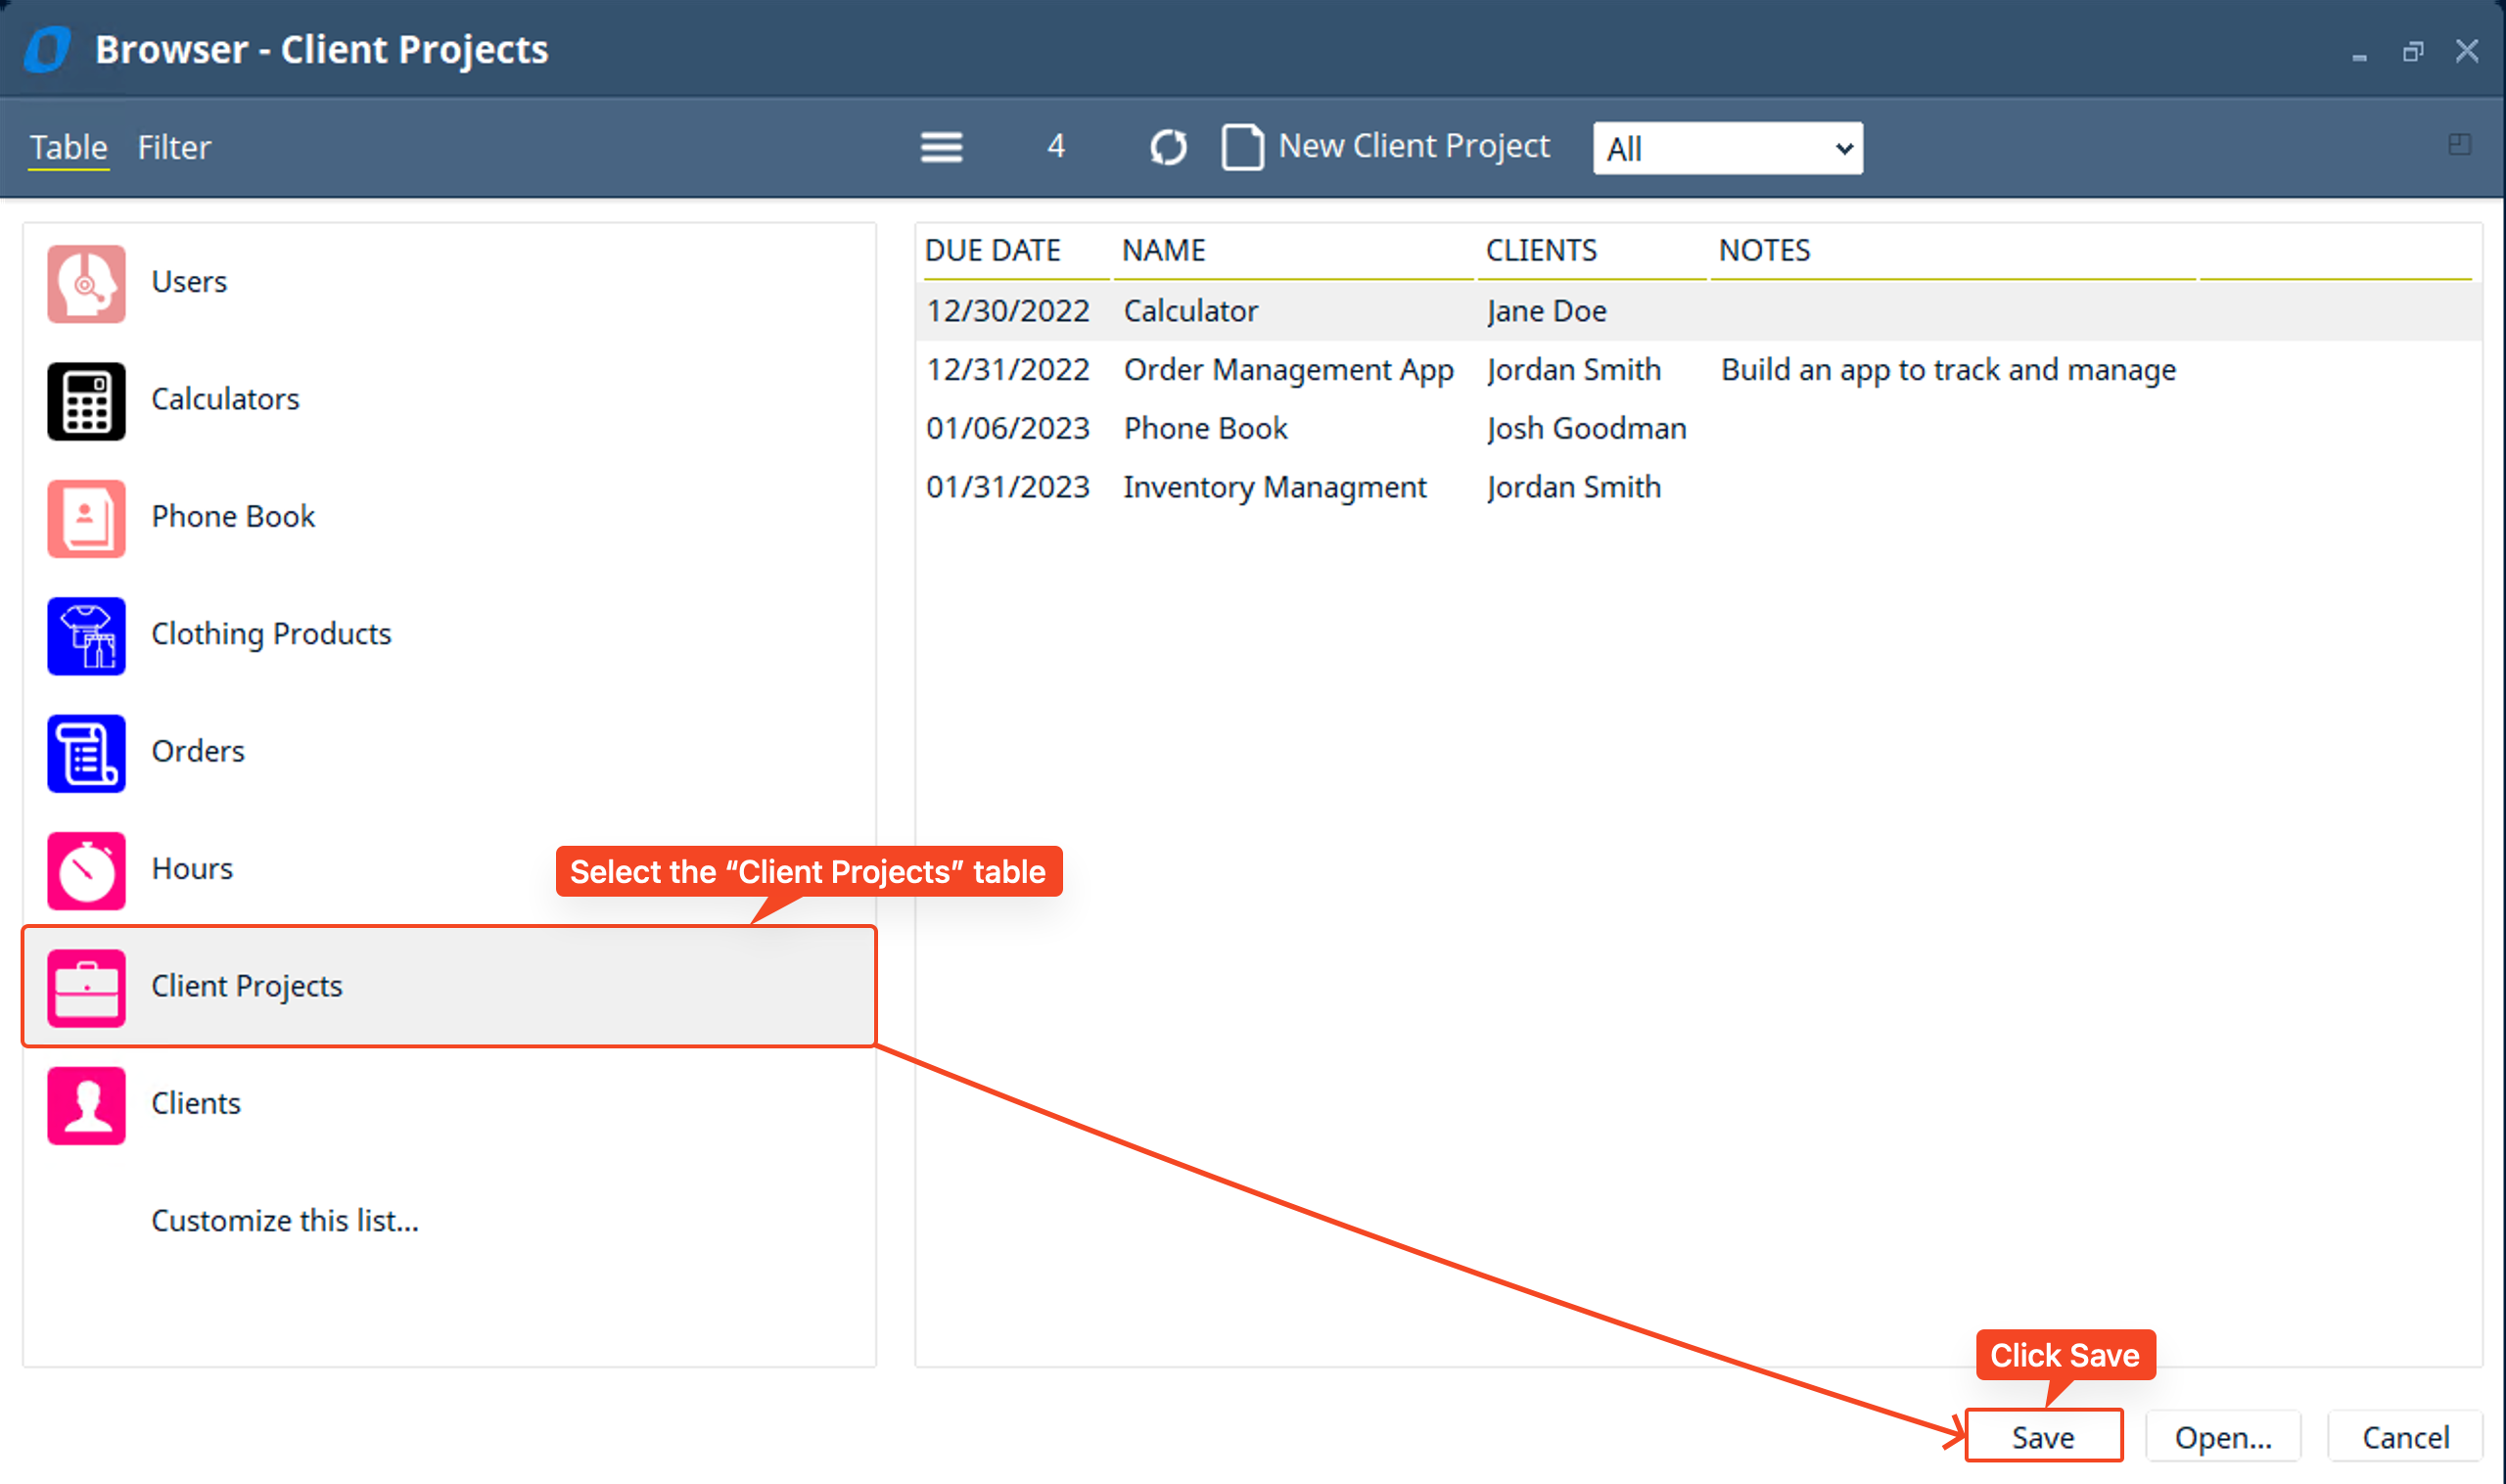
- Next, add a “Title” and name it “My Client Projects” → then add a “List of Items” for the list of all the “Client Projects” in your solution
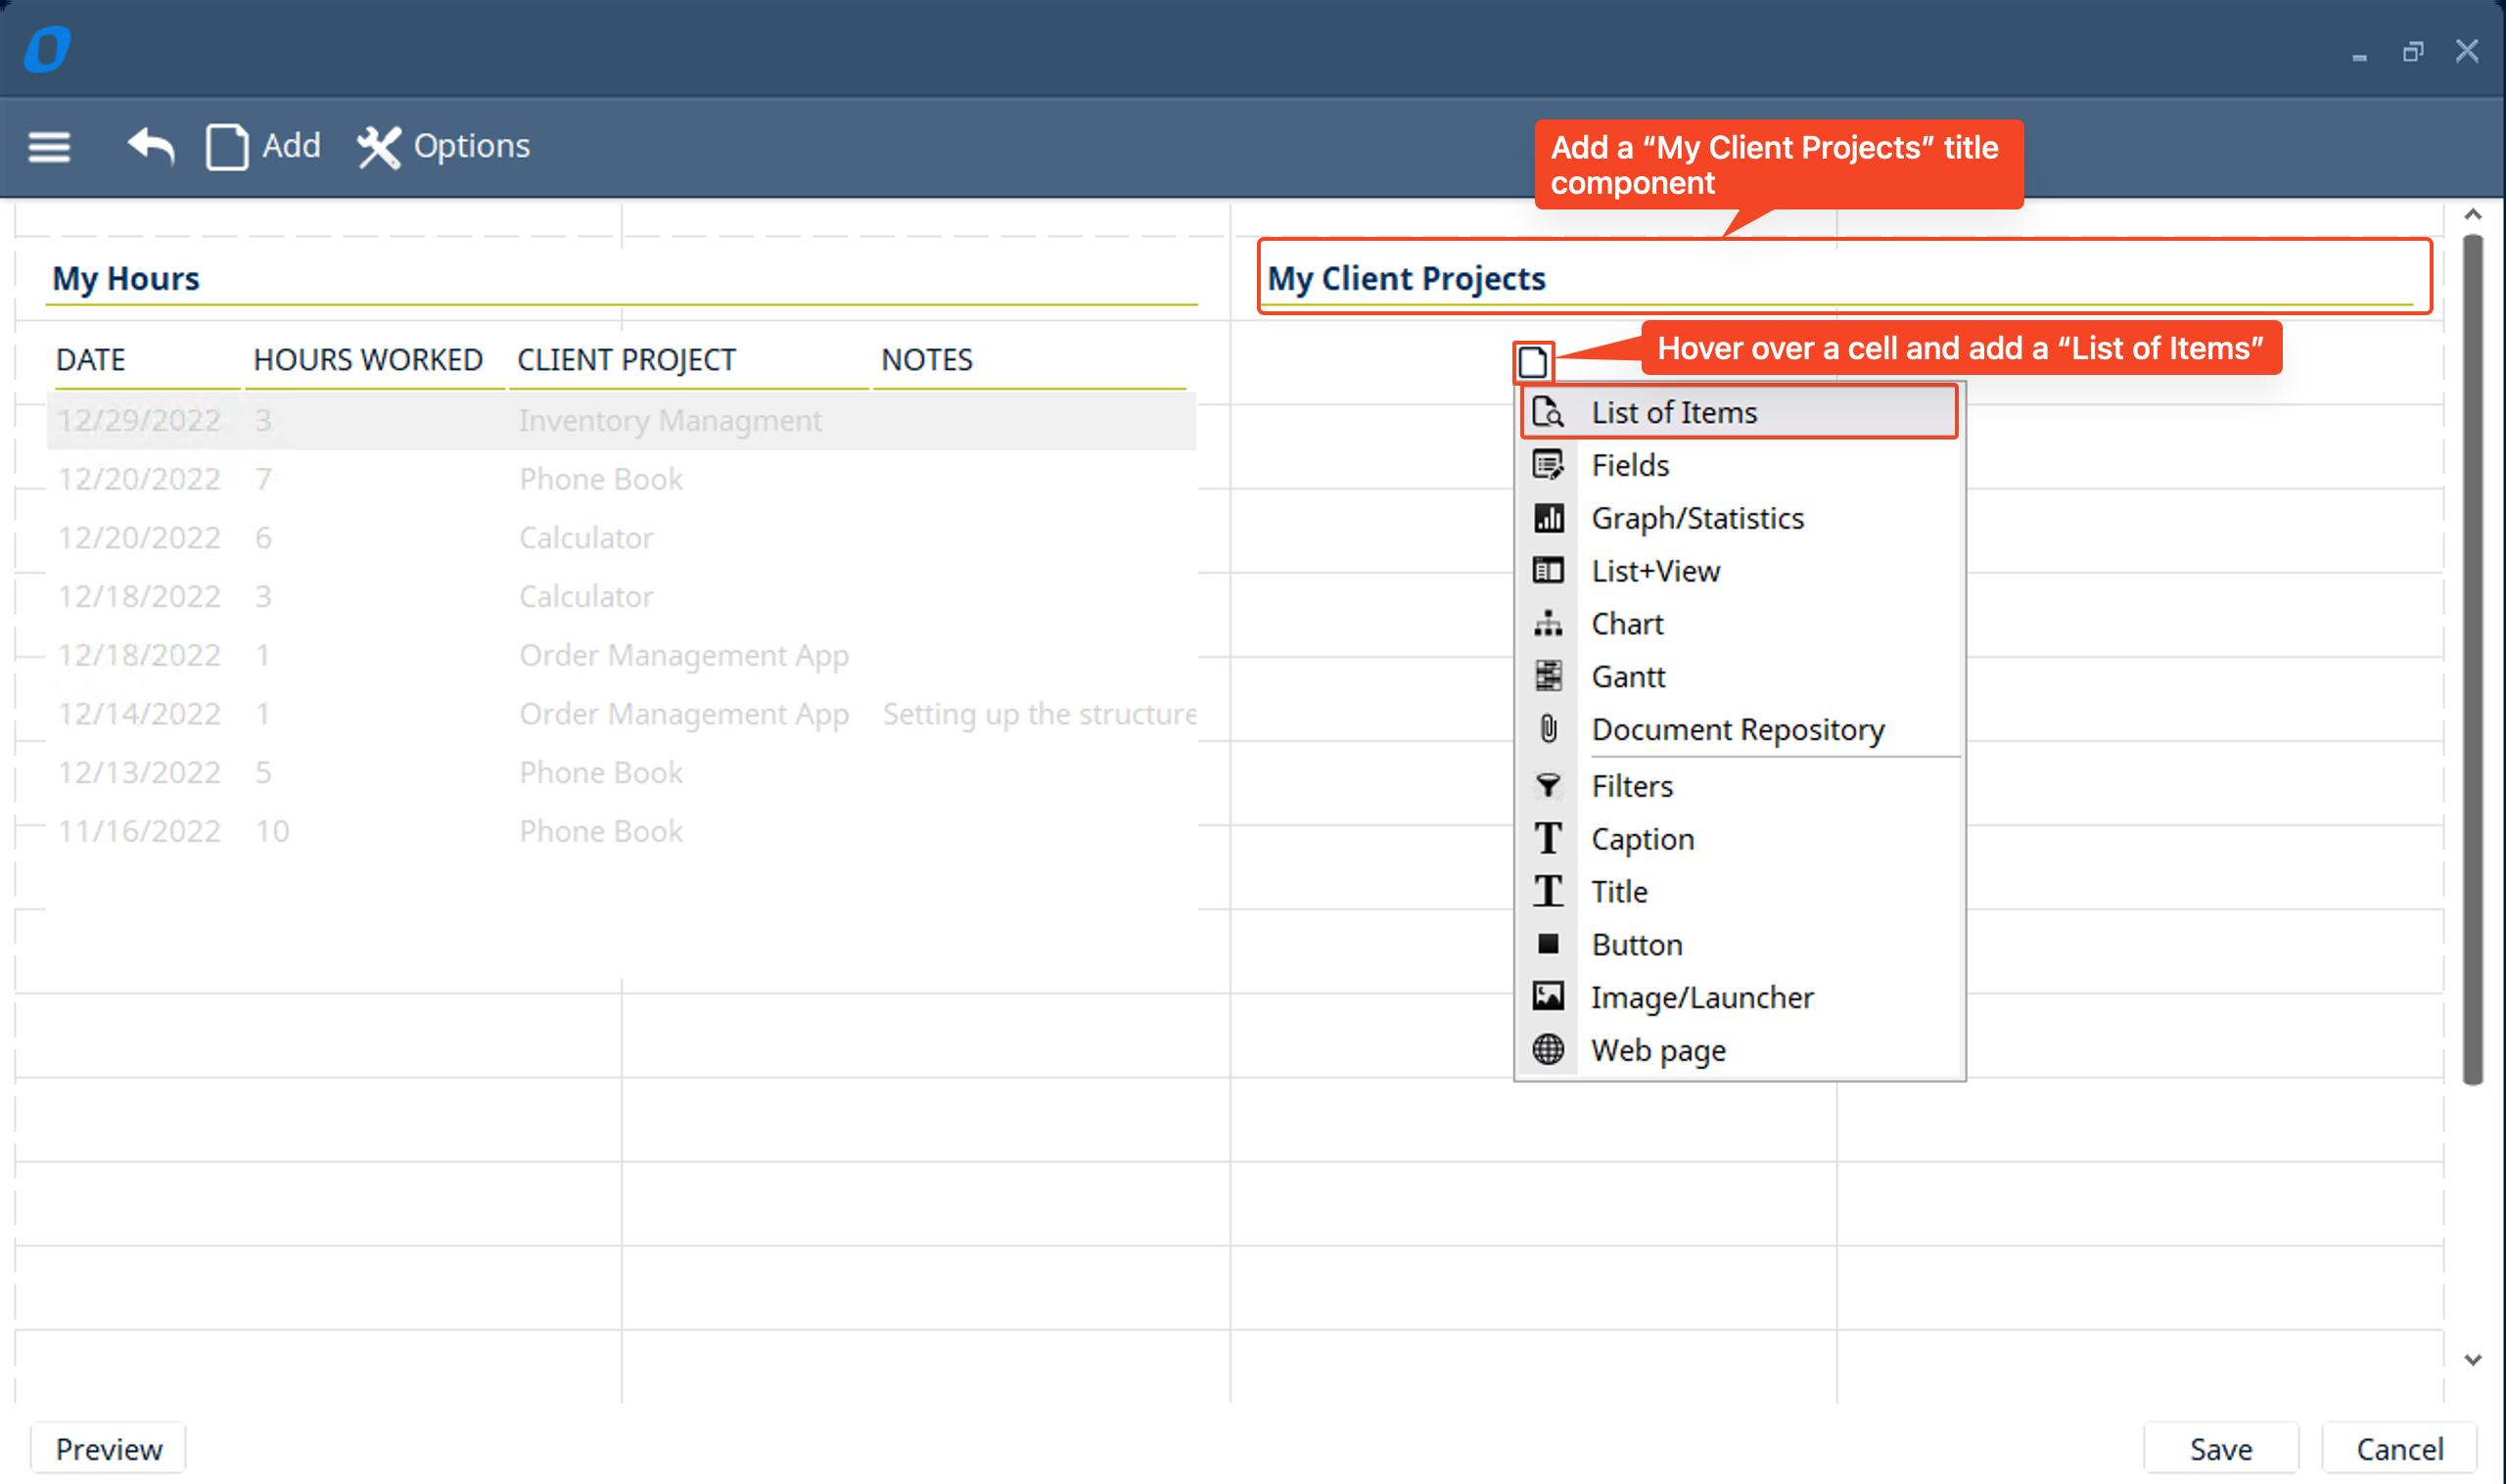
- Click on the “Client Projects” table → set the “Columns” → then “Save”
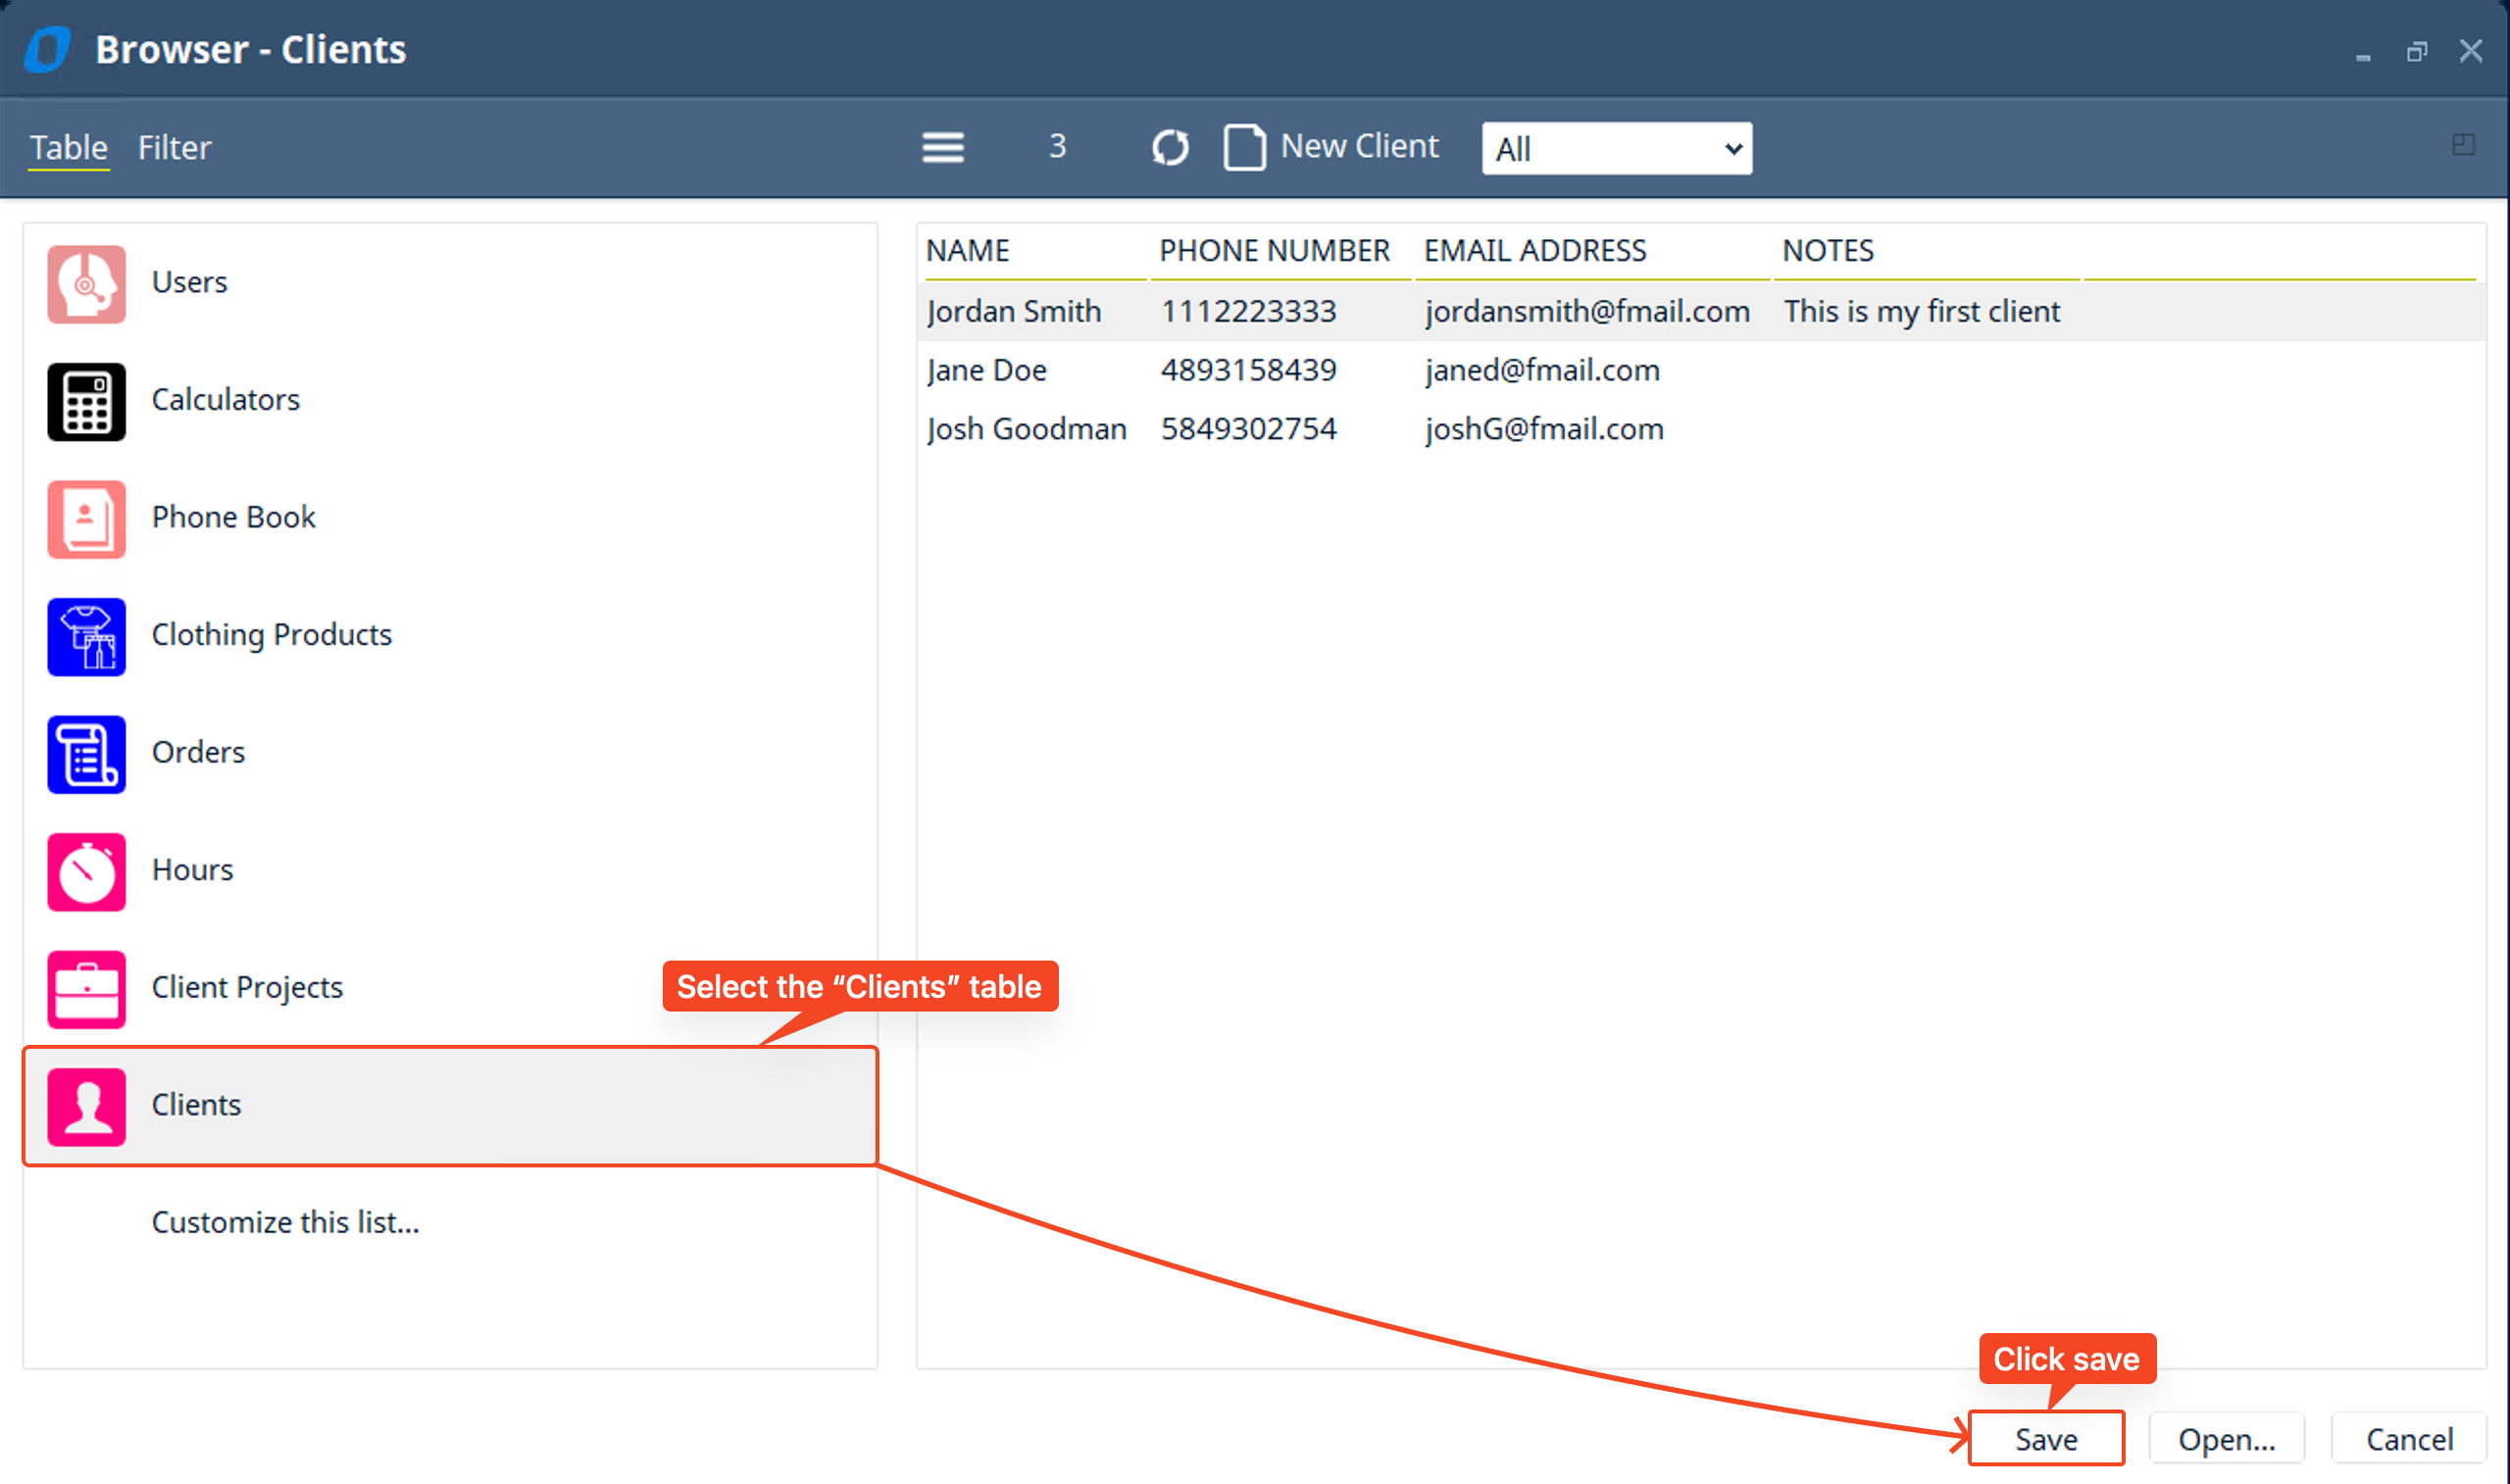
- Next, let’s add a “Title” named “My Clients” and add a list of “Clients. Again, Add a “List of Items”
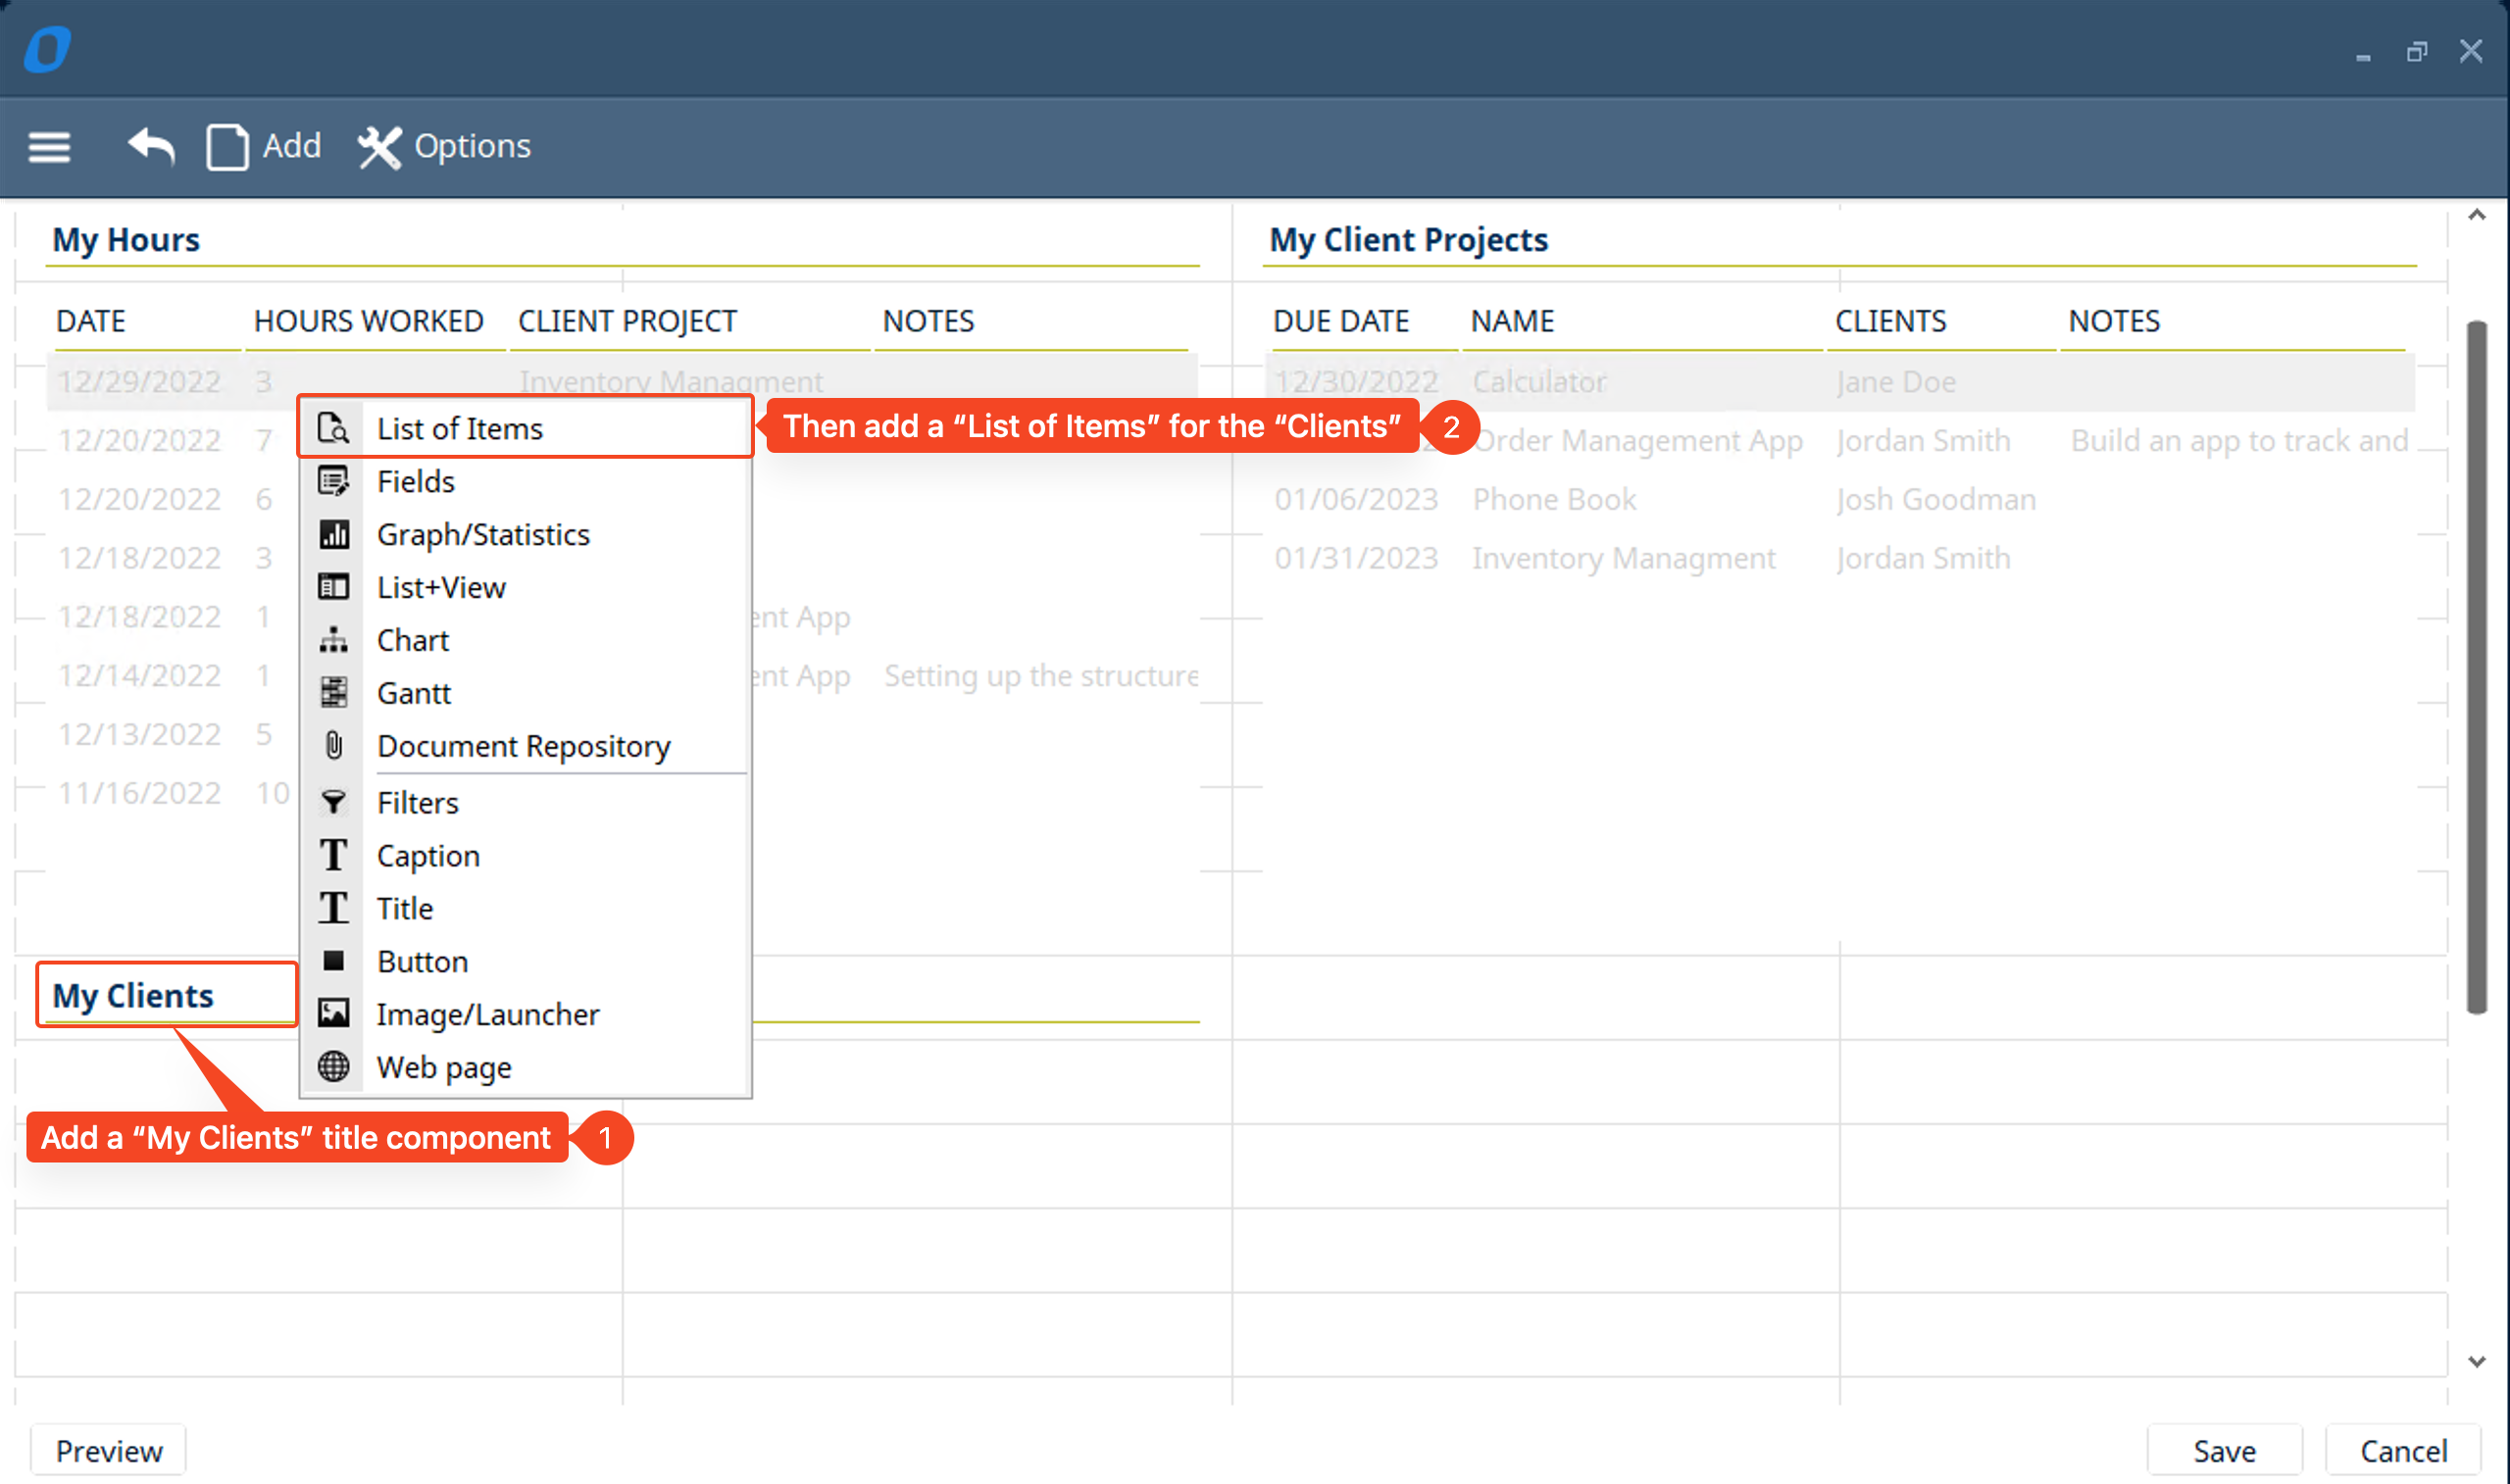
- Select the “Clients” table → set the “Columns” → “Save”
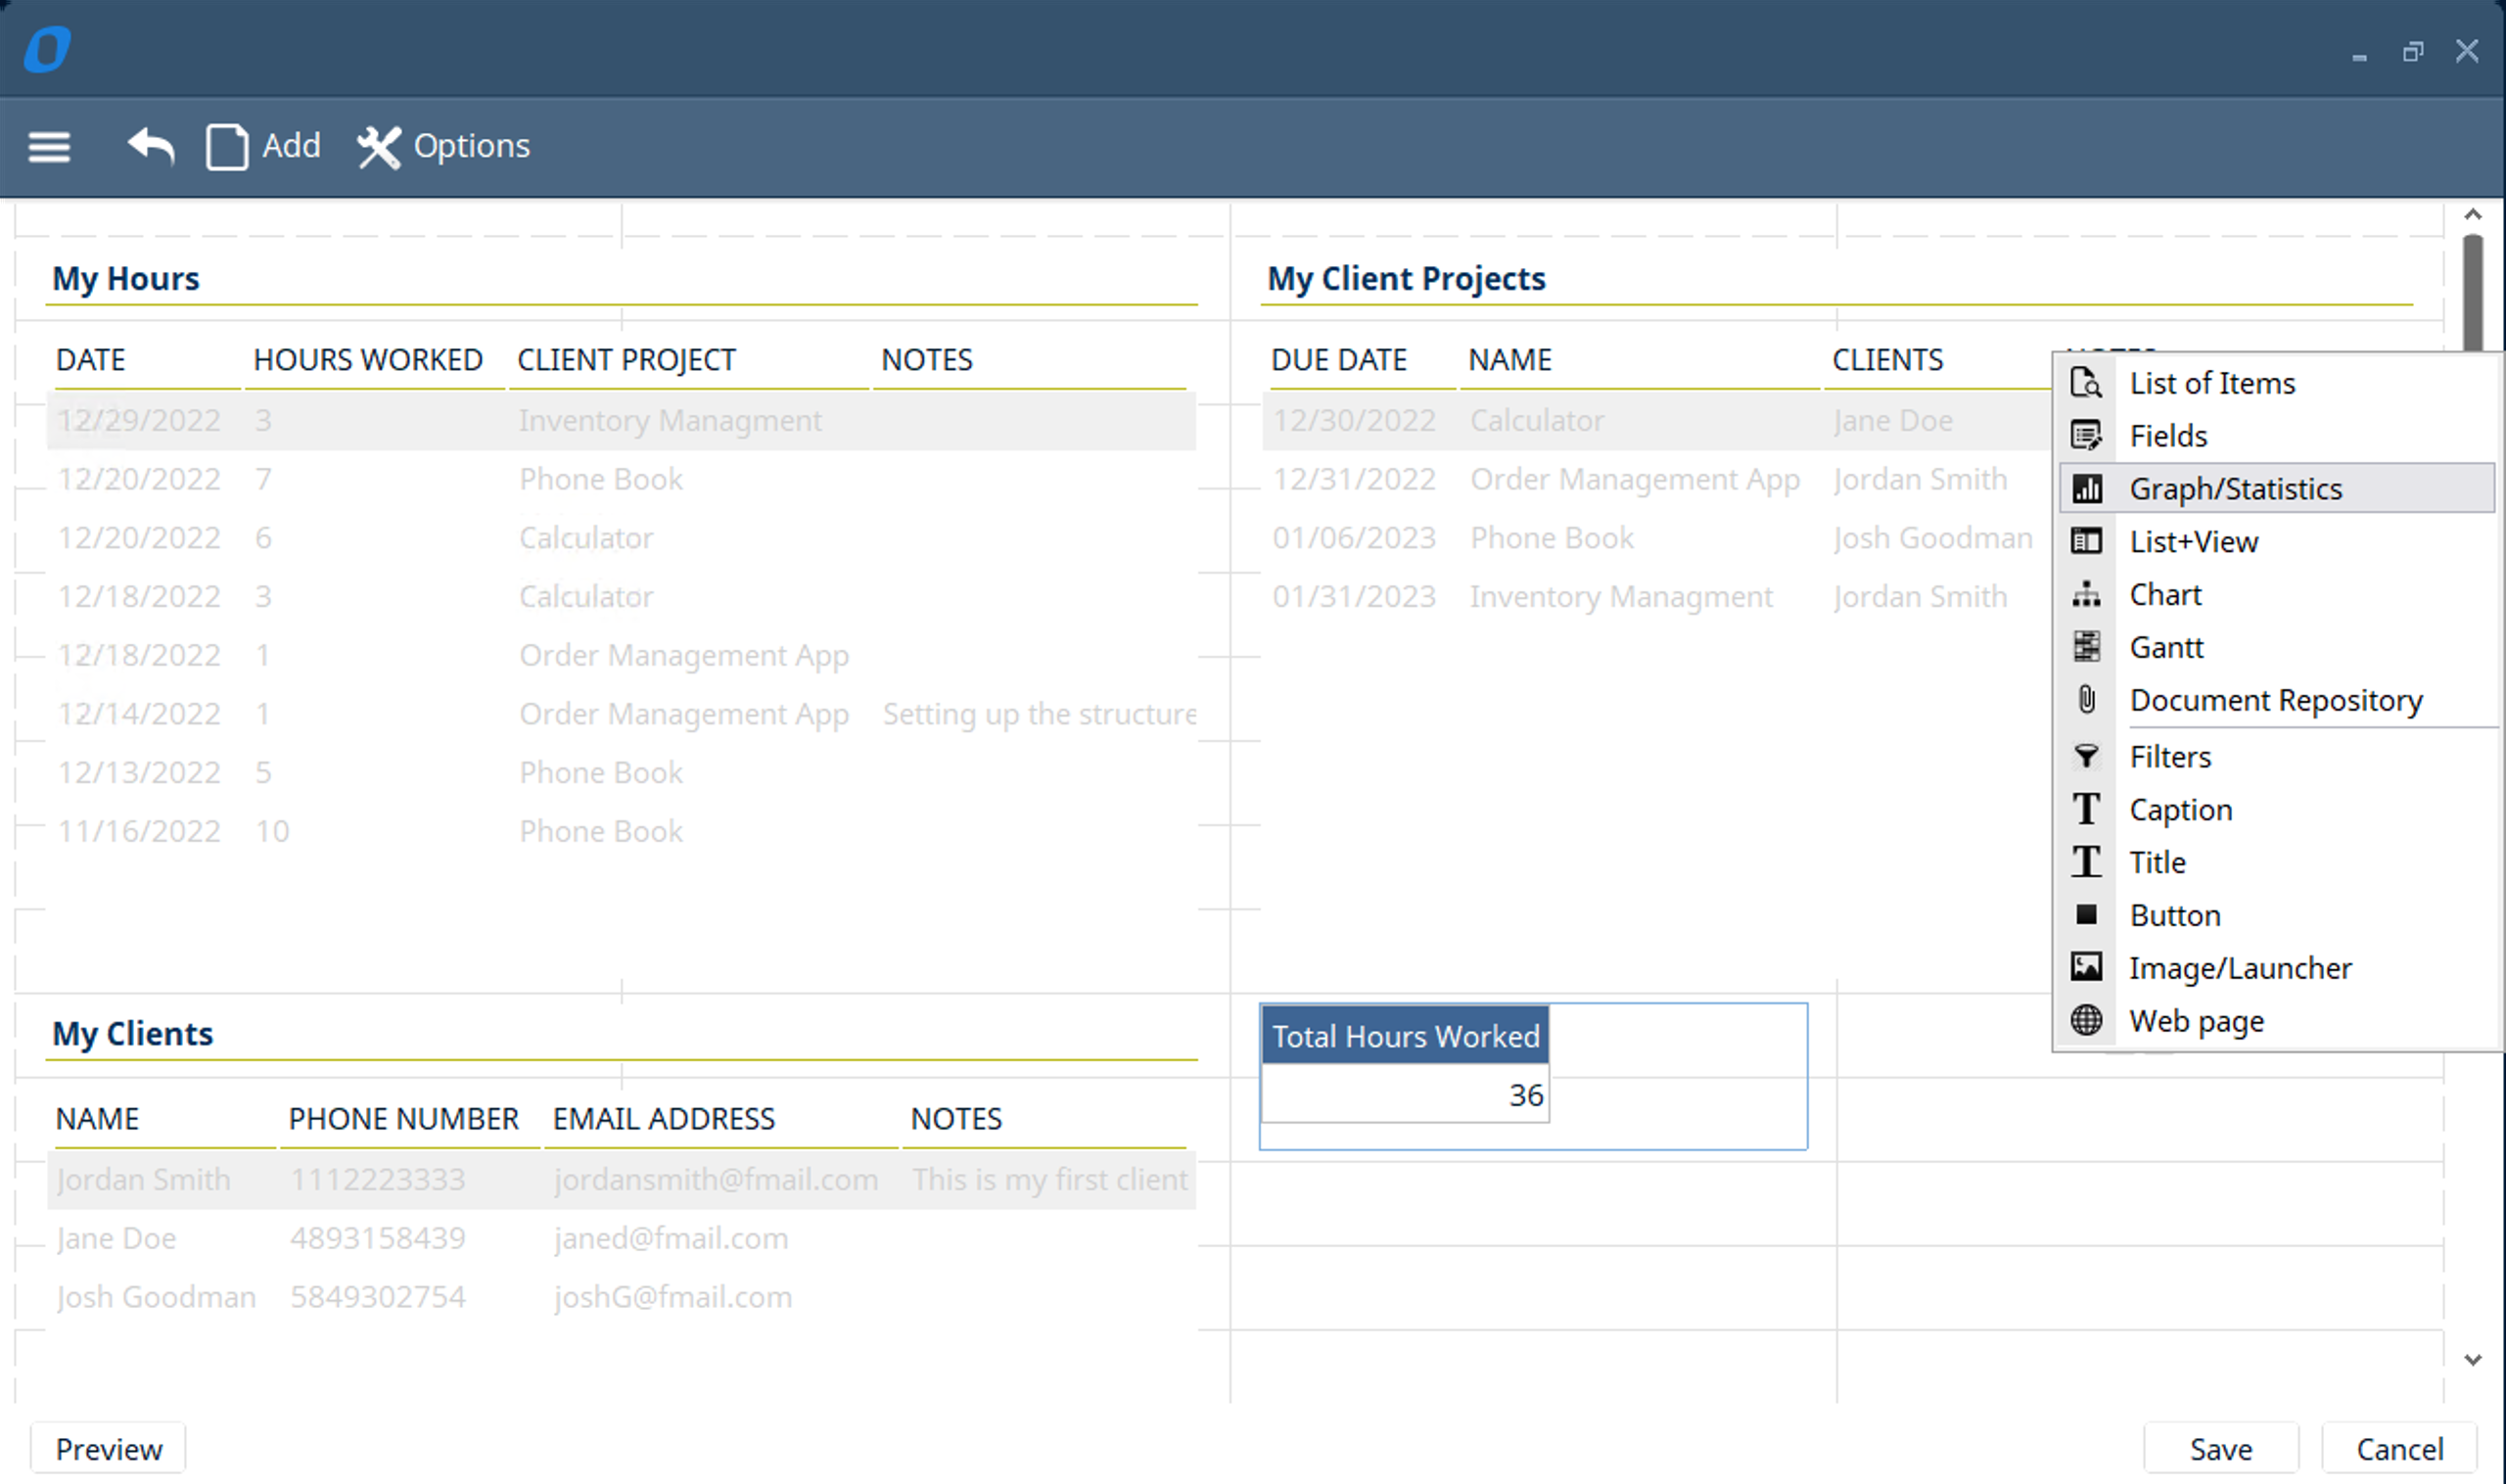
- Next we will display a “Statistic” of all the “Hours” in table. This “Statistic” will add up all the hours worked in the database and display it. Click on “Add” and select “Graph/Statistics”
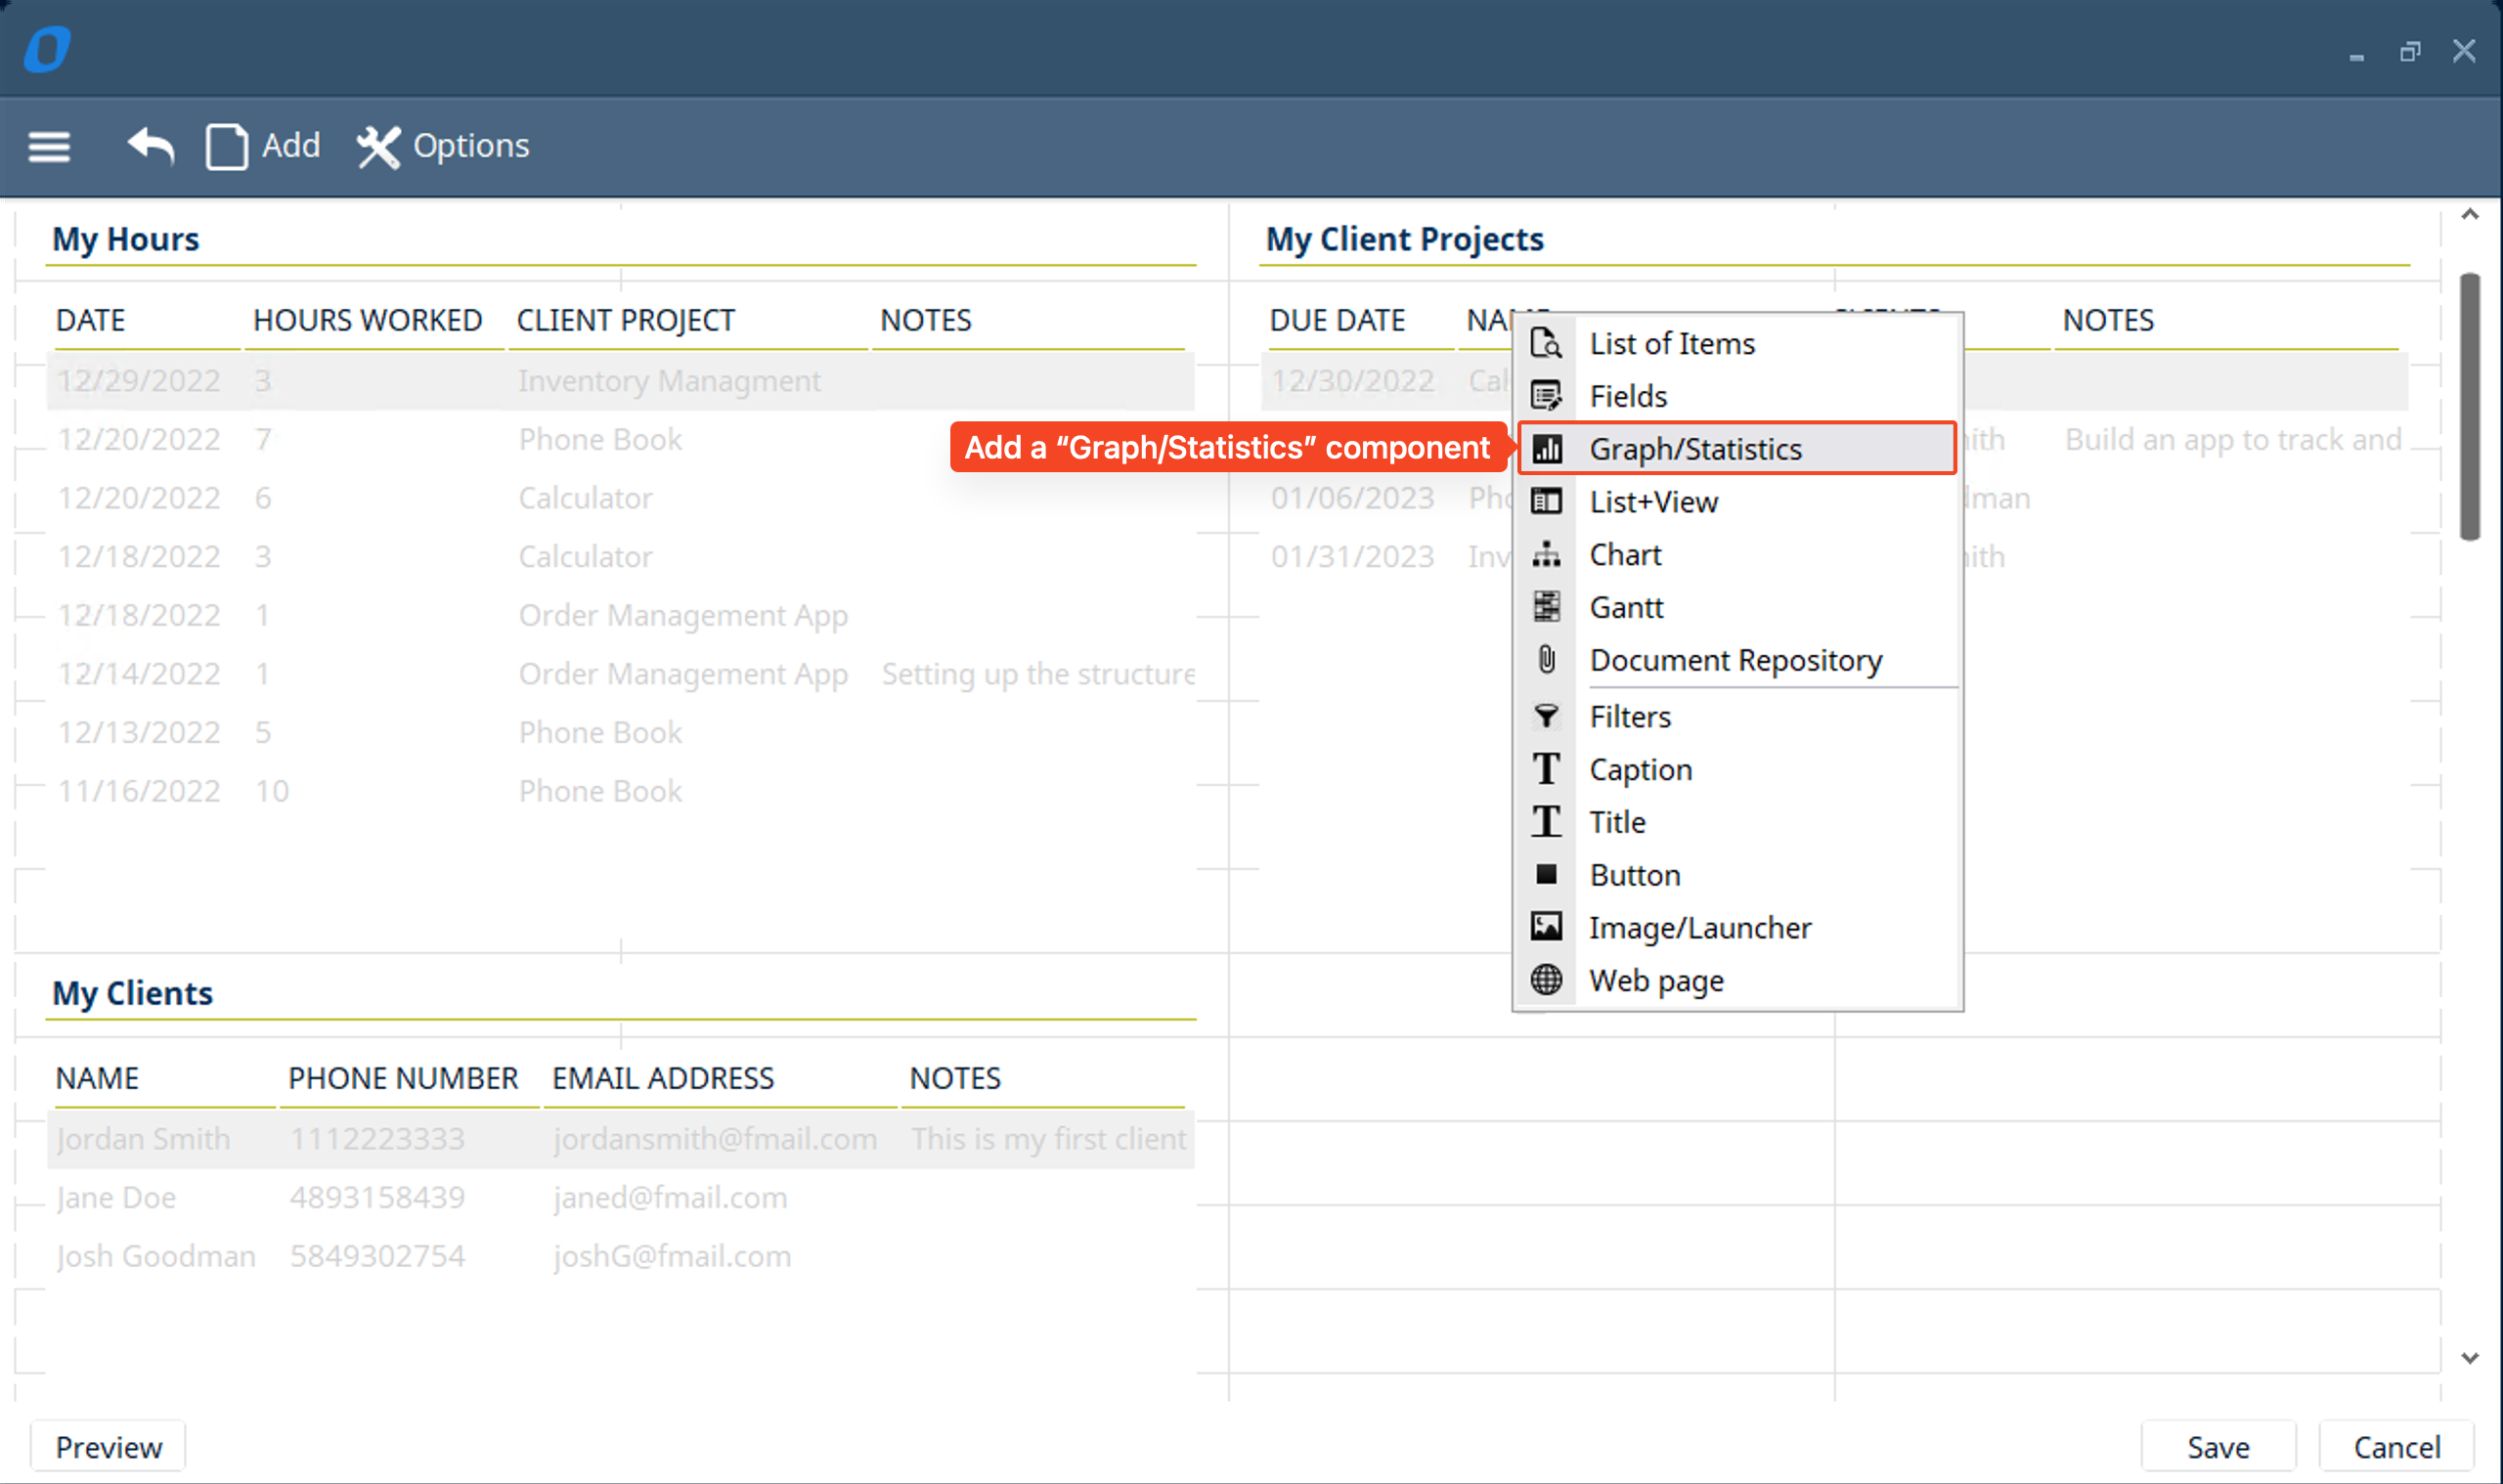
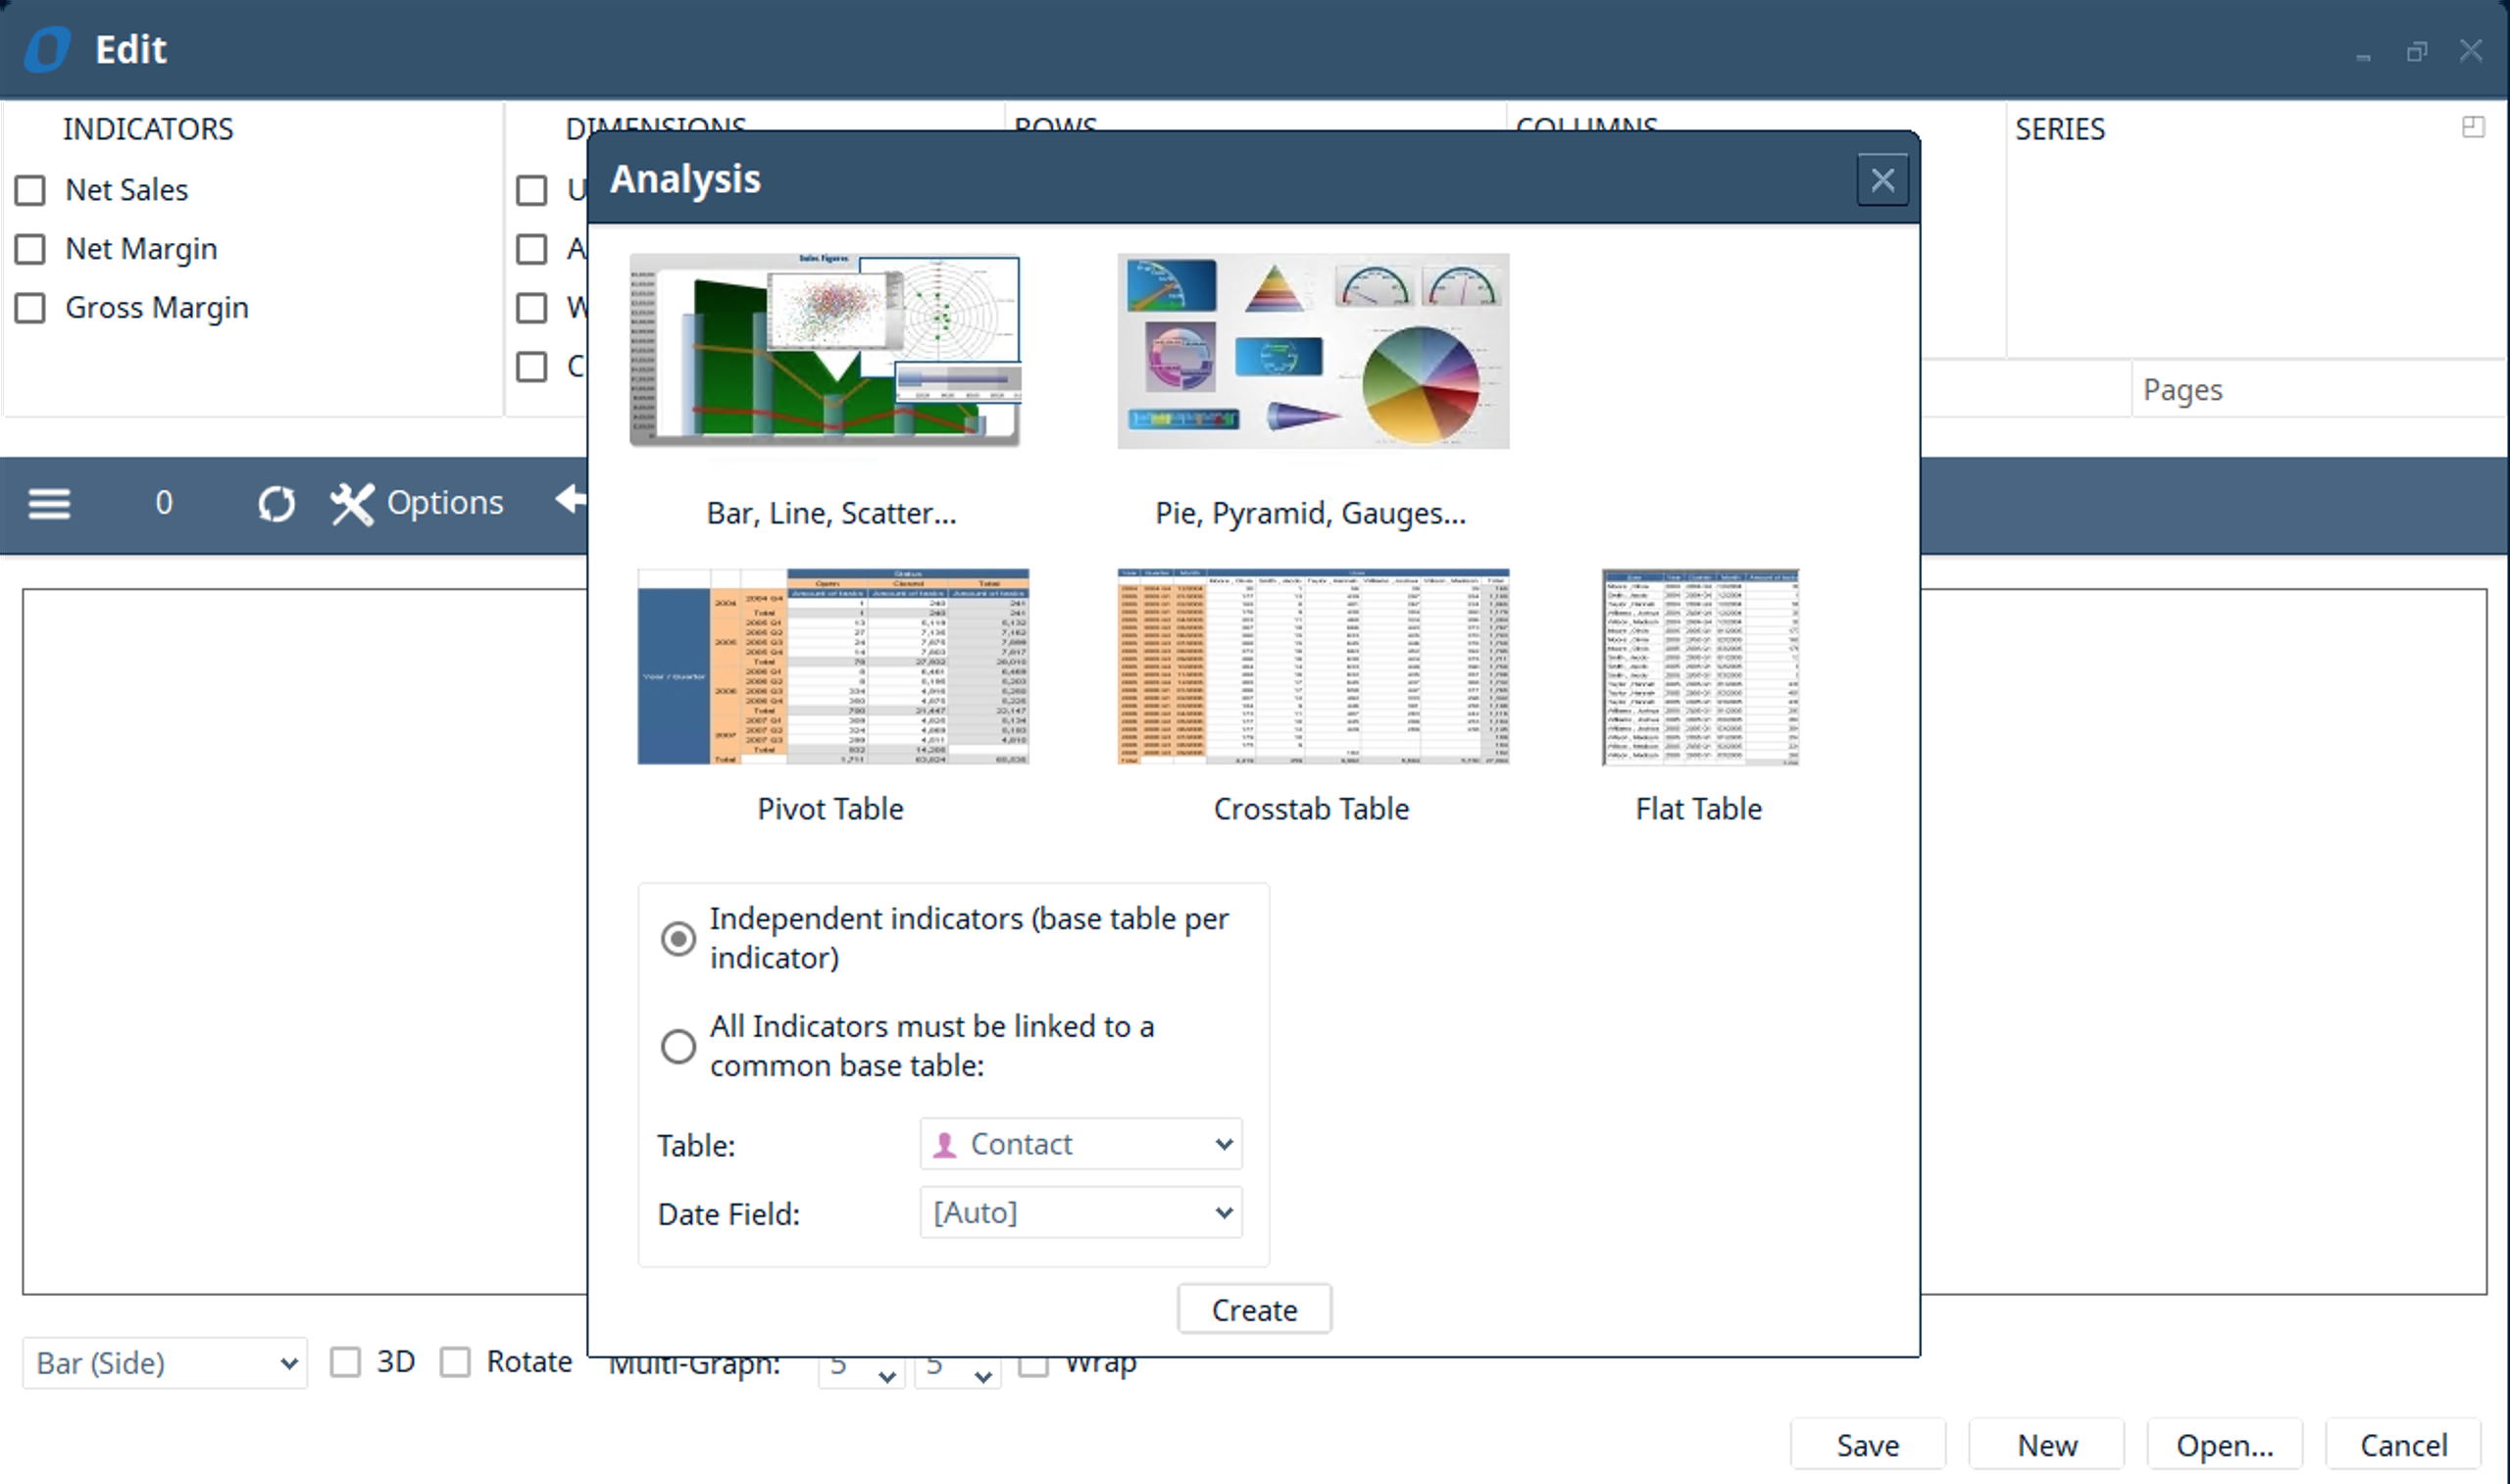
- Here you can select between many graphs, charts, and tables. For this mini project we will select “Flat Table” then click “Create”
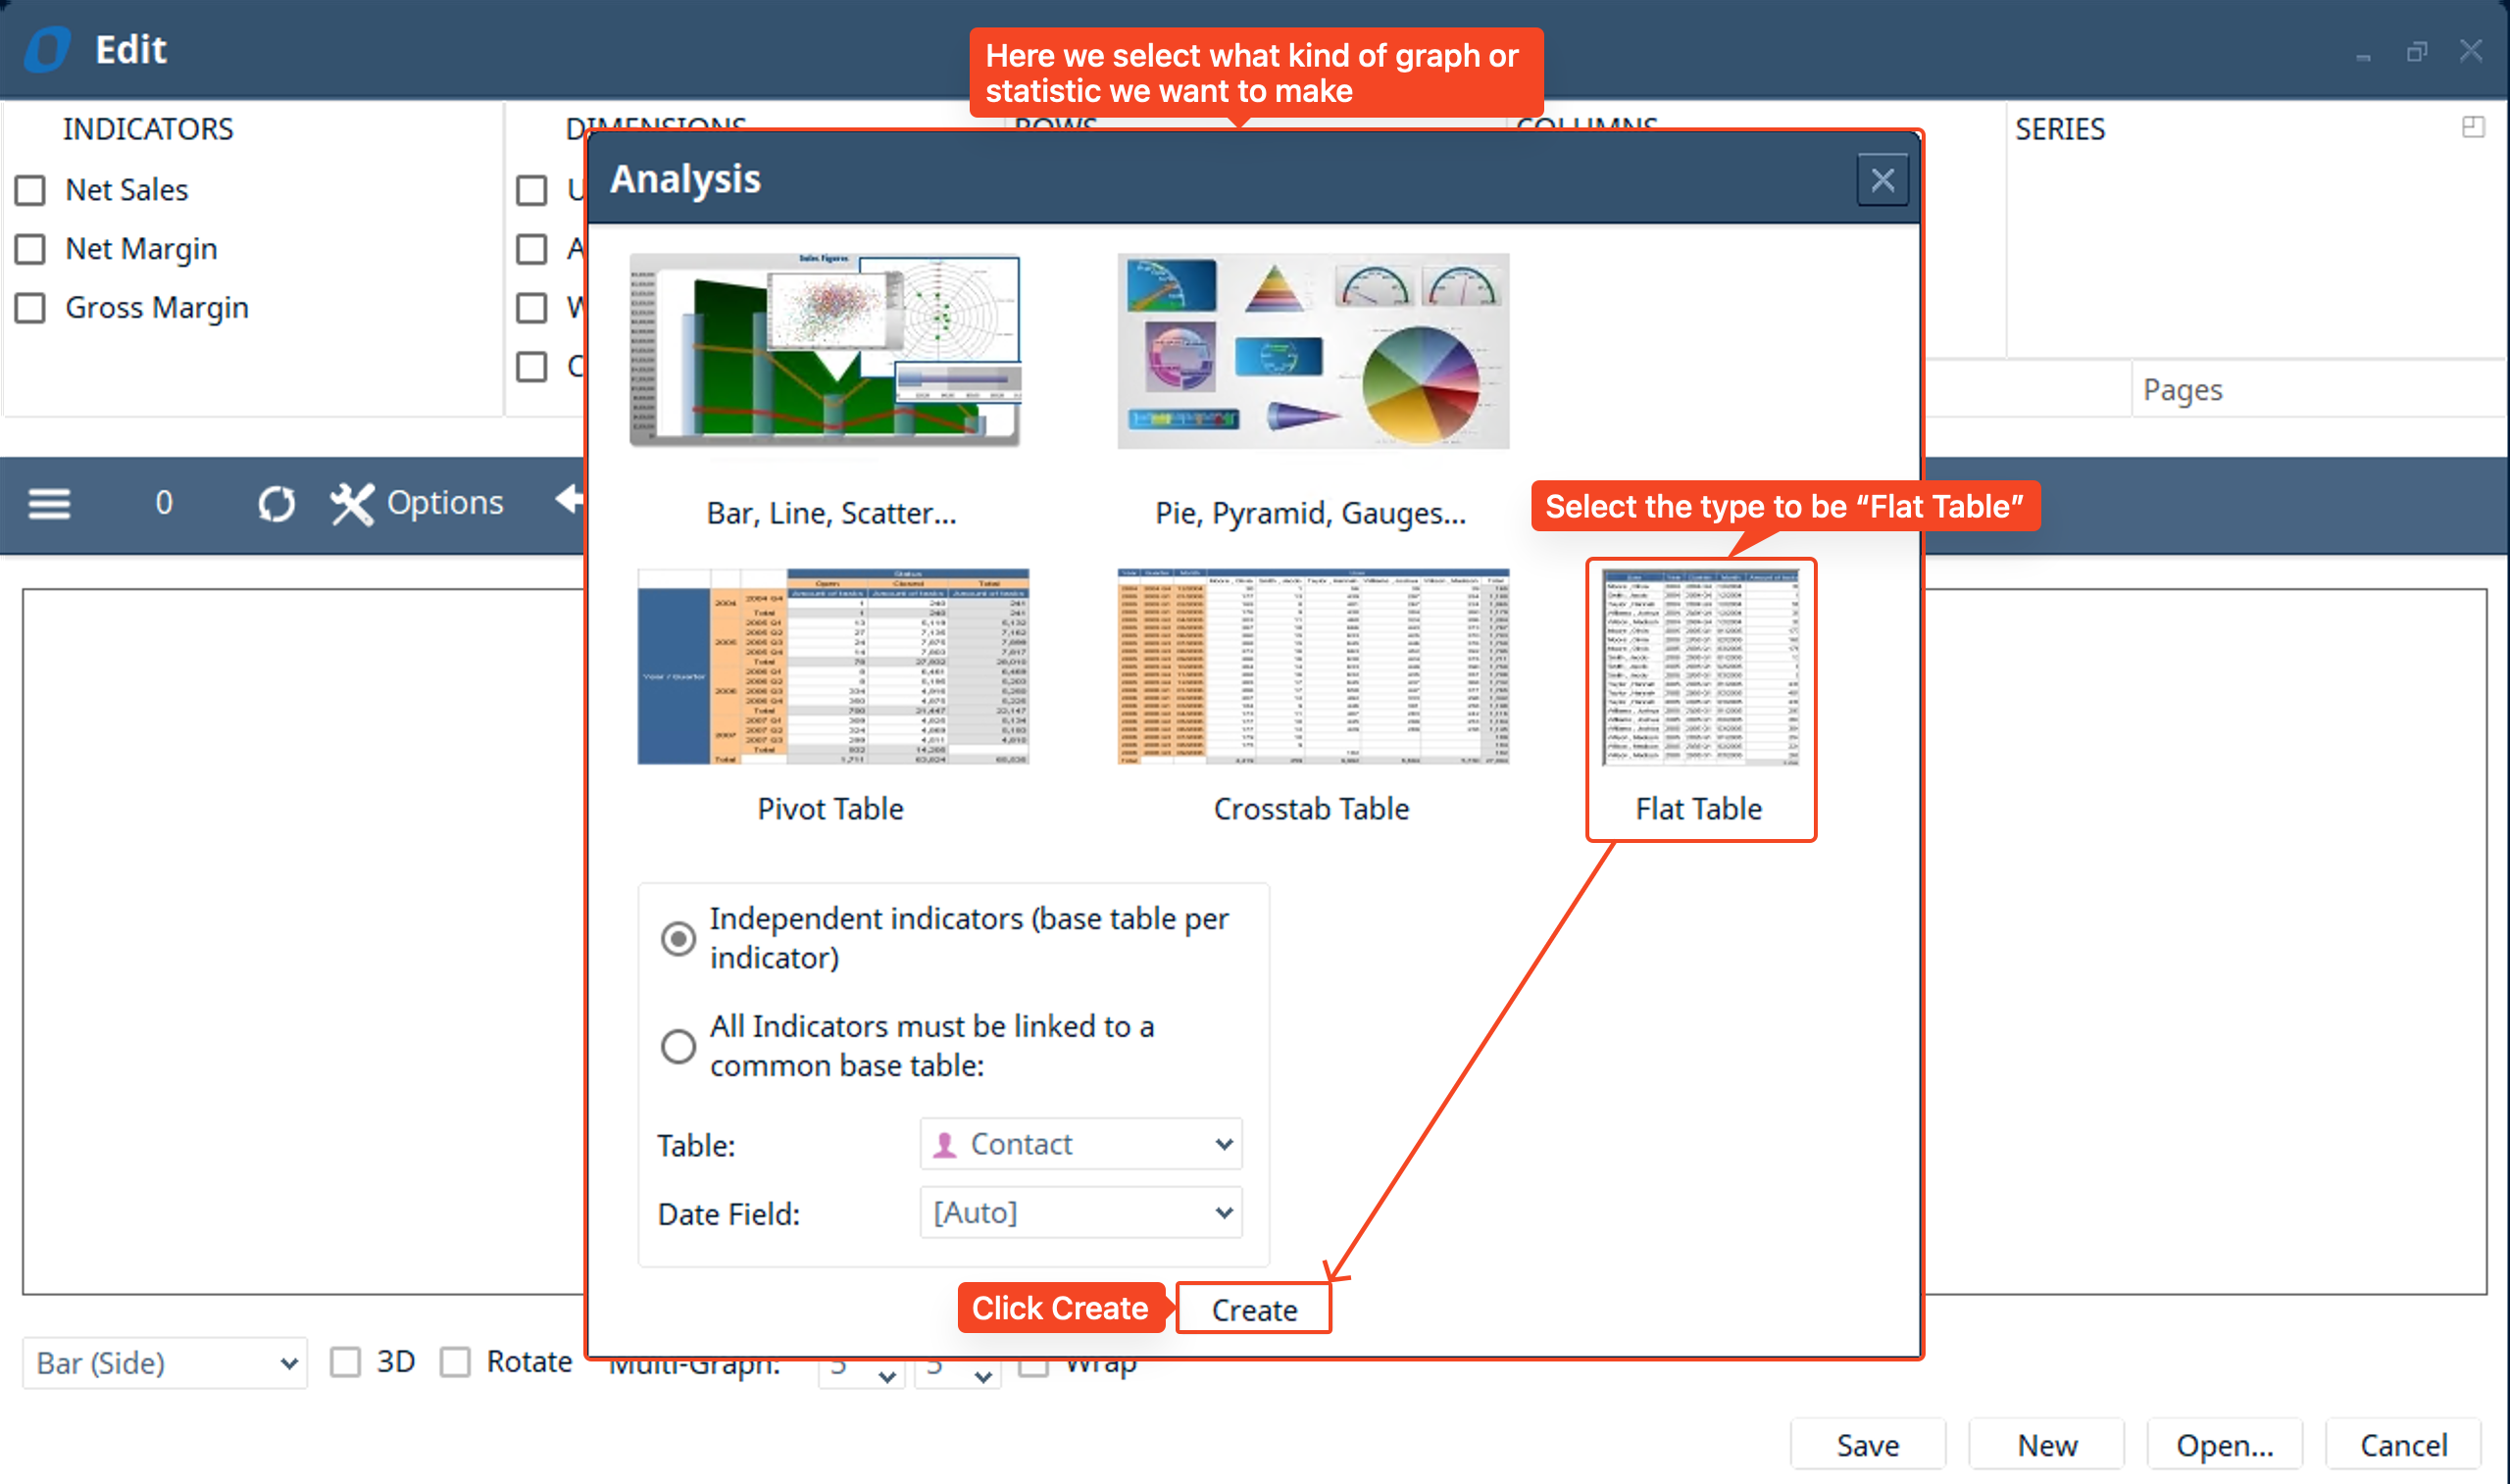
- A an analysis window shows up where you can choose indicators and dimensions. An indicator is a number value, it calculates a number based on a base table. The “Dimension” is a specific value of a field that can show you information on your data that doesn’t need to be calculated.
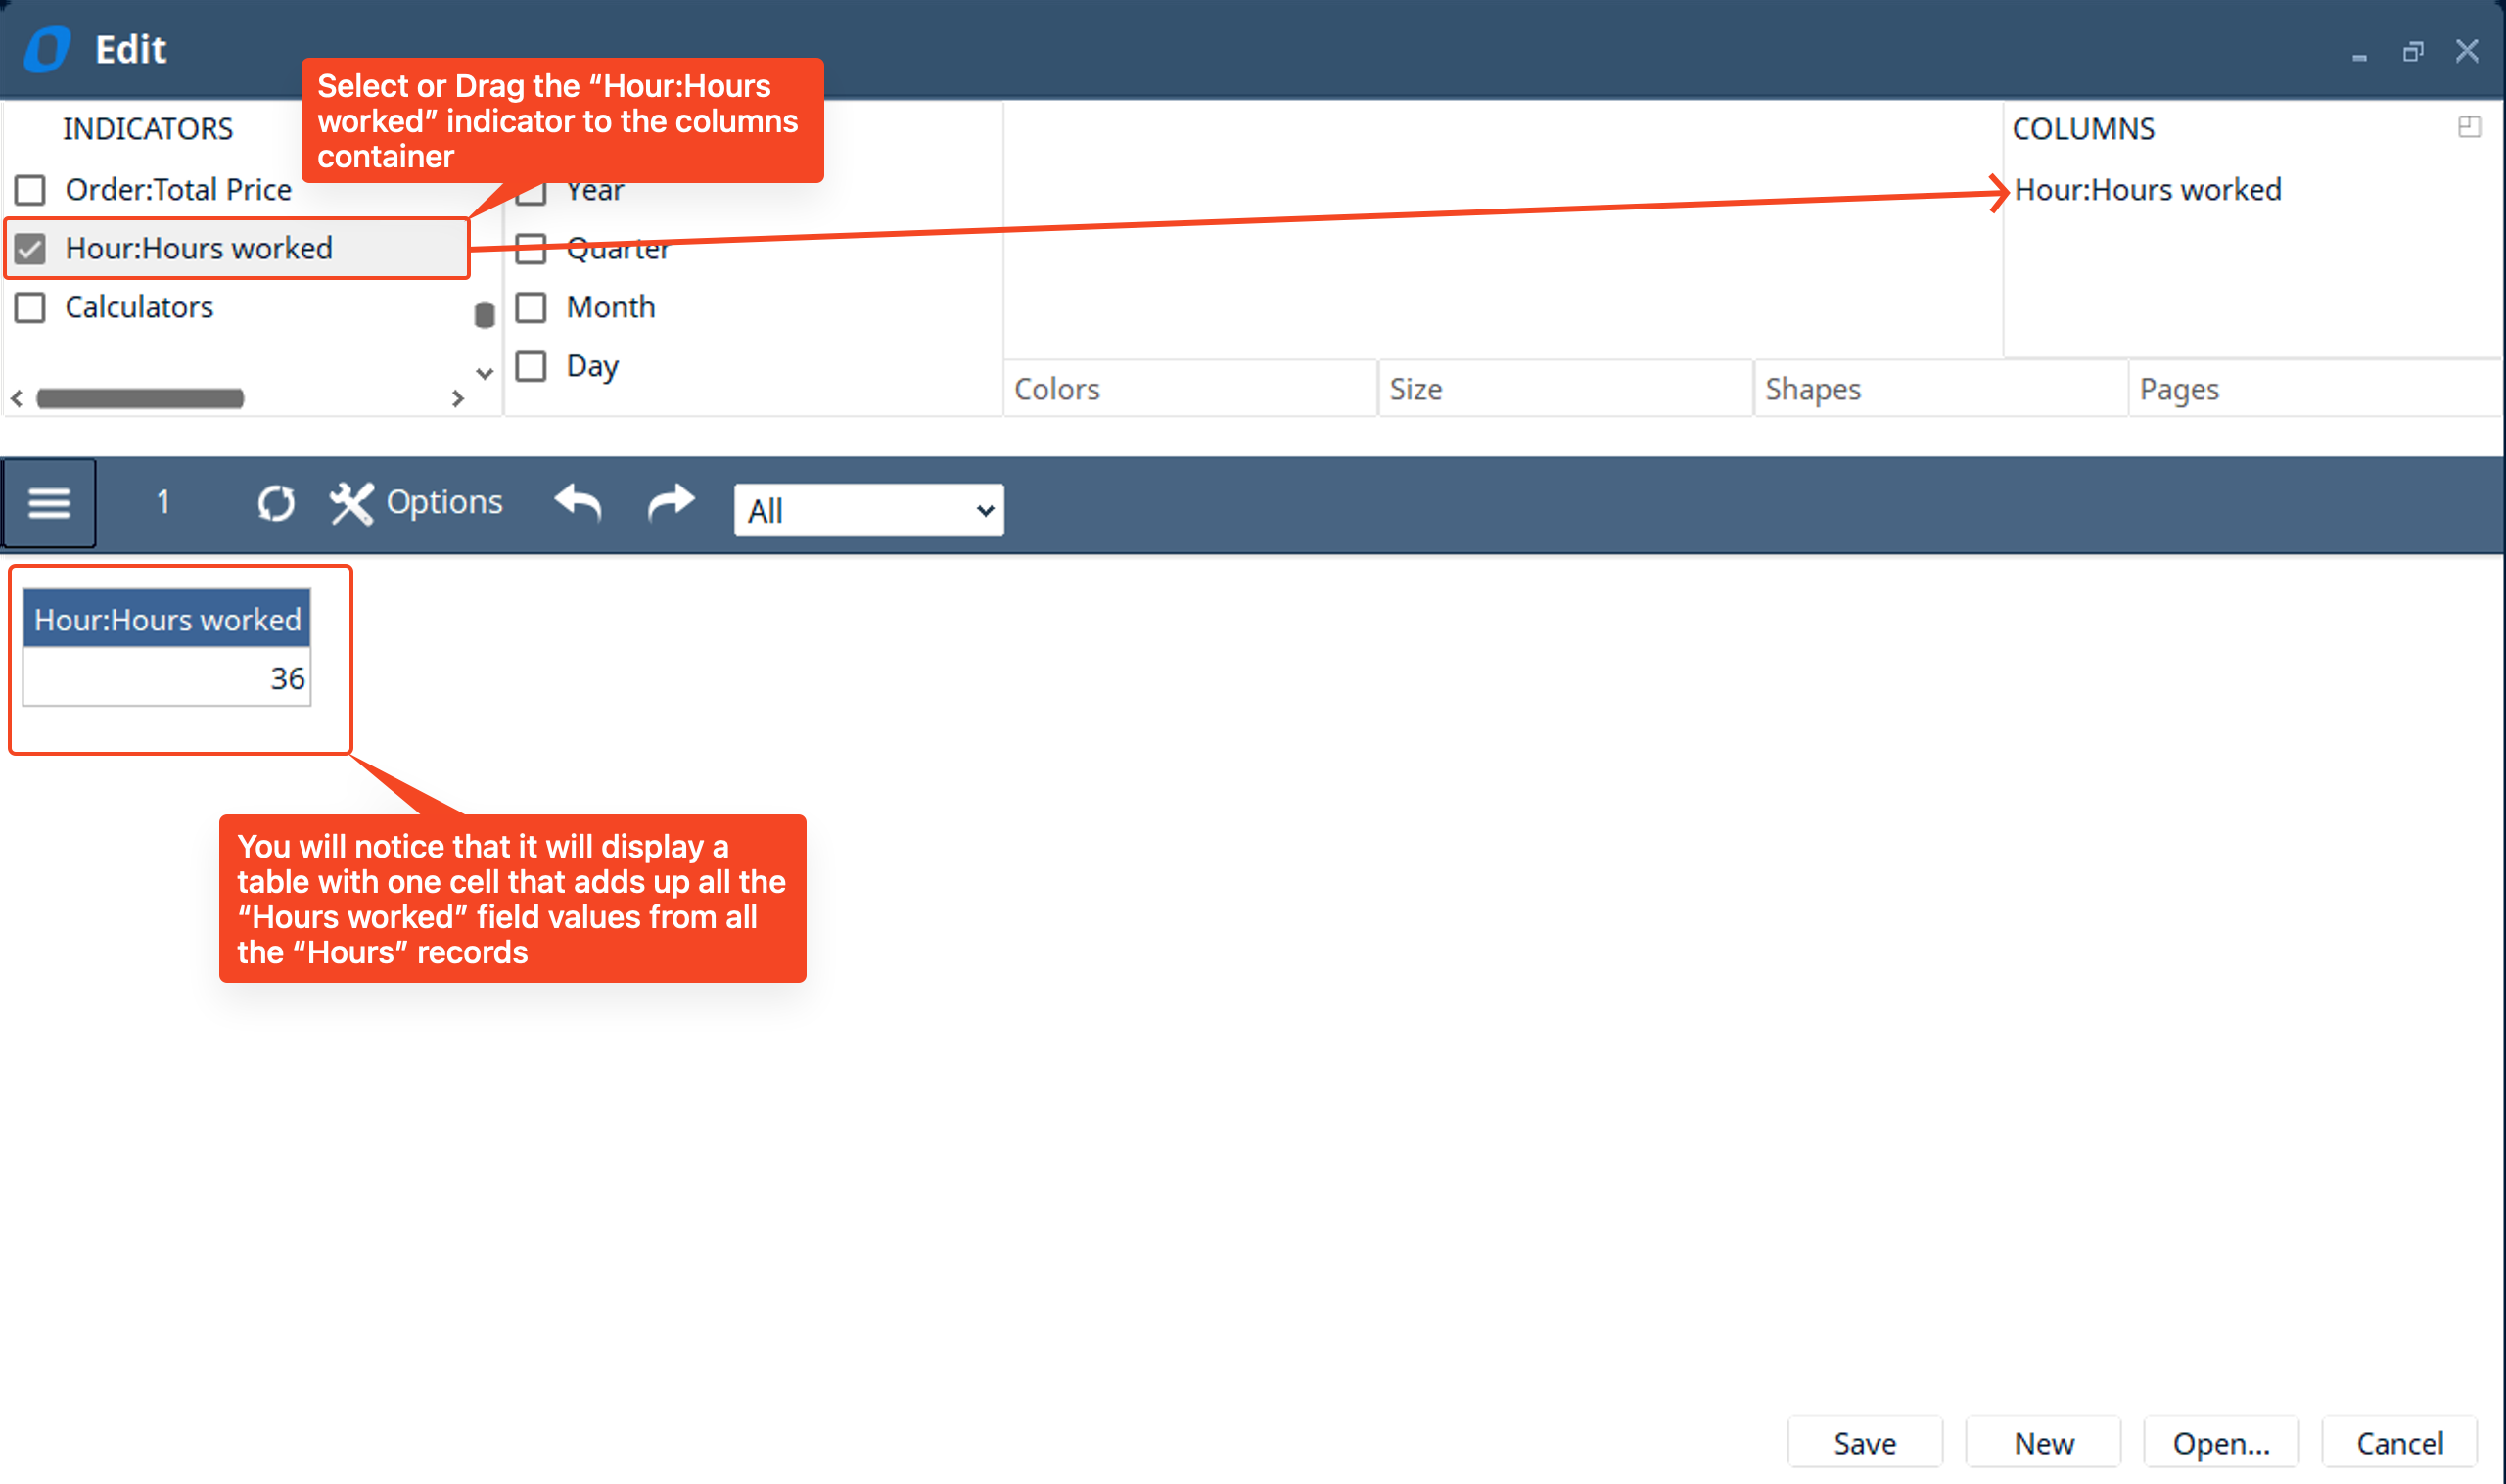
- In the “Indicators” box, select the “Hour:Hours worked” field, a value should be displayed that sums all the “Hours worked” from all the “Hours” records in the “Hours” table
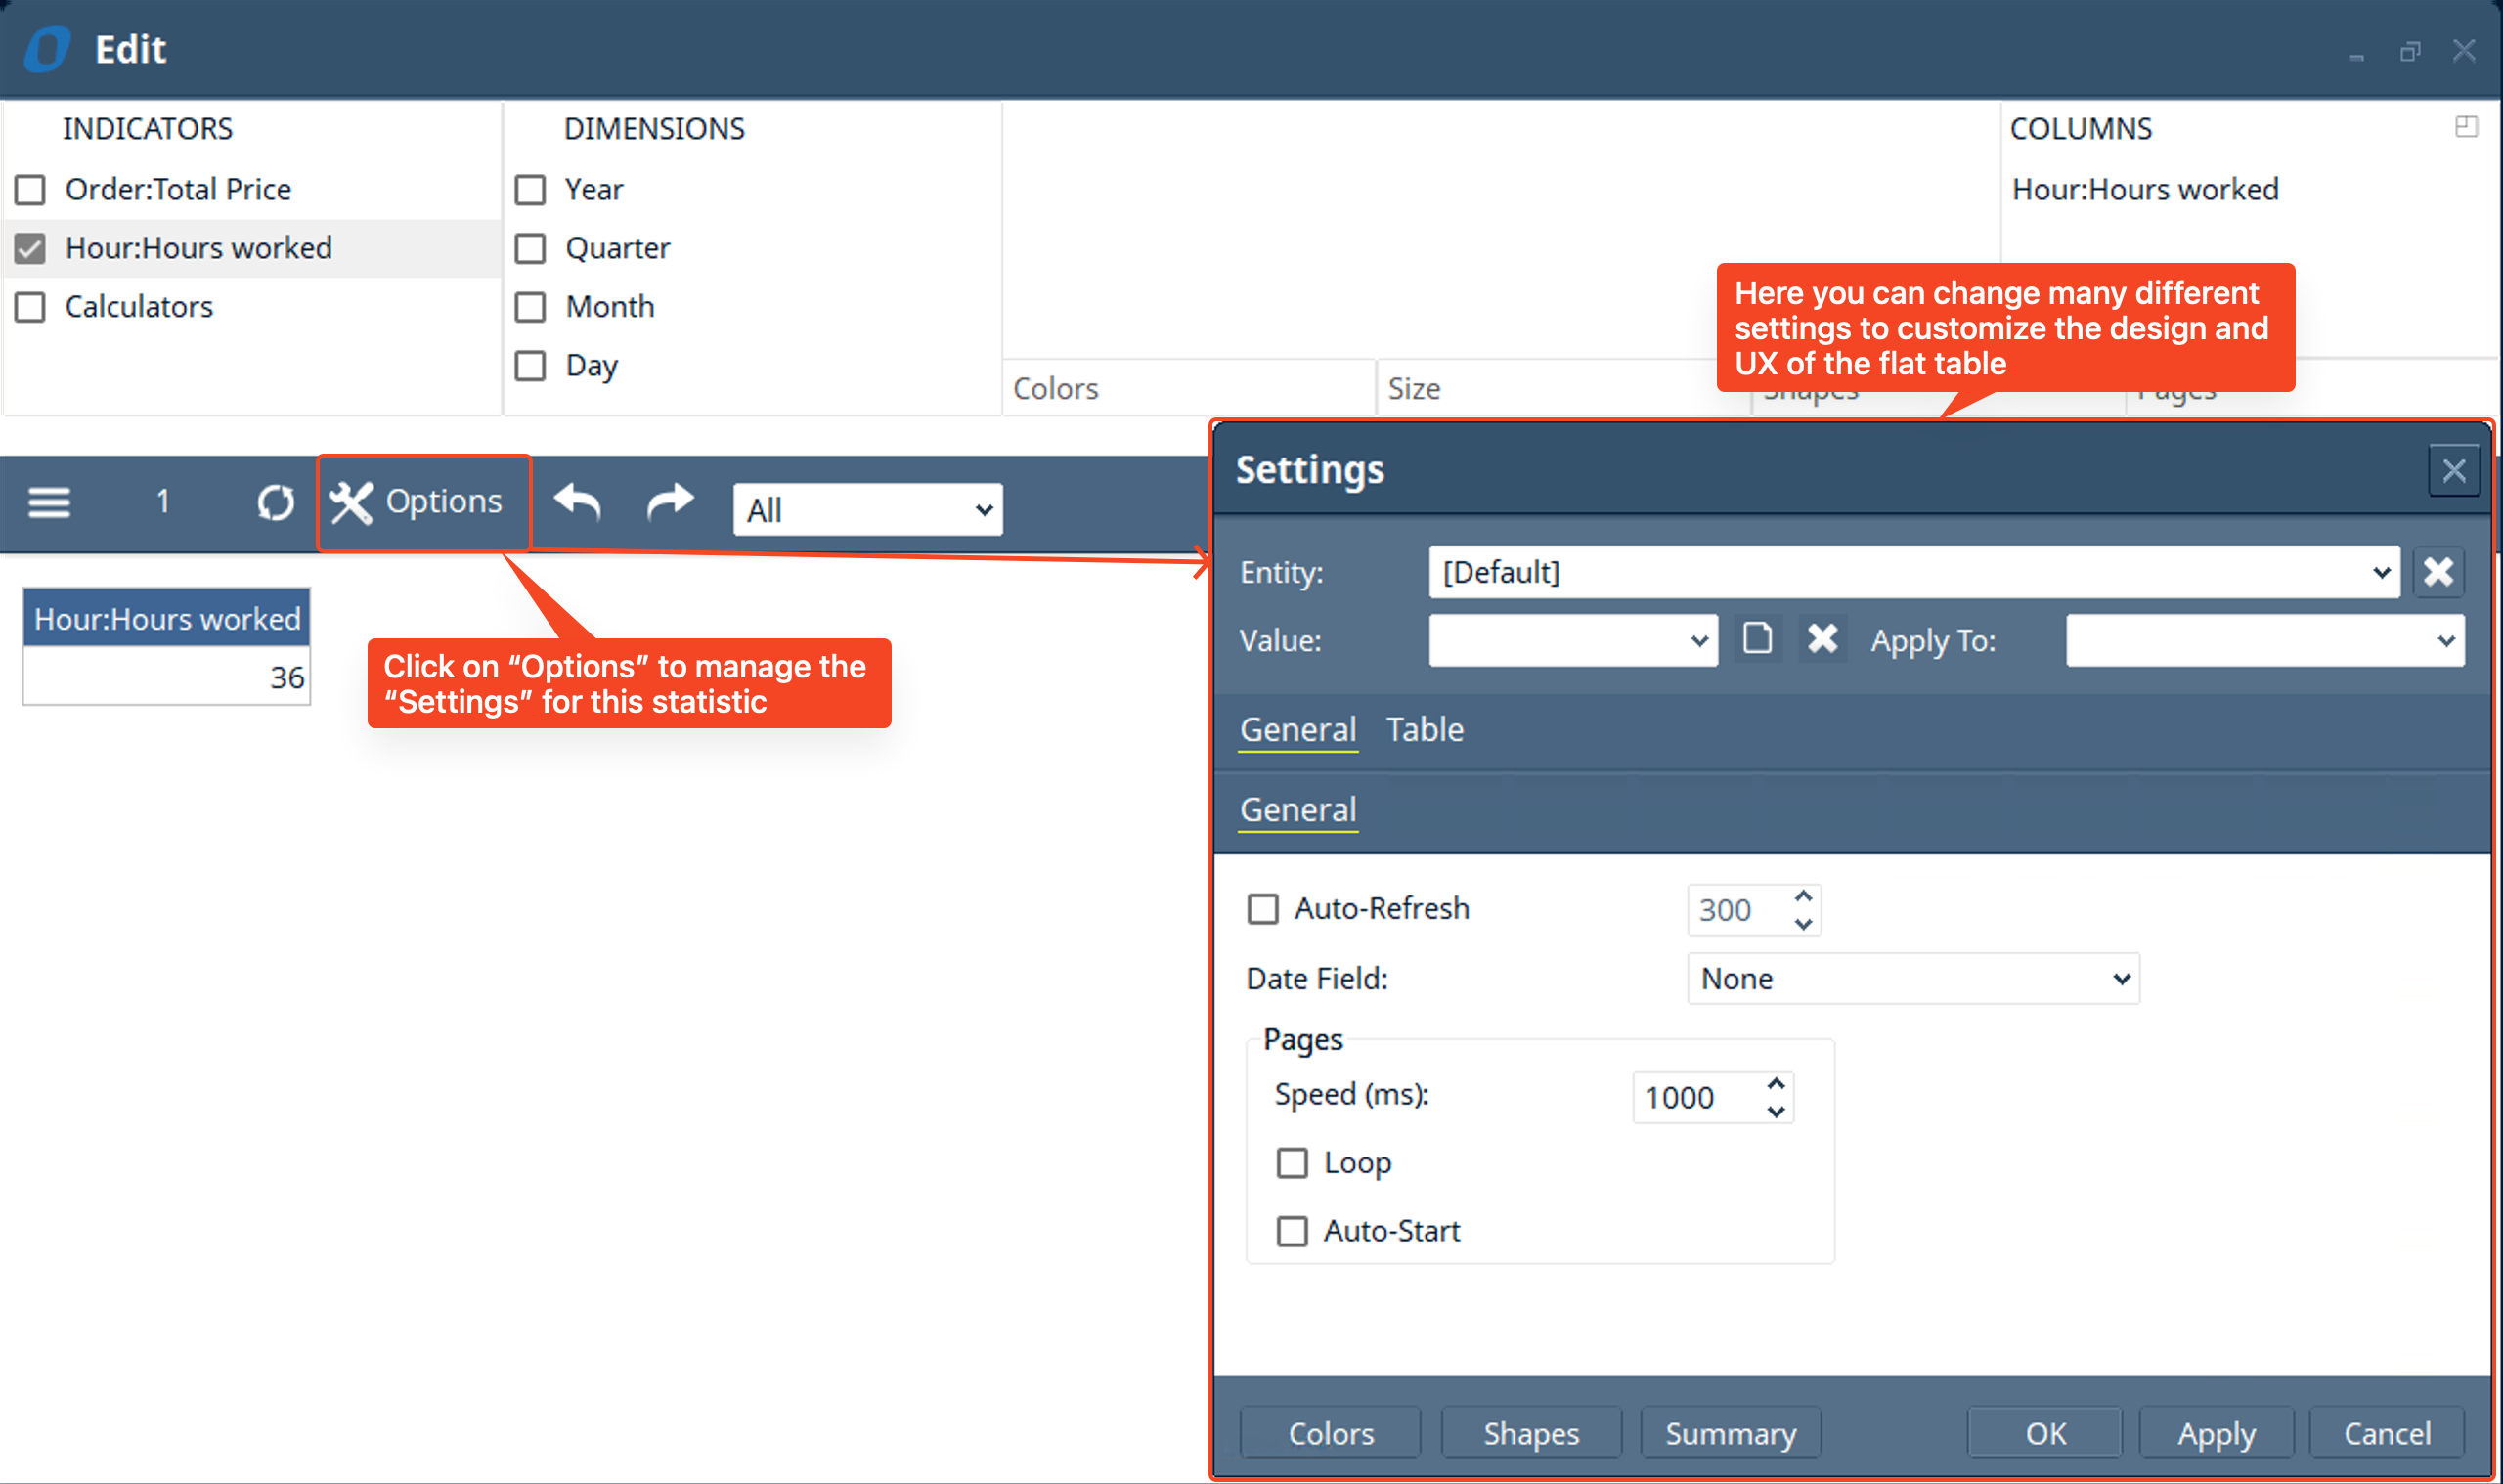
- Click on the “Options” button and a “Settings” window will pop up where you can customize the look and design of the flat table
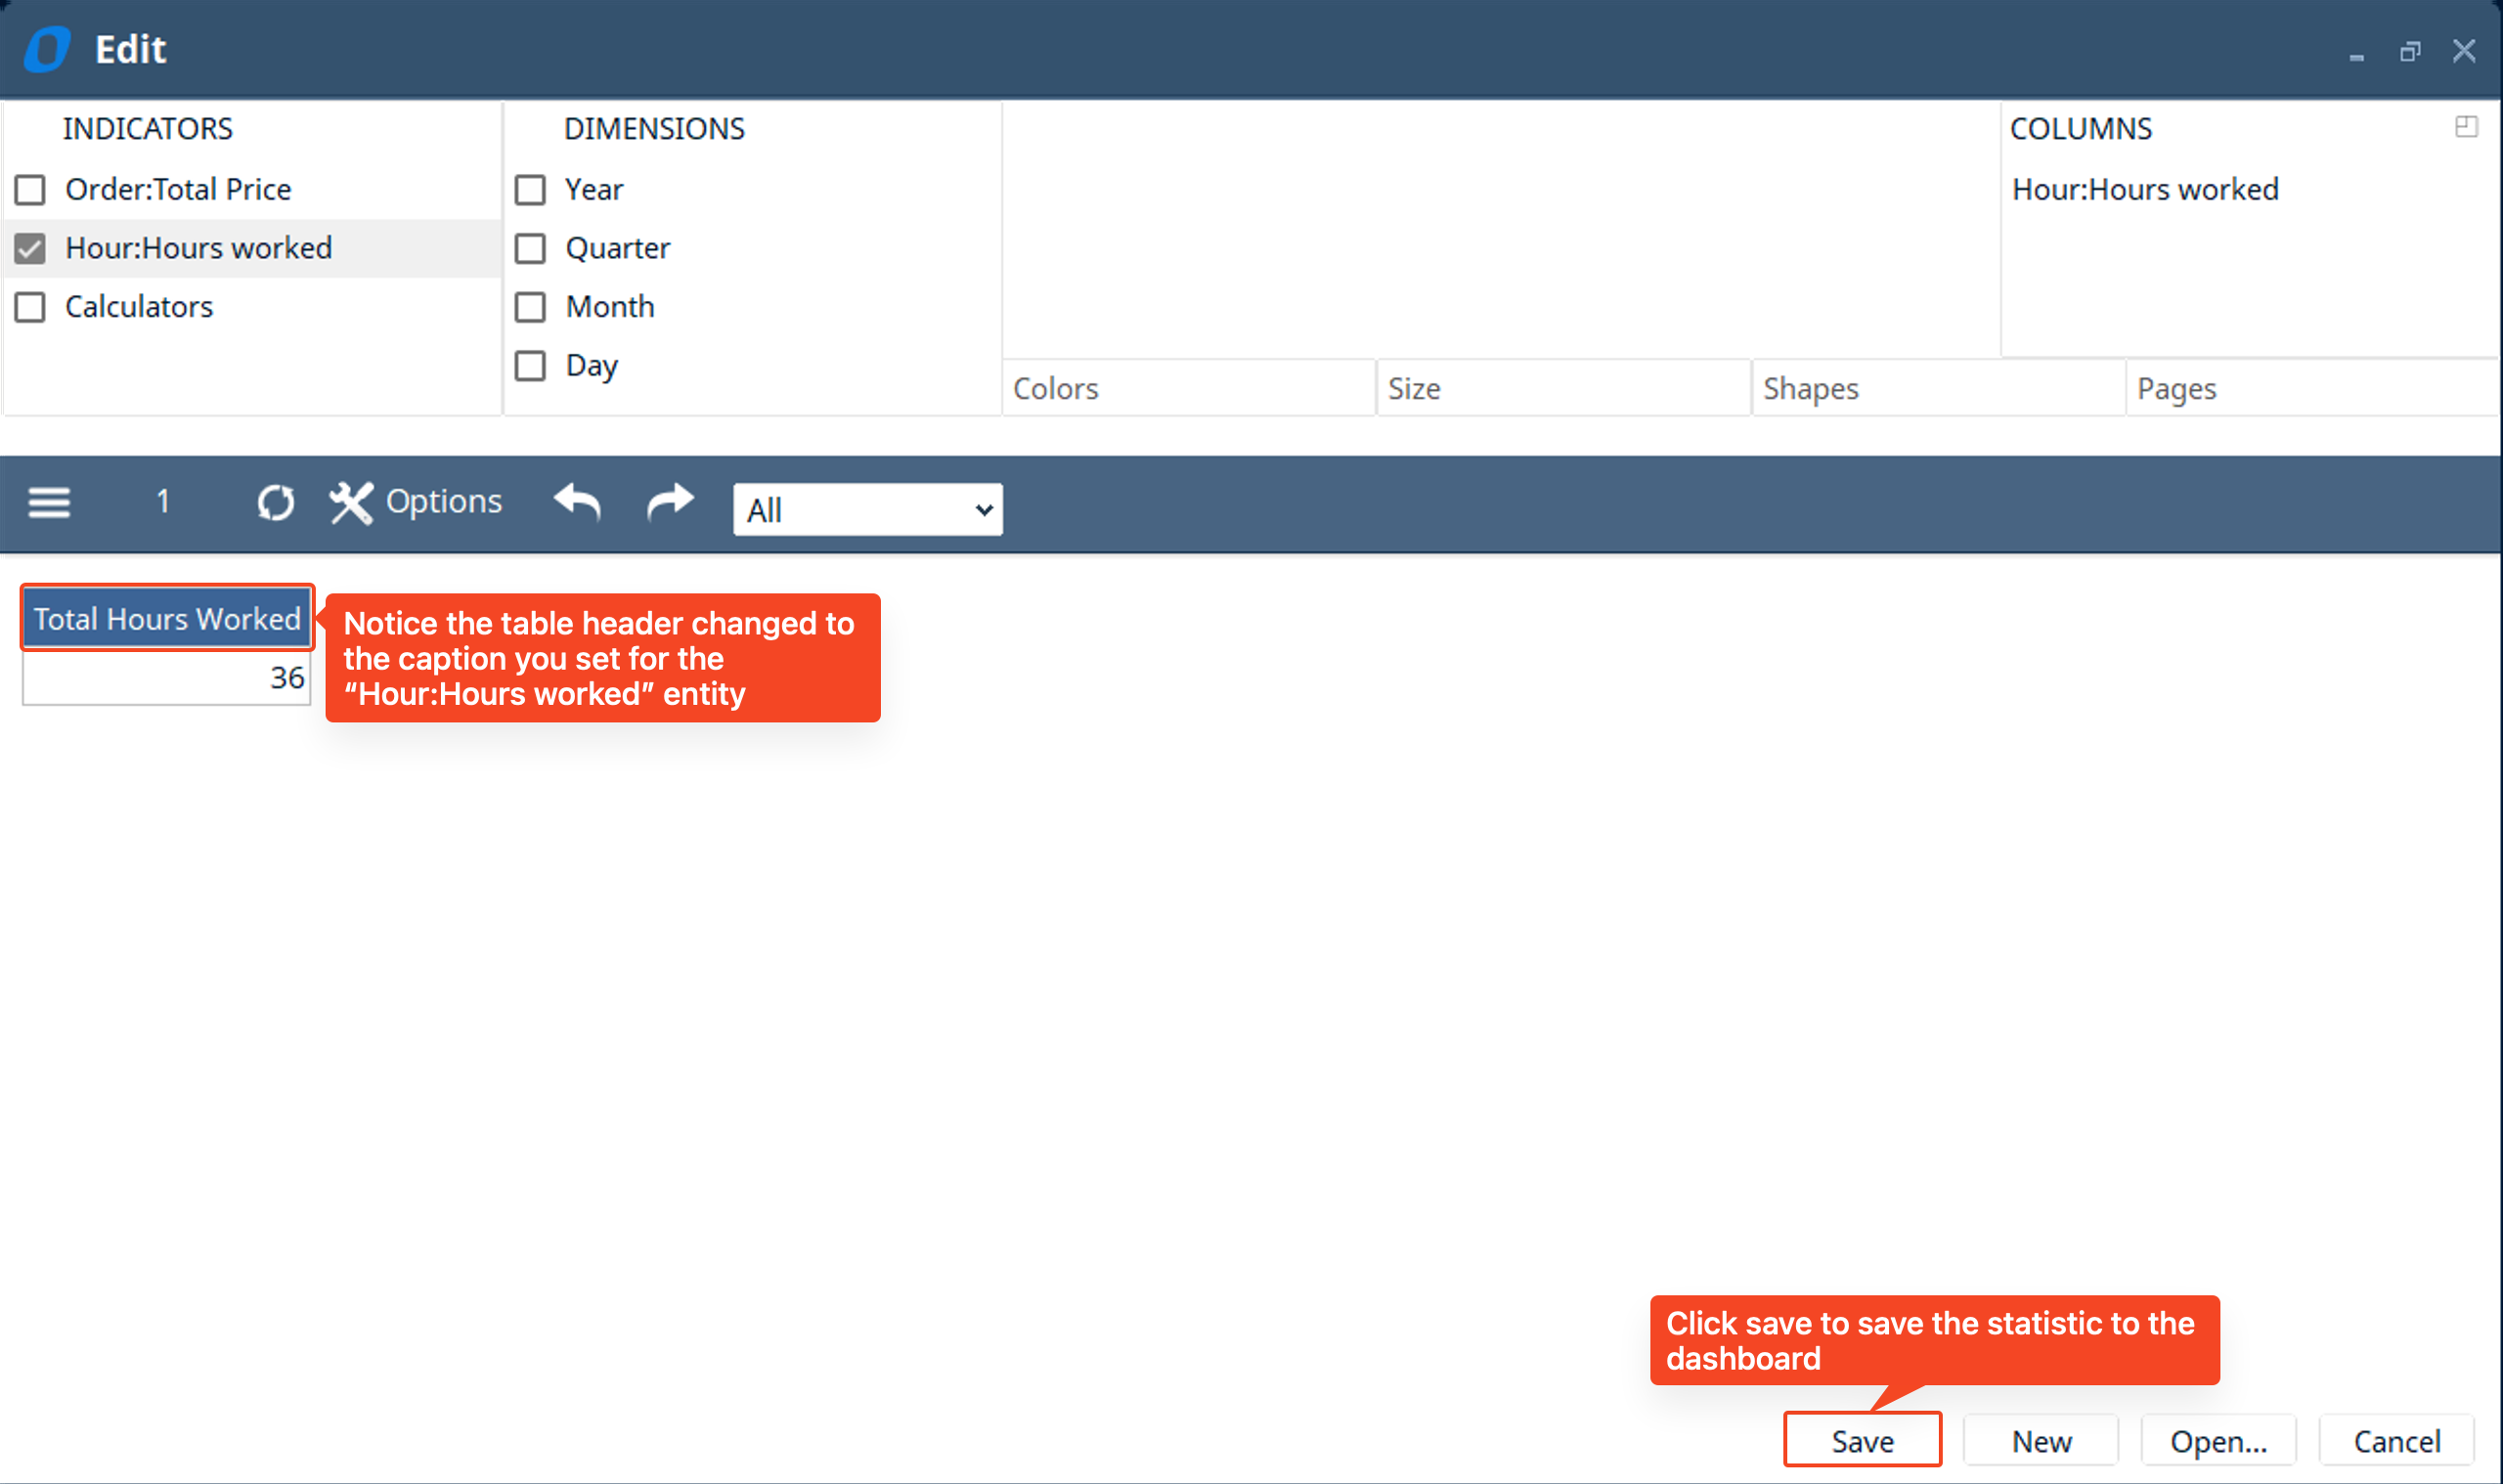
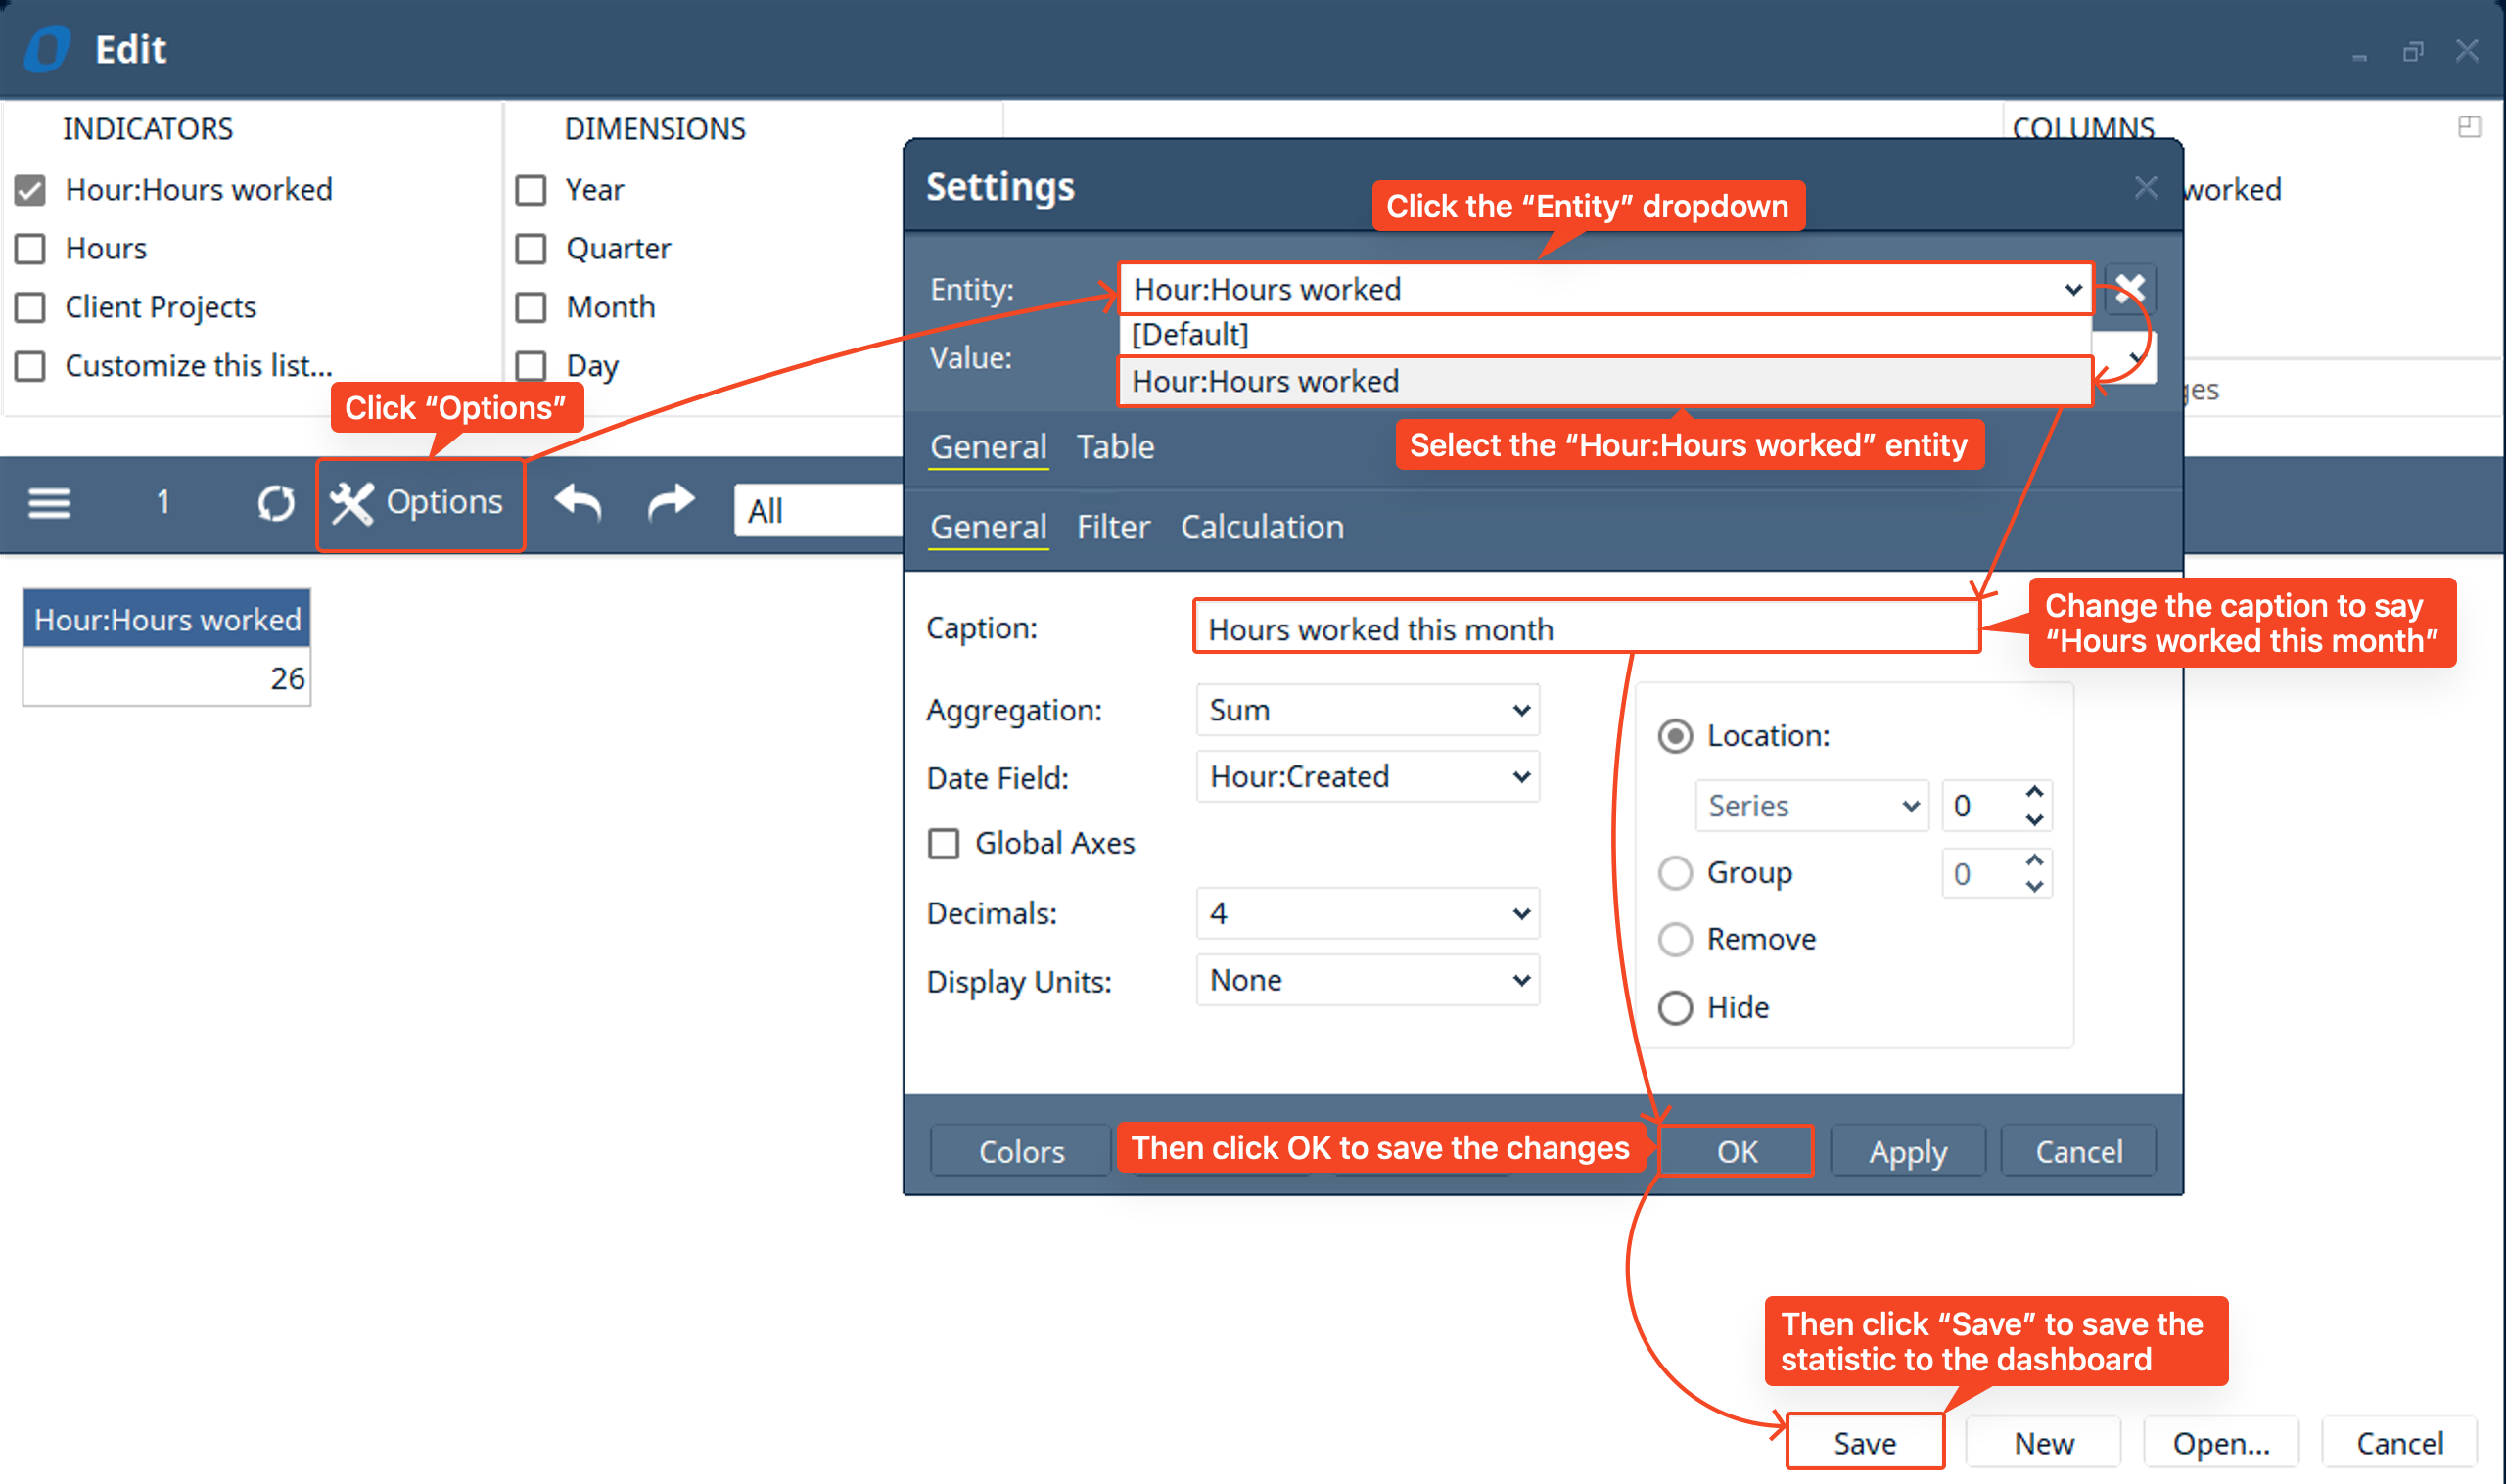
- You can even customize settings for a specific “Entity”. An “Entity” is any “Indicator” or “Dimension” in your “Graph/Statistic”. We will select the “Hour:Hours worked” entity → then change the caption to “Total Hours Worked” → then click OK
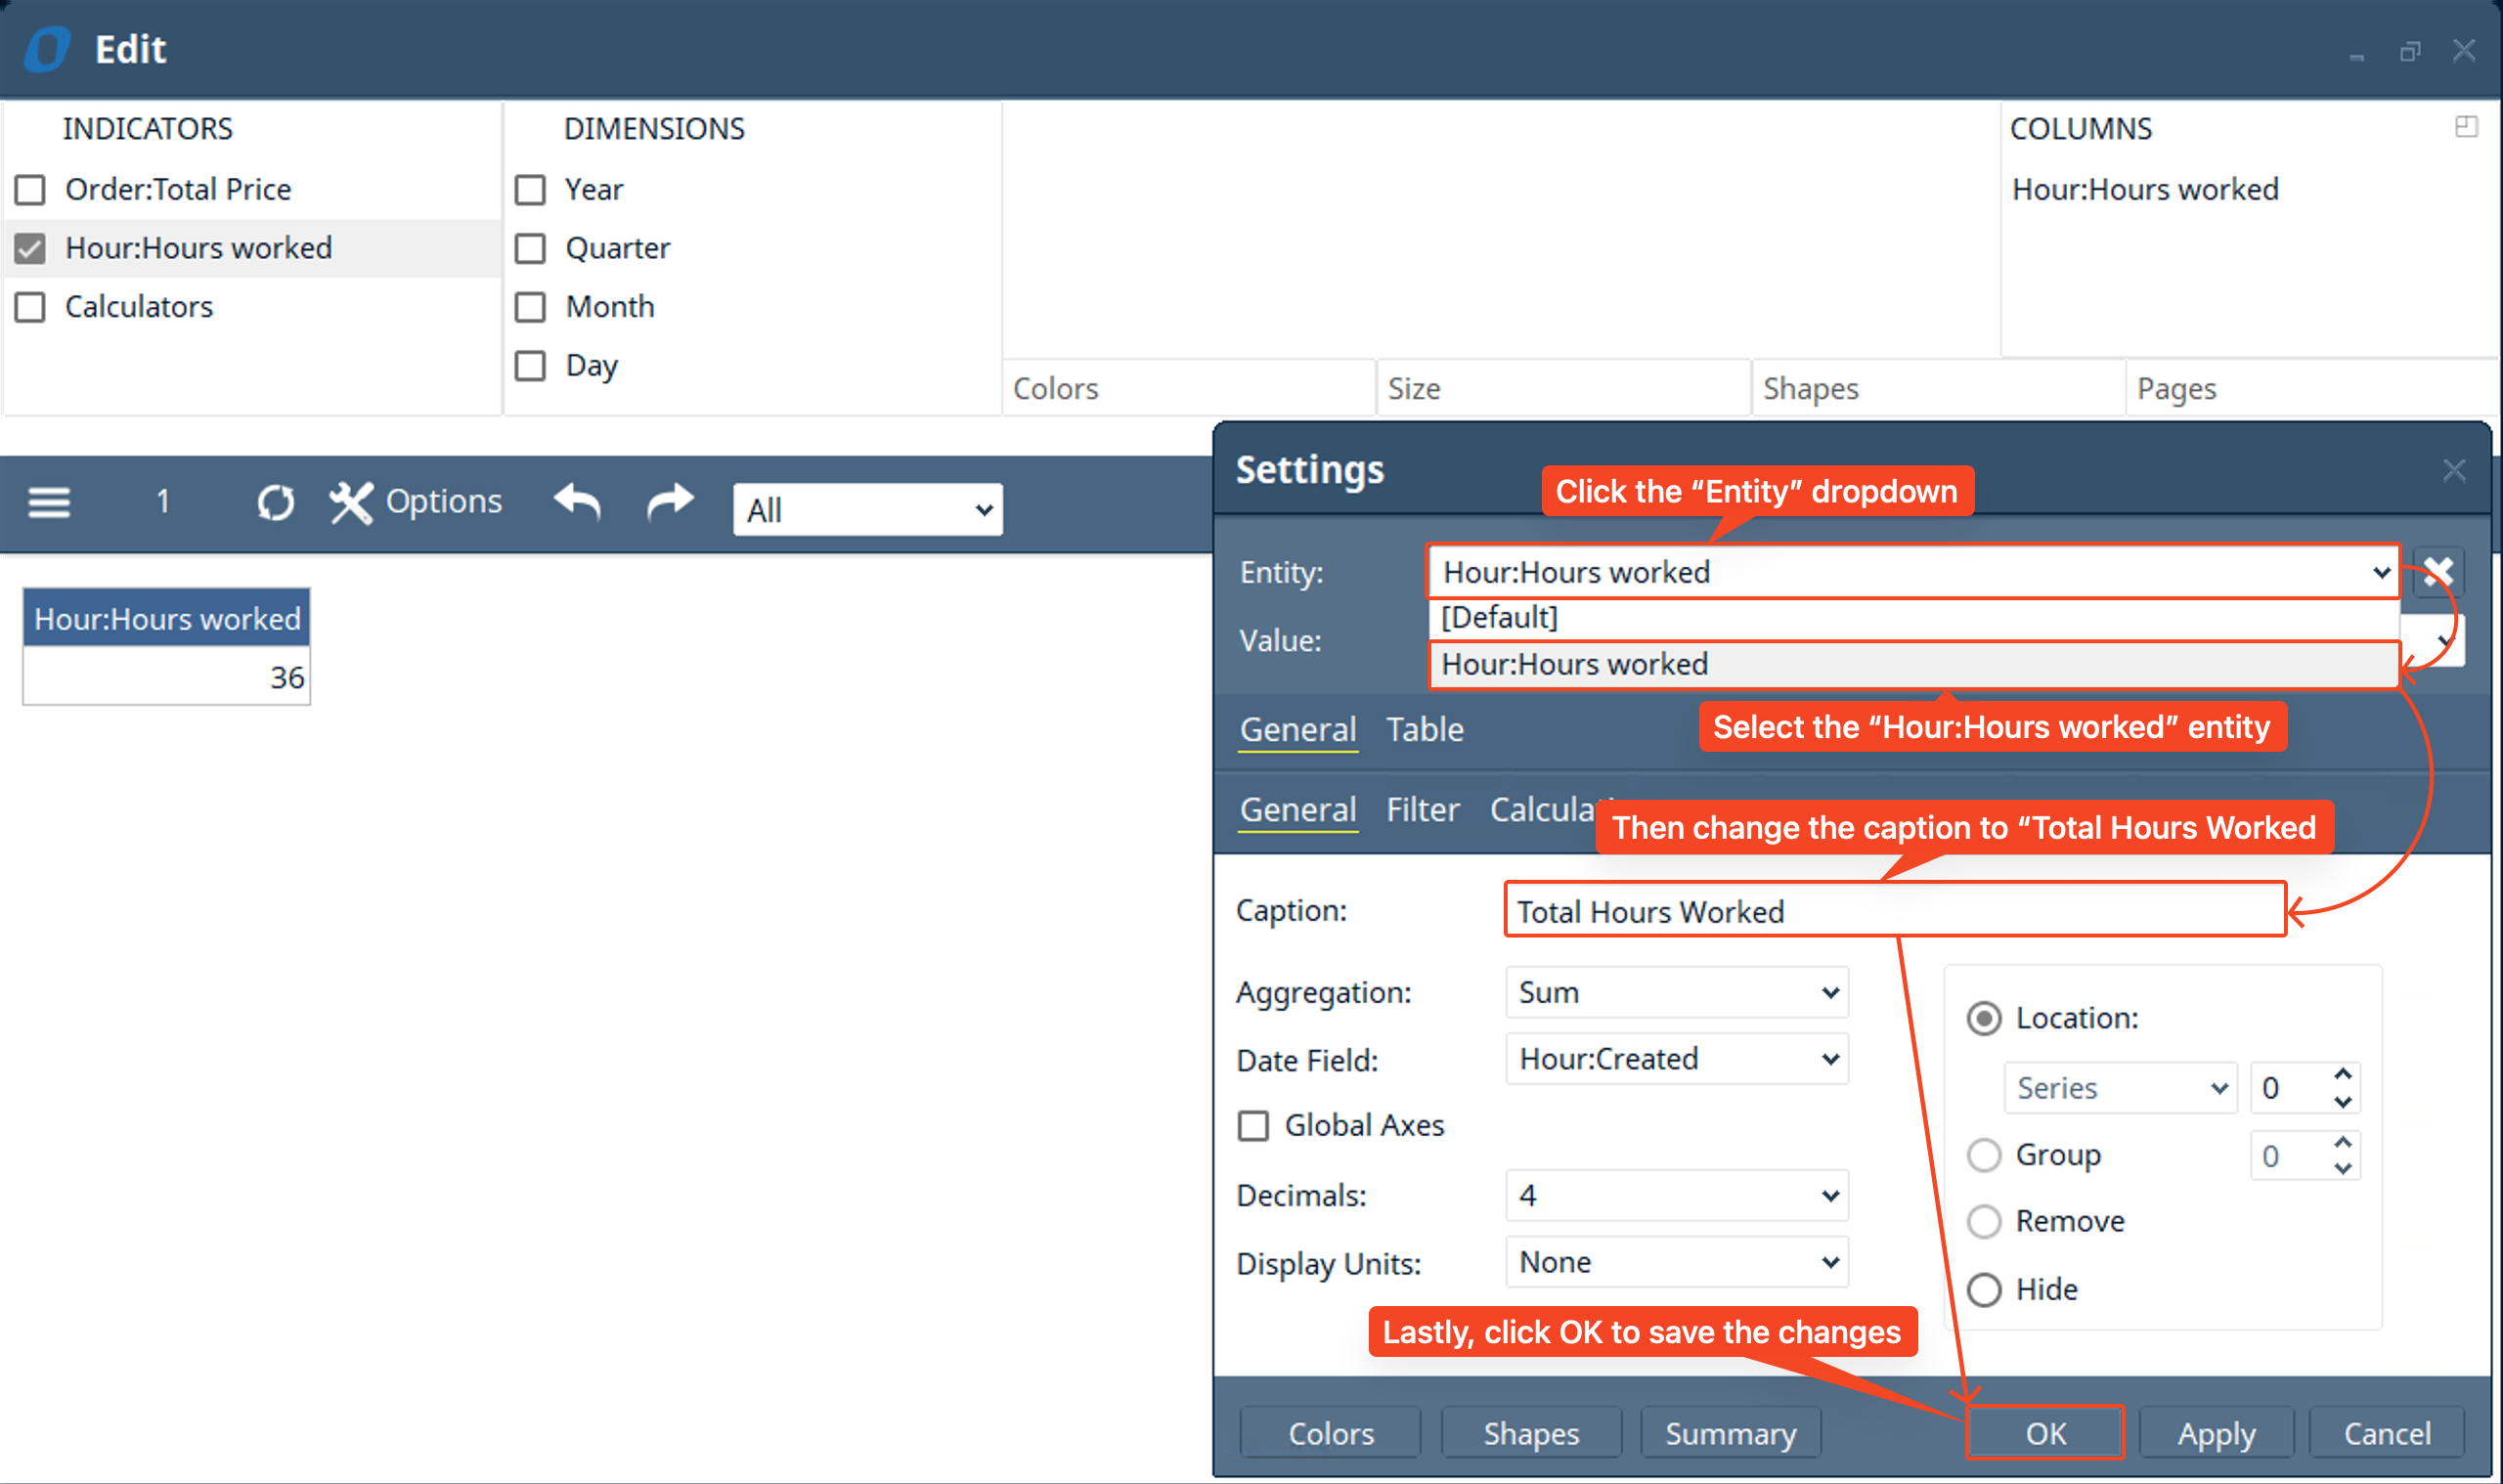
- You should notice the caption of the column of the flat table changed to “Total Hours Worked” → click “Save” to save the “Statistic” to the “Dashboard”
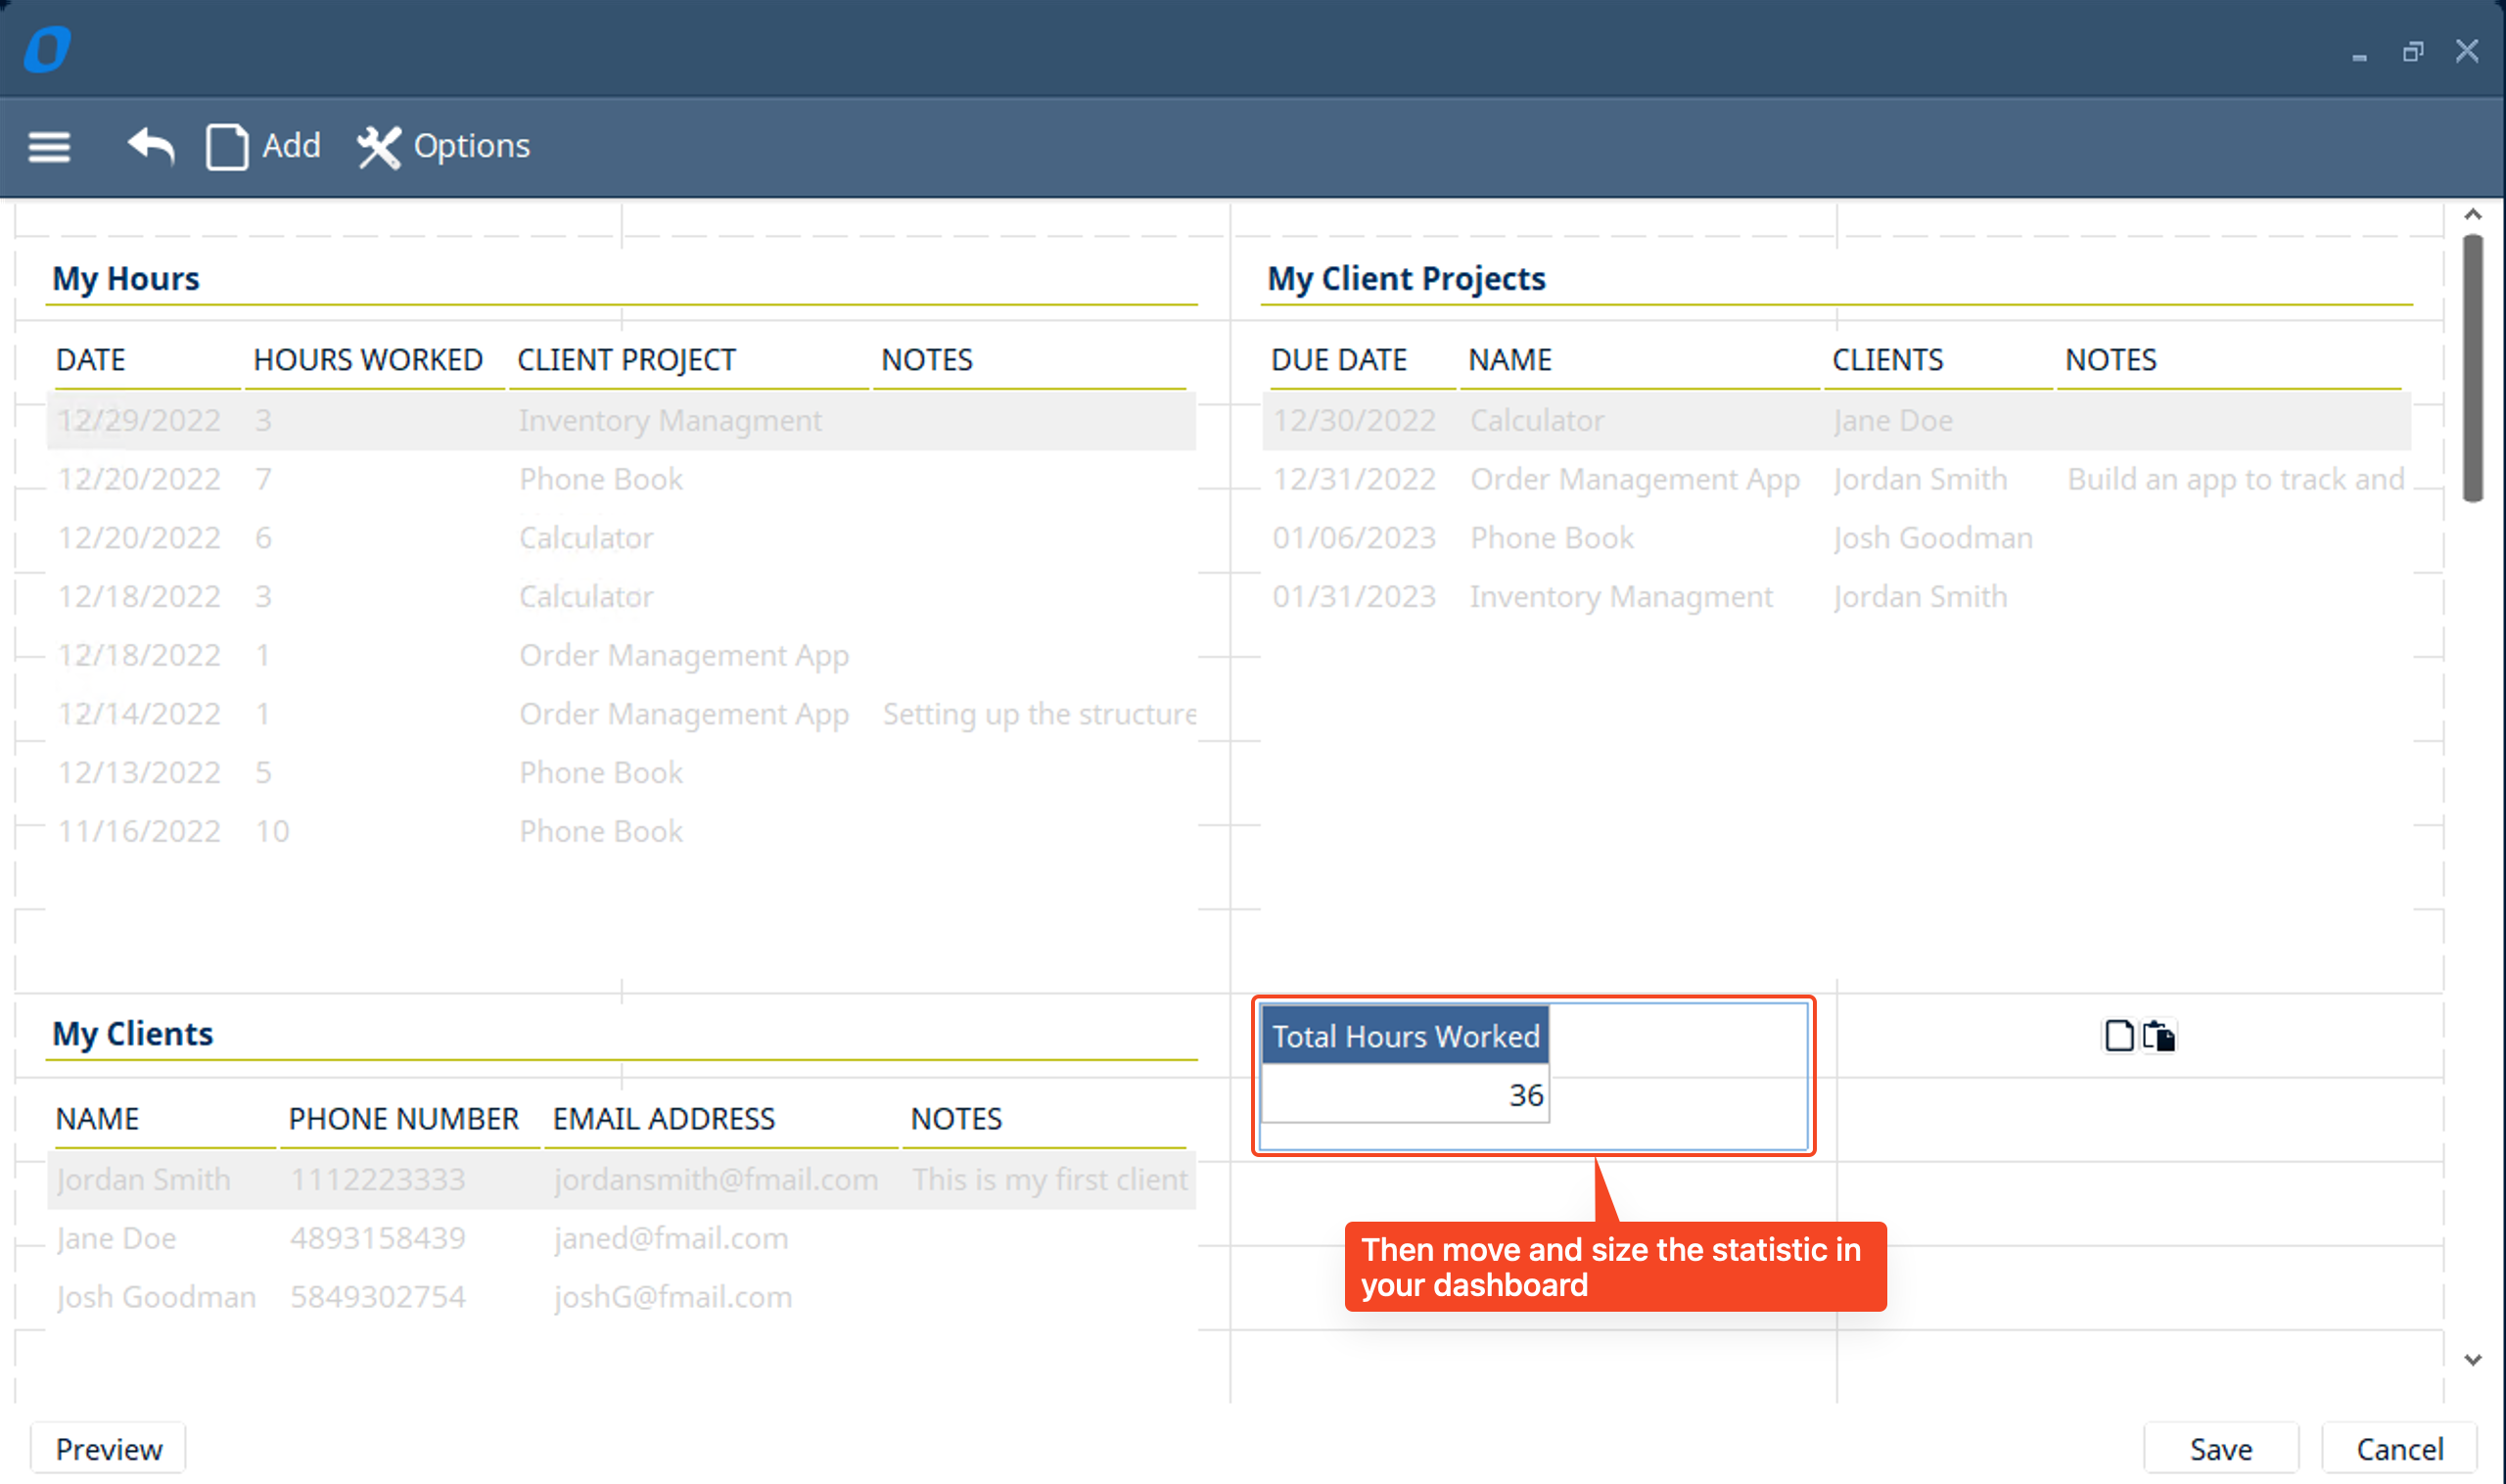
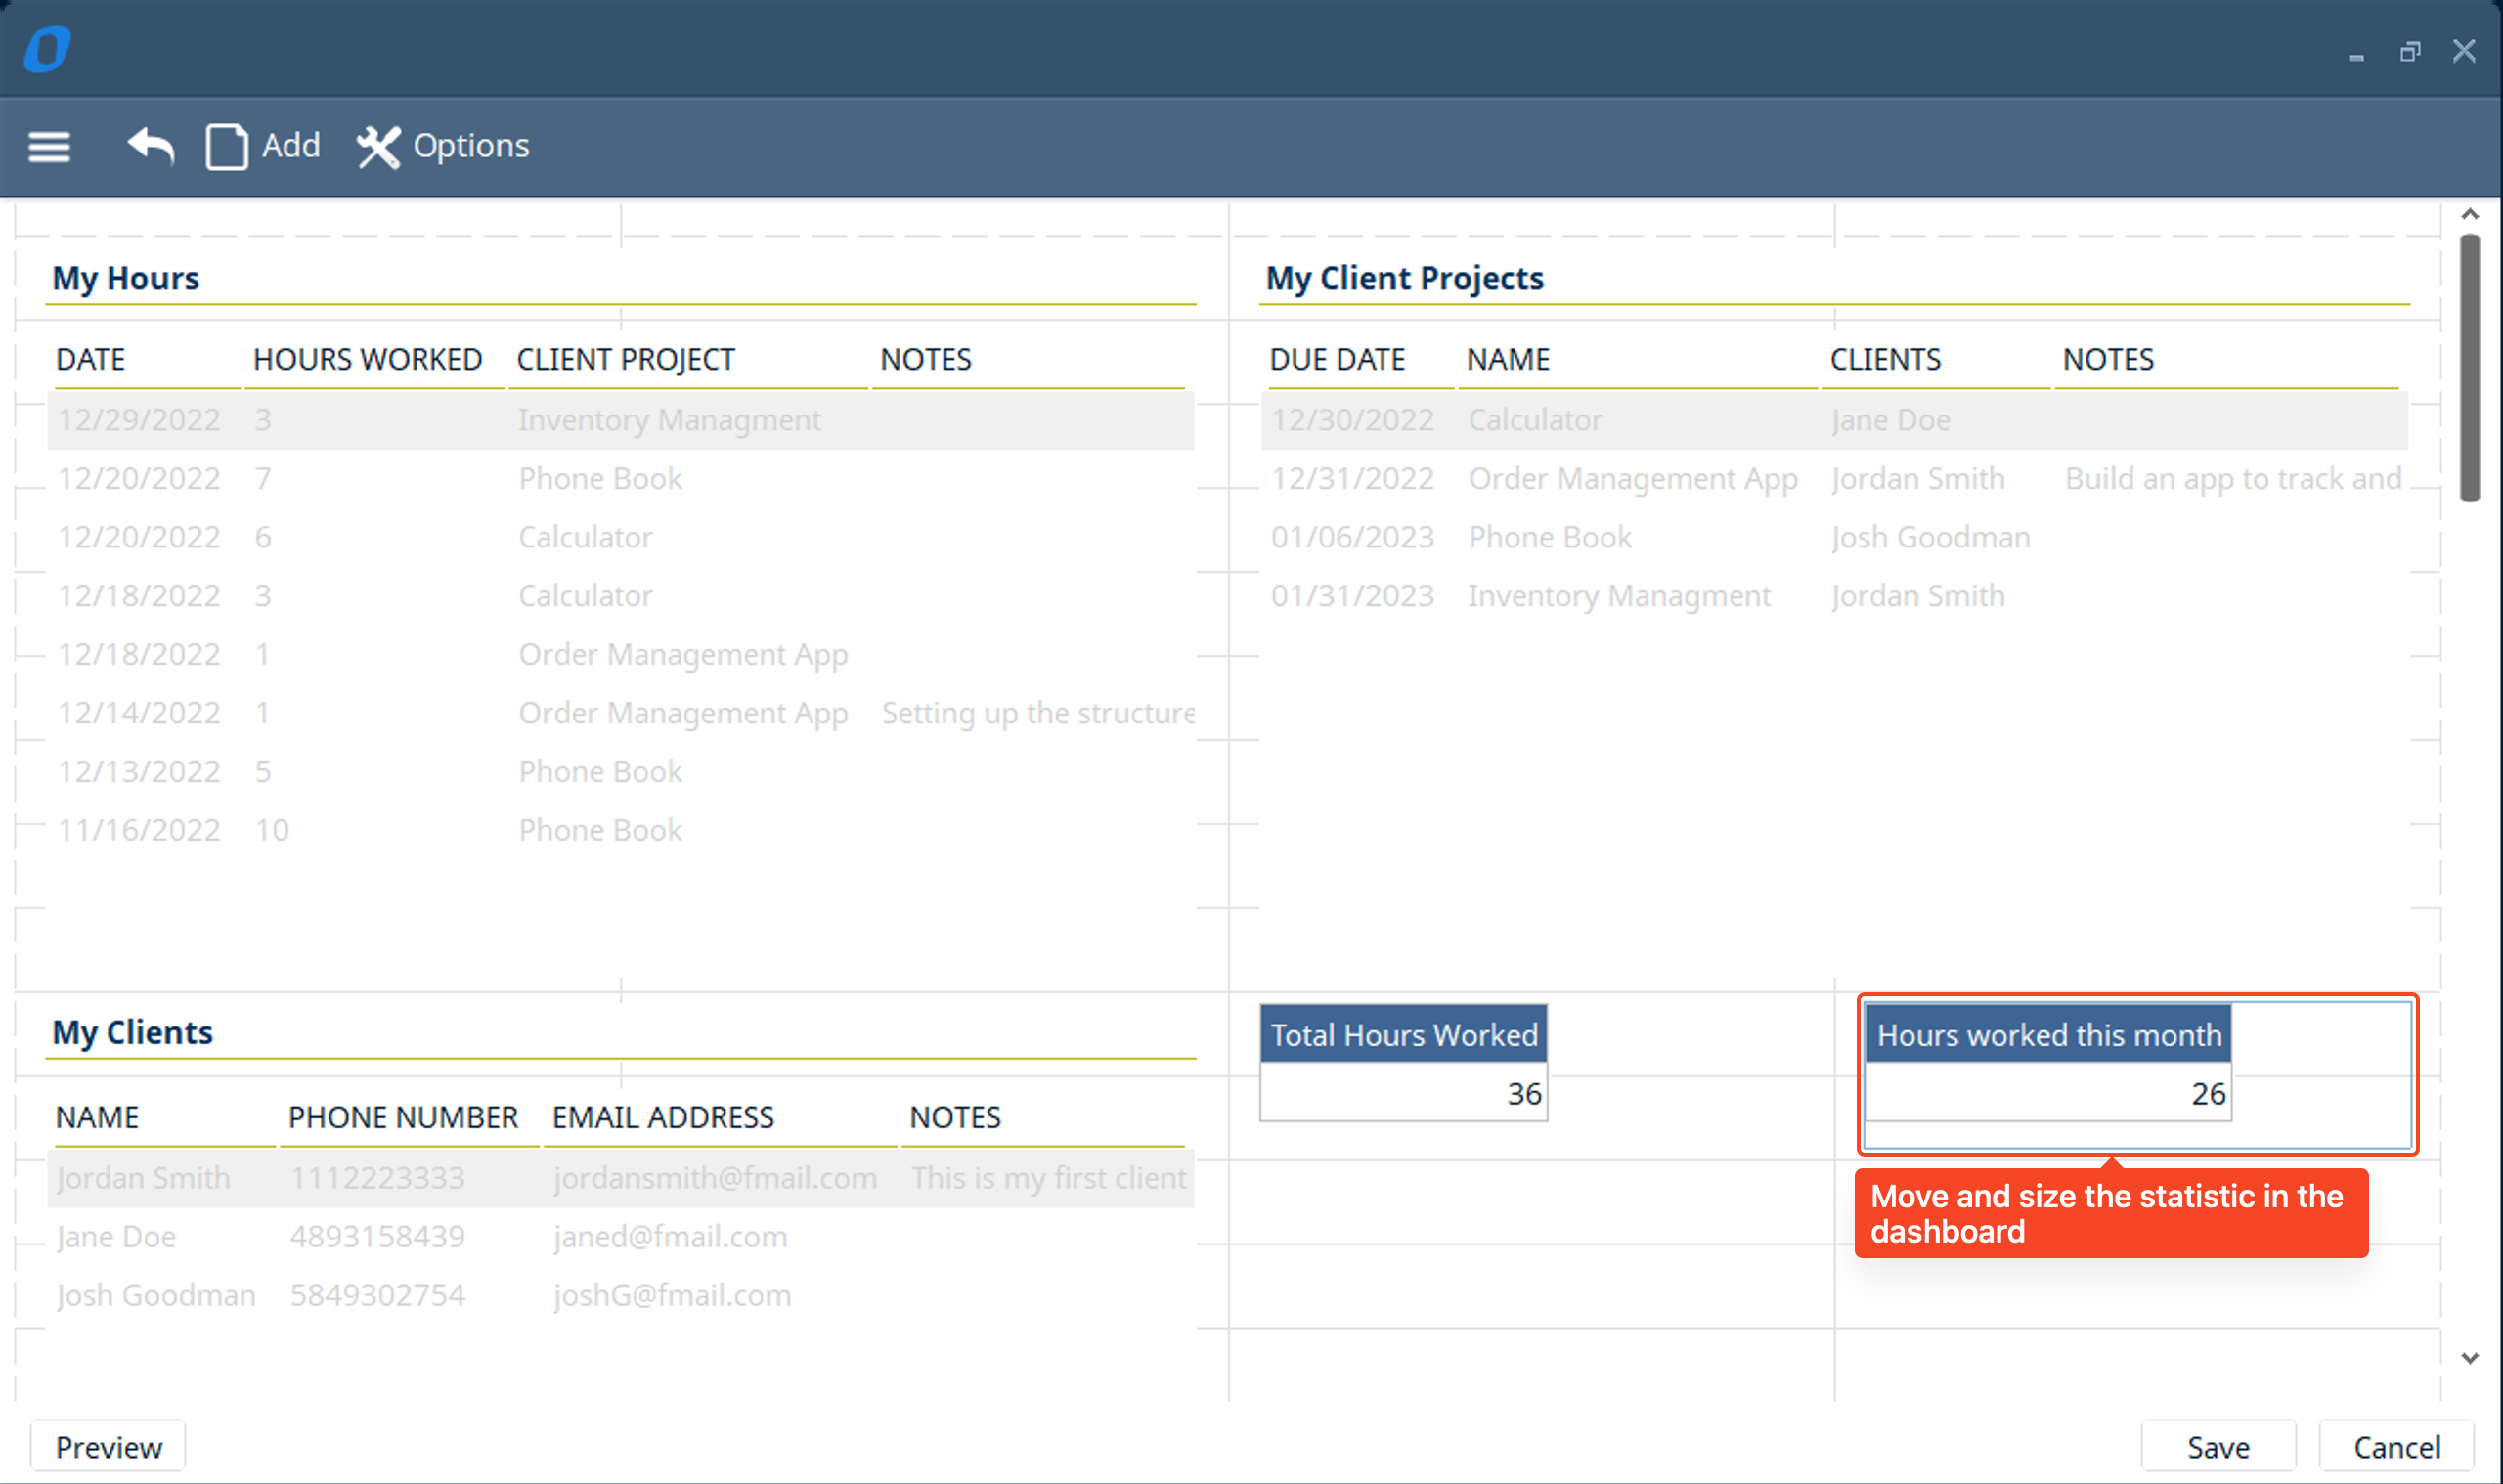
- Then size and place the “Total Hours Worked” statistic in the dashboard.
- Next, let’s add another “Graph/Statistic” but this time we will only show the “Hours worked” this month. So you can see how each month how many hours you have worked for that month.
- Same as before we will click “Flat Table” → “Create”
- Select the “Hour:Hours worked” indicator
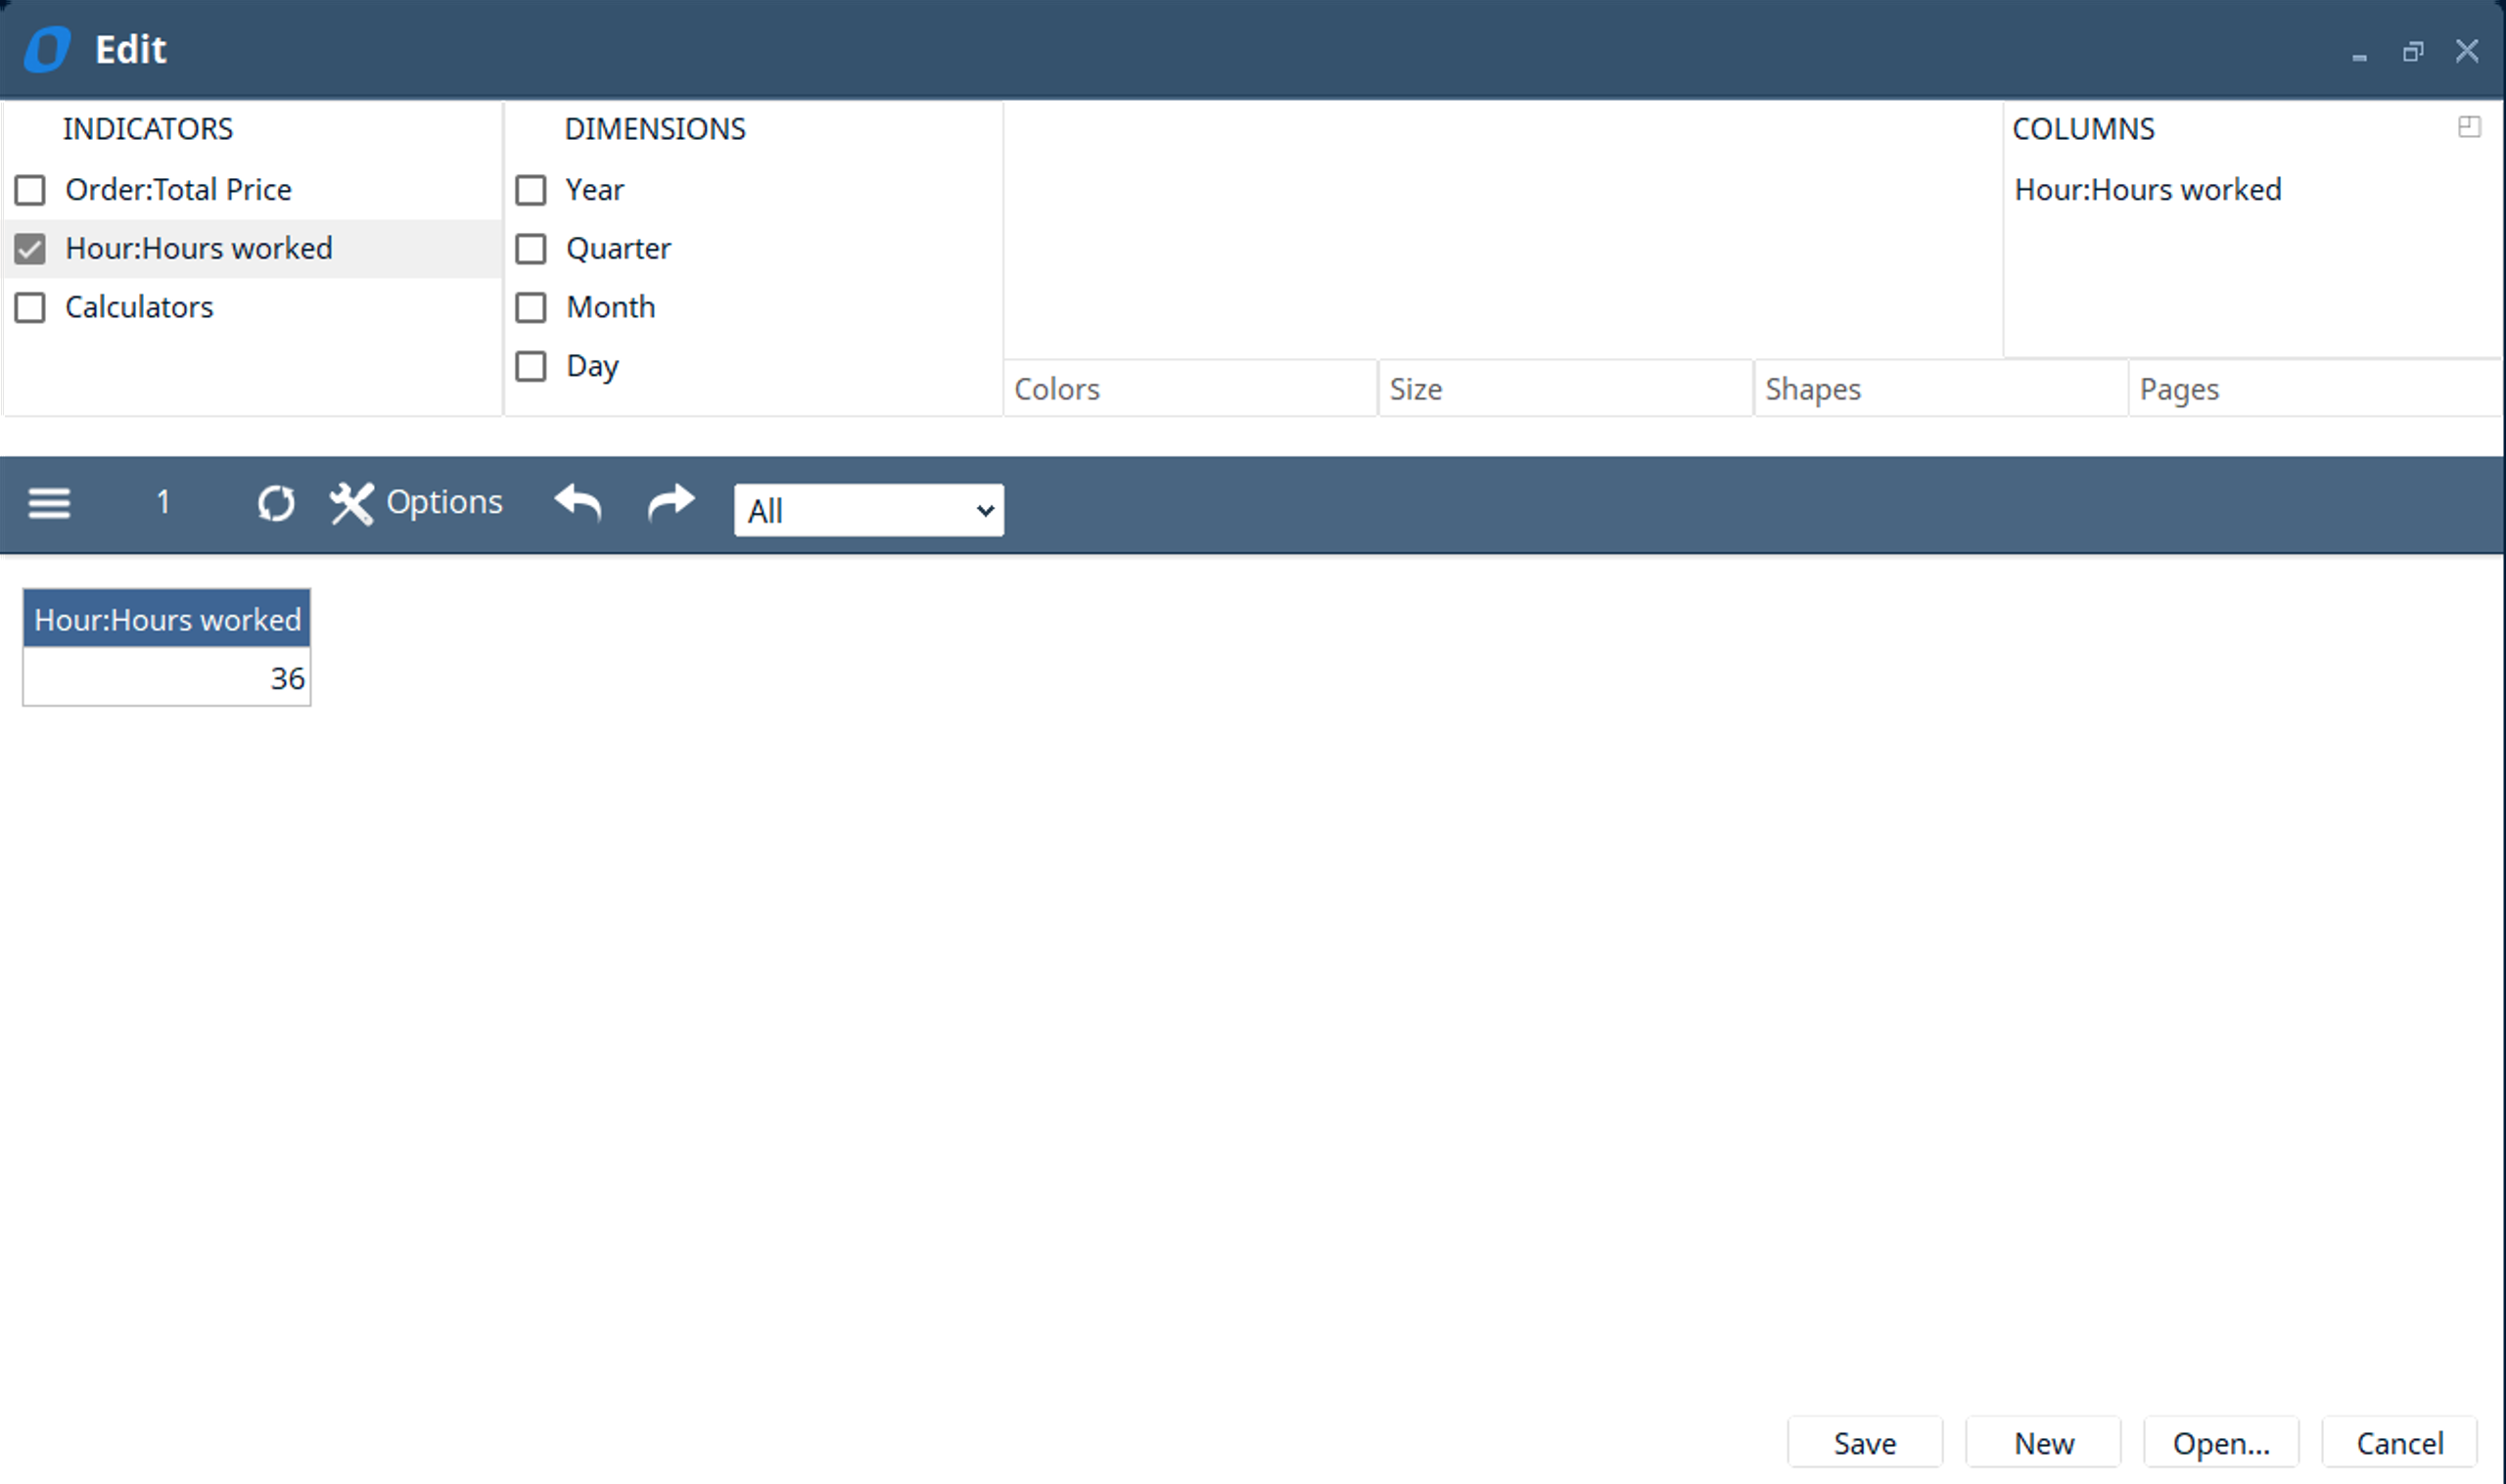
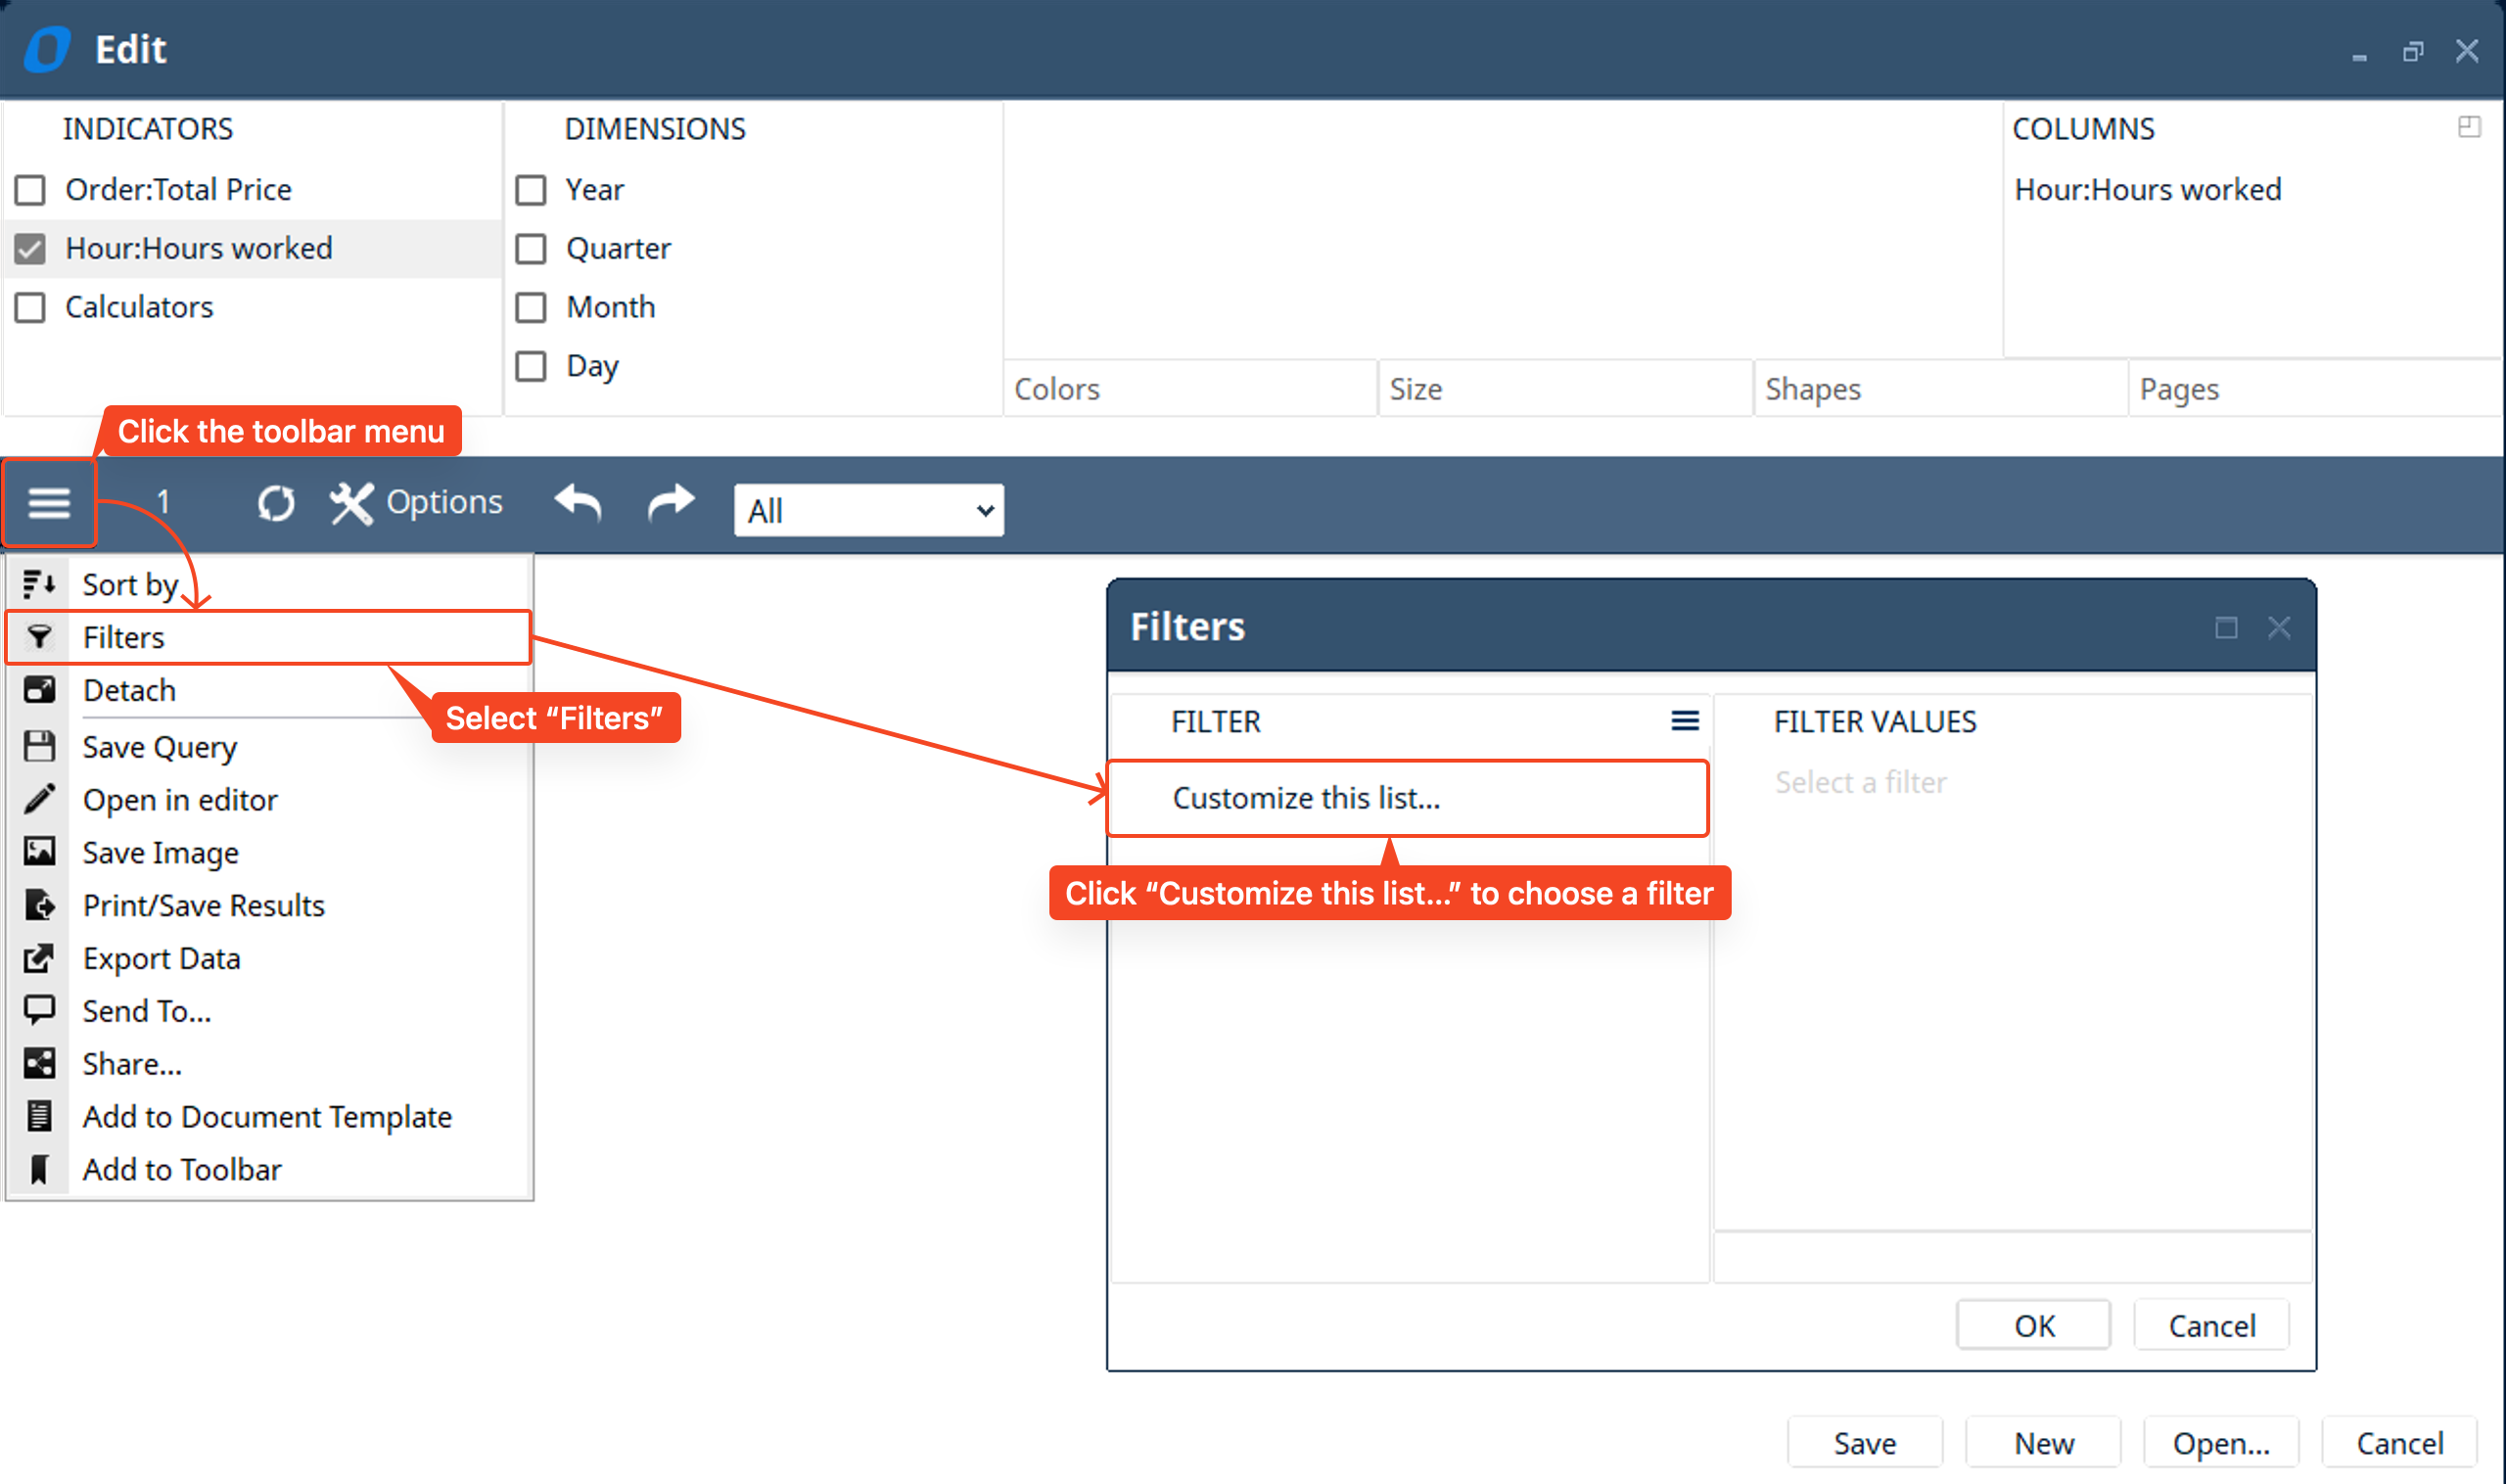
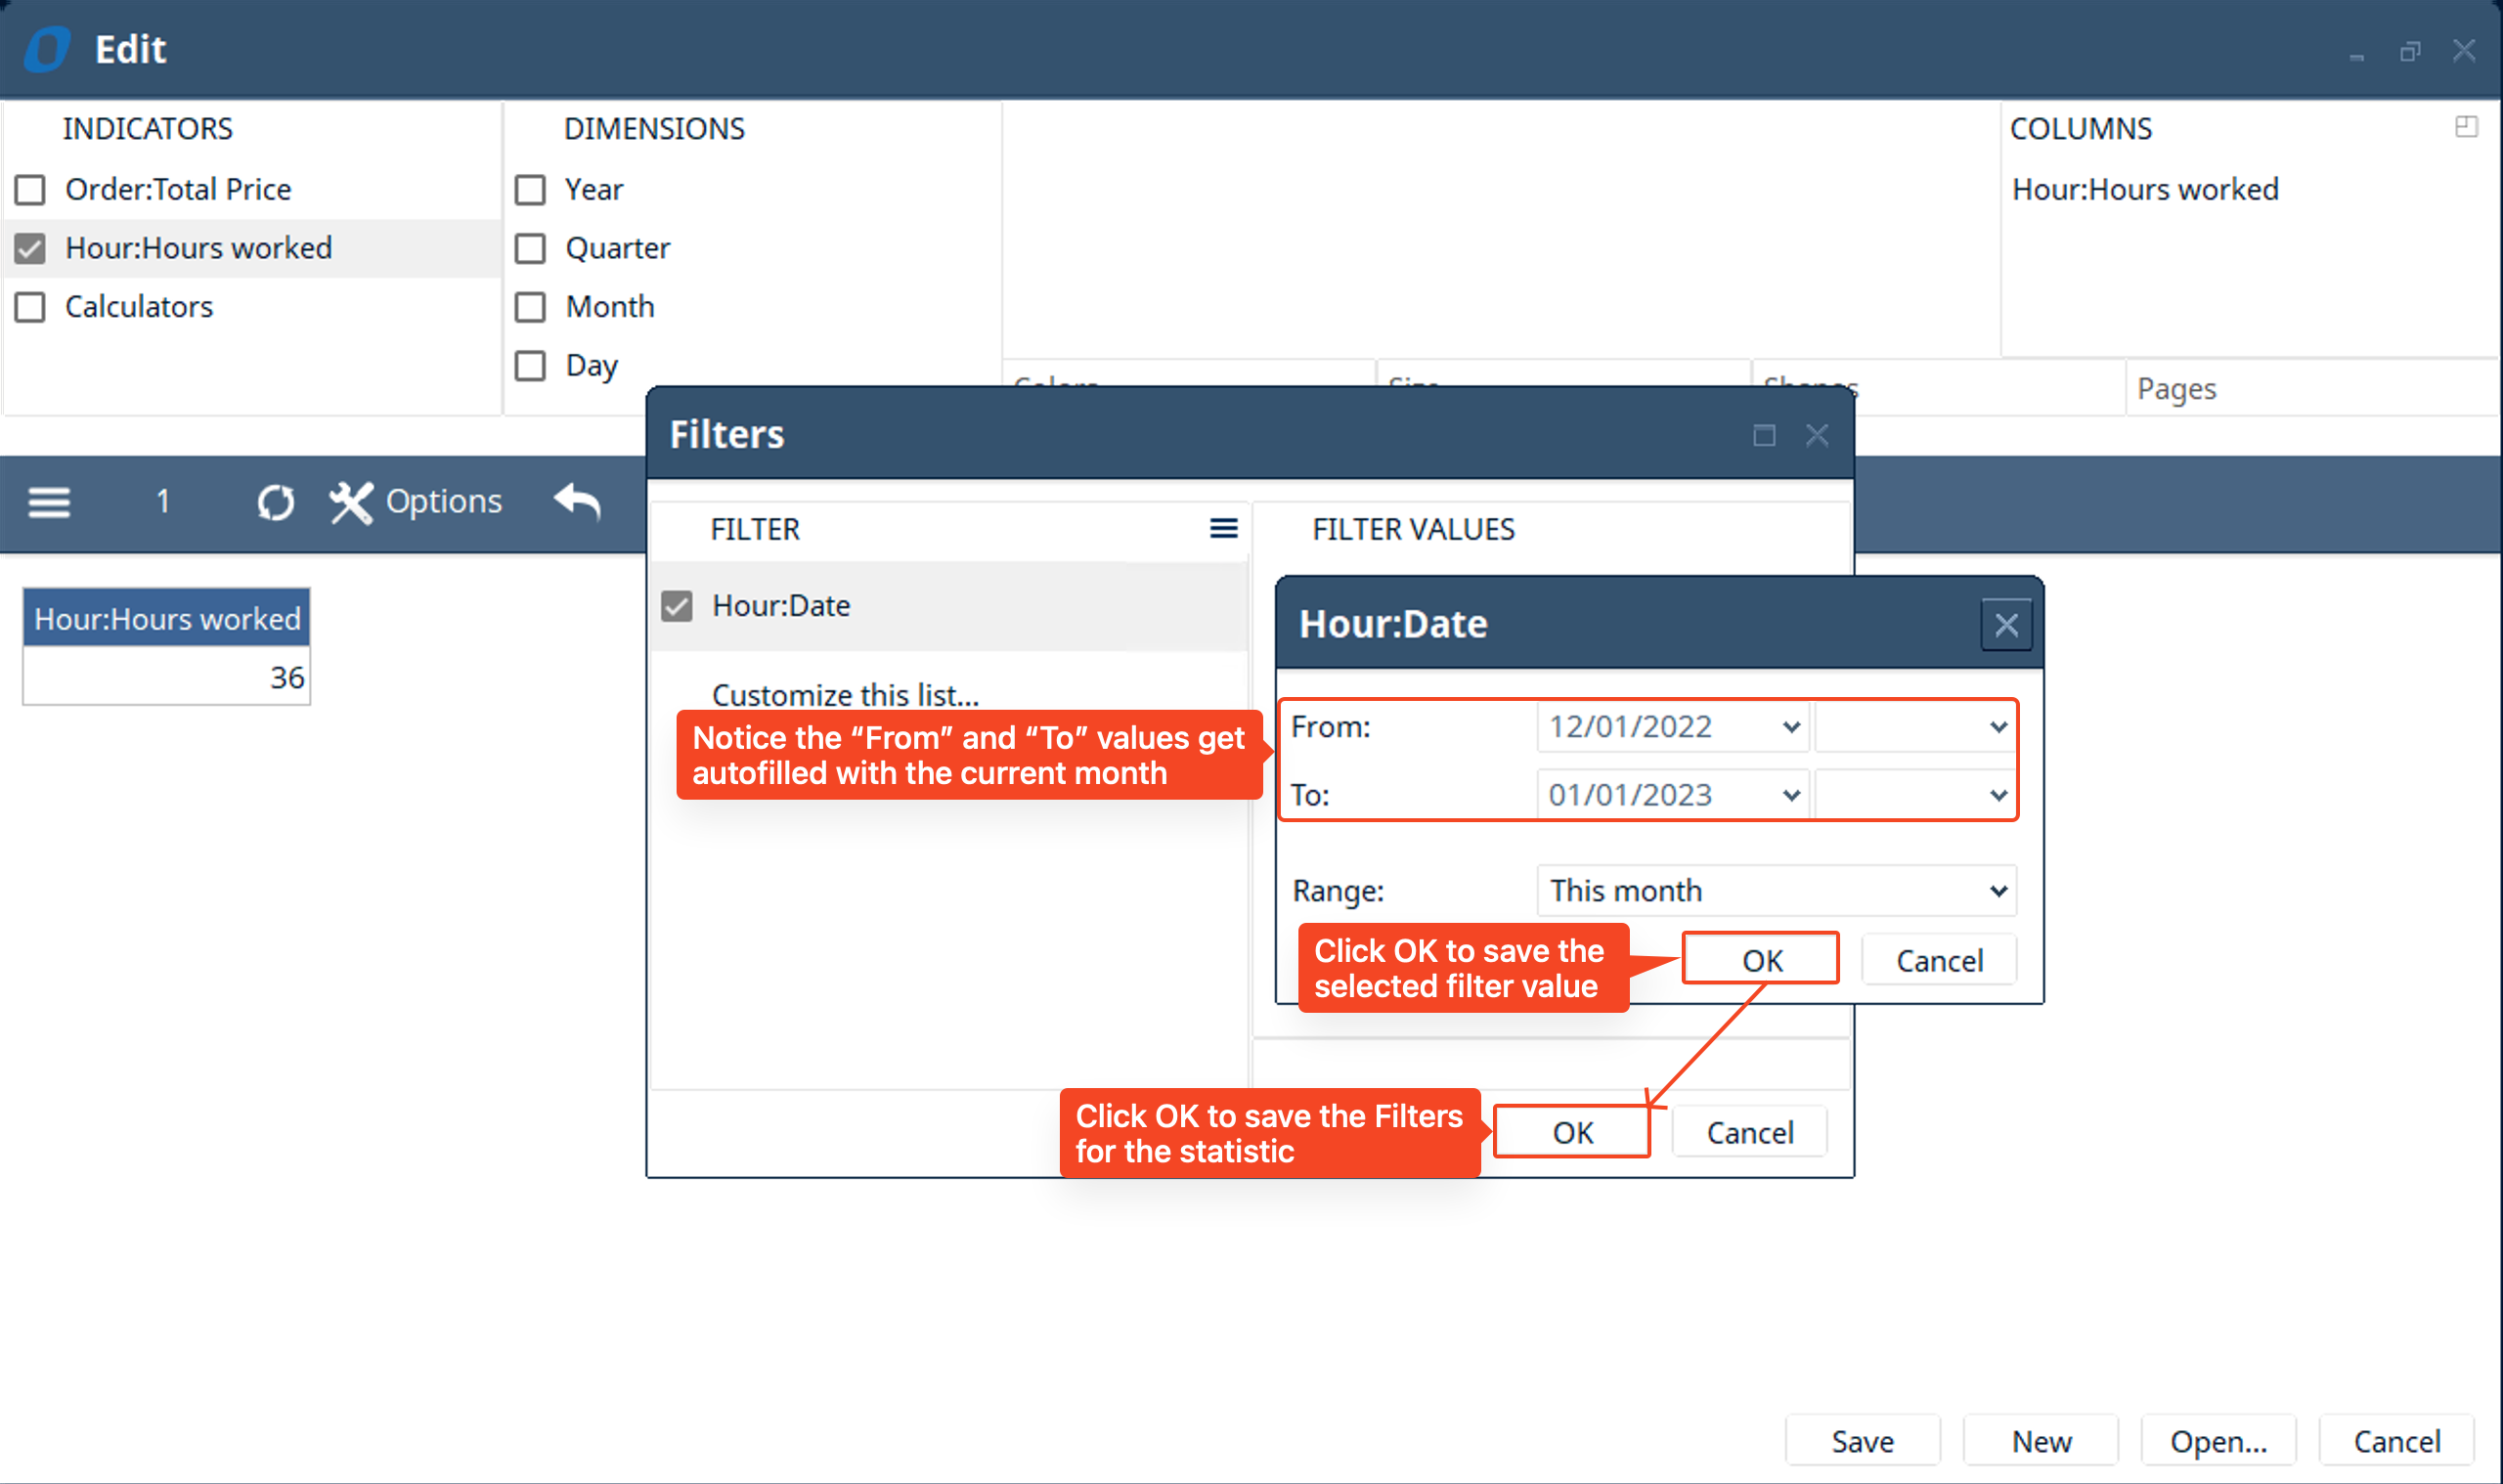
- Click the menu in the toolbar and select “Filters” → then click “Customize this list…”
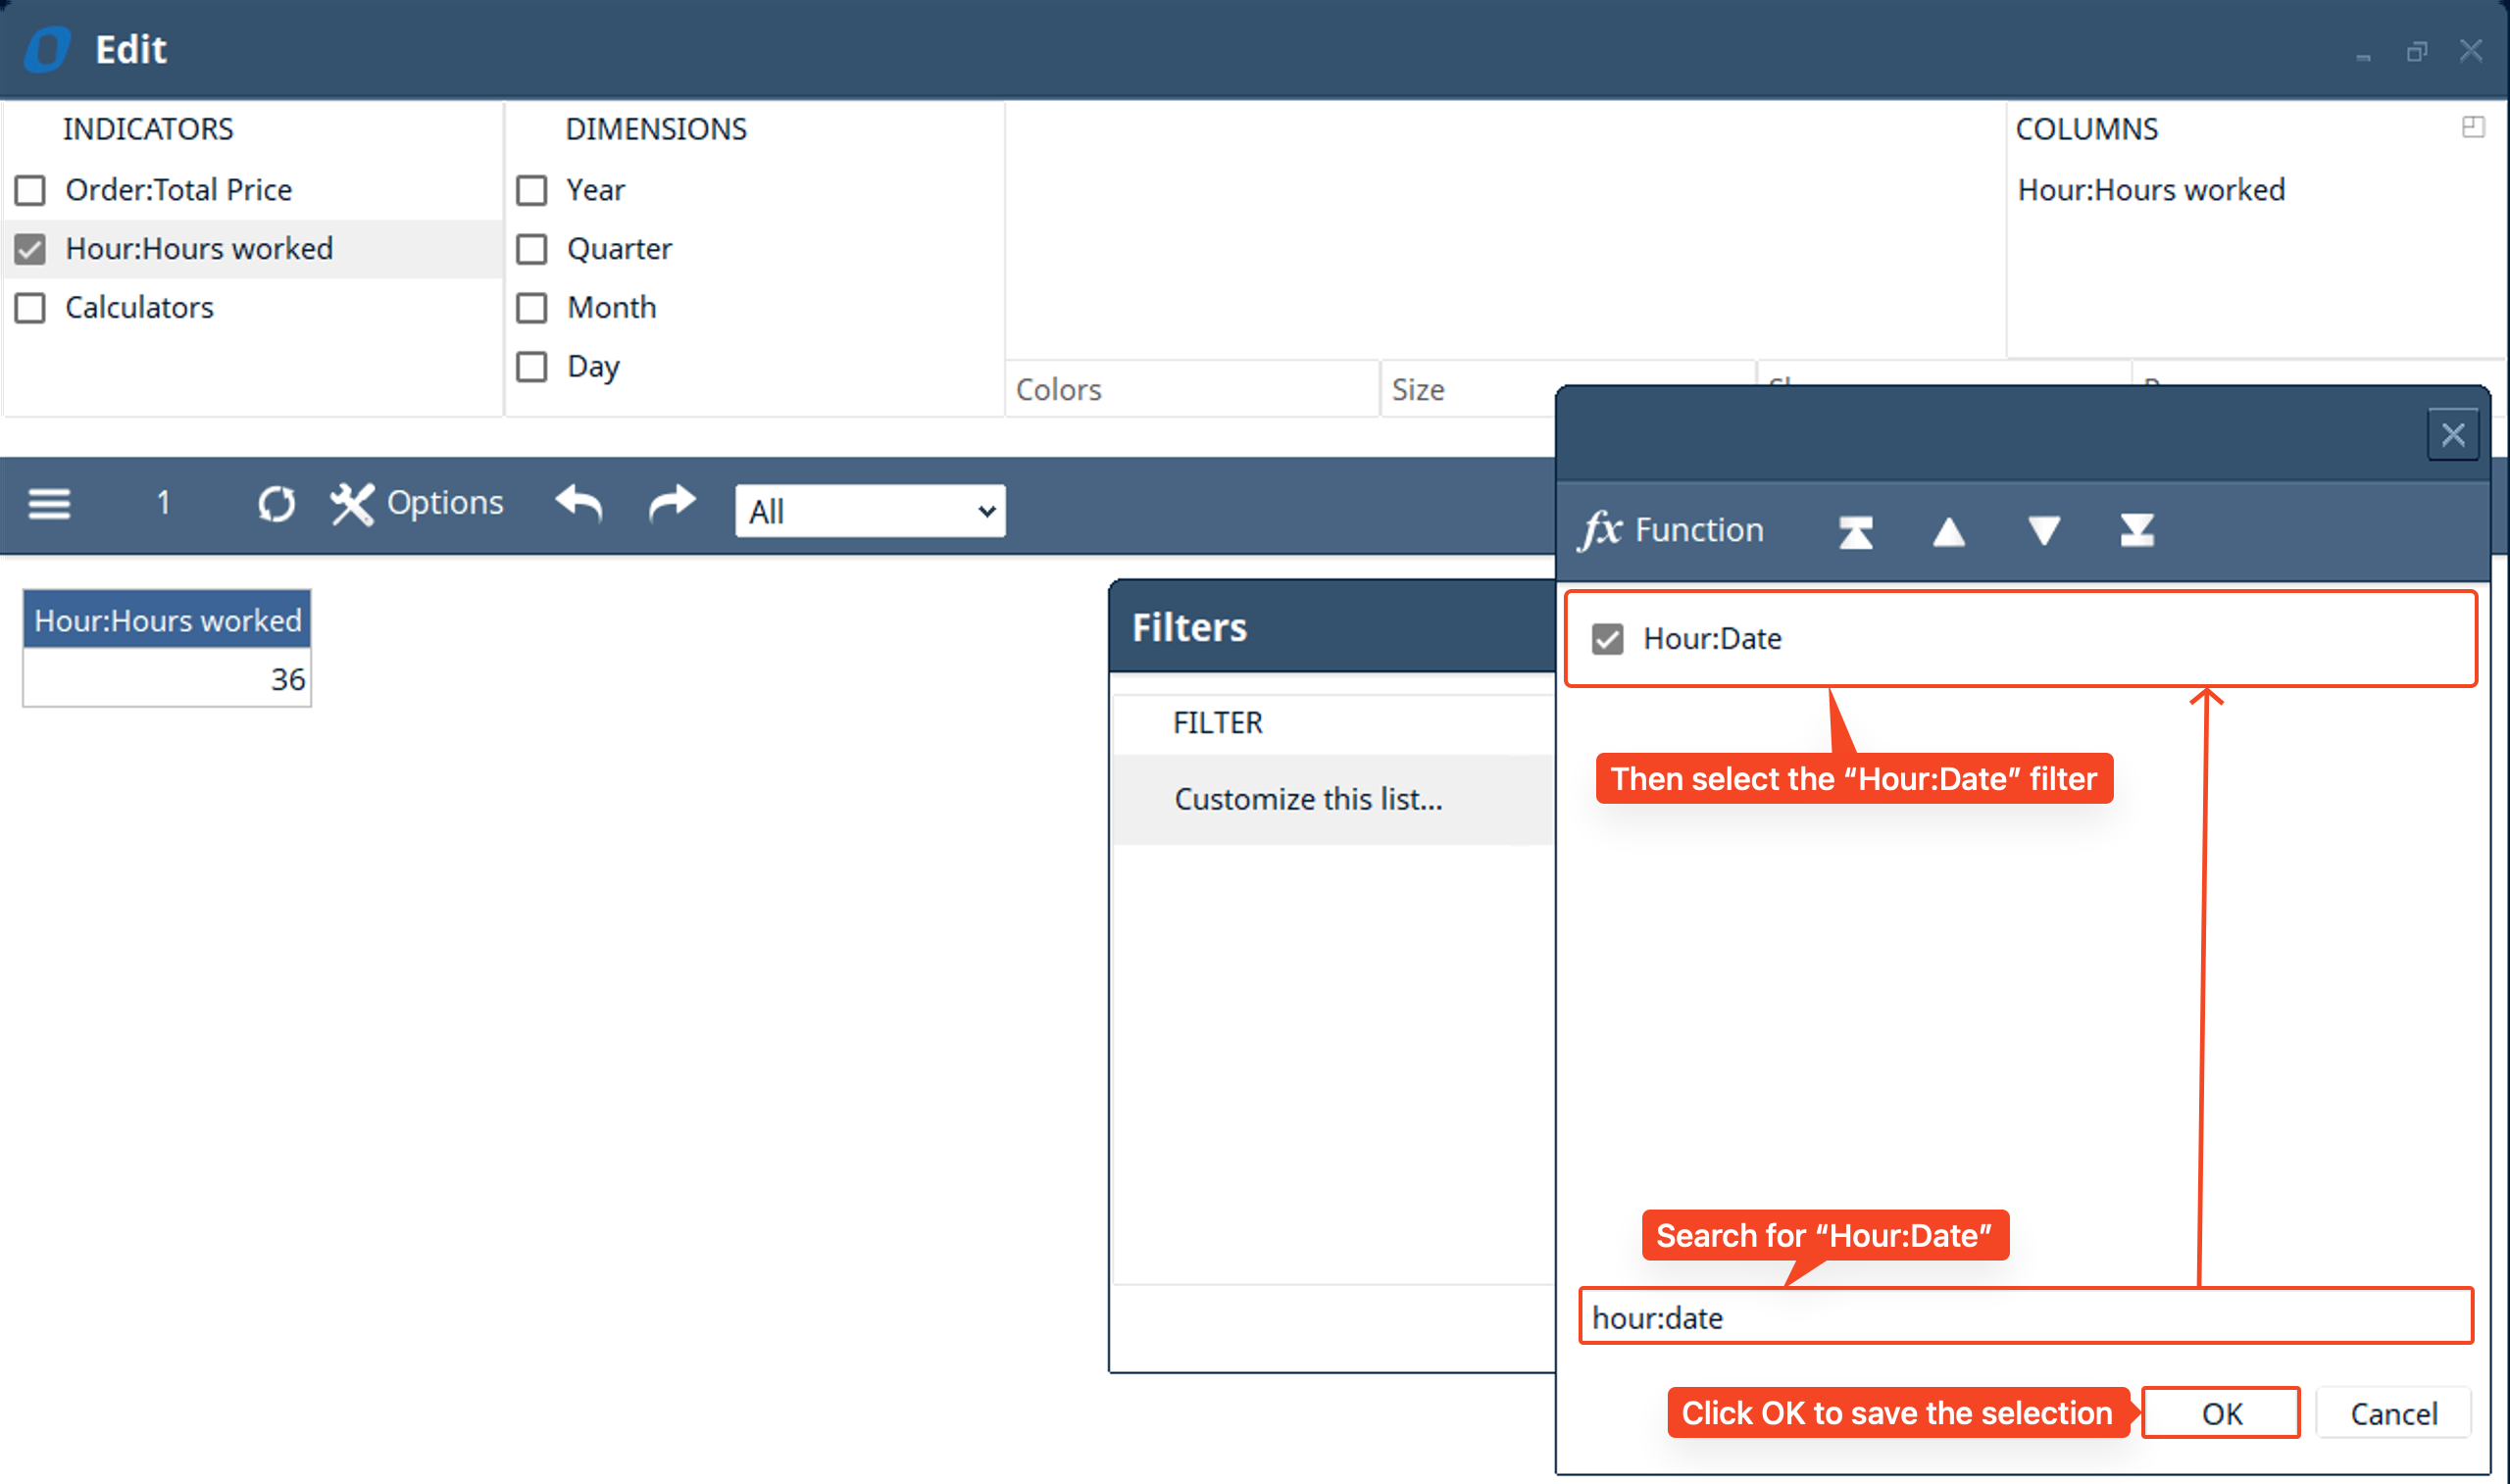
- Select the “Hour:Date” field
- Choose the range to be “This month”
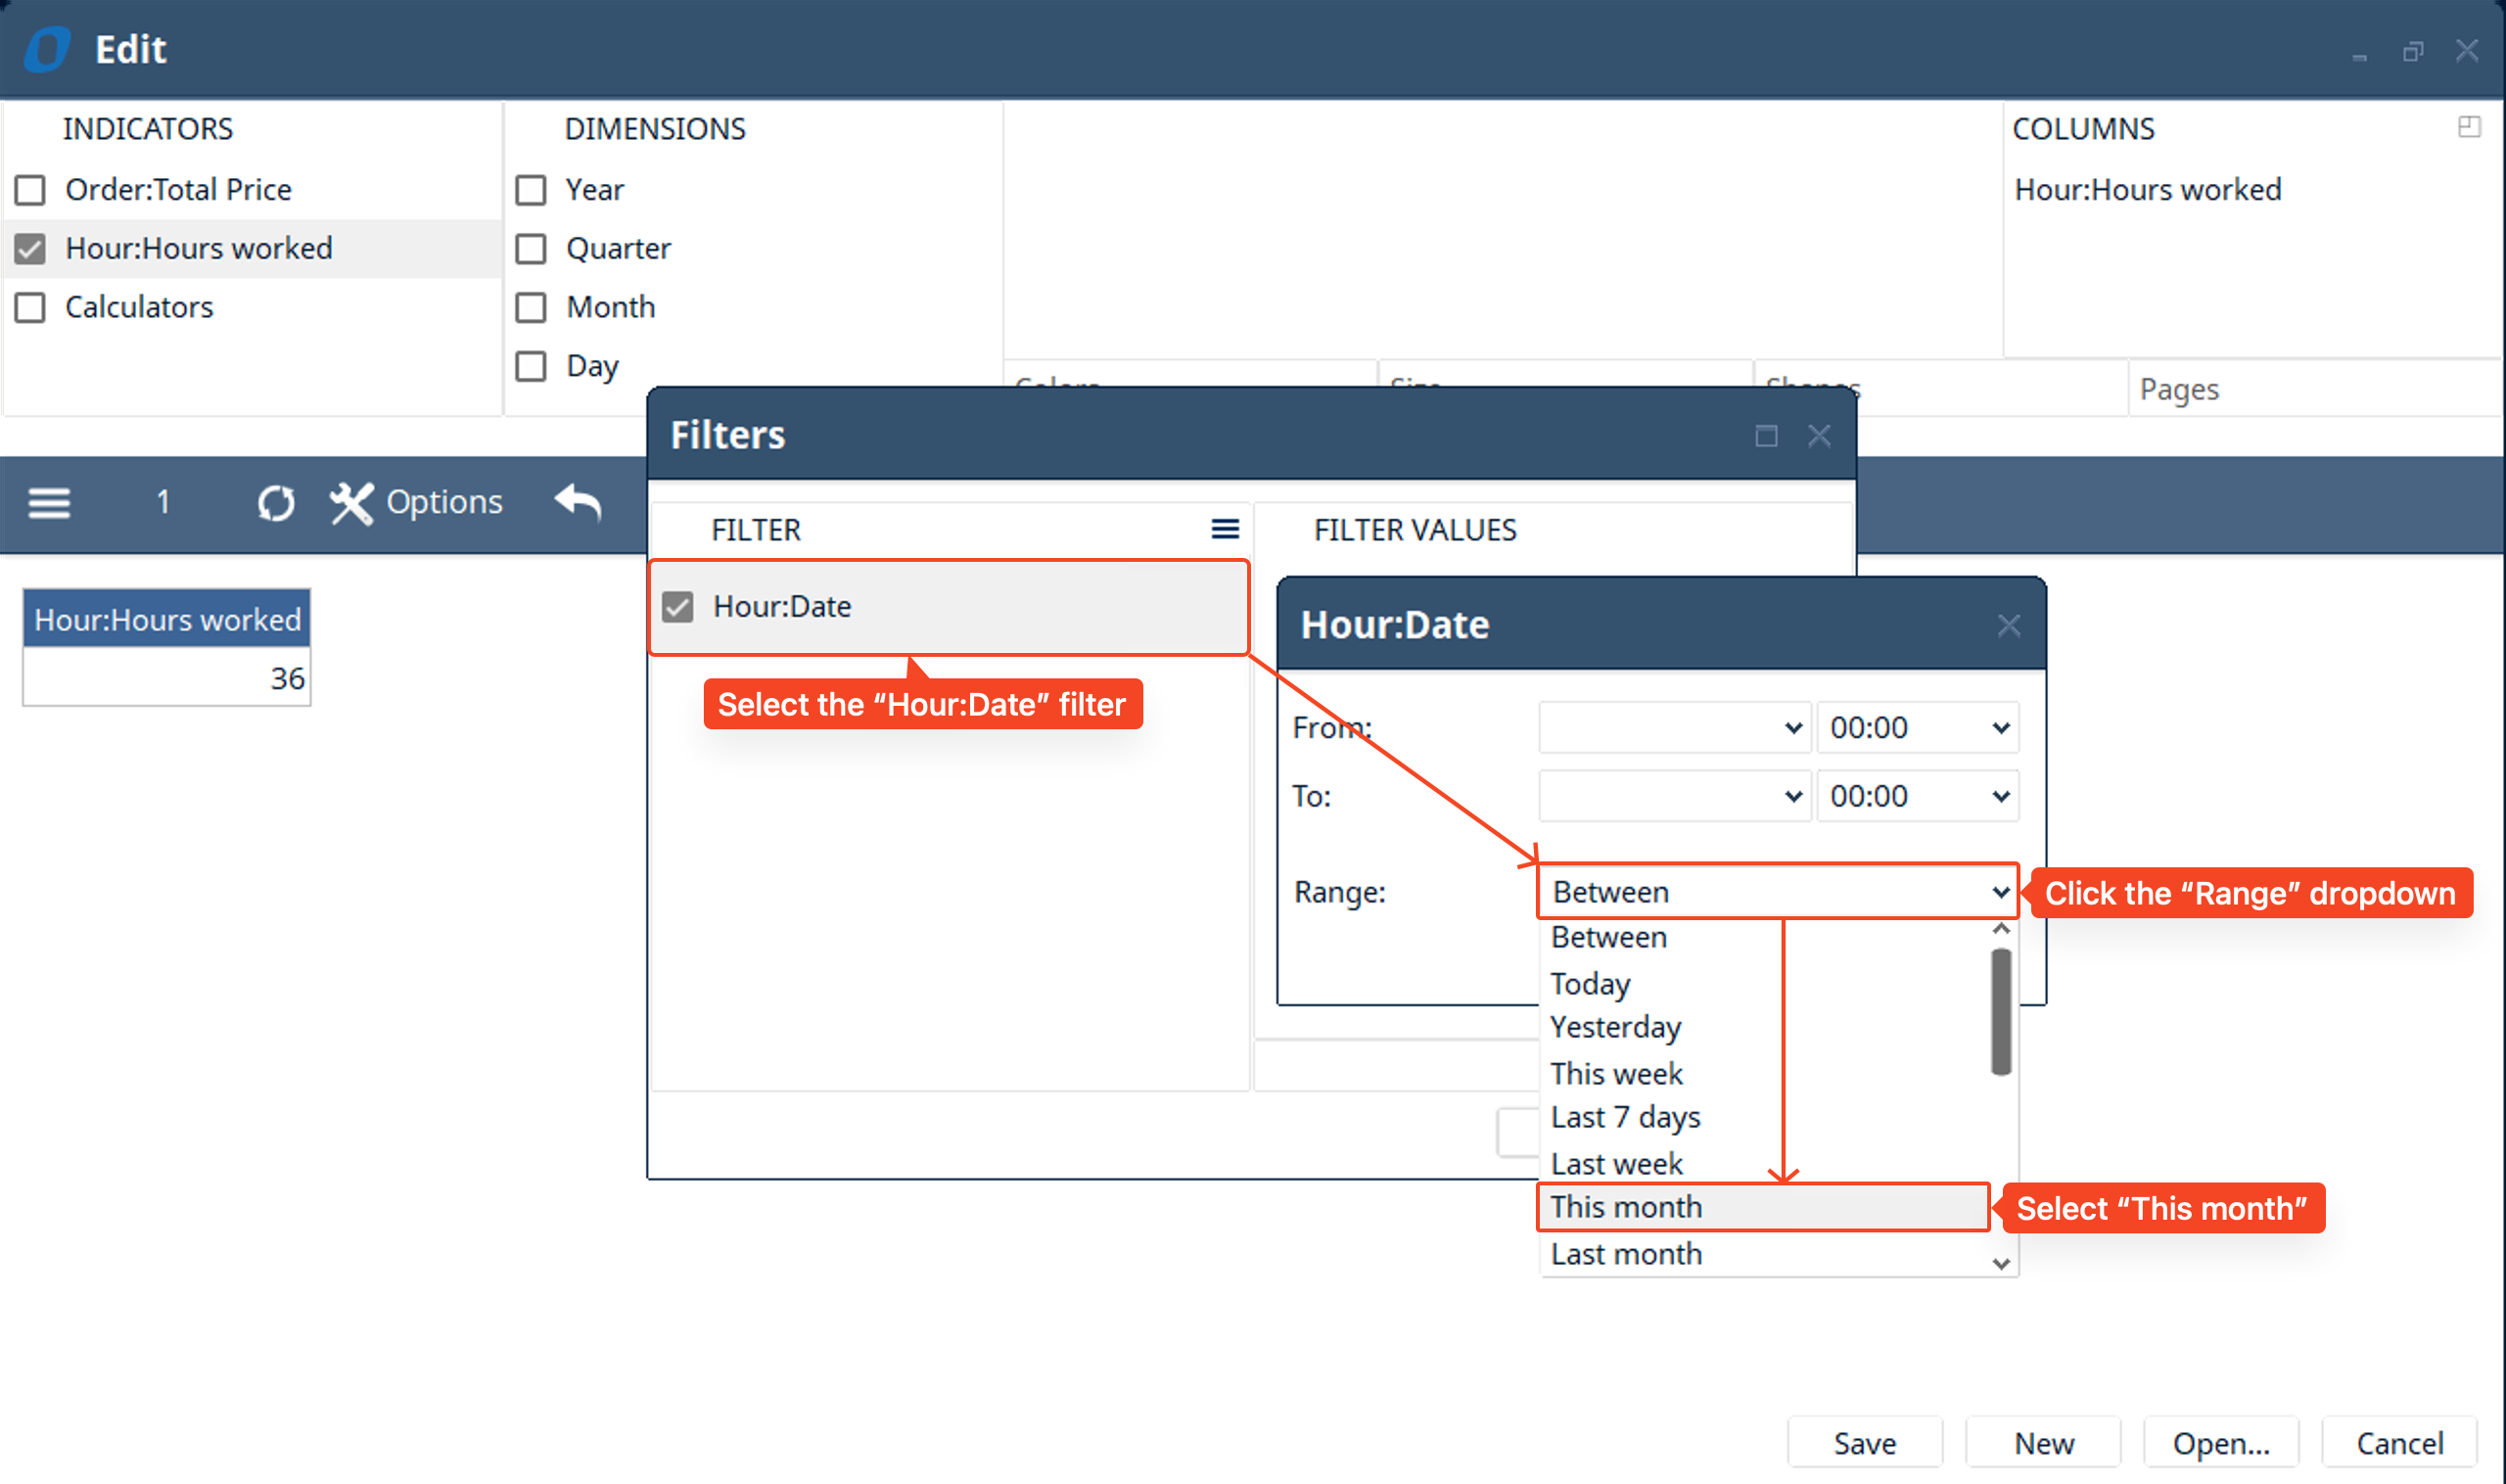
- Then click OK to save the filter value → then again OK to save the filter
- Again we will click on options → select the “Hour:Hours worked” entity → change the caption to “Hours worked this month” → then click OK to save the caption to the “Statistic” → then click “Save” to save the “Statistic” to the “Dashboard”
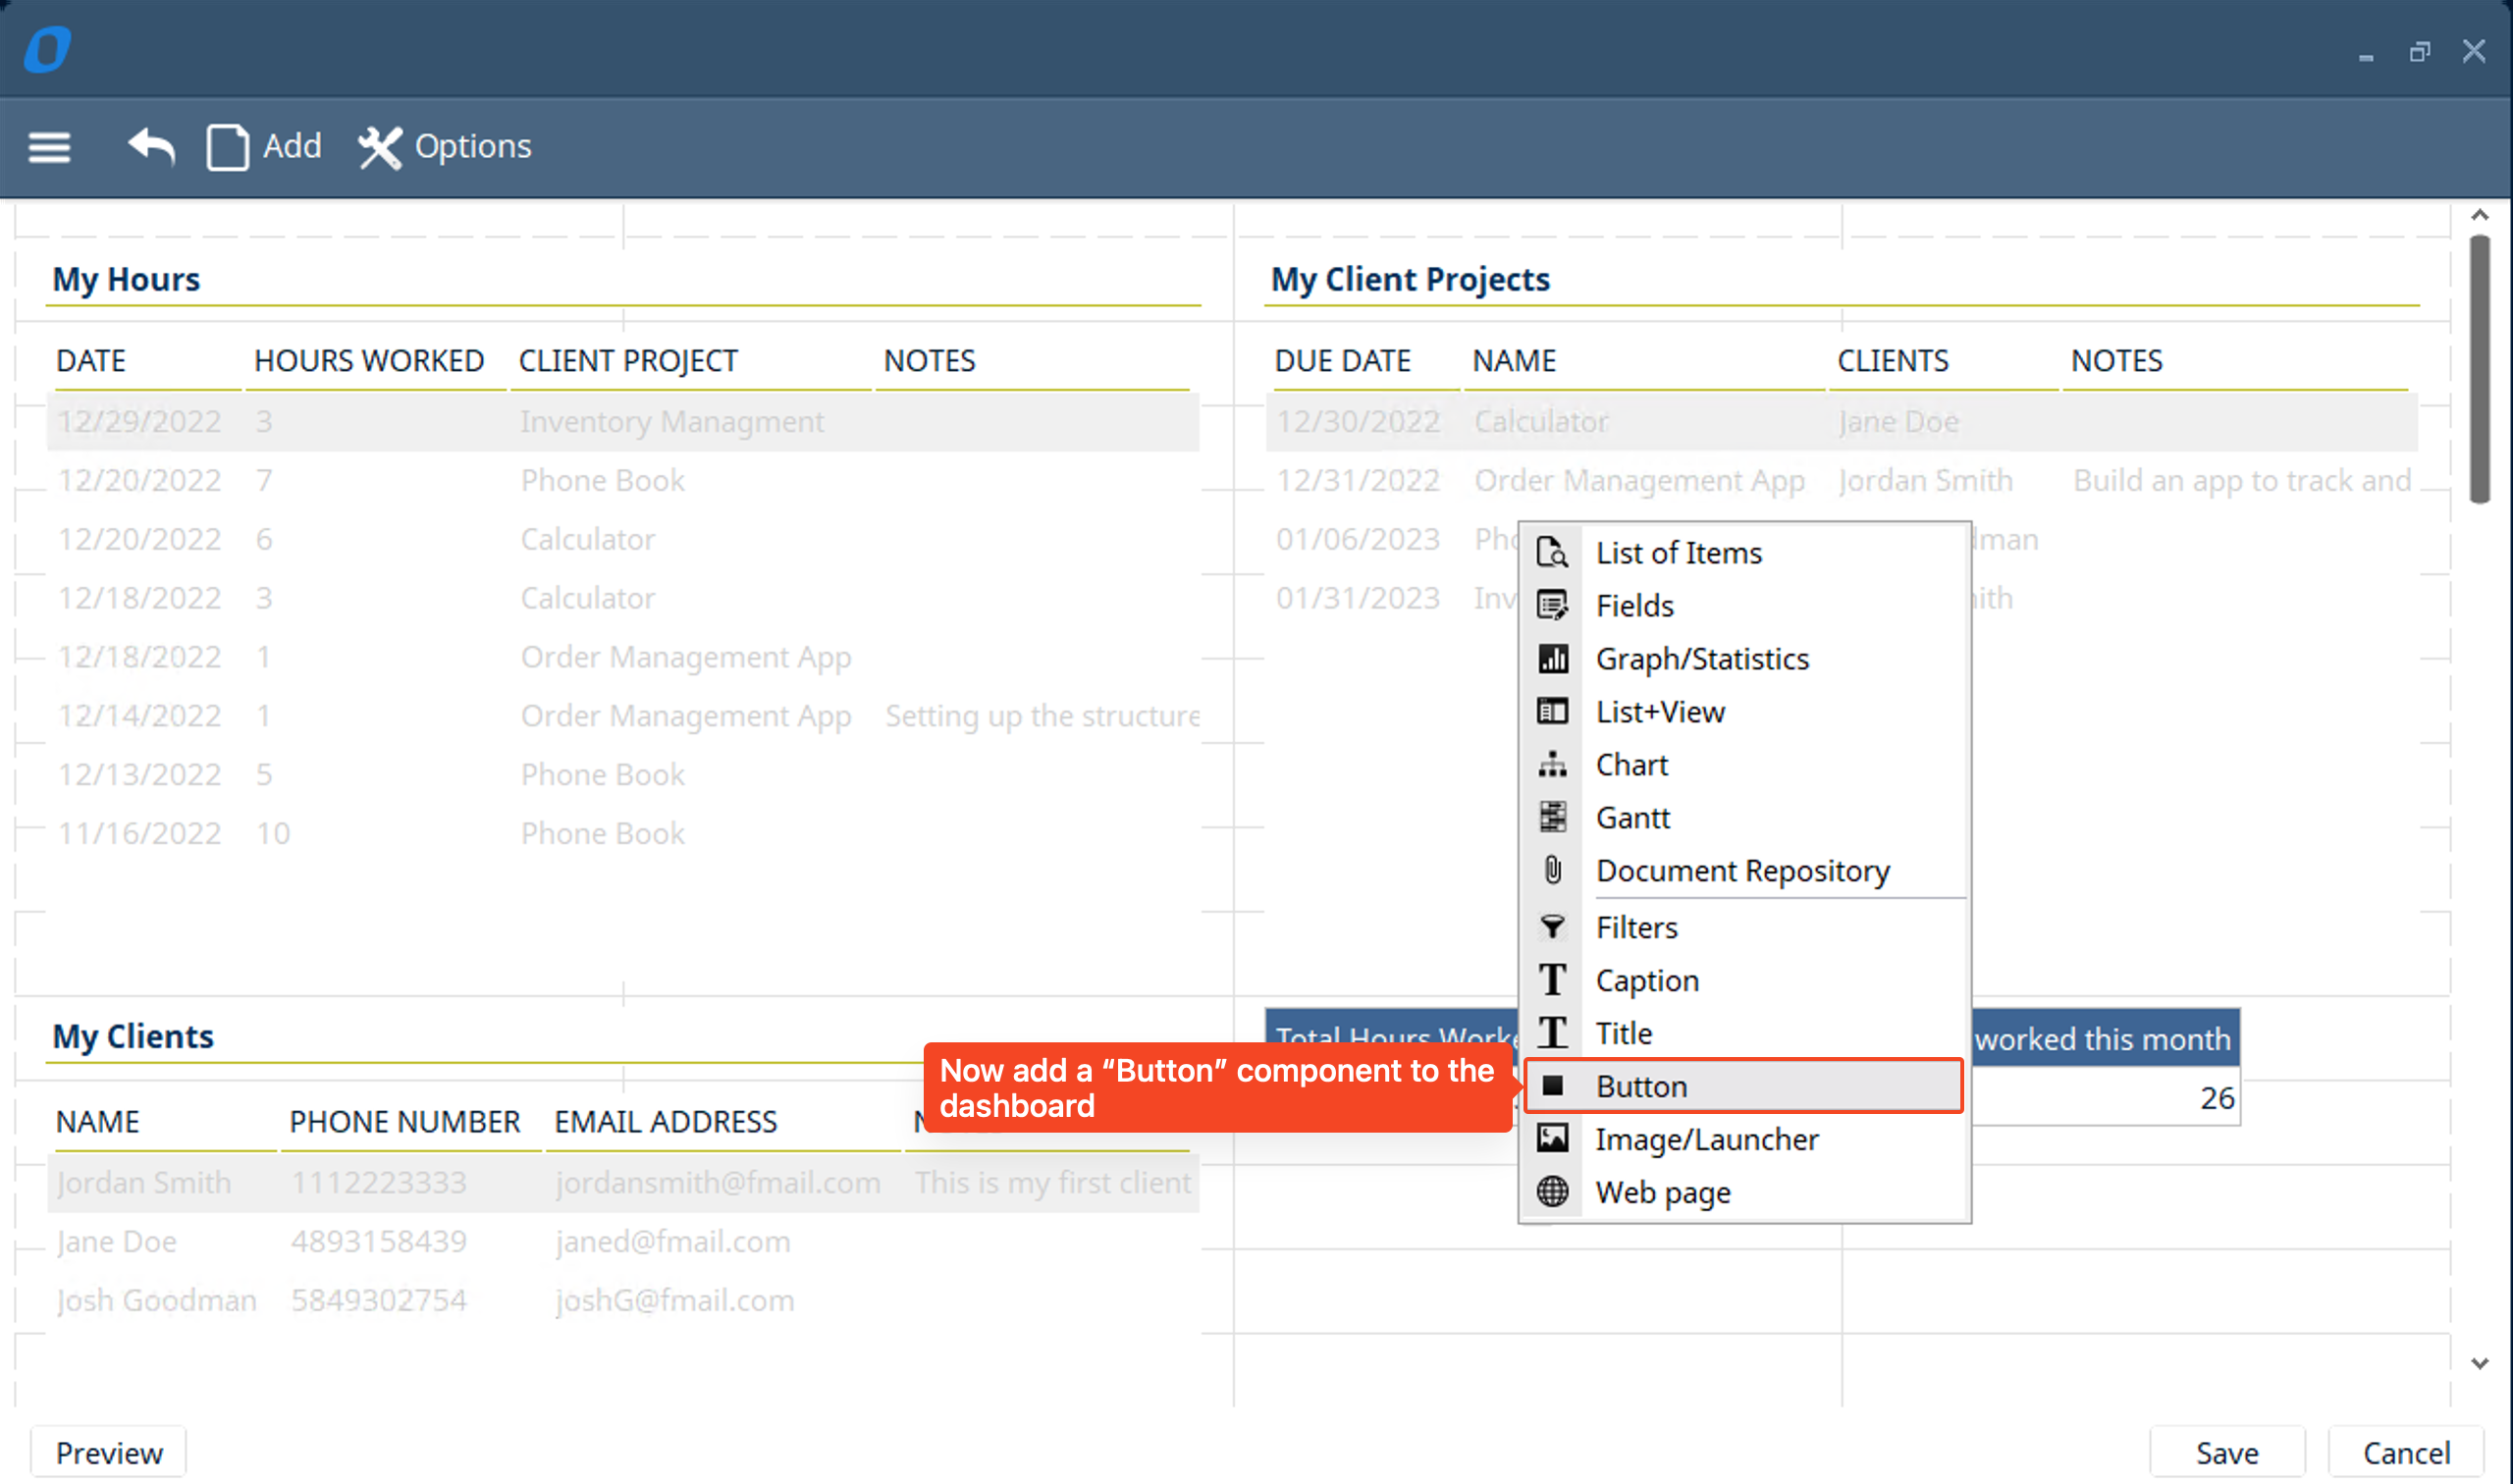
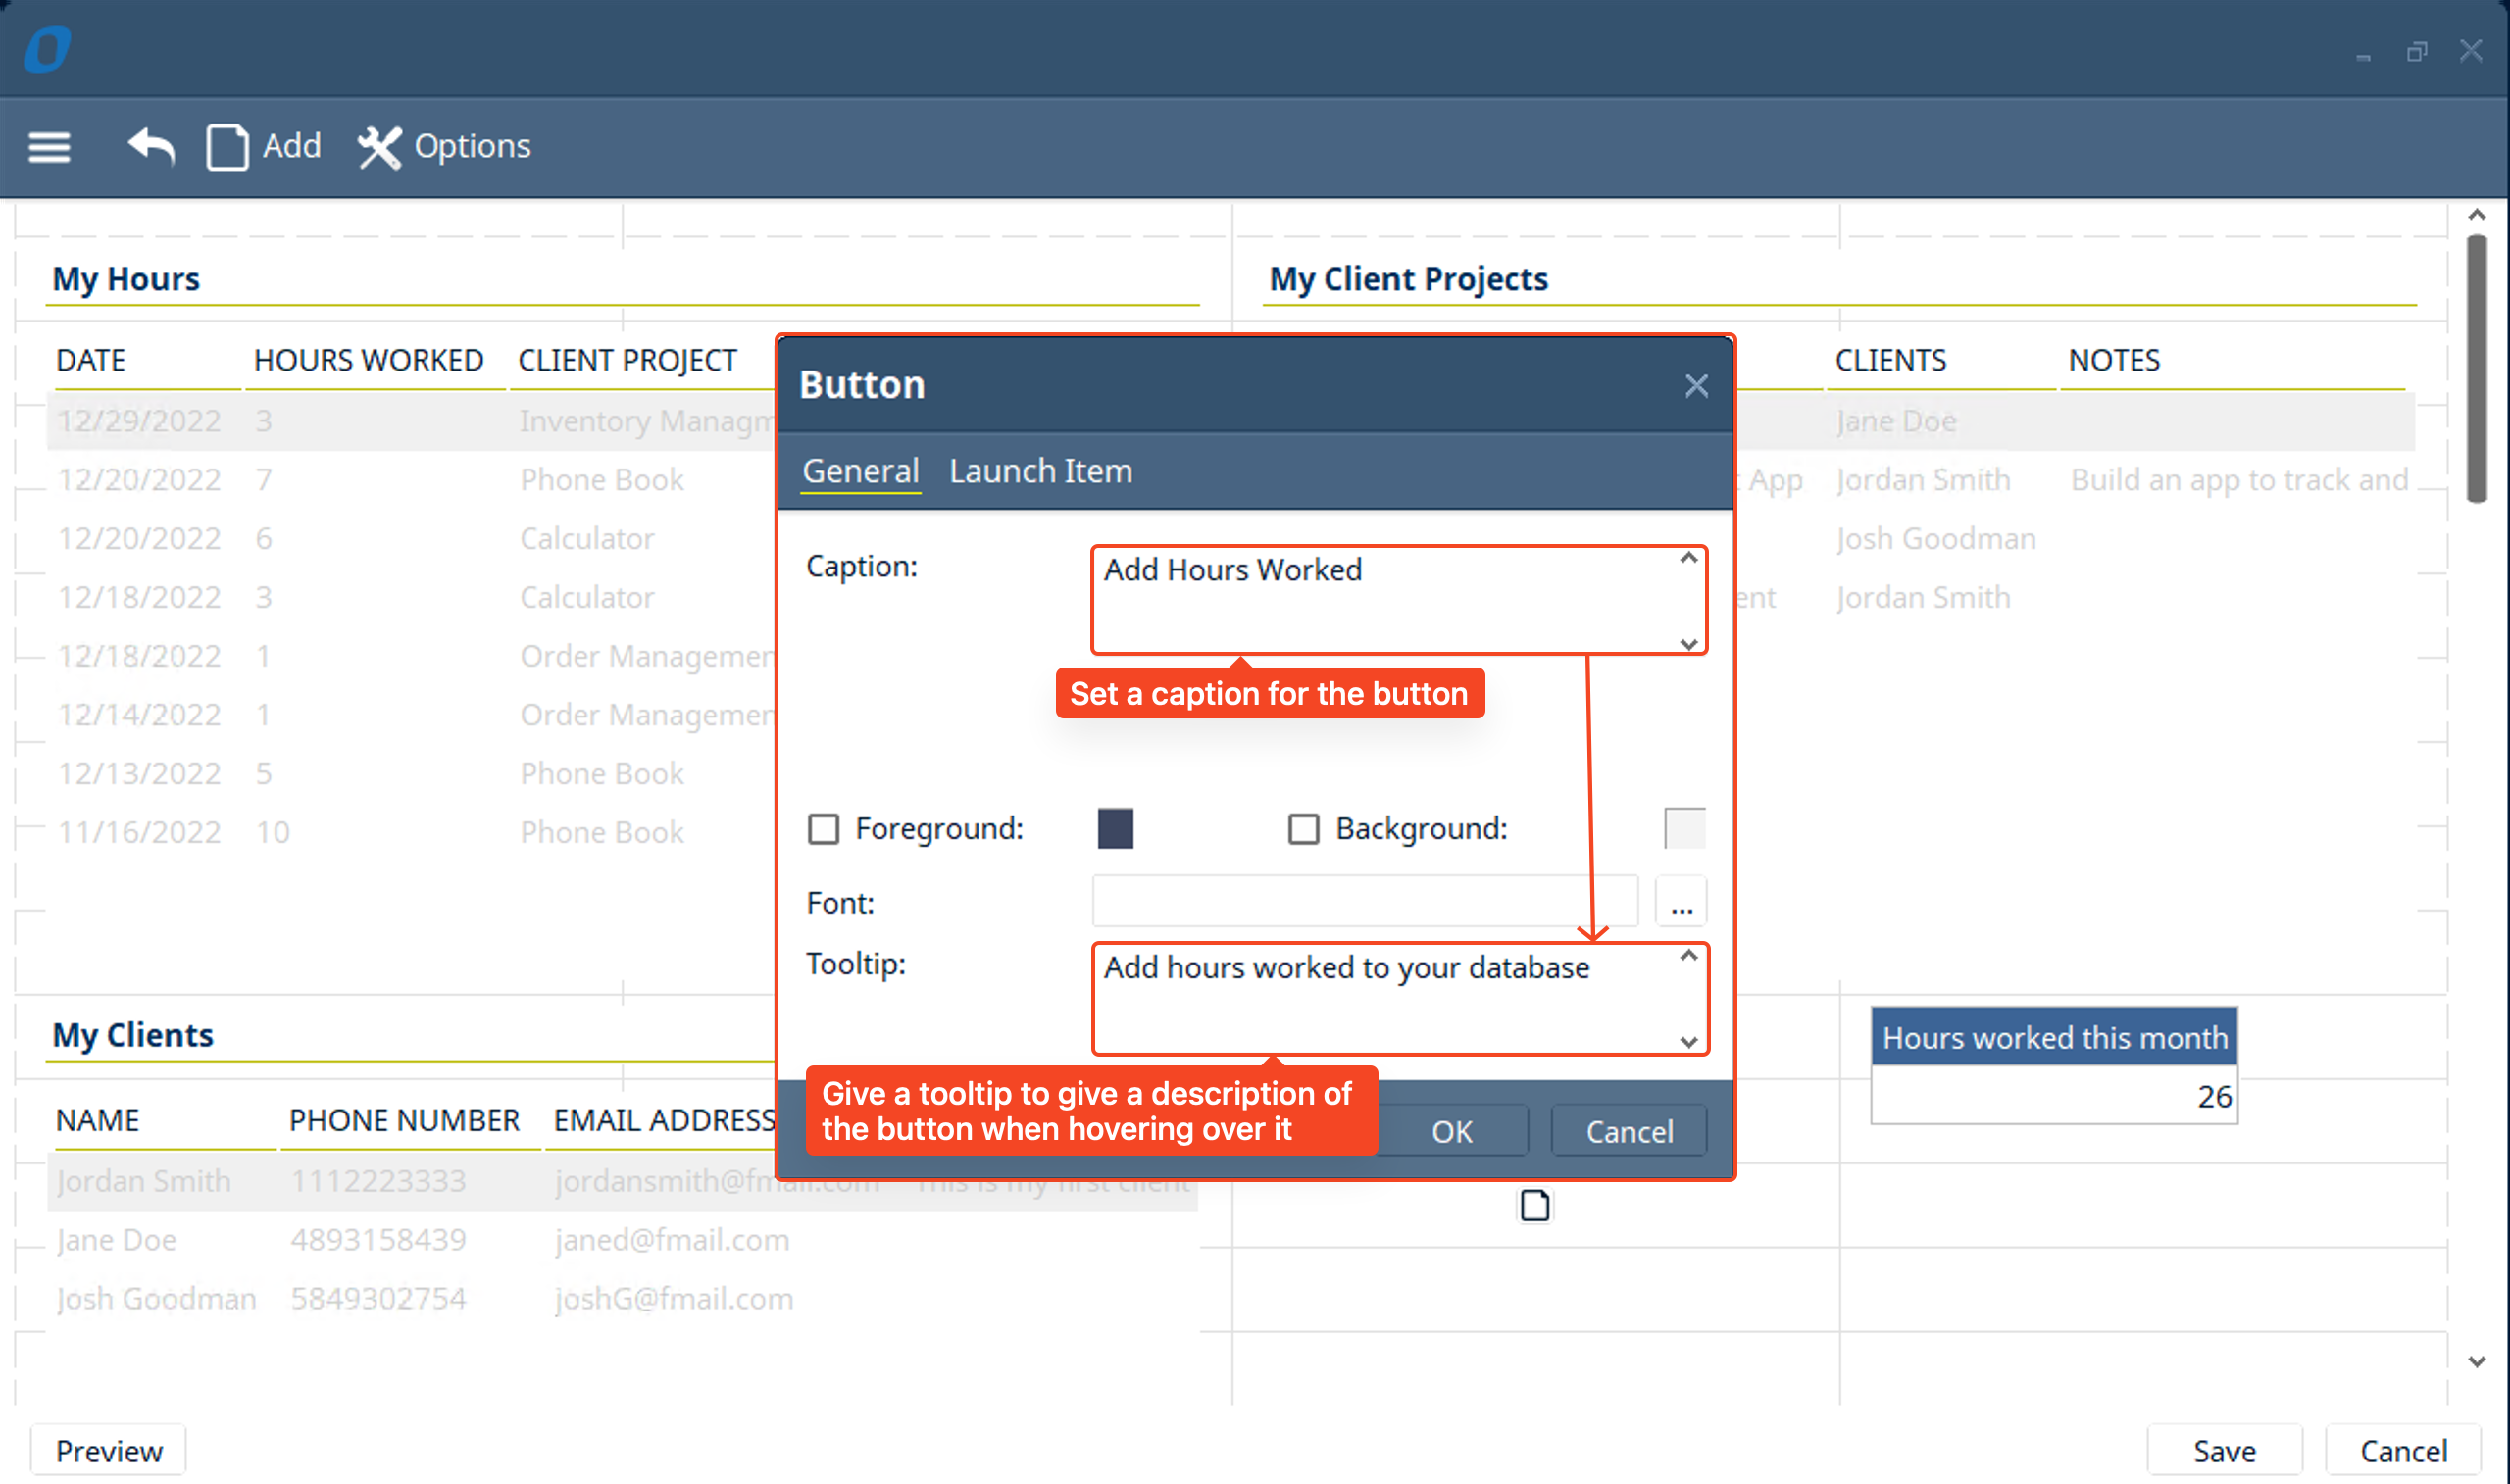
- Lastly, we will add a button to “Add Hours” to our database so we can easily add new hours worked.
- Click on “Add” → select “Button”
- Set the caption to be “Add Hours Worked” → set tooltip “Add hours worked to your database”
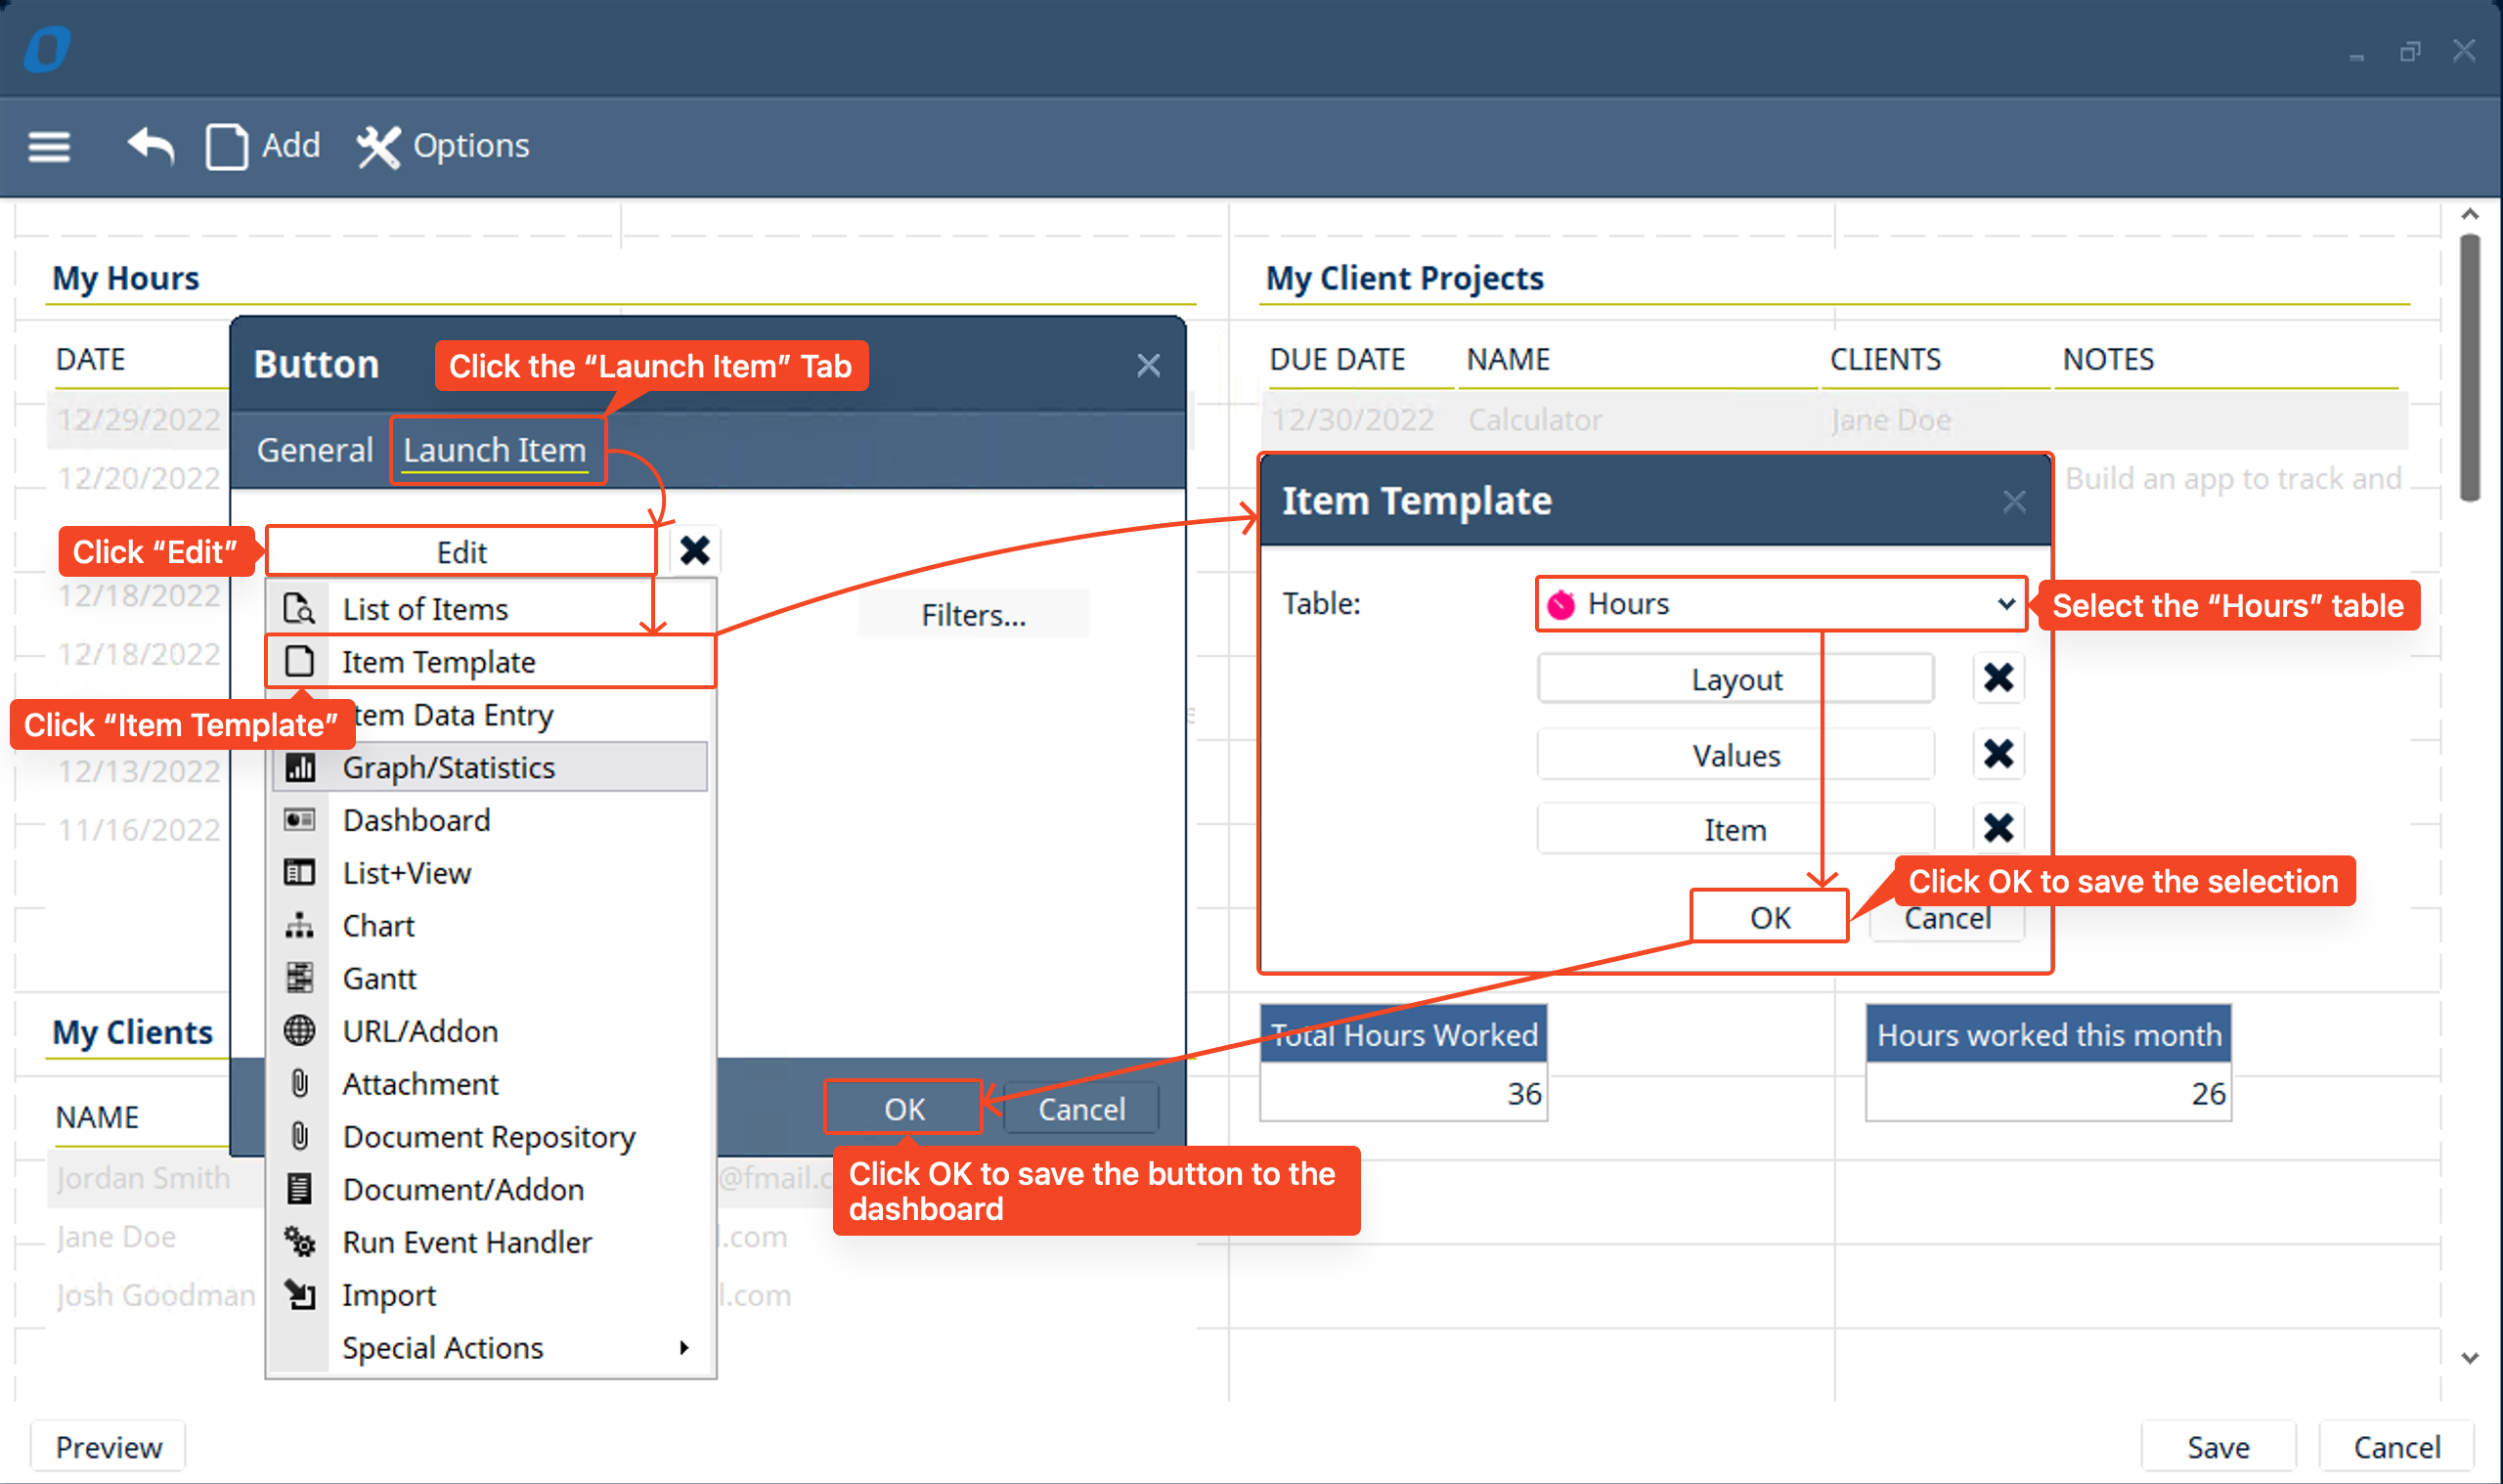
- Click on “Launch Item” tab → Click “Edit” → Select “Item Template” → set the table as “Hours” → then click “OK” to set the item template → Click “Refresh on update” → then click OK to save the button
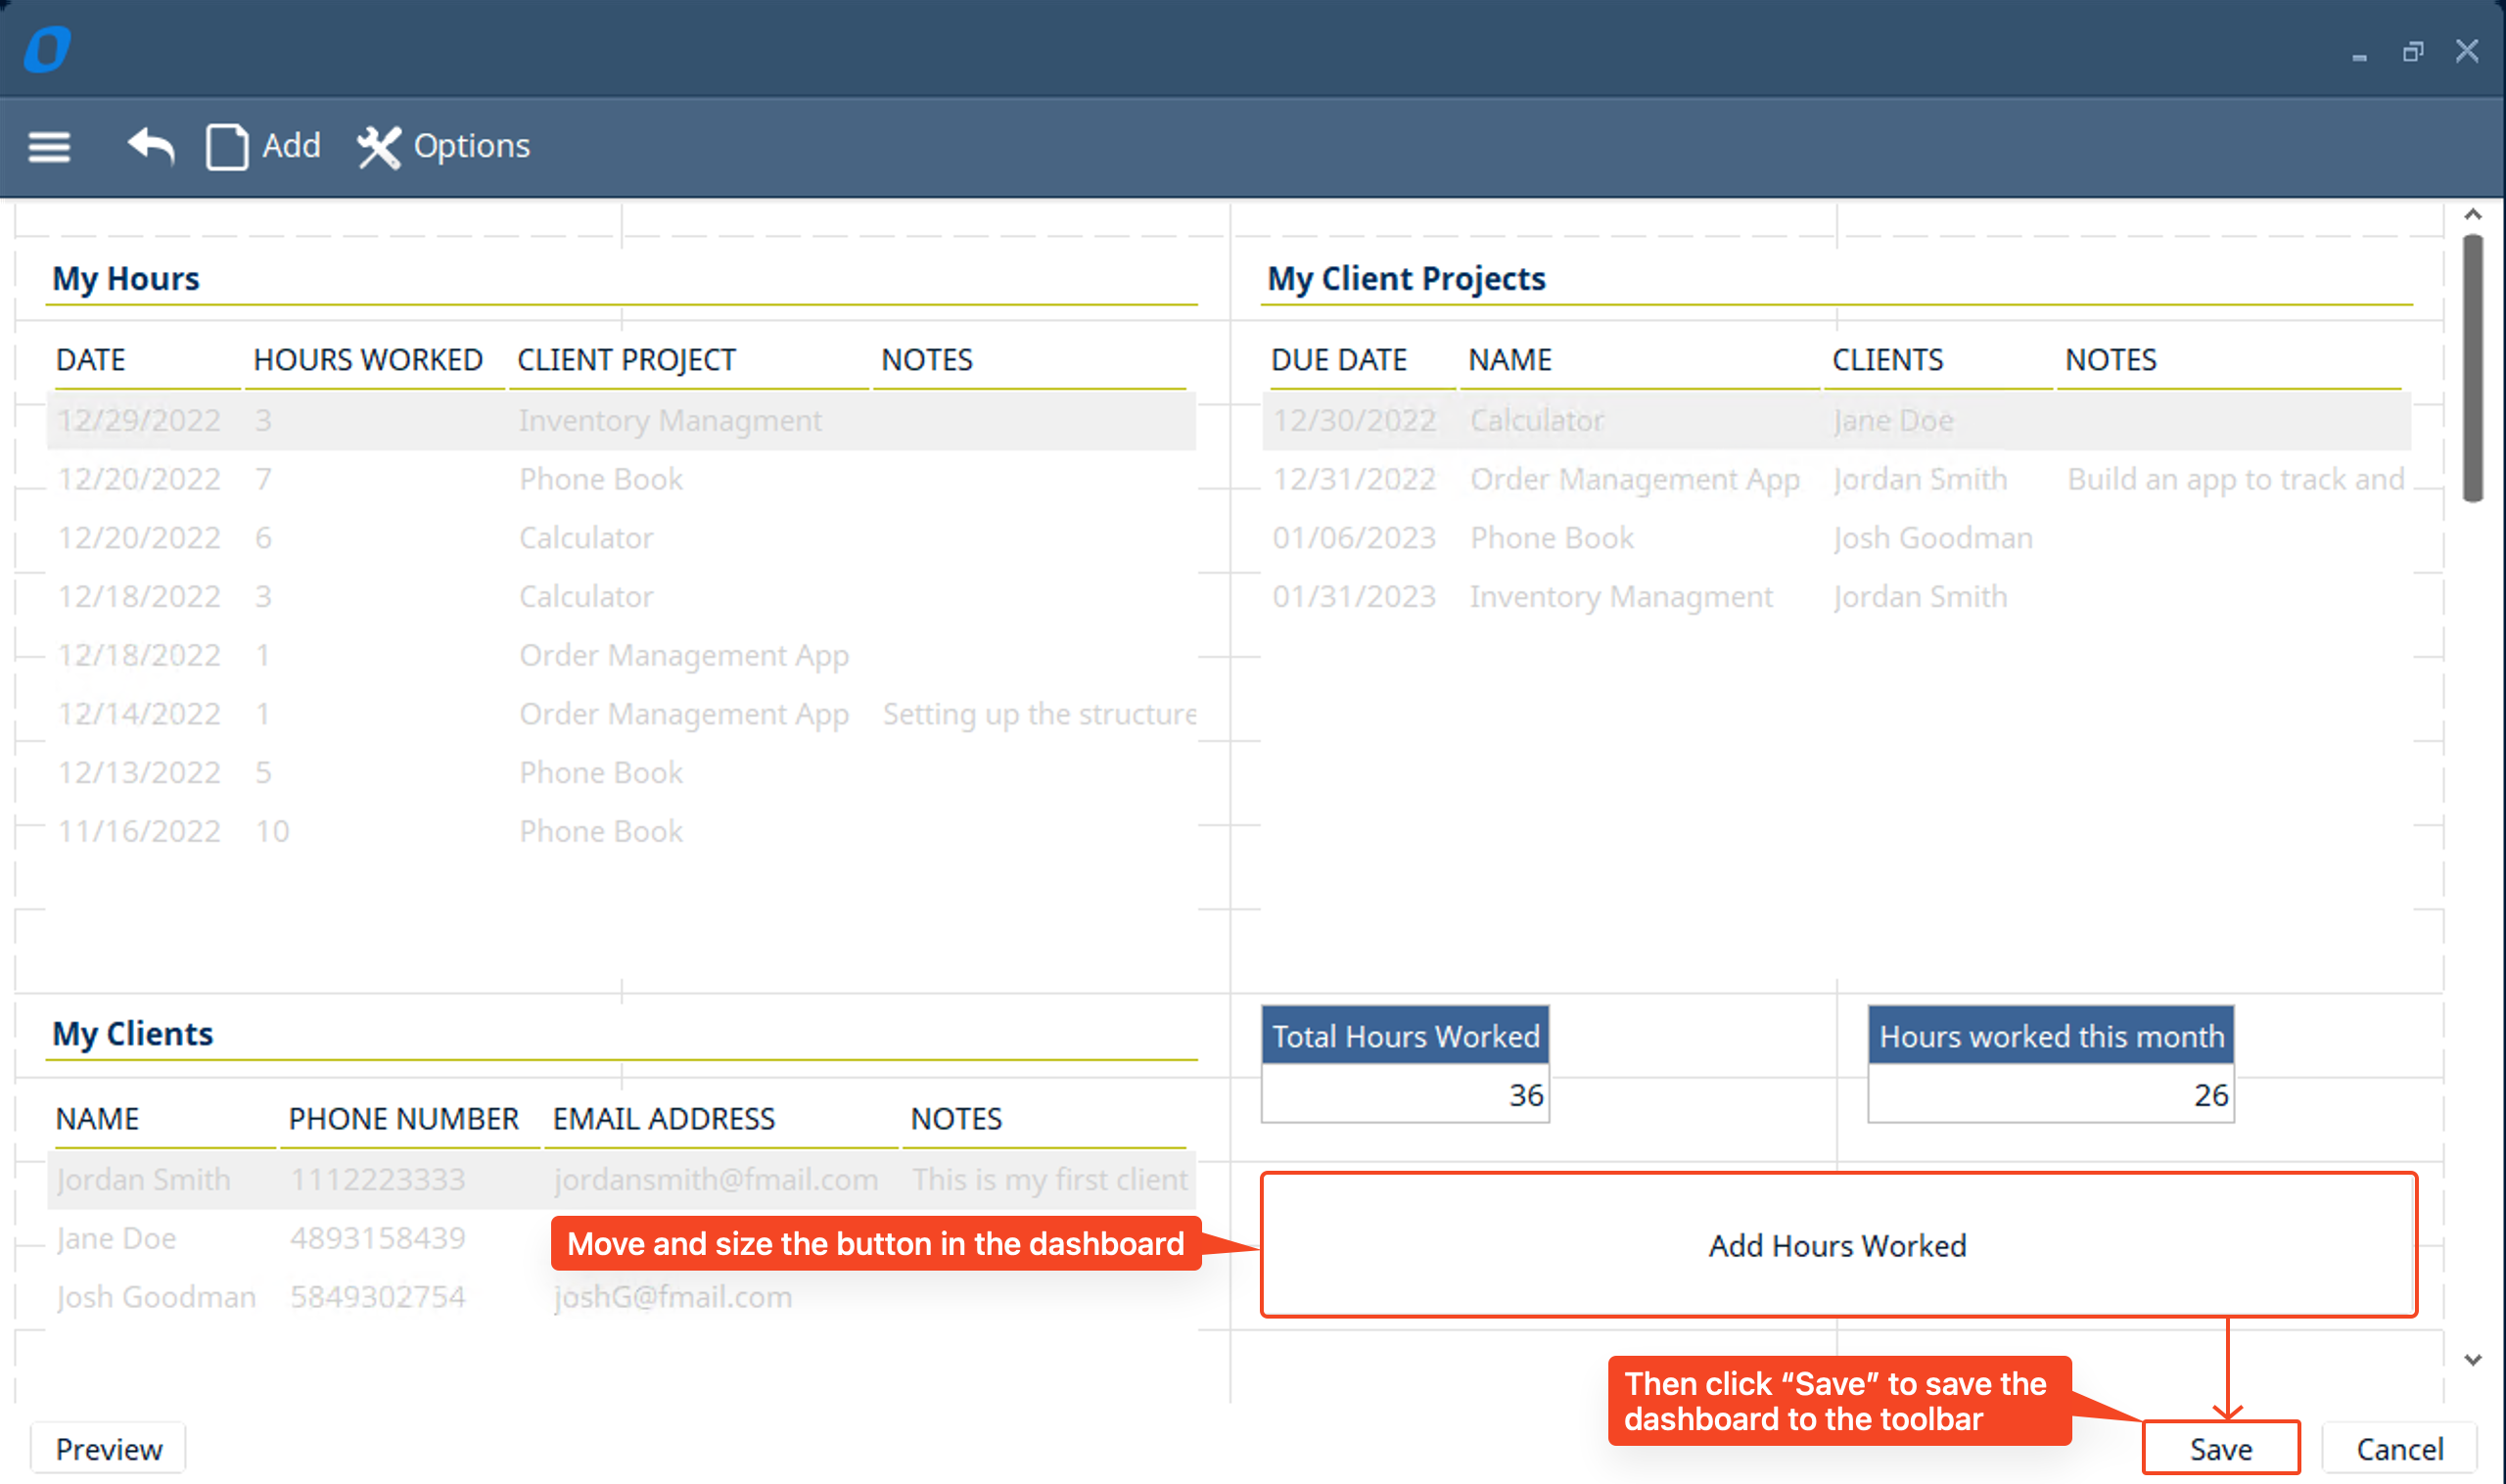
- Now you have completed your dashboard for hour tracking
- Name it “Hour Tracking” and give it a description → set it as “Start Maximized” → click OK
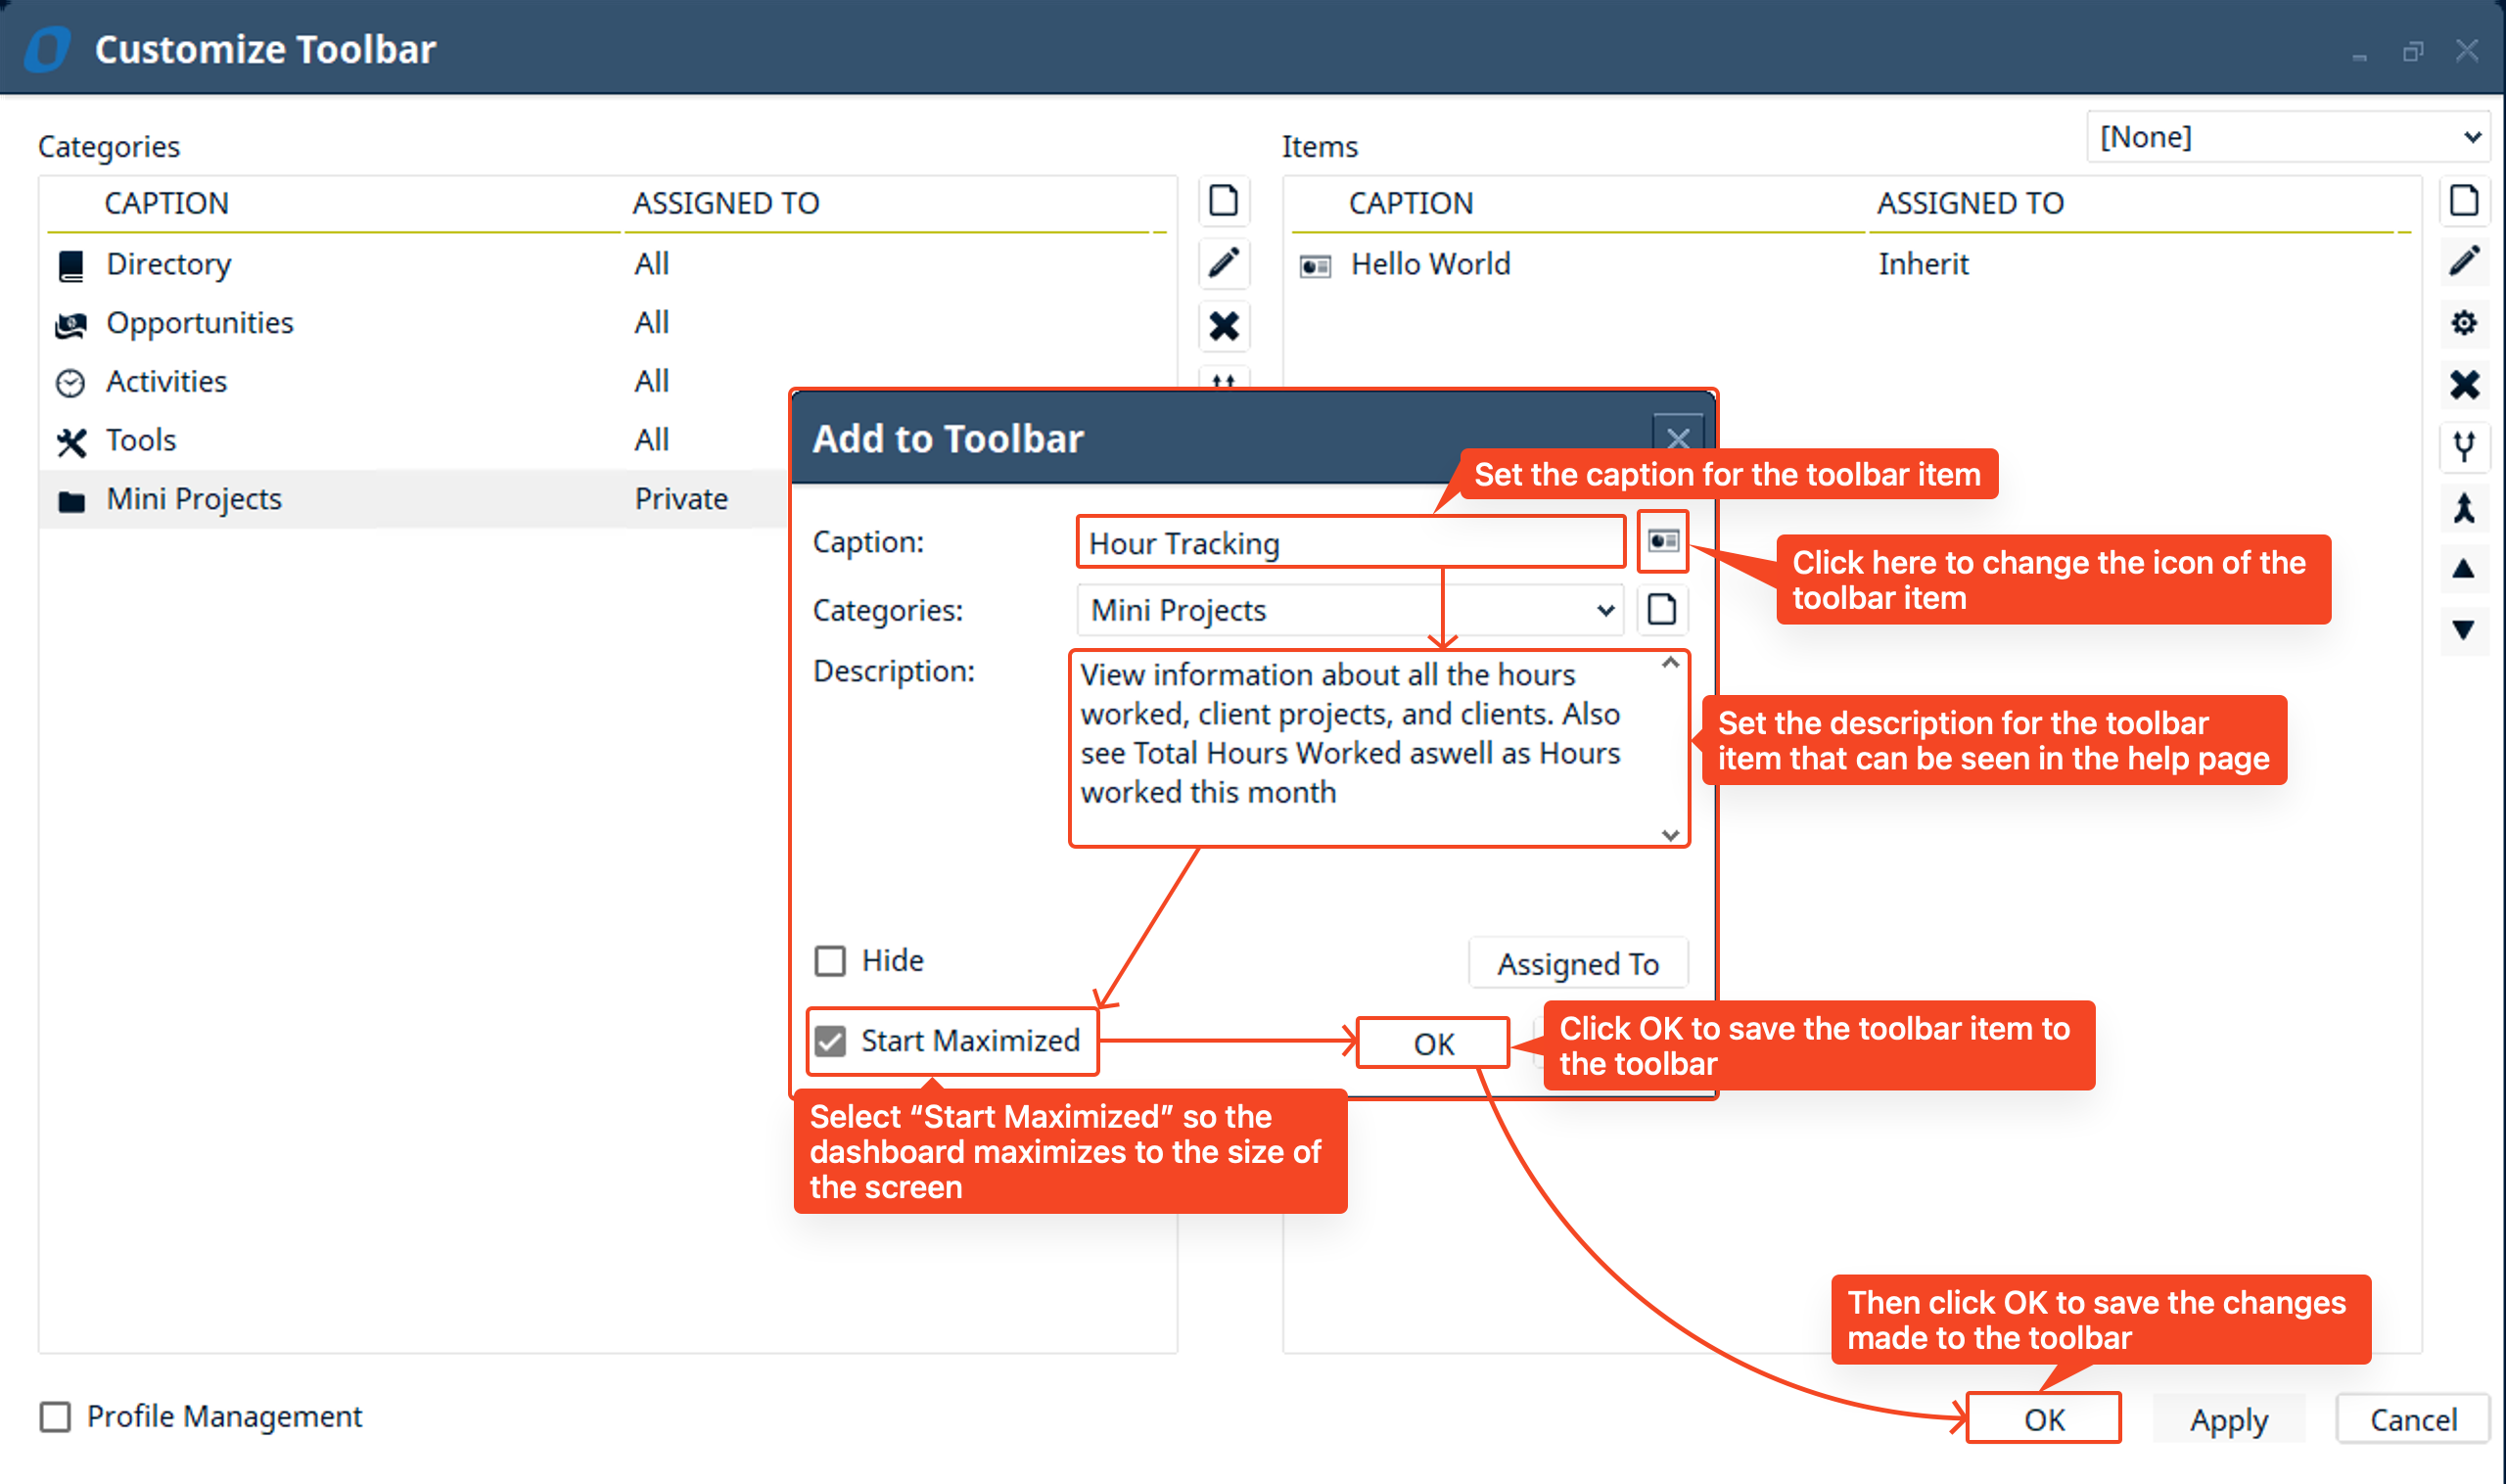
- Then you’ll see the new toolbar item in the “Mini Projects” category → “Hour Tracking”
- Now you will see your up to date hour tracking information. You can easily add hours by clicking on the “Add Hours Worked” button or open a specific “Client Project” to quickly add hours directly to a project.
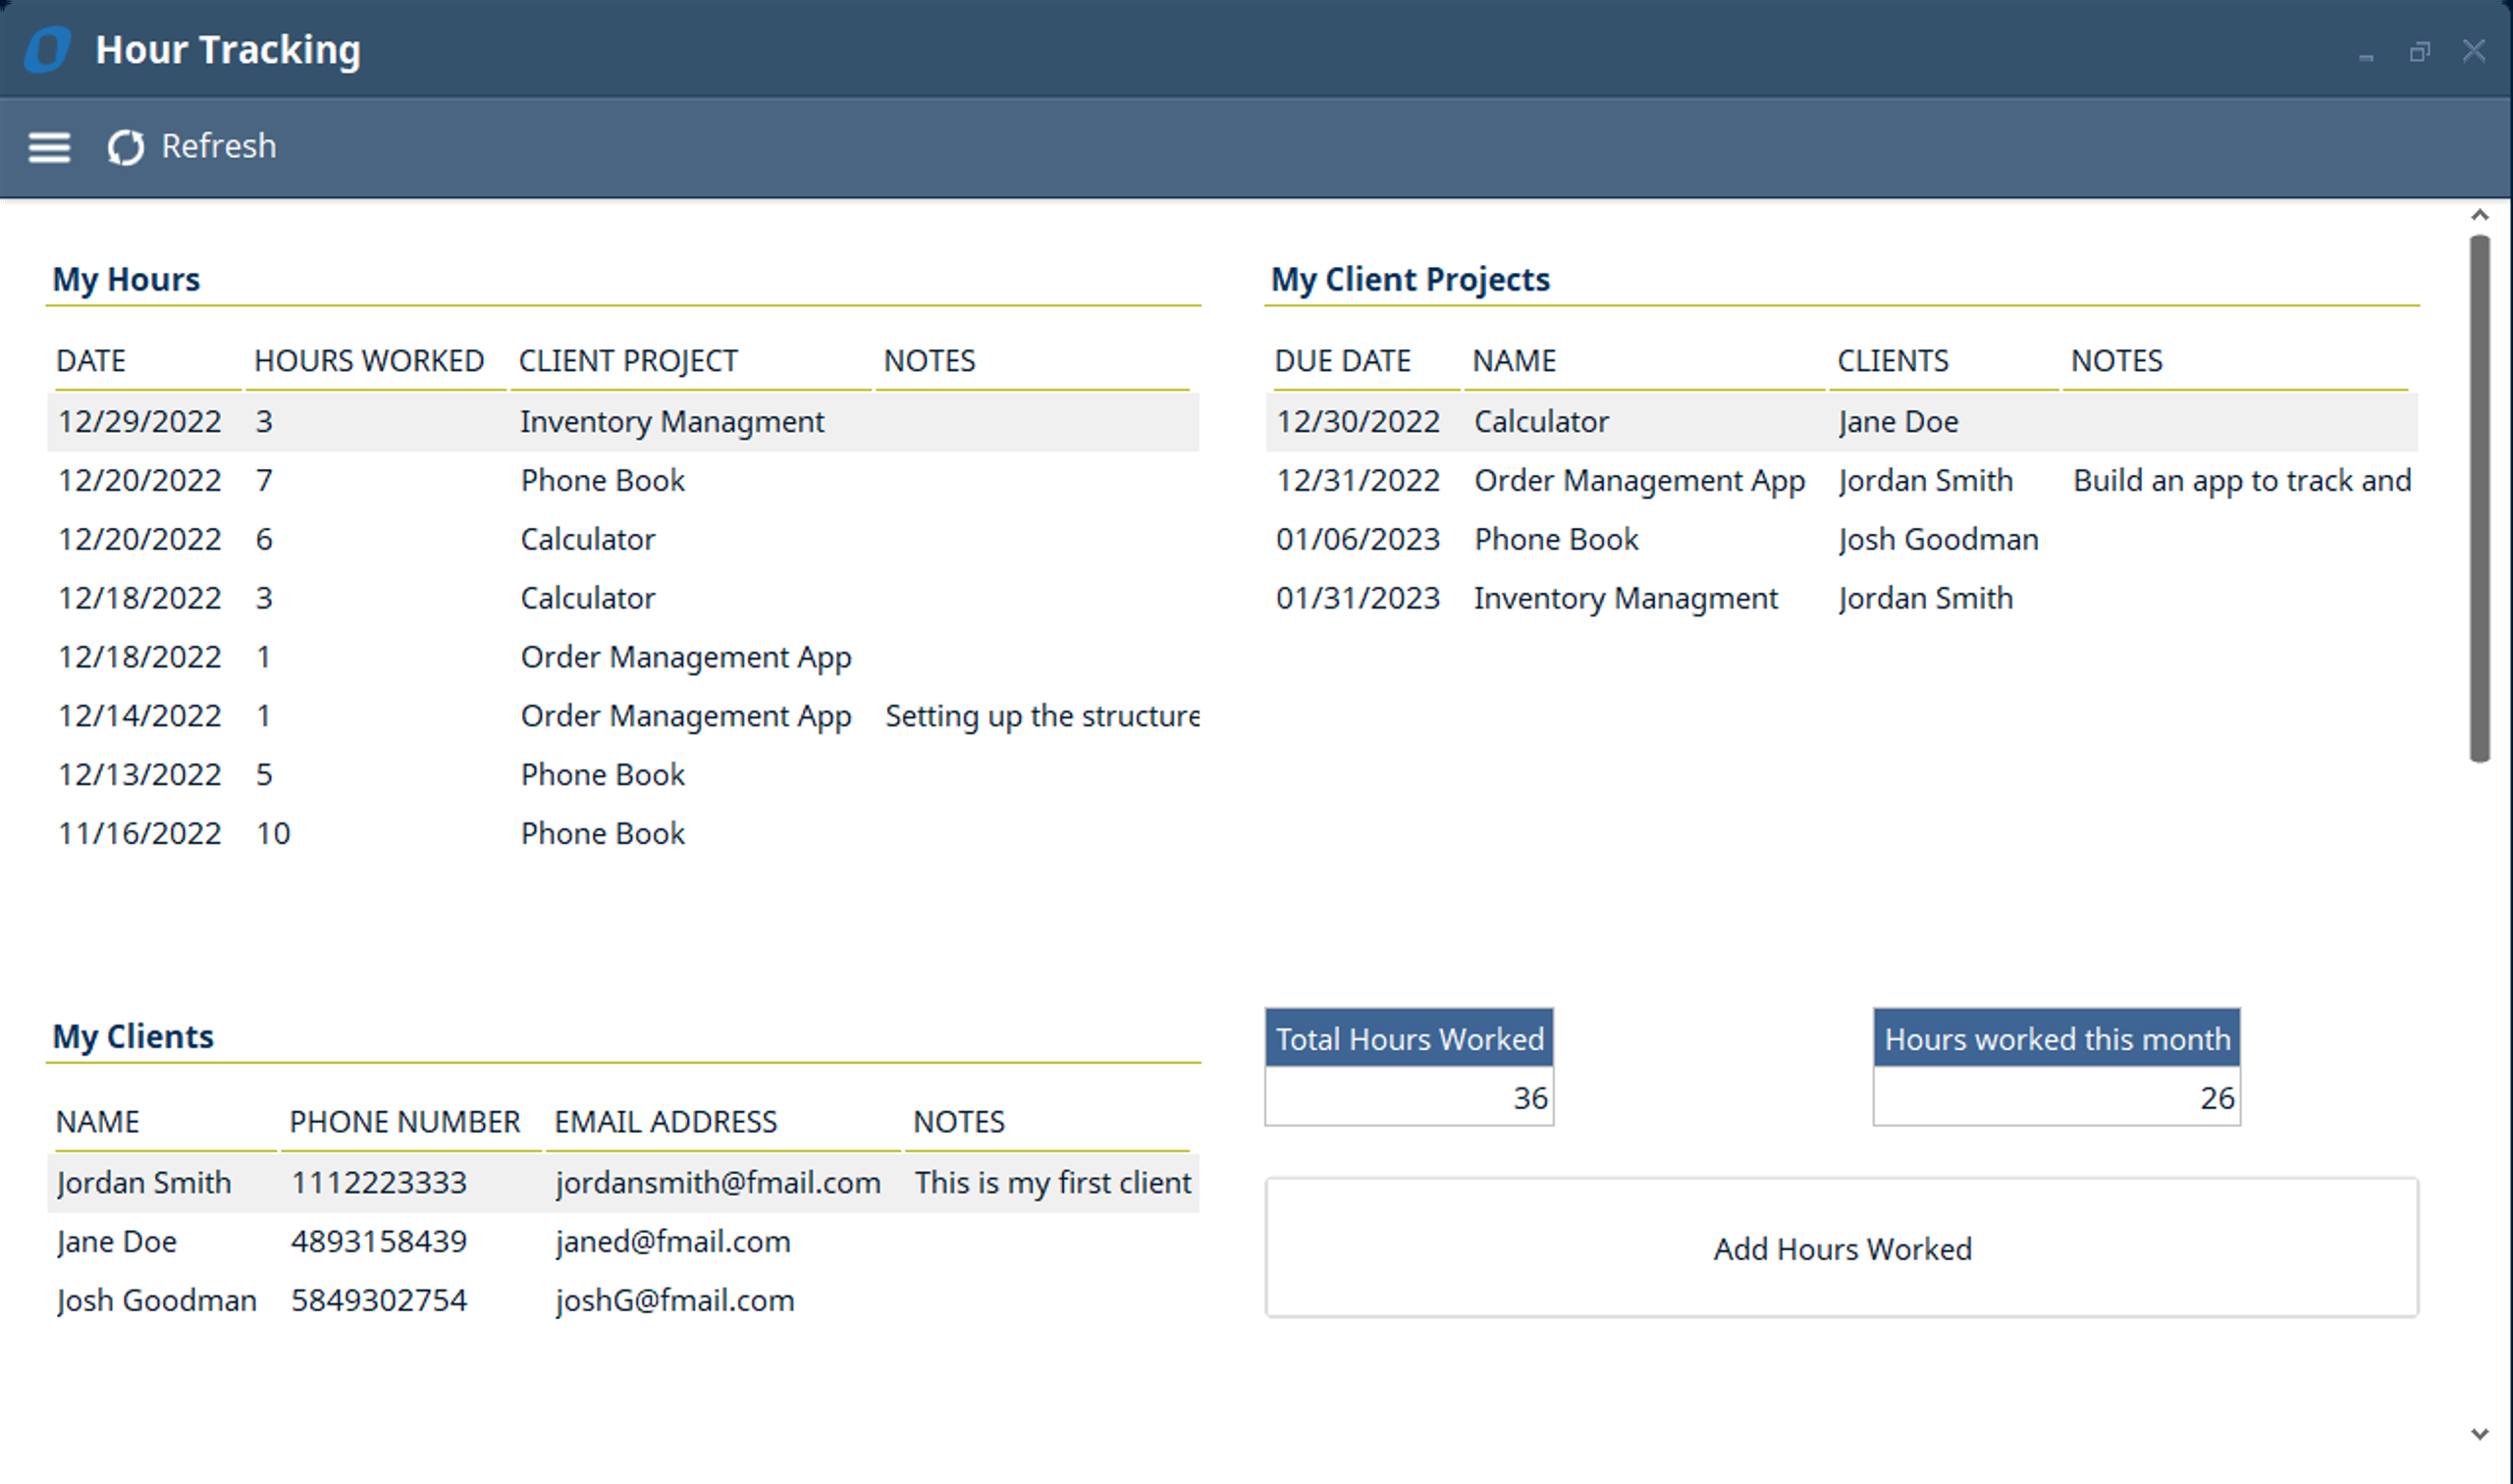
- Congratulations! You completed the hour tracking mini project. Now you are ready to use your hour tracking project! You can easily keep track of the hours you worked for each client and the total hours you worked in a month. You can also quickly add hours to a project or to the database with the "Add Hours Worked" button. Now you have a project that you can use to make sure you are being paid for all of your hard work!
Challenge
The challenge for this mini project will be to:
- Add two more button components to the “Hour Tracking” dashboard to easily create “Clients” and “Client Projects” from the dashboard using the same steps we did to create the “Add Hours Worked” button in steps 95-98.
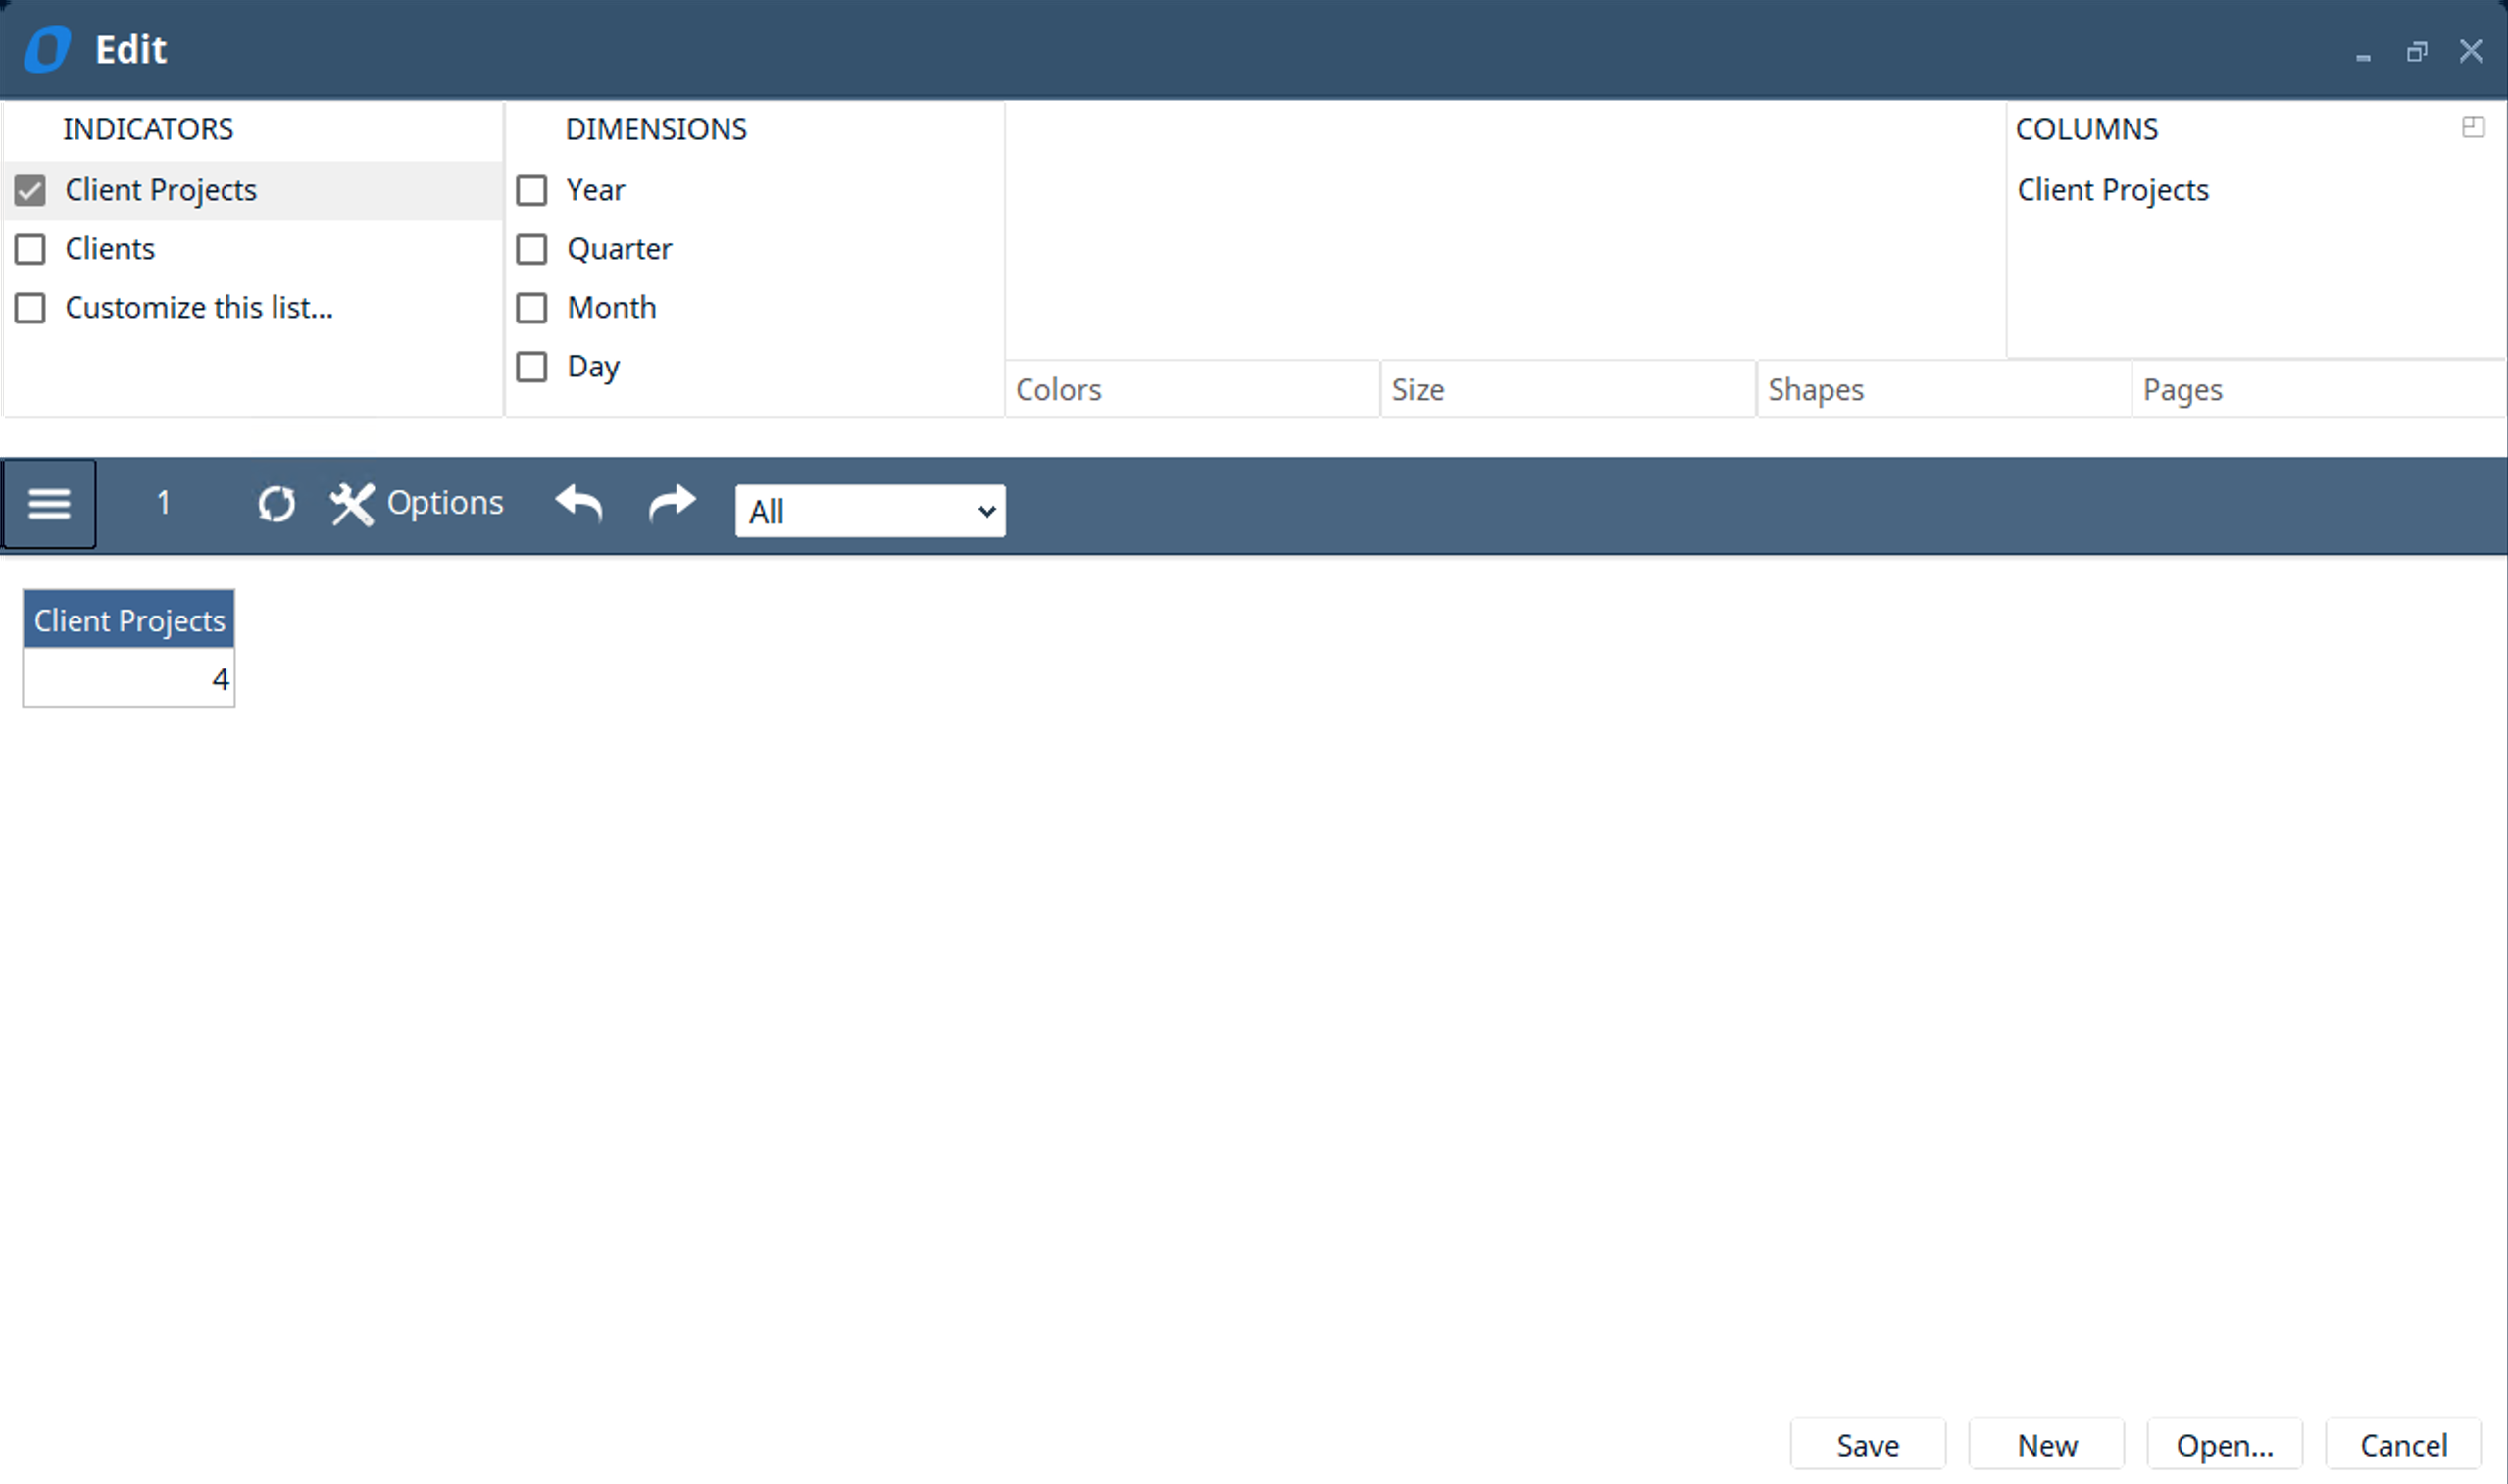
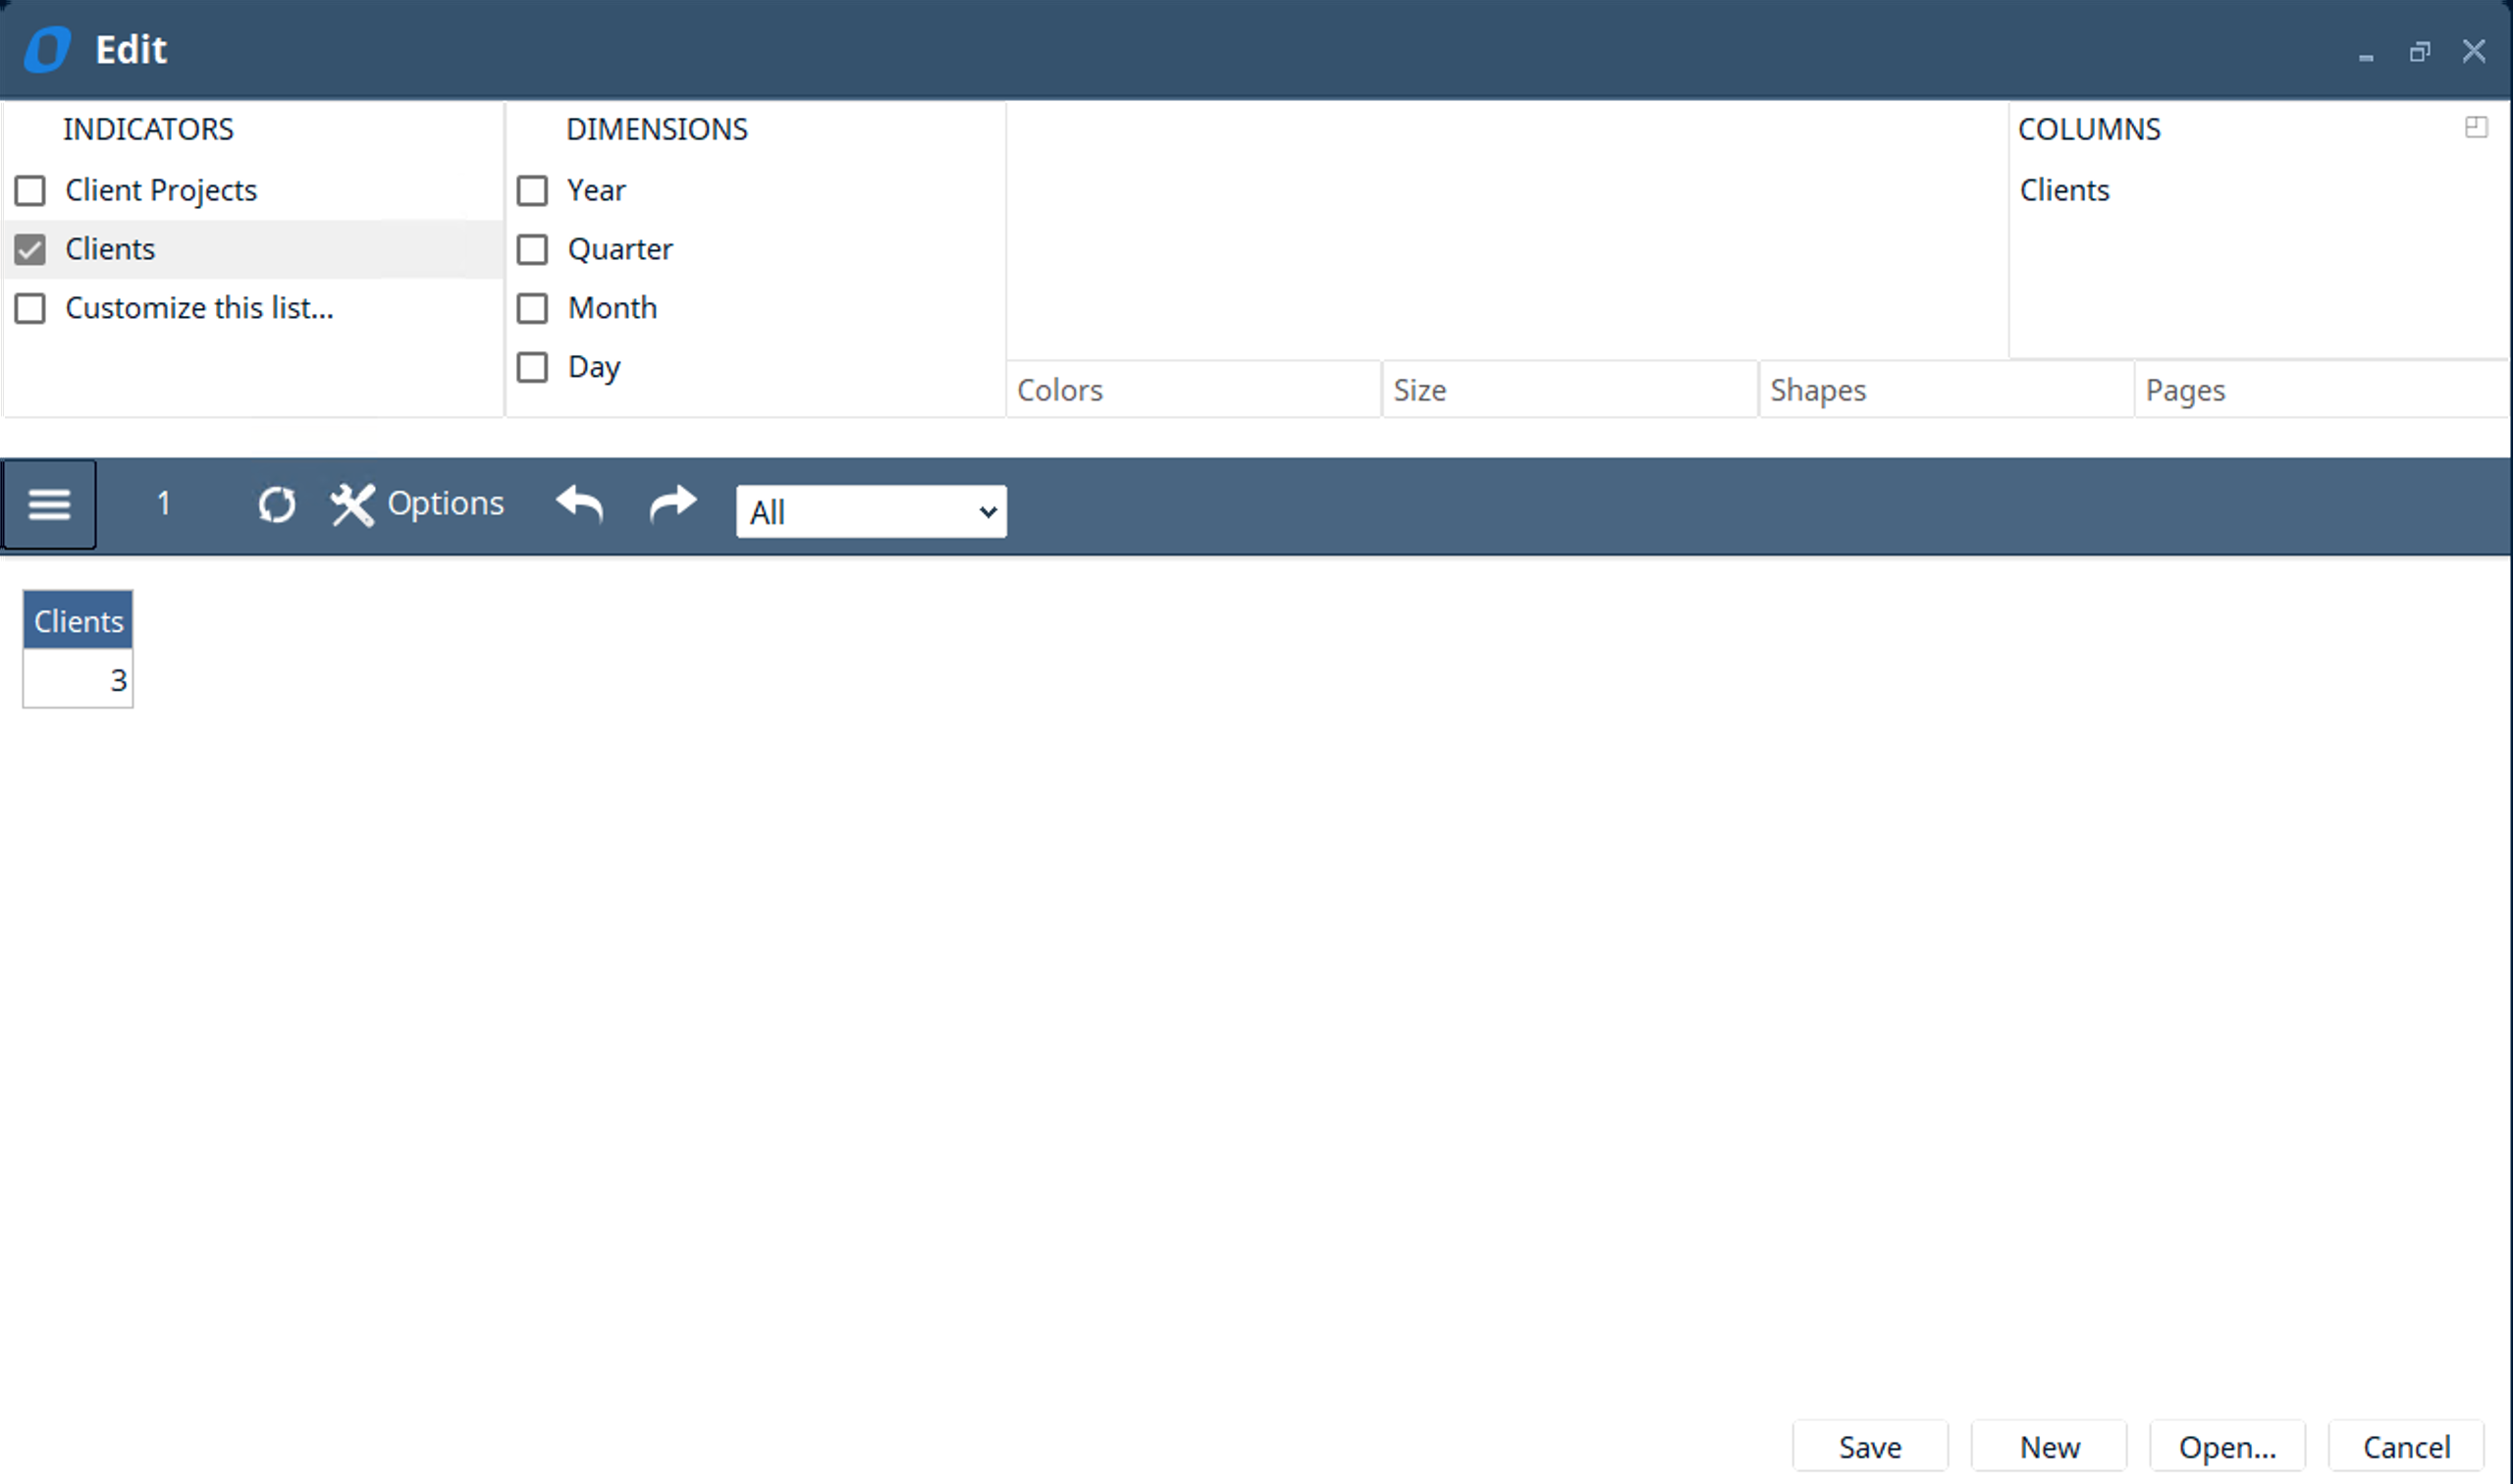
- Add two more statistics components to the “Hour Tracking” dashboard to count the number of “Clients” and “Client Projects” in your solution.
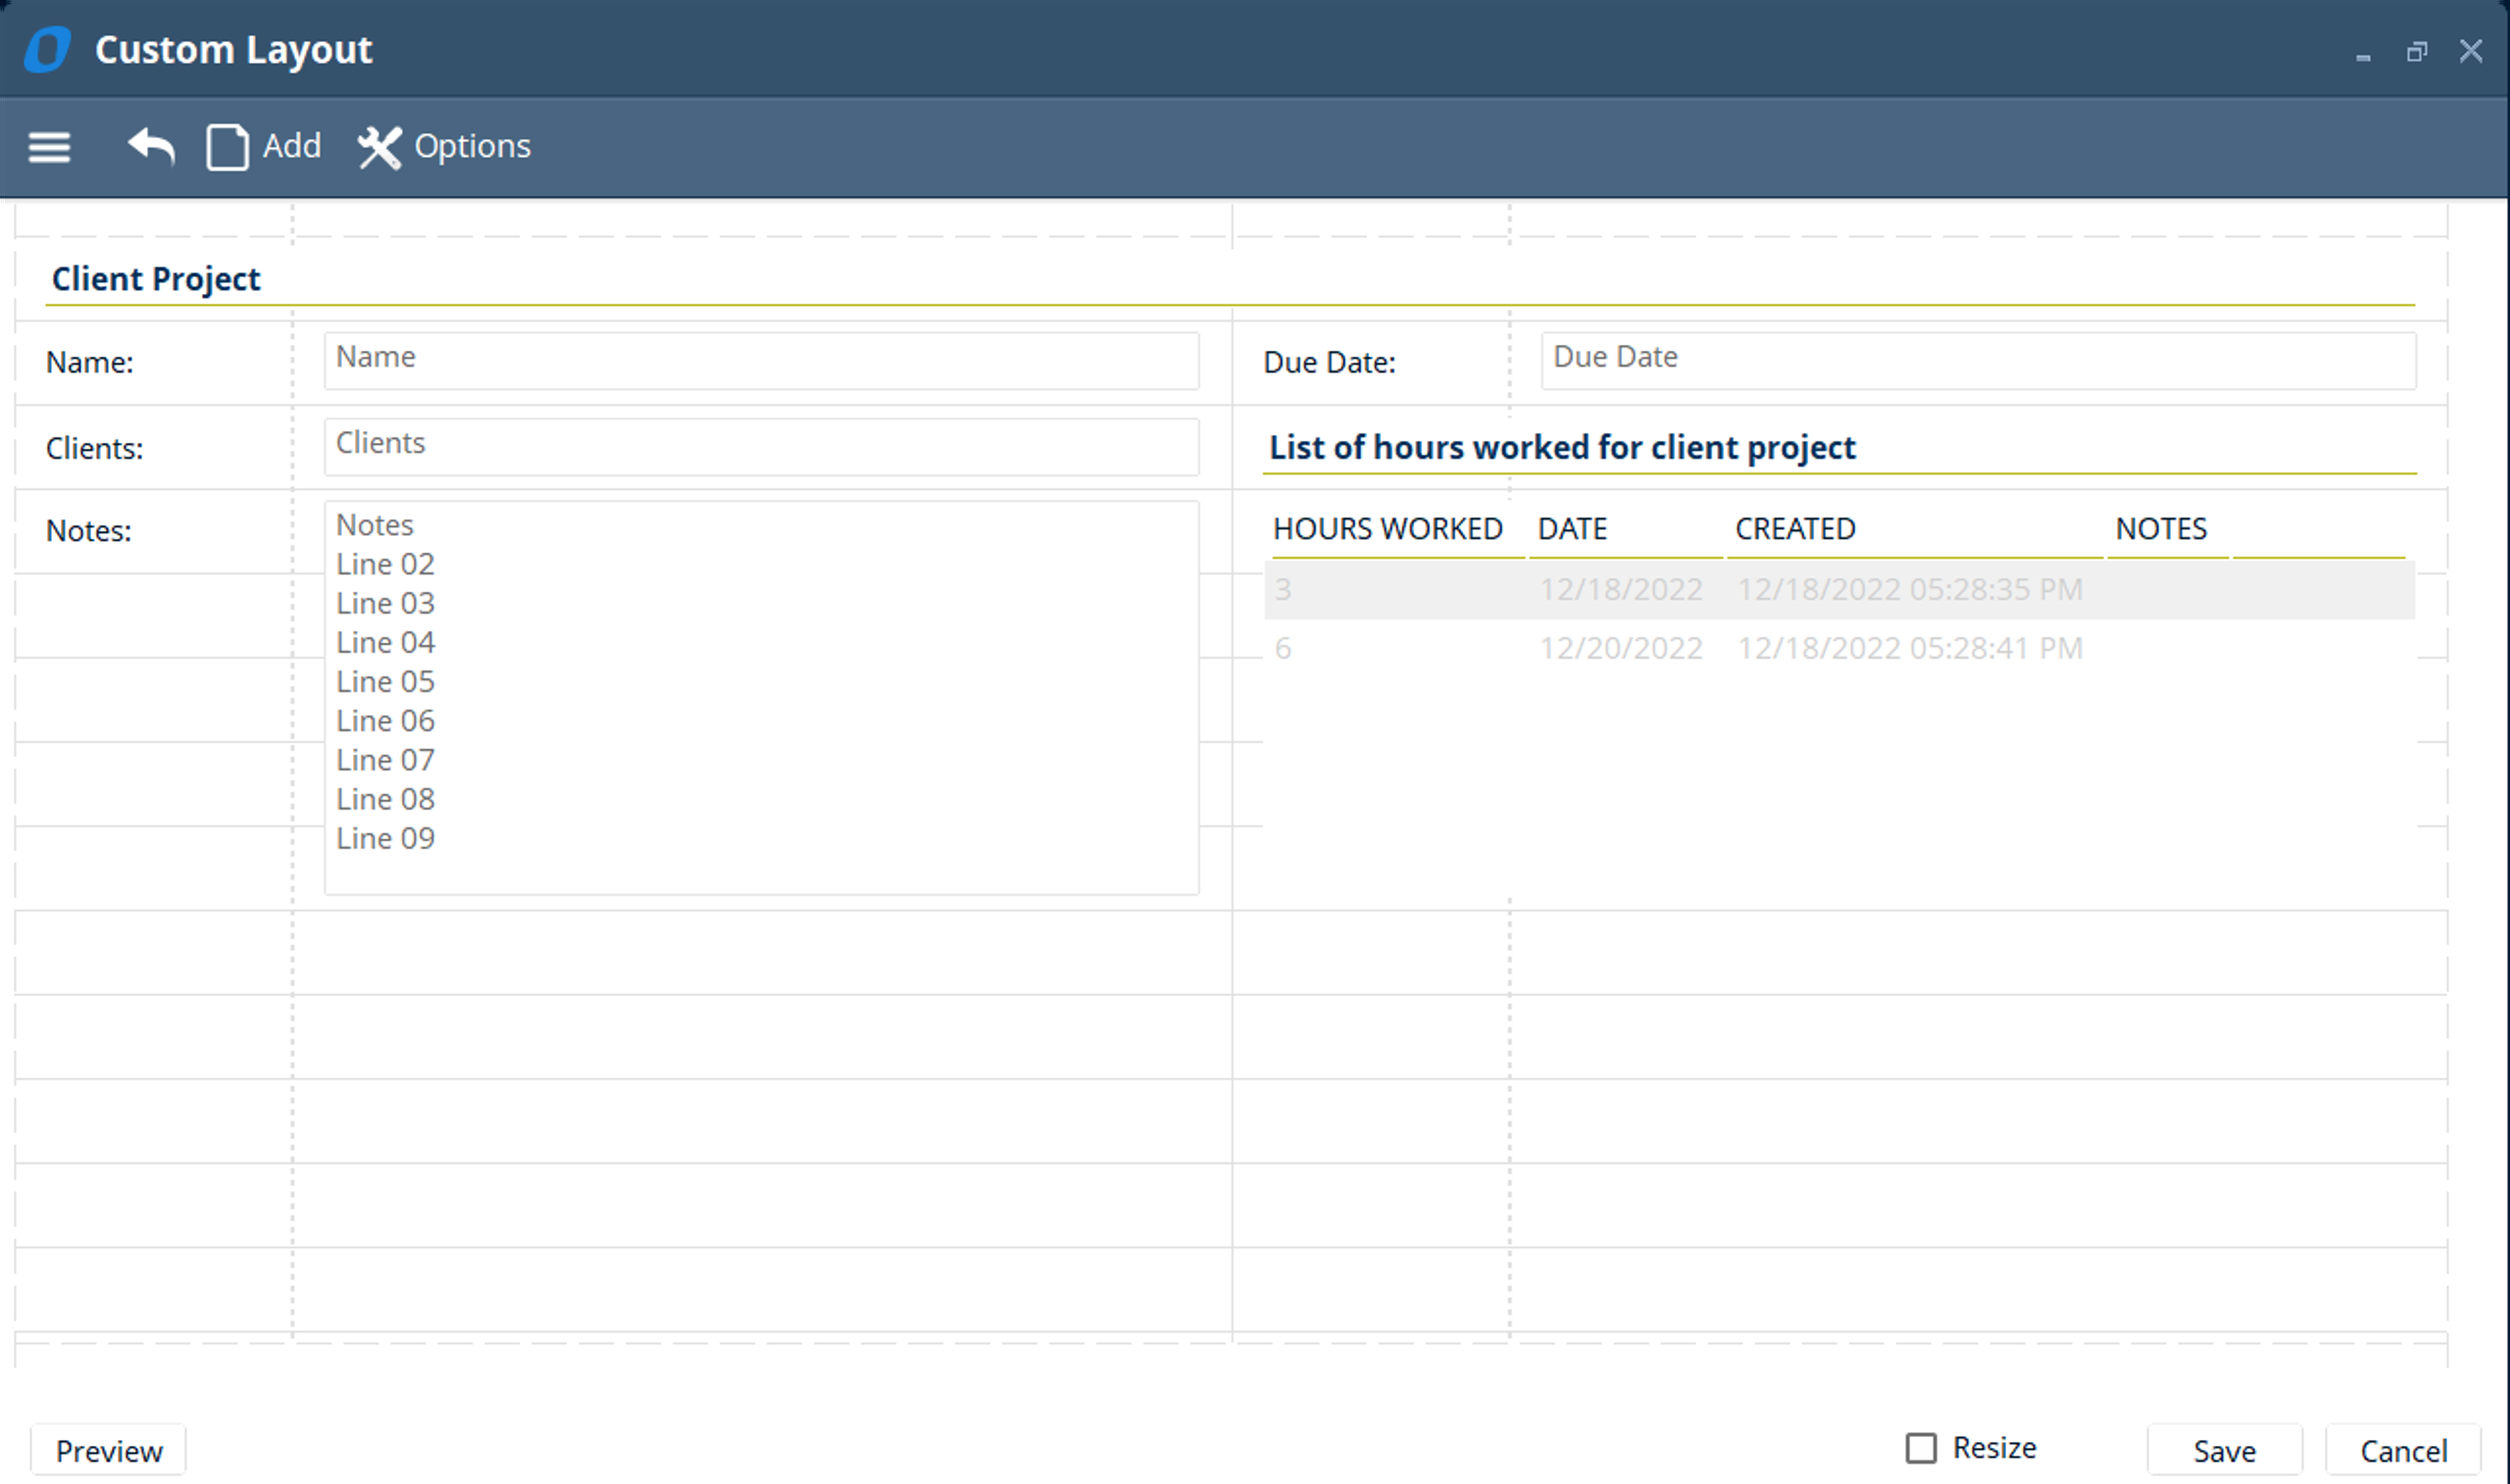
- Create a custom layout for creating and viewing “Client Projects” and add a “List of Hours” to the “Client Project” custom layout so you can easily view hours worked for a specific project.
Hint
- Hint for adding buttons to add “Client Projects” and “Clients” to the “Hour Tracking” dashboard
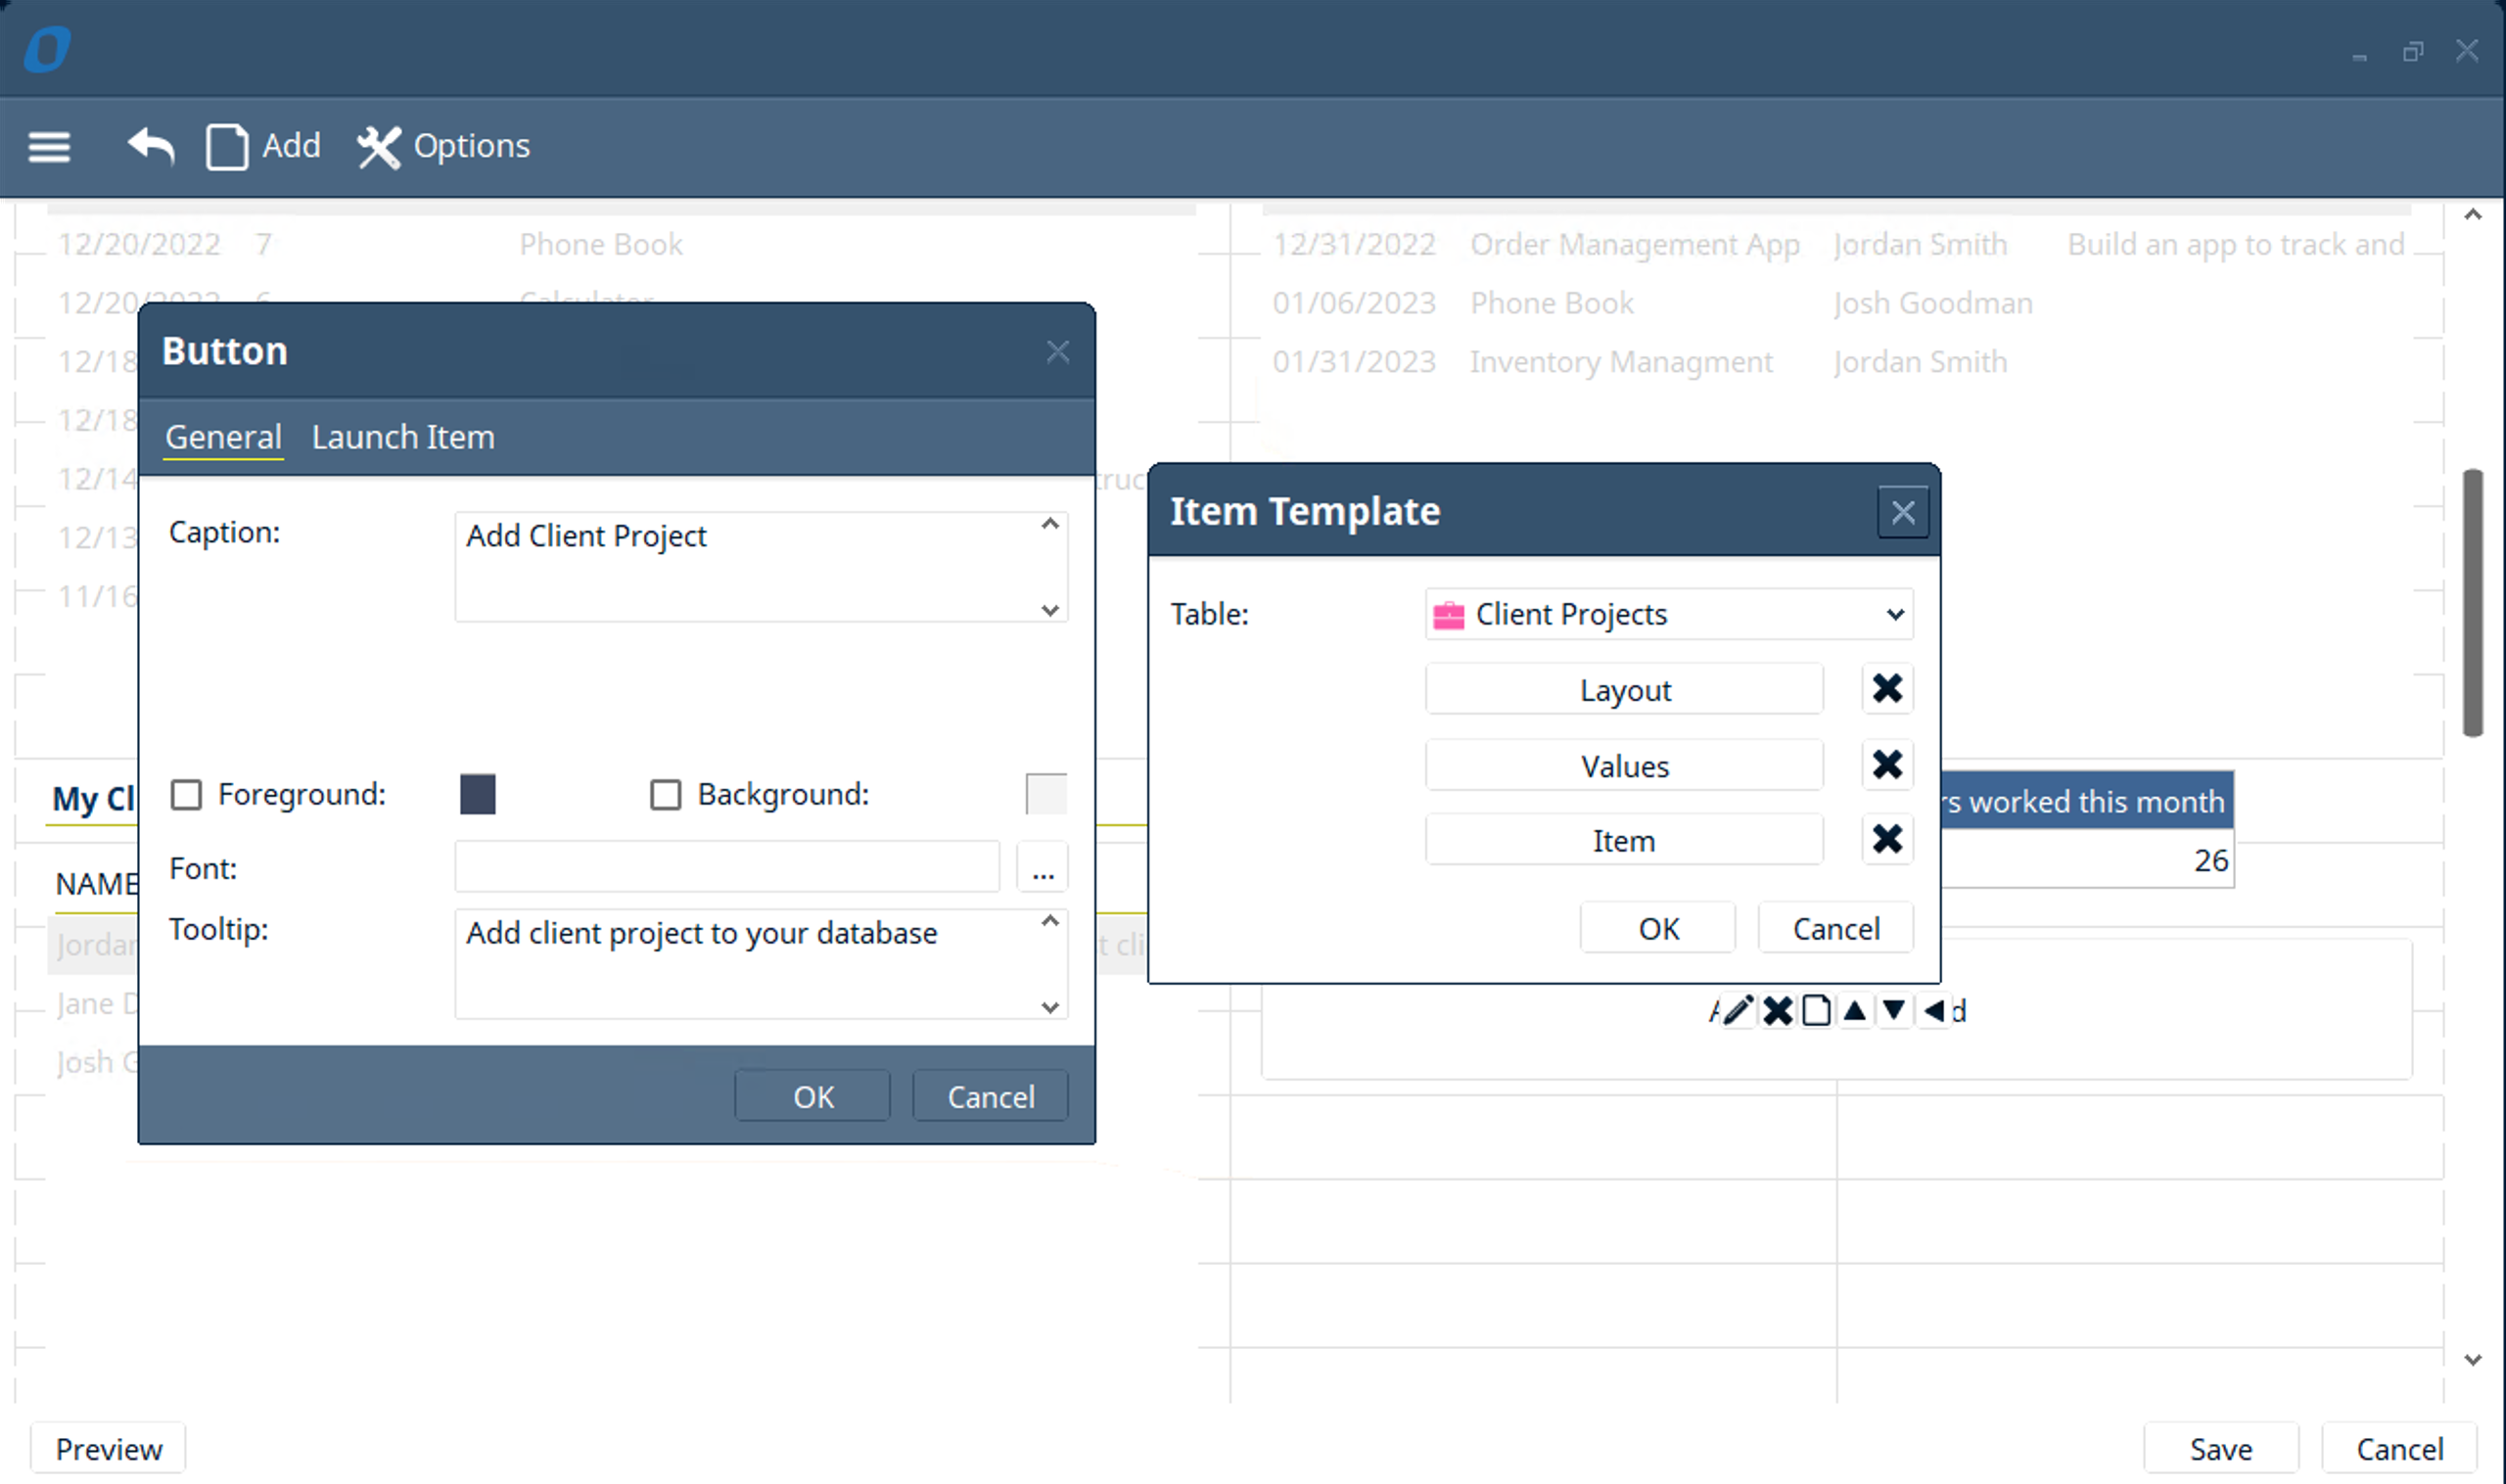
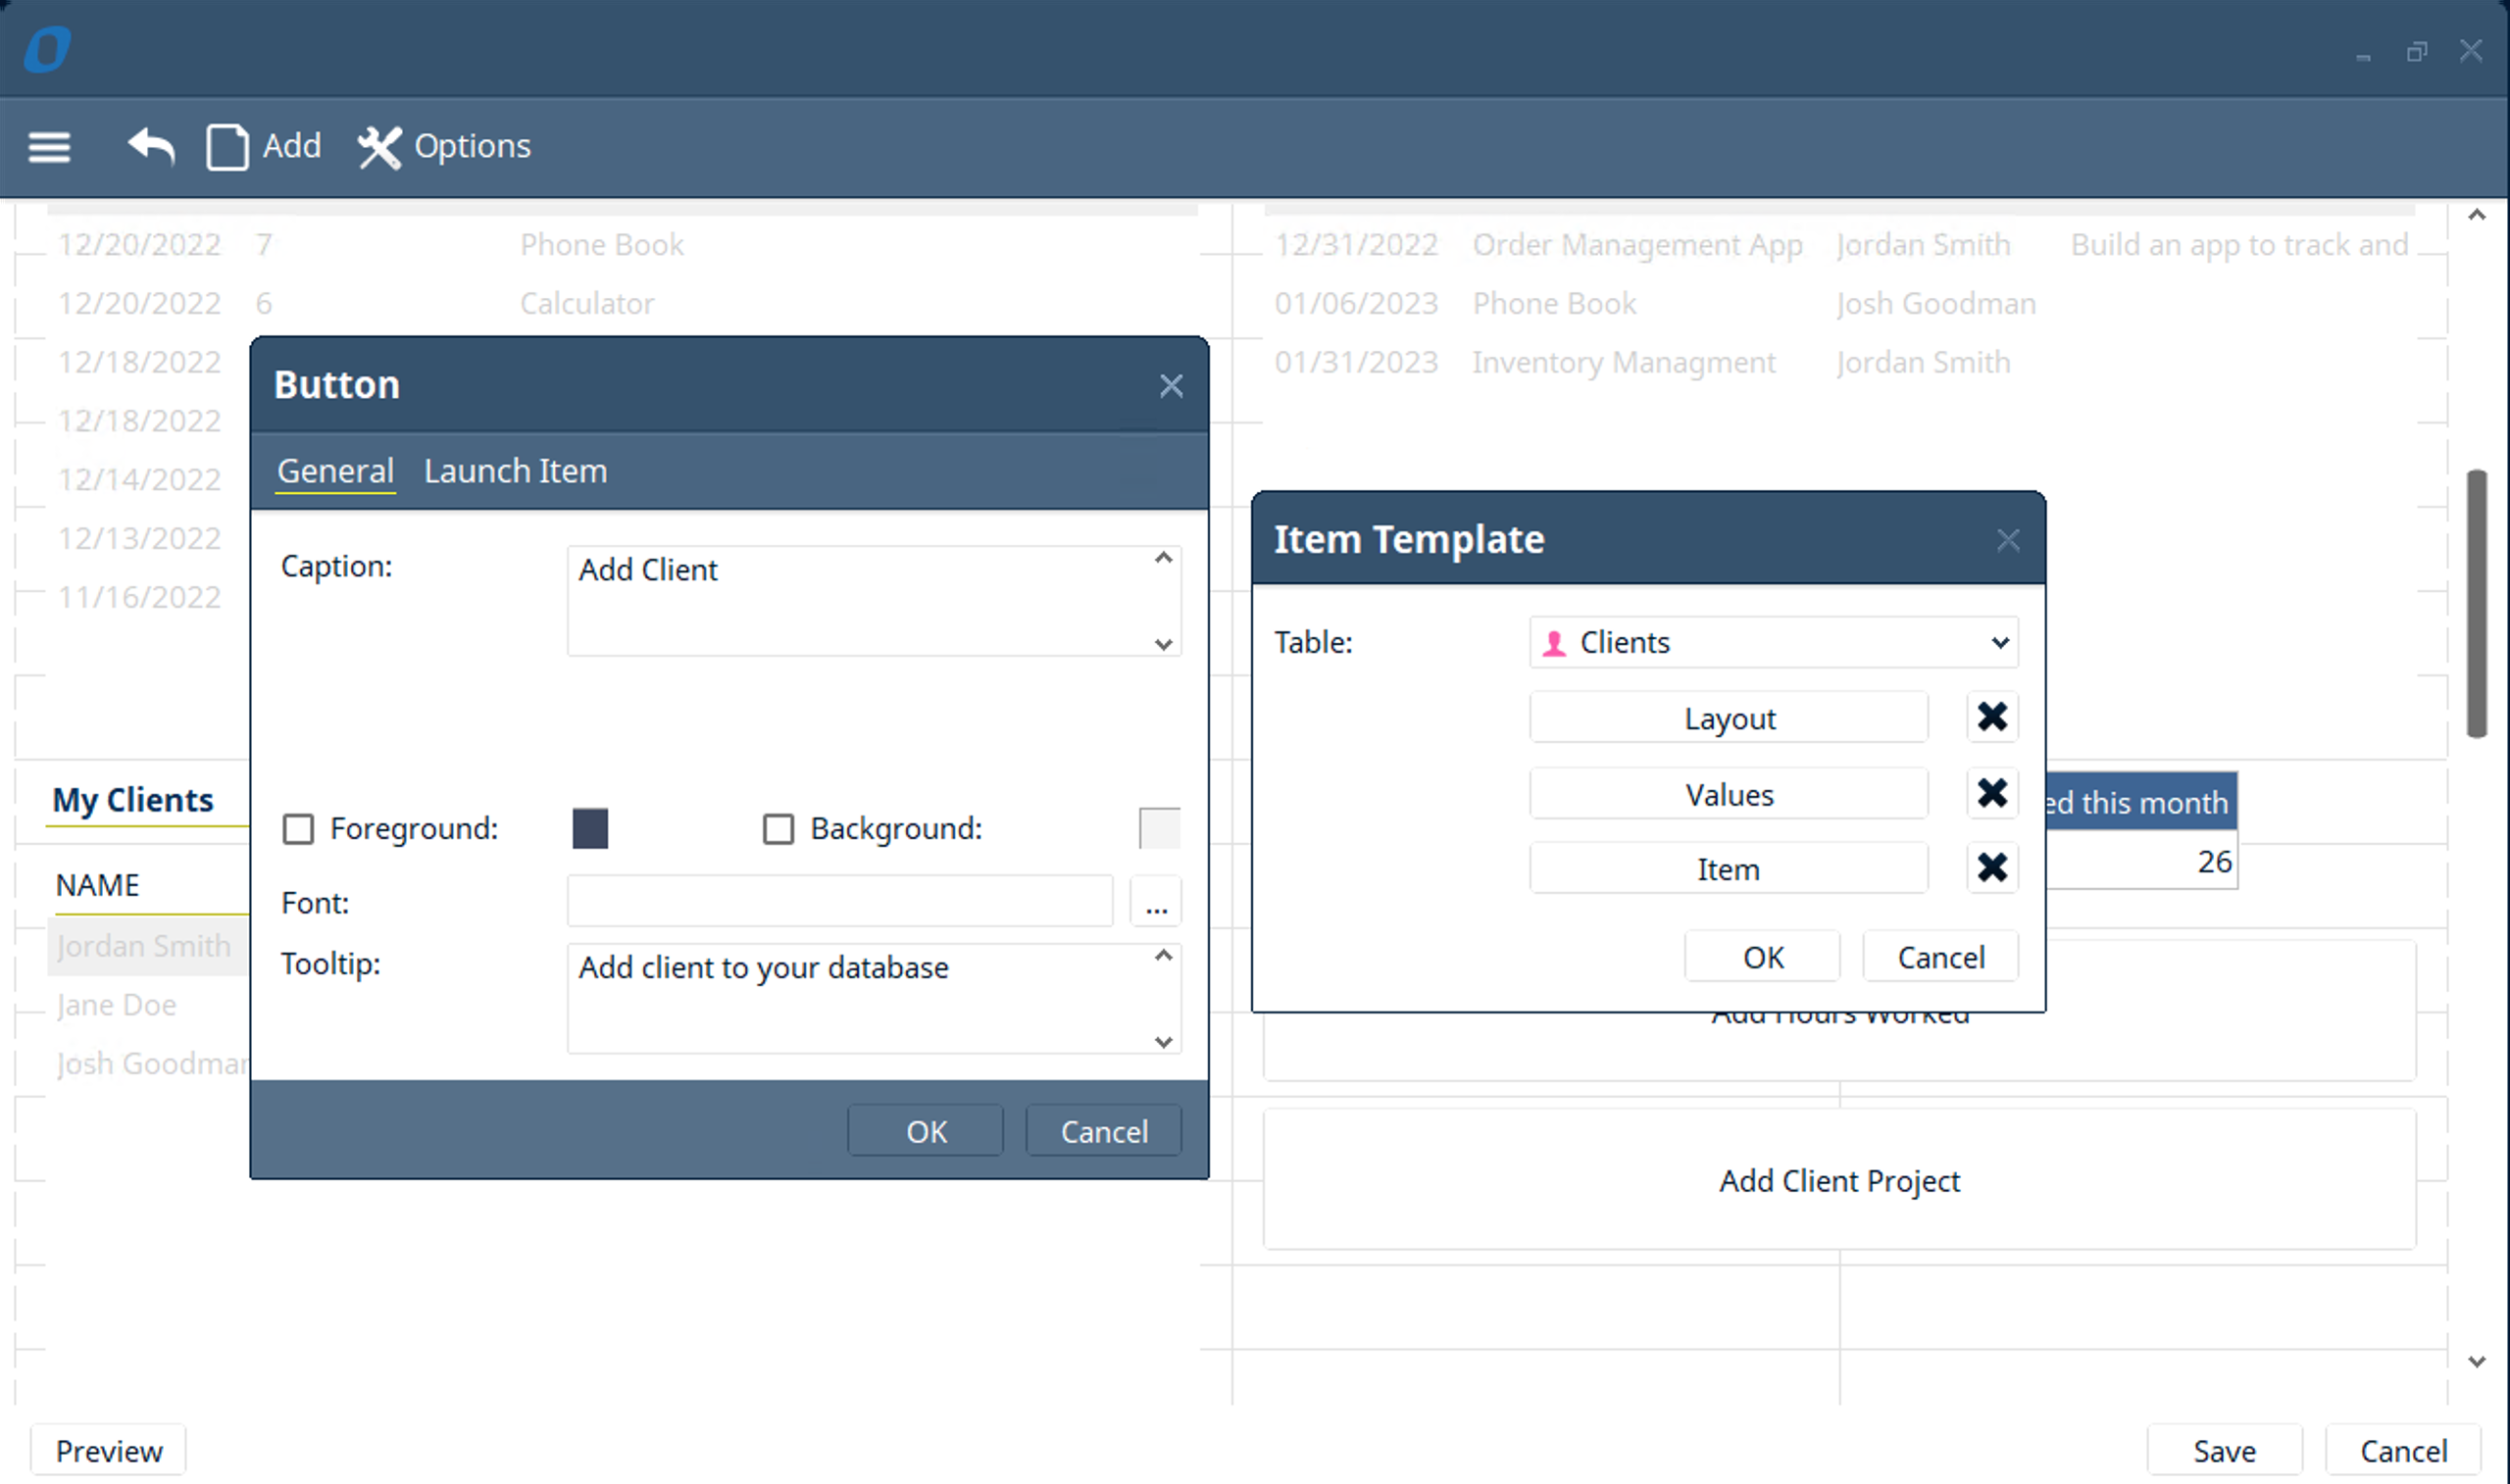
- Hint for adding statistics that count the number of “Client Projects” and “Clients” to the “Hour Tracking” dashboard
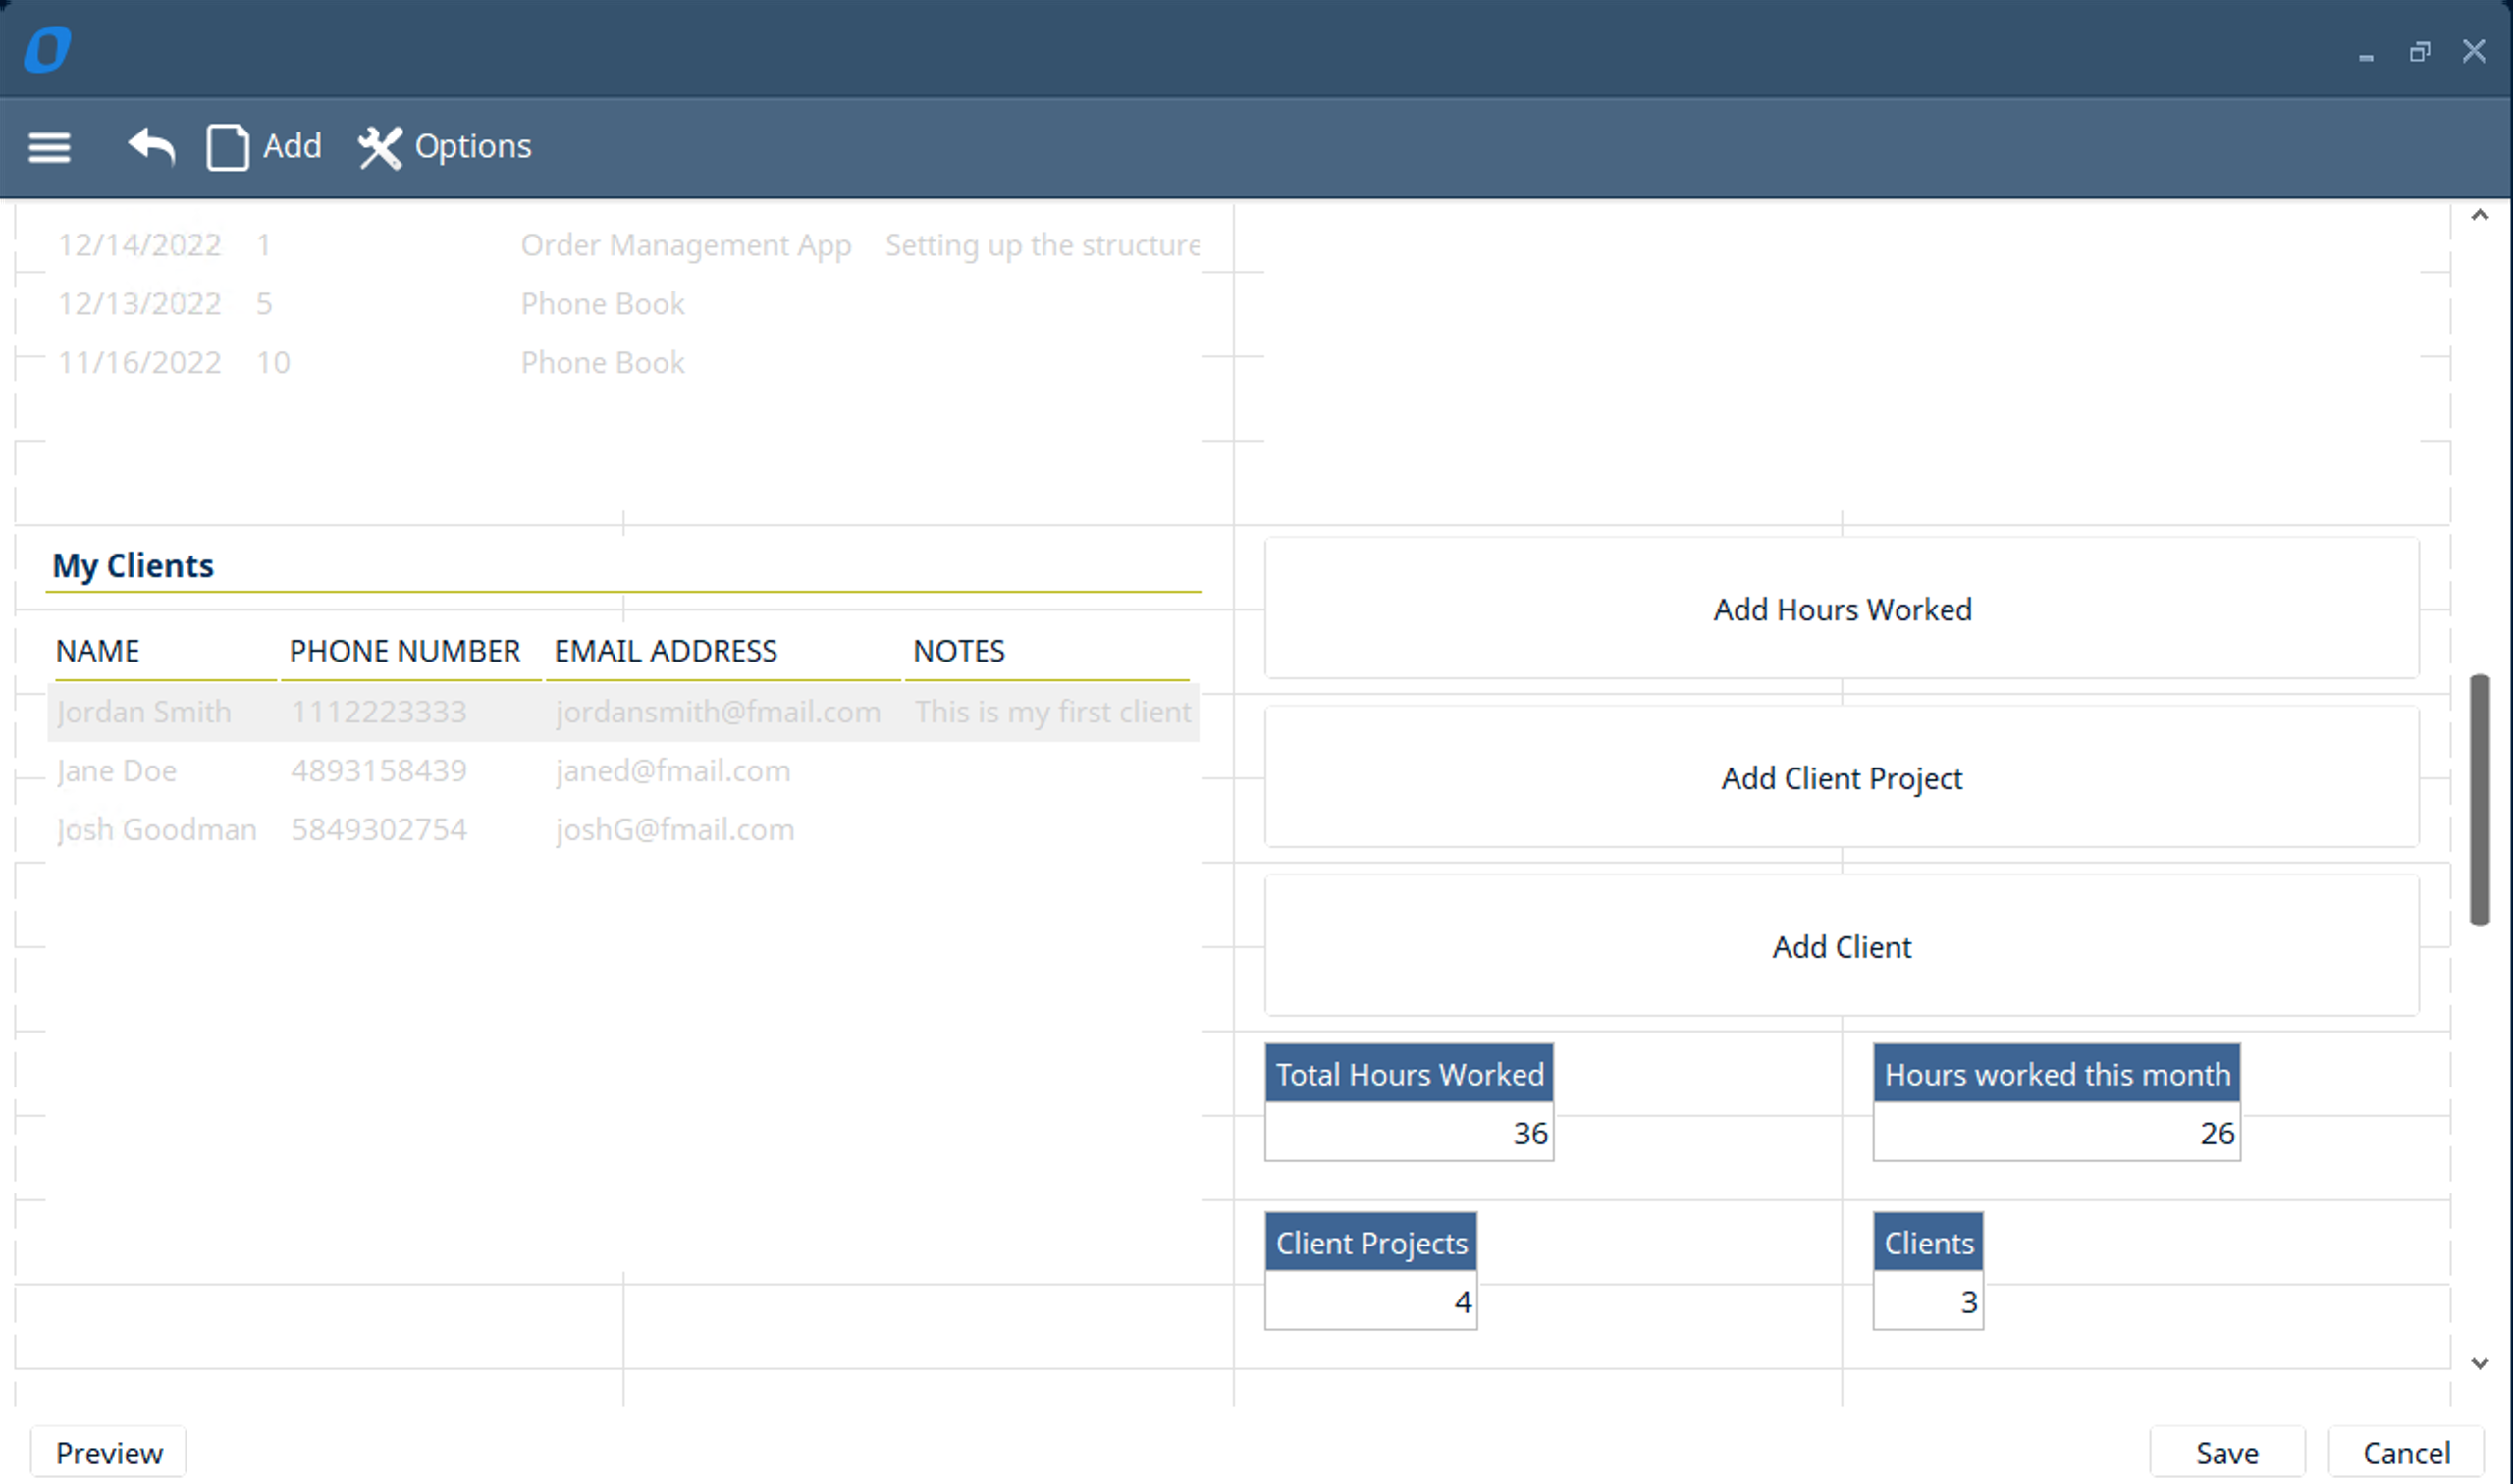
- Hint for creating a custom layout for the “Client Project” table with “list of hours” in that is related to the specific “Client Project”